
I’ve been searching for the perfect little crossbody bag pattern for ages. Something pretty enough to show off but practical enough for everyday errands. This Lavender Field Granny Square Pouch is exactly what I was hoping to find, and I’m thrilled to share it with you today.
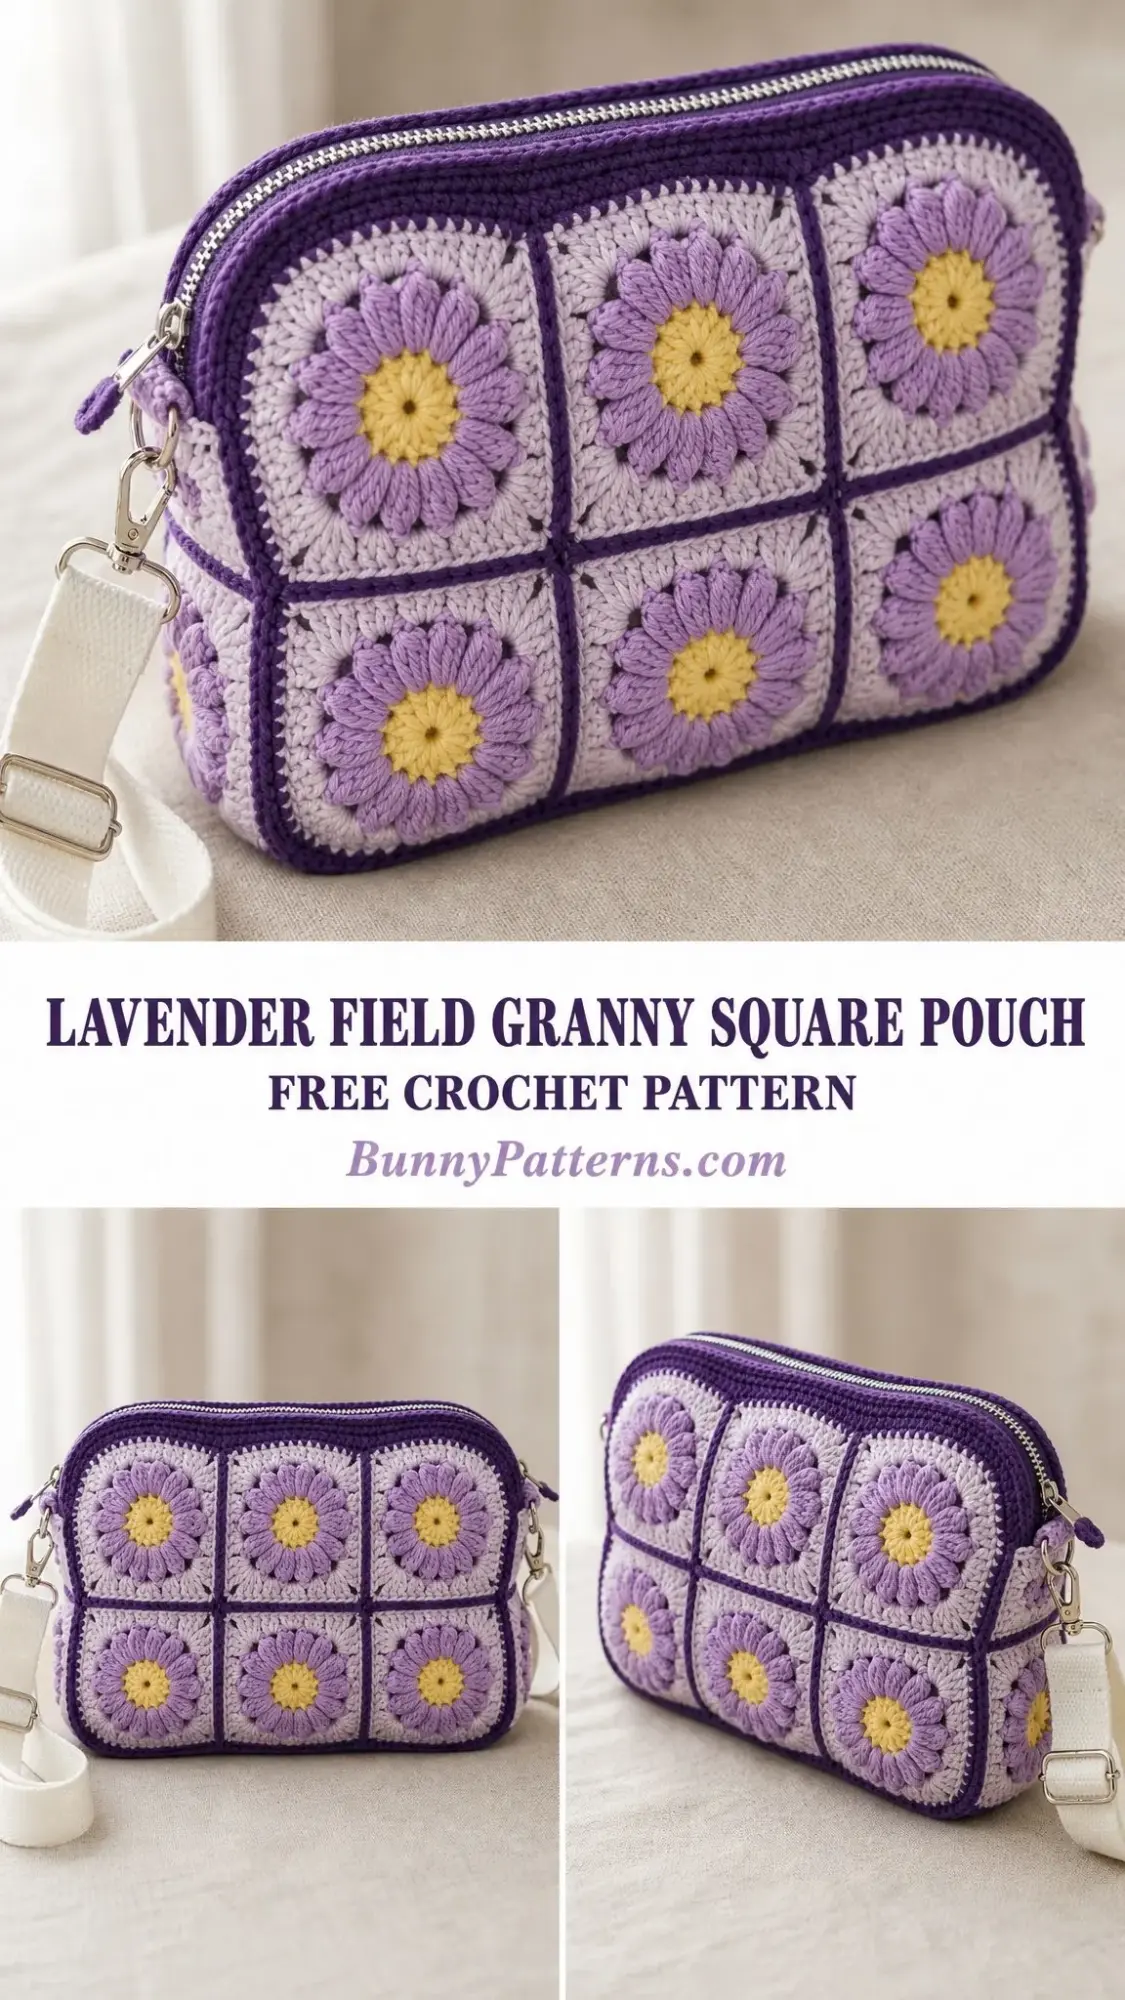
Sixteen puff flower granny squares come together to create this soft, structured pouch that feels handmade in the best way. Each square starts with a buttery yellow center, blooms into twelve plush lavender petals, settles onto a pale lilac background, and gets framed in deep grape purple. The result is a bag that looks like you’re carrying a tiny lavender field wherever you go.
Whether you’re heading to the farmers market or just need something cute to hold your phone, keys, and lip balm, this pouch has you covered. Let me walk you through everything you need to make your own.
Pattern Overview and Skill Level
This pattern is rated intermediate and takes approximately 10 to 14 hours to complete. That’s roughly a weekend of cozy crocheting if you’re dedicated, or a week or two of evening sessions if you prefer a slower pace.
You’ll need to know how to work basic stitches, join granny squares, and do some simple sewing to attach the zipper. The puff stitch might be new to some of you, but don’t worry. I’ll explain it thoroughly, and once you get the rhythm, it becomes almost meditative.
The finished pouch measures approximately 8 inches wide by 5.5 inches tall by 2.75 inches deep. Perfect for holding your essentials without weighing you down.
Materials You’ll Need
This pattern uses DK weight cotton yarn, which gives the petals crisp definition and helps the bag hold its shape beautifully. Here’s what you’ll need:
Yarn (DK Cotton):
Recommended Yarn Brands:
Tools and Notions:
Gauge Information
Getting gauge right is crucial for this project since the square size determines the entire bag’s dimensions. One finished flower square should measure 2¾ × 2¾ inches (7 × 7 cm) after completing all four rounds.
If your squares are running larger or smaller than this, adjust your hook size until you hit that measurement. Going up a hook size will make larger squares, while going down will make them smaller.
Abbreviations and Terms
This pattern uses US crochet terminology. If you’re a UK crocheter, remember that US single crochet equals UK double crochet, and US double crochet equals UK treble. Puff and chain stitches are the same in both systems.
Special Stitches Explained
Puff Stitch
The puff stitch creates those gorgeous plump petals that make this bag so eye catching. Here’s how to work it:
Yarn over, insert your hook into the stitch, yarn over and pull up a loop to the height of a double crochet. Repeat this sequence (yarn over, insert, pull up a loop) 3 more times in the same stitch. You’ll have 9 loops on your hook. Yarn over and draw through all 9 loops at once. Chain 1 to close and lock the puff.
The closing chain is important because it secures the puff and prevents it from getting loose or floppy over time.
Magic Ring
The magic ring (sometimes called a magic circle or adjustable ring) lets you start crocheting in the round with no hole at the center. Loop the yarn around two fingers, work your first round of stitches into that loop, then pull the tail to cinch the center closed. This technique leaves no gap at the flower’s heart.
If magic rings intimidate you, you can substitute chain 4 and slip stitch to join into a ring. The center won’t be quite as tight, but it works.
Pattern Notes Before You Begin
Keep these tips in mind as you work:
Each square is worked in four rounds, with each round using its own color. The right side always faces you. Join each round with a slip stitch and fasten off before changing to the next color.
The starting chain 3 counts as the first double crochet throughout the pattern unless noted otherwise.
I strongly recommend making all 16 squares before you start assembling. Give them a light blocking to even out any irregularities and create nice square corners for the crispest joins.
Weave in your ends as you go. A tidy inside makes the optional lining truly optional, and you won’t face a mountain of tails at the end.
Stitch counts appear at the end of each round in parentheses, like (12 sc). Always check your count before moving to the next round.
The Flower Square Pattern
Make 16 squares total. Each square has four rounds in four colors.
Round 1: Center (Color A, Buttercup)
Make a magic ring. Chain 1, then work 12 single crochet stitches into the ring. Join with a slip stitch to the first single crochet and pull the ring closed tightly. Fasten off Color A. (12 sc)
Round 2: Petals (Color B, Lavender)
Join Color B to any single crochet from Round 1. Chain 2 (this does not count as a stitch), work a puff stitch in the same stitch, chain 1. Puff in the next stitch, chain 1. Repeat from * around the entire circle. Join with a slip stitch to the top of the first puff. Fasten off Color B. Twelve beautiful petals now bloom from your center. (12 puffs, 12 ch-1 spaces)
Round 3: Square It (Color C, Pale Lilac)
Join Color C in any chain 1 space. Chain 3 (counts as double crochet), then work (2 dc, ch 2, 3 dc) in the same space. This creates your first corner.
Work 3 double crochet in each of the next 2 chain 1 spaces, then work (3 dc, ch 2, 3 dc) in the next chain 1 space for the corner. Repeat from * twice more, then work 3 double crochet in each of the last 2 chain 1 spaces. Join to the top of chain 3. Fasten off Color C. (48 dc, 4 corner spaces)
Round 4: Frame (Color D, Grape)
Join Color D in any corner chain 2 space. Chain 3 (counts as double crochet), then work (2 dc, ch 2, 3 dc) in the same space.
Double crochet in each of the next 12 double crochet stitches, then work (3 dc, ch 2, 3 dc) in the next corner space. Repeat from * around, ending with double crochet in each of the last 12 stitches. Join to the top of chain 3. Fasten off, leaving a long tail for joining later. (72 dc, 4 corner spaces)
Quick Reference for Each Round
Helpful tip: Lay your finished squares in a 4 row stack of 4 as you complete them. Count to 16 before assembly. Give them a quick steam or light blocking to help the corners sit nice and square.
Building the Body
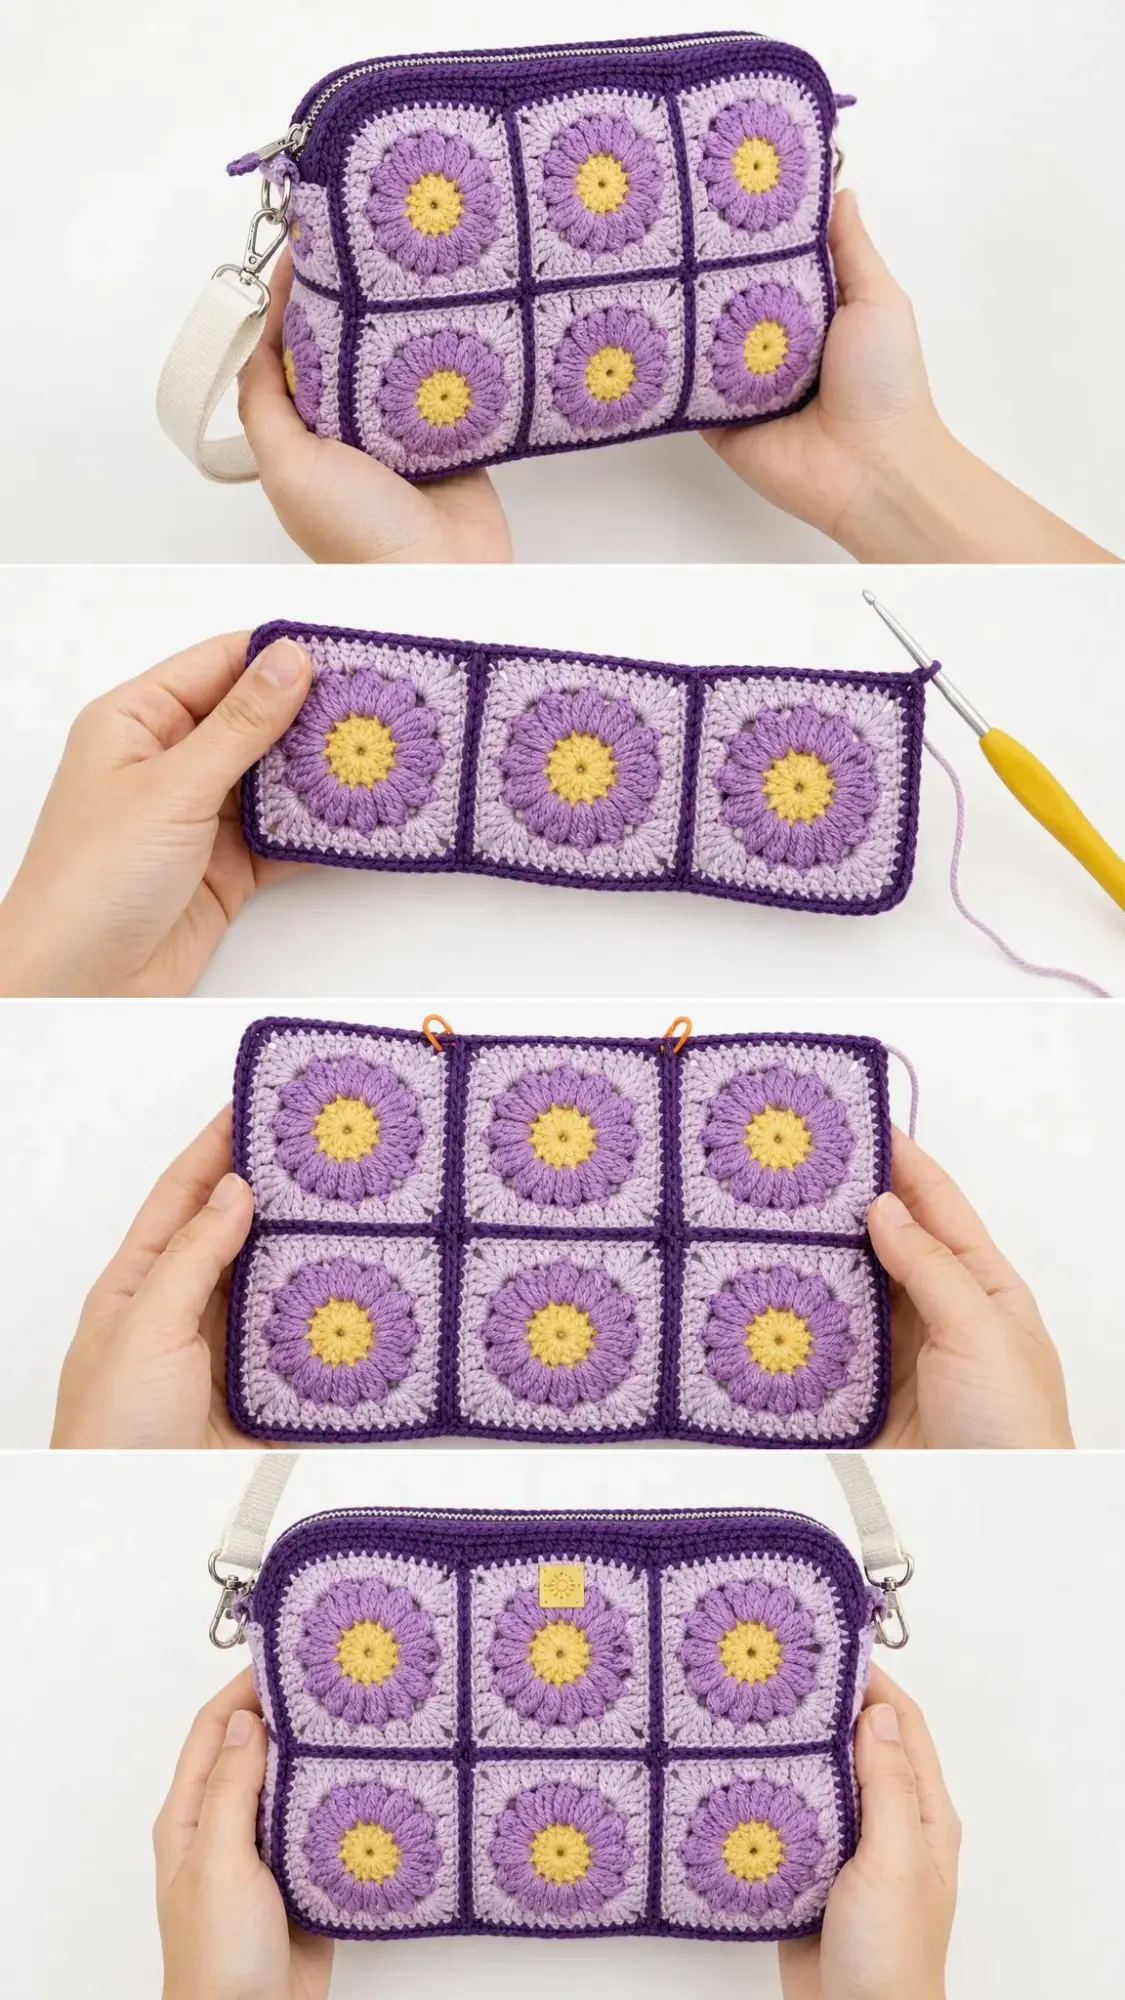
The pouch construction is clever. It’s one continuous loop of squares with no separate bottom panel. The front and back are each 3 squares wide, each side gusset is 1 square wide, and everything stands 2 squares tall.
Step 1: Lay Out the Loop
Arrange your 16 squares right side up in 2 rows of 8. Follow this order around the bag: 3 front squares, 1 right side square, 3 back squares, 1 left side square. The two rows become the upper and lower halves of your bag. (2 rows × 8 squares)
Step 2: Join the Squares
Using Color D and a tapestry needle, whip stitch (or slip stitch if you prefer) neighboring squares together through the back loops only. Match stitch for stitch as you go. Join all squares within each row first, then join the two rows along their long horizontal edge. (16 squares joined)
Step 3: Close Into a Tube
Bring the two short ends of the joined panel together and seam them with Color D to form a ring. You now have 8 squares around and 2 squares tall in a tube shape. (1 open tube)
Step 4: Seam the Bottom
Flatten the tube so the front squares face the back squares. With Color D, seam the entire lower edge closed in a straight line. Let the side gusset squares fold inward at each end. This boxes out the base and gives the pouch its depth. (bottom closed)
Step 5: Tidy the Base Corners
At each bottom corner, tack the folded gusset to the front and back panels with a few small stitches. This helps the base sit flat and keeps that nice square shape. (2 corners tacked)
Step 6: Edge the Top Opening
Join Color D at a top side seam. Single crochet evenly around the entire top opening, keeping your stitch count even so the edge lies flat. Join with a slip stitch. (approximately 108 sc)
Step 7: Second Round (Optional)
For a firmer zipper edge, work one more round of single crochet in each stitch around. Join and fasten off. (approximately 108 sc)
This extra round gives the zipper something sturdy to grab onto and creates a cleaner finish.
Zipper, Strap, and Finishing
Setting the Zipper
With the zipper open, pin it right side up underneath the top opening. Position it so the grape edge just covers the zipper tape. Using a sewing needle and matching thread, backstitch each side of the zipper in place. Take your time easing around the corners. Close the zipper to check that it runs smoothly before knotting off your thread. (8 inch zipper set)
Making the Strap Loops
At each top side seam, join Color D and chain 6. Slip stitch back along the chain and fasten off to form a small loop. Alternatively, you can sew in metal D-rings if you prefer hardware. (2 loops)
Attaching the Strap
Clip the swivel clasps of your adjustable cotton webbing strap into the two loops. Done!
If you prefer an all yarn strap, chain to your desired length plus a little extra, then single crochet back along the chain for two rows. Sew the ends securely to the loops. (1 crossbody strap)
Optional Lining
For a truly polished interior, cut lining fabric to the inside dimensions of your pouch plus seam allowance. Sew it into a pouch shape, then hand stitch it just below the zipper. This gives you a clean, sturdy interior that protects your belongings.
Final Touches
Before you call this project complete:
Care Instructions
To keep your Lavender Field Pouch looking beautiful:
Customizing Your Pouch
This pattern adapts beautifully to different sizes and color schemes.
Want a bigger bag? Add a square to the front and back (4 wide instead of 3) while keeping the sides at 1 square wide. That’s 10 squares around for a roomier tote feel.
Want a taller bag? Work 3 rows of squares instead of 2 for extra depth. Just remember to size your zipper to match the new top width.
Want a mini pouch? Drop to 2 squares wide for front and back with no side gusset. This creates a flat coin purse perfect for small essentials.
Want a new color palette? Keep the buttercup yellow centers (they really pop!) and swap the lavenders for any two tone combination you love. Try sage and cream, rose and blush, or denim and sky blue.
Whenever you change the square count, remember to re-measure your top opening and choose a zipper to match before sewing anything.
You Did It!
Congratulations on completing your Lavender Field Granny Square Pouch! Those sixteen little blooms are ready to wander with you wherever you go. I hope you love using this bag as much as I loved putting this pattern together.
Thank you so much for choosing to make this project. If you loved working on this pouch, I’d be thrilled if you saved it to your Pinterest boards so you can find it again later and share the inspiration with other crafters. And please, leave a comment below if you make one! I genuinely love seeing your finished projects and hearing which color combinations you chose. Happy crocheting!
You Might Also Like
- Lavender Garden Bobble Pullover Free Crochet Pattern
- Pastel Rainbow Kitty Tote Bag Free Crochet Pattern
- Sage Green Summer Tote with Cream Tassels Free Crochet Pattern
- Sunshine Daisy Book Cover Free Crochet Pattern