
Let me guess. You’ve seen those gorgeous granny square bags all over social media and thought, "That looks way too complicated for me." I’m here to tell you that you’re absolutely wrong, and I mean that in the kindest way possible.
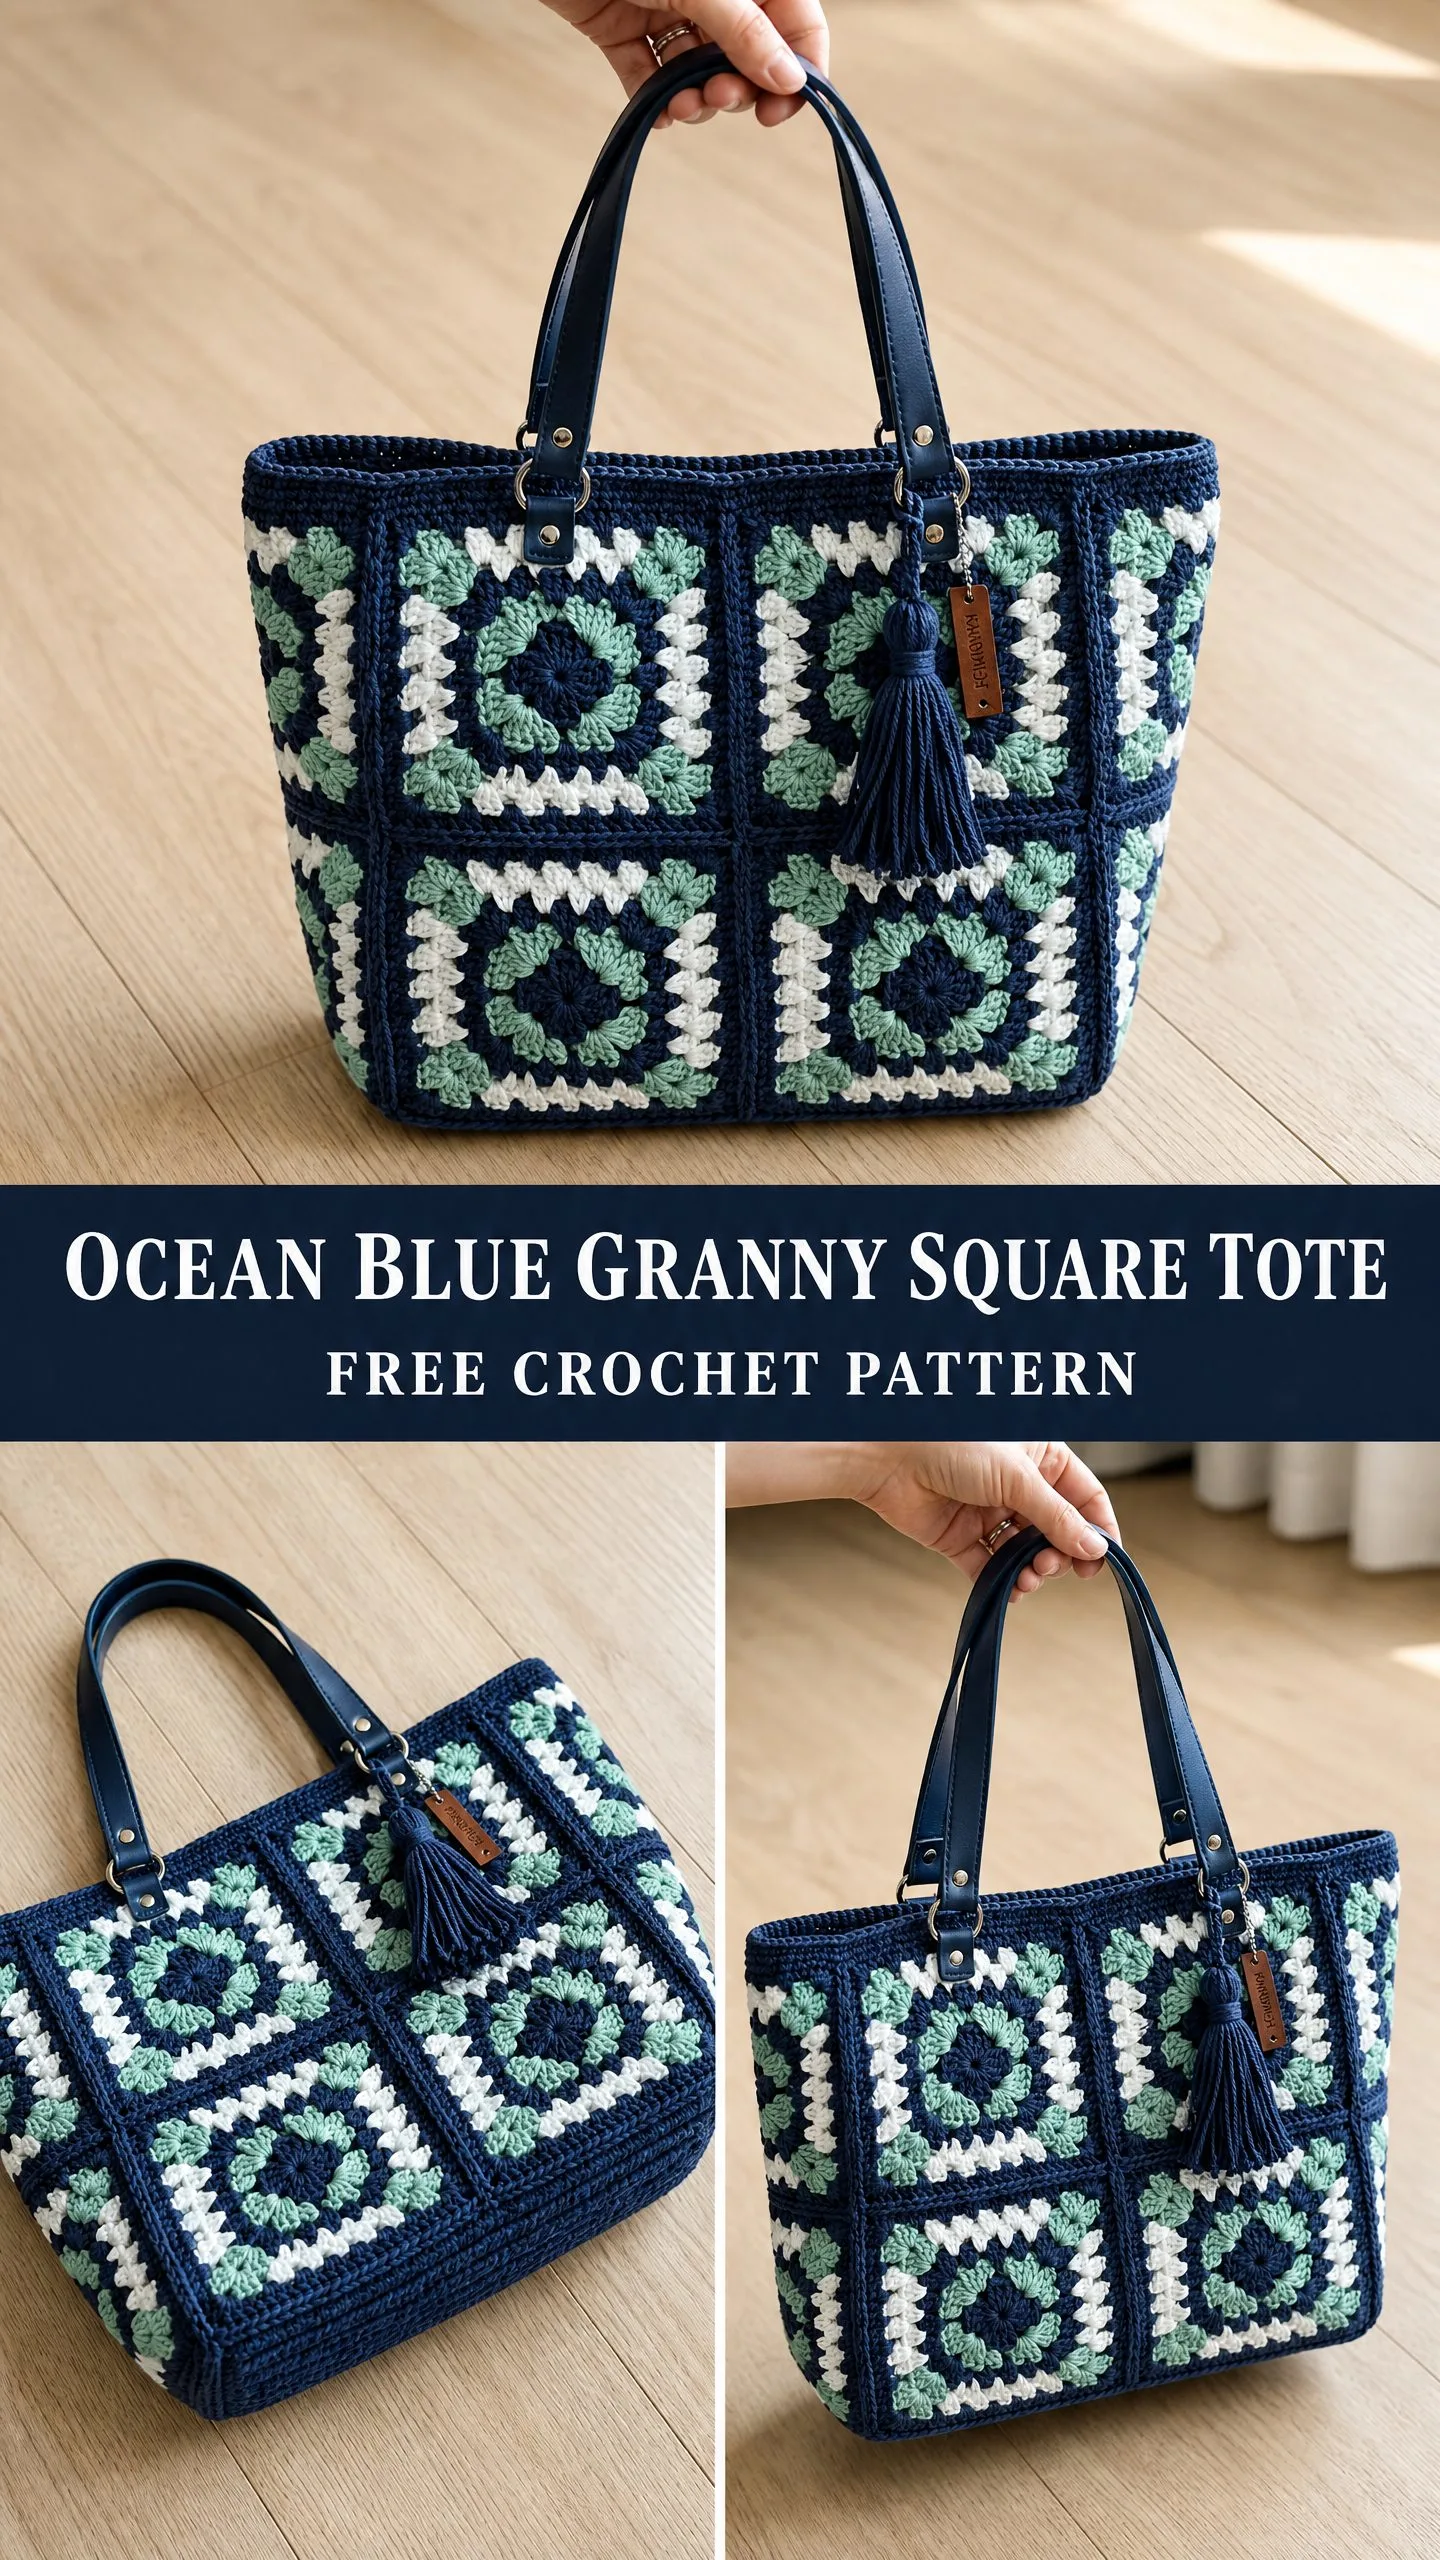
Granny squares are one of the most beginner-friendly crochet techniques out there. If you can chain, double crochet, and slip stitch, you already have every skill you need to make this stunning tote. The magic is in the repetition. You make one square, then another, then another. Before you know it, you’ve got a pile of beautiful motifs ready to become a bag.
This Ocean Blue Granny Square Tote combines classic craftsmanship with modern style. The deep navy blue border frames each square beautifully, while the sage green centers and white accents create a fresh, coastal vibe. Add those sleek leather handles and a matching tassel, and you’ve got a handmade bag that looks like it came from a boutique.
Why You’ll Love This Crochet Tote Bag Pattern
This pattern breaks down into small, manageable pieces. Instead of crocheting one giant intimidating project, you’re making individual 3.5-inch squares. Each one takes about 20 to 30 minutes. You can tuck a few into your bag and work on them during lunch breaks, in waiting rooms, or while watching your favorite show.
The construction is completely modular. Make all your squares first, then join them into panels, then assemble the bag. If you mess up a square, no problem. Just set it aside and make another one. No frogging an entire project because of one mistake three hours ago.
The finished bag measures approximately 14 inches wide by 10 inches tall by 4 inches deep, not including handles. That’s roomy enough for your everyday essentials, a small project, your wallet, phone, and a paperback book. The handle drop of about 10 inches means it sits comfortably on your shoulder.
Materials You’ll Need
Yarn
You’ll need worsted weight yarn (Category 4) in three colors. Cotton or cotton-blend yarn works best for this project because it holds its shape, has excellent stitch definition, and creates a sturdy fabric perfect for bags.
Color A (Navy Blue): approximately 600 yards (549 meters)
Color B (Sage Green): approximately 200 yards (183 meters)
Color C (White): approximately 150 yards (137 meters)
Recommended yarn options:
Avoid fuzzy or textured yarns. You want smooth, plied yarn so your granny clusters pop and your stitch definition stays crisp.
Hook
US Size G-6 (4.0 mm) crochet hook
Notions
Gauge
One completed granny square (through Round 4) should measure 3.5 inches by 3.5 inches (9 cm by 9 cm) after wet blocking.
In standard double crochet (dc) fabric: 14 dc by 8 rows equals 4 inches by 4 inches.
Gauge matters here. Your finished bag dimensions depend entirely on each square measuring exactly 3.5 inches after blocking. If your squares run large, drop down to a US F-5 (3.75 mm) hook. If they run small, go up to a US 7 (4.5 mm) hook.
Skill Level
Intermediate. You should be comfortable working granny squares in the round with multiple color changes, joining motifs neatly, and working a clean border. No advanced shaping is involved, but accuracy in joining squares squarely and evenly is important for the final structure.
Abbreviations
Before we dive in, let me define every stitch abbreviation you’ll encounter:
Special Stitches
Classic Granny Cluster (3-dc cluster)
This is the heart of every granny square. It’s simply three double crochets worked into the same chain space.
1. Yarn over, insert hook into the designated chain space
2. Yarn over, pull up a loop (3 loops on hook)
3. Yarn over, pull through 2 loops (2 loops remain)
4. Repeat steps 1-3 two more times in the same space
You now have three double crochets standing side by side. That’s one cluster.
Corner Cluster
This creates the 90-degree corners of your square. Work one 3-dc cluster into a corner chain-2 space, chain 2, then work another 3-dc cluster into the same corner space.
Flat Slip-Stitch Join
This is how you’ll connect your squares. Place two finished squares with wrong sides together (right sides facing out). Insert your hook through the back loop only of the corresponding stitch on both squares simultaneously. Draw up a loop and pull through to complete the slip stitch. This creates a nearly invisible seam on the right side.
Pattern Notes
How Many Squares Do You Need?
You’ll make 30 granny squares total. Here’s the breakdown:
That’s 26 squares needed, with 4 extras for gauge corrections or replacements.
Crochet Pattern Instructions
Section 1: Making the Granny Squares
Make 30 granny squares total.
Round 1 (Color B, Sage Green):
Make a magic ring (MR).
Ch 3 (counts as first dc of first cluster).
Work 2 more dc into the MR (first cluster complete).
Ch 2 (first corner chain made).
Work 3 dc into the MR (second cluster).
Ch 2.
Work 3 dc into the MR (third cluster).
Ch 2.
Work 3 dc into the MR (fourth cluster).
Ch 2.
Join with a sl st to the top of the beg ch-3.
Pull the MR tail to close the center hole firmly.
Fasten off Color B.
Stitch count: 12 dc total, 4 ch-2 corner spaces
Round 2 (Color B, Sage Green):
Join Color B with a sl st to any ch-2 corner sp.
Ch 3 (counts as first dc of first cluster). Work 2 more dc into the same corner sp. Ch 2. Work 3 dc into the same corner sp (corner 1 complete).
Ch 1.
Work 3 dc into the natural space between the next two adjacent Round 1 corner clusters (side cluster 1).
Ch 1.
Work corner cluster into the next ch-2 corner sp: 3 dc, ch 2, 3 dc (corner 2).
Ch 1.
Work 3 dc into the space between the next two Round 1 clusters (side cluster 2).
Ch 1.
Work corner cluster into the next ch-2 corner sp: 3 dc, ch 2, 3 dc (corner 3).
Ch 1.
Work 3 dc into the space between the next two Round 1 clusters (side cluster 3).
Ch 1.
Work corner cluster into the next ch-2 corner sp: 3 dc, ch 2, 3 dc (corner 4).
Ch 1.
Work 3 dc into the space between the remaining Round 1 clusters (side cluster 4).
Ch 1.
Join with a sl st to the top of the beg ch-3.
Fasten off Color B.
Stitch count: 36 dc, 4 ch-2 corner sp, 8 ch-1 side sp
Round 3 (Color C, White):
Join Color C with a sl st to any ch-2 corner sp.
Ch 3 (counts as first dc). Work 2 dc into the same corner sp. Ch 2. Work 3 dc into the same corner sp (corner 1 complete).
Ch 1.
Work 3 dc into the next ch-1 sp (side cluster A).
Ch 1.
Work 3 dc into the next ch-1 sp (side cluster B).
Ch 1.
Work corner cluster into the next ch-2 corner sp: 3 dc, ch 2, 3 dc (corner 2).
Ch 1.
Work 3 dc into the next ch-1 sp (side cluster C).
Ch 1.
Work 3 dc into the next ch-1 sp (side cluster D).
Ch 1.
Work corner cluster into the next ch-2 corner sp: 3 dc, ch 2, 3 dc (corner 3).
Ch 1.
Work 3 dc into the next ch-1 sp (side cluster E).
Ch 1.
Work 3 dc into the next ch-1 sp (side cluster F).
Ch 1.
Work corner cluster into the next ch-2 corner sp: 3 dc, ch 2, 3 dc (corner 4).
Ch 1.
Work 3 dc into the next ch-1 sp (side cluster G).
Ch 1.
Work 3 dc into the next ch-1 sp (side cluster H).
Ch 1.
Join with a sl st to the top of the beg ch-3.
Fasten off Color C.
Stitch count: 48 dc, 4 ch-2 corner sp, 12 ch-1 side sp
Round 4 (Color A, Navy Blue):
Join Color A with a sl st to any ch-2 corner sp.
Ch 3 (counts as first dc). Work 2 dc into the same corner sp. Ch 2. Work 3 dc into the same corner sp (corner 1).
Ch 1.
(Work 3 dc into next ch-1 sp, ch 1) 3 times across the side.
Work corner cluster into the next ch-2 corner sp: 3 dc, ch 2, 3 dc (corner 2).
Ch 1.
(Work 3 dc into next ch-1 sp, ch 1) 3 times across the side.
Work corner cluster into the next ch-2 corner sp: 3 dc, ch 2, 3 dc (corner 3).
Ch 1.
(Work 3 dc into next ch-1 sp, ch 1) 3 times across the side.
Work corner cluster into the next ch-2 corner sp: 3 dc, ch 2, 3 dc (corner 4).
Ch 1.
(Work 3 dc into next ch-1 sp, ch 1) 3 times across the final side.
Join with a sl st to the top of the beg ch-3.
Fasten off Color A, leaving a long tail for joining.
Stitch count: 60 dc, 4 ch-2 corner sp, 16 ch-1 side sp
Section 2: Blocking the Squares
This step is essential for professional results. Wet each square by immersing it in cool water for several minutes. Gently squeeze out excess water without wringing. Lay each square on a blocking mat and pin to exact 3.5-inch by 3.5-inch dimensions using rust-proof pins at each corner and at the midpoints of each side. Allow to dry completely before unpinning.
Section 3: Joining the Squares into Panels
All panels use the flat slip-stitch join with Color A.
Front Panel:
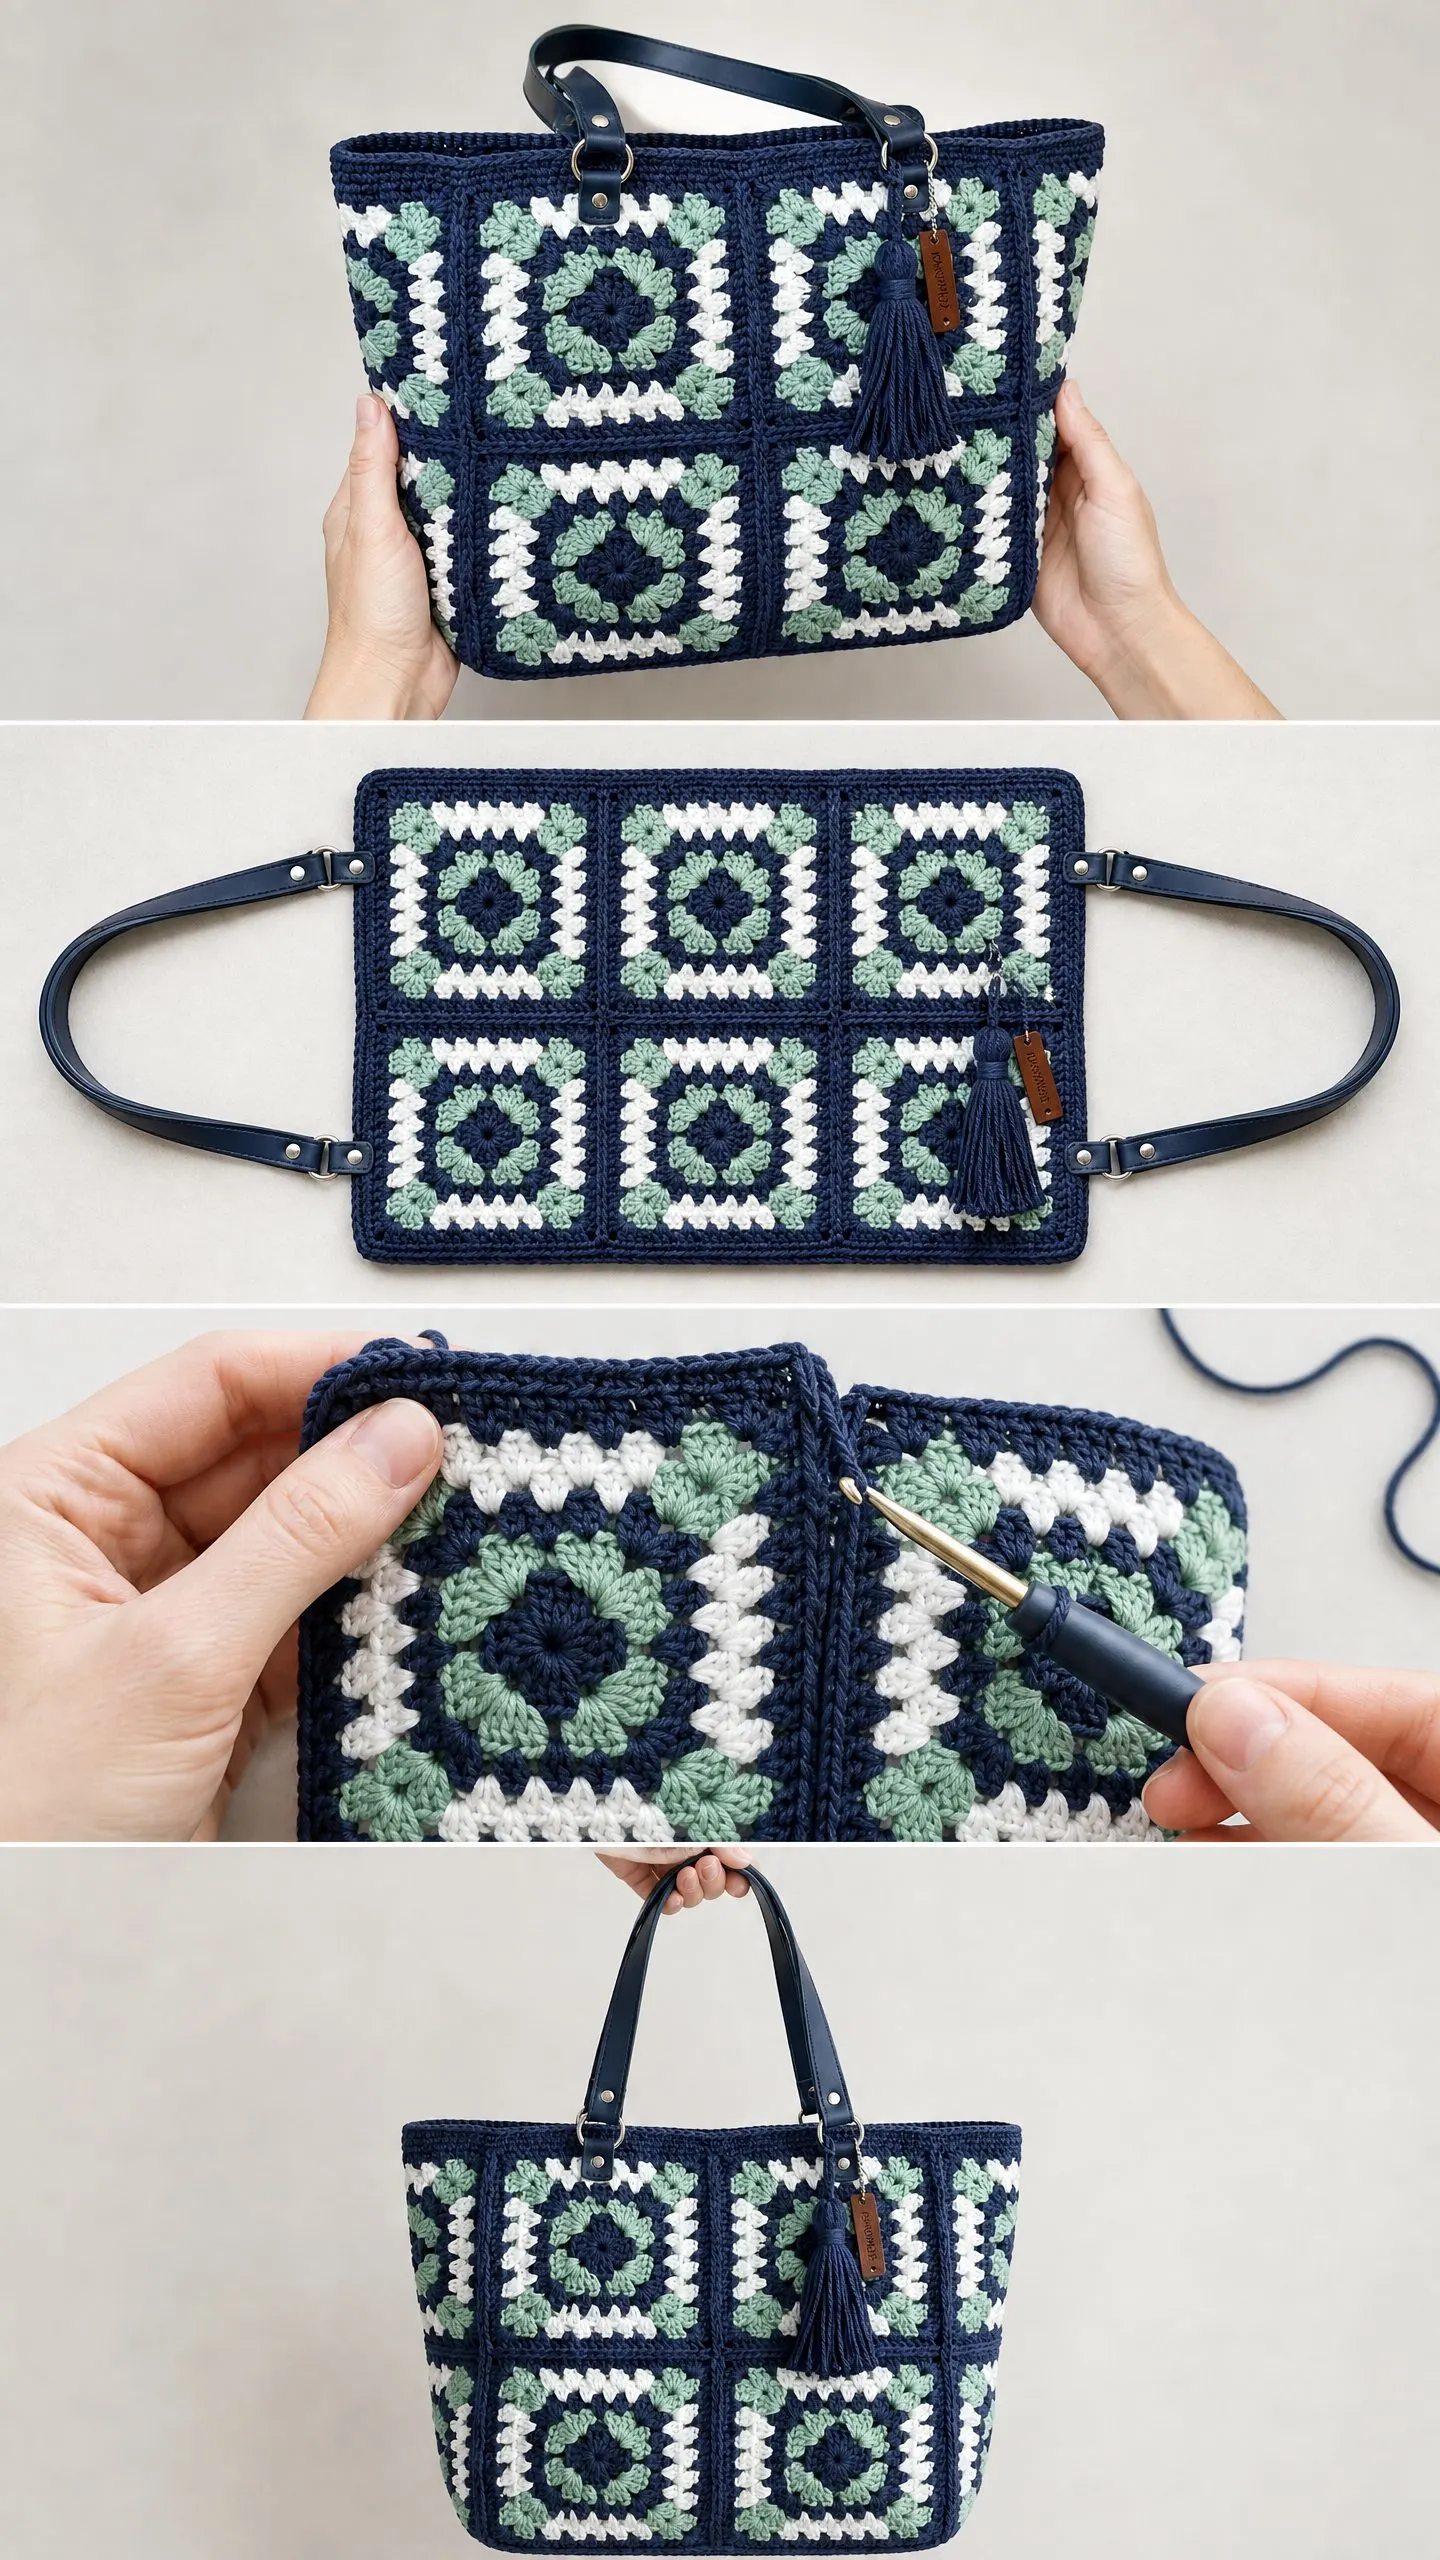
Arrange 8 squares in a 4-wide by 2-tall grid. Join squares in Row 1 along their shared vertical edges. Join squares in Row 2 the same way. Then join Row 1 to Row 2 along their shared horizontal edge. The front panel measures 14 inches wide by 7 inches tall.
Back Panel:
Repeat exactly as for the front panel using 8 squares.
Left Side Panel:
Arrange 2 squares in a 1-wide by 2-tall column. Join along their shared horizontal edge. The panel measures 3.5 inches wide by 7 inches tall.
Right Side Panel:
Repeat as for the left side panel.
Base Panel:
Join 4 squares in a horizontal row, then join 1 square to each short end. The base measures 14 inches wide by 3.5 inches deep.
Section 4: Assembling the Bag Body
All assembly joins use Color A and the flat slip-stitch join.
1. Join the base panel to the front panel along their 14-inch edges.
2. Join the base panel to the back panel on the opposite edge.
3. Join the left side panel to both the front and back panels along the left edges, working from bottom to top.
4. Join the right side panel the same way.
5. Close all four bottom corners where panels meet.
Turn the bag right side out and push out the corners for a clean boxy shape.
Section 5: Top Border
Join Color A with a sl st to any stitch at the top opening.
Round 1: Ch 1 (does not count as a stitch). Work 1 sc into each dc stitch and 1 sc into each ch-1 sp around the entire top opening, working 2 sc into each corner ch-2 sp. Join with a sl st to the first sc. (Approximately 158 sc)
Round 2: Ch 1. Work 1 sc into each sc around. Join with a sl st to first sc. (158 sc)
Round 3: Ch 1. Work 1 sc into each sc around. Join with a sl st to first sc. Fasten off. (158 sc)
Section 6: Making the Tassel
Using Color A and a 4-inch piece of cardboard:
1. Wrap yarn around the cardboard 40 to 50 times
2. Cut a 10-inch length of yarn and tie it tightly around all loops at one end
3. Cut the loops at the opposite end
4. Wrap another piece of yarn around the tassel about 0.5 inch below the top to create the head
5. Trim the ends evenly
Attach the tassel to the bag using a lobster claw clasp and jump ring.
Section 7: Adding the Lining and Handles
Cut your lining fabric to match the interior dimensions of the bag, adding 0.5-inch seam allowances. Sew the lining pieces together, press the seams, and slip-stitch the lining to the inside of the bag by hand along the top border.
Attach the leather handles using D-rings and rivets, positioning them approximately 3 inches from each outer edge on both the front and back panels. The rivets should go through both the crocheted fabric and the lining for reinforcement.
Tips for Success
Take your time with joining. Rushed seams show. Work slowly and keep your tension consistent.
Block aggressively. Cotton yarn especially benefits from wet blocking. Your squares will look twice as professional afterward.
Count your clusters. Each side of a finished square should have 3 clusters plus the corner half-clusters. If something looks off, count before you fasten off.
Make a test square first. Before committing to all 30 squares, make one complete square and block it. Adjust your hook size if needed.
Time Investment
Plan for approximately 20 to 30 hours total. Each granny square takes about 20 to 30 minutes. Joining and finishing add an estimated 4 to 6 hours. This is a wonderful project to work on over a few weeks, making a square or two each day.
I hope this crochet tutorial gives you the confidence to tackle your own granny square tote bag. The step-by-step instructions break everything down into manageable chunks, and before you know it, you’ll be carrying around a handmade bag that turns heads everywhere you go. Thank you so much for choosing this pattern. I can’t wait to see what colors you pick for yours.
If you’re planning to make this later, go ahead and save this pattern to your Pinterest boards so you can find it when you’re ready. And please, leave a comment below when you finish yours. I genuinely love seeing your creations come to life!
You Might Also Like
- Midnight Navy Elegant Braided Clutch Free Crochet Pattern
- Blush Pink Butterfly Lace Earrings Free Crochet Pattern
- Snuggly Nursery Snake Amigurumi Free Crochet Pattern
- Teal Ocean Wave Crochet Robe Free Pattern