
A crochet name pillow turns soft chenille yarn into a keepsake that sits in a nursery and says exactly whose room it is. Plush, cuddly and a little bit handmade-fancy, it is the kind of gift that gets kept.
The Crochet Name Pillow
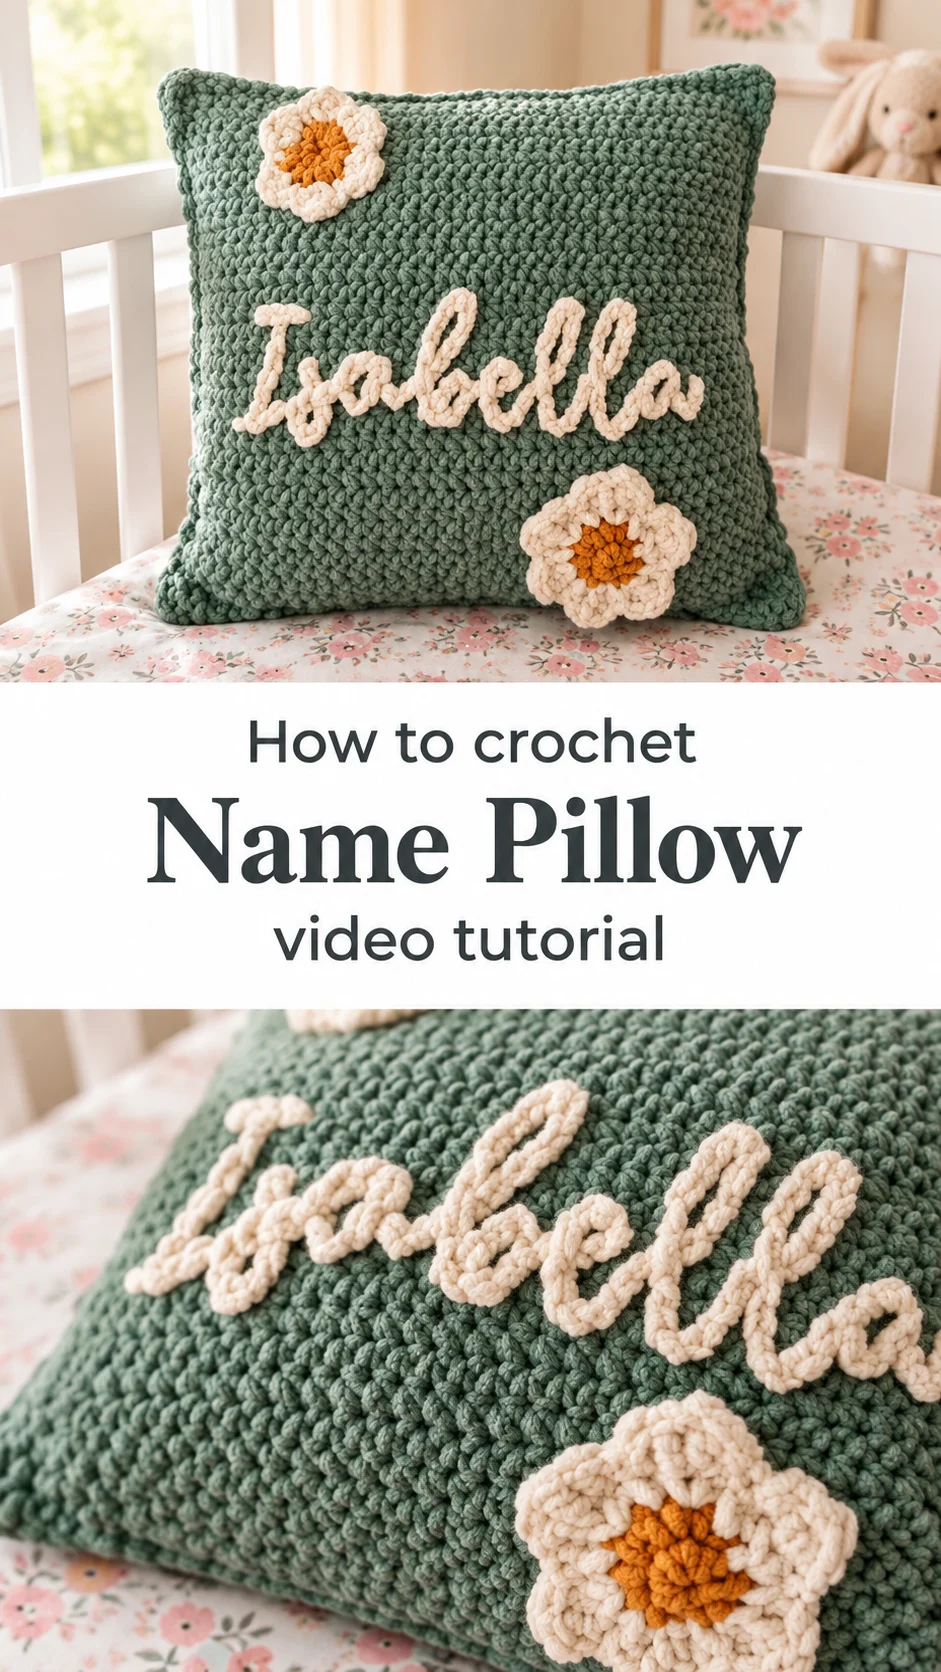
A crochet name pillow is a square cushion with a child’s name raised across the front in looped cursive lettering. The pillow in the photos is worked in a dusty sage green with a dense, nubbly texture. The name sits in the middle in creamy white, and two daisy-style flowers with golden centres fill the corners. The letters are not crocheted as a separate piece. They are stitched onto the finished fabric, so the script looks drawn rather than built. It is a nursery piece first. It shows off beautifully on a crib rail, a rocking chair or a toddler bed. Because the yarn is chunky and plush, the cushion looks cosy and feels it. Change the name, change the colours, and it becomes a new gift every time.
Beyond the nursery, a name pillow suits a first birthday, a baby shower or a new big sister. It also teaches a useful skill, because the lettering technique carries over to blankets, wall hangings and bags. Small, personal and quick to give.
Name Pillow Related Posts:
- Crochet Spider Web Lace: A Delicate Timeless Treasure
- Crochet Oval Table Runner: A Timeless Lace Accent
- Crochet Lace Top: A Delicate and Feminine Statement
- Crochet Andes Headband: A Timeless Winter Accessory
Materials
For a crochet name pillow like this one, choose a super bulky chenille-style yarn, the kind with a velvety, slightly fuzzy surface. The cushion in the photos looks like it uses exactly that, and the plush finish is what makes the raised name look so soft. You need a main colour for the pillow body, a cream or off-white for the lettering and flower petals, and a small amount of mustard or golden yellow for the flower centres. A large hook suited to bulky yarn is the usual choice, and going half a size smaller than the label suggests helps the fabric stay dense so the stuffing cannot peek through. You also need a pillow insert or polyester fiberfill, a yarn needle for sewing the seams, and a washable marker or fabric pencil in a light colour to sketch the name before you stitch it. Choose a contrasting scrap yarn for practice lettering first.
Understanding the Pillow Structure
The cushion is a simple square made from two matching panels joined around the edges. The edge of the pillow has a slightly raised, flat border, which suggests the panels were sewn together with the seam sitting on the outside or finished with a joining row. Either way, the shape is plain and boxy, which leaves all the attention for the front.
The fabric looks like a close, tight stitch worked in rows, with a small woven texture that reads as a crunchy, bumpy surface. That density matters. Open stitches would let the insert show through and would make the lettering sink. A firm fabric also holds the shape of a square cushion without sagging at the corners.
Plan the work in a sensible order. Make both panels first, add the name and flowers to the front panel while it is still flat, then seam the cushion and stuff it. Stitching lettering onto a finished, stuffed pillow is awkward, while a flat panel lets you keep your hand underneath the fabric.
If the panels come out slightly different sizes, block them lightly or tug them gently into line before joining. A mismatch of even half an inch shows up as a twisted corner once stuffed.
Name Lettering: The Detail That Makes It Personal
The name is the signature of this project. In the photos, each letter is a single thick, rounded line of cream yarn, flowing in a connected cursive style. The yarn is not woven in and out like embroidery. It lies on top of the surface in a raised, corded line, which is why it looks so bold and soft.
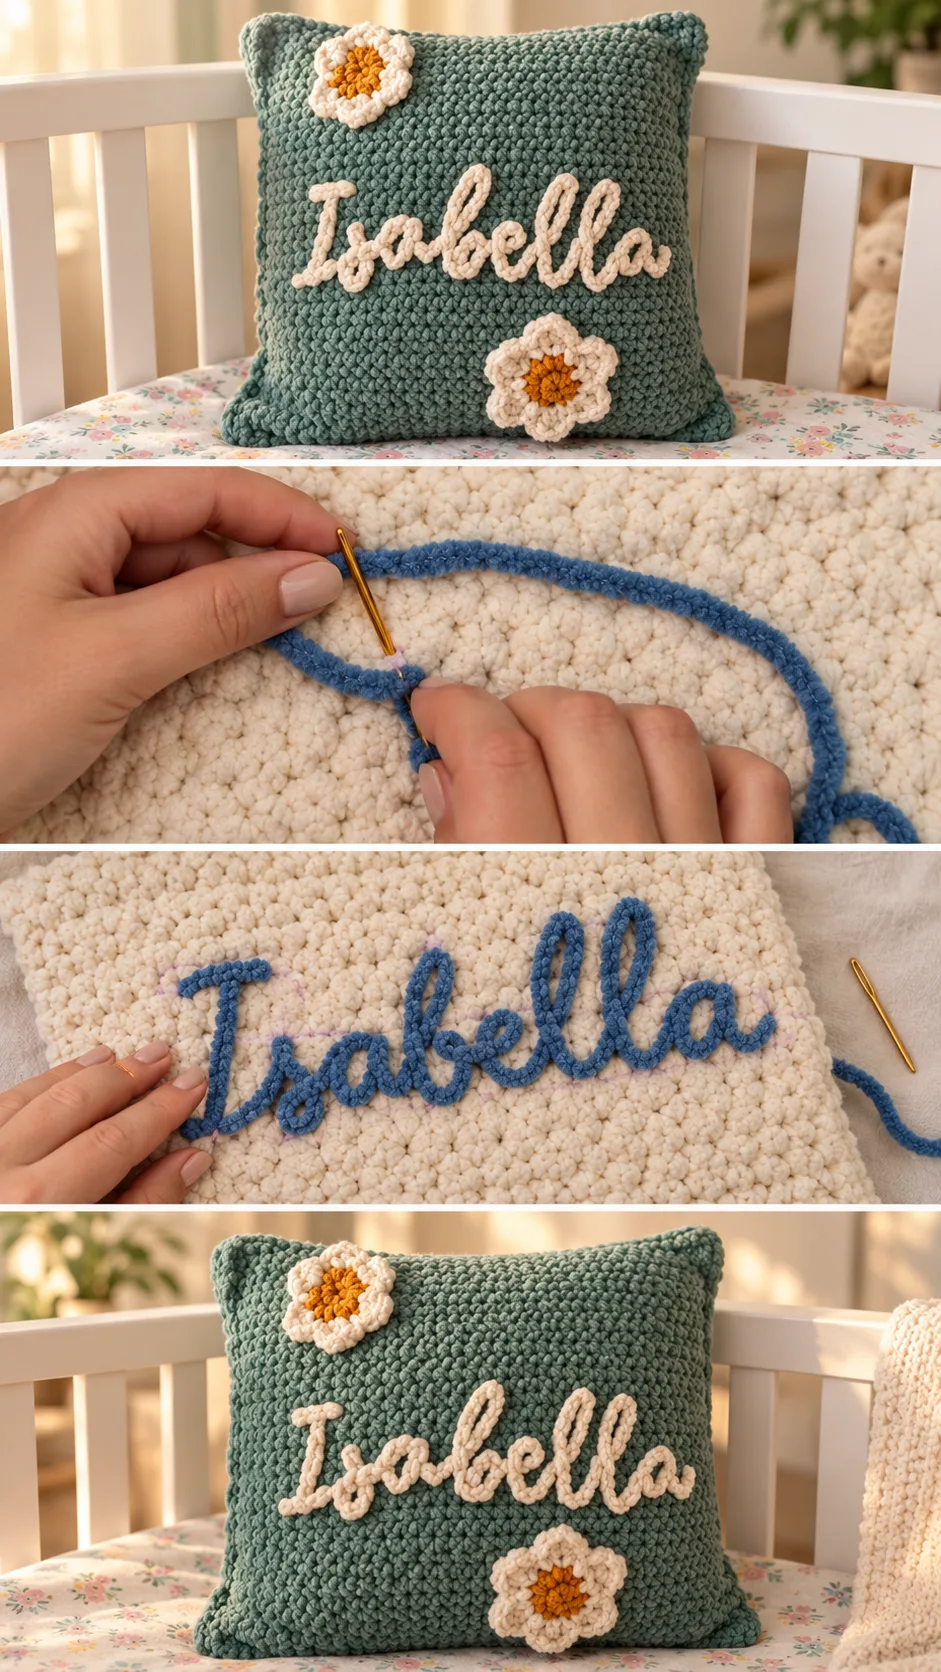
The technique in the tutorial uses a needle and a loop of yarn laid along a traced guideline. You can see the guideline in the video as a faint purple pencil trace on the fabric. A tapestry needle carries the yarn along the line, anchoring it in small, evenly spaced stitches that sit just inside the chain of the letter. Watch the hand position closely here, because the way the loose yarn is held slightly slack decides how plump the letter looks.
Start by drawing the name lightly on the fabric. Choose a script font with thick, simple loops and few sharp angles, since tight curves are harder to follow in bulky yarn. Print the name at the real size you want, then trace it through or copy it freehand.
If the line looks thin and wiry, the stitches are pulling too tight. Loosen your hand and let the yarn rest on the surface. If it looks bumpy and wobbly, the anchoring stitches are spaced too far apart, so work them closer together.
Pause the video at the start of a new letter and replay the way the yarn turns a corner. The joins between letters, like the link between the o and the b, are where most people lose the flow, so rehearse a full name on a scrap swatch before touching the pillow.
Spacing and Centering the Name
Measure the pillow front and mark the centre with a pin before sketching. In the photos, the name sits slightly below the middle, which leaves room for a flower above and another below at opposite corners. That diagonal placement gives the design movement.
Letters with tall loops, such as the capital letter and the l shapes, need extra vertical space. Sketch the whole name first and check that it fits with a margin of at least a few stitches on each side. Erase and redraw if it crowds the edge.
Making the Daisy Flowers
The two flowers add a gentle, springlike counterpoint to the script. Each one has a ring of rounded cream petals and a golden centre made of puffy, tightly packed stitches. They look like small appliqué motifs worked separately, then sewn onto the pillow front.
Making them separately has a practical benefit. You can adjust their size, repeat them if one comes out lopsided, and place them exactly where you like. Start the centre in the golden yarn, then work the petals around it in cream so the ring sits neatly outside the middle.
Sew each flower down with a yarn needle and matching cream yarn, taking small stitches around the outer edge of the petals. Do not sew only through the middle, or the petals will flop up and cup away from the fabric.
If a flower curls or cups, press it gently under a damp cloth and let it dry flat before attaching it. If the petals look pointy rather than round, your tension is too tight on the edge, so loosen up on that round.
Choosing the Best Yarn and Colours
Chenille-style yarn gives the pillow its cuddly, velvety feel and hides tiny irregularities in the stitches. It also makes the raised lettering look generous and soft. The downside is that it can be slippery to work and may snag on rings or rough fingertips, so keep your hands smooth while stitching.
A smooth, plush polyester chenille works well and washes easily. A soft acrylic bulky yarn is a more budget-friendly alternative, though the surface will look flatter and less luxurious. Avoid thin, hairy mohair-style yarns for the lettering, since the loops disappear into the fuzz and the name becomes hard to read.
For colours, start from the sage and cream of the original, then adapt. A blush pink body with ivory lettering and honey centres feels sweet. Soft grey with white letters and pale yellow flowers suits a neutral nursery. Always choose a lettering colour with strong contrast against the background, or the name fades into the fabric.
How to Style a Crochet Name Pillow
In the photos, the pillow leans against the white slats of a crib, with a floral fitted sheet underneath. The green works as a calm anchor against the busy pink and blue flowers. Use that idea as a rule of thumb: a solid, muted pillow settles a patterned room.
Place it on a glider or rocking chair so the name is the first thing visible from the door. On a toddler bed, it makes a decorative back cushion during the day. On a shelf or window seat, it doubles as room art.
For older children, a name pillow works as a reading cushion or a keepsake for a birthday. Choose a bolder colour and a slightly smaller font for a bigger child’s room.
A word on safety: decorative pillows are for display and daytime play, not for babies sleeping in cribs. Keep it out of the sleep space and give it to an older baby or toddler only under supervision.
Tips for a Neat Finish
Weave in every end on the wrong side before stitching the name, because loose tails get tangled in the lettering yarn. Trim fuzzy ends close, and tuck the lettering tails deep into the fabric so they never pop through to the front.
When you seam the panels, match corners first, then ease the sides together with a long, loose whipstitch. A tight seam puckers the corners and makes the cushion look pinched. Stuff the corners before the centre so they fill out fully.
If the finished pillow looks flat and tired, the insert is too small. Choose one a little larger than the finished cover, because chenille fabric stretches slightly with use and will relax around a snug insert.
Spot clean with a damp cloth when you can. If washing is necessary, put the cover in a gentle cycle inside a mesh bag, then dry it flat and fluff by hand. Heat can mat chenille and flatten the raised lettering, so skip the dryer.
A Soft Handmade Welcome
A crochet name pillow is a sweet personalized keepsake that takes a little patience and rewards it generously. The plush yarn, the flowing raised script and the two golden-hearted flowers make it feel instantly special.
Four things decide the result: a dense, firm background fabric, a clear and simple lettering style, even tension on the raised name, and flowers that are sewn down securely. Practise the name on a scrap swatch, trace carefully, and give each letter your unhurried attention.
Soft, simple and made with love.
Video tutorial by CJ Design. Watch the full crochet name pillow tutorial below.
Follow us on Pinterest and subscribe to the Newsletter so you don’t miss a thing!
Tutorial and photos of this name pillow by: CJ Design.