
Okay, yarn lovers, this is your sign to finally use that gorgeous skein of t-shirt yarn you have been saving for "the right project." This Dusty Rose T-Shirt Yarn Backpack is exactly that project. The construction is surprisingly straightforward, using a continuous spiral for the body and a clever Romanian-style cord technique for the heart motif and straps. If you have worked single crochet in the round before, you can absolutely tackle this. The waistcoat stitch might be new to some of you, but I promise it is easier than it sounds once you get the hang of finding that center V.
Get the Ad-Free PDF Pattern
You can find the free pattern below, or you can purchase the ad-free printable PDF from my shop.
Get the Printable PDF →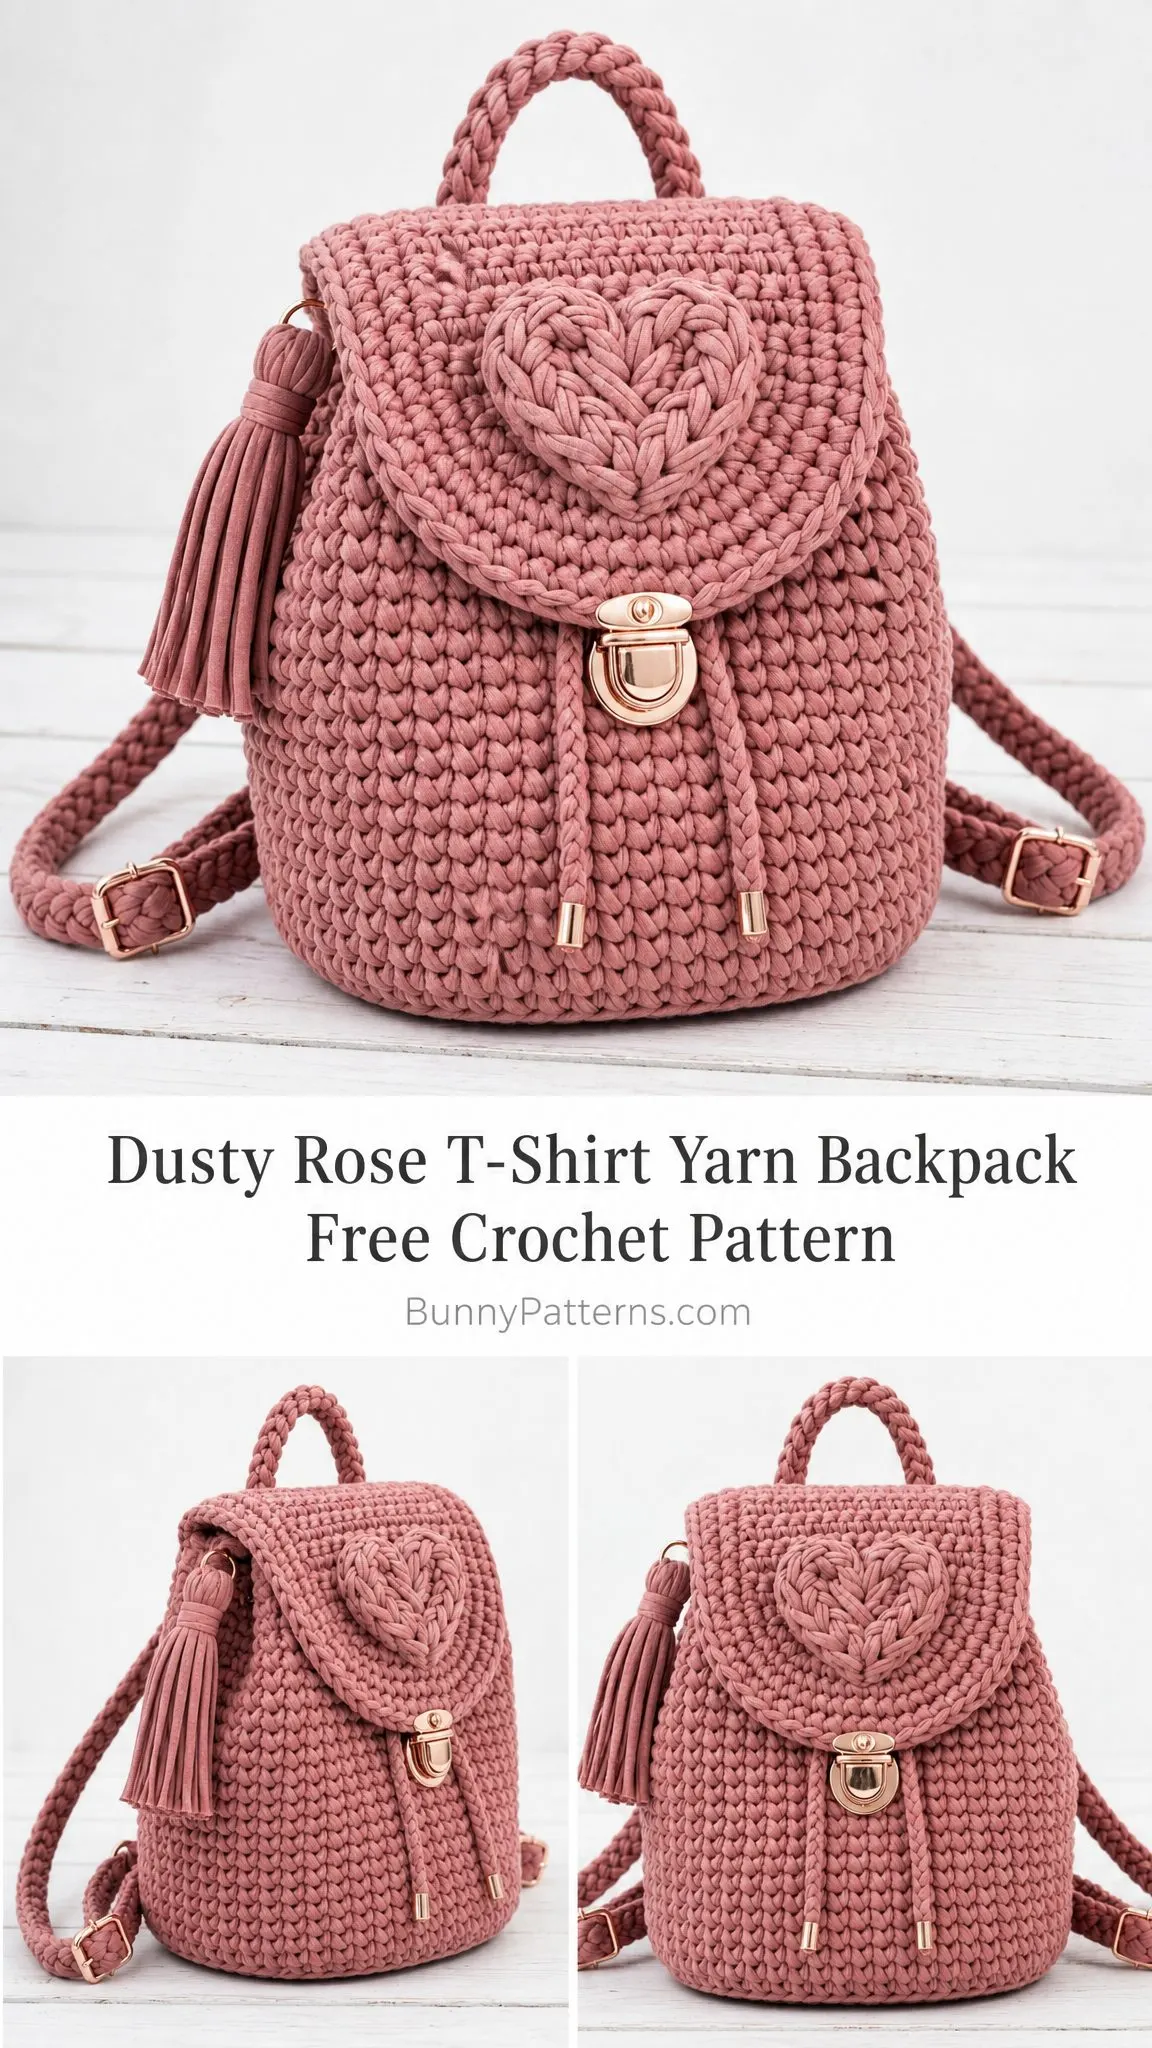
About This Crochet Backpack Pattern
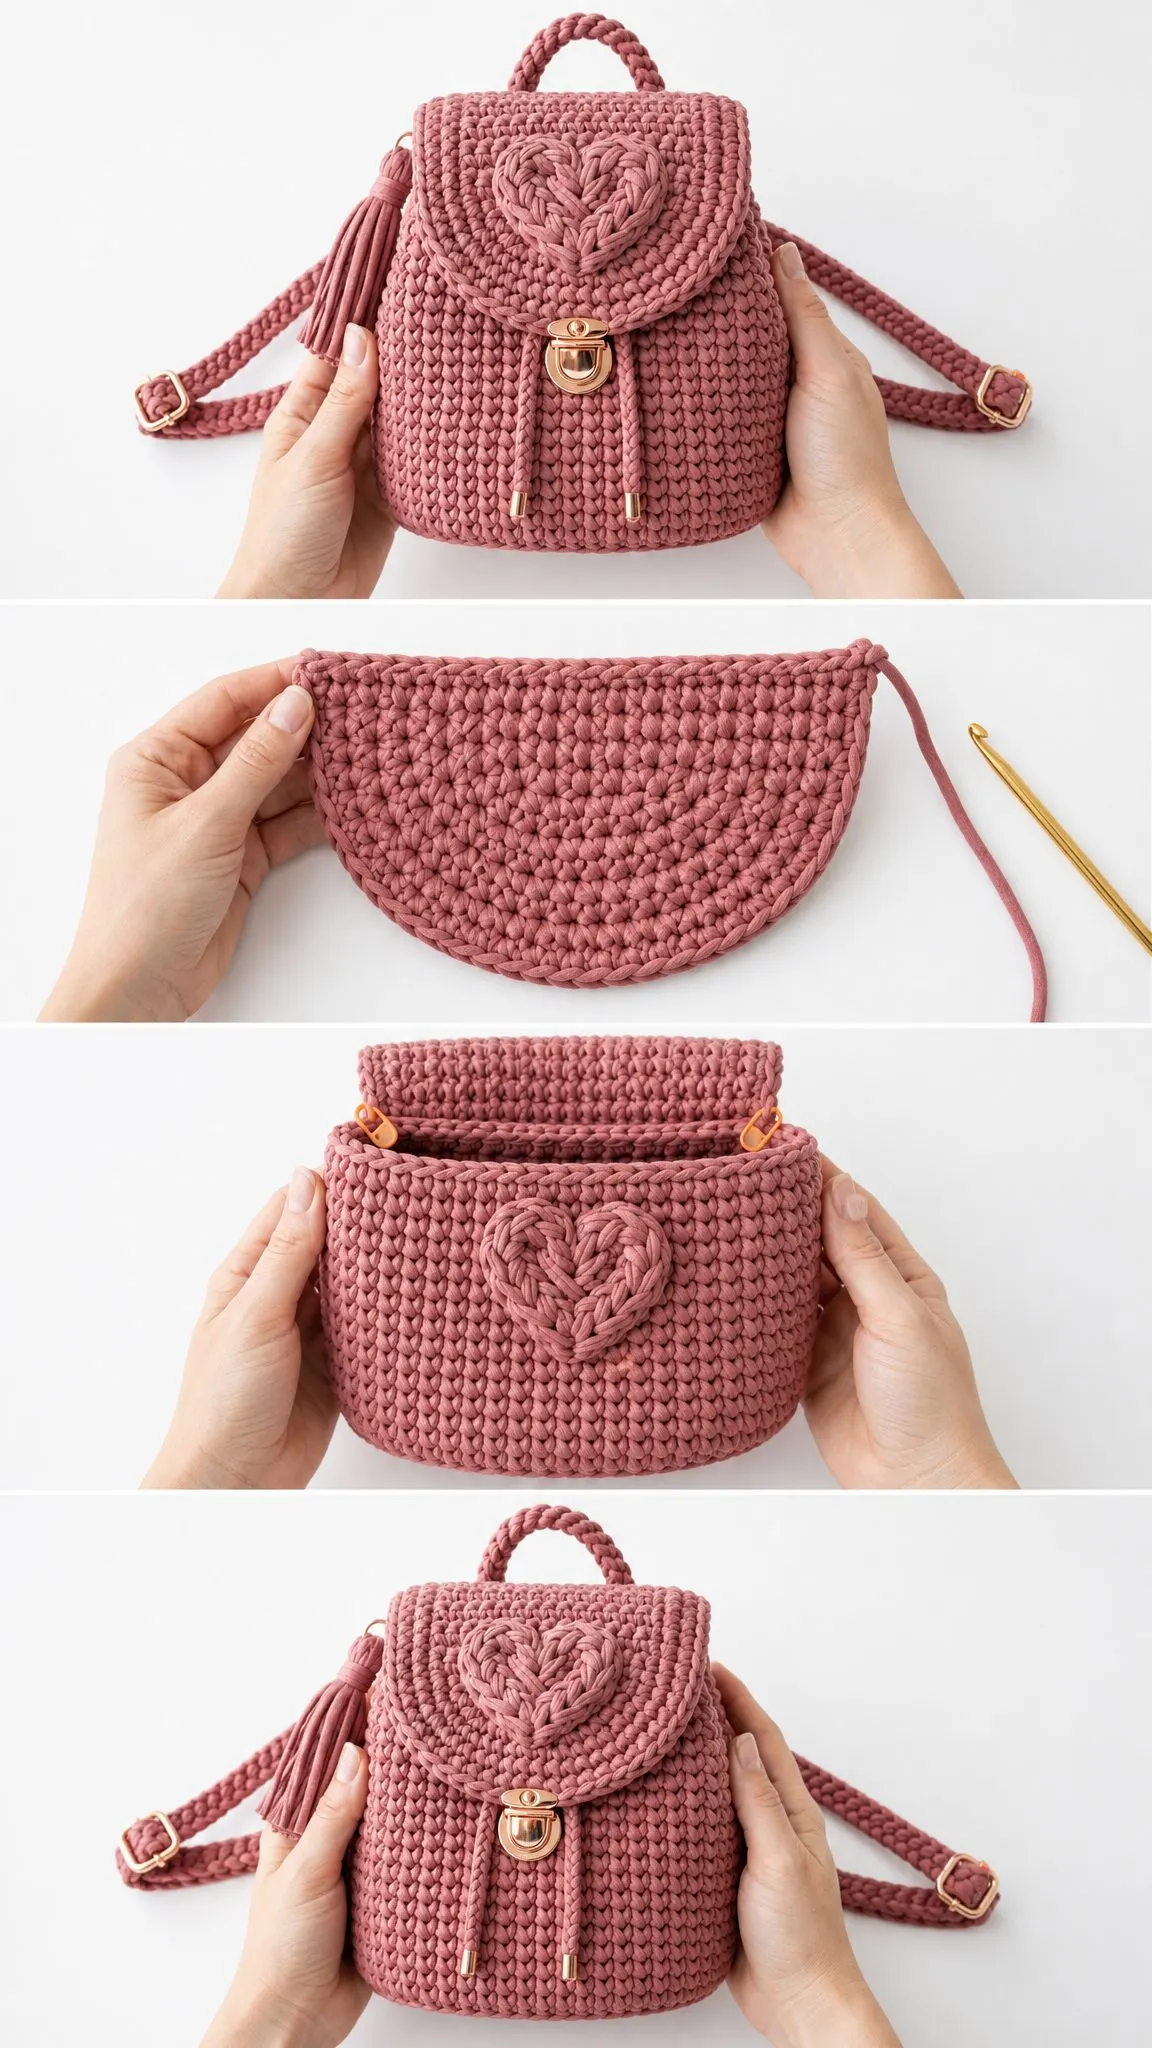
This compact backpack is worked in sturdy t-shirt yarn, giving it a firm structure that holds its shape beautifully. The finished piece features an oval base, a rounded body, a fold-over flap with a raised cord heart, drawstring closure, tassel, top handle, and adjustable shoulder straps. It is both functional and absolutely adorable.
The finished size measures approximately 8.5 inches tall by 7.5 inches wide by 4.5 inches deep (21.5 x 19 x 11.5 cm). This makes it perfect for carrying essentials like your phone, wallet, keys, and a small water bottle.
Skill level: Confident beginner to intermediate. You will work in spirals, use waistcoat single crochet, make cords, surface-sew a motif, and attach hardware neatly. If any of those terms sound unfamiliar, do not worry. I will walk you through each technique.
Time estimate: Expect about 6 to 8 relaxed hours to complete this project. It works up relatively quickly thanks to the chunky t-shirt yarn.
Materials You Will Need
Gather these supplies before you begin:
Yarn suggestions: Hoooked Zpagetti, Lion Brand Fast-Track, or Wool and the Gang Jersey Be Good all work wonderfully. Choose a soft but firm t-shirt yarn with minimal stretch for the best structure. Yarns that are too stretchy will create a floppy bag that does not hold its shape.
Gauge
Getting your gauge right is essential for this project. The firm fabric is what gives the backpack its structure.
Gauge: 8 waistcoat single crochet stitches and 8 rounds equals 4 inches / 10 cm, worked firmly with t-shirt yarn and an 8 mm hook.
How to swatch: Work a 16-stitch round swatch in waistcoat single crochet (sc) for at least 10 rounds. Adjust your hook size until the fabric is dense, upright, and not floppy. If your swatch is too loose, go down a hook size. If it is too tight and stiff, go up a size.
Abbreviations and US Terms
This pattern uses US crochet terminology. Here are all the abbreviations you will encounter:
UK note: US sc equals UK dc. All instructions are written in US crochet terminology.
Special Stitches Explained
Waistcoat Single Crochet (w-sc)
This stitch creates the beautiful knit-like texture you see on the backpack body. Instead of inserting your hook under the top two loops of the stitch, you insert it into the center "V" of the next single crochet, below the top loops.
Here is how to do it: Insert your hook into the center V of the next sc (you will see a little vertical post between the front and back loops). Yarn over, pull up a loop, yarn over, pull through both loops. Keep your loops relaxed enough for the hook to enter the V easily.
Tip: If you are struggling to find the V, pull each loop a little taller as you work and use your hook tip to gently open the center.
Romanian-Style Crochet Cord
This technique creates a beautiful round cord that you will use for the drawstrings, handle, straps, and heart motif.
Chain 2. Single crochet in the 2nd chain from hook. Turn the small cord clockwise, insert your hook under the side loop, yarn over and complete a single crochet. Repeat this process, always turning clockwise and working into the side loop, until the cord reaches the desired length.
Invisible Join
This technique creates a seamless finish. Cut your yarn, pull the tail through the final stitch, thread it onto a needle, insert under both loops of the first stitch, then back into the center of the final stitch. Pull gently to mimic a stitch.
Left-handed note: Work the same stitch counts and shaping. Your spiral will travel opposite the photos. Place the clasp and tassel after assembly so the front remains balanced.
Backpack Body Instructions
Work the base and body in a continuous spiral. Place a marker in the first stitch of each round and move it up as you work. This helps you keep track of where each round begins.
Base
Chain 11.
Rnd 1: Sc in 2nd ch from hook and next 8 ch, 3 sc in last ch; working along opposite side of chain, sc in next 8 ch, 2 sc in first ch. (22 sc)
Rnd 2: Inc in first st, sc 8, inc in each of next 3 sts, sc 8, inc in each of next 2 sts. (28 sc)
Rnd 3: Sc 1, inc, sc 8, [sc 1, inc] 3 times, sc 8, [sc 1, inc] 2 times. (34 sc)
Rnd 4: Sc 2, inc, sc 8, [sc 2, inc] 3 times, sc 8, [sc 2, inc] 2 times. (40 sc)
Rnd 5: Sc 3, inc, sc 8, [sc 3, inc] 3 times, sc 8, [sc 3, inc] 2 times. (46 sc)
Checkpoint: Your base should measure about 7.5 x 4.5 inches / 19 x 11.5 cm after Round 5. If it is significantly smaller or larger, check your gauge.
Sides
Rnd 6: BLO sc in each st around to turn the base upward. (46 sc)
Working in the back loop only creates a crisp edge that helps the base sit flat and the sides stand up straight.
Rnds 7-22: W-sc in each st around. (46 w-sc each rnd)
This is where the waistcoat stitch creates that gorgeous knit-like texture. Take your time on the first few rounds until the stitch feels natural.
Rnd 23: Sc in each st around; invisible join. (46 sc)
Checkpoint: Your body should stand about 8.5 inches / 21.5 cm tall including the base, with a firm 23 inch / 58.5 cm top circumference.
Flap and Top Details
The flap is worked separately, then sewn to the back top edge across the center 26 stitches.
Rounded Flap
Chain 27.
Row 1: Sc in 2nd ch from hook and each ch across. Ch 1, turn. (26 sc)
Rows 2-8: Sc in each st across. Ch 1, turn. (26 sc)
Row 9: Sc2tog, sc 22, sc2tog. Ch 1, turn. (24 sc)
Row 10: Sc2tog, sc 20, sc2tog. Ch 1, turn. (22 sc)
Row 11: Sc2tog, sc 18, sc2tog. Ch 1, turn. (20 sc)
Row 12: Sc2tog, sc 16, sc2tog. Do not turn. (18 sc)
Edging: Attach yarn at top right corner. Sl st in top corner, sc 12 evenly down side, 2 sc in lower corner, sc 18 across lower edge, 2 sc in lower corner, sc 12 up side, sl st in top left corner. (46 edging sc + 2 sl sts)
Placement checkpoint: When centered on the front, the flap covers the top third of the bag and ends about 3.25 inches / 8 cm below the top edge.
Top Drawstring Openings
Lay the bag flat with the front facing you. Mark 8 evenly spaced drawstring openings around Round 22, about 1 inch / 2.5 cm below the top edge. Use a yarn needle or small hook to open the fabric between stitches. Reinforce each opening with 6-8 whip stitches in matching yarn to prevent stretching.
Cords, Handle, and Straps
Drawstring Cords
Make 2 Romanian-style cords, each 28 inches / 71 cm long.
Thread one cord from the front center to the right and back to the front. Thread the second from the front center to the left and back to the front.
Add cord end caps or tie secure knots at the front. The two front cords should hang evenly below the clasp.
Top Handle
Make 1 cord 11 inches / 28 cm long. Fold ends under by 0.5 inch / 1.25 cm and sew firmly to the back top edge, 3 inches / 7.5 cm apart. Stitch through several layers so the handle stands upright.
Shoulder Straps
Make 2 straps, each 32 inches / 81 cm before hardware.
For each strap, chain to length, work 1 row of sc into the back bumps, then 1 row of sl st across the opposite edge for a rounded strap.
Attach the upper ends to D-rings near the back top edge and the lower ends through slider buckles at the lower side corners.
Fit checkpoint: Finished strap length adjusts from about 21-30 inches / 53-76 cm. Lengthen cords for a larger adult fit.
Heart Motif, Tassel, and Assembly
Raised Heart
Make 1 Romanian-style cord, 24 inches / 61 cm long.
Pin it into a symmetrical heart on the flap, about 3.5 inches wide by 3 inches tall / 9 x 7.5 cm. Start at the lower point, curve to the upper left lobe, cross at the center dip, curve to the upper right lobe, and return to the point.
Sew invisibly along both sides of the cord with matching thread.
Tassel
Wrap yarn around a 6 inch / 15 cm card 18 times. Tie the top through a ring, cut the lower loops, then wrap the neck 0.75 inch / 2 cm below the ring. Trim to 4.5 inches / 11.5 cm. Clip to the left side D-ring.
Clasp and Final Assembly
Photo-style checkpoint: The tassel hangs on the left side, the heart sits centered on the flap, and two drawstring ends fall vertically under the clasp.
Customization Options
Change width/depth: Add or remove one base round. Each extra oval round adds 6 stitches and about 0.75 inch / 2 cm to the circumference. Keep the side stitch count unchanged after the final base round.
Change height: Add or remove side rounds before Round 23. At gauge, 2 rounds change height by about 1 inch / 2.5 cm.
Change strap length: Make straps to your body measurement before sewing hardware. T-shirt yarn stretches with wear, so keep straps firm.
Troubleshooting Common Issues
Finishing and Blocking
Steam lightly from 4-6 inches / 10-15 cm away without pressing the fabric flat. Shape the base oval by hand and let the bag dry stuffed with a small towel.
Care Instructions
Spot clean with cool water and mild soap. Do not machine wash unless your exact yarn label allows it. Dry flat, reshaping the base and flap while damp. Remove the detachable tassel before cleaning.
Final Thoughts on This Crochet Backpack Pattern
This Dusty Rose T-Shirt Yarn Backpack pattern creates such a stunning finished piece that people will never believe you made it yourself. The waistcoat stitch gives it that professional, almost store-bought look, while the raised heart motif adds a sweet personal touch. Whether you make this for yourself, as a gift for a friend, or even to sell at craft fairs, it is sure to be a showstopper.
Thank you so much for choosing this pattern. I hope you enjoyed making it as much as I enjoyed creating it. If you have any questions along the way, do not hesitate to reach out.
I would absolutely love to see your finished backpack! Save this pattern to your Pinterest boards so you can find it easily when you are ready to start, and please leave a comment below if you make one. Seeing your creations truly makes my day.
Want a Quick & Easy Printable Version?
Get a clean, beautifully formatted PDF of this pattern — easy to follow step by step, ready to print or save on any device. No scrolling, no distractions, just the pattern.
Get the Printable PDF →You Might Also Like
- Blush Pink Shell Clutch with Pearl Accents Free Crochet Pattern
- Mint and Lavender Bunny Baby Blanket Free Crochet Pattern
- Dusty Rose Heart Valentine Backpack Free Crochet Pattern
- Terracotta Rust Textured Clutch Bag Free Crochet Pattern