
I have been dreaming about designing a granny square bag that actually holds its shape and looks polished enough to carry anywhere. When I started sketching this one, I knew I wanted warm sunset colors, a sturdy cotton construction, and a button closure that keeps everything secure. The flower motif came together beautifully, and I am SO pleased with how this tote turned out!
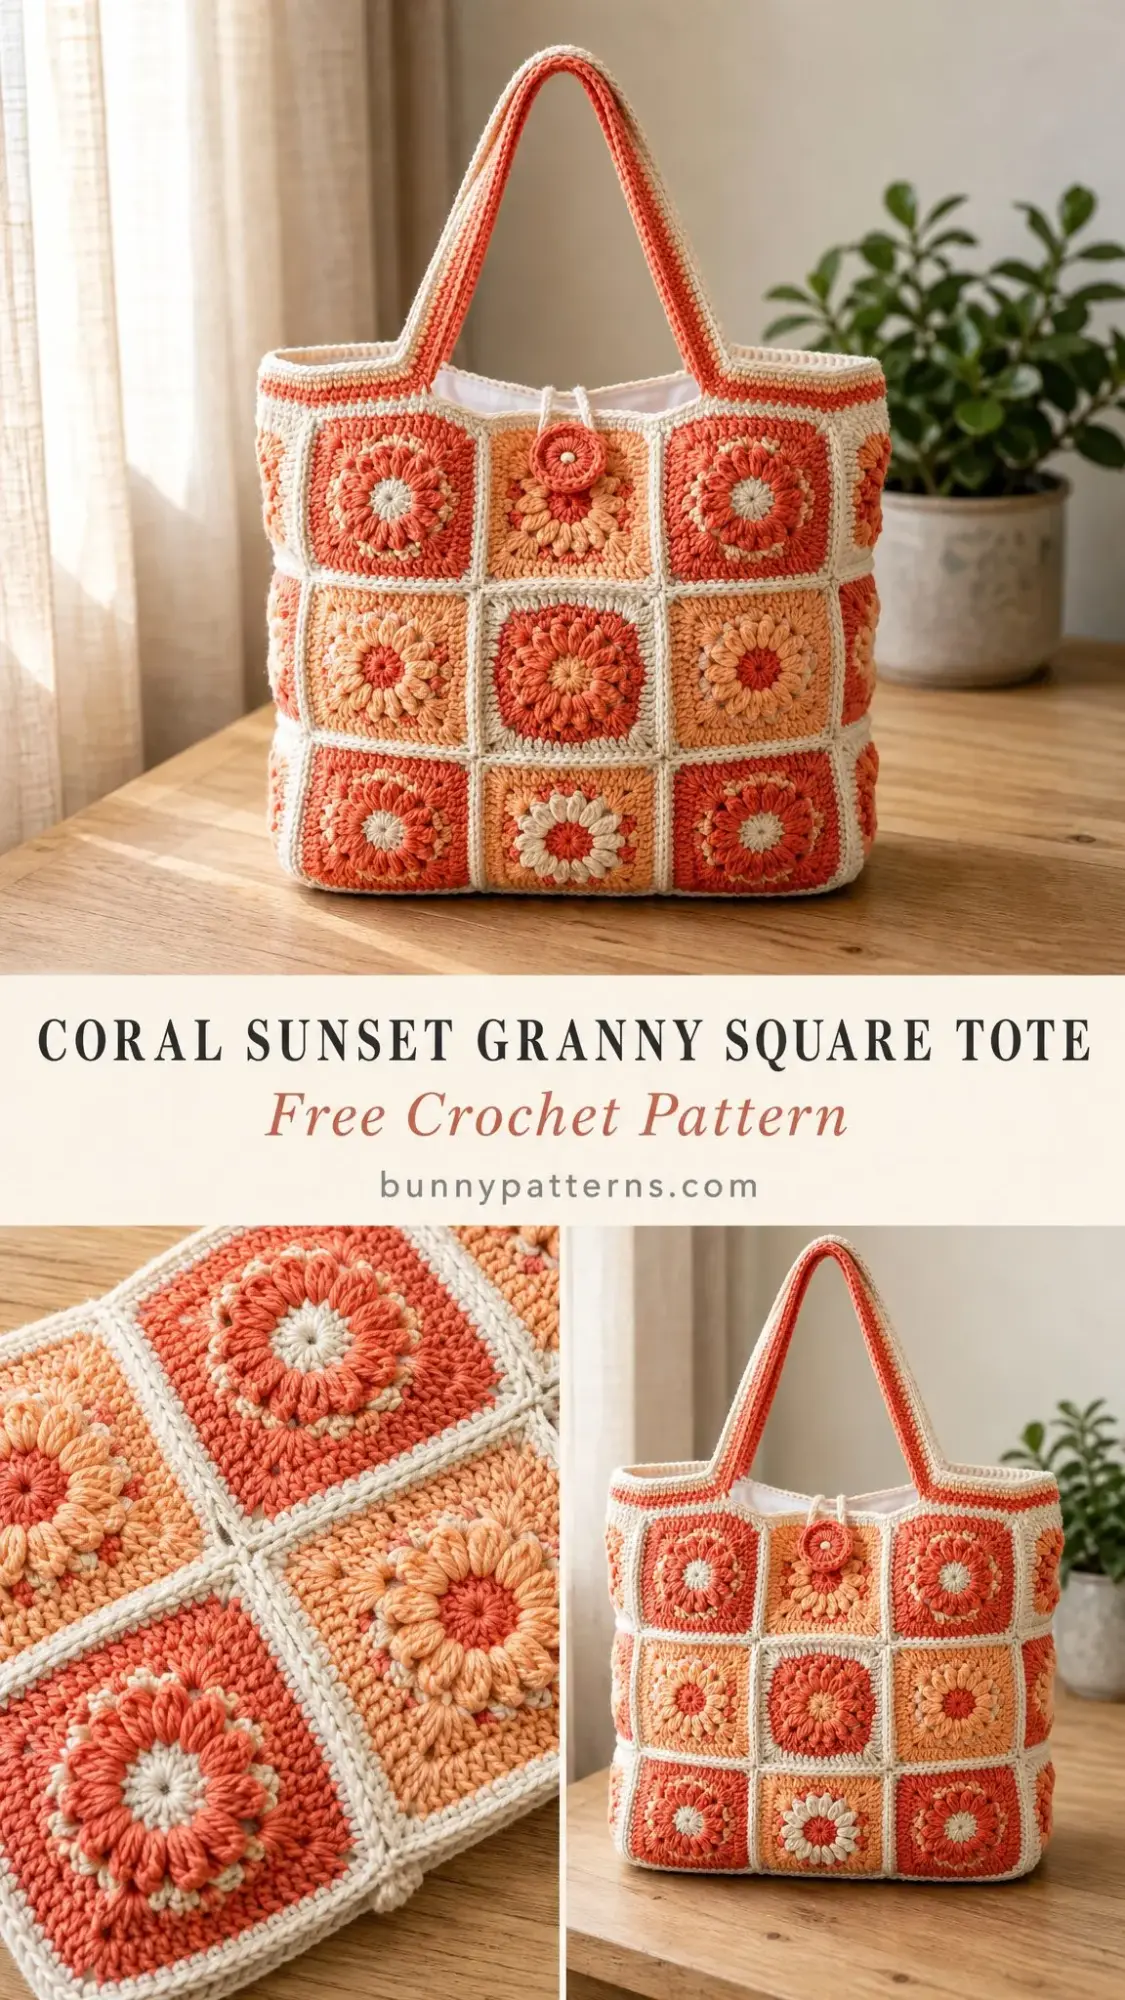
This bag is built from 27 cheerful flower granny squares in coral, peach, and cream. You will crochet each motif one by one, then join them into a roomy carryall with a snug button closure. It works perfectly as a market bag, beach companion, or everyday catch-all.
Whether you have been wanting to try granny square assembly or you are ready to level up from blankets to bags, this project hits that sweet spot of approachable but impressive. Let me walk you through everything you need to know.
Project Overview
Skill Level: Intermediate. You should be comfortable joining motifs and changing colors.
Finished Dimensions: 12 inches wide × 12.5 inches high × 4 inches deep (30 × 32 × 10 cm). Handle drop is approximately 9 inches (23 cm).
Time to Complete: About 18 to 24 hours, split across making the squares.
Construction: 27 flower squares plus a top band, two handles, and a button loop.
Keep in mind that sizes are approximate and will shift slightly depending on your yarn choice and tension. I have included some resizing tips later in this article if you want to go bigger or smaller.
Materials and Yarn
For this Coral Sunset Granny Square Tote, you will need worsted weight cotton yarn (weight 4). Cotton gives this tote its crisp stitch definition and structure. A firm, smooth fiber holds the bag’s shape best.
Yarn Colors and Amounts
Recommended Yarn Brands
Additional Supplies
Gauge
One finished flower square should measure 4 inches × 4 inches (10 × 10 cm) after a light block, using a 4.5 mm hook.
Make one square first and measure it carefully. If your square is smaller, go up a hook size. If it is larger, go down. Matching the motif size keeps the whole tote on target.
Abbreviations
This pattern uses US crochet terms. Here is everything you need to know:
For UK Crocheters
This pattern uses US terms. Convert as follows: US sc equals UK dc, and US dc equals UK tr. Everything else reads the same.
Special Stitches
Corner cluster: Work (2 dc, ch 2, 2 dc) into one space. This creates the corner of your square.
Petal loop: A ch-3 arch that skips one stitch, made in Round 2. These create the flower petals.
Pattern Notes Before You Begin
Take a moment to read through these tips. They will make your crochet experience much smoother.
The Flower Square Pattern (Make 27)
This is the heart of your tote. Rounds 1 and 2 use a flower color (A or B). Rounds 3 and 4 use Cream (C).
Round 1 (Flower Color)
Make a magic ring. Ch 3 (this counts as your first dc), then work 15 dc into the ring. Join with a sl st to the top of the beginning ch-3. Pull the ring tight.
(16 dc)
Round 2 (Same Flower Color, Petals)
Ch 1, sc in the same st. Ch 3, skip 1 st, sc in the next st. Repeat from * around. On the last repeat, ch 3 and skip the final st, then join with a sl st to the first sc.
You now have eight little petal arches.
(8 sc, 8 ch-3 spaces)
Round 3 (Cream, Begin the Square)
Join Color C in any ch-3 space. Ch 3, then work (dc, ch 2, 2 dc) in the same space. This is your first corner made.
Work 3 dc in the next space.
(2 dc, ch 2, 2 dc) in the next space, 3 dc in the next space. Repeat from * around. Join to the top of the beginning ch-3.
(28 dc, 4 corner spaces)
Round 4 (Cream, Finish the Square)
Sl st into the first corner ch-2 space. Ch 3, then work (dc, ch 2, 2 dc) in the same corner space.
Dc in each dc to the next corner.
(2 dc, ch 2, 2 dc) in the corner space, dc in each dc to the next corner. Repeat around. Join.
Fasten off, leaving a long tail for joining.
(44 dc, 4 corner spaces)
Each finished side now holds 11 dc. This is your 4-inch square.
Choosing Your Colors
For the look shown in the photos, make:
All 27 squares use Cream (C) for Rounds 3 and 4.
Arrange them in a relaxed checker pattern so coral and peach alternate across the front and back. The gusset should blend the two colors naturally.
Here is my best tip: there is no wrong layout. Lay all your squares out on the floor or a bed and shuffle them until the colors feel balanced. Do this before you sew a single stitch.
For an extra-soft accent, you could work a few flower centers in cream instead of coral or peachatte your collection.
Joining and Assembly
Now for the fun part. You are going to build this bag piece by piece.
Step 1: Make the Panels
Using Color C, hold two squares with wrong sides together. Work sc through the back loops of both edges to join them.
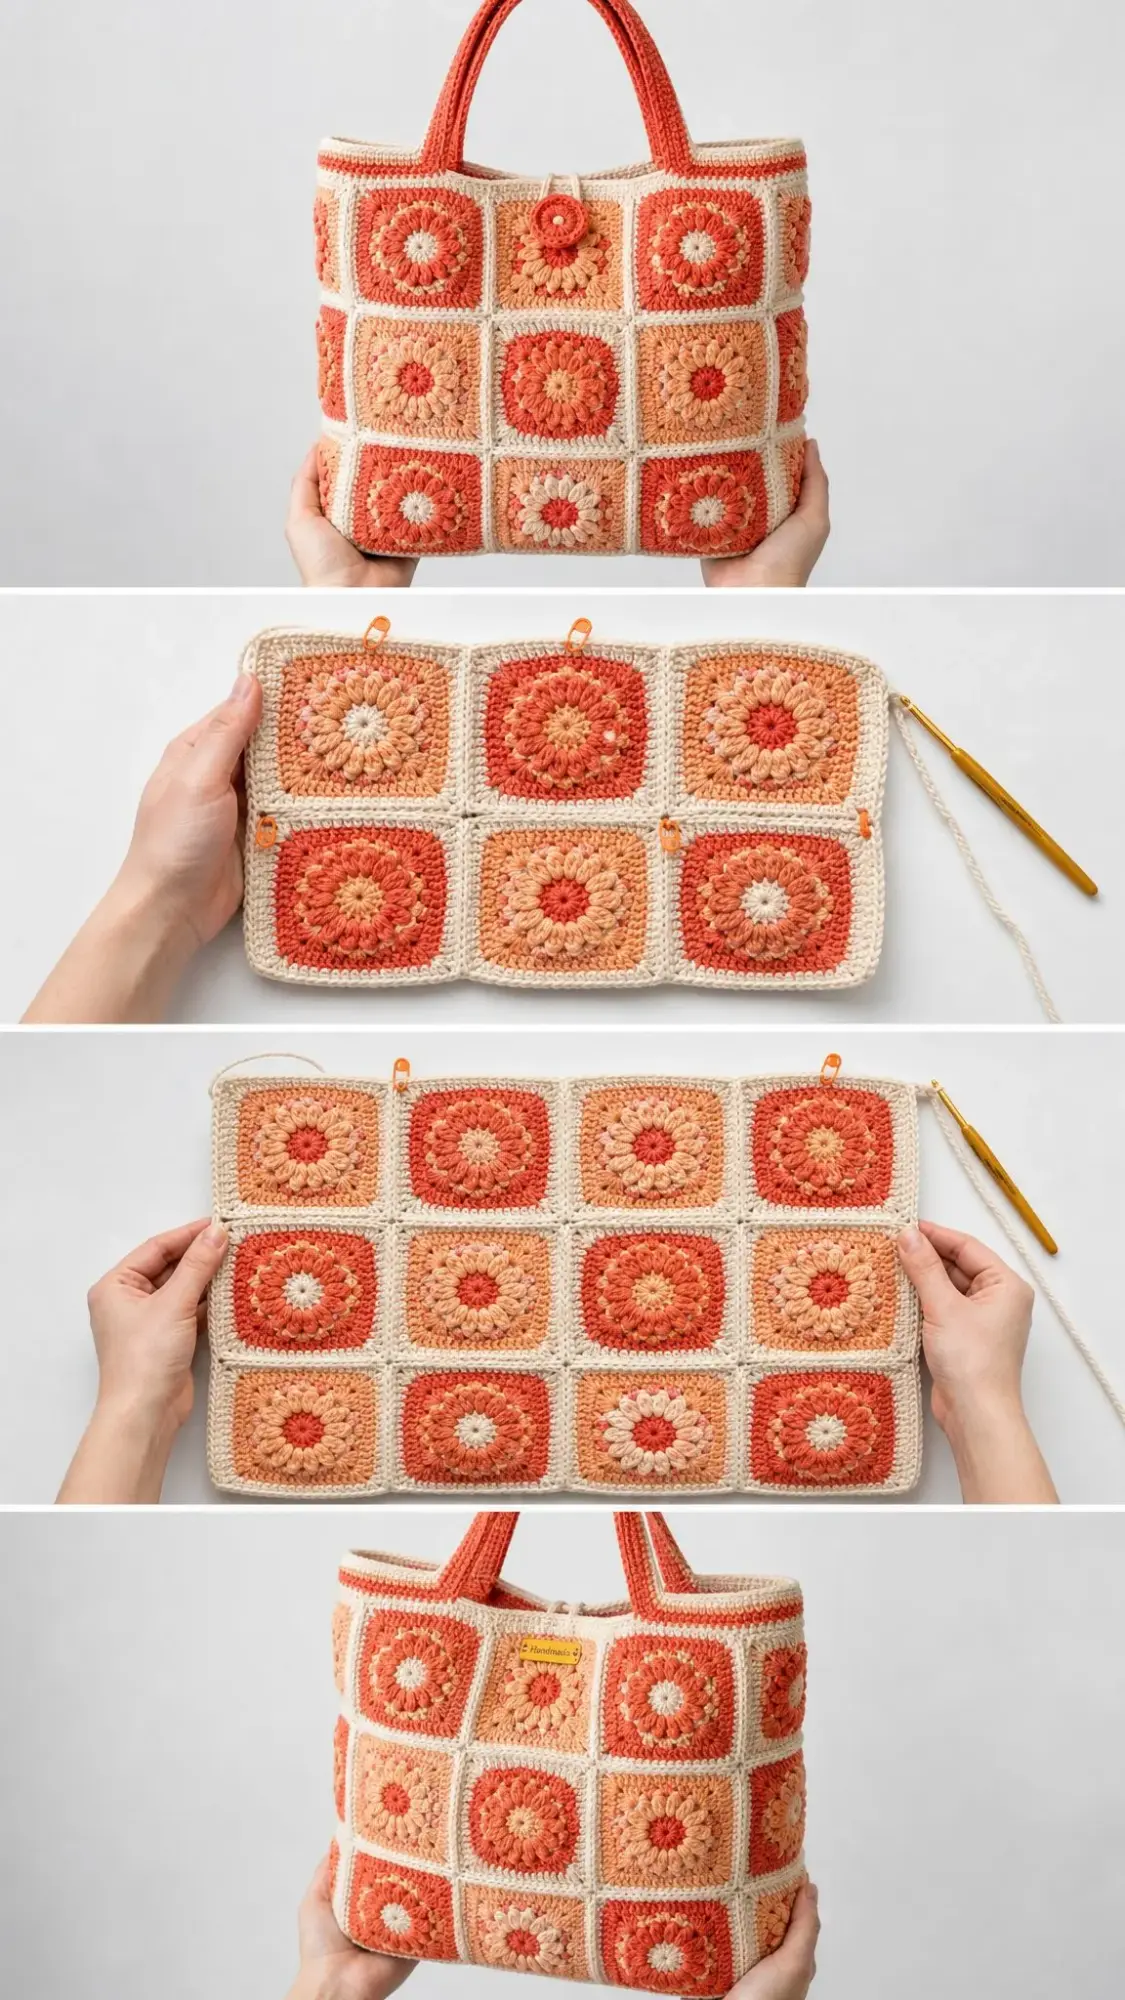
Build a Front panel of 3 × 3 squares (9 squares total).
Build a Back panel of 3 × 3 squares (9 squares total).
Step 2: Make the Gusset
Join 9 squares into one long 1 × 9 strip. This strip will wrap the bag as follows: left side (3 squares) plus base (3 squares) plus right side (3 squares).
(9 squares)
Step 3: Attach Front to Gusset
With Color C, sc the gusset strip around the Front panel’s left edge, across its bottom, and up its right edge. Match square to square as you go.
(9 joined edges)
Step 4: Attach the Back
Sc the Back panel to the gusset’s free long edge in the same way.
The bag now stands up on its own!
(9 joined edges)
Top Band, Handles, and Button
These finishing touches bring everything together and give your tote a polished look.
Top Band (Around the Opening)
Round 1 (Color C): Join at a back corner. Sc evenly around the whole opening. Join. (88 sc)
Rounds 2 and 3 (Color A): Ch 1, sc in each st around. Join. (88 sc)
Round 4 (Color C): Ch 1, sc in each st around. Join. Fasten off. (88 sc)
Handles (Make 2)
With Color A, ch 81.
Row 1: Sc in the 2nd ch from hook and in each ch across. (80 sc)
Rows 2 through 4: Ch 1, turn, sc in each st. (80 sc)
Optional: Edge each strap with a row of Color C for a nice trim.
Sew the ends firmly inside the band. Attach one handle to the front and one to the back, positioning them about a third in from each side.
Button
With Color A, make a magic ring. Work 8 sc into the ring. Then 2 sc in each st around. (16 sc)
Sc 1 round, stuff lightly with a small bit of yarn or fiberfill, then close the opening.
Sew the button to the center front of the band.
Loop
With Color C, join at the center back of the band. Ch 10, then sl st back to form a loop. Make sure it is sized to slip over your button comfortably.
Finishing Your Tote
You are almost done! These final steps will make your bag look professional and last for years.
Care Instructions
Hand wash your tote in cool water with mild soap. Do not bleach.
Press out water gently in a towel, reshape the bag, and lay it flat to dry. If needed, cool-iron through a cloth.
Avoid overloading your tote so the handles keep their shape over time.
Make It Your Size
Want to customize? Here are some easy adjustments:
Troubleshooting Tips for Beginners
If your squares are coming out different sizes, check your tension. Cotton yarn can feel stiffer than acrylic, so relax your grip and let the yarn flow.
If the flower center is pulling through, make sure you pull your magic ring tight before moving on to Round 2.
If joining feels awkward, practice on two scrap squares first. Working through just the back loops creates a neat, flat seam that looks intentional.
And if your bag seems floppy after assembly, blocking really does make a difference. Soak the whole thing, squeeze out the water, and shape it while damp.
Why This Pattern Works
The granny square tote construction is perfect for so many reasons. Each square is portable, so you can work on them anywhere. The repetitive rounds are meditative but not boring. And the finished product looks impressive even though each piece is quite simple on its own.
This particular design balances traditional granny square charm with modern color choices. The coral and peach feel fresh and summery, while the cream borders keep everything cohesive.
Plus, cotton is naturally sturdy and gets softer with washing. Your tote will only get better with use.
Final Thoughts on the Coral Sunset Granny Square Tote Crochet Pattern
I hope you love making this bag as much as I loved designing it. There is something deeply satisfying about watching those flower squares stack up and then assembling them into something so useful and beautiful.
This crochet pattern is perfect for gifting, too. Imagine filling it with goodies for a birthday or bringing it to a friend who loves handmade things. It is the kind of project that sparks conversation everywhere you take it.
Thank you so much for being here and trusting me with your crochet time. I truly appreciate every single one of you who tries my patterns.
I would absolutely love to see your finished tote! Save this pattern to your Pinterest boards so you can find it whenever you are ready to start, and please leave a comment below if you make one. Seeing your creations is the best part of sharing these patterns. Happy crocheting!
You Might Also Like
- Ocean Wave Candy Bolster Pillow Free Crochet Pattern
- Sage Green Tiered Wall Planter Free Crochet Pattern
- Lavender Sunflower Granny Square Tote Free Crochet Pattern
- Pink Valentine Highland Cow Amigurumi Free Crochet Pattern