
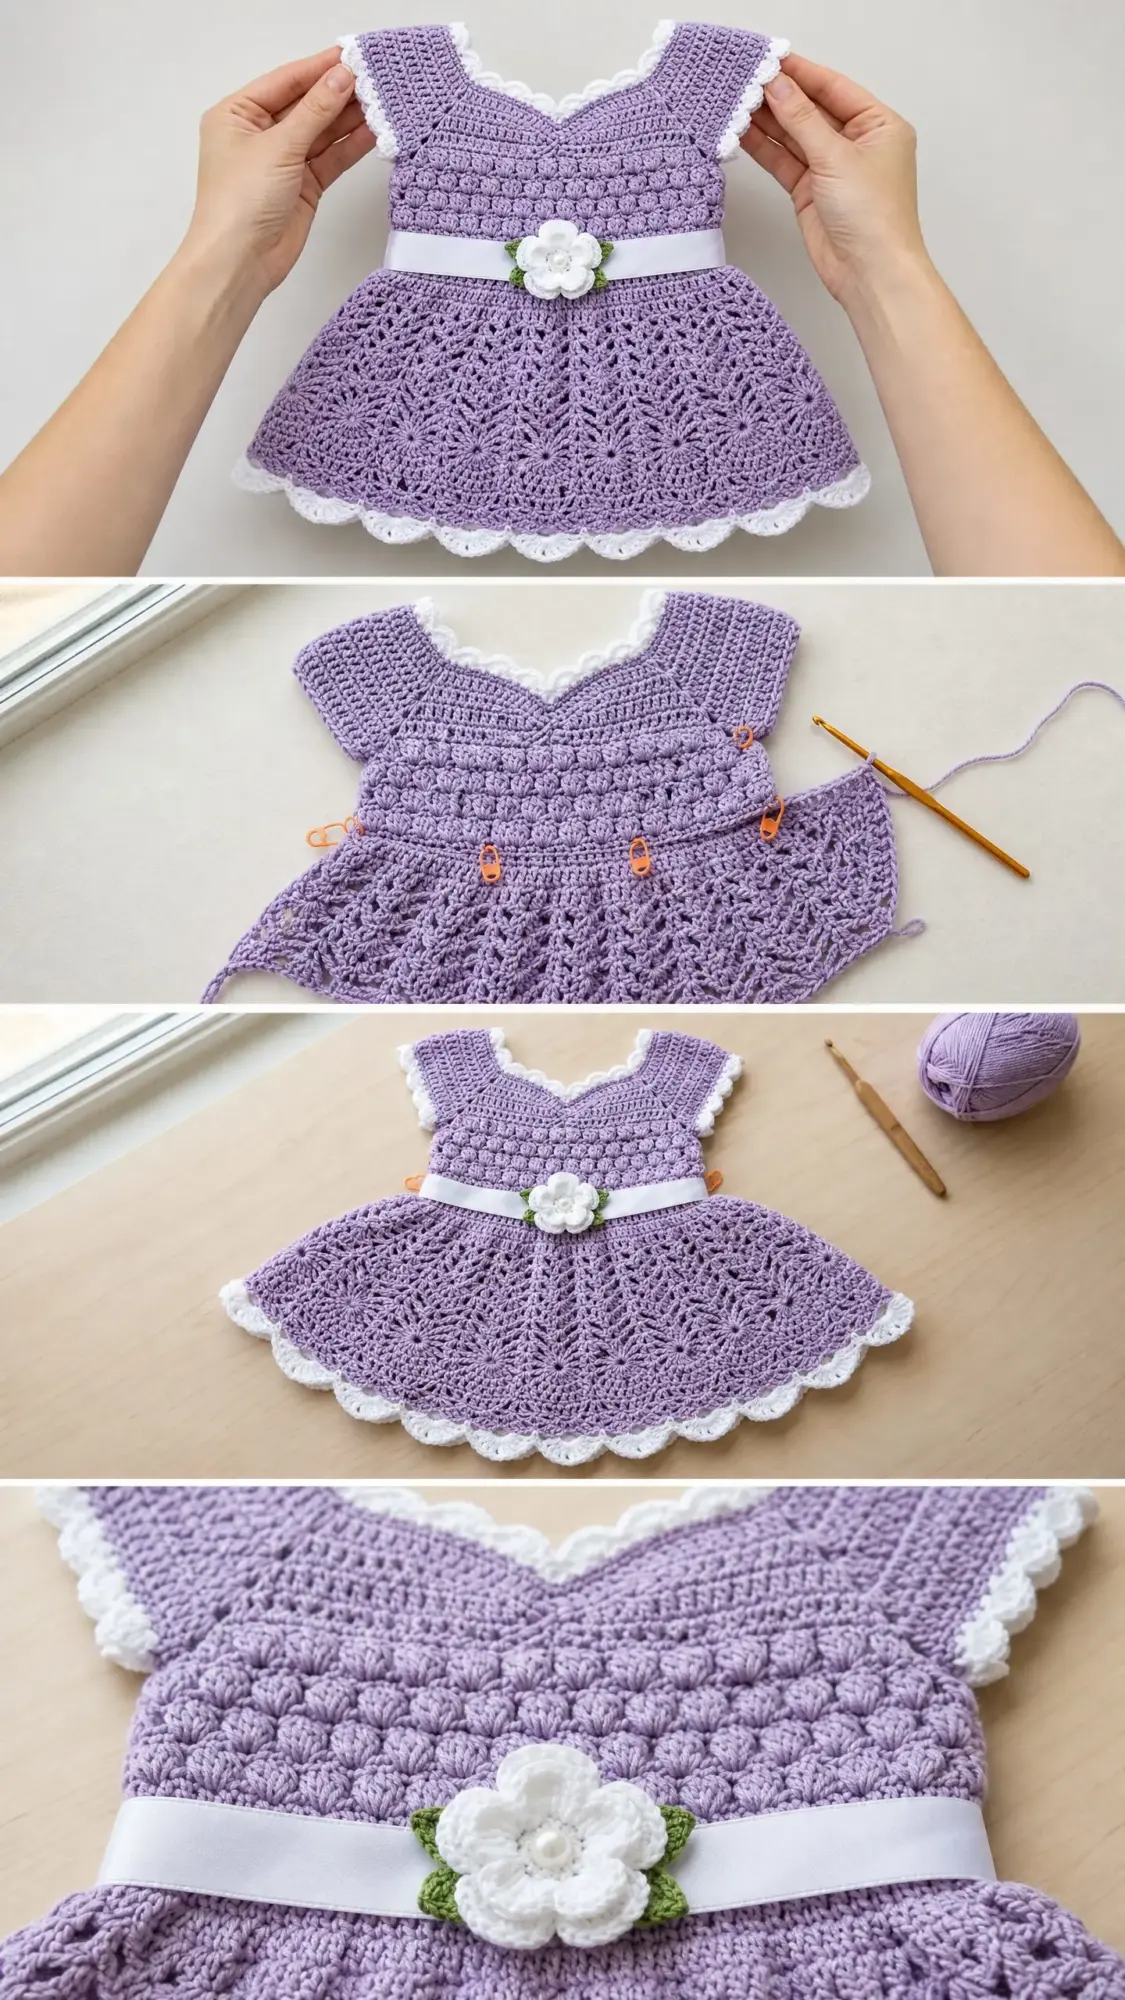
This is a top-down baby dress with a textured puff cluster bodice, an open fan lace skirt, and scallop edging in white. It uses worsted weight yarn and a 4.0 mm hook. The construction is straightforward once you understand the raglan yoke shaping and the fan lace repeat.
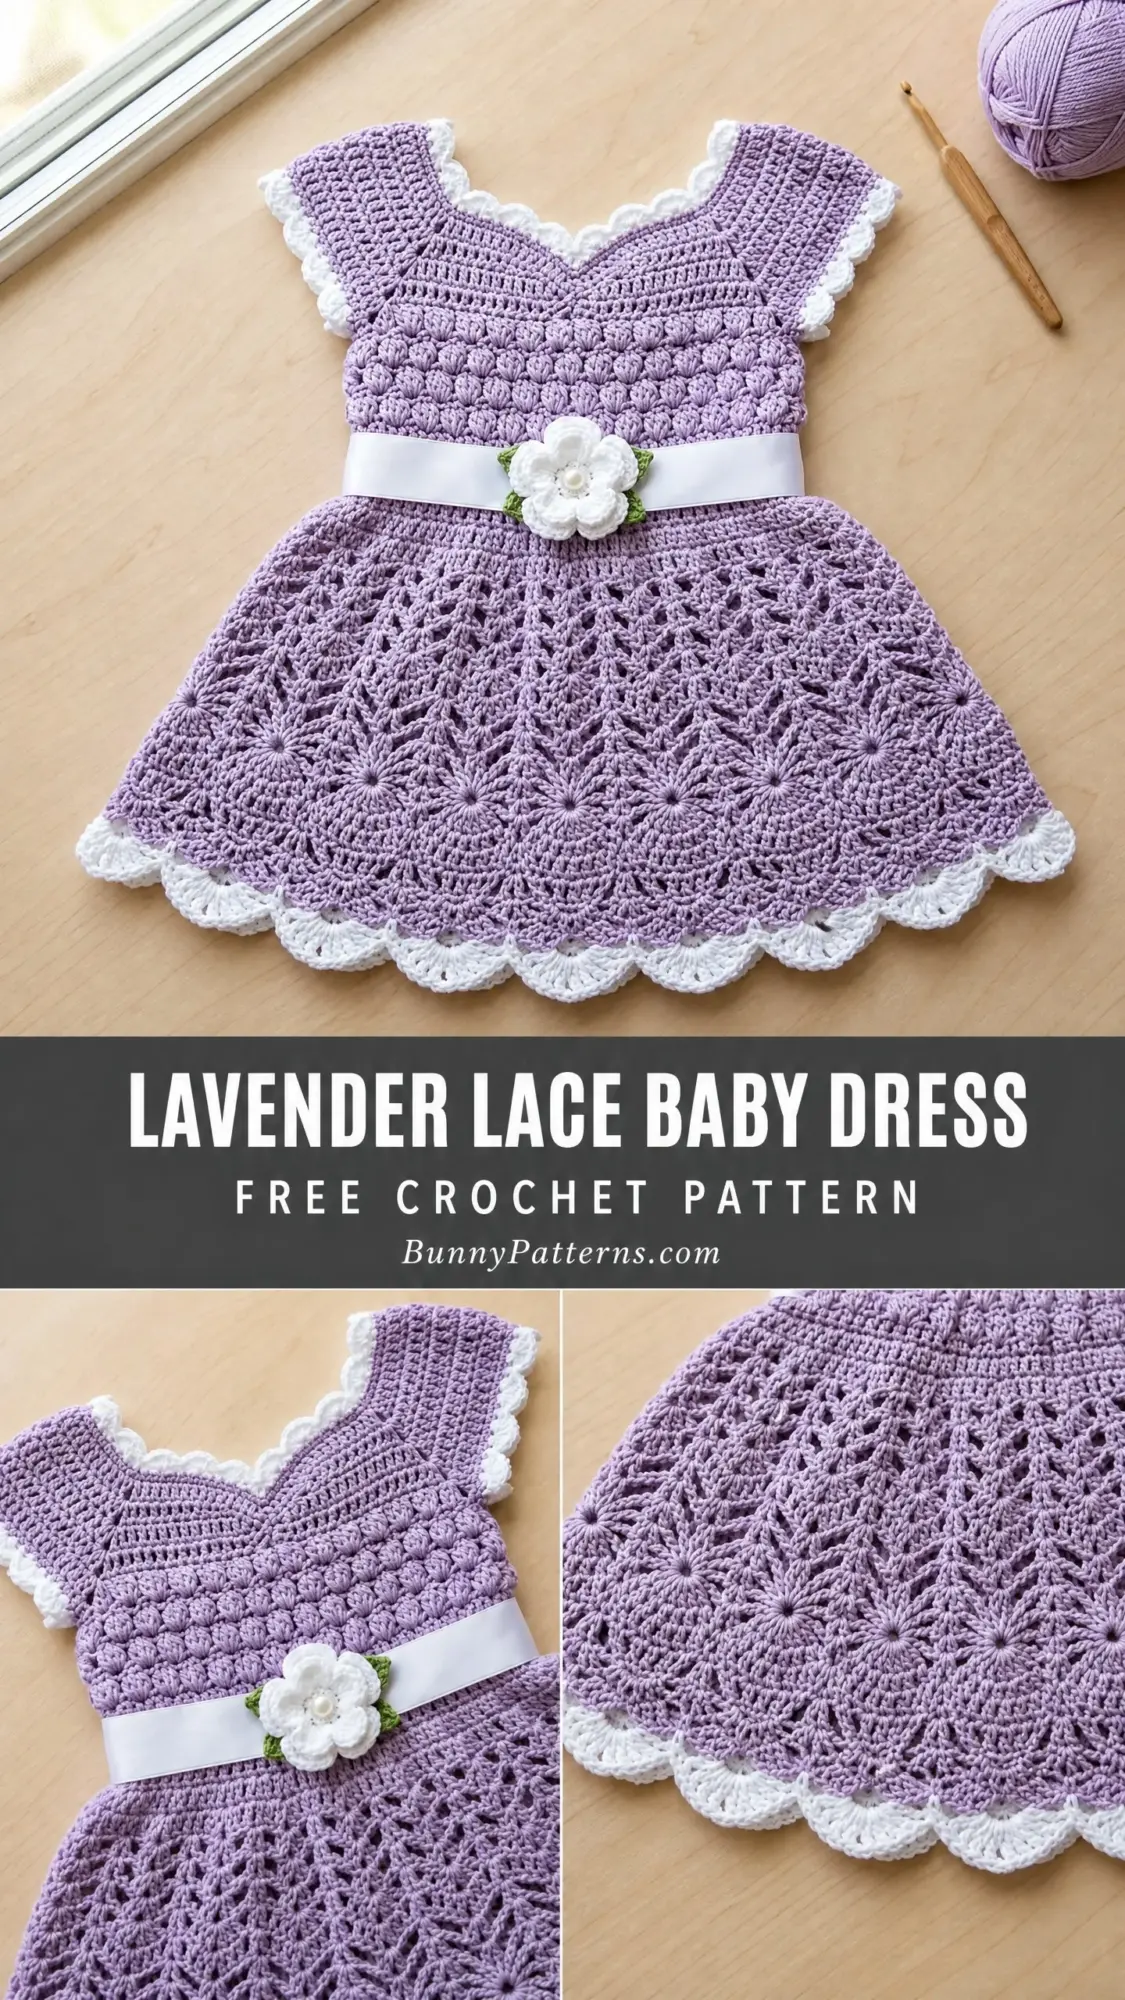
I designed this dress to feel heirloom-quality without being fussy to make. The puff clusters give the bodice that lovely dense texture you see in vintage baby garments. The skirt flares out naturally with the fan shells, and the white edging frames everything beautifully.
If you can work double crochet and follow a repeating pattern, you can absolutely make this dress. Let me walk you through every single step.
Pattern Details at a Glance
Skill Level: Intermediate
Finished Size: 0 to 6 months
Time Estimate: 12 to 18 hours for an experienced intermediate crocheter
Materials You Will Need
Yarn: Worsted weight yarn
A smooth, tightly spun cotton or cotton-blend yarn works best for stitch definition in the puff clusters and fan lace.
Hook: US size G-6 / 4.0 mm crochet hook
Notions:
Yarn Suggestions
Option 1: Lion Brand 24/7 Cotton in Lavender and White. This 100 percent mercerized cotton has excellent stitch definition and is machine washable. 186 yards per 3.5 oz / 100 g skein.
Option 2: Paintbox Yarns Simply DK used at a tight gauge on a G hook. This smooth acrylic-cotton blend produces crisp stitch definition. 137 yards per 1.76 oz / 50 g skein.
Option 3: Cascade Ultra Pima in Lavender. 100 percent Pima cotton, silky smooth and excellent for baby garments. 220 yards per 3.5 oz / 100 g skein.
Choose any worsted weight yarn that feels soft against skin and has a smooth, tight twist. Fuzzy or highly textured yarns will obscure the puff cluster and fan lace stitches.
Gauge
In single crochet (sc), blocked: 16 stitches and 18 rows = 4 inches / 10 cm using MC and G-6 / 4.0 mm hook.
In fan lace pattern (skirt), blocked: 1 fan repeat (12 stitches) = 3 inches / 7.5 cm wide; 2 fan rows = 1.5 inches / 3.8 cm tall.
Gauge is critical for correct fit. Always swatch and adjust hook size as needed.
Abbreviations (US Terms)
Before we dive into the step by step instructions, let me explain every stitch and abbreviation you will encounter:
Special Stitches for This Baby Dress Pattern
Puff Cluster (pc)
This creates that beautiful textured bodice. Here is exactly how to work it:
Step 1: Yarn over, insert hook into indicated stitch or space.
Step 2: Yarn over, pull up a loop to approximately 1/2 inch / 1.3 cm tall. You now have 3 loops on hook.
Step 3: Yarn over, insert hook into same stitch or space.
Step 4: Yarn over, pull up a loop to same height. You now have 5 loops on hook.
Step 5: Yarn over, insert hook into same stitch or space.
Step 6: Yarn over, pull up a loop to same height. You now have 7 loops on hook.
Step 7: Yarn over, draw through all 7 loops on hook. Puff cluster made.
Step 8: Chain 1 to close. This closing chain counts as the top of the puff cluster.
Fan Shell (fan)
In the indicated stitch or space, work: (dc, ch 1, dc, ch 1, dc, ch 1, dc, ch 1, dc). This creates 5 double crochets with 4 chain-1 spaces between them, forming a fan shape.
Scallop Edging
Step 1: Slip stitch into first stitch.
Step 2: Chain 3, work 4 dc into same stitch. You now have 5 dc total in that stitch.
Step 3: Skip 2 stitches.
Step 4: Slip stitch into next stitch.
Step 5: Repeat steps 2 through 4 across or around.
Crocheted Flower
Round 1: Using CC, make a magic ring, ch 1, work 6 sc into ring, join with sl st to first sc. (6 sc)
Round 2: (Ch 3, 2 dc in same st, ch 3, sl st in same st, sl st in next st) 6 times. (6 petals)
Fasten off, leaving a long tail. Sew pearl bead to center. Set aside for finishing.
Pattern Notes Before You Begin
The dress is worked top-down in joined rounds. The right side faces out throughout.
At the end of each round, join with sl st to the top of the beginning chain or to the first stitch as indicated. After joining, chain the appropriate number for the next round. Chain 1 for sc rounds, chain 3 for dc rounds. The beginning chain counts as the first stitch only when indicated.
Use stitch markers at the four raglan division points during the yoke. This makes increasing so much easier.
The waist ribbon eyelet row creates decorative slots for threading the ribbon. Do not skip this round.
The fan lace repeat for the skirt is a multiple of 12 stitches. The stitch count at the base of the bodice must be divisible by 12 before beginning the skirt section. The pattern achieves this automatically, so follow the counts exactly.
Crochet Pattern Instructions
Section 1: Neckline Foundation
Using MC, ch 56, join with sl st to first ch to form a ring. Be careful not to twist.
The 56-chain foundation forms the neckline. It will be divided as follows: 10 stitches front right yoke, 8 stitches right sleeve, 20 stitches back yoke, 8 stitches left sleeve, 10 stitches front left yoke.
Round 1 (Setup): Ch 1, sc in each ch around, join with sl st to first sc. (56 sc)
Place markers at the following positions: after stitch 10, after stitch 18, after stitch 38, after stitch 46. These are your raglan points.
Round 2 (Raglan Increase Round 1): Ch 1, sc in each st to 1 st before first marker, 2 sc in next st, move marker, 2 sc in next st, sc to 1 st before next marker, 2 sc in next st, move marker, 2 sc in next st, sc to 1 st before next marker, 2 sc in next st, move marker, 2 sc in next st, sc to 1 st before next marker, 2 sc in next st, move marker, 2 sc in next st, sc to end, join. (64 sc)
Each raglan point gains 2 stitches per increase round, for a total of 8 stitches added per raglan round.
Round 3: Ch 1, sc in each st around, join. (64 sc)
Round 4 (Raglan Increase Round 2): Repeat Round 2 increase method. (72 sc)
Round 5: Ch 1, sc in each st around, join. (72 sc)
Round 6 (Raglan Increase Round 3): Repeat Round 2 increase method. (80 sc)
Round 7: Ch 1, sc in each st around, join. (80 sc)
Round 8 (Raglan Increase Round 4): Repeat Round 2 increase method. (88 sc)
Round 9: Ch 1, sc in each st around, join. (88 sc)
Round 10 (Raglan Increase Round 5): Repeat Round 2 increase method. (96 sc)
After Round 10, the stitch distribution is: 20 stitches each front yoke section (40 front total), 18 stitches each sleeve section (36 sleeves total), 20 stitches back yoke. Check this before proceeding.
Checkpoint: After Round 10, the neckline foundation and yoke increase section should measure approximately 2.5 inches / 6.5 cm from cast-on edge. You should have 96 stitches total.
Section 2: Bodice Yoke Puff Cluster Section
The puff cluster bodice begins now. The sleeves are not yet separated.
Round 11 (Begin Puff Cluster Pattern): Ch 1, (pc in next st, ch 1, sk 1 st) around, ending with sl st to top of first pc. (48 puff clusters, 48 ch-1 spaces = 96 stitch positions)
Round 12: Ch 1, sc in top of each pc and in each ch-1 sp around, join. (96 sc)
Round 13: Ch 1, (pc in next st, ch 1, sk 1 st) around, join to top of first pc. (48 pc, 48 ch-1 spaces)
Round 14: Ch 1, sc in top of each pc and in each ch-1 sp around, join. (96 sc)
Round 15: Ch 1, (pc in next st, ch 1, sk 1 st) around, join. (48 pc, 48 ch-1 spaces)
Round 16: Ch 1, sc in top of each pc and in each ch-1 sp around, join. (96 sc)
Checkpoint: After Round 16, your bodice yoke should measure approximately 4.5 inches / 11.5 cm from the cast-on edge.
Section 3: Sleeve Separation
On the next round, you will skip the sleeve stitches and replace them with underarm chains.
Round 17 (Sleeve Separation): Ch 1, sc across first 20 sts (front), ch 4, skip the 18 sleeve stitches on the right side, pm in the first skipped st for sleeve pickup later, sc across next 20 sts (back), ch 4, skip the remaining 18 sleeve stitches on the left side, pm in the first skipped st, join with sl st to first sc. (40 sc across body + 4 ch + 4 ch = 48 working stitches)
Round 18: Ch 1, sc in each of the 20 front sts, sc in each of the 4 underarm chs, sc in each of the 20 back sts, sc in each of the 4 underarm chs, join. (48 sc)
Checkpoint: After Round 18, the piece should measure approximately 5.5 inches / 14 cm from the cast-on edge. The chest circumference should be approximately 12 inches / 30.5 cm.
Section 4: Waist Band and Ribbon Eyelet
Round 19: Ch 1, sc in each st around, join. (48 sc)
Round 20 (Eyelet Round for Ribbon): Ch 3 (counts as first dc), sk 1, dc in next st, (ch 1, sk 1, dc in next st) around to last st, ch 1, join with sl st to top of beg ch-3. (24 dc, 24 ch-1 spaces = 48 stitch positions)
Round 21: Ch 1, sc in each dc and in each ch-1 sp around, join. (48 sc)
Round 22: Ch 1, sc in each st around, join. (48 sc)
Checkpoint: After Round 22, the waist band section is complete. The piece should measure approximately 6.5 inches / 16.5 cm from the cast-on edge.
Section 5: Skirt Setup Increase Round
The skirt requires a stitch count divisible by 12. The current count is 48. You need more stitches for proper flare.
Round 23 (Skirt Setup): Ch 1, 2 sc in each st around, join. (96 sc)
96 divided by 12 = 8 fan repeats. Perfect.
Section 6: Skirt Fan Lace Pattern
Now comes the beautiful lace section. The fan lace pattern repeat is worked over 12 stitches.
Round 24 (Fan Round 1): Ch 3 (counts as dc), 2 more dc in same st (beg half-fan), sk 2 sts, sc in next st, sk 2 sts, (fan in next st, sk 2 sts, sc in next st, sk 2 sts) 7 times, 2 dc in same st as beg ch-3 (complete beginning fan by adding 2 dc to the ch-3 dc), join with sl st to top of beg ch-3. (8 fans, 8 sc = 48 working sts)
The beginning ch-3 and the 2 additional dc at the start, combined with the 2 dc added at the end into the base of the beg ch-3, form one complete beginning fan of 5 dc.
Round 25 (Transition Round): Ch 1, work sc in each dc and in each ch-1 sp of the previous round’s fans, and sc into each sc anchor. Each fan of 5 dc with 4 ch-1 sps = 9 positions. 8 fans x 9 = 72, plus 8 sc anchors = 80 sc, join. (80 sc)
Round 26 (revised): Ch 1, (sc in next 4 sts, 2 sc in next st) 16 times, join. (96 sc)
Round 27 (Fan Round 2): Ch 3 (counts as first dc of beg fan), 2 dc in same st, sk 2, sc in next st, sk 2, (fan in next st, sk 2, sc in next st, sk 2) 7 times, 2 dc in base of beg ch-3, join. (8 fans, 8 sc = 48 working sts)
Round 28 (Transition Round): Ch 1, sc in each dc and in each ch-1 sp and in each sc anchor around, join. (80 sc)
Round 29 (Increase Round): Ch 1, (sc in next 4 sts, 2 sc in next st) 16 times, join. (96 sc)
Round 30 (Fan Round 3): Ch 3, 2 dc in same st, sk 2, sc in next st, sk 2, (fan in next st, sk 2, sc in next st, sk 2) 7 times, 2 dc in base of beg ch-3, join. (8 fans, 8 sc = 48 working sts)
Round 31 (Transition Round): Ch 1, sc in each position as established, join. (80 sc)
Round 32 (Increase Round): Ch 1, (sc in next 4 sts, 2 sc in next st) 16 times, join. (96 sc)
Round 33 (Fan Round 4): Ch 3, 2 dc in same st, sk 2, sc in next st, sk 2, (fan in next st, sk 2, sc in next st, sk 2) 7 times, 2 dc in base of beg ch-3, join. (8 fans, 8 sc = 48 working sts)
Round 34 (Transition Round): Ch 1, sc in each position as established, join. (80 sc)
Round 35 (Increase Round): Ch 1, (sc in next 4 sts, 2 sc in next st) 16 times, join. (96 sc)
Round 36 (Fan Round 5, Final Fan Round): Ch 3, 2 dc in same st, sk 2, sc in next st, sk 2, (fan in next st, sk 2, sc in next st, sk 2) 7 times, 2 dc in base of beg ch-3, join. (8 fans, 8 sc = 48 working sts)
Checkpoint: After Round 36, the skirt should measure approximately 7 inches / 18 cm from the waist band. Total dress length from cast-on should be approximately 13.5 to 14 inches / 34 to 35.5 cm.
Section 7: Hem Scallop Edging
Work the hem edging using CC.
Join CC with sl st to the top of any dc in the final fan round.
Round 37 (Hem Edging): Ch 1, sc in each dc and each ch-1 sp and each sc anchor position around, join with sl st. (80 sc)
Round 38 (Scallop Round): Sl st into first sc, (ch 3, 4 dc in same sc, sk 2 sc, sl st in next sc) around, join. Work approximately 27 scallops by working sk 2 for most repeats and sk 1 between 2 repeats as needed to keep edging flat and even. Fasten off CC.
Section 8: Sleeve Edging
Return to the marked sleeve stitches. There are 18 held stitches plus 4 underarm chain stitches, totaling 22 stitches around each sleeve opening.
Join MC with sl st to first marked sleeve stitch.
Sleeve Edging Round 1: Ch 1, sc in each of the 18 sleeve sts, sc in each of the 4 underarm chs, join. (22 sc)
Join CC.
Sleeve Edging Round 2 (Scallop): (Ch 3, 4 dc in same st, sk 2, sl st in next st) around, adjusting end to meet evenly, join. Fasten off CC.
Repeat for second sleeve.
Section 9: Neckline Scallop Edging
Join CC at back of neckline with sl st.
Neckline Edging Round: (Ch 3, 4 dc in same st, sk 2 sts of the foundation neckline edge, sl st in next st) around, adjusting as needed for even scallops, join. Fasten off CC.
Work into the underside of the foundation chain or into Round 1 of sc, whichever provides the cleanest result. The neckline has 56 foundation stitches divided by 3 = approximately 18 scallops.
Section 10: Waist Ribbon and Flower
Thread the satin ribbon through the ch-1 eyelet spaces of Round 20, weaving in and out through all 24 ch-1 spaces around the waist. Center the ribbon so equal lengths hang at the front center. Tie in a bow or secure with a knot.
Attach the completed crocheted flower to the ribbon at the front center using the yarn tail threaded through a yarn needle. The flower sits centered on the ribbon.
Sew the pearl bead to the center of the flower using sewing thread and needle.
Finishing Your Baby Dress
Weave in all yarn ends securely using a yarn needle. Trim after weaving.
Wet block the dress by soaking in cool water for 10 minutes, gently pressing out excess water without wringing, laying flat on a blocking mat, and shaping to finished measurements. Use rust-proof pins to hold scallop edging points open and fan lace open on the skirt. Allow to dry completely flat, at least 24 hours.
Blocking is essential for the fan lace to open up fully and the scallop edging to lie flat. Trust me on this one.
Size Customization Tips
To size up to 6 to 12 months: Work 2 additional raglan increase rounds, increasing total yoke circumference to approximately 112 stitches. Divide sleeves leaving 22 stitches per sleeve and 34 stitches each front and back for a body of 68 stitches after separation. Increase at waist setup to 108 stitches (108 divided by 12 = 9 fan repeats) and add 1 additional fan round to the skirt. Total length will be approximately 16 to 17 inches / 40.5 to 43 cm.
To size up to 12 to 18 months: Add 3 additional raglan rounds for a total of 8 increase rounds. Work 9 fan repeats in the skirt and add 2 extra fan rounds.
To lengthen only: Work additional fan rounds before the hem edging. Each pair of fan and transition rounds adds approximately 1.5 inches / 3.8 cm in length.
To adjust width only: Change hook size by half a millimeter (larger for more width, smaller for less) and recheck gauge.
Care Instructions for Your Finished Dress
Machine wash on gentle cycle in cold water in a mesh laundry bag, or hand wash in cool water with mild soap. Lay flat to dry. Do not tumble dry, wring, or iron directly on textured areas.
If using cotton yarn, the dress will soften and the lace will relax beautifully after the first wash. Re-blocking after washing is recommended.
Remove ribbon before washing and rethread after drying to prevent dye transfer or shrinkage.
Thank you so much for choosing this lavender lace baby dress pattern. I truly hope you enjoy making it as much as I enjoyed designing it. There is something so satisfying about watching that fan lace skirt grow round by round.
If you make this dress, I would absolutely love to see it. Tag me on Instagram or share a photo in my Facebook group. Seeing your finished projects genuinely makes my day.
Go ahead and save this baby dress crochet pattern to your Pinterest boards so you can find it when you are ready to start. And please drop a comment below if you have any questions or just want to share your progress. I read every single one.
You Might Also Like
- Terracotta Rust Textured Clutch Bag Free Crochet Pattern
- Pastel Rainbow Granny Square Hoodie Free Crochet Pattern
- Ocean Blue Ombre Drawstring Bucket Bag Free Crochet Pattern
- Sage Green Minimalist Backpack Free Crochet Pattern