
Last summer, I found myself standing in front of my closet for the hundredth time, frustrated that nothing felt right for a beach vacation. Everything was either too casual or too fussy. I wanted something that looked effortlessly beautiful but could handle a seaside breeze and a long walk on the boardwalk. That’s when I decided to stop searching and start making.
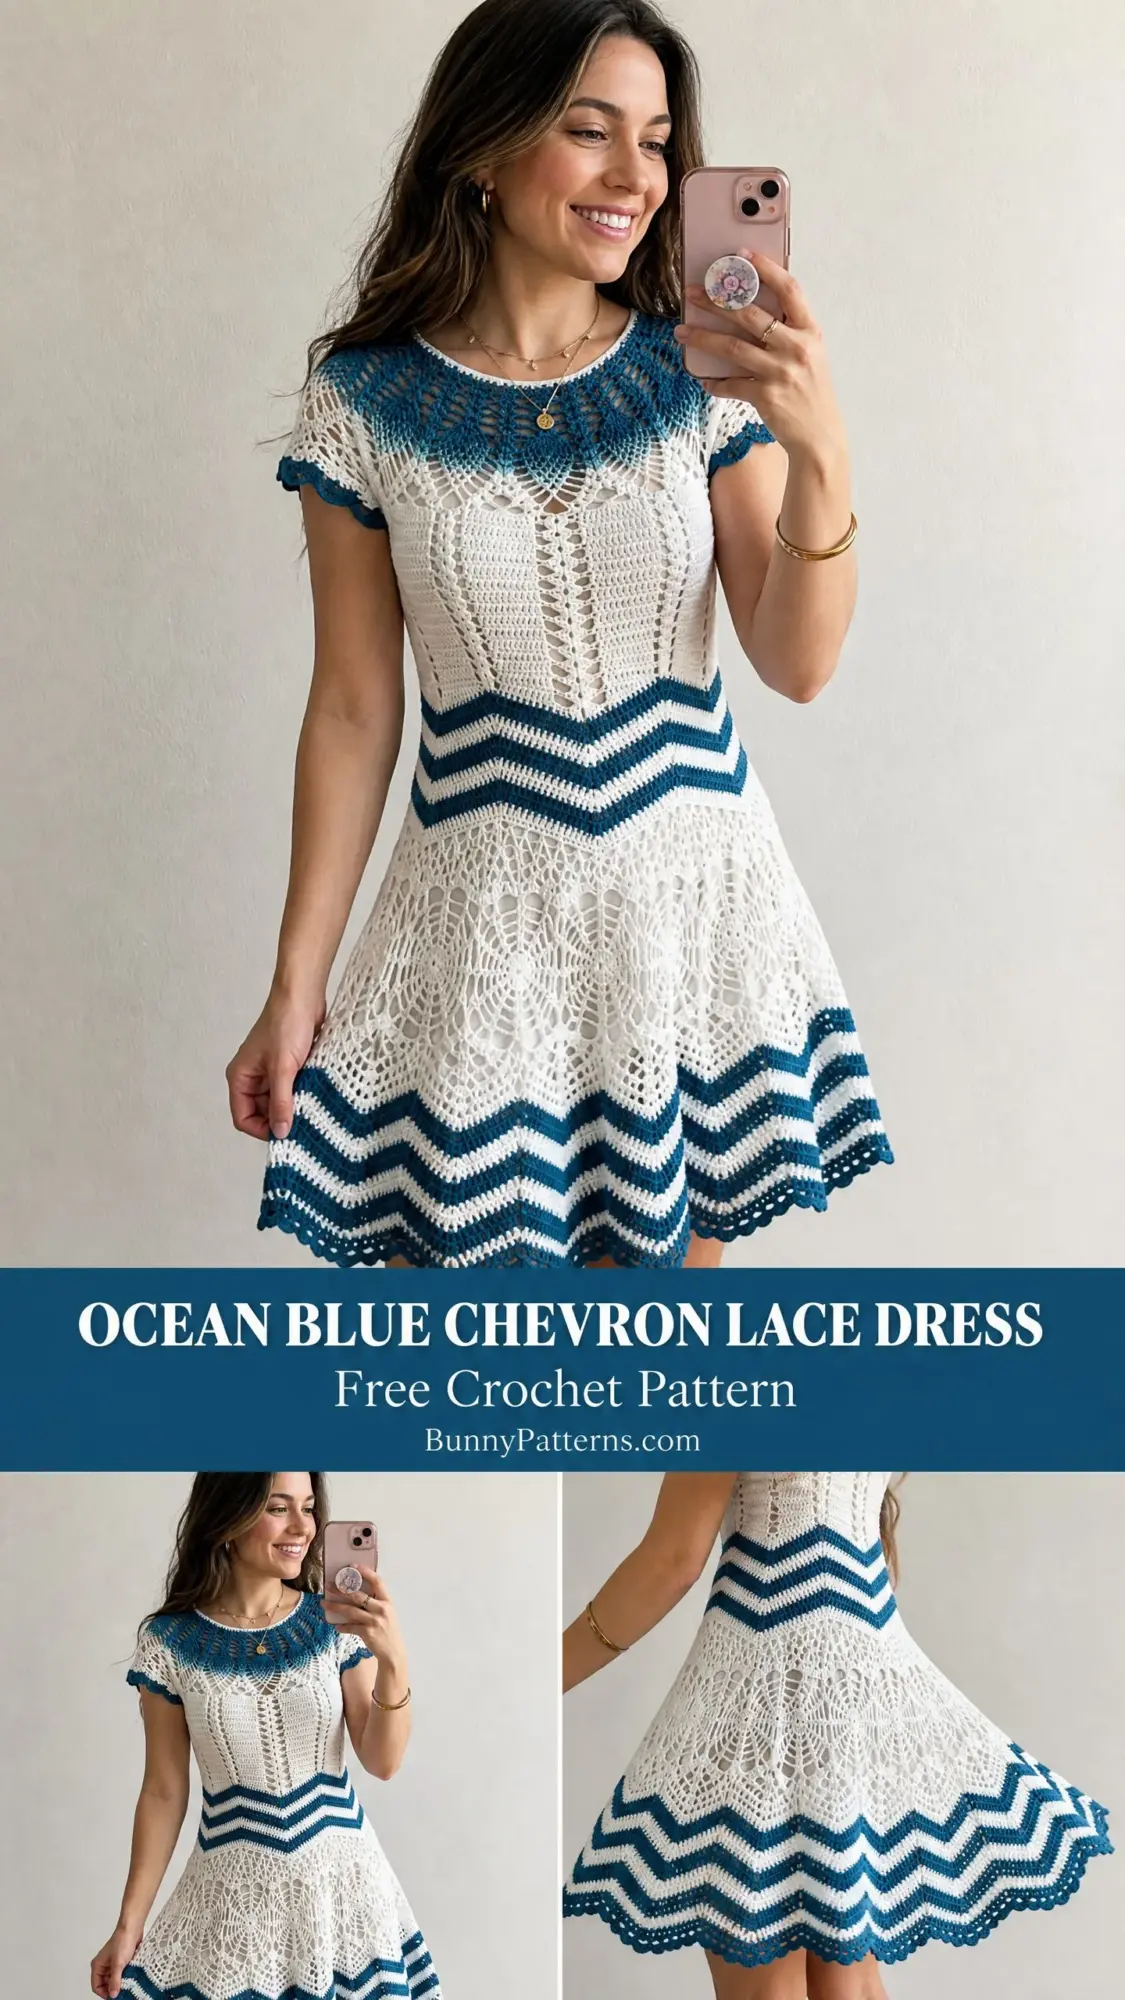
This dress became my obsession for about three months. I sketched it on napkins, ripped it out twice, and called my crochet-loving sister at midnight more than once to talk through the pineapple lace construction. But when I finally slipped it on and looked in the mirror, I actually teared up a little. It was exactly what I had pictured in my head.
If you’ve been dreaming of creating a show-stopping lace garment, this Ocean Blue Chevron Lace Dress crochet pattern is your chance. Yes, it’s an advanced project. Yes, it takes time. But I promise you, every single hour is worth it.
About This Dress Design
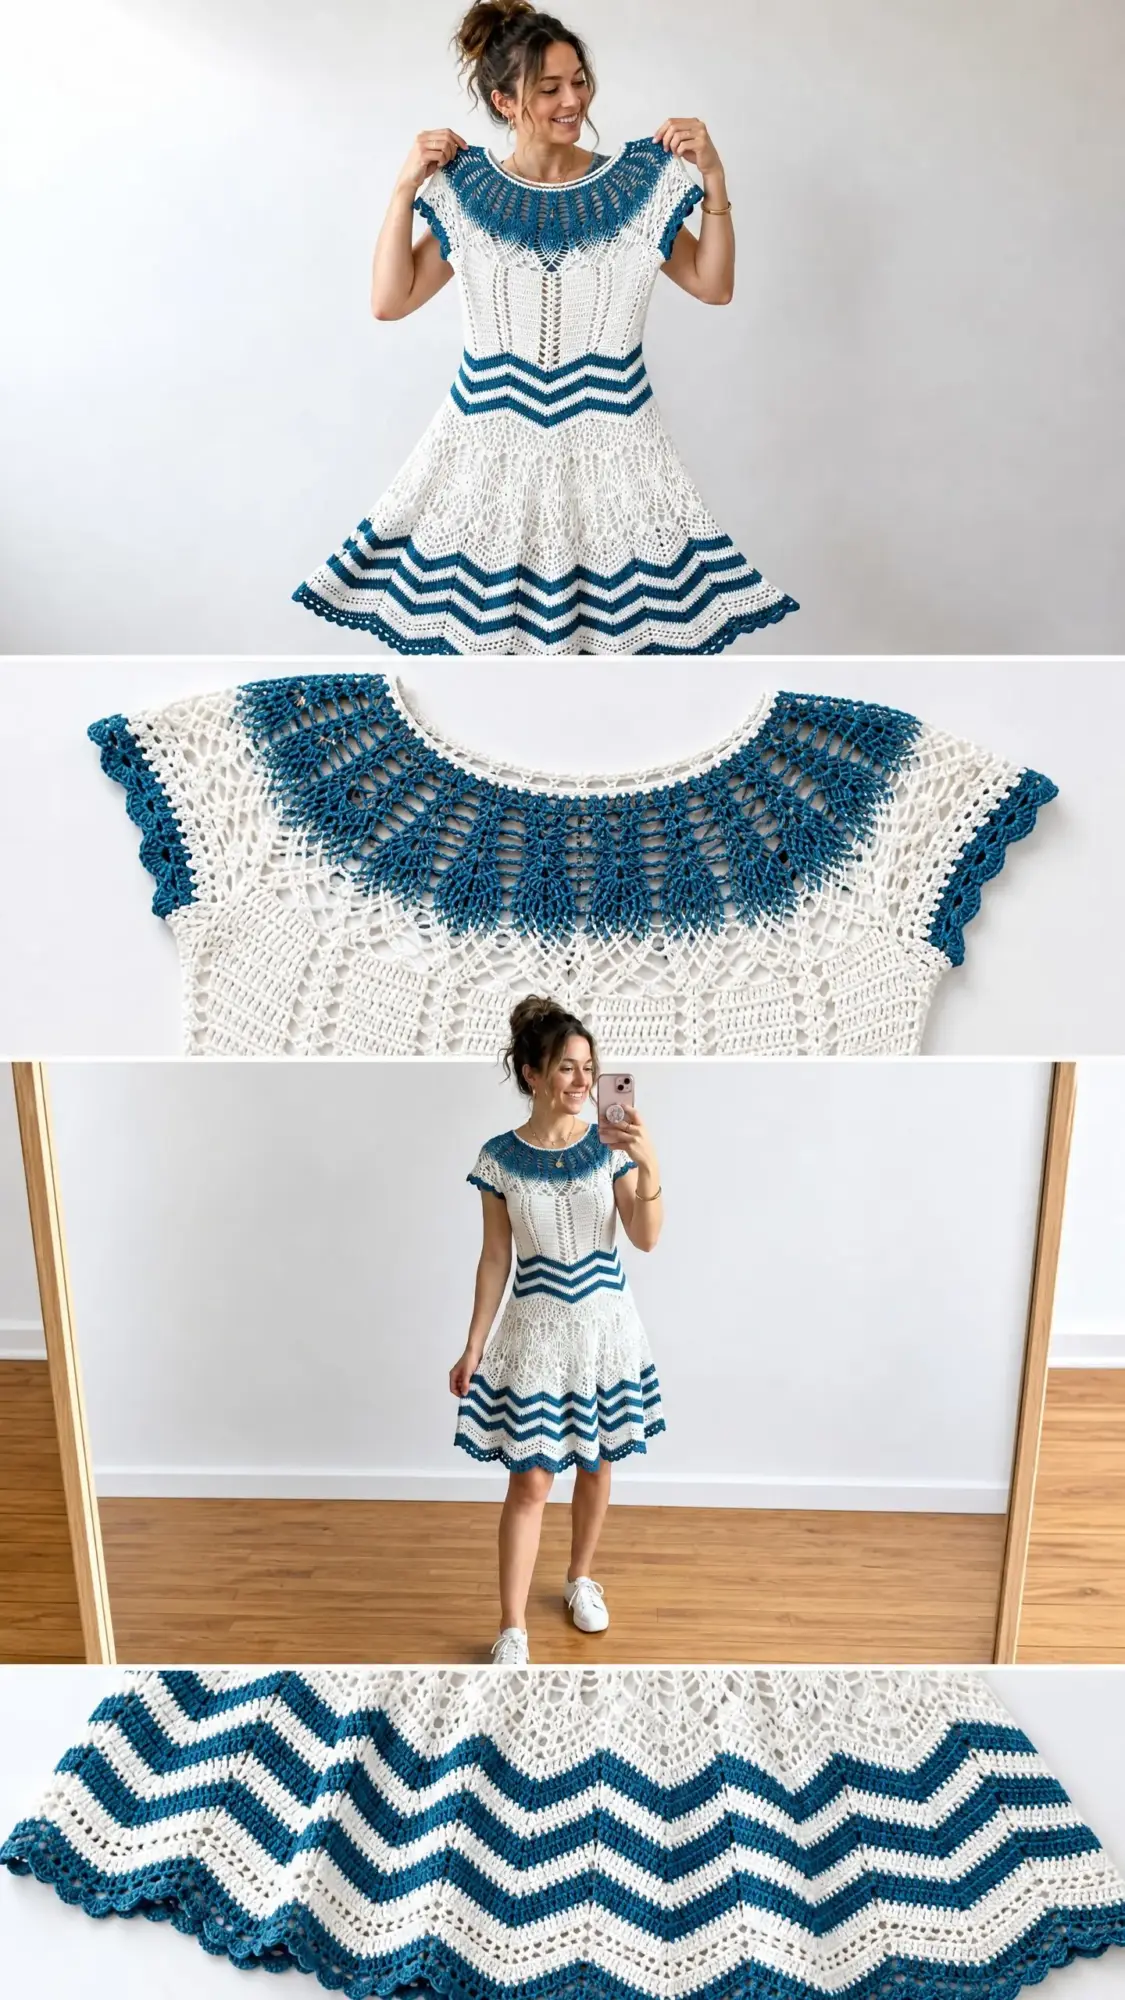
This stunning piece combines multiple classic crochet techniques into one cohesive, wearable garment. The construction is entirely top-down and worked in the round with no seams to sew at the end. You’ll start at the neckline with a gorgeous teal lace yoke featuring fan stitches and mesh patterning. The yoke flows naturally into cap sleeves that require no separate construction.
The fitted bodice showcases vertical pineapple lace columns in crisp white, creating those elegant elongated panels you see running down the front. A bold chevron band in alternating teal and white separates the bodice from the skirt, giving the dress its distinctive waistline definition.
The full skirt features an open pineapple lace pattern that creates beautiful drape and movement. Multiple teal chevron accent rows near the hem tie everything together, and a delicate scalloped edging finishes the piece beautifully. The dress hits at or just above the knee, making it perfect for summer events, beach weddings, or any occasion where you want to feel absolutely stunning.
A small heart-shaped keyhole at the center back neck adds a sweet detail. You can close it with a button or leave it open for a peek of skin.
Skill Level
I’ll be honest with you. This is an advanced crochet pattern. If you’re newer to crochet, I’d recommend bookmarking this one for later and working up to it with a few simpler lace projects first.
You should be comfortable with pineapple lace motifs, fan stitches, working in the round across large stitch counts, color changes, and top-down garment construction. If you’ve completed at least two lace garments before, you absolutely have the skills for this. It just requires patience and attention to detail.
Expect to spend approximately 60 to 90 hours on this project for a size Small or Medium, depending on how quickly you work. I know that sounds like a lot, but remember that you’re creating a custom-fitted, one-of-a-kind garment. The time investment is part of what makes the finished piece so special.
Finished Measurements
The pattern is written for size Small with notes for adjusting to Medium and Large.
Size Small:
Size Medium:
Size Large:
Additional measurements for all sizes:
Materials Needed
Yarn
Main Color (MC): White or off-white, approximately 1,200 yards (1,097 m) of DK weight 100% cotton or cotton-blend
Contrast Color (CC): Teal blue, approximately 500 yards (457 m) of the same DK weight yarn
Recommended Yarn Options
Option 1: Lion Brand 24/7 Cotton in Ecru (MC) and Teal (CC). This is 100% mercerized cotton with 186 yards per 3.5 oz skein. It offers excellent stitch definition for lace and is machine washable. Purchase 7 skeins MC and 3 skeins CC.
Option 2: Paintbox Yarns Simply DK in Paper White (MC) and Kingfisher Blue (CC). This 100% cotton yarn has 137 yards per 50 g skein with a crisp finish ideal for pineapple lace. Purchase 9 skeins MC and 4 skeins CC.
Option 3: WeCrochet Dishie in White (MC) and Marina (CC). This 100% cotton yarn has 190 yards per 100 g skein with a slightly softer drape. Purchase 7 skeins MC and 3 skeins CC.
Important Substitution Note: You can use any DK weight (CYCA 3) 100% cotton or high-cotton-content yarn. Avoid stretchy fibers like acrylic or bamboo blends for this dress. They will cause the lace to lose definition and the dress to grow significantly in length after blocking.
Hooks
Notions
Gauge
Using your US E-4 / 3.5 mm hook and MC in pineapple lace pattern after blocking:
Gauge is critical for a fitted garment. Please do not skip swatching. Block your swatch before measuring to get an accurate read.
Abbreviations
Let me walk you through every abbreviation you’ll encounter in this pattern:
Special Stitches and Techniques
Fan Stitch
Work 7 double crochet stitches all into the same stitch or chain space. This creates a shell or fan shape. The fan counts as 7 stitches across the top when you work into each dc individually on subsequent rows.
Pineapple Cluster
For the pineapple tip: Work (yarn over, insert hook into stitch, yarn over, pull up a loop, yarn over, pull through 2 loops) 5 times into the same stitch or space. You now have 6 loops on your hook. Yarn over and pull through all 6 loops. Chain 1 to close.
The pineapple body below the tip is a series of double crochet rows worked into chain spaces, decreasing in width each row to form the characteristic tapered pineapple shape.
Picot
Chain 3, then slip stitch into the first chain you made. This creates a small decorative loop used in the sleeve edging and hem.
Chevron Pattern
This classic ripple pattern uses increases and decreases to create peaks and valleys:
The full chevron repeat is 18 stitches, and your stitch count remains constant from row to row because each decrease is offset by an equal increase.
Scallop Edging
Slip stitch into the next stitch, chain 3, work 4 dc into the same stitch, skip 2 stitches, slip stitch into the next stitch. Repeat across. Each scallop uses 3 stitches plus the anchor slip stitch.
Heart Keyhole
When the yoke reaches the designated keyhole row, work to the center back 4 stitches. Chain 8, skip those 4 stitches, and continue across the round. On the next round, work 8 sc into the chain-8 arch. On the following round, shape the bottom of the heart by working (sc, hdc, dc, ch1, dc, hdc, sc) across the 8 sc arch, then slip stitch to close. A small button loop is worked on the right side of the keyhole opening during final finishing.
Pattern Notes Before You Begin
Read through these notes carefully. They’ll save you confusion later.
The dress is worked entirely top-down in joined rounds except for the chevron sections, which are worked back and forth in rows to allow easier color changes and turning, then joined.
The yoke is worked in CC (teal) for the fan and mesh collar section, then transitions to MC (white) for the bodice.
Color change tip: When changing colors for chevron stripes, change color in the last pull-through of the final stitch of the previous row. This way the new color appears cleanly at the start of the next row.
The skirt pineapple motifs are larger than the bodice columns. Each pineapple base is anchored in a chain-2 space from the valley and fans out to an 11 dc base in the first motif round.
The back keyhole is small and sits at the center back neck. It’s entirely optional. If you prefer a closed back, simply work continuously across the back without the chain-8 gap.
All rounds are joined with a slip stitch to the top of the beginning chain-3 (which counts as the first dc) unless otherwise noted.
Place stitch markers at the beginning of each round, at center front, center back, and at both underarm points throughout the yoke construction.
Chain 3 at the beginning of dc rounds counts as one dc throughout this pattern unless stated otherwise.
Step-by-Step Instructions
Yoke Section
The yoke is worked top-down in the round using CC (teal).
Foundation: Using CC and your E-4 hook, chain 120. Without twisting the chain, slip stitch into the first chain to form a ring. Place a marker at chain 60 to mark center back if desired.
Rnd 1: Ch 3 (counts as dc), dc in each ch around. Join with sl st to top of beg ch-3. (120 dc)
Rnd 2: Ch 5 (counts as dc plus ch 2), sk 2 dc, dc in next dc, (ch 2, sk 2 dc, dc in next dc) across to last 2 sts, ch 2, sk 2, join with sl st to 3rd ch of beg ch-5. (40 dc, 40 ch-2 sps)
Rnd 3: Ch 1, sc in same st, 2 sc in each ch-2 sp, sc in each dc around. Join with sl st to first sc. (120 sc)
Rnd 4: Ch 3 (counts as dc), dc in next 2 sc, (ch 2, sk 2, dc in next 3 sc) rep around, end ch 2, sk 2, join. (72 dc, 24 ch-2 sps)
Rnd 5 (increase round): Ch 3, dc in each dc and 3 dc in each ch-2 sp around. Join. Stitch count check: 72 dc plus (24 ch-sps times 3 dc) equals 72 plus 72 equals 144 dc. (144 dc)
Rnd 6: Ch 3, dc in next 3 dc, (ch 2, sk 2, dc in next 4 dc) rep around. Join. (24 ch-2 sps, 96 dc)
Rnd 7: Ch 1, sc in each dc, 2 sc in each ch-2 sp. Join. Count: 96 sc plus 48 sc equals 144 sc. (144 sc)
Rnd 8 (fan round): Ch 3, sk 3 sc, 7 dc in next sc (fan made), sk 3 sc, sc in next sc. Repeat (sk 3, fan of 7 dc in next sc, sk 3, sc in next sc) around. Each repeat equals 9 stitches. 144 divided by 9 equals 16 repeats. Join. (16 fans, 16 sc)
Rnd 9: Ch 3, dc in each of 7 dc of first fan, ch 1, (dc in each of 7 dc of next fan, ch 1) around. Join to top of beg ch-3. (128 dc, 16 ch-1 sps)
Rnd 10 (increase round): Ch 3, 2 dc in first dc, dc in next 5 dc, 2 dc in last dc of fan, ch 2, sk ch-1 sp. Repeat around. (144 dc, 16 ch-2 sps)
Rnd 11: Ch 1, sc in each dc, 3 sc in each ch-2 sp. Join. Count: 144 sc plus 48 sc equals 192 sc. (192 sc)
Rnd 12: Ch 3, dc in next 5 sc, ch 2, sk 2, (dc in next 6 sc, ch 2, sk 2) around. Join. (144 dc, 24 ch-2 sps)
Rnd 13: Ch 1, sc in each dc, 2 sc in each ch-2 sp. Join. (192 sc)
Rnd 14 (second fan increase round): Ch 3, sk 2 sc, fan of 9 dc in next sc, sk 2 sc, sc in next sc, sk 2 sc. Repeat around. (32 fans of 9 dc, 32 sc)
Rnd 15: Ch 4 (counts as dc plus ch 1), sk first dc of fan, dc in next dc, (ch 1, dc in next dc) across fan, ch 1, sc into sc between fans, ch 1. Repeat around. (320 sts)
Yoke Division Into Front, Back, and Sleeves
After Rnd 15, place markers to divide the yoke.
Check: 100 plus 100 plus 60 plus 60 equals 320. Correct.
Sleeve Cap Finishing
Work each sleeve cap flat, not in the round.
Right Sleeve Cap:
With RS facing, join CC at first sleeve cap st.
Row 1: Ch 3, dc across 60 sts. Turn. (60 dc)
Row 2: Ch 1, sc across. Turn. (60 sc)
Row 3 (edging): Ch 1, sc in first sc, picot (ch 3, sl st in first ch), sc in next sc, picot across. Fasten off.
Repeat for left sleeve cap.
Checkpoint: After completing the yoke and sleeve caps, the yoke should measure approximately 7 inches (18 cm) from the foundation chain to the bottom of the last yoke round at center front. The width across the chest at the underarm division should measure approximately 17 inches (43 cm).
Bodice Section
Switch to MC (white). Work in the round joining front and back sections only, leaving sleeve cap openings.
The bodice works the 100 front stitches and 100 back stitches together in joined rounds. Chain 4 under each arm to bridge the gap.
Join MC at right underarm.
Setup Rnd: Ch 1, sc across 100 front sts, ch 4, sc across 100 back sts, ch 4. Join with sl st to first sc. (200 sc plus 2 ch-4 bridges)
Rnd 1: Ch 3, dc2tog over first 2 sc, dc in next 96 sc, dc2tog over next 2 sc (first underarm), dc2tog over next 2 sc, dc in next 96 sc, dc2tog over next 2 sc (second underarm), 4 dc across each ch-4 bridge (total 8 dc). Join. (204 dc)
Rnd 2: Ch 3, dc in next 3 dc, ch 2, sk 2, (dc in next 4 dc, ch 2, sk 2) 33 times. Join. (136 dc, 34 ch-2 sps)
Rnd 3: Ch 1, sc in each dc, work 2 sc into 28 of the ch-2 sps and 3 sc into 6 of the ch-2 sps distributed at the side shaping points. (210 sc)
Rnd 4: Ch 4 (dc plus ch 1), sk 1 sc, dc in next sc, ch 1, sk 1, (dc, ch 1, sk 1) around. Join to 3rd ch of beg ch-4. (70 dc, 70 ch-1 sps)
Rnd 5: Ch 3, dc in first ch-sp, (dc in dc, dc in ch-sp) around. Join. (140 dc)
Rnd 6: Ch 4, sk 1, dc in next, ch 1, sk 1, (dc in next dc, ch 1, sk 1) around. Join. (70 dc, 70 ch-1 sps)
Pineapple Column Establishment (Rnds 7 through 20)
The bodice features 14 vertical pineapple columns around the circumference, each separated by mesh chains.
Rnd 7: Ch 3, (7 dc in next ch-sp equals fan base of pineapple column, ch 1, sk 1 dc, sc in next ch-sp, ch 1, sk 1 dc) around. (98 dc in fans, 28 ch-1 sps, 14 sc)
Rnd 8: Ch 5 (dc plus ch 2), (dc in first dc of fan, ch 1, dc in next dc, ch 1, dc in next dc, ch 1, dc in next dc, ch 1, dc in next dc, ch 1, dc in next dc, ch 1, dc in last dc of fan, ch 2, sk sc, dc in next dc) around. Join.
Rnd 9: Sc in first ch-2 sp, (ch 3, sk dc, sc in ch-1 sp, ch 3, sk dc, sc in ch-1 sp) across 6 ch-1 sps of fan, sc in ch-2 sp. Rep for each column.
Rnds 10 through 18: Continue working the pineapple columns. Each round works one fewer sc into the pineapple body, losing one ch-3/sc pair per 2 rounds as the pineapple tapers:
Rnd 19: 1 sc at tip of pineapple, ch 3, sk, sc in mesh sp. (14 sc tips plus 28 sts)
Rnd 20: Dc in each st and ch-sp around, working 2 dc into every 17th dc 12 times to increase stitch count. (216 dc)
Checkpoint: After completing the bodice, your piece should measure approximately 10 inches (25 cm) tall at the bodice section. The waist circumference should be approximately 28 to 30 inches (71 to 76 cm) after light blocking.
Chevron Waist Band
Switch to your F-5 / 3.75 mm hook for this section. The larger hook prevents puckering in the chevron pattern.
The chevron repeat is 18 stitches. With 216 stitches, you’ll have 12 complete chevron repeats.
Chevron Rnd 1: Join CC. Ch 3, work first chevron repeat: dc in next 5 dc, 3 dc in next dc (peak), dc in next 5 dc, dc2tog, dc2tog (valley). Repeat 11 more times. Join. (216 sts)
Chevron Rnd 2: CC. Ch 3, chevron repeat around. Join. (216 sts)
Chevron Rnd 3: Join MC. Ch 3, chevron repeat around. Join. (216 sts)
Chevron Rnd 4: MC. Ch 3, chevron repeat around. Join. (216 sts)
Chevron Rnd 5: CC. Ch 3, chevron repeat around. Join. (216 sts)
Chevron Rnd 6: CC. Ch 3, chevron repeat around. Join. (216 sts)
Chevron Rnd 7: MC. Ch 3, chevron repeat around. Join. (216 sts)
Chevron Rnd 8: MC. Ch 3, chevron repeat around. Join. (216 sts)
Checkpoint: After the chevron waist band, the band should measure approximately 2.5 inches (6 cm) tall. The zigzag pattern should be crisp and even.
Skirt Section
Switch back to your E-4 hook.
Skirt Rnd 1 (increase and base setup): Ch 3. Across each of the 12 chevron repeats: dc in 5 dc, (dc, ch 1, dc, ch 1, dc) in peak st, dc in 5 dc, (dc, ch 2, dc) in valley. Join. (180 dc, 36 ch-sps)
Skirt Rnd 2: Ch 3, dc in next 6 dc, 11 dc in ch-2 valley sp (large pineapple base fan), dc in next 6 dc, 5 dc in ch-1 peak area sp (small pineapple base fan), dc in next dc. Repeat 11 more times. (216 dc total)
Skirt Rnds 3 through 8: Work the large pineapple body, building out from the 11 dc fan bases established in Rnd 2. Follow the same pineapple construction technique used in the bodice, working chain-3 loops and single crochets that decrease each round to form the tapered pineapple shape.
Continue working the skirt pineapple motifs and mesh sections according to the established pattern until the skirt measures 18 inches (46 cm) from the waist chevron band.
Skirt Chevron Accent Rows
Near the hem, work additional chevron accent rows in CC (teal) following the same chevron pattern established at the waist. The hem features multiple teal chevron rows visible in the finished design.
Scallop Edging
Finish the hem with the scallop edging: Sl st into next st, ch 3, work 4 dc into same st, sk 2 sts, sl st into next st. Repeat across the entire hem. Fasten off and weave in all ends.
Blocking Your Finished Dress
Blocking is essential for this garment. The lace patterns will not show their true beauty until the piece is properly blocked.
Soak your finished dress in cool water with a small amount of wool wash or gentle detergent for about 20 minutes. Gently squeeze out excess water without wringing. Roll in a clean towel to remove more moisture.
Lay the dress flat on blocking mats. Pin out each pineapple motif, each scallop along the hem, and the chevron points. Use rust-proof pins and take your time. The dress should dry completely before unpinning, which may take 24 to 48 hours depending on humidity.
Care Instructions
Hand wash in cool water with gentle detergent. Lay flat to dry and reshape while damp. Cotton lace garments may need re-blocking after washing to maintain their shape. Store folded rather than hanging to prevent stretching.
Final Thoughts on This Crochet Tutorial
This Ocean Blue Chevron Lace Dress pattern is genuinely one of the most rewarding projects I’ve ever completed. The combination of pineapple lace, chevron stripes, and careful construction creates a garment that looks like it belongs in a boutique window.
Take your time with this one. Work through each section carefully, check your stitch counts, and don’t be afraid to put it down for a day or two when you need a break. The hours you invest will result in something truly spectacular.
Thank you so much for choosing this pattern. I really hope you love making this dress as much as I loved designing it. When you finish yours, I would absolutely love to see it! Tag me on Instagram or share a photo in my Facebook group. Seeing your beautiful creations genuinely makes my day.
If this pattern caught your eye, go ahead and save it to your Pinterest boards so you can find it when you’re ready to start. And please drop a comment below if you make this dress. I’d love to hear how it turns out for you!
You Might Also Like
- Lavender Peony Bloom Crochet Dress Free Crochet Pattern
- Midnight Blue Floral Bell Sleeve Top Free Crochet Pattern
- Dusty Rose Backpack Free Crochet Pattern
- Rainbow Pastel Granny Square Poncho Free Crochet Pattern