
Pull out that gorgeous ivory crochet thread you have been saving for something truly special. This is the project it has been waiting for.
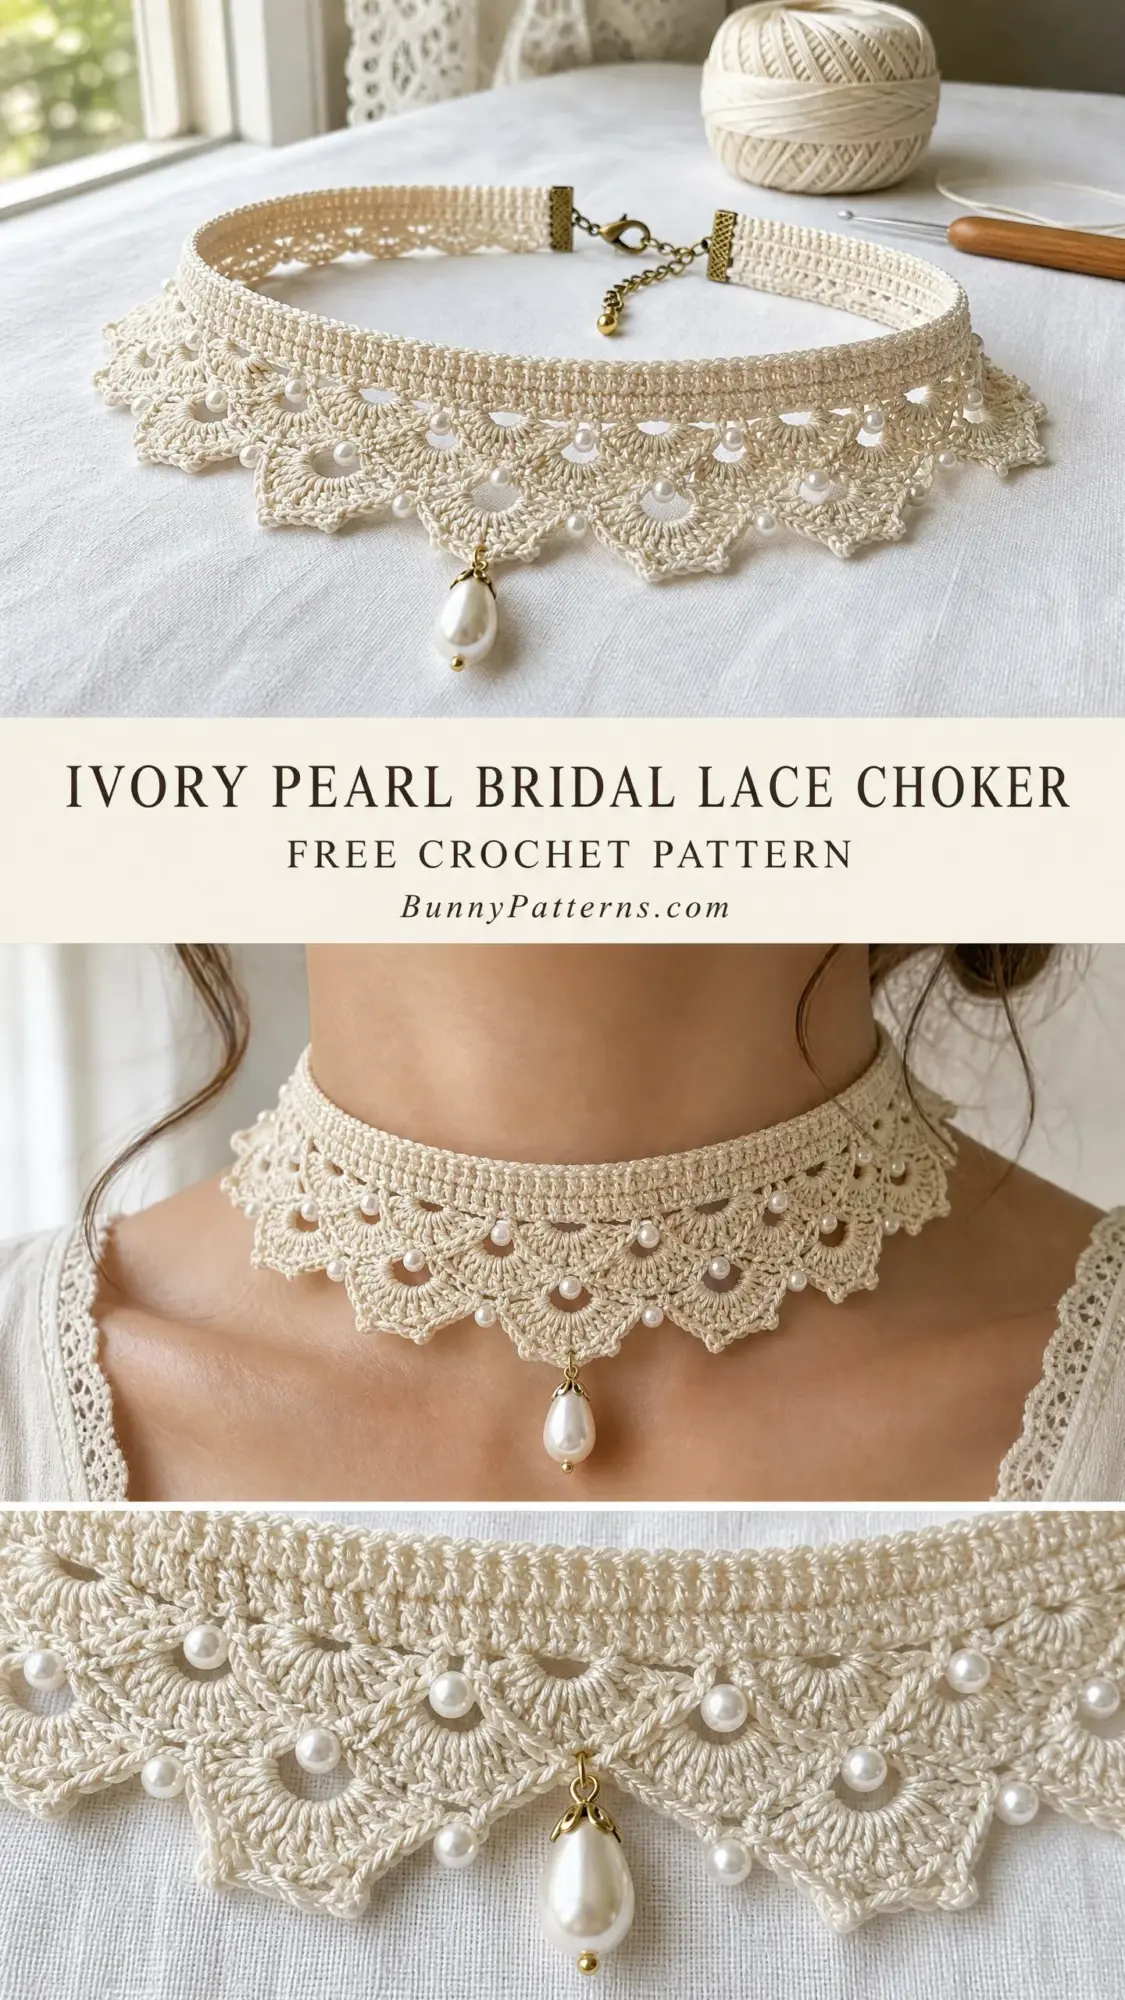
The Ivory Pearl Bridal Lace Choker combines a structured single crochet band with delicate fan shell lace edging, scattered seed pearls, and a teardrop pearl pendant at the center front. The construction is clever but not complicated. You will work the band first, then add the lace edging directly into the lower edge, then finish with bead placement and hardware attachment.
I will be honest with you. This is an intermediate level project. The band itself uses basic stitches that any confident beginner can handle, but the fan and picot lace edging requires comfort with shell stitches, chain spaces, and working beads into your stitches as you go. If you have never pre-strung beads onto thread before, this pattern will teach you. Take your time and you will create something absolutely stunning.
Why This Bridal Choker Pattern Works So Well
This crochet choker sits beautifully at the neckline because of its thoughtful construction. The band portion is approximately 1.25 inches wide and provides structure, while the scalloped lace edging extends an additional 1.5 inches below, creating a total finished depth of roughly 2.75 inches. The result is a piece that looks intricate and heirloom quality but builds logically from start to finish.
The antique brass lobster clasp with a short extender chain allows the choker to fit a range of neck sizes from 13 to 14.5 inches. The adjustability means you can gift this confidently or wear it yourself without stress about precise measurements.
Materials You Will Need
Gather these supplies before you begin. Having everything ready makes the process so much smoother.
Thread: Size 10 crochet cotton thread, approximately 120 yards in ivory or natural ecru
Hook: Steel crochet hook size 7 (1.65 mm) or size needed to obtain gauge
Beads: Approximately 36 white or ivory seed pearl beads, size 6/0 (approximately 4 mm hole diameter must accommodate thread)
Pendant: 1 large white teardrop faux pearl bead, approximately 18 mm x 12 mm, with a gold or brass bail already attached
Notions:
Recommended Yarn Choices
Aunt Lydia’s Classic Crochet Thread Size 10 in Ecru is the primary recommendation. It is widely available with very consistent twist and gives excellent stitch definition in lace work.
DMC Traditions Crochet Thread Size 10 in Ecru or Ivory offers a slightly softer hand with good sheen, which enhances the bridal look of the finished piece.
Lizbeth Crochet Thread Size 10 in Antique White or Ivory is a premium mercerized cotton with beautiful luster and consistent ply, ideal for heirloom or bridal projects.
Use any size 10 mercerized cotton crochet thread in ivory, ecru, or natural. Do not substitute with size 3 or size 20 thread, as the gauge and drape will be significantly altered. Avoid matte or non-mercerized threads, which will not give the slight sheen visible in the finished piece.
Gauge Information
16 single crochet stitches x 18 rows = 2 inches x 2 inches worked in single crochet with size 7 steel hook and size 10 crochet cotton thread.
Gauge is critical for this project. A choker that is even slightly too long will not sit properly at the neckline. Please check gauge before beginning and adjust hook size as needed.
Finished Measurements
Abbreviations Used in This Crochet Pattern
Let me walk you through each abbreviation before we start. Understanding these terms will make the pattern instructions much easier to follow.
Special Stitches Explained
These special stitches create the beautiful lace effect. Read through them before starting so you feel confident.
Fan Shell
In the designated stitch or space, work (3 dc, ch 1, pb, ch 1, 3 dc). This forms one complete fan shell unit with a beaded center. The bead sits at the top arch of the fan.
Step by step:
1. Insert hook into designated stitch or space.
2. Yarn over, pull up a loop.
3. Work 3 dc in that same stitch or space.
4. Chain 1.
5. Slide one pre-strung seed bead snugly up to the hook.
6. Yarn over and pull through 2 loops (this locks the bead in place).
7. Chain 1.
8. Work 3 more dc in the same stitch or space.
The completed fan shell contains 6 dc and 1 bead locked between 2 chain stitches at its center.
Picot
Chain 3, slip stitch into the first chain of the chain 3 just made. This forms a small decorative knot at the point of each scallop.
Step by step:
1. Chain 3.
2. Insert hook into the very first chain of those 3 chains just worked.
3. Yarn over, pull through both loops on hook.
One picot knot complete.
V-Stitch
(Dc, ch 2, dc) all worked into the same stitch or space.
Step by step:
1. Work 1 dc in designated stitch or space.
2. Chain 2.
3. Work 1 dc in the same stitch or space.
Important Pattern Notes Before Starting
Bead stringing: Before beginning, thread all seed pearl beads onto the working ball of thread using a beading needle or a loop of fine wire as a needle. Thread approximately 40 beads to have extras available. Beads are pushed down the thread and out of the way until needed, then slid up one at a time at the designated points.
Turning chain: The band is worked in rows with a turning chain of 1 at the start of each sc row. The turning chain does not count as a stitch throughout.
Right side marking: The band has a right side and a wrong side. Mark the right side with a locking stitch marker at the beginning of Row 1 so you can keep track of orientation.
Crochet Pattern Instructions
Section 1: The Band
The band is worked as a straight rectangle of single crochet. It forms the structural foundation of the choker and the upper portion visible above the lace edging.
Foundation chain: Ch 101.
Row 1 (RS): Sc in 2nd ch from hook, sc in each ch across. Turn. (100 sc)
Row 2 (WS): Ch 1, sc in each st across. Turn. (100 sc)
Row 3 (RS): Ch 1, sc in each st across. Turn. (100 sc)
Row 4 (WS): Ch 1, sc in each st across. Turn. (100 sc)
Row 5 (RS): Ch 1, sc in each st across. Turn. (100 sc)
Row 6 (WS): Ch 1, sc in each st across. Turn. (100 sc)
Row 7 (RS): Ch 1, sc in each st across. Turn. (100 sc)
Row 8 (WS): Ch 1, sc in each st across. Turn. (100 sc)
Row 9 (RS): Ch 1, sc in each st across. Do not turn. (100 sc)
Checkpoint: The band should measure approximately 12.5 inches in length and 1 inch in height. The edges should be straight and even with no curling. If the band curls significantly, blocking with light misting before continuing will help it lie flat for the edging rows.
Section 2: Upper Border
The upper border gives a neat, finished upper rim. Rotate the piece so the foundation chain edge is facing you.
Upper Border Row 1 (RS): With RS facing, join thread in the first st of the foundation chain edge. Ch 1, sc evenly across the entire top edge. Turn. (100 sc)
Upper Border Row 2 (WS): Ch 1, sc in each st across. Fasten off and weave in end. (100 sc)
Section 3: Lace Edging
The lace edging creates the scalloped fan shell border. This is where the magic happens!
Edging setup: With RS facing, join thread in the first st of Row 9 at the right-hand end.
Edging Row 1 (RS, base row): Ch 3 (counts as 1 dc), sk 2 sts, dc in next st, ch 2, dc in same st as last dc (first V-st complete), [sk 4 sts, V-st in next st] 9 times, sk 2 sts, dc in last st. Turn.
Edging Row 2 (RS, fan row): Do not turn. Working with RS facing in the same direction, sl st back into the ch-2 sp of the first V-st at the right edge.
In the first ch-2 sp: work (sc, ch 3, Fan Shell, ch 3, sc). This forms the first scallop.
[In the next ch-2 sp: work (sc, ch 3, Fan Shell, ch 3, sc)] 8 times. This forms scallops 2 through 9.
Fasten off.
Total scallops: 9
Total beads placed in Edging Row 2: 9 (one per Fan Shell center)
Edging Row 3 (RS, picot tip row): With RS facing, join thread in the ch-3 arch before the first Fan Shell.
For each scallop:
1. Sl st to the center ch-1 pb sp of the fan.
2. Ch 2, pb (place one seed bead), ch 2.
3. Sl st to the bottom center tip point between the two dc groups of the fan.
4. Work Picot (ch 3, sl st in first ch of ch-3).
5. Sl st to the ch-3 arch on the right side of the fan.
6. Sl st to the ch-3 arch before the next fan.
Repeat across all 9 fans.
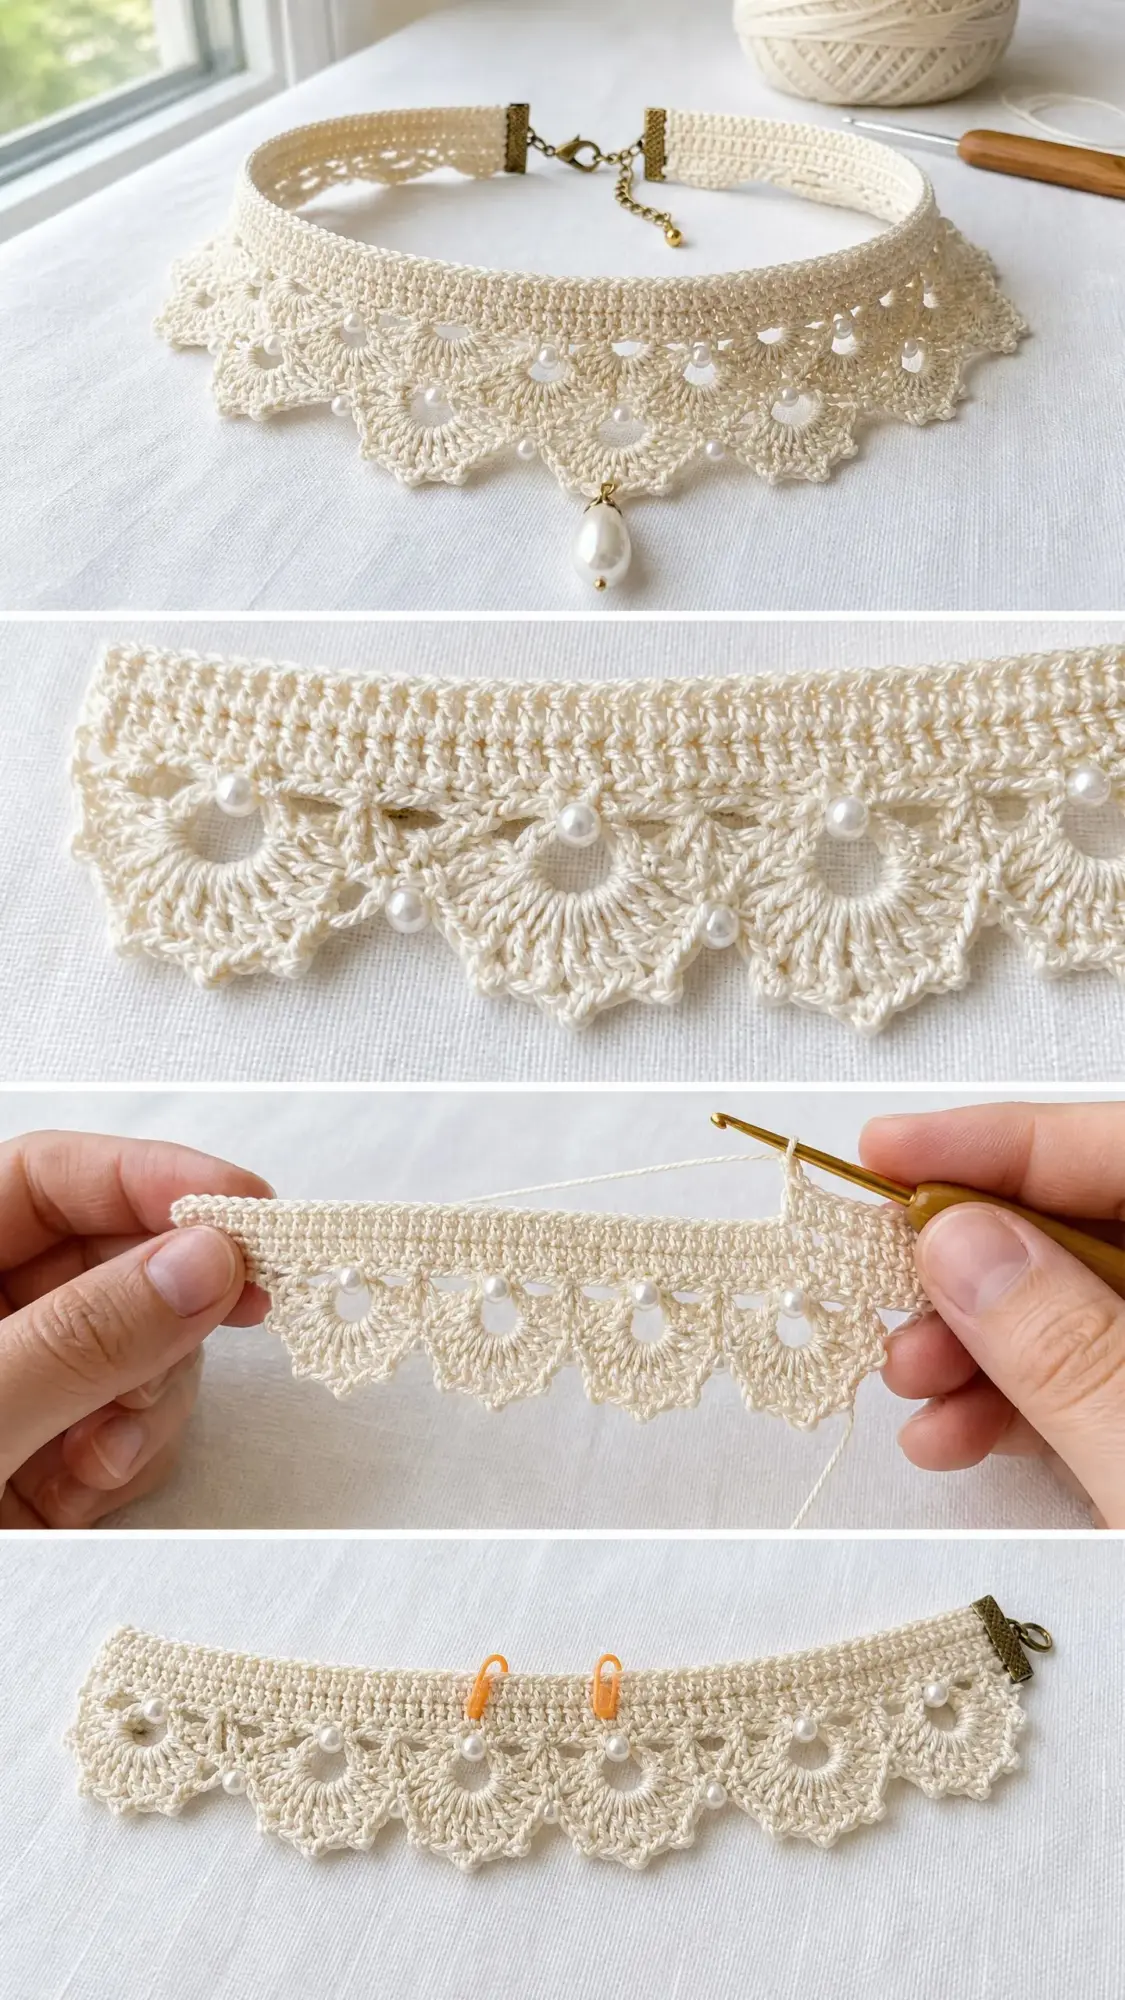
Checkpoint: The scalloped lace border should extend approximately 1.5 inches below the lower edge of the band. There should be 9 evenly spaced fan shell scallops across the full width.
Finishing and Hardware Attachment
Step 1: Thread yarn needle and weave in all loose ends securely on the wrong side.
Step 2: Block the piece by misting lightly with water and pinning to a foam mat or blocking board. Pin the band straight and pin each scallop point downward to shape the fans evenly. Allow to dry completely, at least 4 hours or overnight.
Step 3: Apply bar end findings to each raw short end of the band. Trim thread tail ends flush with the edge. Apply a tiny amount of jewelry adhesive inside the channel of each bar end finding. Insert one raw end of the band into each finding and allow to cure.
Step 4: Use a jump ring to attach the lobster claw clasp to one bar end finding. Use another jump ring to attach the extender chain to the opposite bar end finding.
Step 5: Using a beading needle and an 18-inch length of size 10 thread, hand-sew approximately 2 to 3 seed pearl beads along the upper arch edge of each fan where the fan meets the band edge, and 1 additional bead at each junction point between two adjacent scallops.
Step 6: Identify the center scallop (scallop number 5). Using jeweler’s pliers, open a small jump ring, pass it through the picot tip at the lowest point of scallop 5, then through the bail of the teardrop pearl pendant, and close the jump ring securely.
Size Customization Tips
To lengthen the band: Add 10 stitches to the foundation chain for each additional 1.25 inches needed. This adds one full fan shell repeat to the edging.
To shorten the band: Reduce the foundation chain by 10 stitches per 1.25 inches reduction. The minimum to maintain full fan repeats is Ch 81 (7 fan repeats).
To widen the band: Add 4 to 6 additional plain sc rows to the band before working the upper border and edging.
Care Instructions for Your Finished Choker
Hand wash only in cool water with a small amount of mild soap. Do not machine wash or machine dry. Rinse thoroughly and do not wring. Roll in a towel to remove excess water. Re-pin and allow to air dry flat. Store flat or loosely coiled in a jewelry pouch away from direct sunlight to prevent yellowing.
A Final Word on This Bridal Lace Choker Crochet Pattern
This project combines traditional lace crochet techniques with modern jewelry finishing for a piece that looks like it belongs in a bridal boutique. The construction is straightforward once you understand the sequence: band first, lace edging second, beads and hardware last. Take your time with the fan shells and trust the process.
Thank you so much for choosing this pattern! I would absolutely love to see your finished choker. Tag me on Instagram or share a photo in my Facebook group. Nothing makes my day quite like seeing your beautiful work.
If you loved making this bridal choker, save this pattern to your Pinterest boards so you can find it again later or share it with a friend who has a wedding to attend. And please drop a comment below if you make one. I would love to hear how it turned out for you!
You Might Also Like
- Stormy Gray Neutral Granny Square Blanket Free Crochet Pattern
- Dusty Rose Peplum Baby Outfit Free Crochet Pattern
- Dusty Rose Lace Panel Crochet Sweater Free Pattern
- Teal Ocean Wave Crochet Robe Free Pattern