
I don’t know about you, but I have always been drawn to crochet pieces that feel like wearable art. The kind of project that makes people stop and ask, "Wait, you made that?"
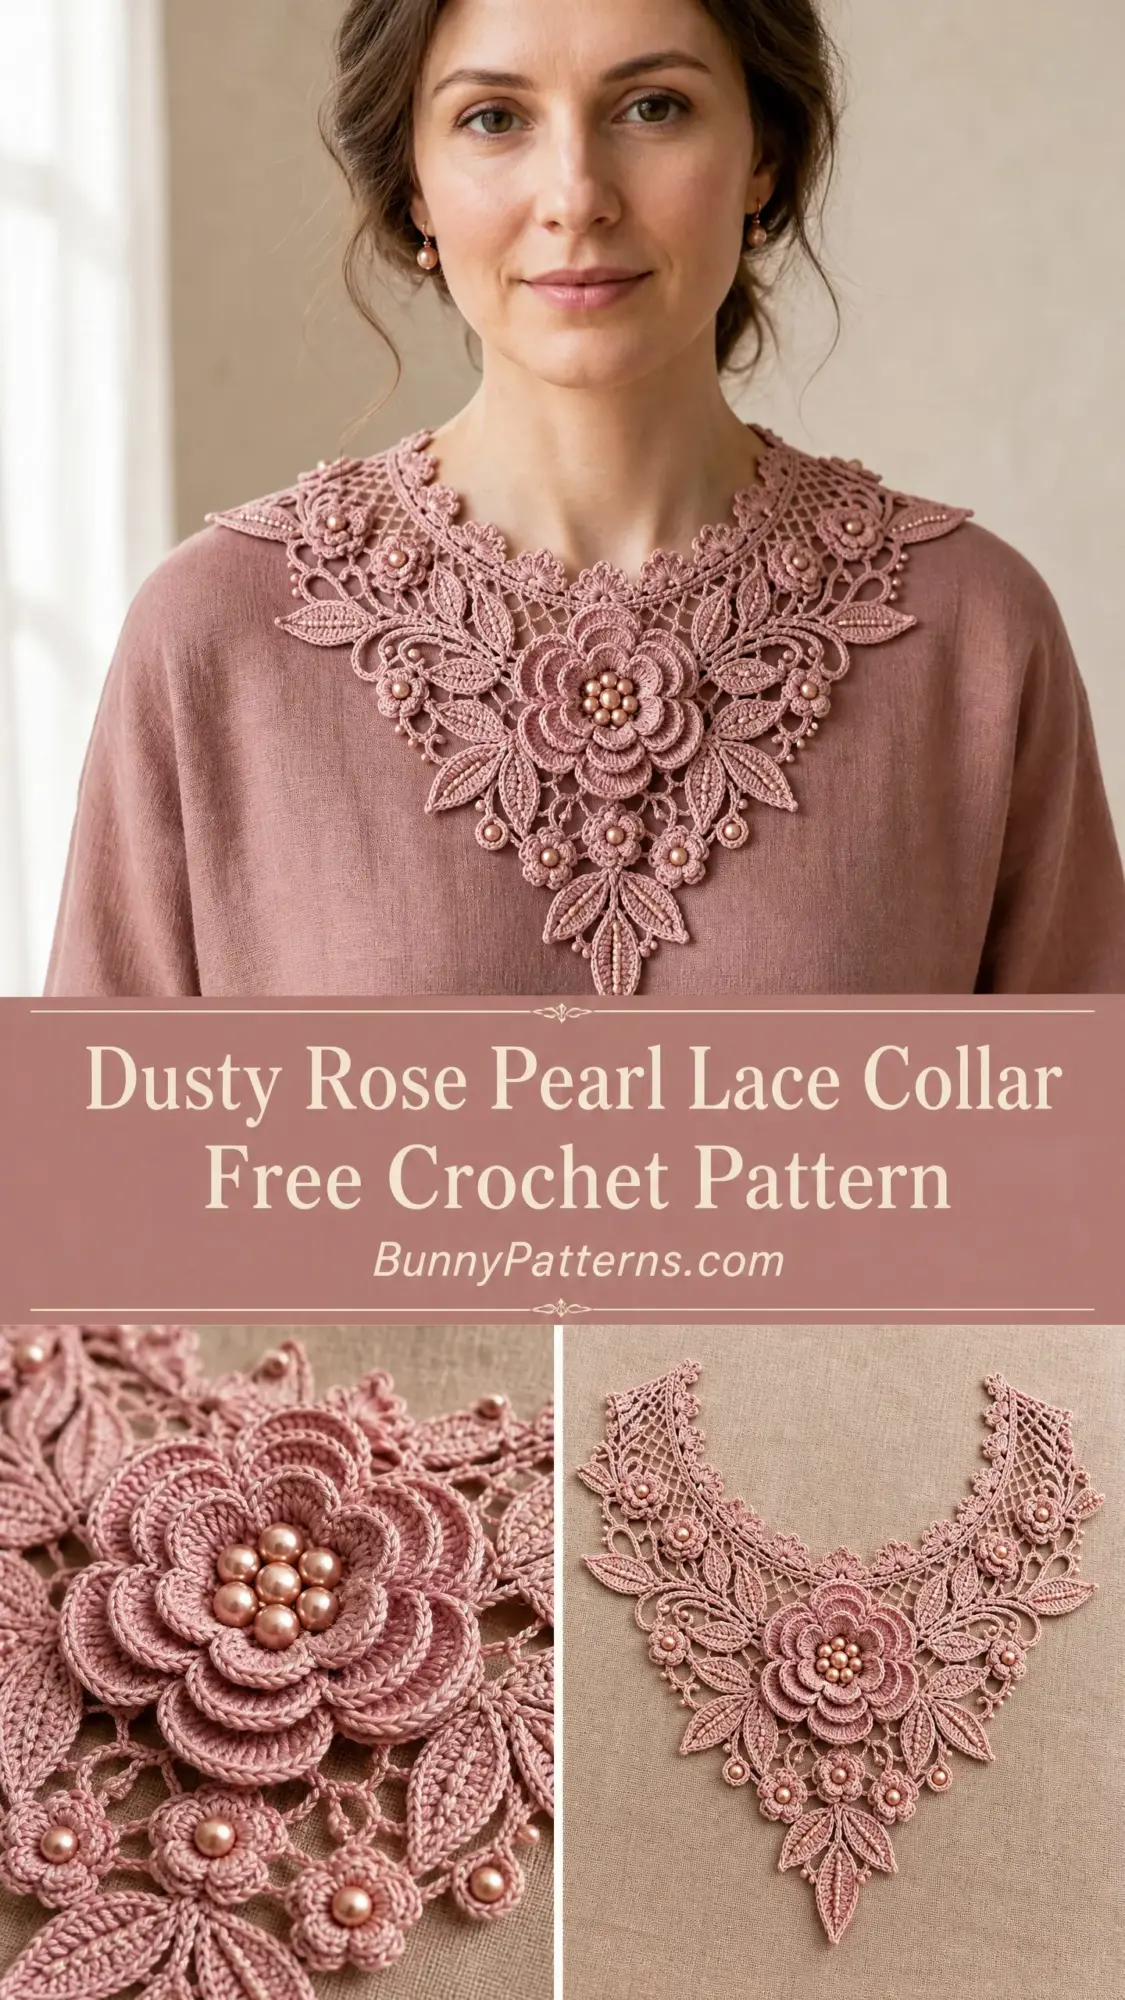
This lace collar is exactly that kind of show-stopper. It combines Irish crochet techniques with romantic pearl embellishments to create something truly heirloom-worthy. All the elegance of antique lacework with a modern dusty rose twist.
If you have been wanting to try Irish crochet but felt intimidated, or if you are an experienced crocheter ready for a challenge that will genuinely impress, this is your project. Let me walk you through every single step.
About This Dusty Rose Lace Collar Crochet Pattern
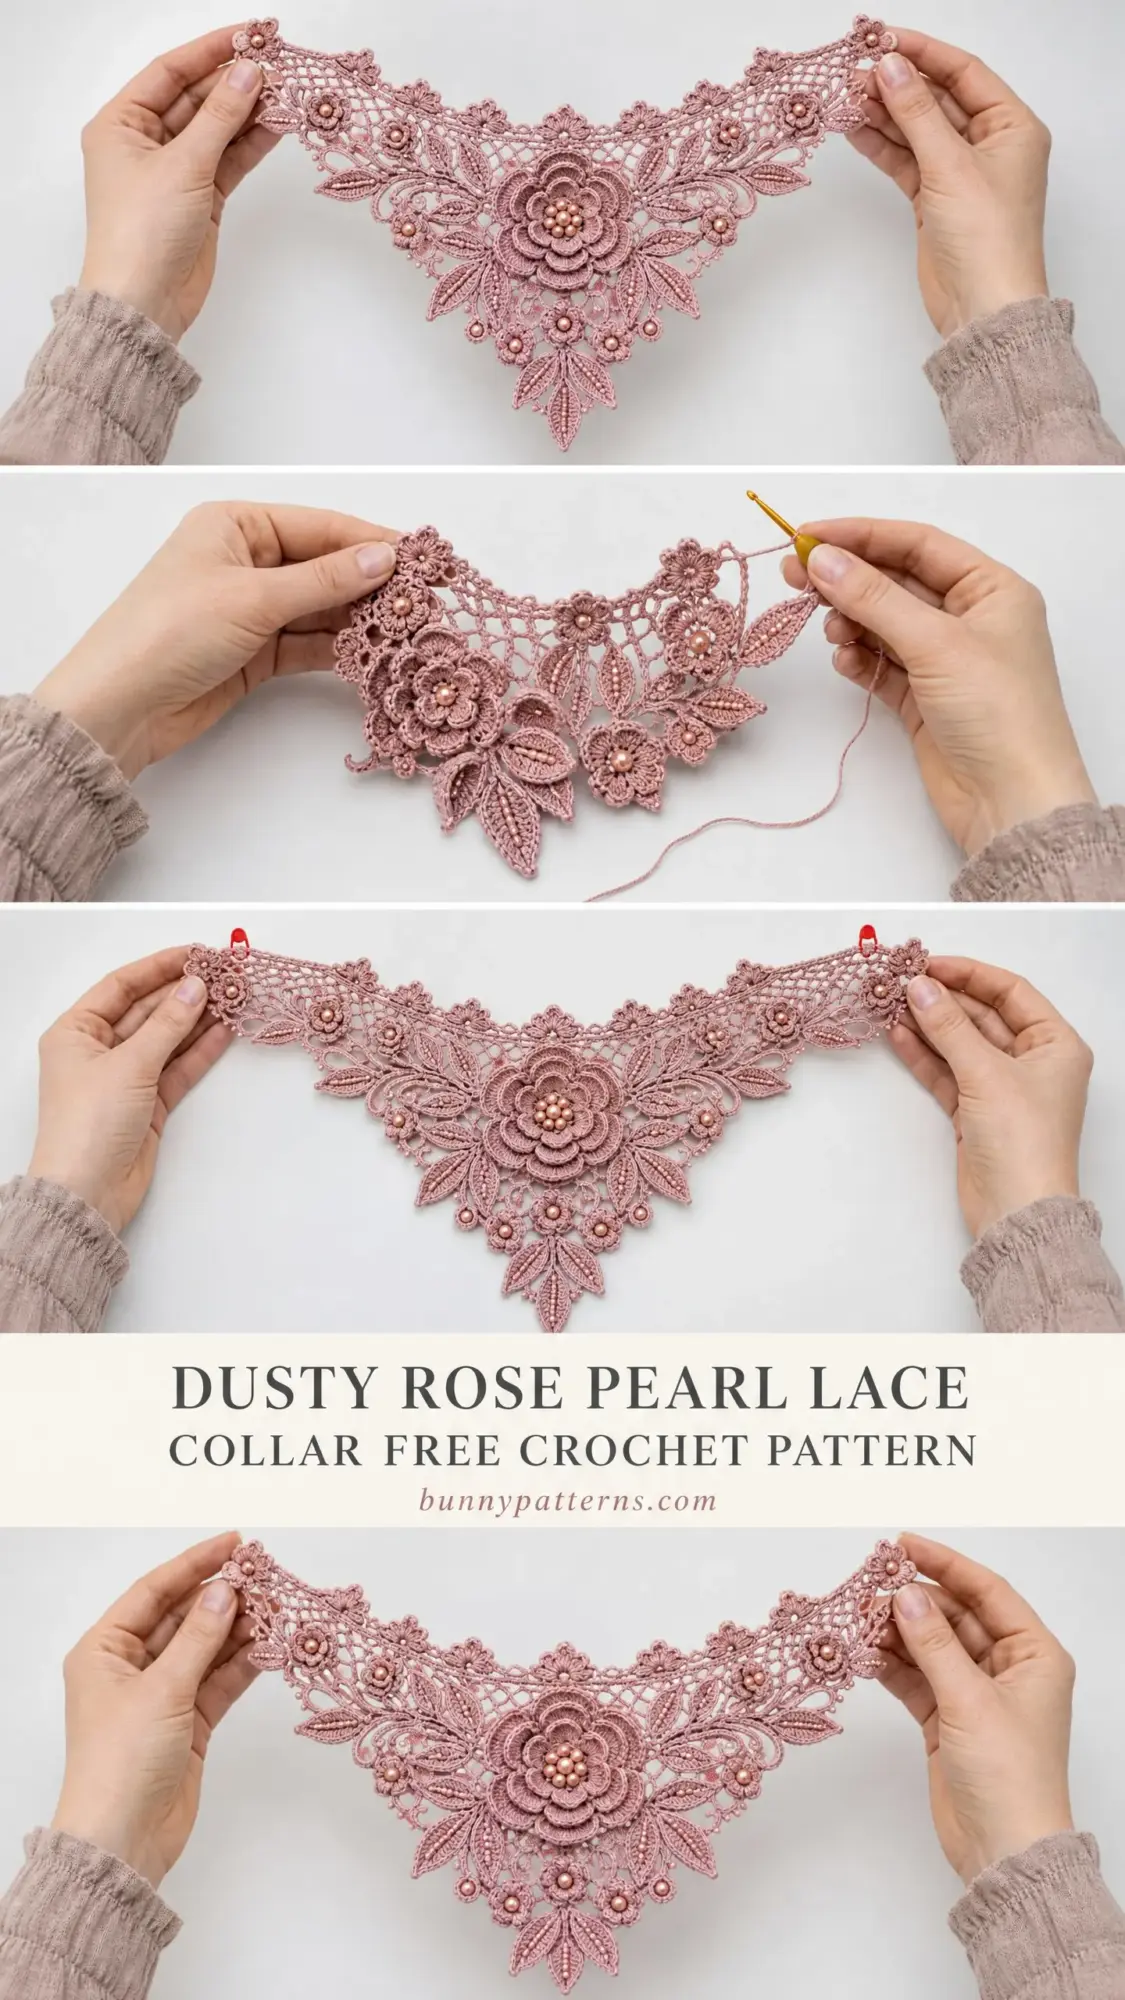
This collar is worked in the traditional Irish crochet style, which means you will create individual motifs first, then connect them with a delicate mesh background. The finished piece features a stunning large dimensional rose at the center, two medium roses at the shoulders, scattered small flowers, and a beautiful array of shaped leaves. Rose-gold freshwater pearls are sewn into the flower centers after blocking for that romantic vintage finish.
The collar sits across your upper chest and shoulders in a dramatic V-shaped bib style. It fastens at the back neckline with either a simple hook-and-eye closure or a ribbon tie. This is the kind of piece you will reach for when you want to transform a simple linen dress into something absolutely extraordinary.
Skill level: Advanced. You should be comfortable with working in the round, dimensional stitches, joining motifs, and filet mesh construction before attempting this pattern.
Time estimate: 30 to 50 hours for an experienced crocheter. If you are new to Irish crochet techniques, budget extra time for learning the methods.
Finished Measurements
The collar lies flat and drapes symmetrically, with the central point falling at mid-chest.
Materials Needed
Yarn: Size 10 crochet cotton thread in dusty rose or antique mauve. You will need approximately 350 to 400 yards / 320 to 365 meters.
Hook: US Steel Hook Size 7 (1.65 mm) for main collar work. US Steel Hook Size 6 (1.8 mm) optional for motifs if your tension runs tight.
Notions:
Recommended Yarn Options
Aunt Lydia’s Classic Crochet Thread Size 10 in Dusty Rose or Tea Rose works beautifully. It is widely available, has a consistent twist, and provides excellent stitch definition for lace.
DMC Petra Size 10 in color 53608 (antique rose) is another excellent choice. This mercerized cotton has a beautiful sheen that really enhances the pearl embellishments.
Lizbeth Size 10 by Handy Hands in Dusty Rose Medium (color 604) offers hand-dyed quality with slight variegation that gives wonderful depth to the floral motifs.
Substitution note: Any size 10 crochet cotton in a muted dusty rose or antique mauve will work. Avoid shiny polyester threads as they do not block well and will not hold the dimensional shaping of the roses.
Gauge
Using size 7 / 1.65 mm steel hook and size 10 crochet cotton:
Gauge is critical for achieving the correct collar dimensions. Work a sample mesh swatch and several test motifs before beginning. Adjust hook size as needed.
Abbreviations and Stitch Definitions
Let me walk you through every abbreviation you will encounter. If you are newer to lace crochet, read through this section carefully before starting.
Special Stitches
Picot (3-chain picot): Chain 3, slip stitch into the first chain made to close the loop. This creates a small decorative knot on the edge.
Picot (5-chain picot): Chain 5, slip stitch into the first chain made to close the loop. Used on outer collar edge for decorative scallop effect.
Shell Stitch: Work 5 dc all into the same stitch or space.
Double Shell: Work 7 dc all into the same stitch or space.
Puff Stitch: (Yarn over, insert hook into stitch, yarn over and pull up a loop to height of a dc) 3 times in same stitch. Yarn over and pull through all 7 loops on hook. Chain 1 to close.
Foundation Single Crochet (FSC): Insert hook into bottom loop of chain just made, yarn over and pull up a loop, yarn over and pull through one loop (chain made), yarn over and pull through 2 loops (sc made). Continue in this manner.
Joined Chain Mesh: Chain 5, skip 2 stitches or the designated number, single crochet into next stitch or join point. Repeat. This creates the open net background.
Important Pattern Notes
Before you begin, please read through these notes. They will save you confusion later.
1. The collar is constructed in five stages: individual motifs, neckline foundation, motif placement and basting, mesh background, and outer edge finishing.
2. All motifs are right-side facing throughout. Do not turn unless specifically instructed.
3. The collar is symmetrical. All leaf clusters and small flower placements mirror left to right.
4. Pearls are attached after blocking. Do not attach pearls before blocking as they interfere with pinning.
5. Chain counts at the start of rounds do not count as stitches unless specifically stated.
6. Block aggressively with starch. This collar requires stiff blocking to achieve the dimensional layered rose effect.
Pattern Instructions
Section A: Individual Motifs
Work all motifs before beginning the collar foundation. You will need:
Large Central Rose (Make 1)
The large rose is worked in 6 rounds with layered petals on a central ring.
Round 1: Begin with magic ring. Ch 1 (does not count as stitch). Work 10 sc into the ring. Pull ring closed. Join to first sc. (10 sc)
Round 2: Ch 1. Work 2 sc into each stitch around. Join. (20 sc)
Round 3 (first petal layer): Ch 1. Working into front loops only: (sc in next st, ch 3, 5 dc into same st as sc, ch 3, sc into same st) 10 times. Join to first sc. (10 petals)
Round 4 (second petal layer): Working into the free back loops of Round 2 stitches. Sl st into first free back loop. Ch 1. (sc, ch 4, 7 dc, ch 4, sc) all into the same back loop stitch. Repeat into each of the 20 back loop stitches. Join. (20 petals)
Round 5 (outer petal layer): Work behind Round 4 petals, in the 10 spaces between Round 4 petal groups: (sc into space, ch 5, 9 dc into same space, ch 5, sc into same space) 10 times. Join. (10 large outer petals)
Round 6 (leaf border at base): Working around the base of the entire rose, attach yarn. Ch 1. Work 30 sc evenly around the base circumference. Join. (30 sc)
Round 6 continues: (Ch 5, skip 2 sts, sc into next st) 10 times. Join. (10 chain-5 loops for attachment) Fasten off, leave 12-inch tail.
Medium Rose (Make 2)
Round 1: Magic ring. Ch 1. Work 8 sc into ring. Pull ring closed. Join. (8 sc)
Round 2: Ch 1. Work 2 sc into each st around. Join. (16 sc)
Round 3 (first petal layer, front loops only): (sc into next st, ch 3, 4 dc into same st, ch 3, sc into same st) 8 times. Join. (8 petals)
Round 4 (second petal layer, back loops of Round 2): (sc into back loop, ch 4, 6 dc, ch 4, sc into same back loop) 8 times. Join. (8 larger petals)
Round 5 (base loops): Work 20 sc evenly around the bottom perimeter. Join. (20 sc)
(Ch 4, skip 1 st, sc into next st) 10 times. Join. (10 ch-4 loops) Fasten off, leave 12-inch tail.
Small Flower (Make 4)
Round 1: Magic ring. Ch 1. Work 6 sc into ring. Pull ring closed. Join. (6 sc)
Round 2: Ch 1. Work 2 sc into each st. Join. (12 sc)
Round 3 (petals): (sc into next st, ch 2, 3 dc into same st, ch 2, sc into same st) 6 times. Join. (6 petals)
Round 4 (attachment loops): Working behind petals at base. (ch 3, sc into space between petals) 6 times. Join. (6 ch-3 loops) Fasten off, leave 10-inch tail.
Large Leaf (Make 4)
Foundation chain: Ch 18.
Row 1 (RS): Starting in 2nd ch from hook. Sc into next 3 ch. Hdc into next 3 ch. Dc into next 4 ch. Hdc into next 3 ch. Sc into next 3 ch. Sc into last ch (tip). (17 sts)
Continuing without turning, work back along opposite side of foundation chain: Sc into next 3 ch. Hdc into next 3 ch. Dc into next 4 ch. Hdc into next 3 ch. Sc into next 3 ch. Join with sl st to first sc. (34 sts total)
Round 2: Ch 1. Sc into each of next 7 sts, hdc into next 3 sts, dc into next 3 sts, hdc into next 3 sts, sc into next 7 sts, work (sc, ch 1, sc) at the pointed tip end, repeat to for second side, work (sc, ch 1, sc) at rounded end. Join. (38 sts plus 2 ch-1 corner spaces)
Round 3: Sl st into each st around, working 3 sl st into each ch-1 corner space. Join. Fasten off, leave 10-inch tail.
Medium Leaf (Make 6)
Foundation chain: Ch 14.
Row 1 (RS): Sc into 2nd ch from hook. Sc in next 2 ch. Hdc in next 2 ch. Dc in next 4 ch. Hdc in next 2 ch. Sc in next 2 ch. Sc in last ch (tip). (13 sts)
Continue along underside of chain: Sc in next 2 ch. Hdc in next 2 ch. Dc in next 4 ch. Hdc in next 2 ch. Sc in next 2 ch. Join to first sc. (26 sts total)
Round 2: Ch 1. Sc into each st around, working (sc, ch 1, sc) at tip and (sc, ch 1, sc) at rounded base. Join. (30 sts plus 2 ch-1 spaces)
Round 3: Sl st into each st around, 3 sl st into each ch-1 corner sp. Join. Fasten off. (34 sl sts total)
Small Leaf (Make 4)
Foundation chain: Ch 10.
Row 1 (RS): Sc into 2nd ch from hook. Sc in next ch. Hdc in next 2 ch. Dc in next 2 ch. Hdc in next ch. Sc in next ch. Sc in last ch (tip). (9 sts)
Continue along underside: Sc in next ch. Hdc in next ch. Dc in next 2 ch. Hdc in next 2 ch. Sc in next ch. Sc in next ch. Join. (18 sts total)
Round 2: Ch 1. Sc into each st around with (sc, ch 1, sc) at each end point. Join. (22 sts plus 2 ch-1 spaces)
Round 3: Sl st into each st, 3 sl st into each ch-1 sp. Join. Fasten off. (26 sl sts)
Decorative Scrolls (Make 2, Optional)
Ch 25. Sl st into 5th ch from hook to form a small loop. Continue sl st into each remaining ch to the end. Roll the sl st section into a loose curl and tack with a few stitches at the base. Fasten off.
Section B: Neckline Foundation
Foundation: Ch 81.
Row 1: Sc into 2nd ch from hook and into each ch across. (80 sc)
Mark the center stitch (stitch 40 and 41 are the center pair). Place a marker here.
Row 2 (begin V shaping): Ch 3 (counts as first dc). Dc into each st across to center marker. At center, work dc2tog over sts 40 and 41. Dc into each remaining st to end. (79 dc)
Row 3: Ch 1. Sc into first st, ch 5, skip 3 sts, sc into next st across, ending with sc in last st. (20 ch-5 spaces)
Fasten off. Mark Row 3 as the top attachment row.
Section C: Motif Placement
Pin all motifs to your blocking board according to this layout guide. The collar is symmetrical around a vertical center axis.
Center: Large Central Rose sits at the lowest point of the V, approximately 9.5 inches below the center neckline.
Upper left and upper right: Medium Roses sit at the shoulder areas, approximately 3 inches below and 6 inches to either side of center neckline.
Left cluster: Large Leaf 1, Medium Leaves 1 and 2 flank the left medium rose. Small Flower 1 sits just below the left medium rose. Small Leaves 1 and 2 fill the spaces between larger leaves.
Right cluster: Mirror exactly with corresponding leaves and Small Flower 2.
Lower center cluster: Large Leaves 3 and 4, Medium Leaves 5 and 6 radiate outward from the base of the Large Central Rose. Small Flowers 3 and 4 are positioned just below the large rose.
Scrolls: One scroll curls from the inner left cluster, one from the inner right cluster.
Take a photograph of your arrangement before continuing.
Section D: Mesh Background
The mesh background is worked in rows from the neckline foundation downward, joining to each motif as the mesh reaches it.
Setup: Attach yarn to the rightmost ch-5 loop of Row 3 of the neckline foundation.
Right Half Mesh
Row 1 (RS): Ch 1. Sc into first ch-5 sp of neckline Row 3. Ch 5, sc into next ch-5 sp across to center marker. (10 ch-5 spaces)
Row 2: Ch 5 (does not count as st). Turn. Sc into next ch-5 sp, ch 5 across, ending sc in last sp. Ch 2, dc into turning ch base. (10 full spaces, 1 half space)
Row 3: Ch 1. Sc into dc base. Ch 5. Sc into next ch-5 sp, ch 5 across. (10 ch-5 spaces)
Joining Motifs: When mesh reaches a motif, work: ch 2, sc into the nearest attachment loop on the motif, ch 2, sc into the next mesh position.
Right Half Stitch Count Sequence:
Fasten off. Weave in end.
Left Half Mesh: Mirror exactly, attaching yarn to leftmost ch-5 space.
Section E: Decorative Edging
Neckline Edge:
Attach yarn at right end of neckline foundation.
Row 1: Ch 1. Sc into each st across the foundation. (80 sc)
Row 2: Ch 1. Sc into next 3 sts, picot (3-chain) across, ending sc in last st. Fasten off. (approximately 26 picots)
Outer Edge:
Attach yarn at right shoulder point.
Round 1: Ch 1. Work sc evenly around the entire outer perimeter, approximately 3 sc per ch-5 space. Work (sc, ch 2, sc) at each outer corner point. Join.
Round 2: Ch 1. Sc into next 2 sts, 5-chain picot evenly around. At each corner point, work (5-chain picot, sc, 5-chain picot). Join. Fasten off.
Back Neckline Ties:
At each back shoulder end, attach yarn. Ch 30 for a ribbon channel OR ch 6, sc in 2nd ch from hook and in each ch back to collar for a button tab.
Section F: Finishing and Blocking
Weave in all ends using a tapestry needle.
Soak the collar in cool water for 20 minutes. Press gently between towels. Do not wring.
Pin the collar to your blocking board in the exact finished dimensions: 17 inches wide, 9.5 inches deep. Stretch the leaf tips to their full length and pin each one individually. Open the mesh spaces fully.
Spray generously with starch or blocking solution. Allow to dry completely (12 to 24 hours) before removing pins.
Once dry, use a beading needle and coordinating thread to sew pearls into position:
Attach closure hardware or thread ribbon.
Care Instructions
Hand wash in cool water with mild soap. Do not machine wash or dry. Roll in a towel to remove excess water. Re-pin if needed and air dry flat. Light spray starch restores body after washing. Store flat or rolled gently. Keep away from prolonged sunlight to prevent fading.
Size Customization Tips
Neckline adjustment: The chain of 81 stitches produces a 16-inch total neckline. For a larger neckline, add stitches in multiples of 4. Each group of 4 stitches adds approximately 1 inch total.
Width adjustment: Adding 2 extra mesh spaces per half in the shoulder rows adds approximately 0.8 inch to each shoulder.
Depth adjustment: Each additional mesh row adds approximately 0.4 inch to the center front depth.
Final Thoughts on This Lace Collar Crochet Tutorial
This dusty rose pearl lace collar is truly a labor of love. It takes time, patience, and attention to detail. But when you slip it over a simple dress and see those dimensional roses and delicate mesh come together, you will understand why Irish crochet has been treasured for generations.
Thank you so much for choosing this crochet pattern for your next project. I genuinely hope you enjoy the process as much as the finished piece.
If you make this collar, I would absolutely love to see it! Tag me on Instagram or share a photo in my Facebook group. Seeing your finished projects is honestly one of my favorite parts of sharing patterns.
Before you go, save this pattern to your Pinterest boards so you can find it easily when you are ready to start. And please leave a comment below if you have any questions or just want to share your progress. I read every single one and love hearing from you!
You Might Also Like
- Mustard Yellow Circle Purse Free Crochet Pattern
- Lavender Dreams Candy Bolster Pillow Free Crochet Pattern
- Lavender Tiered Ruffle Doll Dress Free Crochet Pattern
- Ocean Blue Ombre Drawstring Bucket Bag Free Crochet Pattern