
Last spring, my best friend called me in a panic. Her daughter’s christening was six weeks away, and she couldn’t find a dress that felt special enough. Everything in stores looked mass-produced and forgettable. She wanted something handmade, something with meaning, something that could become a family keepsake.
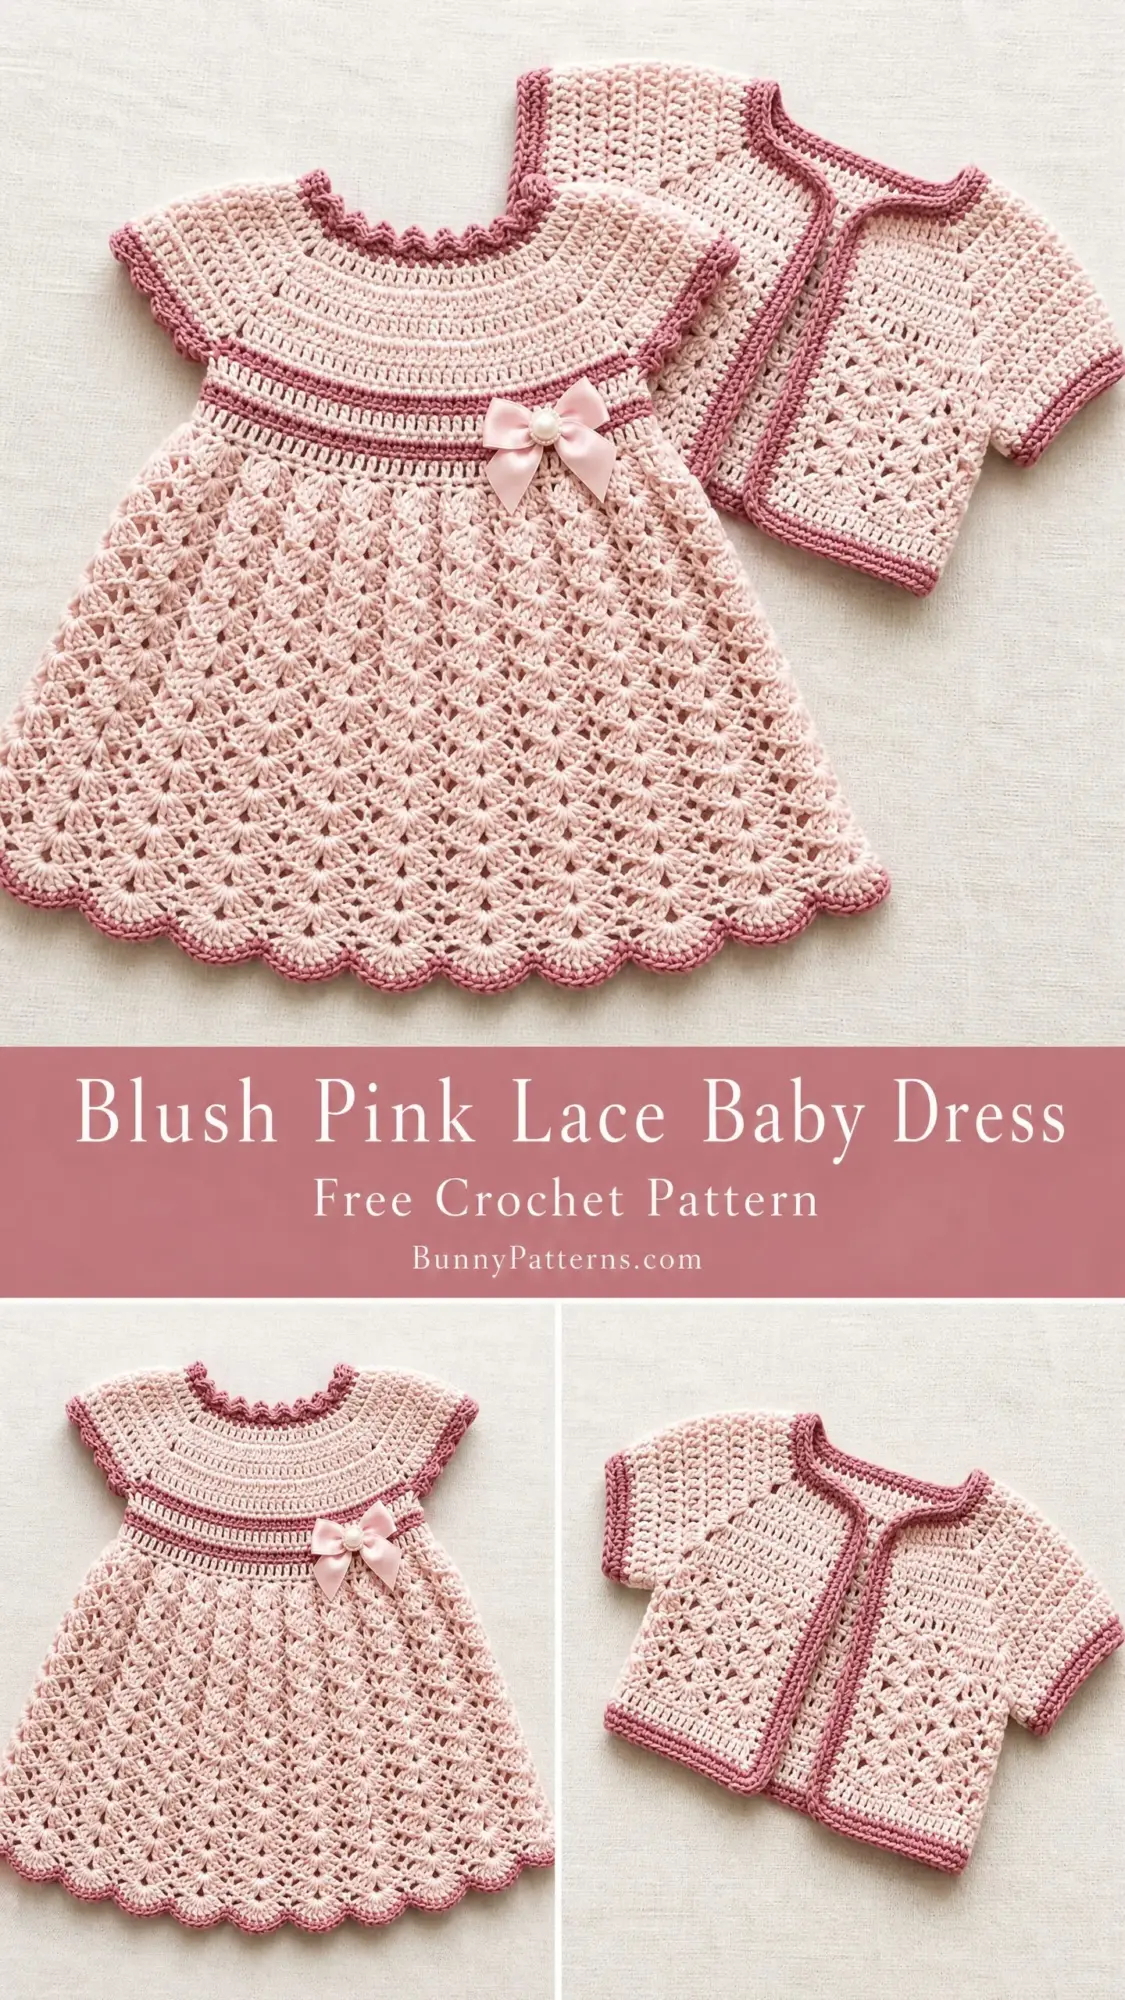
I told her I’d figure it out. That weekend, I sketched out this design on the back of a grocery receipt while my coffee got cold. The round yoke, the shell lace skirt, the delicate scalloped edges. I knew exactly what I wanted to create.
Three weeks later, I shipped her a tiny blush pink dress with a matching bolero, wrapped in tissue paper. She cried when she opened it. Her daughter wore it for the ceremony, and now it’s tucked away in an heirloom box waiting for the next generation. That’s the dress you’re about to make.
About This Blush Pink Lace Baby Dress Crochet Pattern
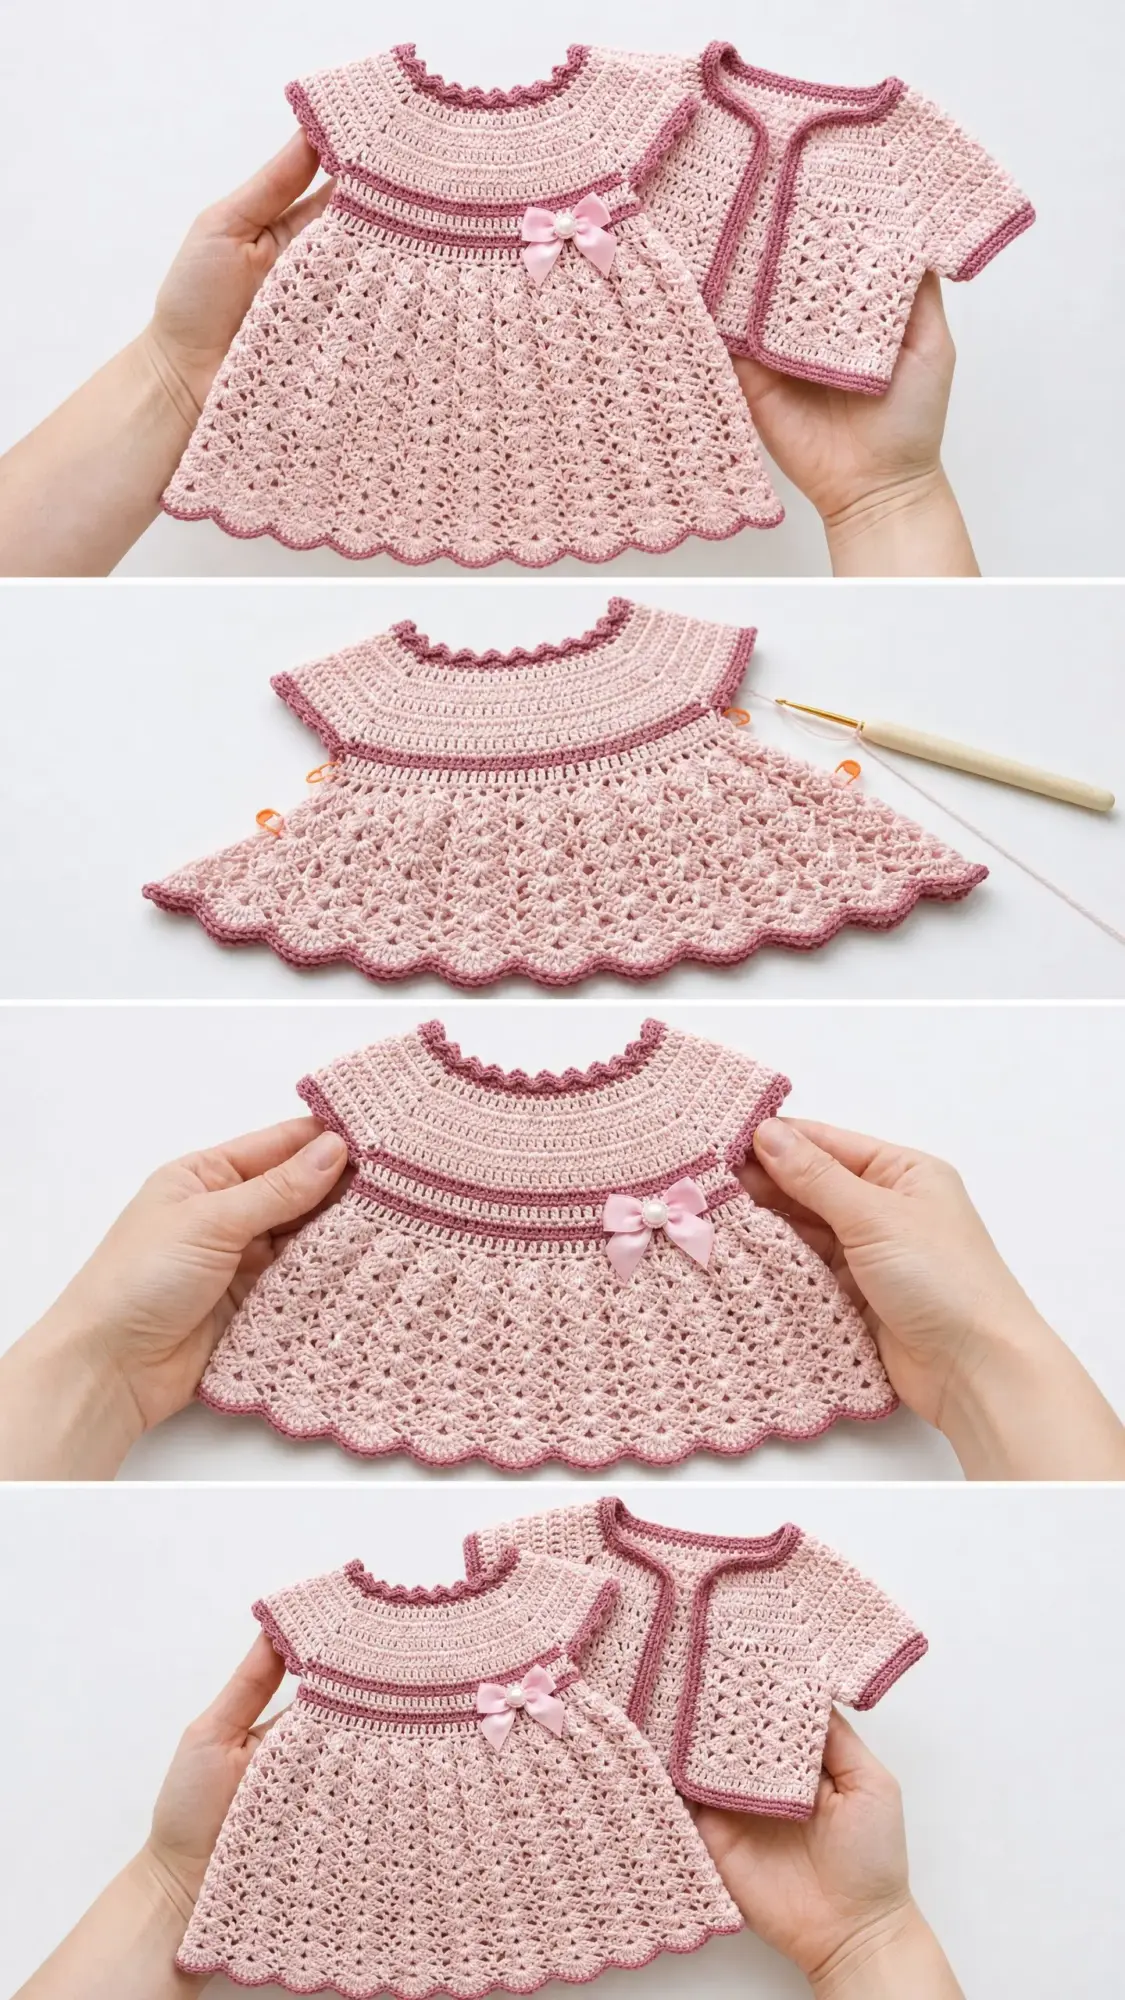
This heirloom-style baby dress features everything you need for a showstopping special occasion outfit. You’ll work a seamlessly constructed round yoke from the top down, create a defined waistband with contrast trim, and finish with a gorgeous flared shell stitch skirt that has the most beautiful scalloped hem.
The matching short-sleeved bolero cardigan completes the set perfectly. Both pieces use the same stitch patterns and color scheme, so they look intentionally designed together.
Two yarn colors create the visual interest here. A pale blush pink serves as your main color for most of the fabric. A deeper dusty rose adds contrast at the neckline edging, waistband accent row, and hem scallops. The satin ribbon bow with pearl center at the waistline adds that final touch of sweetness.
Skill level: Intermediate. You’ll need comfort with working in joined rounds, reading multi-stitch shell repeats, managing two colors, and constructing a top-down yoke garment. If you’re a confident beginner who has made shells before and can count stitch repeats carefully, you can absolutely do this with patience.
Time estimate: Plan for 12 to 16 hours for the dress and 4 to 6 hours for the bolero. Total project time runs 16 to 22 hours depending on your pace.
Finished Measurements
This pattern is written for size 6 to 12 months.
Size customization tips are included at the end of this crochet tutorial so you can adjust for newborn through 24 months.
Materials You’ll Need
Yarn:
Hook: US size G-6 (4.0 mm) crochet hook
Notions:
Yarn Suggestions
Paintbox Yarns Simply DK works beautifully here. It’s 100% acrylic, gentle on baby skin, and fully washable. You’ll need approximately 3 balls of the main color and 1 ball of contrast.
Drops Safran gives lovely drape with its cotton and viscose blend. The slight sheen looks gorgeous in occasion wear. Machine washable on a gentle cycle.
Lion Brand Pound of Love offers excellent value. It’s soft, machine washable, and one ball covers your main color needs easily.
When substituting yarn, choose any DK weight that gets gauge. For best drape in the shell skirt, a yarn with some cotton or viscose content works wonderfully. Avoid chunky or fuzzy yarns that would hide the lace detail.
Gauge
With MC and your G-6 (4.0 mm) hook:
Shell pattern gauge:
Gauge matters for correct fit. Please make a swatch and adjust your hook size as needed before starting.
Abbreviations and Stitch Definitions
Let me walk you through every abbreviation you’ll encounter. If you’re newer to crochet patterns, bookmark this section.
Special Stitches for This Pattern
Shell Stitch: Work 5 double crochet (dc) stitches all in the same stitch or space. This creates a fan shape, which is the signature look of the skirt.
7-dc Shell: Work 7 dc in the same stitch or space. You’ll use this larger shell at the waist-to-skirt transition to create the flare.
Picot: Work sc in the indicated stitch, chain 3, slip stitch into the first chain you made (back at the base of the chain-3), then sc in the next stitch. This makes a tiny decorative loop along the neckline.
Scallop Edging: Slip stitch in first stitch, chain 1, work 6 dc in the same stitch (this is a half-shell), slip stitch in next chain-space, repeat around. Creates those beautiful waves at the hem.
Pattern Notes Before You Begin
Read through these notes first. They’ll save you confusion later.
1. The dress is worked top-down in joined rounds. You start at the neckline and work through the yoke, waistband, and skirt. No seaming on the skirt body.
2. The yoke uses dc with evenly spaced increase rounds. This creates that beautiful rounded shoulder area.
3. The waistband is worked in sc with a contrast color accent row. This forms the visual division between yoke and skirt.
4. The back of the dress has a small opening at the neckline. A single small button or snap may be added.
5. Color changes happen at three points: neckline edging, waistband accent row, and skirt hem scallop. Everything else is worked in MC.
6. The bolero is worked separately and joined at the shoulders. Instructions follow the dress.
7. All rounds begin with a starting chain that counts as the first dc. When you see "ch 3," that counts as 1 dc. Do not count the turning chain as a stitch in sc rounds.
Step by Step Crochet Pattern Instructions
Dress Instructions
Neckline Foundation
With MC, ch 64. Join with sl st to first ch to form a ring. Be careful not to twist your chain.
Round 1: Ch 3 (counts as dc here and throughout), dc in each ch around. Join with sl st to top of beg ch-3. (64 dc)
Round 2 (neckline edging, CC): Join CC in any st. Ch 1, sc in same st, (ch 3, sl st into first ch of ch-3, sc in next 2 sts) rep around, ending sl st in last ch-3 picot loop. Fasten off CC. (64 working sc base)
This creates your scalloped neckline trim. Do not count picots as working stitches.
Note: Reattach MC in the original Round 1 dc round (below the picot edging) to begin yoke shaping. Insert your hook into the top of any dc in Round 1 to resume.
Yoke Shaping
The yoke is worked from the top down in joined dc rounds with evenly spaced increase rounds.
Round 3 (MC, attach after picot round): Ch 3, dc in same st, dc in next 7 sts, 2 dc in next st, dc in next 6 sts, 2 dc in next st, dc in next 7 sts, 2 dc in next st, dc in next 6 sts, 2 dc in next st, dc in next 7 sts, 2 dc in next st, dc in next 6 sts, 2 dc in next st, dc in next 7 sts, 2 dc in next st, dc in next 6 sts, 2 dc in next st. Join. (72 dc)
Round 4: Ch 3, dc in each st around. Join. (72 dc)
Round 5: Ch 3, dc in same st, (dc in next 8 sts, 2 dc in next st) 7 times, dc in last 8 sts. Join. (80 dc)
Round 6: Ch 3, dc in each st around. Join. (80 dc)
Round 7: Ch 3, dc in same st, (dc in next 9 sts, 2 dc in next st) 7 times, dc in last 9 sts. Join. (88 dc)
Round 8: Ch 3, dc in each st around. Join. (88 dc)
Round 9: Ch 3, dc in same st, (dc in next 10 sts, 2 dc in next st) 7 times, dc in last 10 sts. Join. (96 dc)
Round 10: Ch 3, dc in each st around. Join. (96 dc)
Round 11: Ch 3, dc in same st, (dc in next 11 sts, 2 dc in next st) 7 times, dc in last 11 sts. Join. (104 dc)
Round 12: Ch 3, dc in each st around. Join. (104 dc)
Round 13: Ch 3, dc in same st, (dc in next 12 sts, 2 dc in next st) 7 times, dc in last 12 sts. Join. (112 dc)
Round 14: Ch 3, dc in each st around. Join. (112 dc)
Checkpoint: After Round 14, your yoke should measure approximately 4 inches (10 cm) from the neckline foundation edge and approximately 13 inches (33 cm) in circumference at the lower yoke edge.
Waistband
The waistband creates visual definition below the yoke.
Round 15 (MC): Ch 1 (does not count as st), sc in each st around. Join with sl st to first sc. (112 sc)
Round 16 (MC): Ch 1, sc in each st around. Join. (112 sc)
Round 17 (CC): Join CC. Ch 1, sc in each st around. Join. Fasten off CC. (112 sc)
Round 18 (MC): Join MC. Ch 1, sc in each st around. Join. (112 sc)
Round 19 (MC): Ch 1, sc in each st around. Join. (112 sc)
Checkpoint: After Round 19, the dress should measure approximately 6 inches (15 cm) from neckline to bottom of waistband. The waistband section should be approximately 1 inch (2.5 cm) wide. This is where you’ll attach the satin ribbon later.
Skirt Expansion Round
Round 20: Ch 3, 4 dc in same st (first shell made), ch 1, sk 2 sts, (5 dc in next st, ch 1, sk 2 sts) 36 times, 5 dc in next st, ch 1, sk 1 st. Join with sl st to top of beg ch-3. (37 shells, 37 ch-1 sps)
Skirt Body
Round 21: Sl st into center dc of first shell (3rd dc), ch 3, 4 dc in same st, ch 1, (5 dc in center dc of next shell, ch 1) 36 times. Join. (37 shells)
Round 22: Rep Round 21. (37 shells)
Round 23: Sl st into center dc, ch 3, 4 dc in same st, ch 2, (5 dc in center dc of next shell, ch 2) 36 times. Join. (37 shells, 37 ch-2 sps)
Round 24: Rep Round 23. (37 shells, 37 ch-2 sps)
Round 25: Sl st into center dc, ch 3, 6 dc in same st (7-dc shell), ch 2, (7 dc in center dc of next shell, ch 2) 36 times. Join. (37 large shells of 7 dc each, 37 ch-2 sps)
Round 26: Sl st into center dc (4th dc of 7-dc shell), ch 3, 6 dc in same st, ch 2, (7 dc in center dc of next shell, ch 2) 36 times. Join. (37 large shells, 37 ch-2 sps)
Round 27: Rep Round 26. (37 large shells, 37 ch-2 sps)
Round 28: Sl st into center dc, ch 3, 6 dc in same st, ch 3, (7 dc in center dc of next shell, ch 3) 36 times. Join. (37 large shells, 37 ch-3 sps)
Round 29: Rep Round 28. (37 large shells, 37 ch-3 sps)
Round 30: Rep Round 28. (37 large shells, 37 ch-3 sps)
Checkpoint: After Round 30, the skirt should measure approximately 6 inches (15 cm) from the waistband. The full dress length from shoulder to current hem should be approximately 12 inches (30.5 cm).
Skirt Hem Scallop
Round 31 (MC): Ch 1, sc in center dc of first shell, (ch 3, sc in ch-sp, ch 3, sc in center dc of next shell) rep 36 times, ch 3, sc in last ch-3 sp, ch 3. Join. (74 sc, 74 ch-3 sps)
Round 32 (CC): Join CC. Sl st into first ch-3 sp, ch 3, 5 dc in same ch-3 sp (scallop), sl st in next sc, (6 dc in next ch-3 sp, sl st in next sc) rep around. Join. Fasten off CC.
Bolero Instructions
Bolero Back Panel
With MC, ch 46.
Row 1 (RS): Dc in 4th ch from hook, dc in each ch across. Turn. (44 dc)
Row 2: Ch 3, dc in each st across. Turn. (44 dc)
Row 3: Ch 4, sk 2 sts, (5 dc in next st, ch 1, sk 2 sts) 13 times, dc in last st. Turn. (13 shells)
Row 4: Ch 3, 2 dc in ch-1 sp, (ch 1, 5 dc in ch-1 sp of next shell) 12 times, ch 1, 3 dc in last ch-1 sp, dc in top of ch-3. Turn. (13 shells)
Row 5: Ch 4, sk 2 sts, (5 dc in ch-1 sp, ch 1, sk shell) 12 times, 5 dc in last ch-1 sp, ch 1, dc in top of ch-3. Turn. (13 shells)
Rows 6 through 8: Rep Rows 4 and 5 alternating, ending on a Row 4 rep. (13 shells each row)
Checkpoint: After Row 8, the bolero back panel should measure approximately 4 inches (10 cm) wide and 3.5 inches (9 cm) tall.
Row 9 (shoulder shaping left): Work across first 4 shells in established pattern. Fasten off.
Row 9 (shoulder shaping right): Skip center 5 shells (this becomes the back neck opening). Reattach MC at the 9th shell position. Work across final 4 shells in established pattern. Fasten off.
Bolero Fronts (Make 2)
With MC, ch 22.
Row 1: Dc in 4th ch from hook, dc in each ch across. Turn. (20 dc)
Row 2: Ch 3, dc in each st across. Turn. (20 dc)
Row 3: Ch 4, sk 2 sts, (5 dc in next st, ch 1, sk 2 sts) 5 times, dc in last st. Turn. (5 shells)
Rows 4 through 8: Work in established shell pattern as for bolero back. (5 shells each row)
Row 9 (shoulder): Work across first 4 shells. Fasten off.
Seam bolero back to both fronts at shoulders using a sl st join or mattress stitch on WS, matching 4 shells on each side.
Bolero Sleeves (Make 2)
After shoulder seams are joined, join MC at bottom center of armhole.
Round 1: Ch 3, work 36 dc evenly around armhole opening. Join. (36 dc)
Round 2: Ch 4, sk 2, (5 dc in next st, ch 1, sk 2) 11 times, 5 dc in next st, ch 1. Join. (12 shells)
Round 3: Sl st to center of first shell, ch 3, 4 dc in same st, ch 1, (5 dc in center of next shell, ch 1) 11 times. Join. (12 shells)
Round 4: Rep Round 3. (12 shells)
Round 5 (CC): Join CC. Ch 1, sc in center of each shell and in each ch-sp around. Sl st to join. Work a scallop edging: 5 dc in each sc at shell centers, sl st in sc over ch-sp. Fasten off CC.
Bolero Edging
With CC, join at lower right front edge.
Row 1: Ch 1, sc evenly up right front edge, across back neck, down left front edge, and across lower back edge. Work 3 sc in each corner. Join or fasten off at starting point.
Finishing Your Baby Dress Set
Weave in all yarn ends using your yarn needle. Take extra care to secure CC ends at color change points.
Blocking: Soak the dress and bolero in cool water with a small amount of wool wash. Gently squeeze out excess water without wringing. Pin flat on foam blocking mats to finished measurements. Pin the skirt hem scallops out to their full width to define the shells clearly. Allow to dry completely before unpinning.
Ribbon attachment: Sew the satin ribbon in and out through the CC waistband row (Round 17 of the dress), centering the ribbon at front. Bring the ribbon ends together at center front, tie into a neat bow, and trim the ends at an angle to prevent fraying. Sew or pin a pearl brad or button through the center knot of the bow.
Optional back closure: Sew a small button approximately 0.5 inch (1.3 cm) below the neckline picot edge on the right back. Work a chain loop on the left back: join MC or CC at corresponding position, ch 5, sl st at base to form loop. Fasten off and secure well.
Size Customization Tips
For newborn (14 to 16 inch chest): Work neckline foundation chain of 52. Work yoke increases through Round 11 only (88 dc at yoke completion). Reduce waistband to 88 sts. Use 31 shells in skirt. Work skirt through Round 27 only. Finished dress length approximately 11 inches.
For 12 to 18 months (19 to 21 inch chest): Work neckline foundation chain of 70. Work yoke increases through Round 16, adding 1 additional increase round. Work waistband on 120 sts. Use 40 shells in skirt. Add 2 extra rounds in the ch-3 sp section. Finished dress length approximately 16 inches.
For 18 to 24 months: Work neckline foundation chain of 76. Work yoke to 132 dc. Use 44 shells in skirt. Work skirt through Round 32. Finished dress length approximately 18 inches.
To lengthen any size: Add additional shell repeat rounds between the ch-2 sp section and the ch-3 sp section. Work 2 rounds per inch of desired additional length.
Care Instructions
Hand wash in cool water with mild baby-safe detergent. Rinse gently and roll in a clean towel to remove excess moisture. Lay flat to dry, reshaping shells and scallops by hand while damp. Store folded flat, not on a hanger. Do not tumble dry, iron directly, or bleach.
This blush pink lace baby dress crochet pattern creates something truly special. The kind of piece that gets passed down, photographed at every milestone, and stored away with love. Whether you’re making it for a christening, a first birthday, or simply because a little one in your life deserves something beautiful, you’re creating a keepsake.
Thank you so much for choosing this pattern. I hope you love every stitch of it.
If you make this dress, I would absolutely love to see it. Tag me on Instagram or share your finished photos in our Facebook group. There’s nothing better than seeing these patterns come to life in your hands.
Save this pattern to your Pinterest boards so you can find it when you’re ready to start. And if you make this sweet little dress set, please drop a comment below. I read every single one, and your photos and stories honestly make my whole week.
You Might Also Like
- Gray Tabby Cat Bow Sweater Free Crochet Pattern
- Autumn Fox Lace Crochet Sweater Free Pattern
- Ocean Blue Ombre Drawstring Bucket Bag Free Crochet Pattern
- Dusty Rose Open Weave Crochet Bolero Free Pattern