
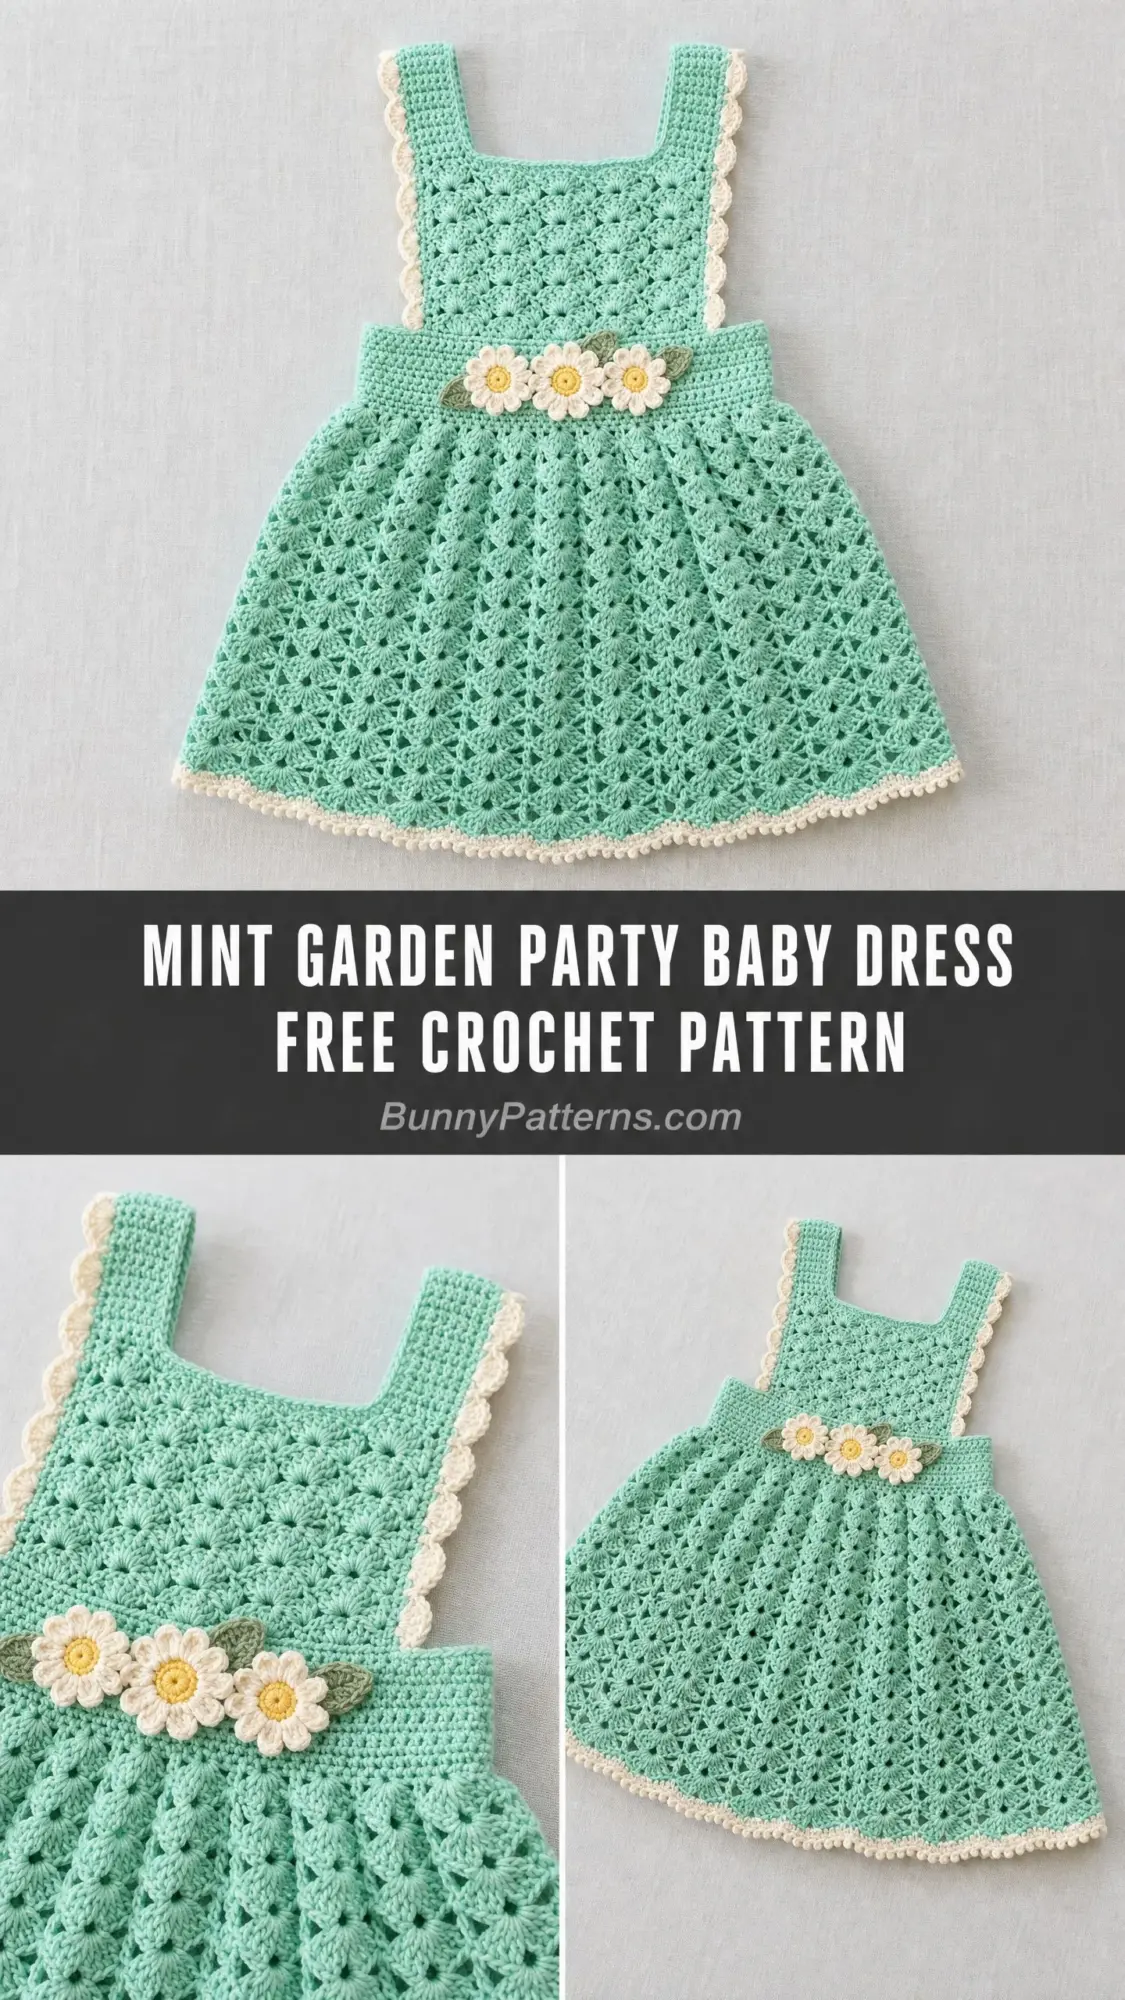
This is one of those patterns that will make you look like an absolute CROCHETING GENIUS, and I am not exaggerating. The lacy fan shell texture, the delicate daisy appliques, the sweet scalloped edges. This baby dress is a showstopper that works up in about 12 to 18 hours total.
Here is the best part. Despite looking incredibly intricate, this pattern uses one main stitch repeated throughout. Once you get the rhythm of the fan shell, you are basically on autopilot. It is the kind of project that feels impressive while you are making it and looks even more impressive when you are done.
Whether you are making this for a baby shower gift, a first birthday outfit, or just because you cannot resist tiny adorable things, this mint garden party dress delivers. Let me walk you through everything you need to know.
About This Baby Dress Crochet Pattern
This sweet pinafore style baby dress features a classic square neckline with wide shoulder straps, a fitted bodice, and a gorgeous flared skirt that swings beautifully when worn. The entire garment showcases a repeating fan shell stitch pattern that creates that lovely lacy, layered texture you see in the photo.
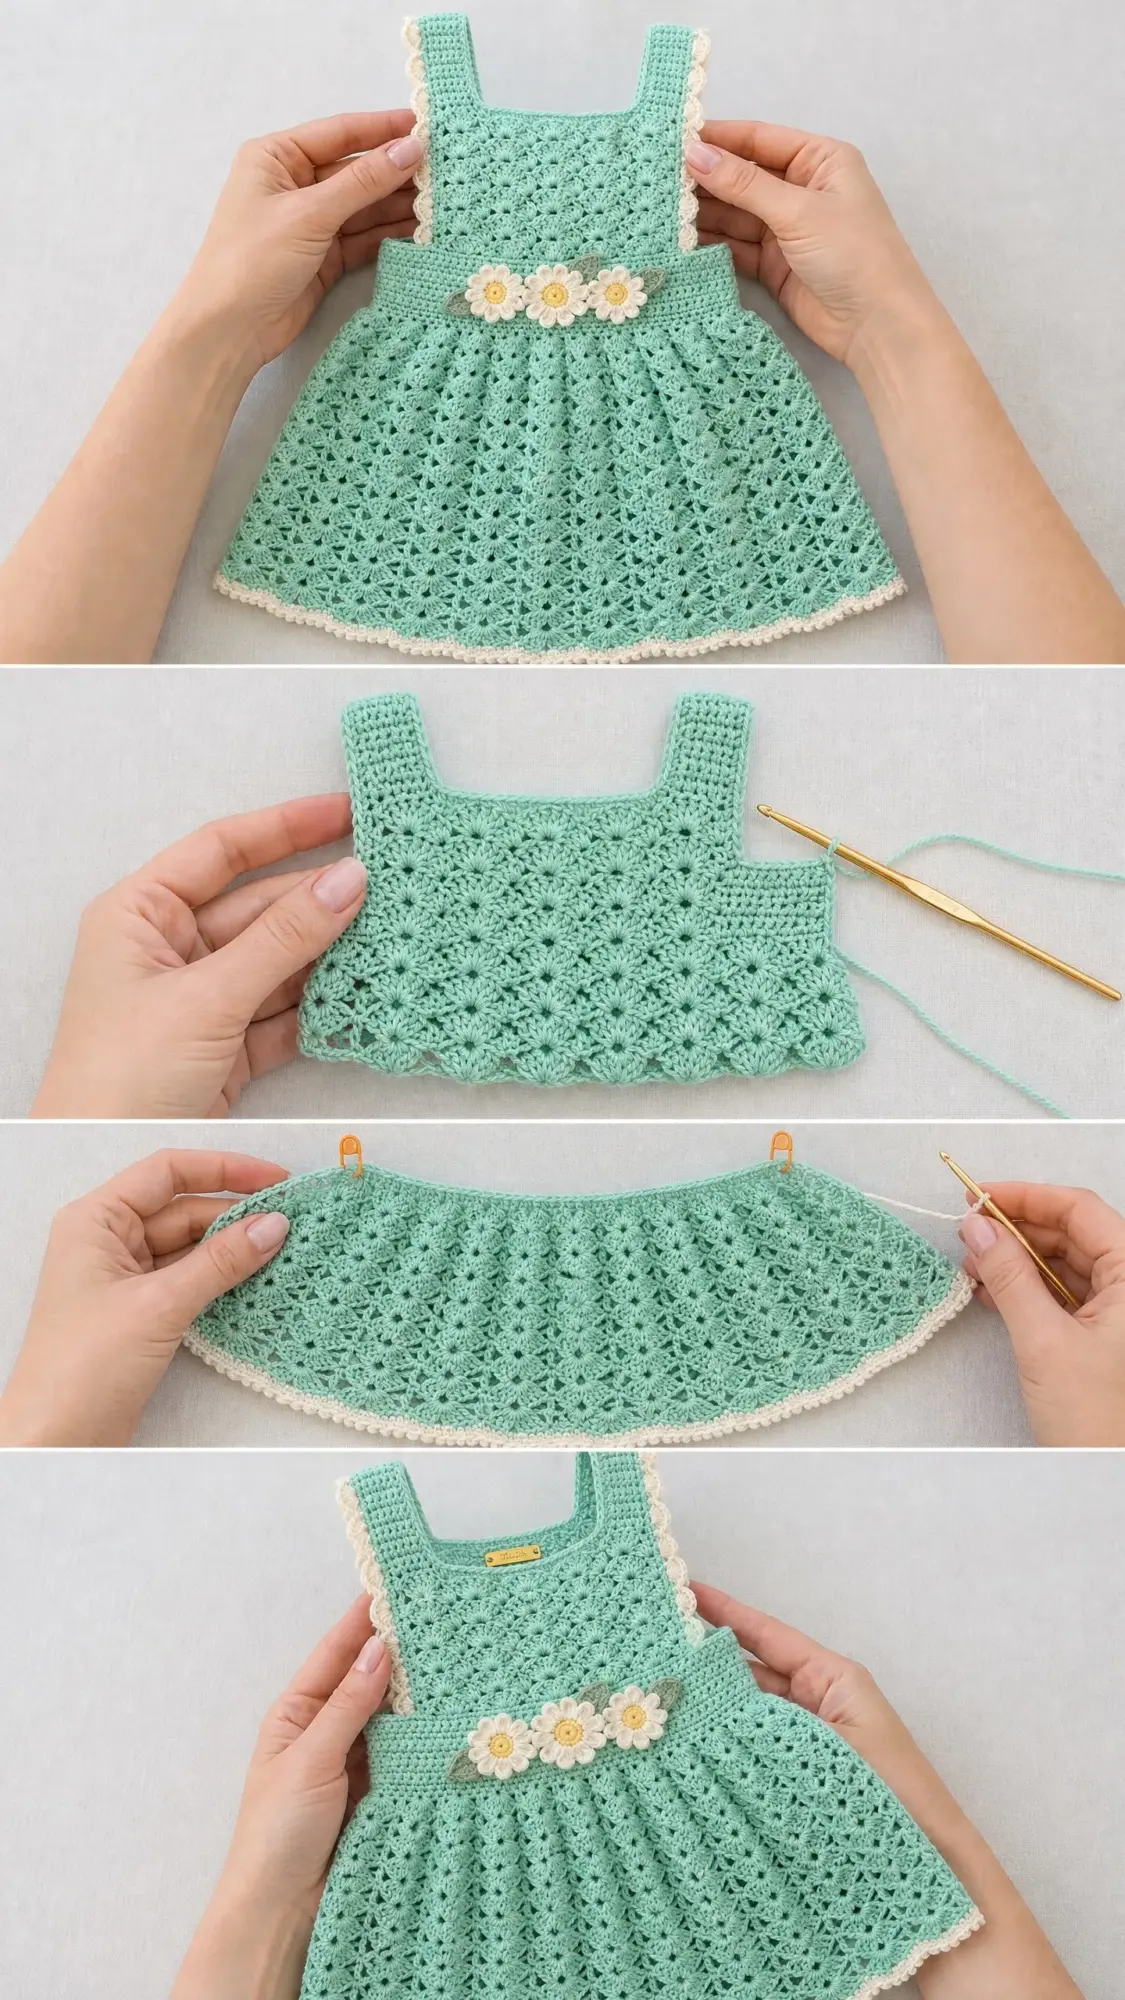
The dress is worked in three main sections. First, you will crochet two flat rectangular bodice panels. Then you will seam them together and pick up stitches along the waist to work the circular skirt from the top down. Finally, you will add the cream scallop trim and those adorable daisy appliques.
The finished dress fits babies 6 to 12 months with a chest circumference of 18 inches and a total length of 14 inches from shoulder strap to hem. I have included size customization tips at the end if you need to go smaller or larger.
Skill Level
This pattern is rated intermediate. The fan shell stitch itself is straightforward once you understand the rhythm, but you will need to pay attention to stitch counts to keep the pattern aligned properly.
If you have completed at least two garment projects and feel comfortable working gauge swatches, you will do great here. The construction involves seaming flat panels, picking up stitches in the round, and creating small crocheted appliques.
New to garment construction? Do not let that scare you off. I will walk you through every step, and the pinafore style is actually one of the most forgiving garment shapes to make.
Materials Needed
Yarn:
Recommended Yarn Options:
Hook: US Size E-4 / 3.5 mm (adjust to meet gauge)
Notions:
Substitution tip: Any DK weight yarn that achieves the stated gauge will work. For baby items, choose machine washable yarns that are soft against sensitive skin. Avoid fluffy or textured yarns since the fan shell pattern needs clear stitch visibility.
Gauge
Getting gauge right is essential for a properly fitting garment. Please do not skip this step.
Fan shell gauge: One full fan shell repeat (1 single crochet + chain 1 + 5 double crochet fan + chain 1) = 1.5 inches / 3.8 cm wide. Six rows of fan shell pattern = 3 inches / 7.6 cm tall.
Alternate gauge check: 18 stitches x 10 rows in single crochet = 4 inches x 4 inches / 10 cm x 10 cm.
Work a swatch of at least 20 stitches and 12 rows before starting. If your swatch is too small, go up a hook size. If it is too large, go down a hook size.
Abbreviations
Special Stitches
Fan Shell Stitch (FS)
Work 5 double crochet stitches all into the same stitch or space. This creates one fan or shell unit. When placed over the chain space of the previous row, it fans outward and creates that beautiful petal like texture throughout the dress.
Scallop Edge Stitch
Worked in CC. Slip stitch into next stitch, chain 3, 2 double crochet in same stitch, slip stitch into next stitch. Repeat across. Each scallop uses 2 stitches of the base edge, creating that rounded ruffle trim along the straps and hem.
Picot Stitch
Chain 3, slip stitch in first chain of chain 3. Creates a small decorative loop.
Daisy Flower (Make 3)
With CC, make a magic ring.
Round 1: Ch 1, 8 sc into ring, sl st to first sc to join. (8 sc)
Round 2: (Ch 4, sl st in 2nd ch from hook, sc in next ch, hdc in next ch, sl st into next sc of rnd 1) 8 times. (8 petals)
Fasten off CC, leaving a tail for attaching.
For the center: With AC (yellow), make a magic ring. Ch 1, 6 sc into ring, sl st to join. Fasten off, leaving a tail. Sew the yellow center onto the daisy. Finished daisy measures approximately 1.25 inches / 3.2 cm across.
Daisy Leaf (Make 2)
Ch 8. Sl st in 2nd ch from hook, sc in next ch, hdc in next ch, dc in next ch, hdc in next ch, sc in next ch, sl st in last ch. Fasten off, leaving a tail for attaching.
Pattern Notes Before You Begin
1. The dress is constructed in this order: back bodice panel, front bodice panel, strap seaming, skirt in the round, hem border, strap borders, daisy appliques.
2. Both bodice panels are worked flat from the waist up to the shoulders. They are identical except the back panel has button loops at the top corners.
3. The skirt is worked in the round from the joined waist downward.
4. Fan shell rows that begin with single crochet use chain 1 as the turning chain. Rows that begin with a fan use chain 3 (counts as first double crochet).
5. The fan shell pattern for flat panels uses a multiple of 6 plus 1 stitches. For the skirt in the round, it uses a multiple of 6 stitches.
6. Right side of work is the smooth outward facing side. Keep this consistent throughout.
7. Leave 6 inch tails when joining new colors and weave them in securely, especially for items that will be washed frequently.
Instructions
Section 1: Back Bodice Panel
The back bodice panel is worked flat from the waist edge upward to the shoulder straps.
Foundation Chain: With MC, ch 38. (This yields 37 working stitches.)
Row 1 (WS, setup row): Sc in 2nd ch from hook, (ch 1, sk 2 ch, 5 dc in next ch, ch 1, sk 2 ch, sc in next ch) 6 times. Turn. (6 fans, 7 sc = 37 working sts)
Row 2 (RS): Ch 3 (counts as first dc), 2 dc in same sc (half fan at edge), ch 1, sc in top of next fan (center of the 3rd dc of the 5 dc fan), ch 1, (5 dc in next sc, ch 1, sc in center of next fan, ch 1) 5 times, 3 dc in last sc (half fan at edge). Turn. (5 full fans, 2 half fans, 6 sc)
Row 3 (WS): Ch 1, sc in first dc, (ch 1, 5 dc in next sc, ch 1, sc in center dc of next fan) 6 times, ending sc in top of turning ch. Turn. (6 fans, 7 sc)
Row 4 (RS): Repeat Row 2.
Row 5 (WS): Repeat Row 3.
Row 6 (RS): Repeat Row 2.
Row 7 (WS): Repeat Row 3.
Row 8 (RS): Repeat Row 2.
Checkpoint: After Row 8, the bodice panel should measure approximately 4.5 inches / 11.5 cm tall and 9 inches / 23 cm wide. If measurements differ by more than 0.5 inch, recheck your gauge.
Strap Shaping
You will now work two straps, each 1.5 inches / 4 cm wide. The center section remains open to form the square neckline.
Left Strap (as worn):
Row 9 (WS): Ch 1, sc in first dc, ch 1, 5 dc in next sc, ch 1, sc in center of next fan. Turn, leaving remaining stitches unworked. (1 fan, 2 sc)
Row 10 (RS): Ch 3, 2 dc in same sc (half fan), ch 1, sc in center of fan, ch 1, 3 dc in last sc (half fan). Turn. (2 half fans, 1 sc)
Row 11 (WS): Ch 1, sc in first dc, ch 1, 5 dc in next sc, ch 1, sc in top of turning ch. Turn. (1 fan, 2 sc)
Rows 12-15: Continue alternating Rows 10 and 11.
Fasten off, leaving a 12 inch tail for seaming.
Right Strap (as worn):
With WS facing, skip the center 25 stitches (the open neckline), rejoin MC to the last fan group sc.
Row 9 (WS): Ch 1, sc in same st, ch 1, 5 dc in next sc, ch 1, sc in last sc. Turn. (1 fan, 2 sc)
Rows 10-15: Work same as Left Strap Rows 10-15.
At end of Row 15: Ch 8, sc in 6th ch from hook (button loop made), ch 2, sl st to top corner. Fasten off.
Repeat button loop at the left strap top corner.
Section 2: Front Bodice Panel
Work exactly as Back Bodice Panel through Row 8.
Strap Shaping: Work Rows 9-15 for both straps exactly as the back, but without adding button loops. Fasten off both straps.
Section 3: Seaming the Bodice
Place front and back panels with wrong sides together (right sides facing out). Using a tapestry needle and MC, whipstitch the side seams from the waist up to where the straps begin (the armhole). Do not seam the straps yet.
Seam the left strap front to left strap back along the top edge using whipstitch.
Seam the right strap front to right strap back along the top edge using whipstitch.
Leave the button loops accessible on the back panel. Sew one button onto each front strap corner, aligned with the back button loops.
Section 4: Skirt (Worked in the Round)
The skirt is worked by picking up stitches along the bottom edges of both bodice panels.
Setup Round: With RS facing and MC, join yarn at one side seam at the waist. Work 1 sc in each foundation chain stitch around the entire bottom edge. Work 2 sc in each corner to prevent pulling. Adjust your stitch count to achieve 78 sc total (this is divisible by 6 for the fan pattern). Sl st to first sc to join. Place stitch marker. (78 sc)
Round 1 (RS, fan pattern setup): Ch 1, sc in same st, (ch 1, sk 2 sc, 5 dc in next sc, ch 1, sk 2 sc, sc in next sc) 12 times, ch 1, sk 2 sc, 5 dc in next sc, ch 1, sk last 2 sc, sl st to first sc. (13 fans, 13 sc)
Round 2: Ch 3, 2 dc in base of ch 3, ch 1, (sc in center dc of next fan, ch 1, 5 dc in next sc, ch 1) 12 times, sc in center dc of last fan, ch 1, sl st to top of ch 3. (13 fans, 13 sc)
Round 3: Sl st into next ch sp, ch 1, sc in same ch sp, (ch 1, 5 dc in next sc, ch 1, sc in next ch sp between fans) 12 times, ch 1, 5 dc in next sc, ch 1, sl st to first sc. (13 fans, 13 sc)
Rounds 4-6: Continue alternating Round 2 and Round 3 patterns.
Checkpoint: After Round 6, the skirt should measure approximately 3 inches / 7.6 cm from the waist.
Skirt Flare Increases
Increase Round A: Work the established fan round pattern, but at two evenly spaced points (approximately at the side seams), work 2 fans into 1 sc anchor point instead of 1 fan. This increases your fan count from 13 to 15. (15 fans, 15 sc = 90 working sts)
Rounds 7-12: Continue in the established 15 fan round pattern, alternating fan rounds and sc anchor rounds.
Checkpoint: After Round 12, the skirt should measure approximately 6.5 inches / 16.5 cm from the waist.
Section 5: Hem Border
Border Round 1 (SC foundation): With CC, ch 1, sc evenly around the hem, working approximately 90 sc total (6 sc per fan repeat). Sl st to first sc. (90 sc)
Border Round 2 (Scallop): (Sl st in next sc, ch 3, 2 dc in same sc, sl st in next sc) 45 times. (45 scallop shells)
Fasten off CC. Weave in ends.
Section 6: Strap Borders
With RS facing, join CC at the armhole edge of one strap. Work sc evenly along the outer edge (approximately 18 sc per strap side).
Work scallop border: (Sl st in next sc, ch 3, 2 dc in same sc, sl st in next sc) across. Fasten off.
Repeat for all four strap long edges.
Section 7: Daisies and Leaves Assembly
Make 3 daisy flowers and 2 leaves following the special stitch instructions above.
Arrange the 3 daisies in a row at the center front waist seam. Tuck one leaf between the left and center daisies, and one leaf between the center and right daisies. Pin in place before sewing.
Using your tapestry needle and the yarn tails, sew each daisy and leaf securely to the bodice, catching only the back loops so stitches do not show on the wrong side.
Section 8: Buttons
Sew one button to the front right strap corner, aligned with the back right button loop. Sew one button to the front left strap corner, aligned with the back left button loop. Test the fit before finalizing placement.
Size Customization Tips
To size up (12-18 months or 18-24 months): Add 1 full fan repeat (6 stitches) to each bodice panel foundation chain (ch 44 instead of ch 38). Begin skirt with 90 sc and 15 fans from Round 1. Increase to 17 fans for the flare.
To size down (3-6 months): Remove 1 fan repeat from each bodice panel (ch 32). Begin skirt with 66 sc and 11 fans. Flare to 13 fans.
To lengthen the skirt: Add fan shell rounds before the hem border. Each 2 rounds adds approximately 1 inch of length.
To shorten the skirt: Skip Rounds 11 and 12. Proceed directly to the hem border after Round 10.
Finishing and Blocking
Wet blocking will dramatically improve how this dress looks. Trust me on this one.
Fill a basin with cool water and a small amount of wool wash. Submerge the dress and let it soak for 20 minutes. Do not wring or twist.
Gently press water out by rolling in a clean towel. Lay flat on a blocking mat. Pin the hem to the desired circumference, easing the fan shells open evenly. Pin the straps straight and the bodice to measurements.
Allow to dry completely, about 24 to 48 hours. Blocking opens up the lace pattern beautifully and evens everything out.
Care Instructions
Machine wash on delicate cycle in cold water using a mesh laundry bag. Or hand wash in cool water with mild detergent. Lay flat to dry. Do not tumble dry. Store folded, not hung, to prevent stretching.
I really hope you love making this crochet baby dress as much as I loved designing it. The combination of that soft mint color, the delicate lacework, and those sweet little daisies creates something truly special. It is the kind of handmade gift that makes people gasp when they open it.
If you found this pattern helpful, I would love for you to save it to your Pinterest boards so you can find it easily when you are ready to start. And please leave a comment below if you make one. Seeing your finished dresses absolutely makes my day, and I would love to hear how it turned out for you.
You Might Also Like
- Sage Green Ribbed Flared Dress Free Crochet Pattern
- Sunset Peach Woven Crochet Clutch Free Pattern
- Lavender Daisy Wrist Cuff Free Crochet Pattern
- Coral Sunset Mandala Crochet Two-Piece Free Pattern