
This bag is GORGEOUS and honestly one of those projects that looks way more complicated than it actually is. The bobble texture, those sweet cream flowers, the leather strap hardware. It all comes together into something that looks straight out of a boutique. You could absolutely make this in a weekend if you set aside some dedicated crochet time, and I promise the finished result will have people asking where you bought it.
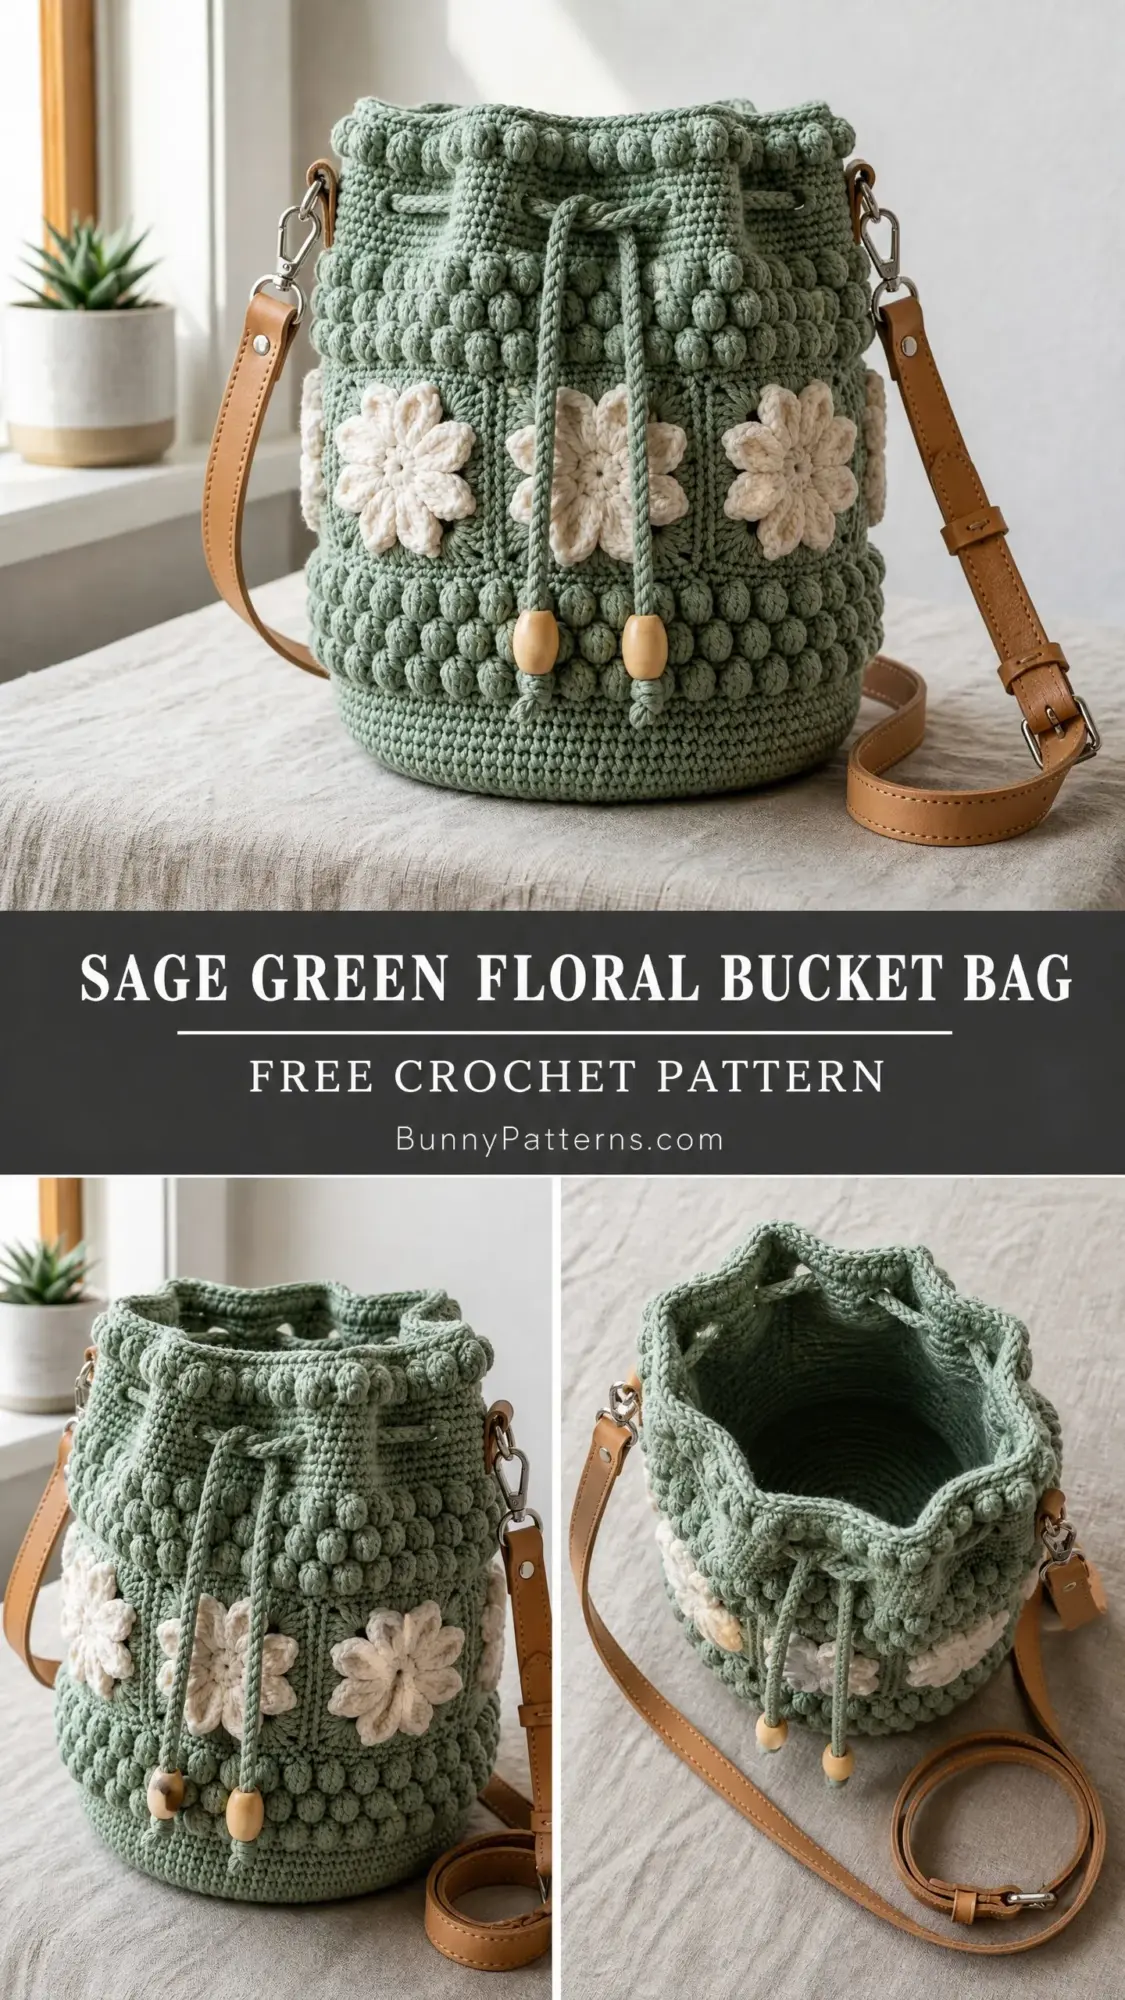
I designed this bucket bag to hit that sweet spot between impressive and achievable. The construction is straightforward since you work from the bottom up in continuous rounds. No weird shaping, no confusing decreases. Just good solid stitchwork that builds into something truly special.
If you have been wanting to try bobble stitches or just need a practical project that doubles as a statement piece, this is your sign. Let me walk you through everything you need to know.
Why You Will Love This Crochet Bucket Bag Pattern
This sage green floral bucket bag has become one of my favorite makes for so many reasons. The bobble stitch texture gives the whole piece incredible dimension and visual interest. Those raised bumps catch the light beautifully and create a fabric that feels substantial and structured.
The three cream flower appliques add a feminine touch without being over the top. They sit in a band around the middle of the bag, breaking up the bobble texture perfectly. And the leather strap with silver hardware elevates the whole thing from craft project to actual accessory you will reach for constantly.
The finished bag measures approximately 10 inches wide by 11 inches tall, not including the strap. That is plenty of room for your phone, wallet, keys, sunglasses, and whatever else you need to carry. The drawstring closure keeps everything secure, and those wooden bead accents on the cord add such a lovely organic detail.
Skill Level and Time Estimate
I am calling this one intermediate level. You will need to be comfortable working in continuous rounds, making consistent bobble stitches, crocheting a flat circular base without it warping on you, and sewing on applique motifs neatly. Nothing here is advanced, but bobble tension control is essential to get that polished finished look.
Plan for 12 to 18 hours of work if you are an experienced intermediate crocheter. The three flower appliques add some time, and the hardware assembly requires a bit of patience. But honestly, this is such a satisfying project that the hours fly by.
Materials You Will Need
Gathering your supplies before you start will make the whole process smoother. Here is everything required for this crochet bucket bag pattern.
Yarn
Main Color (MC): Sage green, approximately 400 yards (366 m) of bulky weight yarn (US weight 5). This makes up the entire bag body.
Contrast Color (CC): Cream or off-white, approximately 80 yards (73 m) of the same weight for the flowers.
Recommended Yarn Brands
Lion Brand Pound of Love in bulky weight works beautifully here. The 100% acrylic gives excellent stitch definition for bobbles and is machine washable.
Paintbox Yarns Simply Chunky is another solid choice. The consistent twist and smooth surface create clean bobble shapes, and their color range includes lovely sage and cream options.
Wool and the Gang Shiny Happy Cotton in bulky weight is perfect if you want a firmer bag. The cotton content provides natural structure and a slight sheen.
A quick note on yarn substitution: choose a smooth, tightly plied yarn. Loosely spun or fuzzy yarns will obscure your bobble texture, and you definitely want those bobbles to pop. Avoid anything with high halo.
Hook
US Size K / 6.5 mm crochet hook, or whatever size you need to meet gauge.
Notions
You can purchase the strap and hardware as a pre-made bag strap set from craft and bag-making suppliers. This saves time and ensures everything coordinates nicely.
Gauge
Getting gauge right matters for this project. An incorrect gauge will throw off both the circumference and height significantly.
Single crochet gauge: 14 single crochet stitches and 16 rows = 4 inches (10 cm) in single crochet worked in the round, unblocked.
Bobble gauge: 7 bobble stitches and 5 bobble rounds = 4 inches (10 cm) in bobble stitch pattern worked in the round.
If your bobble gauge is looser, go down half a hook size. If tighter, go up half a hook size.
Abbreviations and Stitch Definitions
Let me walk you through every abbreviation you will encounter in this pattern. I am defining each one in plain English so there is no confusion.
ch = chain. Wrap yarn over hook, pull through the loop on your hook.
sl st = slip stitch. Insert hook, yarn over, pull through both the stitch and the loop on hook in one motion.
sc = single crochet. Insert hook, yarn over, pull up a loop (2 loops on hook), yarn over, pull through both loops.
dc = double crochet. Yarn over, insert hook, yarn over, pull up a loop (3 loops), yarn over, pull through 2 loops, yarn over, pull through remaining 2 loops.
hdc = half double crochet. Yarn over, insert hook, yarn over, pull up a loop (3 loops), yarn over, pull through all 3 loops at once.
inc = increase. Work 2 single crochet stitches into the same stitch.
sk = skip. Pass over the indicated stitch without working into it.
sp = space. The gap created by chain stitches.
st(s) = stitch or stitches.
BLO = back loop only. Work into only the back loop of the stitch, leaving the front loop unworked.
FLO = front loop only. Work into only the front loop of the stitch.
RS = right side. The outside of your work that will be visible when finished.
WS = wrong side. The inside of your work.
rnd = round.
rep = repeat.
rem = remaining.
pm = place marker.
sm = slip marker.
Special Stitches
Bobble Stitch (bo)
The bobble stitch creates a raised rounded bump on the right side of your fabric. It is worked over one stitch position, and it is what gives this bag its incredible texture.
Step 1: Yarn over, insert hook into the indicated stitch or space.
Step 2: Yarn over and pull up a loop. You now have 3 loops on your hook.
Step 3: Yarn over and pull through the first 2 loops only. You now have 2 loops remaining. This is one incomplete double crochet.
Step 4: Repeat steps 1 through 3 four more times in the same stitch, until you have 6 loops on the hook.
Step 5: Yarn over and pull through all 6 loops on the hook.
Step 6: Chain 1 to close and lock the bobble. This chain 1 counts as the top of the bobble and does not count as a separate stitch.
When working bobbles in the round, always keep the right side facing you. The closing chain 1 should be firm. Do not skip it.
Drawstring Eyelet
Chain 2, skip 2 stitches. On the following round, work into these chain-2 spaces as if they were 2 stitches.
Pattern Notes Before You Begin
A few important things to keep in mind as you work through this crochet tutorial.
The bag is worked in continuous rounds (spiral) for the base and body sections. Use a stitch marker in the first stitch of each round and move it up as you go. This helps you keep track of where rounds begin and end.
The drawstring channel round is the only round worked as a joined round. All other rounds are continuous spirals.
Bobble stitches are worked on every odd round of the bobble section. Even rounds between bobble rounds are worked entirely in single crochet through the back loop only. This creates horizontal ridges and stabilizes the fabric.
Bobbles are always worked into the single crochet stitches of the previous even round. They are never stacked directly on top of each other.
The stitch count throughout the bobble body section is 84 stitches. This divides evenly by the bobble repeat (every 3 stitches: 1 bobble, 2 sc) giving 28 bobbles per bobble round.
Step by Step Crochet Pattern Instructions
Section 1: Base
The base is a flat circle worked in continuous rounds of single crochet.
Foundation: Magic ring (adjustable loop).
Round 1: Work 6 sc into the magic ring. Pull ring closed. (6 sc)
Round 2: Work 2 sc in each stitch around. (12 sc)
Round 3: (1 sc, inc) around. Repeat the sequence of 1 sc then inc all the way around. (18 sc)
Round 4: (2 sc, inc) around. (24 sc)
Round 5: (3 sc, inc) around. (30 sc)
Round 6: (4 sc, inc) around. (36 sc)
Round 7: (5 sc, inc) around. (42 sc)
Round 8: (6 sc, inc) around. (48 sc)
Round 9: (7 sc, inc) around. (54 sc)
Round 10: (8 sc, inc) around. (60 sc)
Round 11: (9 sc, inc) around. (66 sc)
Round 12: (10 sc, inc) around. (72 sc)
Round 13: (11 sc, inc) around. (78 sc)
Round 14: (12 sc, inc) around. (84 sc)
CHECKPOINT: After Round 14 your flat base should measure approximately 9.5 to 10 inches (24 to 25 cm) in diameter. It should lie flat without ruffling or cupping. If it ruffles, your gauge is too loose. Go down a hook size. If it cups, your gauge is too tight. Go up a hook size.
Section 2: Base Transition Rounds
These two rounds shift from the flat base to the vertical walls using back loop only single crochet. Working through the back loop only creates a crisp fold at the base edge.
Round 15: Working in BLO, sc in each stitch around. (84 sc)
Round 16: Working through both loops, sc in each stitch around. (84 sc)
Section 3: Lower Single Crochet Band
This smooth band sits at the very bottom of the bag sides and provides a clean visual base below the bobbles.
Round 17: Sc in each stitch around. (84 sc)
Round 18: Sc in each stitch around. (84 sc)
Round 19: Sc in each stitch around. (84 sc)
CHECKPOINT: After Round 19 your bag walls should be rising cleanly from the base. The sides should stand up vertically. Height from base to current round should be approximately 1 inch (2.5 cm) above the base fold line.
Section 4: Bobble Body
The bobble body is the main visual section of the bag. It alternates bobble rounds with back-loop-only single crochet rounds. Bobbles are worked in a staggered offset on alternating bobble rounds so the bobbles brick across the surface.
Round 20 (Bobble Round A): (1 bo, 2 sc) 28 times. (84 sts, 28 bobbles)
Round 21 (Single Crochet Round): Working in BLO, sc in each stitch around. Work 1 sc into the top of each bobble and 1 sc into each of the 2 sc between bobbles. (84 sc)
Round 22 (Bobble Round B, offset by 1 stitch): 1 sc, (1 bo, 2 sc) 27 times, 1 bo, 1 sc. This shifts the bobbles to fall between the bobbles of Round 20. (84 sts, 28 bobbles)
Round 23 (Single Crochet Round): Working in BLO, sc in each stitch around. (84 sc)
Round 24 (Bobble Round A): (1 bo, 2 sc) 28 times. (84 sts, 28 bobbles)
Round 25 (Single Crochet Round): Working in BLO, sc in each stitch around. (84 sc)
Round 26 (Bobble Round B, offset): 1 sc, (1 bo, 2 sc) 27 times, 1 bo, 1 sc. (84 sts, 28 bobbles)
Round 27 (Single Crochet Round): Working in BLO, sc in each stitch around. (84 sc)
Round 28 (Bobble Round A): (1 bo, 2 sc) 28 times. (84 sts, 28 bobbles)
Round 29 (Single Crochet Round): Working in BLO, sc in each stitch around. (84 sc)
Round 30 (Bobble Round B, offset): 1 sc, (1 bo, 2 sc) 27 times, 1 bo, 1 sc. (84 sts, 28 bobbles)
Round 31 (Single Crochet Round): Working in BLO, sc in each stitch around. (84 sc)
Round 32 (Bobble Round A): (1 bo, 2 sc) 28 times. (84 sts, 28 bobbles)
Round 33 (Single Crochet Round): Working in BLO, sc in each stitch around. (84 sc)
Round 34 (Bobble Round B, offset): 1 sc, (1 bo, 2 sc) 27 times, 1 bo, 1 sc. (84 sts, 28 bobbles)
Round 35 (Single Crochet Round): Working in BLO, sc in each stitch around. (84 sc)
Round 36 (Bobble Round A): (1 bo, 2 sc) 28 times. (84 sts, 28 bobbles)
Round 37 (Single Crochet Round): Working in BLO, sc in each stitch around. (84 sc)
CHECKPOINT: After Round 37, the bobble body should measure approximately 7 to 7.5 inches (18 to 19 cm) tall from the base fold. You should have 9 complete bobble rounds creating a full textured grid. The bobbles should stack in a neat offset brick pattern when viewed straight on.
Section 5: Upper Single Crochet Band
This smooth section sits above the bobbles and below the drawstring channel.
Round 38: Sc in each stitch around. (84 sc)
Round 39: Sc in each stitch around. (84 sc)
Section 6: Drawstring Eyelet Round
This is a joined round. At the end of Round 39, slip stitch into the first stitch to join. Chain 1 to begin the eyelet round. The bag is still worked with RS facing.
Round 40 (Eyelet Round): (sc in next 2 sts, ch 2, sk 2 sts) 21 times. Slip stitch into the first sc of the round to join. (84 sts equivalent: 42 sc and 21 ch-2 spaces)
Round 41: Work in continuous rounds again. Sc in each stitch around, working 2 sc into each ch-2 space to restore the full stitch count. (84 sc)
Section 7: Upper Bobble Rim
The top rim mirrors the bobble texture and creates the raised rolled edge visible in the finished bag.
Round 42 (Bobble Round): (1 bo, 2 sc) 28 times. (84 sts, 28 bobbles)
Round 43 (Single Crochet Round): Working in BLO, sc in each stitch around. (84 sc)
Round 44 (Bobble Round, offset): 1 sc, (1 bo, 2 sc) 27 times, 1 bo, 1 sc. (84 sts, 28 bobbles)
Round 45 (Single Crochet Round): Working in BLO, sc in each stitch around. (84 sc)
Round 46 (Bobble Round): (1 bo, 2 sc) 28 times. (84 sts, 28 bobbles)
Round 47: Sc in each stitch around. (84 sc)
Slip stitch into the next stitch to close the round neatly. Fasten off and weave in the end securely on the inside.
CHECKPOINT: The total bag body should now measure approximately 10 to 11 inches (25 to 28 cm) tall from base to the top of Round 47. The drawstring eyelets should be visible as a clean channel running around the bag at approximately the 8-inch (20 cm) height mark from the base.
Section 8: Drawstring Cord
Using MC, make a chain approximately 48 inches (122 cm) long, or to your preferred length. Slip stitch into the second chain from the hook and into each chain across to form a tight, rounded cord. Fasten off leaving a 6-inch (15 cm) tail.
Thread the cord through the eyelet round beginning at the center front of the bag. Pass the cord in and out through each ch-2 space all the way around so both ends emerge at the center front.
Thread one wooden bead onto each end of the cord. Tie a firm overhand knot below each bead to secure. Trim excess cord if desired, leaving at least 1 inch (2.5 cm) below the knot.
Thread a third wooden bead onto both strands together just below where they emerge from the bag to create the central gathered drawstring look. Knot below this bead to hold it in place.
Section 9: Flower Appliques (Make 3)
Each flower is worked in CC (cream). Make 3 identical flowers.
Foundation: Magic ring.
Round 1: Ch 1, work 10 sc into the ring. Pull ring closed. Slip stitch to first sc to join. (10 sc)
Round 2: Ch 1. (sc in next st, inc) 5 times. Slip stitch to first sc to join. (15 sc)
Round 3 (Petal Round): Working in front loop only, (ch 3, work 4 dc in the same stitch, ch 3, sl st in the same stitch, sl st in next stitch) 5 times around. At the end slip stitch to join at base of first petal. (5 petals formed)
Round 4 (Back Petal Round): Return to the back loops of Round 2 stitches. Join yarn to any back loop. (ch 4, work 5 dc in the same stitch, ch 4, sl st in the same stitch, sl st in next stitch) 5 times around. Slip stitch to join. (5 larger back petals formed)
Fasten off leaving a 12-inch (30 cm) tail for sewing.
The finished flower has two layers of petals: a front layer of 5 smaller pointed petals and a back layer of 5 larger rounded petals offset between the front ones. This creates the full multi-petal look visible in the finished bag.
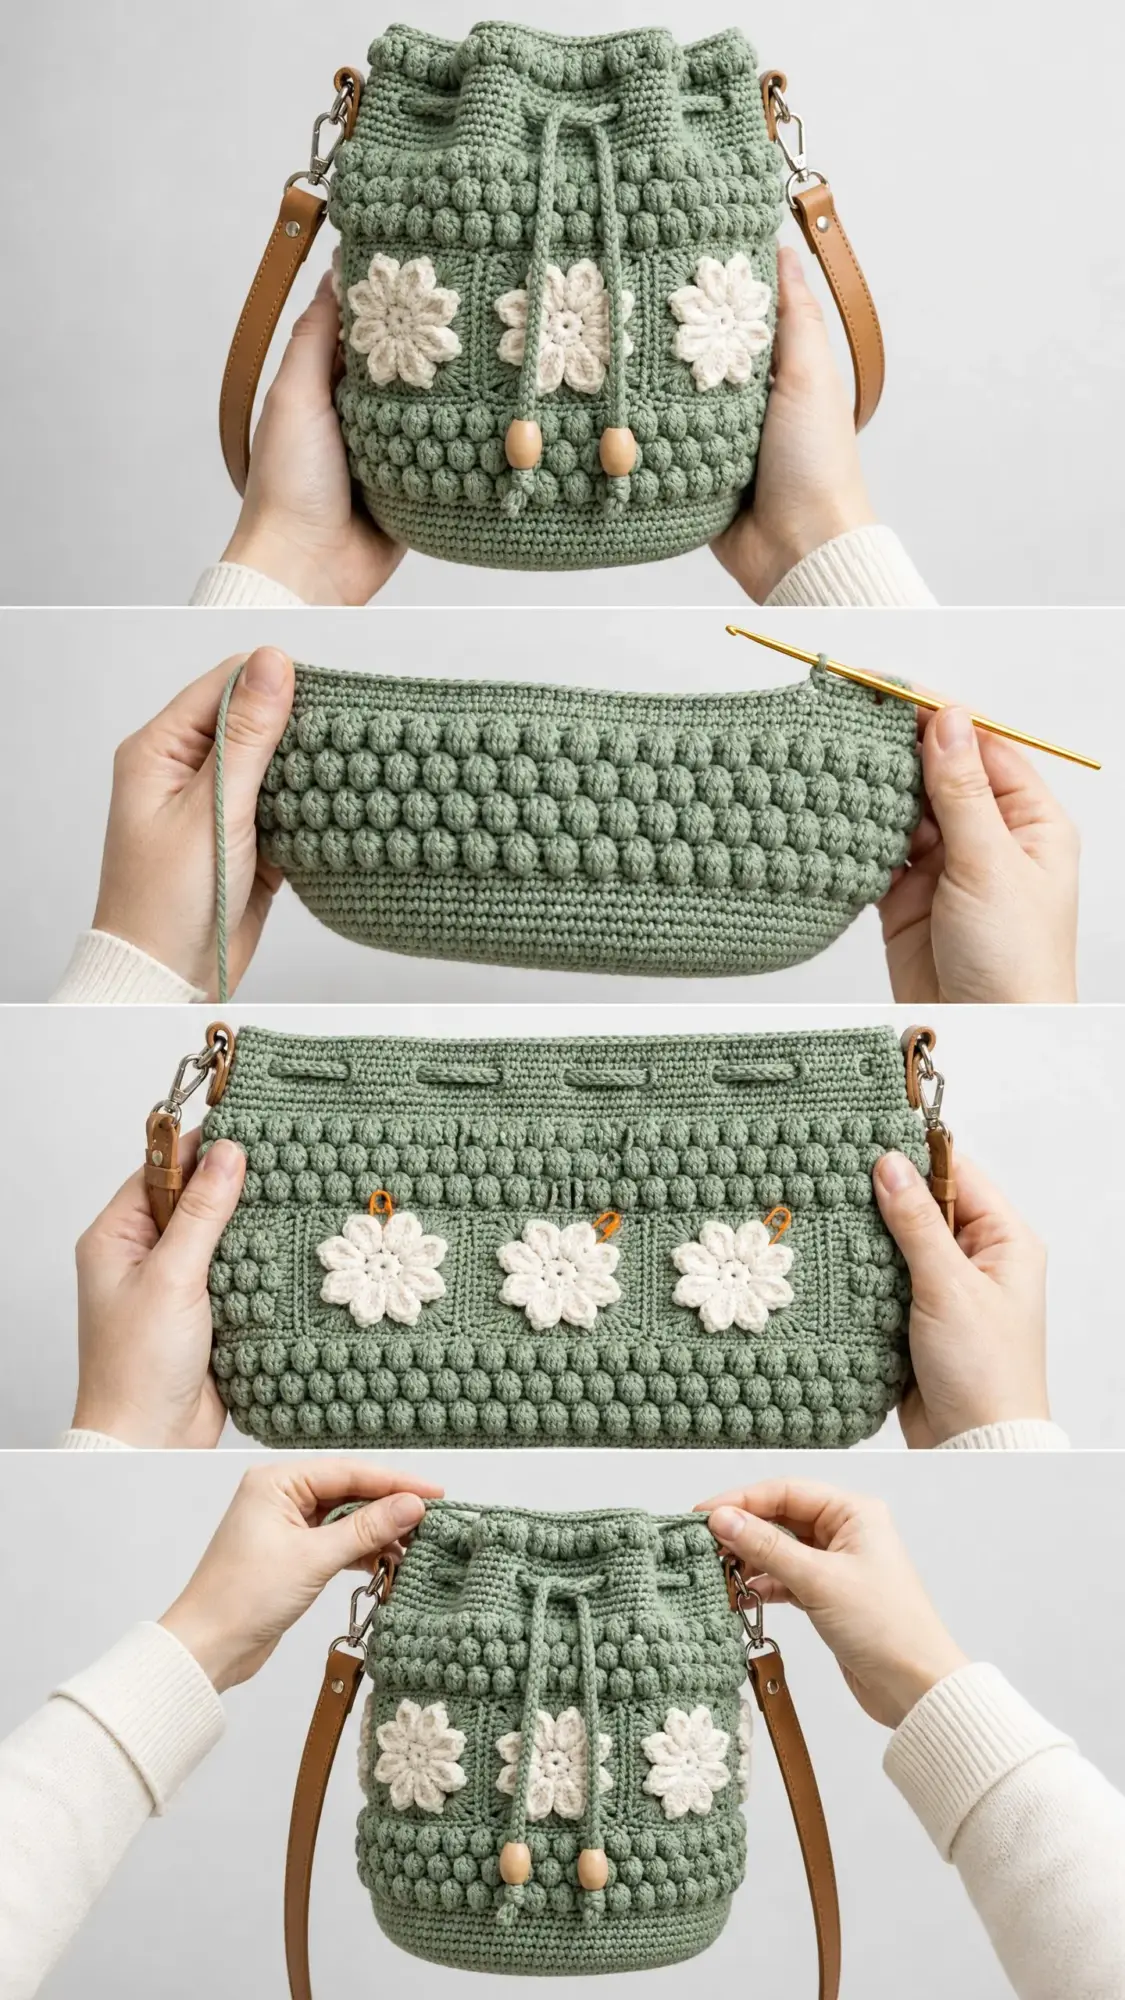
Flower Placement: Position the three flowers evenly spaced around the circumference of the bag, each approximately 120 degrees apart. Center each flower vertically between Rounds 26 and 34, which places them in the middle of the bobble body. Pin or use locking stitch markers to hold them in position before sewing.
Using the yarn tail and a yarn needle, sew each flower to the bag through the base of the flower center, catching the bobble stitches of the bag body with small secure stitches. Work around the perimeter of the flower center to anchor it flat. Weave in all ends on the inside.
Section 10: Hardware and Strap Attachment
At the 3 o’clock position (directly to the right side of the bag when facing the front) and the 9 o’clock position (directly to the left), create two attachment loops for the strap hardware.
Cut two lengths of MC approximately 18 inches (46 cm) long. Thread each length through a D-ring on a lobster clasp fitting. Fold the yarn in half so the D-ring sits at the fold. Insert both ends to the inside of the bag between Rounds 39 and 40 (just below the eyelet channel) using a yarn needle, passing through the bag wall from outside to inside. Pull through about 3 inches (7.5 cm) on the inside. Tie the ends together firmly with several square knots on the inside. Thread the tails back through the adjacent stitches for at least 1 inch (2.5 cm) in each direction to distribute the load and prevent tearing. Weave in all ends.
Attach the pre-made leather strap clips to the D-rings. Adjust the strap to the desired length using the buckle.
Finishing Your Bucket Bag
Weave in all yarn ends securely, especially around the base center and the strap attachment points. Use a yarn needle to bury all tails at least 1 to 1.5 inches (2.5 to 4 cm) through adjacent stitches before trimming.
If using acrylic yarn, do not wet block. Instead, lightly steam block the body on the outside using a steam iron held at least 1 inch (2.5 cm) above the surface. This relaxes the bobbles and evens the surface without flattening the texture.
If using cotton yarn, wet block the bag body by submerging in cool water, gently squeezing out excess water without wringing, then shaping on a round form (a large bowl or balloon works well) to the correct diameter and allowing to air dry completely before attaching hardware.
If you want a stiffer base, cut a circle of plastic canvas or cardboard to 9.5 inches (24 cm) diameter and insert it inside the finished bag before threading the drawstring.
Care Instructions
For acrylic yarn: Machine wash on a gentle cycle in a mesh laundry bag, cold water. Reshape while damp. Air dry flat. Do not put in a dryer.
For cotton yarn: Hand wash in cool water with mild soap. Do not wring. Roll in a towel to remove excess water. Reshape and air dry flat.
Remove the leather strap before washing. Wipe the leather strap with a slightly damp cloth if needed. Do not submerge leather hardware in water.
Size Customization Tips
To make the bag wider: Work additional increase rounds in the base section before stopping at 84 sc. Each additional increase round adds 6 stitches to the circumference. The bobble stitch repeat requires a stitch count divisible by 3, so adjust your final base round accordingly.
To make the bag taller: Add additional repeats of Rounds 20 through 37 (the bobble body section). Each full repeat of 2 rounds adds approximately 0.75 to 1 inch (2 to 2.5 cm) to the height.
To make the bag shorter: Remove 2 to 4 bobble rounds from the middle of Section 4. Keep at least 4 bobble rounds for a balanced look.
Thank you so much for choosing this sage green floral bucket bag crochet pattern. I truly hope you love making it as much as I loved designing it. If you finish one, I would absolutely love to see it. Tag me on Instagram or share your photos on Facebook. Happy crocheting!
If this pattern is calling your name, go ahead and save it to your Pinterest boards so you can find it when you are ready to start. And please drop a comment below if you make one. I love hearing how your projects turn out!
You Might Also Like
- Sage Green Bobble Stitch Sweater Vest Free Crochet Pattern
- Lavender Jellyfish Baby Blanket Free Crochet Pattern
- Coral Bloom Baby Dress Free Crochet Pattern
- Mint Green Popcorn Stitch Baby Jumpsuit Free Crochet Pattern