
Last summer, I found myself standing in a farmers market with my arms completely full. Tomatoes in one hand, a jar of honey wedged under my elbow, and somehow I was still trying to juggle my phone and wallet. My flimsy reusable bag had ripped at the seam for the third time that month. Right there, surrounded by fresh produce and mild embarrassment, I decided I needed to make myself a proper tote bag. Not just any tote, but something sturdy enough to actually carry things and pretty enough that I would want to grab it every single time I left the house.
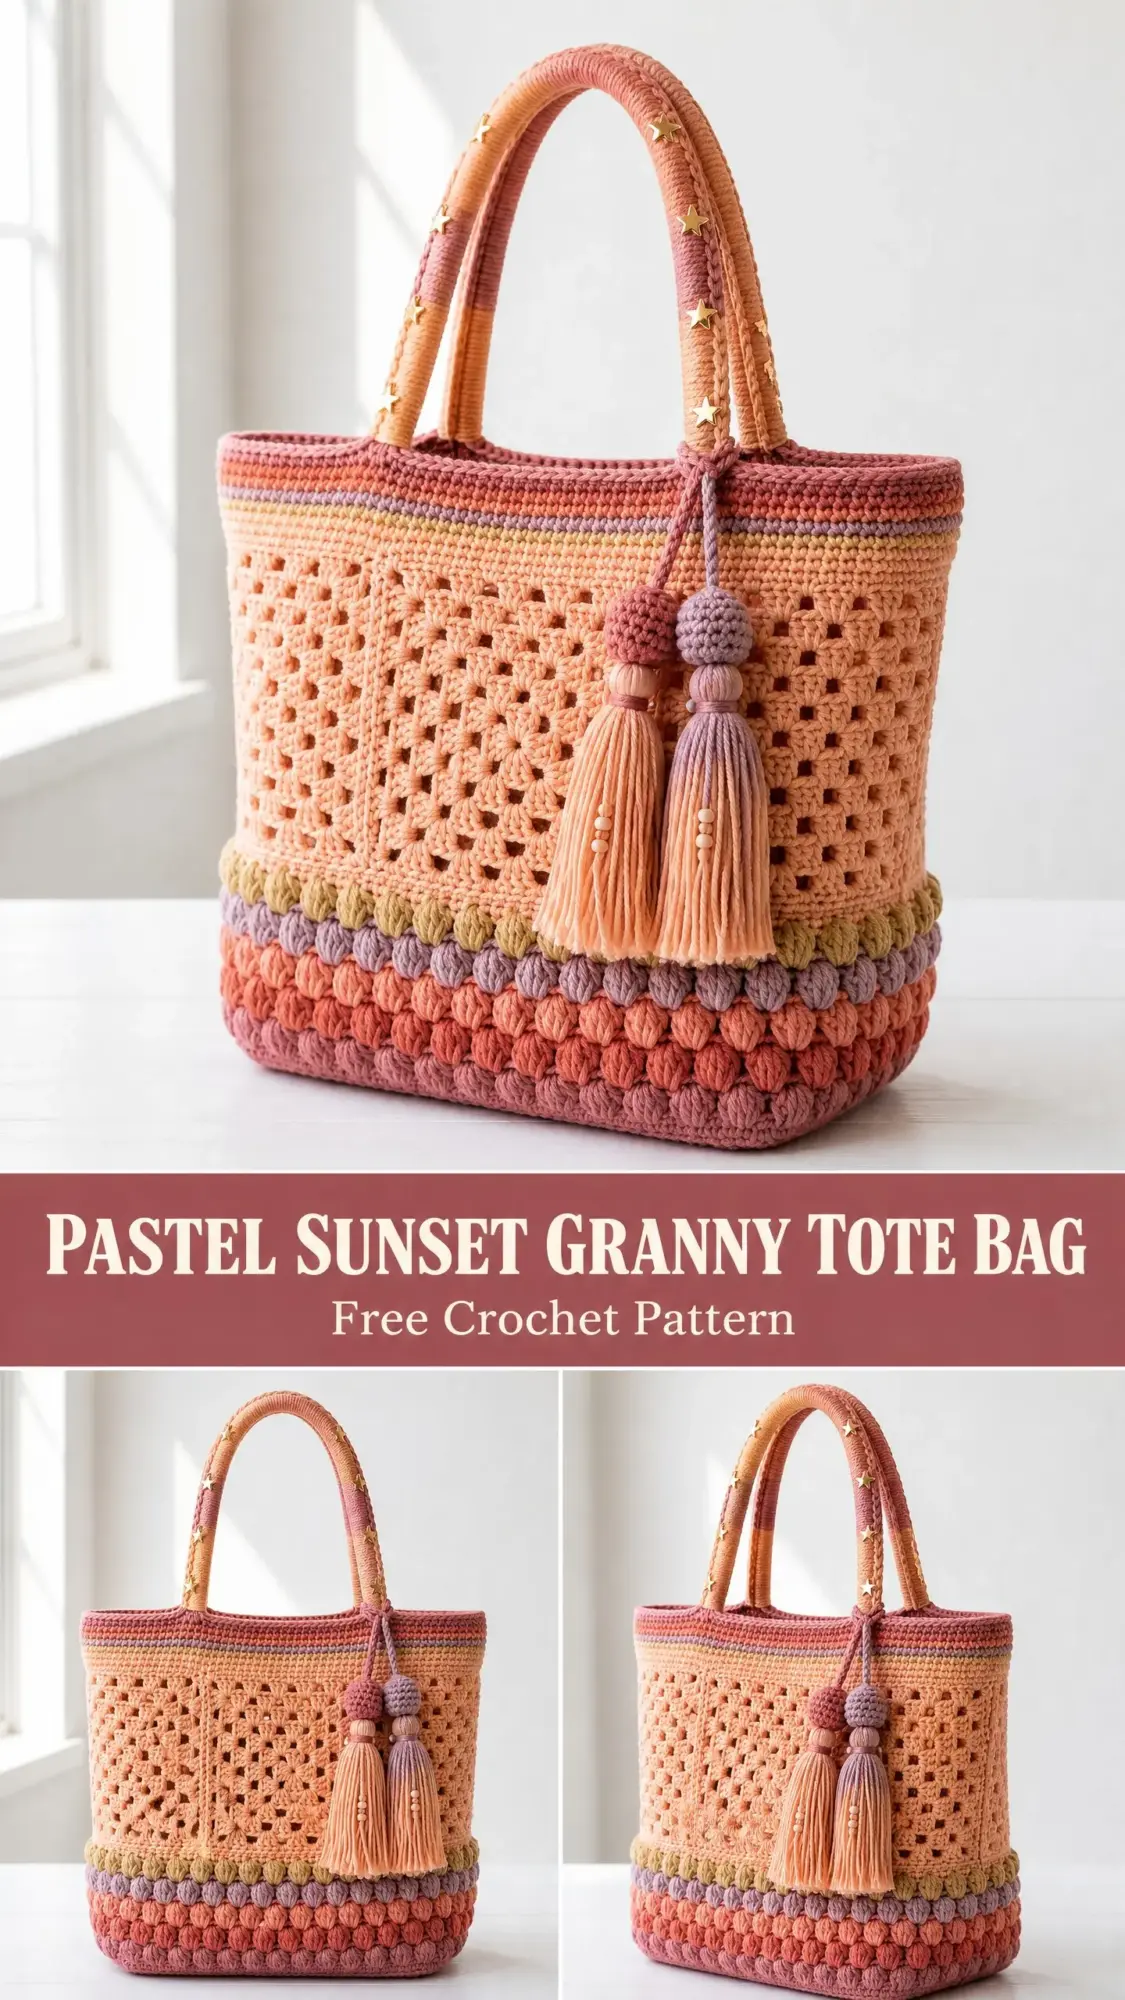
That moment became the inspiration for this Pastel Sunset Granny Tote Bag crochet pattern. I wanted a bag with real structure, one that would hold its shape whether it was stuffed full of groceries or sitting empty on my kitchen counter. The combination of bobble stitches at the base, open granny mesh in the middle, and colorful stripes at the top gives it texture and visual interest from every angle. Plus those little gold star charms on the handles make me smile every time I pick it up.
If you have been looking for a tote bag pattern that feels special but still functions as a workhorse, this is the one. The construction is straightforward once you understand each section, and the finished bag is genuinely useful. Let me walk you through exactly how to make it.
Why This Granny Tote Bag Pattern Works
This bag combines three distinct textures that create visual interest while also serving practical purposes. The bobble stitch band at the bottom adds thickness and durability right where your bag needs it most. The granny mesh body keeps the bag lightweight and gives it that classic handmade charm. And the colorwork stripes at the top add a pop of personality while reinforcing the opening.
The finished bag measures approximately 14 inches wide, 13 inches tall (not including handles), and 6 inches deep. That is plenty of room for library books, farmers market finds, or a full day’s worth of project supplies. The 10 inch handle drop means you can carry it comfortably on your shoulder or in your hand.
Skill Level and Time Commitment
I would call this an intermediate level crochet pattern. You should feel comfortable working in the round, changing colors, and following a multi-section pattern. If you have made granny squares before, the mesh section will feel familiar. If bobble stitches are new to you, do not worry. I will walk you through them step by step.
Plan for approximately 18 to 26 hours of crochet time, depending on your pace. The bobble band and handle wrapping take the most time, but both are relaxing once you get into a rhythm.
Materials You Will Need
Yarn (Worsted Weight, Category 4, 100% Cotton or Cotton Blend)
Recommended Yarn Brands
Lion Brand 24/7 Cotton works beautifully for this pattern. It has excellent stitch definition, holds its shape without blocking, and comes in all the soft sunset shades you need. Paintbox Yarns Simply DK held doubled is a budget friendly option with a gorgeous color range. WeCrochet Comfy Worsted (75% pima cotton, 25% acrylic) adds a bit of memory and durability if you want your bag to carry heavier loads.
Hooks
Notions
Gauge
Getting gauge right matters for this pattern because it affects both the size and structure of your finished bag.
With your H-8 / 5.0 mm hook and worsted weight cotton:
If your gauge is too tight, your bag will be smaller and stiffer. Go up a hook size. If your gauge is too loose, your bag will be larger and may not hold its shape. Go down a hook size.
Abbreviations and Special Stitches
Let me define every stitch and abbreviation before we begin so you can reference them as needed.
Standard Abbreviations
Special Stitches
Bobble Stitch (bo): This creates a raised, rounded cluster on the right side of your work. Here is how to make one: Yarn over, insert hook into the indicated stitch, yarn over and pull up a loop, yarn over and draw through 2 loops. You now have one incomplete double crochet on your hook. Repeat this sequence 4 more times in the same stitch (5 incomplete double crochets total). Yarn over and draw through all 6 loops on your hook. One bobble made.
Granny Mesh Shell (gms): Work 3 double crochets into the indicated chain space or stitch. This forms the classic granny cluster that gives the pattern its name.
Handle Wrap: Cut yarn lengths approximately 4 times the handle length plus 2 inches. Hold the tail against the handle and wrap yarn tightly around the core, trapping the tail under your first inch of wraps. Continue wrapping until the entire handle is covered. Thread charms onto the yarn between wrap sections as you go.
Pattern Instructions
Section 1: Oval Base
The base is worked flat in single crochet with increases at each short end to create an oval shape.
Foundation: With Color A (Peach) and H-8 hook, chain 31. Place a stitch marker in the 2nd chain from hook and another in the last chain.
Round 1 (RS): Starting in the 2nd chain from hook, work 1 sc in the 2nd chain from hook, 1 sc in each of the next 28 chains, work 3 sc in the last chain. Rotate your work to crochet along the bottom loops of the foundation chain. Work 1 sc in each of the next 28 chains along the bottom. Work 2 sc in the same stitch as the first sc. Sl st to the first sc to join. (64 sc)
Round 2: Ch 1. Work 2 sc in the first st, 1 sc in each of the next 28 sts, 2 sc in the next st, 2 sc in the next st, 1 sc in each of the next 28 sts, 2 sc in the last st. Sl st to join. (68 sc)
Round 3: Ch 1. Work 1 sc in the first st, 2 sc in the next st, 1 sc in each of the next 28 sts, 2 sc in the next st, 1 sc in the next st, 2 sc in the next st, 1 sc in each of the next 28 sts, 2 sc in the next st. Sl st to join. (72 sc)
Round 4: Ch 1. Work 1 sc in each of the first 2 sts, 2 sc in the next st, 1 sc in each of the next 28 sts, 2 sc in the next st, 1 sc in each of the next 2 sts, 2 sc in the next st, 1 sc in each of the next 28 sts, 2 sc in the next st. Sl st to join. (76 sc)
Round 5: Ch 1. Work 1 sc in each of the first 3 sts, 2 sc in the next st, 1 sc in each of the next 28 sts, 2 sc in the next st, 1 sc in each of the next 3 sts, 2 sc in the next st, 1 sc in each of the next 28 sts, 2 sc in the next st. Sl st to join. (80 sc)
Round 6: Ch 1. Work 1 sc in each of the first 4 sts, 2 sc in the next st, 1 sc in each of the next 28 sts, 2 sc in the next st, 1 sc in each of the next 4 sts, 2 sc in the next st, 1 sc in each of the next 28 sts, 2 sc in the next st. Sl st to join. (84 sc)
Round 7: Ch 1. Work 1 sc in each of the first 5 sts, 2 sc in the next st, 1 sc in each of the next 28 sts, 2 sc in the next st, 1 sc in each of the next 5 sts, 2 sc in the next st, 1 sc in each of the next 28 sts, 2 sc in the next st. Sl st to join. (88 sc)
Round 8: Ch 1. Work 1 sc in each st around. Sl st to join. (88 sc)
Fasten off and weave in ends. Your base should measure approximately 14 inches long and 6 inches wide. It should lie flat without cupping or ruffling.
Section 2: Bobble Stripe Band
This section creates the textured lower body of the bag using three colors in alternating rounds of bobbles and single crochet.
With RS facing, join Color B (Coral) with sl st to any stitch of the final base round.
Round 1 (Bobble Round, Color B): Ch 2 (does not count as dc). Work 1 bobble in each st around. Sl st to join. (88 bobbles)
Round 2 (Single Crochet Round, Color B): Ch 1. Work 1 sc in each st around (work into the tops of bobbles). Sl st to join. (88 sc)
Round 3 (Bobble Round, Color C): Join Color C. Ch 2. Work 1 bobble in each st around. Sl st to join. (88 bobbles)
Round 4 (Single Crochet Round, Color C): Ch 1. Work 1 sc in each st around. Sl st to join. (88 sc)
Round 5 (Bobble Round, Color D): Join Color D. Ch 2. Work 1 bobble in each st around. Sl st to join. (88 bobbles)
Round 6 (Single Crochet Round, Color D): Ch 1. Work 1 sc in each st around. Sl st to join. (88 sc)
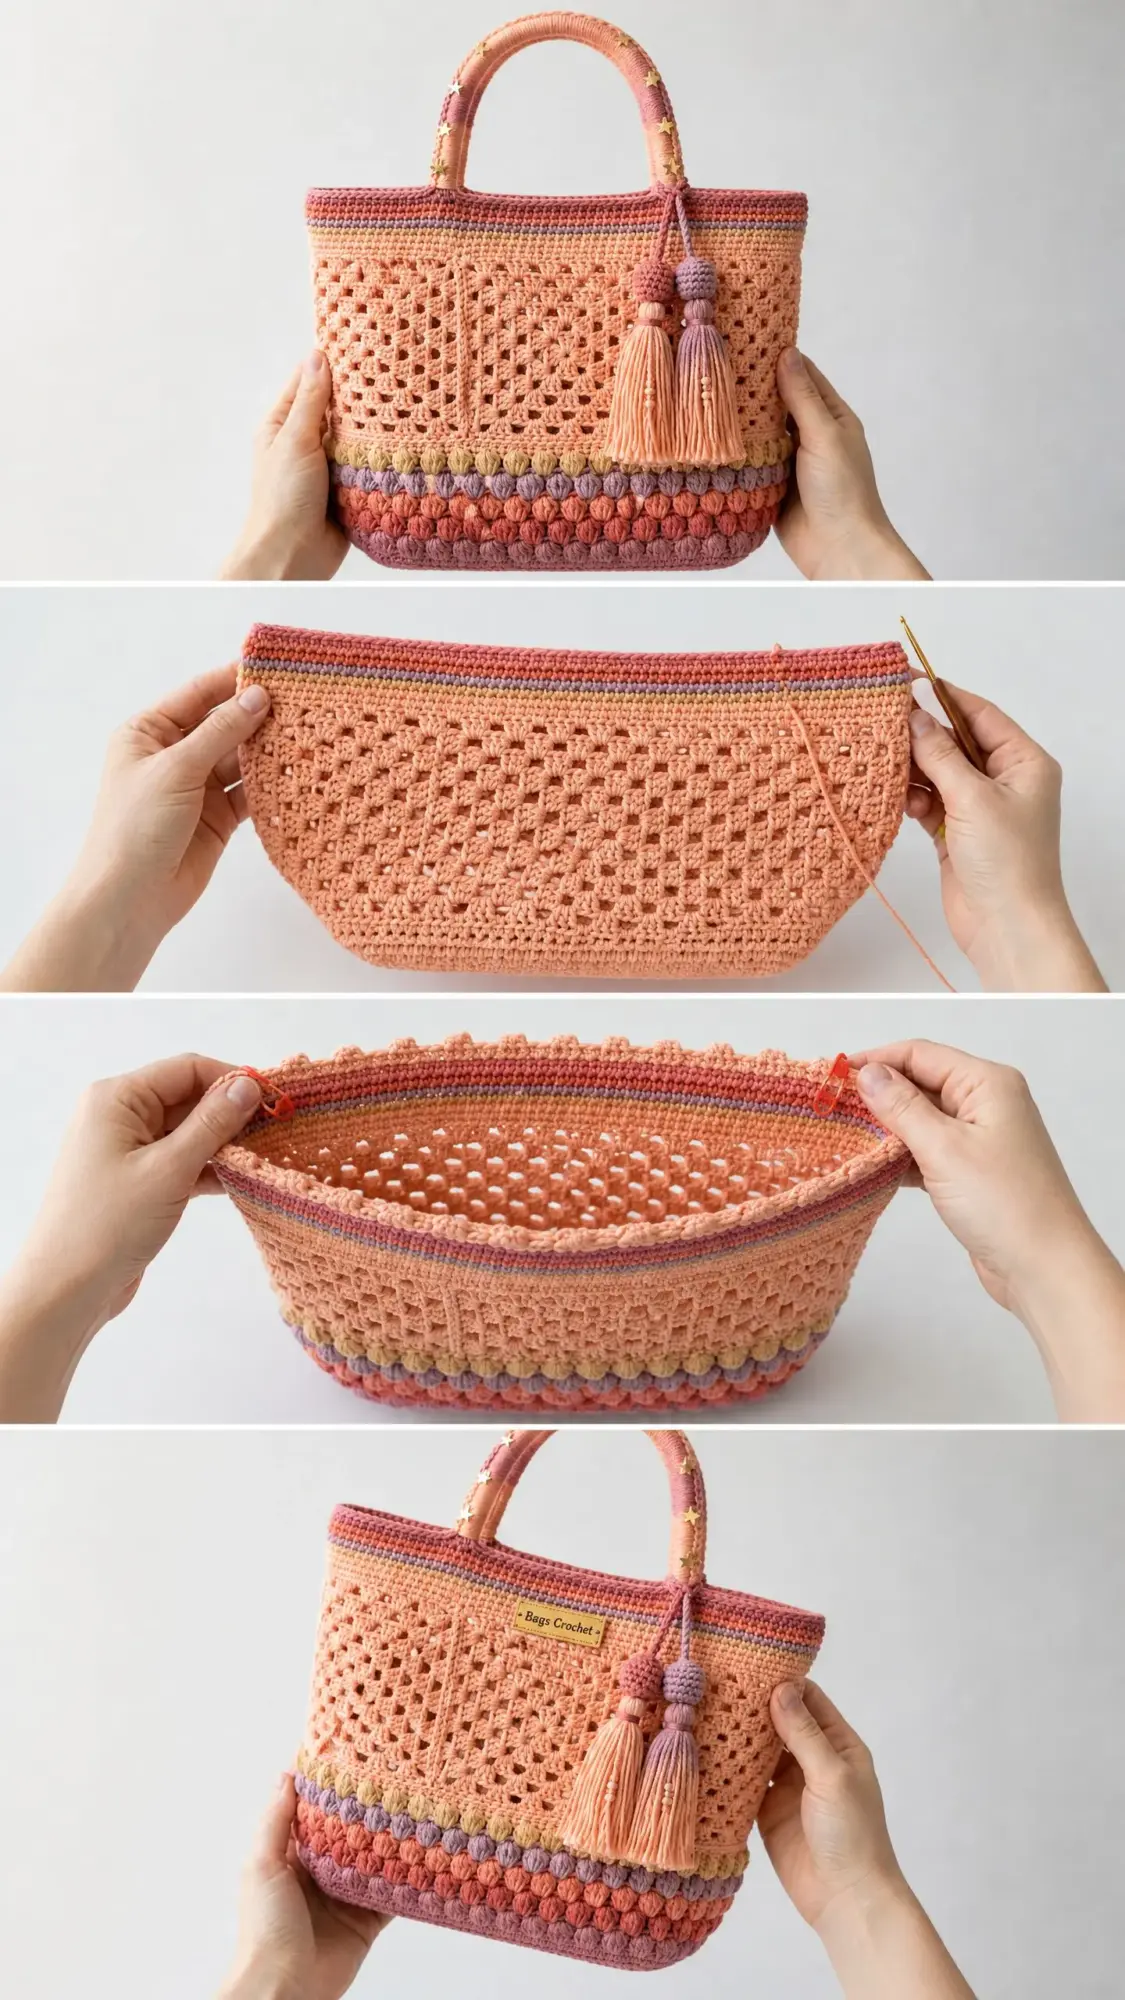
Fasten off all colors. Your bobble band should measure approximately 3.5 inches tall and show three distinct rows of bobbles in Coral, Dusty Rose, and Lavender.
Section 3: Transition Row
This single round in sage creates a clean break between the bobble band and granny mesh.
Join Color E with sl st to any stitch of the final sc round.
Transition Round: Ch 1. Work 1 sc in each st around. Sl st to join. (88 sc)
Fasten off Color E.
Section 4: Granny Mesh Body
This is the open lattice section that makes up the central body of the bag. You will convert your 88 stitches into 22 granny mesh shells.
Join Color A with sl st to any stitch of the Transition Round.
Setup Round: Ch 4 (counts as 1 dc + ch 1). Skip 3 sts. Work 3 dc in the next st. Ch 1. Skip 3 sts. Repeat (3 dc in next st, ch 1, skip 3 sts) around. Sl st to the 3rd chain of beg ch-4 to join. (22 shells of 3 dc with 22 ch-1 spaces)
Granny Mesh Round 1: Sl st across and into the first ch-1 sp. Ch 3 (counts as 1 dc). Work 2 dc in same ch-1 sp. Ch 1. Work 3 dc in next ch-1 sp. Ch 1. Repeat (3 dc in next ch-1 sp, ch 1) around. Sl st to the top of beg ch-3. (22 shells, 22 ch-1 spaces)
Repeat Granny Mesh Round 1 for a total of 8 rounds (including the Setup Round). Your granny mesh section should measure approximately 7 inches tall.
Section 5: Upper Colorwork Stripe Border
This section transitions back to single crochet with narrow stripes in multiple colors.
Transition to Single Crochet Setup: Join Color A with sl st to any ch-1 space of the final granny mesh round.
Ch 1. Work 2 sc in each ch-1 sp and 1 sc in each dc around. This gives you 44 sc from the chain spaces plus 66 sc from the double crochets. Sl st to join. (110 sc)
Stripe Round 1 (Color A): Ch 1. Work 1 sc in each st around. Sl st to join. (110 sc)
Stripe Round 2 (Color B): Join Color B. Ch 1. Work 1 sc in each st around. Sl st to join. (110 sc)
Stripe Round 3 (Color C): Join Color C. Ch 1. Work 1 sc in each st around. Sl st to join. (110 sc)
Stripe Round 4 (Color F): Join Color F. Ch 1. Work 1 sc in each st around. Sl st to join. (110 sc)
Stripe Round 5 (Color E): Join Color E. Ch 1. Work 1 sc in each st around. Sl st to join. (110 sc)
Stripe Round 6 (Color D): Join Color D. Ch 1. Work 1 sc in each st around. Sl st to join. (110 sc)
Stripe Round 7 (Color A): Join Color A. Ch 1. Work 1 sc in each st around. Sl st to join. (110 sc)
Stripe Round 8 (Color A): Ch 1. Work 1 sc in each st around. Sl st to join. (110 sc)
Stripe Round 9 (Color B): Join Color B. Ch 1. Work 1 sc in each st around. Sl st to join. (110 sc)
Fasten off all colors. Weave in all ends from the stripe section now.
Section 6: Handle Construction
Make 2 handles.
Core Preparation: Cut 2 lengths of rope or cord, each 24 inches long. Fold each in half so both ends meet, creating a loop.
Handle Wrapping: Using Color A yarn, wrap tightly and evenly around each cord from one end to the other. Trap the tail end under the first inch of wraps. As you wrap, slide gold star charms onto the yarn, spacing them approximately 1.5 inches apart. Use 5 to 6 charms per handle.
Handle Attachment: Position the first handle on the front of the bag, centered, with the cord ends approximately 4.5 inches apart. Using Color A and a yarn needle, stitch the cord ends securely to the inside of the top border. Repeat for the second handle on the back.
Section 7: Tassel Construction
Make 2 tassels, one in Color A (Peach) and one in Color D (Lavender).
For each tassel: Cut 30 lengths of yarn, each 12 inches long. Fold all strands together in half. Cut an 18 inch tying strand, fold it in half, loop it around the fold point, and pull through to create the hanging loop.
Wrap a 12 inch piece of yarn around all strands approximately 1 inch below the top. Wrap 5 to 6 times tightly and tie a firm knot. Thread 2 to 3 wooden beads onto the hanging loop above the tassel head. Trim ends evenly to 4 to 5 inches.
Tassel Cord Attachment: Cut a 16 inch length of Color D yarn. Fold in half and attach the midpoint to one handle base. Thread both tassels onto this cord and knot to secure.
Finishing Your Granny Tote Bag
Weave in all remaining yarn ends, threading through at least 4 to 5 stitches in different directions.
Wet blocking: Soak the finished bag in lukewarm water for 15 minutes. Gently squeeze out excess water without wringing. Stuff the bag firmly to hold its shape and smooth the granny mesh so all spaces are open and even. Allow to dry completely for 24 to 48 hours.
For extra structure, cut a piece of plastic canvas or craft foam to fit the base interior and slip it into the bottom of the bag.
Size Customization Tips
For a smaller tote (approximately 11 inches wide): Start with 21 chains instead of 31. Work only 5 increase rounds on the base. Complete 5 rounds of granny mesh instead of 8.
For a larger tote (approximately 17 inches wide): Start with 41 chains. Work 8 increase rounds, ending with 108 sc. Work 10 rounds of granny mesh with 27 shells.
To add depth: Work additional rounds in the granny mesh section. Each extra round adds about 1 inch of height.
Care Instructions
Hand wash in cool water with gentle detergent. Press out excess water without wringing. Reshape and dry flat or stuffed with a towel. Do not machine wash or tumble dry. Store flat or stuffed to maintain shape.
You Made It!
Thank you so much for choosing this pattern for your next project. I hope the finished bag brings you as much joy as mine has brought me. There is something really satisfying about carrying a bag you made with your own hands, especially one with this many textures and colors to admire.
If you make this Pastel Sunset Granny Tote Bag, I would absolutely love to see it! Tag me on Instagram or share a photo in our Facebook group. Seeing your finished projects is genuinely the best part of sharing patterns.
I hope you will save this crochet pattern to your Pinterest boards so you can find it easily when you are ready to start. And if you do make one, please drop a comment below and let me know how it turned out. I love hearing which colors you chose and where your new tote ends up traveling with you!
You Might Also Like
- Sage Green Textured Baby Outfit Set Free Crochet Pattern
- Mint Chocolate Daisy Granny Square Blanket Free Crochet Pattern
- Pastel Rainbow Shell Stitch Bodysuit Free Pattern
- Wildflower Meadow Crochet Pot Free Crochet Pattern