
I found this design tucked away in my pattern development files, labeled simply "bridal lace concept" with a date from last spring. I had sketched it out after a friend asked me to create something delicate for her outdoor wedding. Something that would catch the light, frame her face beautifully, and feel like a treasured heirloom rather than just an accessory.
Get the Ad-Free PDF Pattern
You can find the free pattern below, or you can purchase the ad-free printable PDF from my shop.
Get the Printable PDF →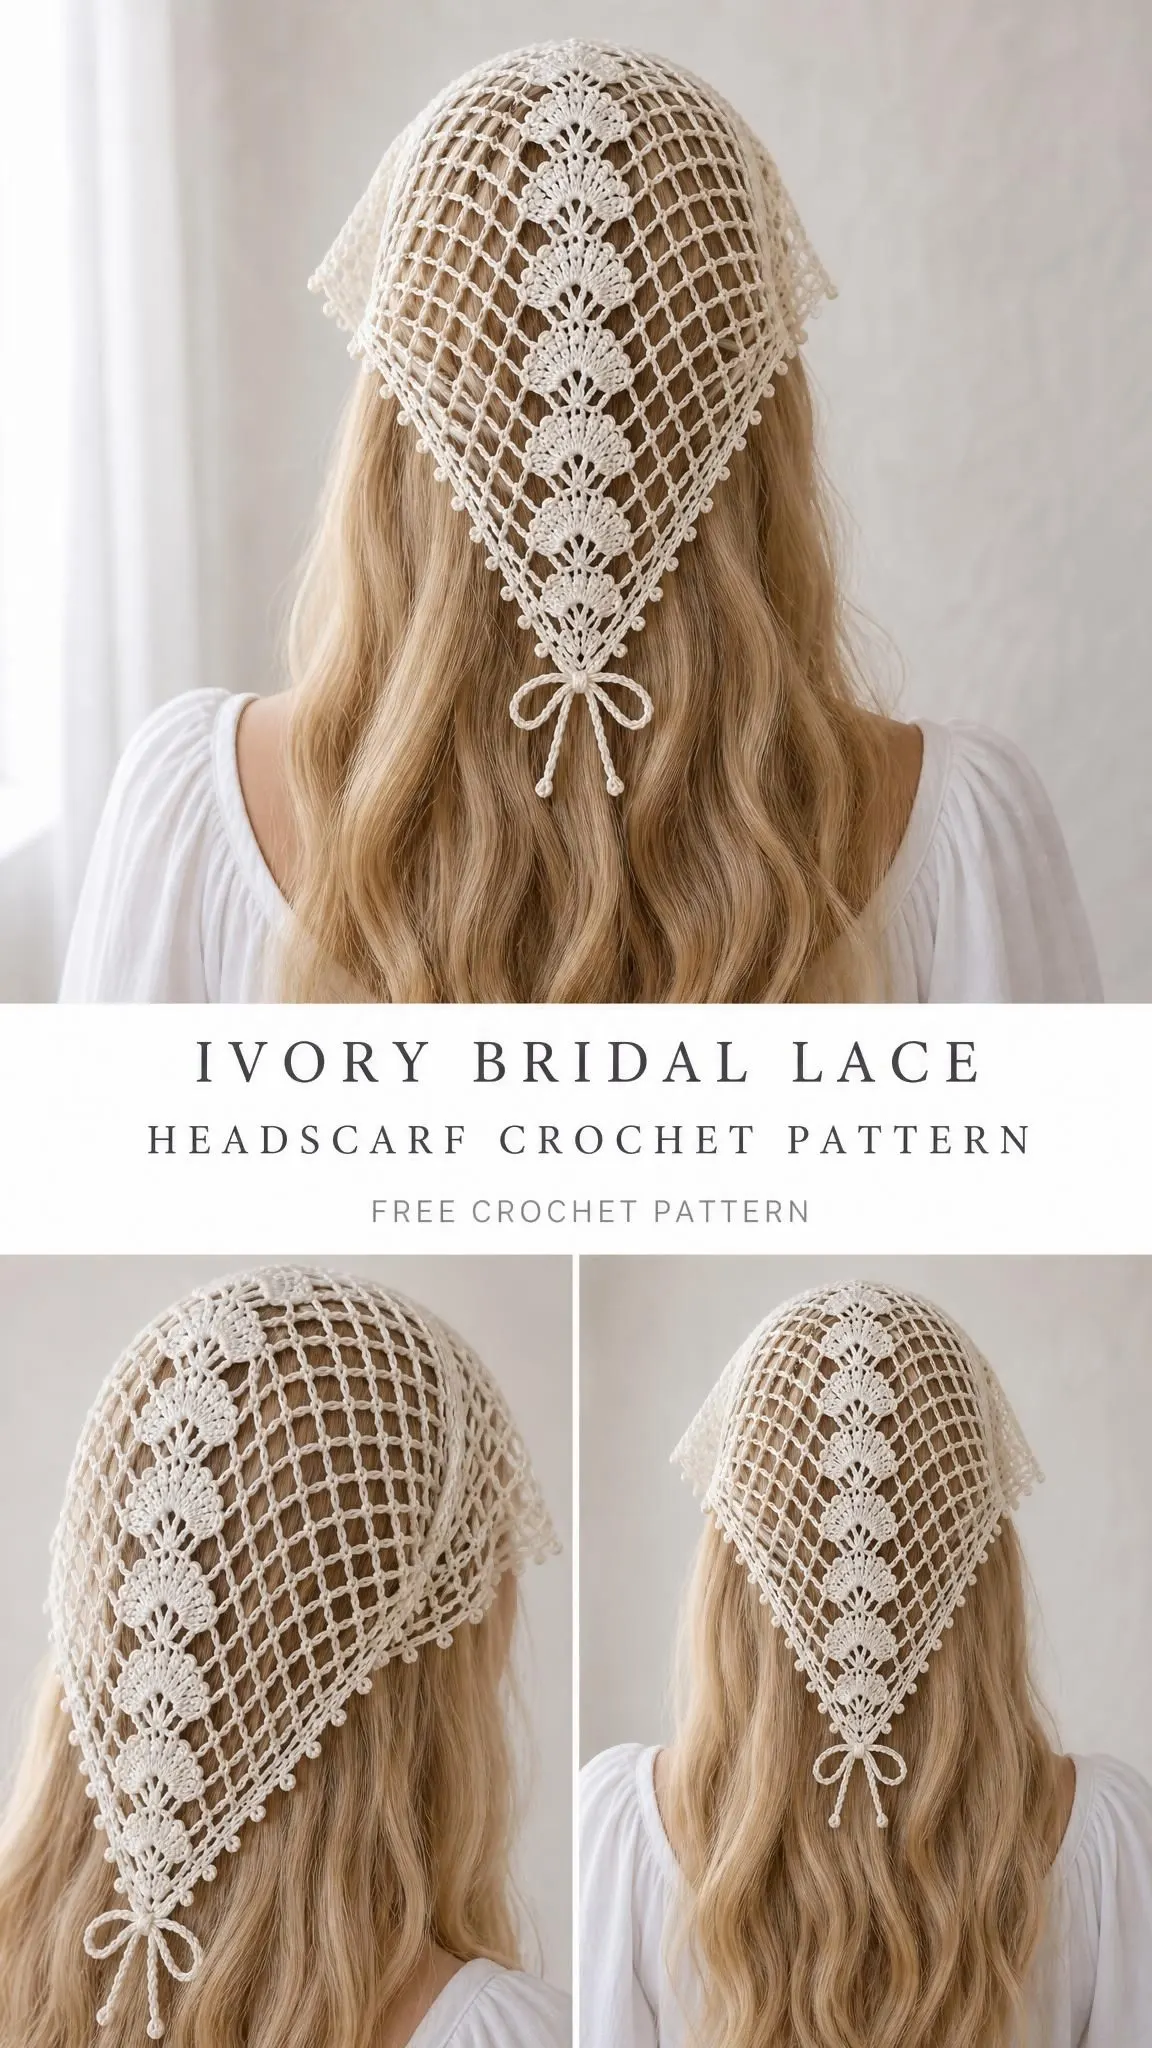
The Ivory Bridal Lace Headscarf finally made it from sketch to written pattern. It combines an airy mesh triangle with a central spine of fan motifs, finished with picot edging and a sweet little bow at the point. The construction is simpler than it looks, I promise.
Whether you are making this for your own special day, gifting it to a bride-to-be, or simply want a romantic accessory for summer evenings, this pattern delivers that handmade elegance we all dream about creating.
About This Ivory Bridal Lace Headscarf Pattern
This headscarf sits beautifully over the crown of your head with the longest edge framing your hairline. Two crocheted ties secure it at the nape beneath your hair, letting the delicate triangular point hang down the center back. The overall effect is romantic, vintage-inspired, and absolutely stunning in photographs.
Finished measurements after blocking: The triangle measures approximately 48 cm (19 inches) across the top edge and 30 cm (12 inches) in depth. Each tie is roughly 25 cm (10 inches) long. This sizing fits an adult head circumference of approximately 54 to 58 cm comfortably.
Skill level: Intermediate. You should be comfortable with basic stitches, working in rows, and sewing appliqué pieces onto mesh. The mesh itself uses simple chain arches and single crochets. The decorative fans are quick little motifs worked separately and then sewn on.
Materials You Will Need
Gather everything before you begin. There is nothing worse than running out of yarn halfway through a bridal project.
Yarn: Fingering-weight cotton, approximately 350 to 400 meters per 100 grams. You will need about 75 grams of ivory for the main headscarf and 15 grams of accent yarn for details. The pattern calls for the same ivory shade throughout, creating that classic bridal look.
Hook: 2.5 mm crochet hook, or whatever size you need to achieve gauge. Do not skip the gauge swatch on this one. The mesh needs to be open and airy but not so loose that it loses its shape.
Additional tools:
Optional for pearl version: Small smooth beads with holes wide enough for sewing thread and a fine beading needle.
Gauge Information
Target mesh gauge, lightly blocked: Five chain-5 arches across equals 10 cm. Eight mesh rows equals 10 cm.
Here is my strong recommendation. Work at least 12 rows of the triangle as a test swatch. Wet-block it, let it dry completely, then measure through the center. If your triangle comes out too dense and stiff, go up a hook size. If it is too open and floppy, go down. Getting gauge right ensures your finished headscarf will match the intended dimensions.
Abbreviations and Special Stitches
Let me walk you through every abbreviation used in this pattern. Even if you know them by heart, a quick refresher never hurts.
ch = chain. Wrap yarn over hook, pull through loop on hook. This creates the foundation and the airy spaces in your mesh.
sl st = slip stitch. Insert hook, yarn over, pull through both the stitch and the loop on your hook in one motion. Used for joining and creating the ties.
sc = single crochet. Insert hook, yarn over, pull up a loop (two loops on hook), yarn over, pull through both loops. The workhorse stitch holding this mesh together.
hdc = half double crochet. Yarn over, insert hook, pull up a loop (three loops on hook), yarn over, pull through all three loops at once.
dc = double crochet. Yarn over, insert hook, pull up a loop, yarn over and pull through two loops, yarn over and pull through remaining two loops. Used in the fan motifs.
tr = treble crochet. Yarn over twice, insert hook, pull up a loop, then yarn over and pull through two loops three times.
st = stitch. sp = space.
An arch refers to one chain-5 loop in this pattern.
Important note: The turning chain 1 never counts as a stitch throughout this pattern. This keeps your edges neat and your stitch counts accurate.
Special Stitch: Picot
Picot: Chain 3, then slip stitch into the first of those 3 chains. This creates a tiny decorative bump along your edging. They look like little pearls when blocked.
Special Stitch: Bobble
Bobble: Yarn over, insert hook in indicated stitch, draw up a loop, yarn over and pull through 2 loops. Repeat this sequence five times in that same stitch, so you have 6 loops on your hook. Yarn over and pull through all 6 loops. Chain 1 to close and secure the bobble.
Pattern Instructions
Section 01: Increasing Mesh Triangle
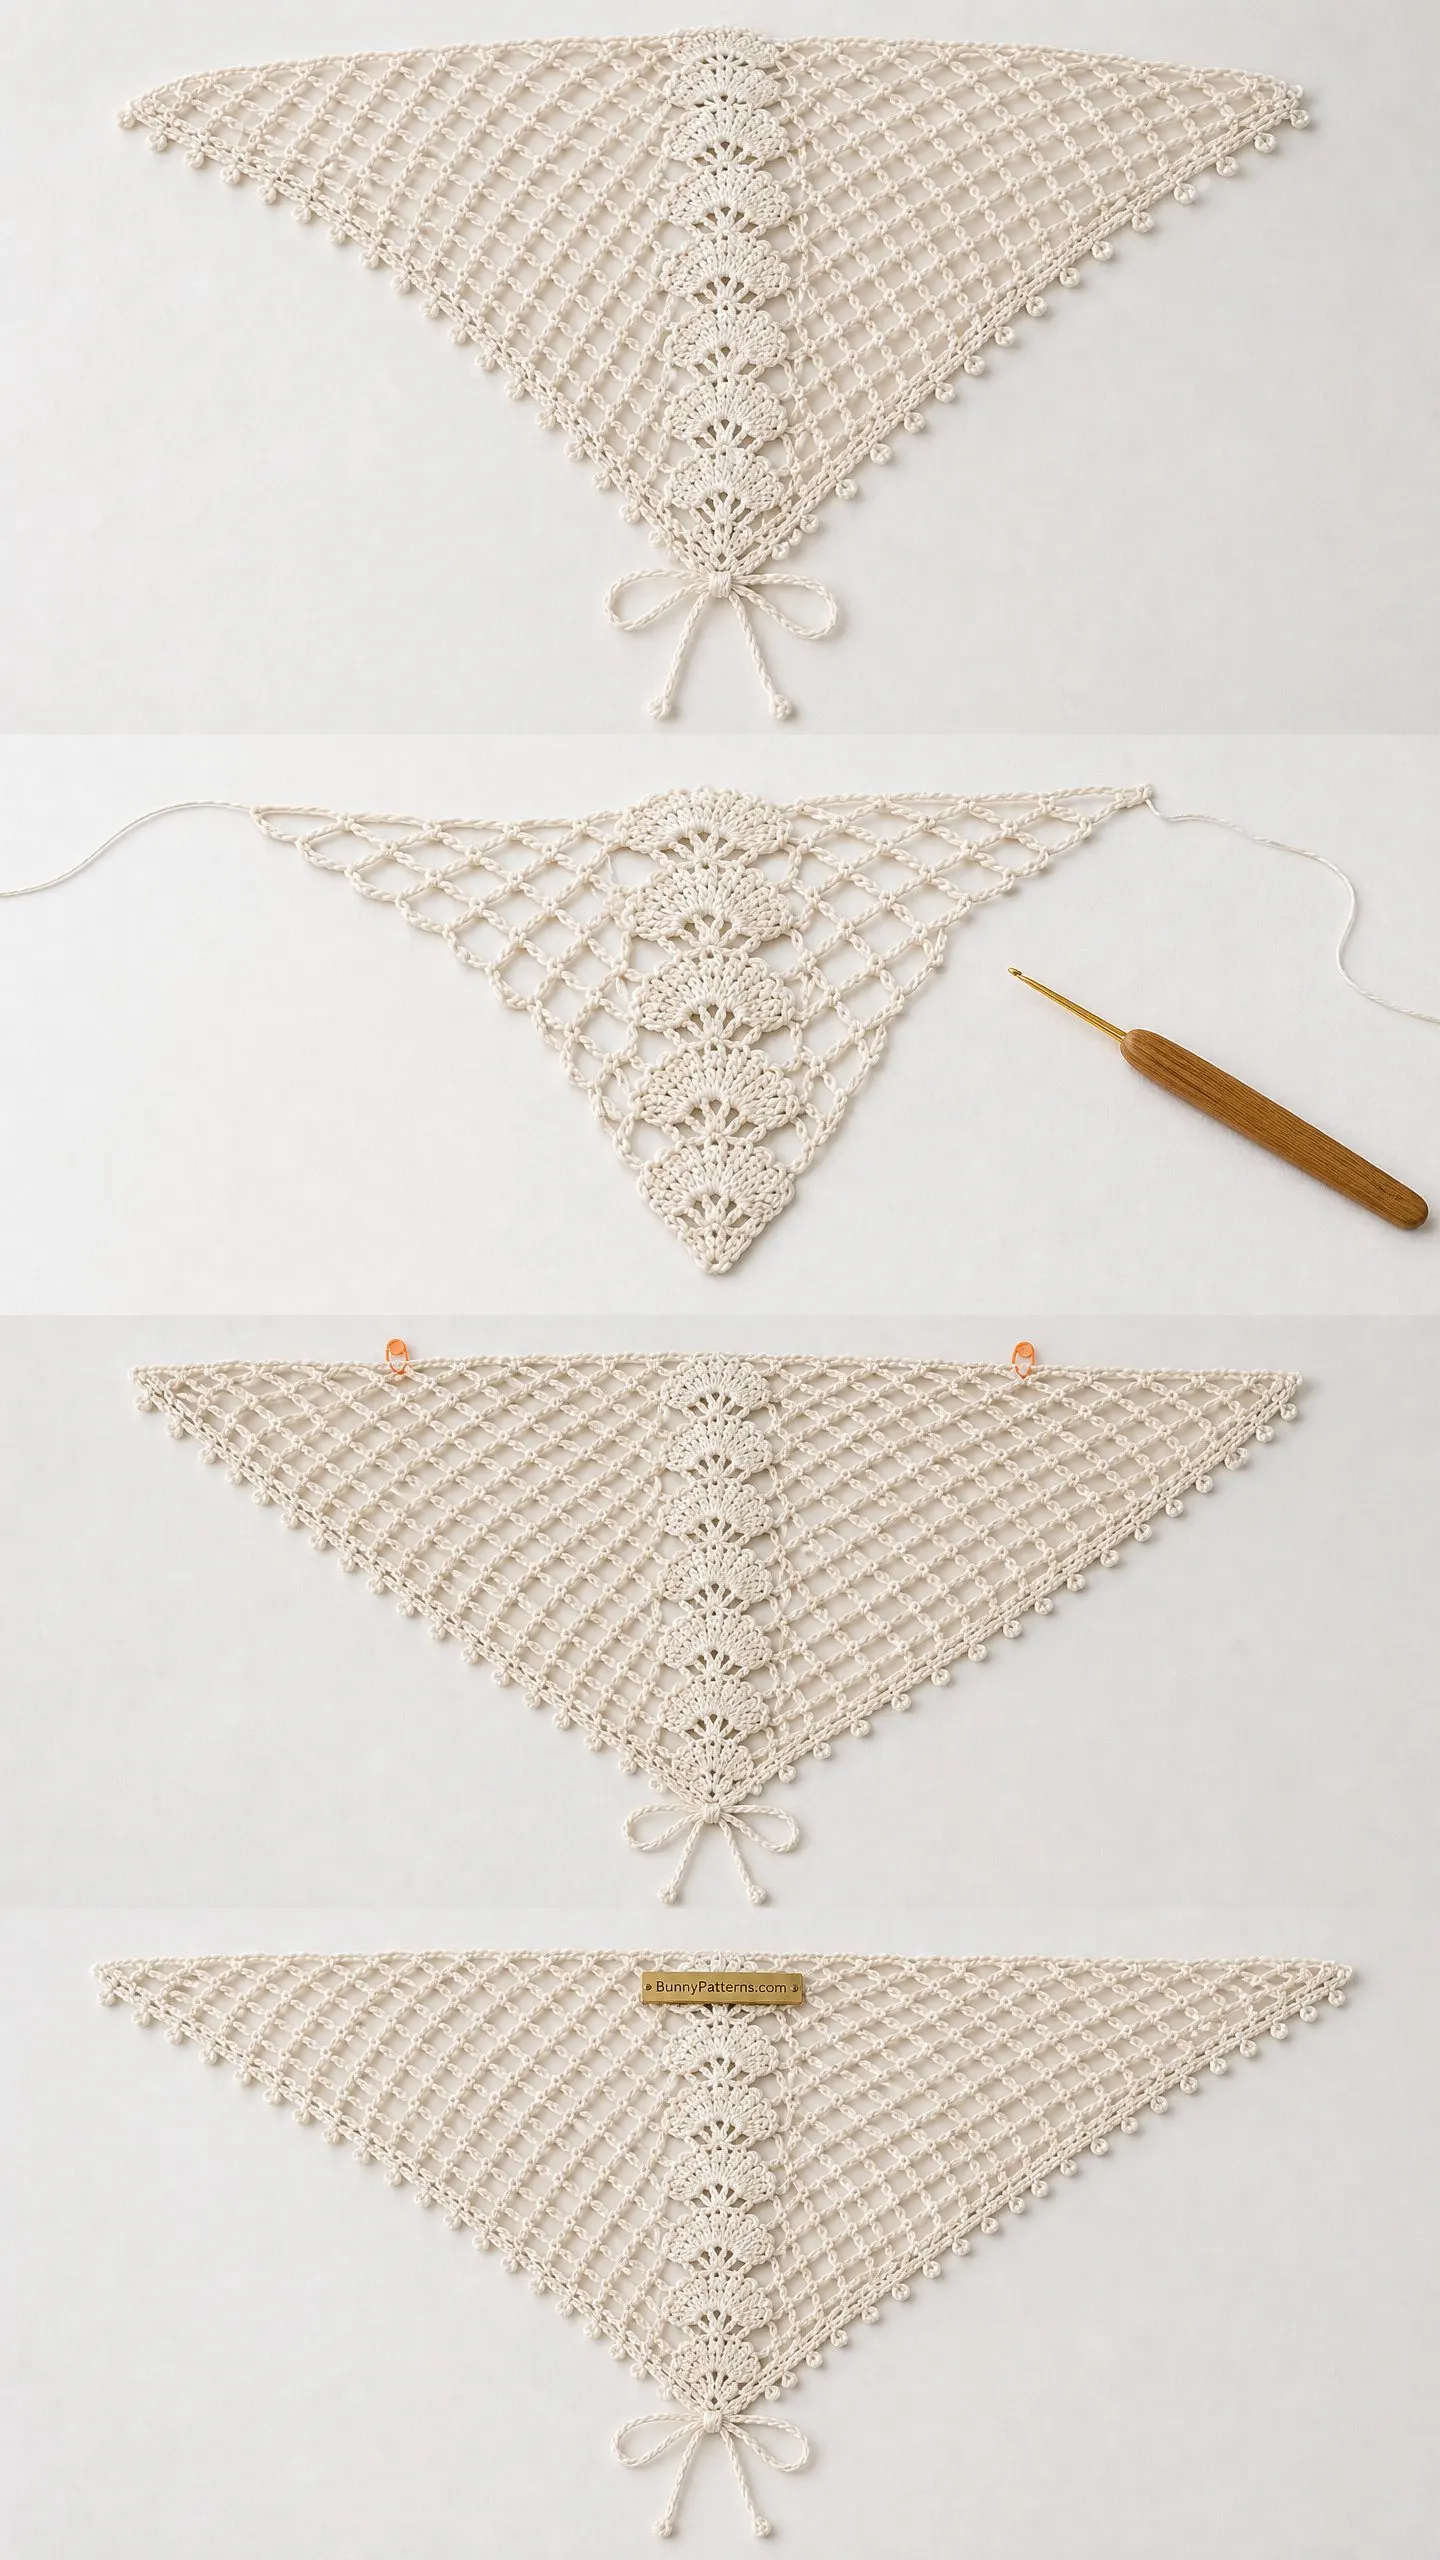
This is where the magic happens. You will start at the bottom point and work upward, adding one arch each row to create that beautiful triangular shape.
Starting ring: With ivory yarn, chain 4. Slip stitch to the first chain to form a ring. Mark this ring as your lower point.
Row 1: Chain 1, single crochet in ring, chain 5, single crochet in ring. You now have 1 arch and 2 single crochets.
Row 2: Chain 1, turn. Single crochet in first sc, chain 5, single crochet in the chain-5 arch, chain 5, single crochet in last sc. You now have 2 arches and 3 single crochets. Work into the open arch space, not into individual chain stitches.
Row 3: Chain 1, turn. Single crochet in first sc, [chain 5, single crochet in next arch] twice, chain 5, single crochet in last sc. You now have 3 arches and 4 single crochets.
Rows 4 through 24: Chain 1, turn. Single crochet in first sc, [chain 5, single crochet in next arch] across all arches, chain 5, single crochet in last sc.
Each row gains one arch and one single crochet. Row number equals arch count. Row n has n arches and n+1 single crochets.
Checkpoints to verify your work:
The newest row you just completed is always your widest, which becomes the top edge. The starting ring remains your bottom tip.
After completing Row 24, lightly block your triangle and measure. You are aiming for a top edge of 48 cm and depth of 30 cm. If you need more width, continue adding rows using the same increase rule. At target gauge, every additional row adds approximately 2 cm of width and 1.25 cm of depth. Write down your final row count because you will need it for the edging.
Section 02: Edge and Ties
Now we stabilize all those edges and add the ties that make this headscarf wearable.
Top edge foundation: Chain 1, turn. Work 1 single crochet in each existing single crochet AND 5 single crochets into every chain-5 arch across the top edge.
With 24 arches, your math looks like this: 25 single crochets (from the row endpoints) plus 120 single crochets (5 in each of 24 arches) equals 145 single crochets total. Do not pull this row tight. Keep it relaxed.
First sloping side: Continue without turning. Work 2 single crochets around each row-end segment down the first diagonal edge.
Bottom point: Work 3 single crochets into the starting ring at the very tip.
Second sloping side: Work 2 single crochets around each row-end segment up the other diagonal edge.
Join with a slip stitch to the first top-edge single crochet. If your edge is not lying flat, adjust your stitch count slightly and make a note of what worked.
Tie 1: At the first upper corner, chain 71. Working back toward the scarf, single crochet in second chain from hook and each remaining chain. You will have 70 single crochets. Slip stitch securely into the corner. Fasten off.
Tie 2: Repeat at the opposite upper corner.
Measure your ties rather than stretching them. You want approximately 25 cm each. Add or subtract starting chains before working back if your ties come out too short or too long.
Section 03: Border and Center Fans
Picot border: Work single crochet along both sloping edges, making one picot after every fourth single crochet. At the lower point, work (single crochet, picot, single crochet) in the center point stitch. Keep your picot spacing symmetrical on both sides. Leave the top edge plain with no picots.
Tip bow: Chain 61, slip stitch back along 60 chains. Fasten off. Tie a small bow with these chains and sew its center firmly to the lower point of your triangle.
Fan Motifs
Make 8 fan motifs in ivory.
For each fan: Chain 4, slip stitch to first chain to form a ring. Chain 3 (this counts as your first double crochet for this motif only), work 6 double crochets in ring. You now have 7 double crochets total.
Do not join this into a circle. Fasten off, leaving a 20 cm tail for sewing. Gently spread the fan into a semicircle shape.
Attaching the fans: Arrange all 8 fans in a centered column running from about 3 cm below the top edge down to about 3 cm above the tip. Point the straight edges of each fan downward. Overlap neighboring fans slightly so they create a continuous spine down the center of your triangle.
Using your yarn tails, sew each fan base to mesh intersections. Then tack down the outer corners of each fan. Be careful not to pull the mesh arches together as you sew. The mesh should remain open and airy around the fans.
Optional tip medallion: Chain 4, join to form a ring. Chain 3 (counts as first dc), work 11 double crochets in ring, join with slip stitch. You have 12 double crochets. Fasten off. Sew this medallion over the lowest fan base for extra detail.
Section 05: Block, Fit, and Finish
Weaving ends: Thread each tail through your blunt needle and weave in at least two directions through nearby solid stitches. Trim close.
Wet blocking: Soak your finished headscarf according to your yarn label instructions. Press excess water into a clean towel. Never wring or twist.
Lay the scarf on your blocking mat. Pin the top edge to approximately 48 cm and the lower tip to approximately 30 cm depth. Pin both side edges symmetrically.
Open up each mesh arch gently with your fingertips, keeping them similar in size. Do not stretch so aggressively that stitches lose their shape. Let everything dry completely before removing pins. This might take overnight.
Fitting: Try on over the crown of your head with the longest edge across your front hairline. Tie the two corner ties at the nape beneath your hair. The center point should hang down the middle of your hair. Adjust tie position for comfort without pulling the mesh tight.
Care Instructions
This delicate cotton piece deserves gentle care. Follow your yarn label for washing instructions. Hand washing in cool water with a mild soap works beautifully. Always re-block after laundering to restore the shape and open up the mesh.
Inspect any beads or appliqués before each use to make sure everything is secure. Remove your headscarf for sleeping or any activity where the ties could catch on something.
Troubleshooting Tips
Curling top edge? Your single crochet tension in the foundation row is probably too tight. Try again with a more relaxed hand.
Flared sides? You have too many edging stitches. Reduce the stitch count around the row ends slightly.
Unequal sides? You likely missed an arch somewhere or added an extra repeat. Count your arches in the problem area, undo back to the last correct row, and restore the proper count.
Final Thoughts on This Ivory Bridal Lace Headscarf Crochet Pattern
Creating handmade accessories for special occasions carries a certain joy that store-bought pieces simply cannot match. This Ivory Bridal Lace Headscarf transforms fingering-weight cotton into something genuinely heirloom-worthy. The combination of airy mesh, delicate fans, and picot edging creates visual interest without overwhelming complexity.
I hope this pattern brings you the same satisfaction it brought me while designing it. Whether you are wearing it yourself or gifting it to someone special, every stitch carries intention and care.
Thank you so much for choosing this pattern. I would absolutely love to see your finished headscarves. Tag me on Instagram or share your photos in our Facebook group. Seeing your makes genuinely brightens my day.
If this pattern caught your eye, go ahead and save it to your Pinterest boards so you can find it easily when you are ready to start. And if you do make one, please drop a comment below. I love hearing about your projects and seeing how you personalize your pieces.
Want a Quick & Easy Printable Version?
Get a clean, beautifully formatted PDF of this pattern — easy to follow step by step, ready to print or save on any device. No scrolling, no distractions, just the pattern.
Get the Printable PDF →You Might Also Like
- Sunset Ombre Beach Bikini Free Crochet Pattern
- Sage Green Shell Stitch Lounge Set Free Crochet Pattern
- Sage Green Granny Square Hobo Bag Free Crochet Pattern
- Charcoal Gray Modern Crochet Backpack Free Pattern