
This is THE dress pattern you’ve been waiting for. STUNNING, elegant, and absolutely show-stopping, this ivory pearl shell midi dress is the kind of project that makes people stop and ask, "Wait, you MADE that?" Yes, you did. And you’re going to love every stitch of it.
Get the Ad-Free PDF Pattern
Scroll down for the full pattern, or get the ad-free printable PDF from the shop.
Get the Printable PDF →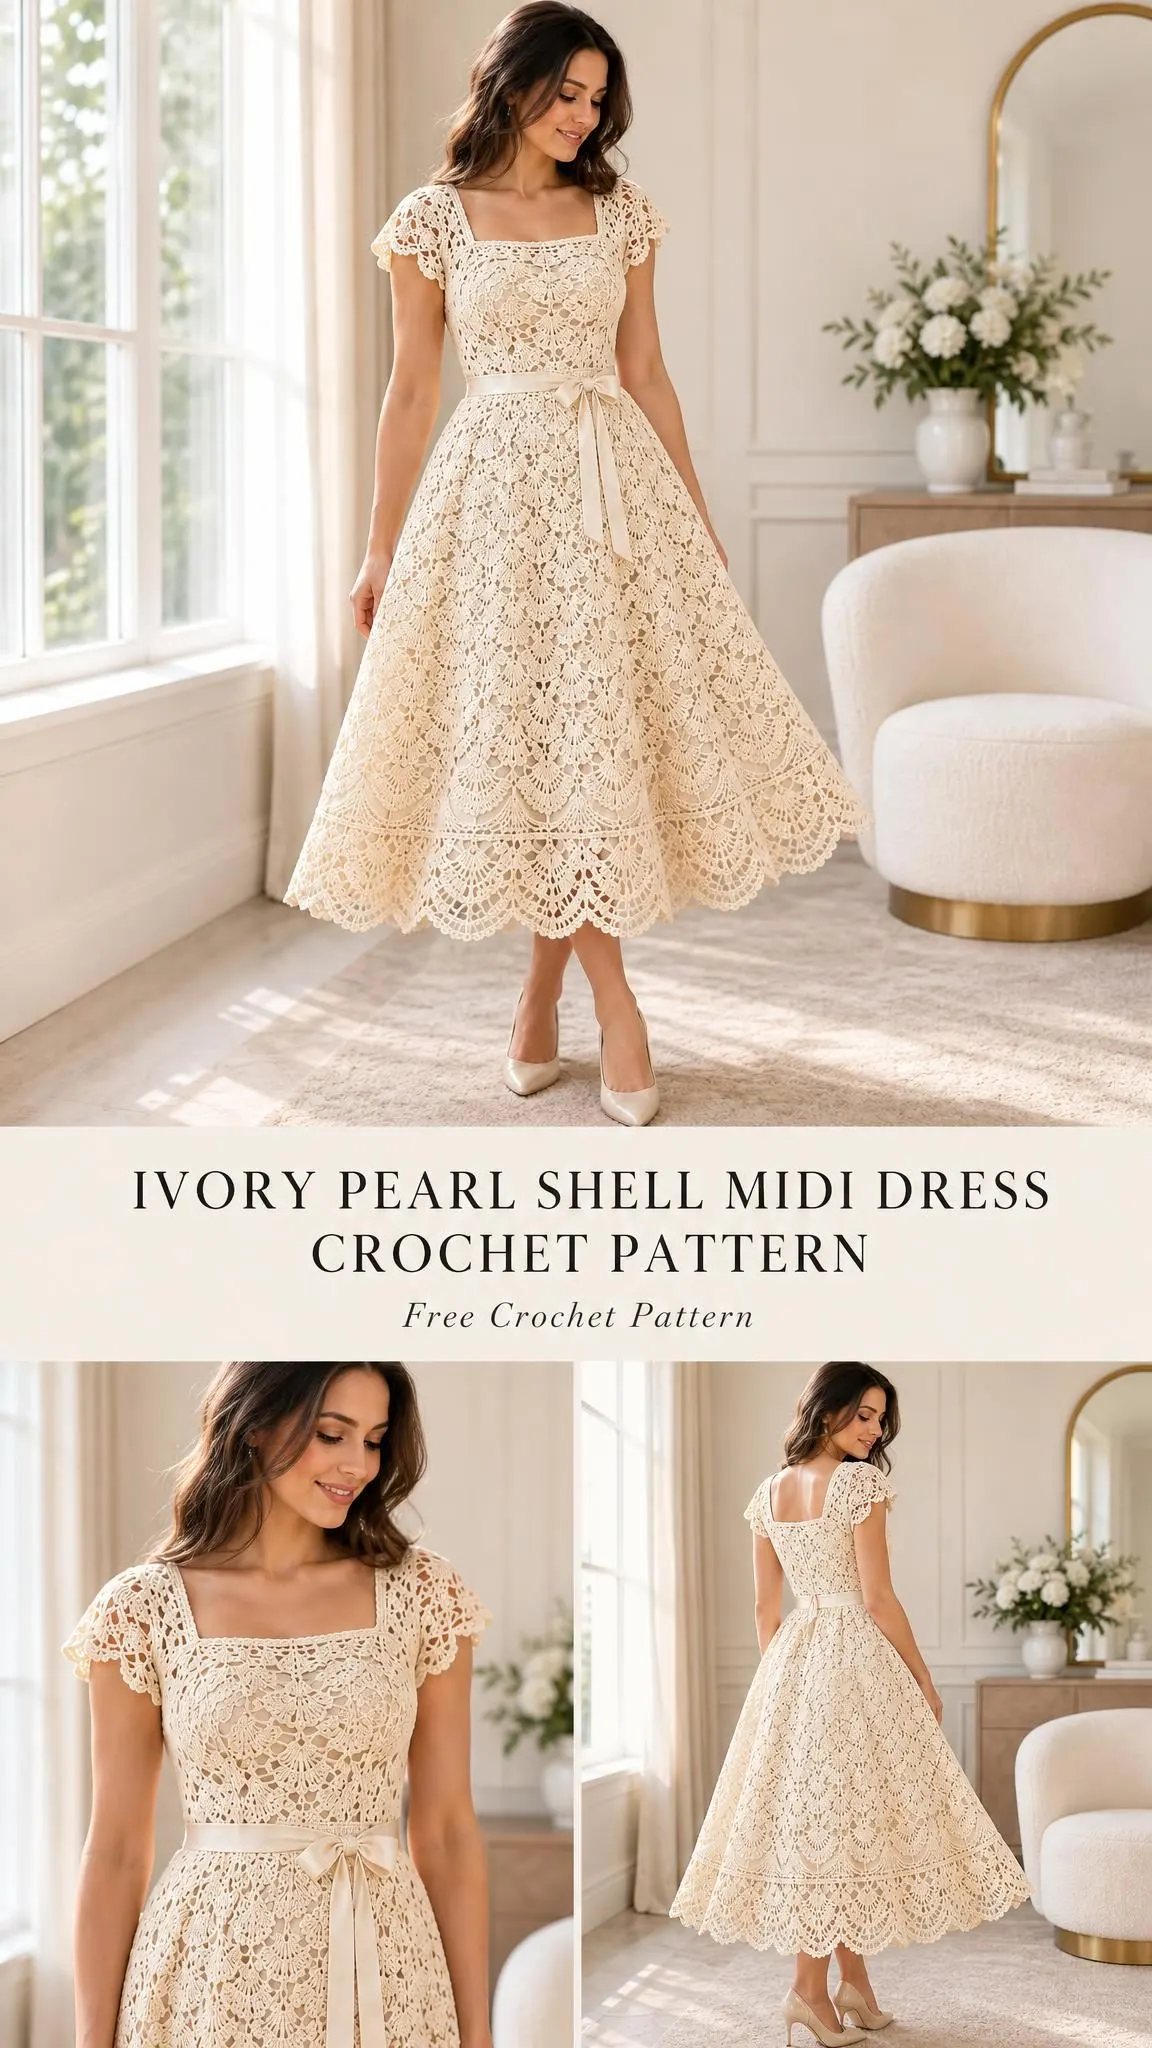
Now, let’s be honest. This is not a weekend project. This is a labor of love, a commitment piece, the kind of crochet that you work on during movie marathons and lazy Sunday afternoons. But here’s the thing: the construction is straightforward, the lace pattern repeats beautifully once you get it memorized, and the finished result is nothing short of breathtaking.
Whether you’re making this for a garden wedding, a special anniversary dinner, or simply because you deserve to wear something this beautiful, this pattern delivers. The romantic shell lace, the flattering A-line silhouette, the delicate cap sleeves, and that gorgeous scalloped hem all come together to create a dress that looks like it belongs in a boutique window. Let’s dive in.
Why This Shell Midi Dress Pattern Stands Out
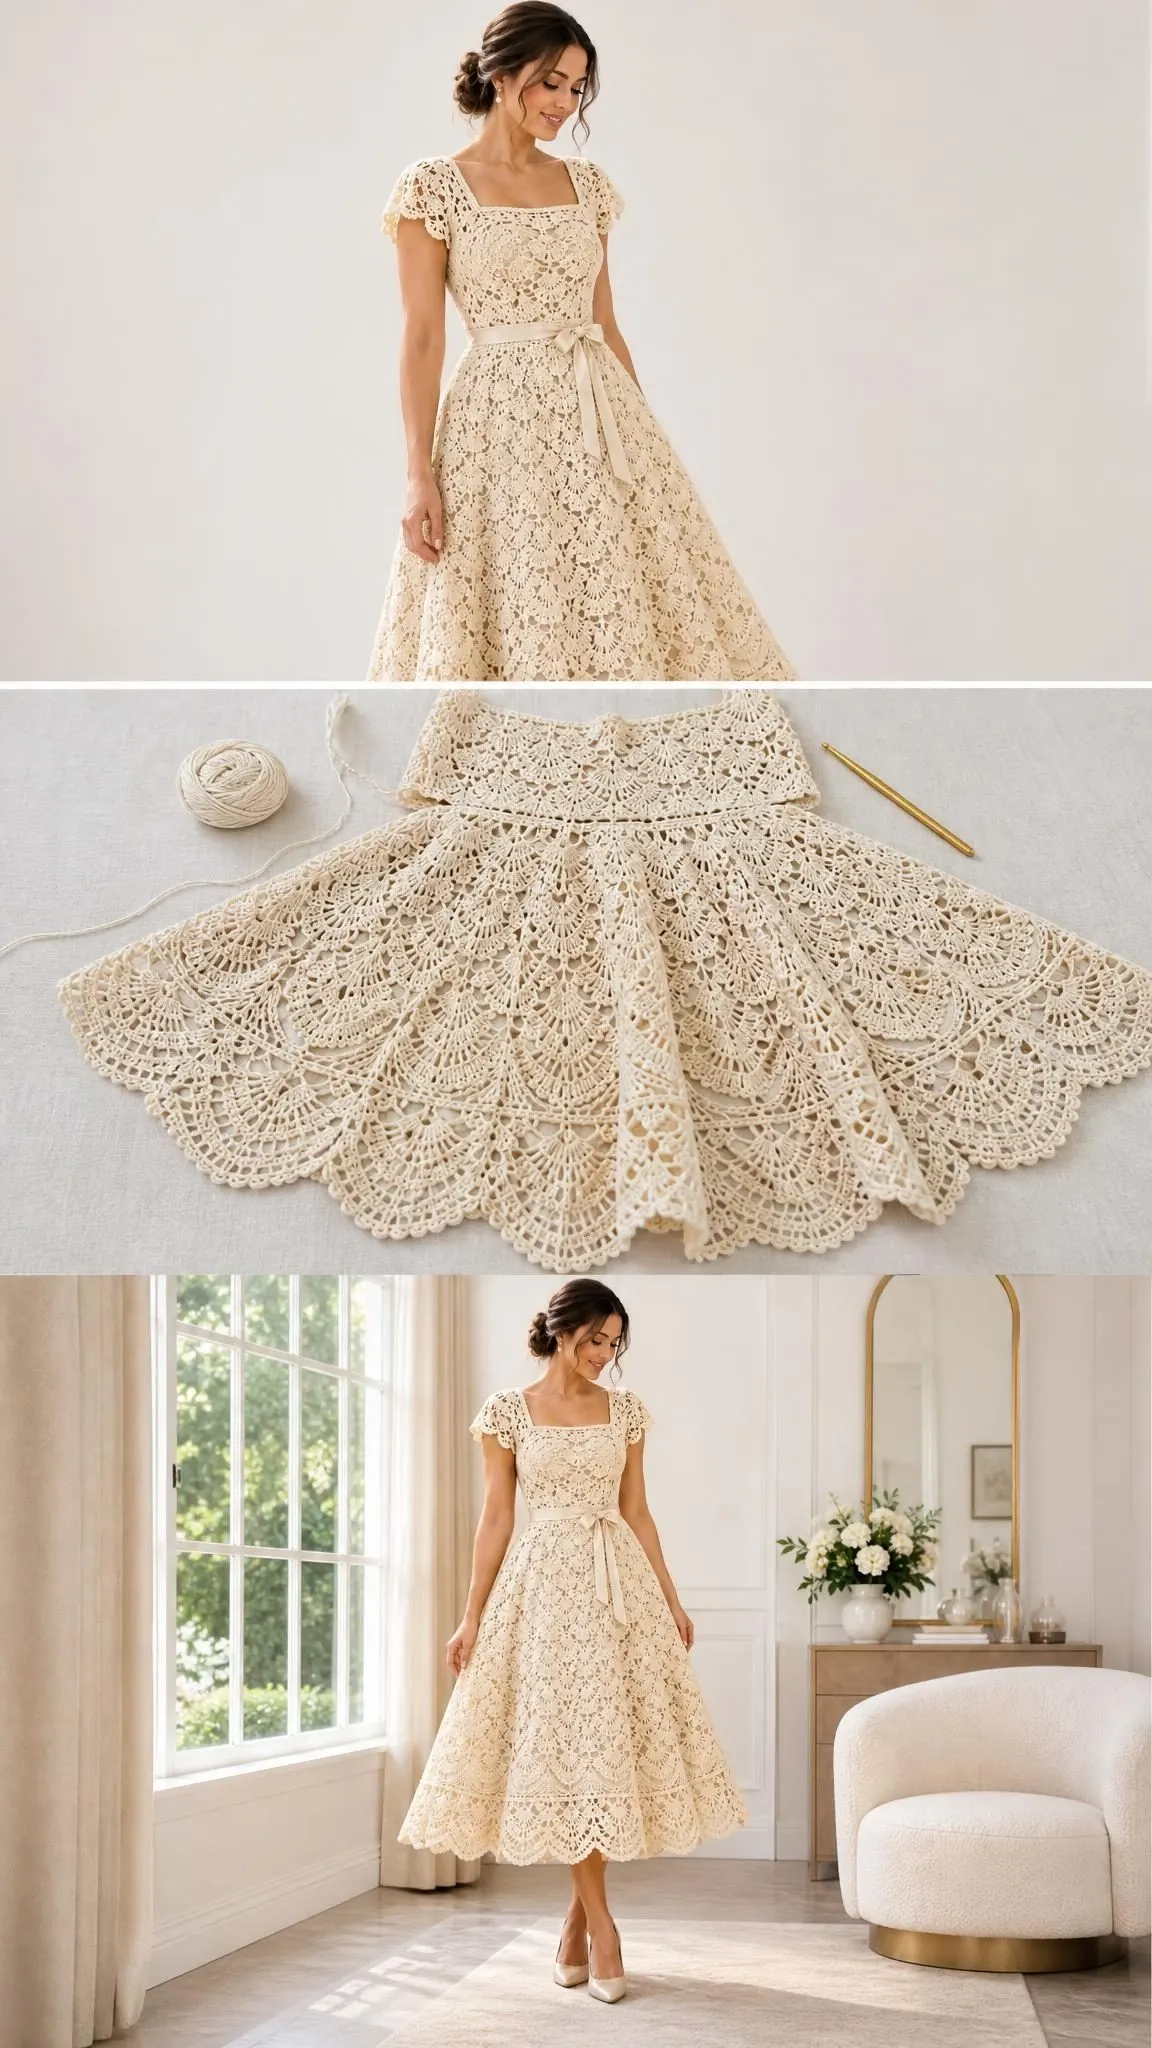
The Ivory Pearl Shell Midi Dress combines classic crochet techniques with a modern, wearable silhouette. The fan lace stitch creates that signature shell pattern visible throughout the bodice and skirt, giving the dress its romantic, vintage-inspired character. The construction is clever: two flat bodice panels join to a two-panel skirt that gradually widens at two level changes, creating the beautiful A-line shape without complicated shaping.
The square neckline frames the face beautifully, while the cap sleeves add just enough coverage without overwhelming the design. A removable waist tie threaded through crocheted eyelets creates the fitted appearance at the waist, and that deep scalloped hem with picot details is truly the crown jewel of this piece.
This dress is designed for one adult size with a finished bust measurement of 100 cm (approximately 39 inches), suitable for body measurements of 88-94 cm bust. The pattern includes adjustment guidance for customizing the fit.
Materials You’ll Need
Gathering the right materials before you begin ensures smooth sailing throughout this project. Here’s everything you’ll need:
Yarn:
- Smooth sport-weight cotton or cotton blend, approximately 300 m per 100 g
- Total needed: 650 g / 1950 m (including swatching and finishing reserve)
- Color: Warm ivory (use all 650 g in this single color)
Hooks:
- 3.5 mm crochet hook (or size needed to achieve gauge)
- 3 mm hook for firm edgings and waist tie
Notions:
- Tapestry needle
- Scissors
- 12 removable stitch markers
- Tape measure
- Blocking mats and rustproof pins
- Optional: 6 mm clear elastic cut to comfortable waist plus 2 cm overlap, matching sewing thread and needle
For Wearing:
The pattern recommends using a separate opaque slip with a neckline at least as high as the dress and a hem reaching the crochet hem. This is a styling layer, not an additional crochet project. Open lace should not be relied upon for coverage.
Gauge Information
Getting gauge right is essential for a garment this size. Take the time to swatch before diving in.
Foundation and dense trim gauge: 20 single crochet (sc) and 24 sc rows = 10 x 10 cm
Lace gauge: The lace must block to 5 cm per ten-stitch repeat. Filet mesh must block to 10 spaces across 10 cm.
Fan gauge: Two full four-row lace cycles = 6 cm high. To swatch: chain (ch) 42, work 41 sc, then work the fan setup and at least four cycles. The four repeats should measure 20 cm across. Measure in the middle, excluding the foundation and finishing rows.
If your swatch is too wide, use a smaller hook. If too narrow, use a larger hook. Adjust row count separately for height. All length-based stops take priority over sample row estimates.
Important: Hang the blocked swatch for 24 hours and note any growth before choosing the final dress length. Cotton especially can grow when hung.
Finished Measurements
| Measurement | Size |
|---|---|
| Bust / Upper Waist | 100 cm / 100 cm |
| Suggested Body Bust | 88-94 cm |
| Waist (with removable tie) | 80-94 cm |
| Hip / Hem Circumference | 120 cm / approximately 140 cm |
| Shoulder to Waist | 40 cm |
| Waist to Hem | 70 cm |
| Upper Arm Circumference | 40 cm before edging |
Check bust, hips, armhole depth, and shoulder-to-waist length before starting. The waist tie creates the fitted appearance, but the untied opening must pass comfortably over the bust. Garment dimensions are after blocking, before wear stretch.
Abbreviations and Special Stitches
Understanding these terms before you begin will make following the pattern much easier.
Standard Abbreviations (US Terms):
- ch = chain
- st/sts = stitch/stitches
- sl st = slip stitch
- sc = single crochet (insert hook, yarn over, pull through, yarn over, pull through both loops)
- hdc = half double crochet
- dc = double crochet (yarn over, insert hook, pull through, yarn over, pull through 2 loops, yarn over, pull through remaining 2 loops)
- tr = treble crochet
- sp = space
- RS/WS = right side/wrong side
- rep = repeat
Special Stitches:
sc2tog (single crochet two together): Insert hook into next stitch and draw up a loop, repeat in following stitch, yarn over and draw through all three loops. This creates a decrease.
Picot: Ch 3, sl st in the third chain from hook. This creates a small decorative bump.
Fan F: [dc, ch 1] four times, then dc, all in the same stitch. The completed fan contains 5 dc and four ch-1 spaces.
Joining seam: With RS together, pass a tapestry needle under corresponding edge loops on both pieces, one pair at a time, without pulling tight.
Weaving in ends: Weave a yarn end back and forth through dense stitches for at least 5 cm, reversing direction twice.
Pattern Notes Before You Begin
Work flat, turning at the end of every row unless instructed to work a round. Ch 1 for sc and ch 2 for dc do not count as stitches. Work the first actual stitch in the first stitch. Join rounds with sl st to the first actual stitch; joining sl sts do not count. Keep a marker in each edge stitch.
The sample uses 101 foundation stitches per bodice panel and 10 lace repeats. In the shared instructions, n means the number of repeats in the current piece or skirt level. The extra stitch closes the final repeat and forms the seam edge. Counts given for lace rows distinguish stitches, arches, and motifs. Do not treat chain spaces as single stitches unless instructed.
Block sections before assembly and compare each checkpoint before proceeding.
Construction Overview
The dress is built in this order:
- Make and block the swatch
- Make front and back bodice panels from waist upward
- Add shoulder sections
- Make two skirt panels, widening at two level changes
- Make sleeves if needed
- Block, seam, add waist tie and trim, then finish
Stitch Repeat Chart
For easy reference, here is the lace pattern repeat. Read one row at a time:
| Chart Row | One Repeat After the First Edge SC |
|---|---|
| Setup | ch3; skip4; F; skip4; ch3; sc |
| A | ch3; sc in dc1; (ch3, sc in next dc) x4; ch3; sc at anchor |
| B | ch4; sc in arch1; (ch3, sc in next internal arch) x3; ch4; sc at anchor |
| C | ch5; sc in middle of 3 internal arches; ch5; sc at anchor |
| D | ch3; F in central sc; ch3; sc at anchor |
Reading the chart:
- Anchor = the sc between two fans, or the edge sc
- On Row A, ignore the four ch-1 spaces
- On Row B, use only the four internal ch-3 arches between the five fan stitches; ignore side arches
- On Row C, ignore the two side ch-4 arches
- Repeat A-D vertically
- Work D before converting to a dense row
Shared Lace Row Instructions
These instructions are used throughout the bodice and skirt sections.
Foundation: Ch (10 x number of repeats + 2). Sc in second ch from hook and each ch across. Turn. [10 x repeats + 1 sc]
Setup: Ch1, sc in first sc; [ch3, skip4 sc, F in next sc, skip4 sc, ch3, sc in next sc] across. Turn. [n fans, n+1 anchors, 2n side arches]
Row A: Ch1, sc in first anchor; [ch3, sc in first dc of fan, (ch3, sc in next dc) 4 times, ch3, sc in next anchor] across. Turn. [6n+1 sc, 6n ch3 arches]
Row B: Ch1, sc in first anchor; [ch4, sc in first internal ch3 arch, (ch3, sc in next internal arch) 3 times, ch4, sc in next anchor] across. Turn. [5n+1 sc, 3n ch3 arches, 2n ch4 arches]
Row C: Ch1, sc in first anchor; [ch5, sc in middle of the three internal ch3 arches, ch5, sc in next anchor] across. Turn. [2n+1 sc, 2n ch5 arches]
Row D: Ch1, sc in first anchor; [ch3, F in central sc of motif, ch3, sc in next anchor] across. Turn. [n fans, n+1 anchors, 2n side arches]
Repeat A-D, keeping the same n.
Conversion row (after D): Sc in first anchor; [2 sc in side ch3 arch, sc in each of 5 fan dc skipping ch1 spaces, 2 sc in next side arch, sc in next anchor] across. [10n+1 sc]
Bodice Front Instructions
Ch 102, work 101 sc, then fan lace with n=10 until the panel is approximately 30 cm tall, ending with Row D. This is about nine four-row cycles after setup; check your swatch for accuracy. Convert to 101 sc. [101 sc]
First Shoulder Row 1: Ch1, sc in first 20 sc only. Leave remaining stitches unworked. Turn. [20 sc]
Remaining Shoulder Rows: Ch1, sc in every sc. Continue to 10 cm above the neck split, approximately 24 shoulder rows total. [20 sc]
Second Shoulder: Attach yarn at opposite outer edge and mirror the first shoulder across the outer 20 sc, keeping all decreases, if any, at the neck. Both shoulders finish with 20 sc. The center stitches remain unworked to form the square neckline.
Bodice Back Instructions
Work a matching 101-stitch panel in fan lace to 40 cm total height, ending after Row D. Convert to 101 sc. Mark the outer 20 sc on each side for shoulder seams; the remaining 61 sc form the back neck. [101 sc]
Two Skirt Panels
Make two identical panels from waist downward. Target level heights, including dense transition rows and final edging allowance:
- Upper: 19.6 cm
- Middle: 23.8 cm
- Lower: 26.6 cm
Reserve 2 cm of the final level for the hem. Total finished skirt length is 70 cm.
Upper Level Foundation: Ch102; sc in second ch and across. Work shared lace over 10 repeats to upper-level height, ending on a conversion-ready row. Convert if required. [101 sc / 10 repeats]
Increase Row 1: Ch1, sc in first sc; [sc in next 4 sc, 2 sc in next sc] 20 times. Turn. [121 sc]
Middle Level: Restart the lace setup with 12 repeats. Work to middle-level height, ending on a conversion-ready row. Convert if required. [121 sc / 12 repeats]
Increase Row 2: Ch1, sc in first sc; [sc in next 5 sc, 2 sc in next sc] 20 times. Turn. [141 sc]
Lower Level: Restart the lace setup with 14 repeats. Work to lower-level height less the hem allowance. Finish on a conversion-ready row; convert if required. [141 sc / 14 repeats]
Block both panels to equal level heights before joining. Level joins are narrow structural bands, not added ruffles. If the skirt reaches the desired length early, shorten the lower level; do not remove the hip-width increase.
Sleeves (Cap Sleeves)
Make two sleeves from upper arm toward cuff.
Ch82, work 81 sc, then shared lace with n=8. Work to 6 cm including 2 cm cuff allowance. The foundation edge measures 40 cm and fits the two 20 cm armhole edges.
Continue without increasing to 6 cm less cuff allowance. Convert for cuff trim. [81 sc / 8 repeats]
Assembly Instructions
You’ll Need: Main color yarn, tapestry needle, and removable markers. Use the 3 mm hook only if you prefer slip-stitch seams; keep them loose enough to lie flat. Pre-block all pieces to the schematic measurements.
Pass 1: Join front and back shoulders, matching one front stitch/space to its back counterpart. [2 shoulder seams]
Pass 2: Seam bodice sides from waist upward for 20 cm, leaving the upper 20 cm on each full-height panel open for armholes. [2 side seams; 2 armholes of 40 cm perimeter]
Pass 3: Fold each sleeve lengthwise and seam its long edges. Join each 40 cm sleeve foundation around one armhole, placing the sleeve seam at the underarm and distributing the edge evenly. [2 sleeves attached]
Pass 4: Seam the two skirt panels along both long edges, matching both widening bands exactly. Keep hem level. [2 skirt seams]
Pass 5: Join skirt upper edge to bodice foundation with RS together. Match 101 stitches to 101 stitches on each panel, aligning side seams. Do not cinch this seam. [202 stitch pairs joined]
Assembly Checkpoint: Untied bust and waist approximately 100 cm; hip 120 cm; hem 140 cm. Skirt length including planned trim 70 cm. Both armholes are even, side seams hang vertically, and the dress passes over the bust without forcing the yarn.
Edgings and Details
You’ll Need: 3 mm hook, main color yarn, tapestry needle, tape measure, and markers. Optional soft waist elastic and matching sewing thread.
Waist Edging with Eyelets
Waist Round 1: With RS facing, work 100 sc evenly over the front waist seam and 100 sc over the back. Join. Do not turn. [200 sc]
Waist Round 2: Ch1, sc in every sc. Join. [200 sc]
Waist Round 3: Ch1, sc in first 2 sc; [ch2, skip2 sc, sc in next 2 sc] 49 times; ch2, skip last 2 sc; join. [100 sc, 50 eyelets]
Waist Round 4: Ch1, sc in each sc and 2 sc in each ch2 space. Join. [200 sc]
Waist Round 5: Ch1, sc in every sc. Join and fasten off. [200 sc]
Waist Tie
Tie Row 1: Ch301; sl st in second ch from hook and every ch across. Fasten off. Block to approximately 150 cm; add or remove chains to achieve this length. [300 sl sts for sample]
Tie Pass 2: Weave through all waist eyelets, bringing both ends out at center front. Tie a bow without distorting the mesh. [50 eyelets threaded]
Optional Elastic: If using waist elastic, measure a comfortable loop on the wearer, overlap ends by 2 cm and sew securely. Tack inside the waistband at side seams and center back. Keep the crochet waistband stretchy enough to pass over the bust; omit fixed elastic if it would prevent dressing.
Neckline Edging
Neck Round 1: Sc evenly around the neck edge at 2 sc per cm, putting 3 sc in each square corner or sc2tog at the bottom of a V. Adjust by at most 2 stitches to a multiple of 6; record the resulting number as E. Join. [E sc, E divisible by 6]
Neck Round 2: [Skip2 sc, 5 dc in next sc, skip2 sc, sc in next sc] around. Join and fasten off. [E/6 shells]
Hem Edging
Hem Round 1: Work 140 sc across each skirt panel, omitting the seam-edge surplus stitch from each panel. Join. [280 sc]
Hem Round 2: Sc in first sc; [ch3, skip4 sc, 7 dc in next sc, ch3, skip4 sc, sc in next sc] 27 times; ch3, skip4 sc, 7 dc in next sc, ch3, skip last 4 sc; join to first sc. [28 fans, 28 sc anchors, 56 ch3 arches]
Hem Round 3: Sl st into first ch3 arch; [3 sc in side arch, sc in each of 7 dc with a picot after the 4th sc, 3 sc in next side arch, sl st in anchor] around. Join and fasten off. [28 picots, 364 sc]
Cuff Edging (Each Sleeve)
Cuff Round 1: Sc evenly around the converted sleeve edge, omitting the surplus seam-edge stitch. Join. [80 sc per cuff]
Cuff Round 2: [Sc in next 4 sc, picot] around. Join and fasten off. [80 sc, 20 picots per cuff]
Edging Checkpoint: Waist tie slides through all 50 eyelets. Neck and armhole edges lie flat. Hem repeats are evenly spaced. Count both cuffs and compare. Sewn motifs must not pull the grid out of square, and the final length must agree with the schematic.
Finishing Your Dress
Pass 1: Inspect every seam, tie end, and applique attachment. Weave all yarn tails through dense stitches in three directions; trim only after secure anchoring. [0 loose ends]
Pass 2: Soak according to yarn label, press out water in towels without wringing, and lay flat to schematic dimensions. Pin lace points without forcing the openings. [1 complete dress blocked]
Pass 3: Dry completely, remove pins, rest flat overnight, then hang briefly to check length. Adjust tie and confirm the opaque slip reaches the hem for worn styling. [1 finished dress]
Final Checkpoint: Confirm bust about 100 cm, skirt 70 cm, and total shoulder-to-hem approximately 110 cm. Allow small differences from lace blocking. Record actual finished measurements and hook size in your project notes.
Care Instructions
Follow the yarn label for specific care. Hand wash cool with mild detergent if the yarn permits, support the wet garment fully, reshape, and dry flat. Do not hang for storage: long crochet dresses can grow under their own weight. Keep away from direct heat and snagging jewelry.
Secure all appliques and avoid beads or detachable small parts. Keep the waist cord tied and away from machinery. Check that long hems do not trail or cause trips. Stop wearing if a strap, seam, or neckline becomes overstretched.
Tips for Success
Take your time with gauge. This dress uses a significant amount of yarn, and being off gauge can mean running out or ending up with incorrect sizing. The extra hour spent swatching will save frustration later.
Block as you go. Blocking each section before assembly ensures your seams line up and your finished dress lies beautifully.
Mark everything. Use those 12 stitch markers liberally. Mark your anchors, mark your repeats, mark your shoulder stitches. You’ll thank yourself.
Trust the process. The shell lace pattern looks complicated in writing but becomes intuitive after a few repeats. Once you complete one full A-B-C-D cycle, you’ll find yourself working from memory.
This dress is a statement piece, the kind of handmade garment that becomes an heirloom. The combination of delicate shell lace, thoughtful construction, and that gorgeous flowing silhouette creates something truly special. Whether you’re wearing it to a summer wedding, a special dinner, or simply a day when you want to feel extraordinary, this ivory pearl shell midi dress delivers.
Thank you so much for choosing this pattern for your next project. If you make this beautiful dress, I would absolutely love to see it! Share your finished photos on Instagram or Facebook and tag your creation. Seeing your work come to life is the best part.
Pin this pattern to your Pinterest boards so you can find it when you’re ready to start, and please leave a comment below if you give it a try. Happy crocheting!
Want a Quick & Easy Printable Version?
Get a clean, beautifully formatted PDF of this pattern — easy to follow step by step, ready to print or save on any device. No scrolling, no distractions, just the pattern.
Get the Printable PDF →You Might Also Like
- Lavender Purple Drawstring Bucket Bag Free Crochet Pattern
- Strawberry Baby Romper Free Crochet Pattern
- Monarch Butterfly Shawl Free Crochet Pattern
- Periwinkle Hydrangea Sweater in Closet Free Crochet Pattern