
I call this one the Rosie Dress, named after my grandmother who taught me my very first chain stitch when I was seven years old. She had a worn blue notebook filled with handwritten patterns, and tucked between the pages was a faded photograph of a lace baby dress she made for my mother in 1962. I spent months studying that photo, trying to recreate the delicate shell-and-fan construction, the empire waist, the scalloped hem that looked like flower petals.
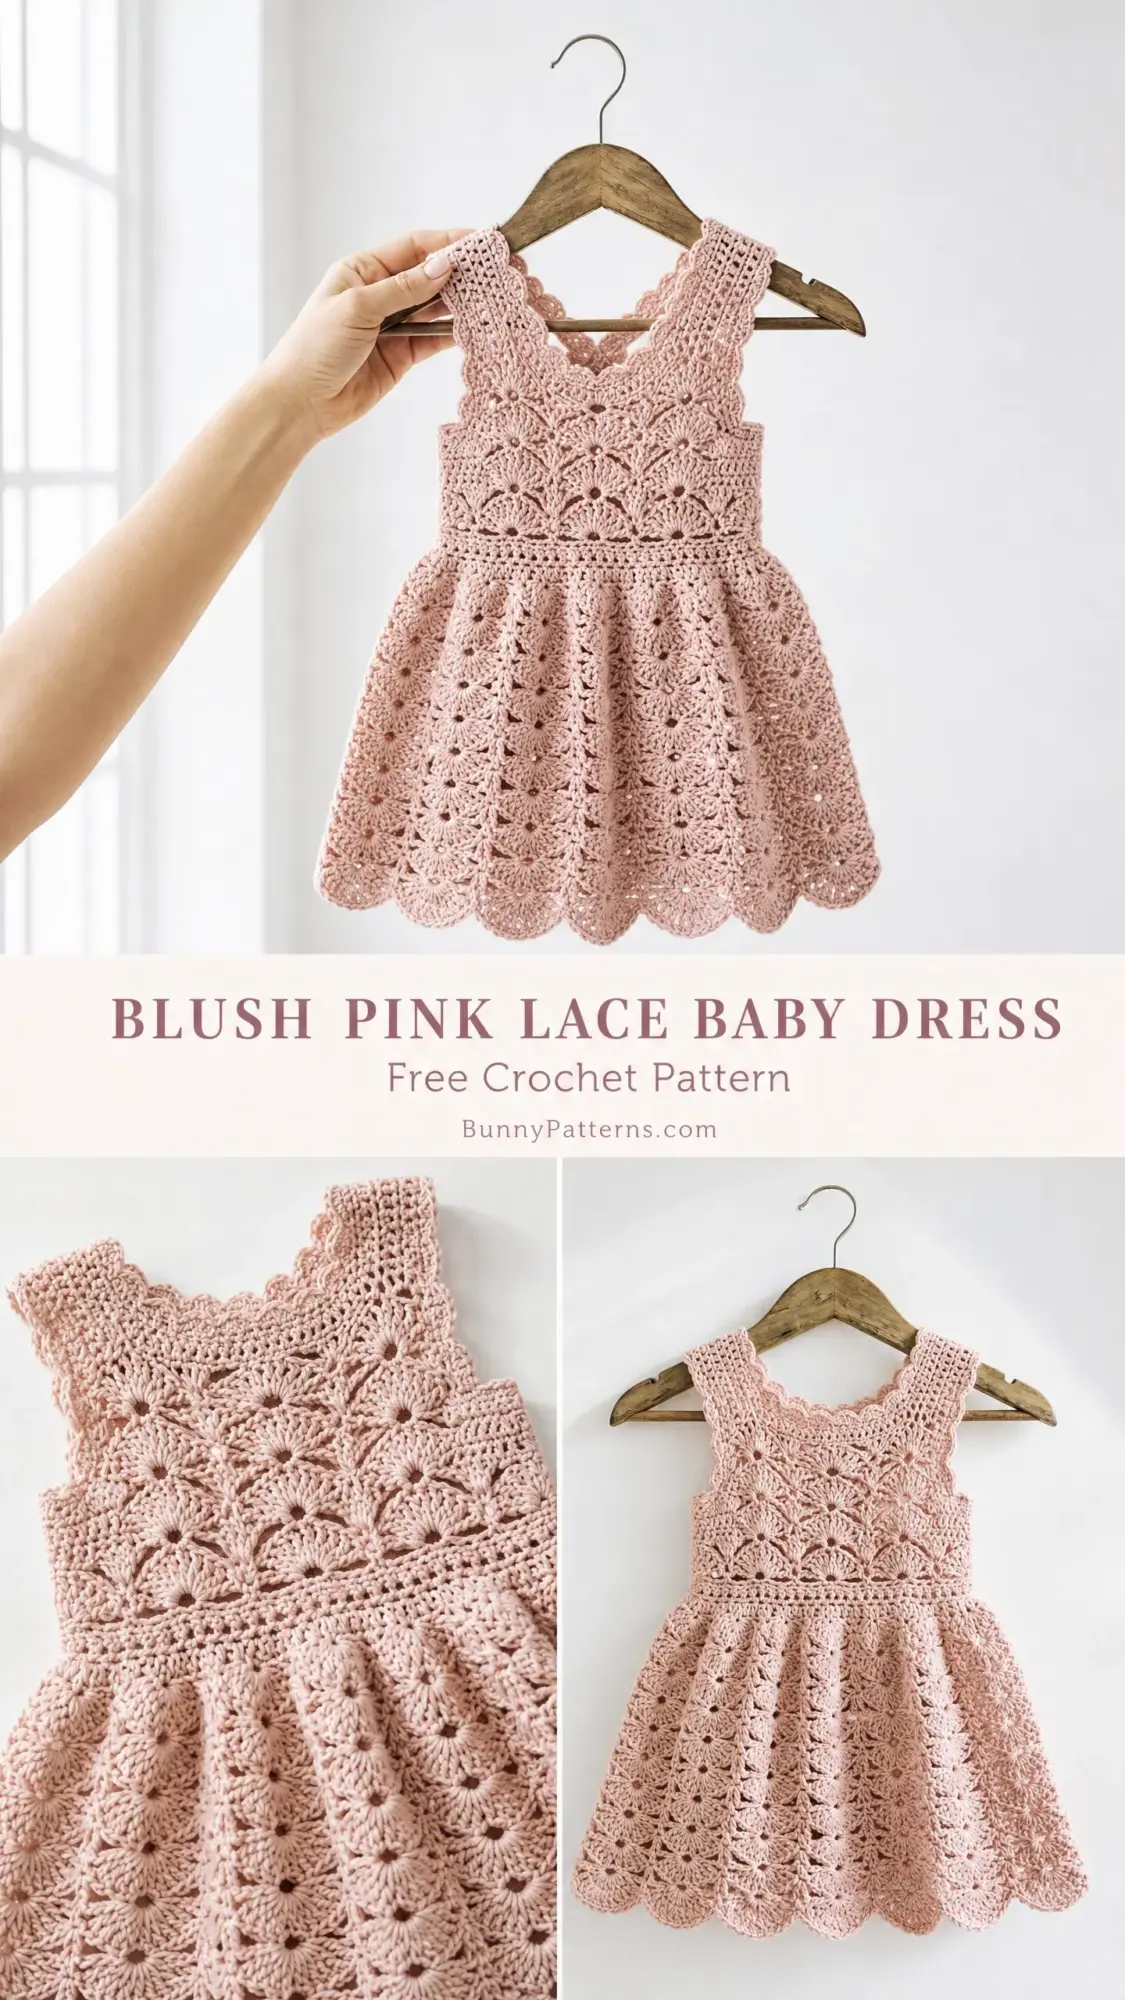
This pattern is my love letter to that memory. The stacked shell columns, the fitted bodice, the dramatic flare of the skirt. Every design choice connects back to that grainy photograph and the way my grandmother’s hands moved when she crocheted.
If you have been searching for an heirloom-quality baby dress pattern that feels special enough to pass down through generations, this is the one. The construction is intermediate to advanced, but I will walk you through every single step. Let us make something beautiful together.
About This Lace Baby Dress Crochet Pattern
This baby dress features a fitted shell-stitch bodice worked flat in panels, joined at the sides, with a flowing shell-and-fan lace skirt worked in the round from the waist down. The sleeveless design has wide shoulder straps, a slightly square neckline on the front, and a lower back neck with an optional button closure.
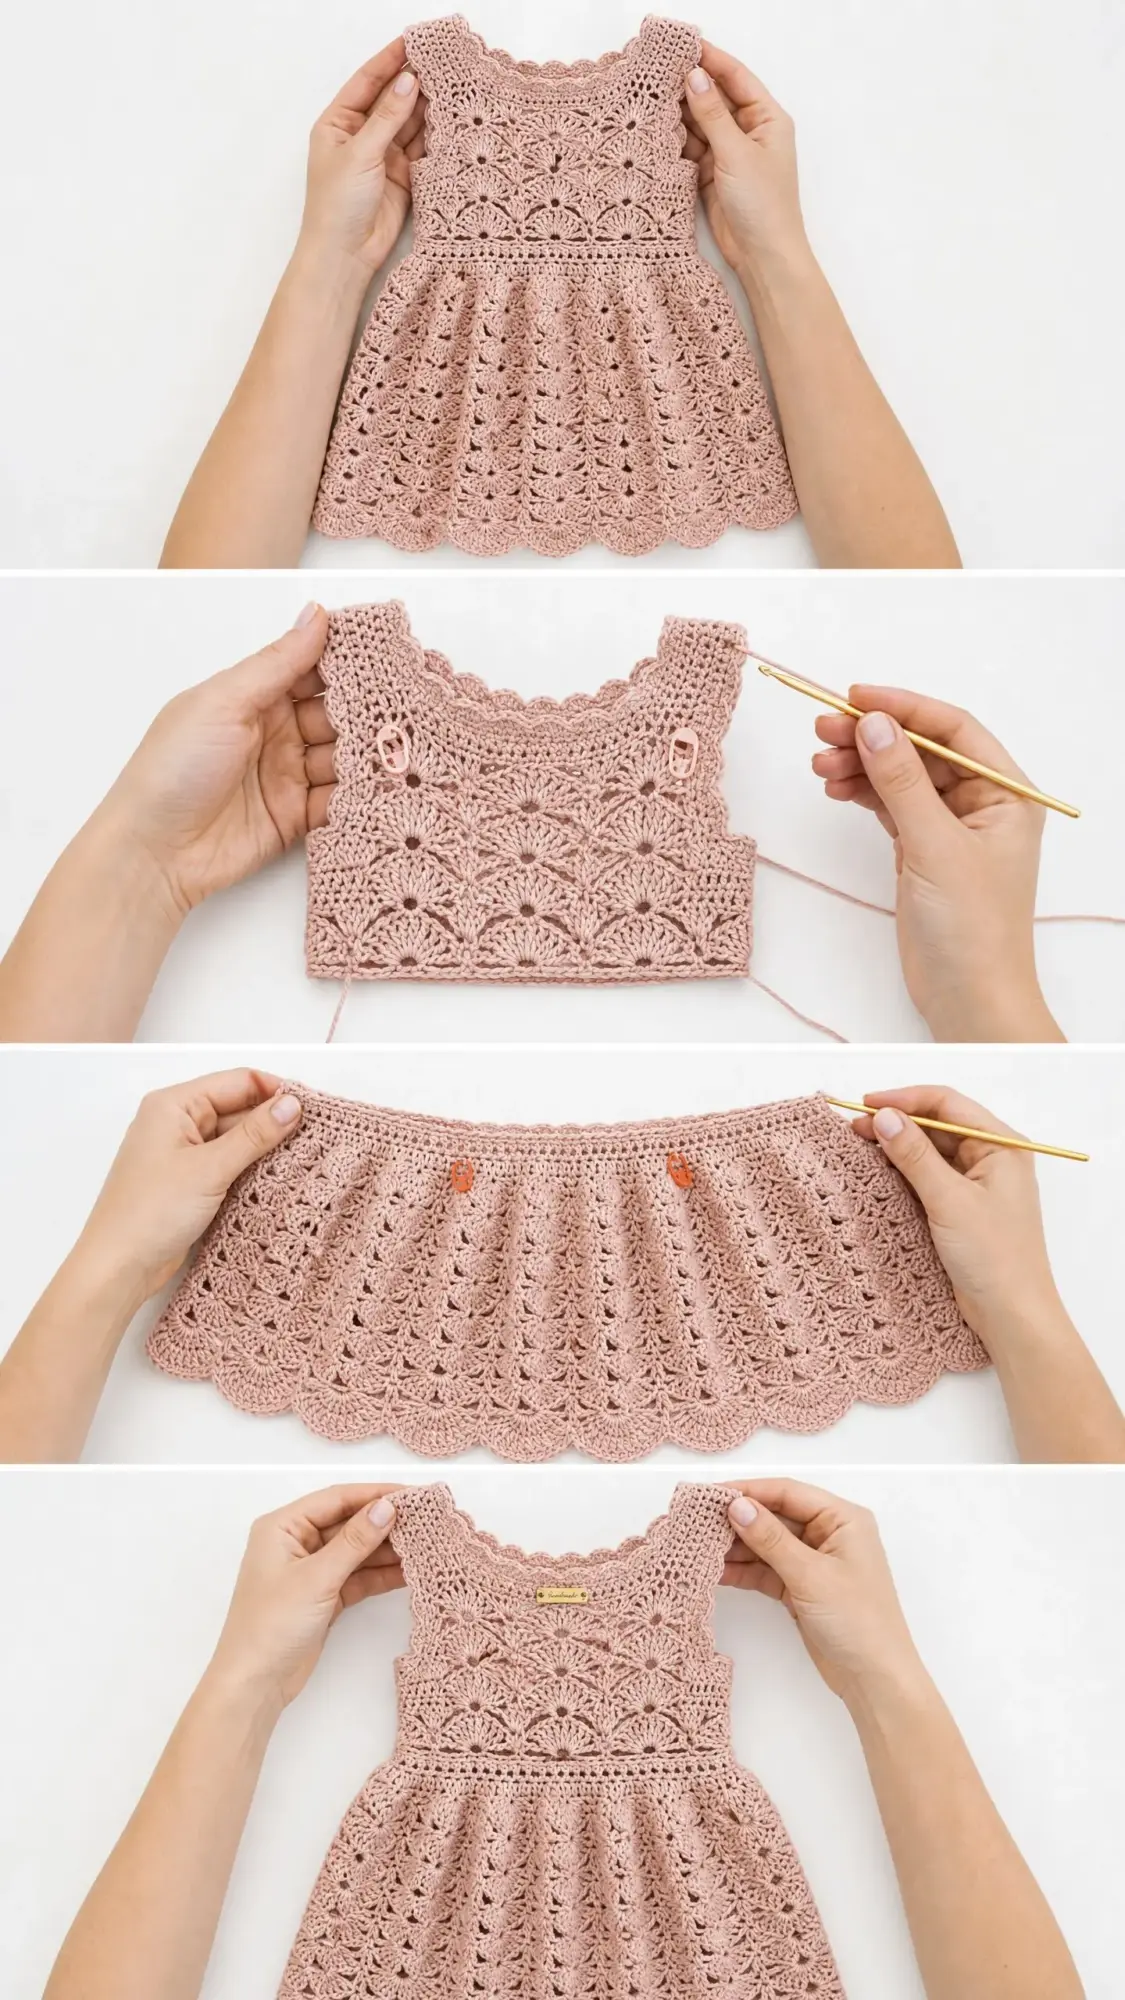
The construction moves from the top down. You will work the bodice front panel first, then the bodice back in two panels, join the side seams, pick up stitches at the waist, and work the skirt downward in the round. The neckline, armholes, and hem all get finished with a delicate scallop edging that really makes this piece shine.
The entire dress is worked in a single blush pink color, which keeps the stitch pattern as the star of the show. When blocked, those fan motifs open up into the most gorgeous petal shapes you have ever seen.
Skill level: Intermediate to Advanced. You should feel comfortable with shell stitches, working flat and in the round, seaming, and picking up stitches. If you have made at least one garment before, you can absolutely handle this.
Time estimate: 12 to 18 hours for sizes 6 to 12 months. Larger sizes add approximately 2 hours per size step.
Finished Sizes
This pattern is written for size 6 months (6M) with sizes 12 months (12M), 18 months (18M), and 24 months (24M) in parentheses throughout. When you see instructions formatted like this: 6M (12M, 18M, 24M), work the first number for 6M and find your size in the parentheses.
Chest circumference: 16 (17, 18, 19) inches / 40.5 (43, 45.5, 48.5) cm
Dress length, shoulder to hem: 14 (15.5, 17, 18.5) inches / 35.5 (39.5, 43, 47) cm
Bodice length, shoulder to waist: 5.5 (6, 6.5, 7) inches / 14 (15, 16.5, 18) cm
Skirt length, waist to hem: 8.5 (9.5, 10.5, 11.5) inches / 21.5 (24, 26.5, 29) cm
Materials Needed
Yarn: Size 2 (fine weight) or light fingering/sport weight 100% mercerized cotton. You will need approximately 350 (420, 500, 580) yards / 320 (385, 457, 530) meters.
Hook: US B-1 / 2.25 mm or US C-2 / 2.75 mm. Use whichever hook achieves gauge.
Notions:
Yarn Suggestions
Option 1: Paintbox Yarns Simply DK Cotton in shade Dusty Rose or Ballet Pink. You will need 3 (4, 4, 5) balls. This yarn is affordable and produces excellent stitch definition.
Option 2: Scheepjes Catona in shade Powder Pink (238) or Old Lace (130). You will need 6 (7, 9, 10) balls. This mercerized cotton has a polished finish that elevates the heirloom look.
Option 3: Lion Brand 24/7 Cotton in shade Blush. You will need 2 (3, 3, 4) balls. This is the most economical option.
Avoid fuzzy fibers because the lace detail will be obscured. Always purchase one extra ball as insurance.
Gauge
In shell stitch pattern:
One 12-stitch repeat (one full shell unit) = 1.5 inches / 3.8 cm wide
8 rows = 2 inches / 5 cm tall
In single crochet (sc):
24 sc x 28 rows = 4 inches / 10 cm
Make a swatch at least 5 inches wide before beginning. Wash and block the swatch as you intend to care for the finished piece, then measure again. Adjust hook size as needed. Gauge is critical for garment fit.
Abbreviations and Stitch Definitions
Let me walk you through every abbreviation you will encounter. I am defining them all upfront so you never have to guess.
ch = chain. Wrap the yarn over your hook and pull through the loop on your hook. That is one chain.
sl st = slip stitch. Insert hook into the stitch, yarn over, pull through both the stitch and the loop on your hook in one motion.
sc = single crochet. Insert hook into stitch, yarn over and pull up a loop (2 loops on hook), yarn over and pull through both loops.
hdc = half double crochet. Yarn over, insert hook into stitch, yarn over and pull up a loop (3 loops on hook), yarn over and pull through all 3 loops.
dc = double crochet. Yarn over, insert hook into stitch, yarn over and pull up a loop (3 loops on hook), yarn over and pull through 2 loops (2 loops remain), yarn over and pull through remaining 2 loops.
tr = treble crochet. Yarn over twice, insert hook into stitch, yarn over and pull up a loop (4 loops on hook), yarn over and pull through 2 loops three times.
sk = skip. Pass over the indicated number of stitches without working into them.
st(s) = stitch(es)
sp(s) = space(s)
RS = right side (the side that faces outward when worn)
WS = wrong side (the side that faces your body when worn)
rep = repeat
pm = place marker
beg = beginning
rem = remaining
tch = turning chain
yo = yarn over
lp(s) = loop(s)
Special Stitches for This Baby Dress Pattern
These are the signature stitches that create the lace texture. Practice them on your gauge swatch first.
Shell Stitch (shell)
Work 5 double crochet (dc) all into the same stitch or space. This creates a fan shape. Here is how: yarn over, insert hook into indicated stitch or space, yarn over and pull up a loop, yarn over and pull through 2 loops. That is your first dc. Without removing your hook, repeat this process 4 more times in the exact same stitch or space. You will have 5 dc grouped together. This counts as one shell.
Large Shell (L-shell)
Work 7 dc all into the same stitch or space. Follow the same process as the shell above but work 7 dc instead of 5. This is used at the hem to create the wider scallops.
V-stitch (V-st)
Work (dc, ch 2, dc) all into the same stitch or space. This creates an open V shape that serves as the base for shells in subsequent rows.
Picot
Ch 3, sl st into the 3rd chain from hook. This creates a small decorative loop.
Scallop Edging
Work across the edge as follows: sc into the first st, [sk 2 sts, shell into the next st, sk 2 sts, sc into the next st] rep across. On curved sections like armholes, sk 1 st between shells rather than 2 to accommodate the curve.
Joining Shell Round (waistband)
Work [sc, ch 1, sc] all into the same space. This creates the gathered waistband join visible as the horizontal band between the bodice and skirt.
Pattern Notes Before You Begin
Read through these notes carefully. They will save you frustration later.
The dress is constructed in this order: bodice front (worked flat), bodice back (worked flat in two panels for the button closure), side seams joined, skirt worked in the round downward from the waist, then all edgings worked last.
The front bodice is a single flat piece. The back bodice is worked as two equal panels, each covering half the back, creating a small opening at the back center neck.
All flat sections use a turning chain that does not count as a stitch unless specifically noted. This keeps the edges clean for seaming.
The lace skirt is worked entirely in the round with no turning. The right side (RS) always faces you. Place a stitch marker at the beginning of each round and move it up as you work.
Stitch counts given at the end of rows and rounds refer to the total number of stitches or the total number of pattern repeats as clarified in each section.
The skirt uses a 12-stitch repeat. Before beginning the skirt, verify that your waist pickup count is a multiple of 12.
When instructions say "shell center," they mean the 3rd dc of a 5-dc shell.
Bodice Front Instructions
Foundation: Ch 49 (53, 57, 61).
Row 1 (RS): Sc into 2nd ch from hook and into every ch across. Turn. (48, 52, 56, 60 sc)
Row 2 (WS): Ch 1 (does not count as st throughout bodice). Sc in first st. [Ch 2, sk 2 sts, sc in next st] rep across. Turn. You will have 16 (17, 18, 20) ch-2 spaces and 17 (18, 19, 21) sc.
Row 3 (RS): Ch 1. Sc in first sc. [Shell into next ch-2 sp, sc in next sc] rep across. Turn. (16, 17, 18, 20 shells + 17, 18, 19, 21 sc = 97, 103, 109, 121 sts)
Let me verify Row 3 math for you. For size 6M: 16 shells x 5 dc = 80 dc, plus 17 sc = 97 sts total. Perfect.
Row 4 (WS): Ch 1. Sc in first sc. [Ch 2, sc in 3rd dc of shell (center dc), ch 2, sc in next sc] rep across. Turn. (17, 18, 19, 21 sc with 32, 34, 36, 40 ch-2 sps)
Row 5 (RS): Ch 1. Sc in first sc. [Shell in ch-2 sp, sc in sc, shell in next ch-2 sp, sc in next sc] rep across. Turn. (32, 34, 36, 40 shells)
Row 5 doubles the shell count from Row 3. From here, maintain this density for the upper bodice.
Rows 6 through 12 (12, 14, 14): Repeat Rows 4 and 5 alternately, ending on a Row 4 repeat so the final row is a WS row of sc and ch-2 spaces.
After Row 12 (12, 14, 14), the bodice front should measure approximately 2.75 (3, 3.25, 3.5) inches / 7 (7.5, 8, 9) cm from the foundation chain.
Neckline Shaping for Bodice Front
The neckline is worked on the next RS row. You will work across the first section, fasten off, skip the center stitches, and work the second shoulder separately.
Row 13 (RS), Right shoulder strap: Ch 1. Work in established shell pattern across first 8 (9, 9, 10) pattern repeats (shells plus sc). Turn, leaving remaining sts unworked.
Row 13 continued, Left shoulder strap: Rejoin yarn at the opposite edge and work across the last 8 (9, 9, 10) pattern repeats in established pattern. Turn.
The center stitches left unworked form the front neckline opening. These are approximately 16 (16, 18, 20) stitches wide.
Work each shoulder strap separately for 4 (4, 5, 5) more rows in established pattern, ending with a WS row.
Fasten off, leaving a 12-inch / 30 cm tail for seaming.
Bodice front checkpoint: The completed front piece should measure 5.5 (6, 6.5, 7) inches / 14 (15, 16.5, 18) cm from foundation to top of shoulder strap, and 8 (8.5, 9, 9.5) inches / 20 (21.5, 23, 24) cm wide.
Bodice Back Left Panel
The back is worked in two half-panels side by side, with the opening at the back center.
Foundation: Ch 25 (27, 29, 31).
Row 1 (RS): Sc into 2nd ch from hook and into every ch across. Turn. (24, 26, 28, 30 sc)
Row 2 (WS): Ch 1. Sc in first st. [Ch 2, sk 2 sts, sc in next st] rep across. Turn. (8, 8, 9, 10 ch-2 sps)
Row 3 (RS): Ch 1. Sc in first sc. [Shell into ch-2 sp, sc in next sc] rep across. Turn. (8, 8, 9, 10 shells)
Rows 4 through 12 (12, 14, 14): Continue in pattern, matching the front panel row count.
Neckline and Shoulder for Back Left Panel
Row 13 (RS): Work across all stitches in established pattern for the shoulder area. No center stitches are skipped here since the back neck is lower.
Work 2 (2, 3, 3) more rows on the shoulder strap only (the outermost 8, 9, 9, 10 repeats), matching the front strap length.
Fasten off.
Bodice Back Right Panel
Work exactly as Back Left Panel, mirroring the construction. The two back panels sit side by side with approximately 0.5 inch / 1.25 cm of ease at the center back neck.
Fasten off.
Joining Seams
With RS together, use the mattress stitch or whipstitch and the yarn tails to join the front and back at the shoulder straps. Pin carefully before seaming to ensure straps align symmetrically.
With RS together, join front and back side seams from the bottom edge of the bodice upward, stopping approximately 0.5 inch / 1.25 cm below the armhole. Leave the armhole edge open for edging later.
Turn RS out.
Waist Pickup Round
With RS facing, join yarn at the side seam at the bottom edge of the bodice.
Round 1: Ch 1. Work sc evenly around the entire bottom edge of the bodice. The target count is a multiple of 12. Work approximately 1 sc for every dc and 1 sc for every sc along the lower edge.
Target stitch counts at waist: 96 (108, 108, 120) sc.
If your count is slightly off after pickup, increase or decrease evenly on this round to reach the target multiple of 12. Join with sl st to first sc. (96, 108, 108, 120 sc)
Waistband Round 2: Ch 1. [Sc in next sc, ch 1, sk 1 sc] rep around. Join with sl st to first sc. (48, 54, 54, 60 sc + 48, 54, 54, 60 ch-1 sps)
Waistband Round 3: Ch 1. [Sc in sc, sc in ch-1 sp] rep around. Join with sl st to first sc. (96, 108, 108, 120 sc)
Waistband Round 4: Ch 1. Sc in each sc around. Join with sl st. (96, 108, 108, 120 sc)
The waistband is now complete. You should see a distinct horizontal textured band separating the bodice from the skirt.
Skirt Instructions
The skirt is worked in the round. The RS always faces you. Do not turn between rounds. Place a marker at the beginning of each round.
Skirt Round 1 (RS, establish pattern):
Ch 1. [Sc in first sc, sk 2 sc, shell in next sc, sk 2 sc, sc in next sc, ch 3, sk 2 sc, shell in next sc, sk 2 sc] rep around, ending sl st to first sc. (16, 18, 18, 20 shells; 8, 9, 9, 10 ch-3 sps; 8, 9, 9, 10 sc)
Each repeat consumes 12 stitches: sc + sk 2 + shell + sk 2 + sc + ch 3 + sk 2 + shell + sk 2.
Skirt Round 2 (step round, shift pattern):
Ch 1. [Sc in 3rd dc of shell, ch 5, sc in 3rd dc of next shell, shell in ch-3 sp] rep around. Join. (8, 9, 9, 10 shells in ch-3 sps; 8, 9, 9, 10 ch-5 arches)
Skirt Round 3 (expand):
Ch 1. [Shell in ch-5 arch, sc in 3rd dc of shell] rep around. Join. (8, 9, 9, 10 shells in arches; alternating sc)
Skirt Round 4 (increase shell density):
Ch 6 (counts as dc + ch 3). [Sc in 3rd dc of shell, ch 3, dc in sc, ch 3] rep around. Join to 3rd ch of ch-6. (16, 18, 18, 20 ch-3 sps)
Skirt Round 5:
Ch 1. [Shell in ch-3 sp, sc in sc, shell in next ch-3 sp, sc in dc] rep around. Join. (16, 18, 18, 20 shells; 16, 18, 18, 20 sc)
Skirt Round 6:
Ch 1. [Sc in 3rd dc of shell, ch 3, sc in next sc, ch 3] rep around. Join. (16, 18, 18, 20 ch-3 sps; 16, 18, 18, 20 sc)
Skirt Round 7:
Ch 1. [Shell in ch-3 sp, sc in sc, shell in next ch-3 sp, sc in next sc] rep around. Join. (32, 36, 36, 40 shells; 32, 36, 36, 40 sc)
Rounds 8 and 9: Repeat Rounds 6 and 7 once more. (32, 36, 36, 40 shells maintained)
Round 10 (expansion increase round):
Ch 1. [Sc in 3rd dc of shell, ch 2, sc in sc, ch 2] rep around. Join. (64, 72, 72, 80 ch-2 sps total; 64, 72, 72, 80 sc)
Round 11:
Ch 1. [Shell in ch-2 sp, sc in sc] rep around. Join. (64, 72, 72, 80 shells; 64, 72, 72, 80 sc)
Round 12:
Ch 1. [Sc in 3rd dc of shell, ch 3, sc in sc, ch 3] rep around. Join. (128, 144, 144, 160 ch-3 sps; 128, 144, 144, 160 sc)
Round 13:
Ch 1. [Shell in ch-3 sp, sc in sc] rep around. Join. (128, 144, 144, 160 shells)
Rounds 14 through 17 (17, 19, 21): Repeat Rounds 12 and 13 twice (three times for 18M and 24M).
For 6M, work through Round 17.
For 12M, work through Round 17.
For 18M, work through Round 19.
For 24M, work through Round 21.
Skirt checkpoint: After the final pattern repeat round, the skirt should measure 7.5 (8.5, 9.5, 10.5) inches / 19 (21.5, 24, 26.5) cm from the waist pickup.
Hem Large Shell Round
Ch 1. [Sc in 3rd dc of shell, ch 4, sc in sc, ch 4] rep around. Join.
Hem Scallop Round
Ch 1. [L-shell (7 dc) in ch-4 sp, sc in sc] rep around. Join with sl st to first sc. Fasten off. (128, 144, 144, 160 L-shells at hem)
Edgings
Neckline Edging
Join yarn at center back neck, right panel side.
Round 1: Ch 1. Work sc evenly around entire neckline, working into row ends along shoulder straps and into the top of stitches across front neck and back neck.
Target: Approximately 66 (72, 72, 78) sc around the full neckline.
Round 2 (Scallop): Ch 1. Sc in first sc. [Sk 2 sc, shell in next sc, sk 2 sc, sc in next sc] rep around. Join. Fasten off.
Back Center Neck Button Loop (Optional)
On the right back panel top corner, join yarn and ch 6, sl st to the corresponding point on the left back panel to form a button loop. If using two buttons, work a second loop 0.5 inch / 1.25 cm below the first. Sew buttons to left panel at corresponding positions.
Armhole Edging
Work each armhole separately.
Join yarn at underarm.
Round 1: Ch 1. Sc evenly around armhole opening. Target: 44 (44, 48, 52) sc.
Round 2 (Scallop): Ch 1. Sc in first sc. [Sk 1 sc, shell in next sc, sk 1 sc, sc in next sc] rep around. Join. Fasten off.
Repeat for second armhole.
Finishing and Blocking Your Baby Dress
Weave in all ends with the yarn needle. Take time to work ends well into the lace fabric so they do not show.
Soak the finished dress in cool water with a small amount of gentle wool or cotton wash for 15 minutes. Gently squeeze out excess water. Do not wring. Roll in a clean towel and press to remove more moisture.
Lay flat on blocking mat. Pin into shape, opening up all lace motifs by gently stretching shells and pinning each scallop at the hem individually. The lace transforms dramatically with blocking. Those fan motifs will open and flatten into the clear petal shapes that make this dress so stunning.
Allow to dry completely flat. This may take 24 hours depending on humidity.
Sew on buttons if used.
Size Customization Tips
To add chest circumference in 1-inch increments: Add 6 stitches to the foundation chain of the bodice front and 3 stitches to each back panel.
To lengthen the bodice: Add 2 rows to the bodice front and back panels before neckline shaping. This adds approximately 0.5 inch.
To lengthen the skirt: Add additional repeats of Rounds 12 and 13 before moving to the hem. Each two-round repeat adds approximately 0.75 inch.
For a newborn size: Work the foundation chain at 43 stitches and reduce shell repeats throughout by one. Target chest circumference 14 inches.
For a 3T to 4T size: Add 2 additional shell repeats to the bodice foundation and extend the skirt by 4 round repeats. Yarn requirement increases to approximately 700 yards.
Care Instructions
Machine wash on delicate cycle in cold water or hand wash. Lay flat to dry, reshaping as needed. Do not tumble dry. Do not iron directly on the lace. If pressing is needed, use a pressing cloth and low steam with the iron hovering above, not touching. Store folded flat or hung on a padded hanger to preserve the lace structure.
Final Thoughts on This Crochet Baby Dress Pattern
Making this blush pink lace baby dress is a labor of love. The shell-and-fan construction creates a garment worthy of christenings, first birthdays, family portraits, and special occasions that deserve something handmade and beautiful. Every scallop at the hem, every petal column in the skirt, and every delicate detail at the neckline comes together into something truly heirloom quality.
The intermediate to advanced skill level means this is not a quick weekend project. But when you hold the finished dress in your hands, you will understand why every hour was worth it. Block it well, and those lace motifs will take your breath away.
Thank you so much for choosing this pattern for your next project. I cannot wait to see what you create.
If this pattern spoke to you, save it to your Pinterest boards so you can find it when you are ready to start. And please, please leave a comment below when you finish yours. Seeing your Rosie Dresses out in the world would absolutely make my day.
You Might Also Like
- Dusty Rose Cable Cuff Slipper Boots Free Crochet Pattern
- Cream Boho Tassel Fringe Clutch Free Crochet Pattern
- Dusty Rose Ribbed Ankle Socks Free Crochet Pattern
- Cozy Gray Hexagon Sofa Throw Free Crochet Pattern