
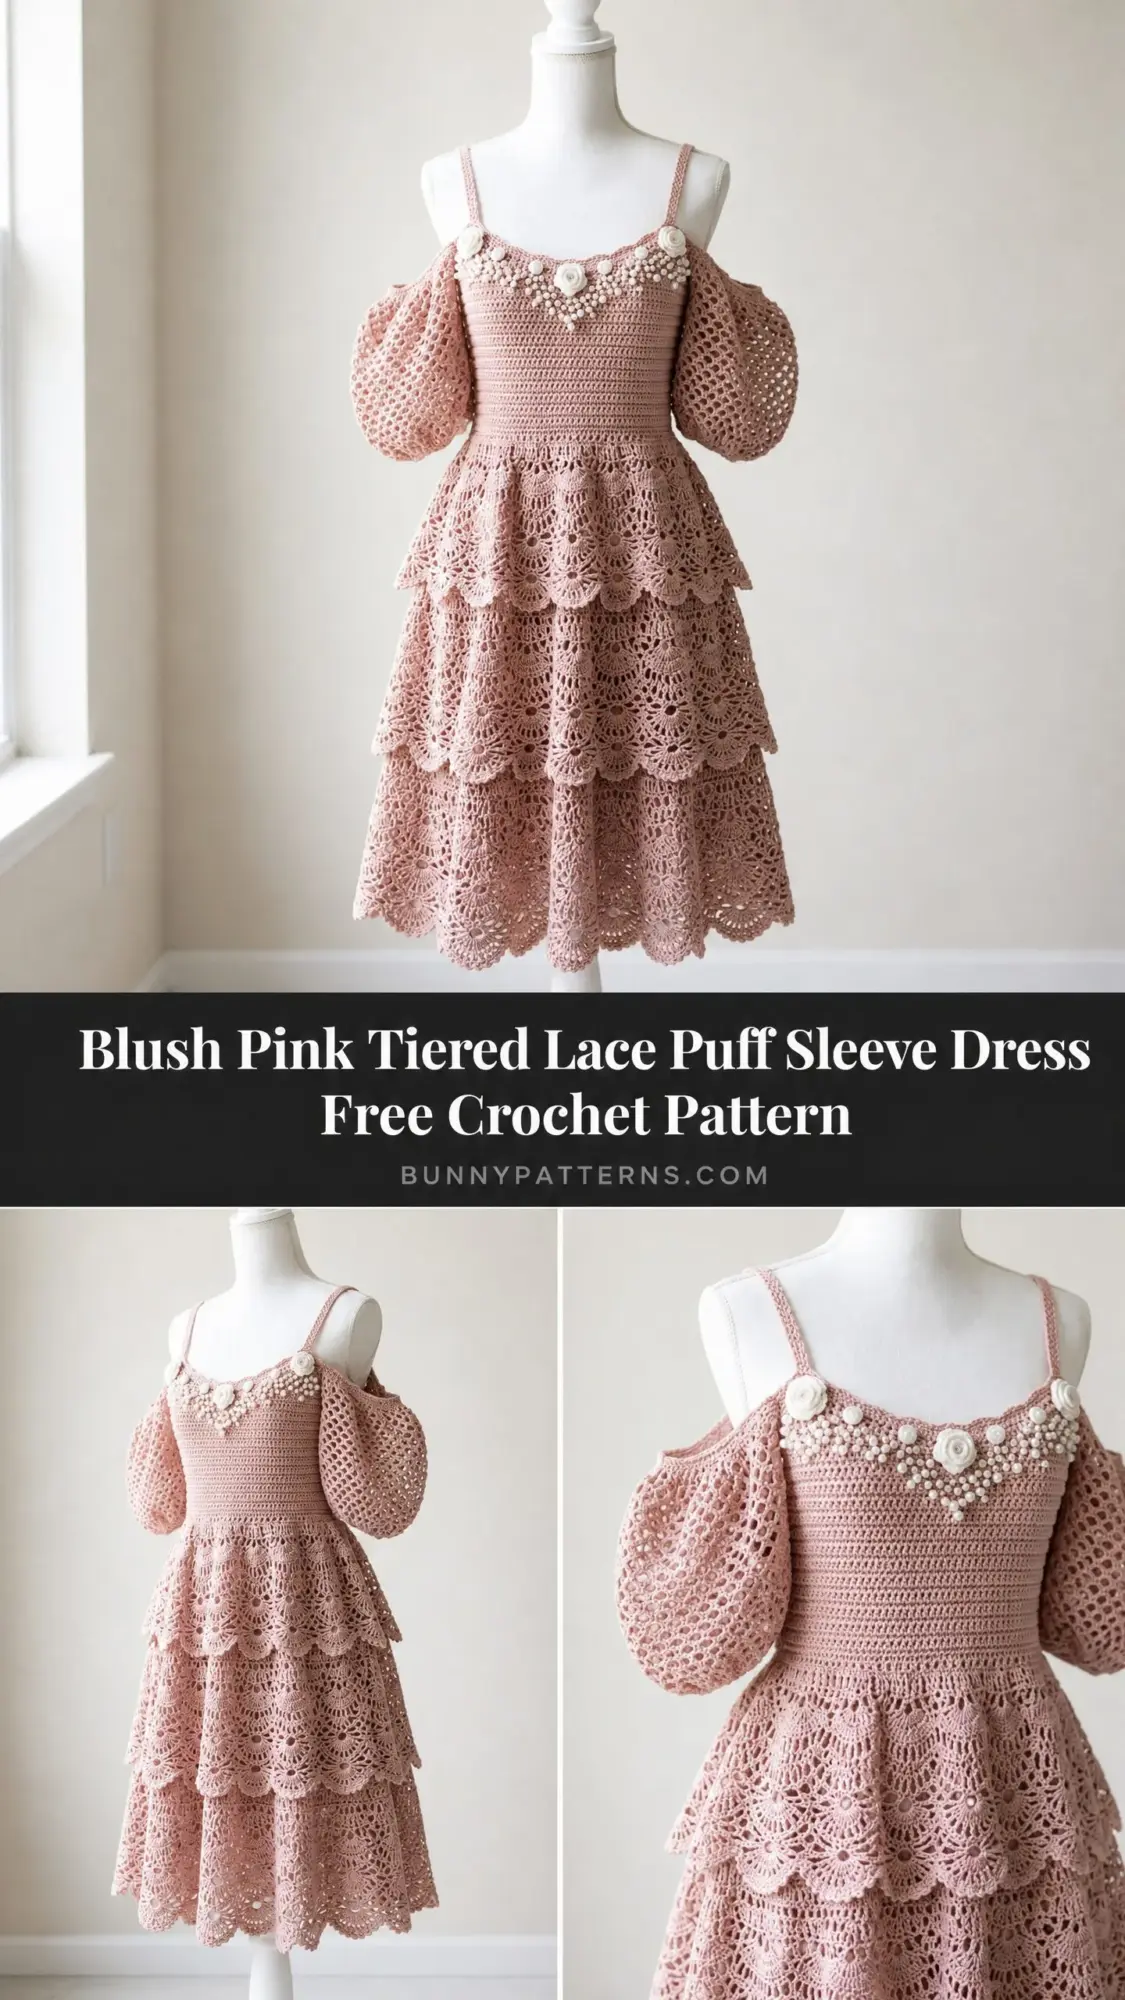
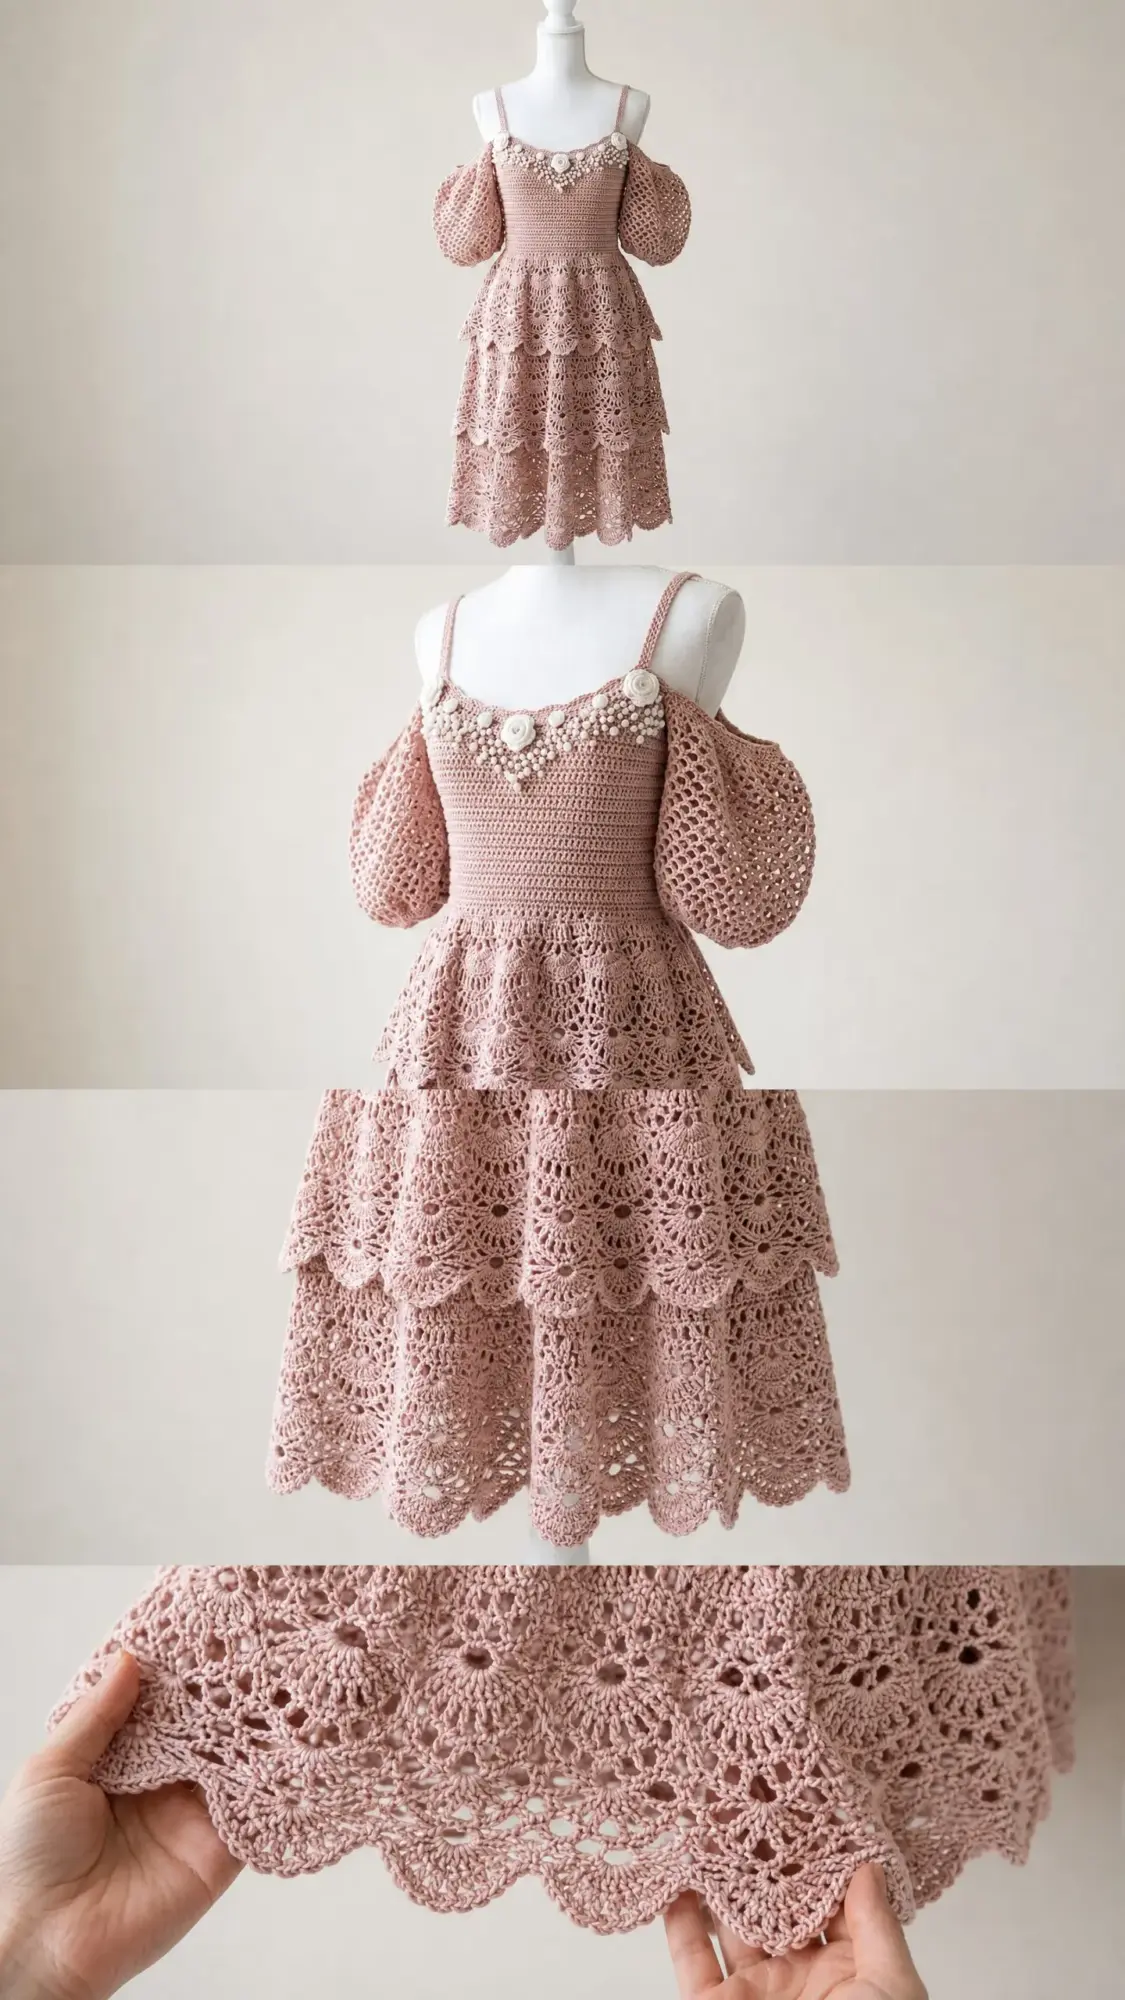
This is a showstopper dress pattern for girls aged 6 to 8 years. It features a fitted bodice, three cascading tiers of fan lace, and romantic cold-shoulder puff sleeves. The entire garment is worked in a single dusty blush pink color with delicate crocheted roses and pearl beads at the neckline.
I know what you might be thinking. A tiered lace dress sounds intimidating. But here is the honest truth. If you can work a double crochet and follow a repeating stitch pattern, you can absolutely make this dress. The construction is methodical, and I will walk you through every single step.
The bodice uses simple single crochet throughout. The fan lace tiers follow a two-row repeat that becomes second nature after the first few rows. And those gorgeous puff sleeves? They are worked in an easy mesh stitch in the round. Let me show you how it all comes together.
Why This Crochet Pattern Works So Well
This blush pink tiered lace puff sleeve dress combines structure with softness in a way that photographs beautifully and wears comfortably. The sweetheart neckline gives it a dressy feel while the cold-shoulder detail keeps it modern and playful. The three skirt tiers create movement and visual interest without adding bulk.
What makes this crochet tutorial special is the construction method. You work from the top down, starting with the straps and bodice, then adding the waistband, and finally attaching each tier separately. This means you can try the dress on as you go and adjust the fit before committing to the skirt length.
The fan lace stitch creates those beautiful scalloped edges you see in the reference image. Each tier increases in width from top to bottom, giving the dress a natural A-line silhouette that flatters and flows.
Skill Level and Time Commitment
I would rate this pattern as advanced intermediate. You should be comfortable working in the round, reading stitch repeats, seaming pieces together, and constructing a garment from multiple components. If you have completed at least one garment project before and you are familiar with fan or shell stitch lace, you will find this achievable with careful attention.
Plan for approximately 30 to 40 hours of work time if you are an experienced crocheter. Allow extra time for finishing, blocking, and attaching the embellishments. This is not a weekend project, but it is absolutely worth the investment for a special occasion dress.
Finished Measurements
Child size 6 to 8 years
Materials You Will Need
Yarn
Recommended Yarn Options
Choose a smooth 100 percent cotton yarn. Avoid yarns with texture, halo, or high stretch content because the lace stitch definition will be lost. Mercerized cotton is preferred for the slight drape and sheen.
Hooks
Notions
Gauge (Critical for Fit)
With B-1 / 2.25 mm hook in single crochet (sc): 22 stitches and 24 rows = 4 inches / 10 cm
With C-2 / 2.75 mm hook in fan lace pattern: One full fan lace repeat (14 stitches wide) = approximately 2.25 inches / 5.7 cm. Four rows of fan lace = approximately 2 inches / 5 cm.
Make a 5 inch / 13 cm square swatch in each stitch pattern and block before measuring. Adjust hook size if needed. Gauge is critical for garment fit.
Abbreviations and Stitch Definitions
Let me walk you through every abbreviation used in this pattern with plain-English definitions.
Special Stitches for This Dress Pattern
Fan Lace Stitch (worked over a multiple of 14 stitches plus 3)
This stitch creates the scalloped fan motifs on all three skirt tiers.
Setup Row (RS): Ch 3 (counts as dc), 2 dc in first st, sk 2 sts, sc in next st, sk 2 sts, 7 dc in next st (fan made), sk 2 sts, sc in next st, sk 2 sts, rep from beginning across, end with 3 dc in last st.
Row 1 (WS): Ch 1, turn, sc in first dc, ch 3, sk 3 dc, sc in next sc, ch 3, sc in 4th dc of 7-dc fan, ch 3, sc in next sc, ch 3, rep across, sc in top of t-ch.
Row 2 (RS): Ch 3, turn, 3 dc in first ch-3 sp, sc in next sc, 7 dc in next sc (center sc between ch-3 sps), sc in next sc, 3 dc in next ch-3 sp, rep across ending with 3 dc in last ch-3 sp, dc in last sc.
These two rows (Row 1 and Row 2) form the fan lace repeat. Always begin a new tier on the Setup Row.
Scallop Edge
Work along the top or bottom of any tier as follows: Sl st into first st, ch 3, 4 dc in same st, sk 2 sts, sl st in next st, ch 3, 4 dc in same st, sk 2 sts, rep across.
Puff Mesh Stitch (used for sleeves, worked in rounds)
Rnd 1: Ch 4 (counts as dc plus ch 1), sk 1 st, dc in next st, ch 1, sk 1 st, rep around, sl st to 3rd ch of beg ch-4.
Rnd 2: Sl st into ch-1 sp, ch 3, dc in same sp, ch 1, 2 dc in next ch-1 sp, rep around, sl st to top of beg ch-3.
Rep Rnd 1 and Rnd 2 for puff mesh pattern.
Crocheted Rose (make 3 for neckline)
Ch 20.
Row 1: Sc in 2nd ch from hook and in each ch across. (19 sc)
Row 2: Ch 2, turn, 2 dc in first sc, 3 dc in each sc across. (approximately 57 dc)
Fasten off leaving a long tail. Roll the strip into a rose coil starting from one end. Use the tail to sew the base of the coil together.
Pattern Notes Before You Begin
The dress is constructed in this order: Straps first, then the bodice front and back joined in the round, followed by the waistband, then the three skirt tiers worked as separate joined panels attached to the waist, and finally the sleeves worked in the round and seamed into the armhole openings.
The cold-shoulder effect happens because the bodice top has no fabric crossing the top of the shoulder. The straps sit on top of the shoulder and the sleeve hangs from a dropped point at the upper arm.
All rounds are joined with a slip stitch unless otherwise noted. Turning chains are counted as stitches in double crochet rows and not counted as stitches in single crochet rows.
When working the bodice shaping, place markers at the 4 underarm points and move them up each row. Stitch counts are given in parentheses at the end of each row or round.
Step by Step Crochet Pattern Instructions
Straps (make 2)
Using B-1 / 2.25 mm hook, ch 5.
Row 1: Sc in 2nd ch from hook and in each ch across. (4 sc)
Row 2 through Row 60: Ch 1, turn, sc in each st across. (4 sc)
Each strap measures approximately 10 inches / 25 cm. Fasten off both straps and set aside.
Bodice Front
Using B-1 / 2.25 mm hook, ch 73.
Row 1 (RS): Sc in 2nd ch from hook and in each ch across. (72 sc)
Row 2: Ch 1, turn, sc in each st across. (72 sc)
Row 3: Ch 1, turn, sc in each st across. (72 sc)
Begin sweetheart neckline shaping:
Row 4: Ch 1, turn, sc in first 34 sts, leave rem 38 sts unworked. (34 sc) This is the right cup.
Work right cup:
Row 5: Ch 1, turn, sc2tog, sc to end. (33 sc)
Row 6: Ch 1, turn, sc to last 2 sts, sc2tog. (32 sc)
Row 7: Ch 1, turn, sc2tog, sc to end. (31 sc)
Row 8: Ch 1, turn, sc across. (31 sc)
Row 9: Ch 1, turn, sc across. (31 sc)
Row 10: Ch 1, turn, sc across. (31 sc)
Fasten off.
Return to Row 3 foundation. Skip center 4 sts (this creates the sweetheart center dip), rejoin yarn in next st.
Row 4: Ch 1, sc in same st and in each rem st across. (34 sc) This is the left cup.
Work left cup:
Row 5: Ch 1, turn, sc to last 2 sts, sc2tog. (33 sc)
Row 6: Ch 1, turn, sc2tog, sc to end. (32 sc)
Row 7: Ch 1, turn, sc to last 2 sts, sc2tog. (31 sc)
Row 8: Ch 1, turn, sc across. (31 sc)
Row 9: Ch 1, turn, sc across. (31 sc)
Row 10: Ch 1, turn, sc across. (31 sc)
Do not fasten off.
Joining Row for Bodice Front:
With RS facing, ch 1, sc across 31 sts of left cup, ch 4 (bridge over center gap), sc across 31 sts of right cup. (62 sc plus 4-ch bridge = 66 working sts across top of front)
Continue on all 66 sts for bodice body:
Row 11: Ch 1, turn, sc in each st and ch across. (66 sc)
Row 12: Ch 1, turn, sc across. (66 sc)
Row 13: Ch 1, turn, sc across. (66 sc)
Row 14: Ch 1, turn, sc across. (66 sc)
Row 15: Ch 1, turn, sc2tog, sc to last 2 sts, sc2tog. (64 sc)
Row 16: Ch 1, turn, sc across. (64 sc)
Row 17: Ch 1, turn, sc across. (64 sc)
Row 18: Ch 1, turn, sc2tog, sc to last 2 sts, sc2tog. (62 sc)
Row 19: Ch 1, turn, sc across. (62 sc)
Row 20: Ch 1, turn, sc across. (62 sc)
Fasten off. This is the bodice front panel.
Bodice Back
Using B-1 / 2.25 mm hook, ch 73.
Row 1: Sc in 2nd ch from hook and in each ch across. (72 sc)
Rows 2 through 3: Ch 1, turn, sc across. (72 sc)
Begin back neckline (straight across):
Row 4: Ch 1, turn, sc across. (72 sc)
Rows 5 through 6: Ch 1, turn, sc across. (72 sc)
Back shaping:
Rows 7 through 10: Ch 1, turn, sc across. (72 sc)
Row 11: Ch 1, turn, sc2tog, sc across to last 2 sts, sc2tog. (70 sc)
Row 12: Ch 1, turn, sc across. (70 sc)
Row 13: Ch 1, turn, sc across. (70 sc)
Row 14: Ch 1, turn, sc2tog, sc across to last 2 sts, sc2tog. (68 sc)
Row 15: Ch 1, turn, sc across. (68 sc)
Row 16: Ch 1, turn, sc across. (68 sc)
Row 17: Ch 1, turn, sc2tog, sc across to last 2 sts, sc2tog. (66 sc)
Row 18: Ch 1, turn, sc across. (66 sc)
Row 19: Ch 1, turn, sc across. (66 sc)
Row 20: Ch 1, turn, sc2tog, sc across to last 2 sts, sc2tog. (64 sc)
Note: The back has 64 sts at the waist join row and the front has 62 sts. The 2-stitch difference is absorbed in the side seam joins.
Fasten off.
Joining Bodice into the Round
With RS facing, hold front and back panels together. Using B-1 / 2.25 mm hook and a new length of yarn, sl st through both layers at one side edge to join. Sc evenly down side edge, then continue in the round. Alternatively, seam each side using mattress stitch for a neater finish.
After seaming both sides, the bodice is now a joined tube. Total sts around the lower edge of the bodice tube: 62 front plus 64 back = 126 sts total.
Sew straps to the bodice: Position one strap at each shoulder (approximately 2 inches in from armhole edge on front, straight up and over to the matching position on back). Sew securely with yarn needle.
Waistband
Using B-1 / 2.25 mm hook, join yarn at one side seam at the bottom edge of the bodice.
Rnd 1: Ch 1, sc in each st around. (126 sc) Sl st to first sc.
Rnd 2: Ch 1, sc in each st around. (126 sc) Sl st to first sc.
Rnd 3: Ch 1, sc in each st around. (126 sc) Sl st to first sc.
Rnd 4: Ch 1, sc across. (126 sc) Sl st to first sc.
Rnd 5: Ch 1, sc across. (126 sc) Sl st to first sc.
Rnd 6: Ch 1, sc across. (126 sc) Sl st to first sc.
The waistband is 6 rounds of sc (approximately 1 inch / 2.5 cm). Fasten off.
Checkpoint: After completing the waistband, the bodice from strap top to waistband bottom should measure approximately 8 inches / 20 cm. The waist circumference should measure approximately 23 inches / 58 cm when laid flat and doubled.
Skirt Tier 1
Tier 1 attaches directly to the bottom of the waistband. The waistband has 126 sts. Tier 1 requires a foundation of 129 sts.
Using C-2 / 2.75 mm hook, join yarn at one side of waistband base.
Pickup Rnd: Ch 1, sc in each of first 42 waistband sts, inc in next st, sc in next 42 sts, inc in next st, sc in next 40 sts, inc in last st, sl st to first sc. (129 sc)
Row 1 (Setup, RS): Ch 3 (counts as dc), 2 dc in same pickup st, sk 2 sts, sc in next st, sk 2 sts, 7 dc in next st, sk 2 sts, sc in next st, sk 2 sts, rep across to last st, 3 dc in last st. (9 fans plus border)
Row 2 (WS): Ch 1, turn, sc in first dc, ch 3, sk 3 dc, sc in next sc, ch 3, sc in 4th dc of fan, ch 3, sc in next sc, ch 3, rep across, sc in top of t-ch.
Row 3 (RS): Ch 3, turn, 3 dc in first ch-3 sp, sc in next sc, 7 dc in next sc, sc in next sc, 3 dc in next ch-3 sp, rep across, ending 3 dc in last ch-3 sp, dc in last sc.
Rows 4 through 9: Rep Rows 2 and 3 three more times.
Total rows for Tier 1: Setup Row plus 8 more rows = 9 rows = approximately 4.5 inches / 11.5 cm.
Scallop Edge at bottom of Tier 1: Sl st into first st, ch 3, 4 dc in same st, sk 2 sts, sl st in next st, ch 3, 4 dc in same st, sk 2 sts, rep across entire bottom edge. Fasten off.
Seam the short edges of Tier 1 together if worked flat.
Checkpoint: Tier 1 should measure approximately 4.5 inches / 11.5 cm from pickup row to scalloped hem. The circumference at the lower edge should measure approximately 29 inches / 74 cm.
Skirt Tier 2
Tier 2 attaches approximately 2 rows below the top of Tier 1. Tier 2 stitch count: 157 sts (11 full fan repeats).
Pickup Rnd: Join yarn, ch 1, sc evenly around increasing 28 sts as follows: (sc in 4 sts, inc in next st) x 28, sc in remaining sts to total. (157 sc)
Row 1 (Setup, RS): Ch 3, 2 dc in same st, sk 2 sts, sc in next st, sk 2 sts, 7 dc in next st, sk 2 sts, sc in next st, sk 2 sts, rep across to last st, 3 dc in last st. (11 fans)
Rows 2 through 11: Work fan lace Rows 2 and 3 alternately for 10 more rows.
Total rows for Tier 2: Setup Row plus 10 more rows = 11 rows = approximately 5.5 inches / 14 cm.
Scallop Edge: Same as Tier 1. Fasten off and seam.
Checkpoint: Tier 2 should measure approximately 5.5 inches / 14 cm tall. The circumference at the lower edge should measure approximately 35 inches / 89 cm.
Skirt Tier 3
Tier 3 is the longest and widest tier. Tier 3 stitch count: 199 sts (14 full fan repeats).
Pickup Rnd: Join yarn, ch 1, sc evenly around increasing 42 sts as follows: (sc in 3 sts, inc in next st) x 42, sc in remaining sts to close round to 199. (199 sc)
Row 1 (Setup, RS): Ch 3, 2 dc in same st, sk 2 sts, sc in next st, sk 2 sts, 7 dc in next st, sk 2 sts, sc in next st, sk 2 sts, rep across to last st, 3 dc in last st. (14 fans)
Rows 2 through 15: Work fan lace Rows 2 and 3 alternately for 14 more rows.
Total rows for Tier 3: Setup Row plus 14 more rows = 15 rows = approximately 7.5 inches / 19 cm.
Scallop Edge: Same as previous tiers. Fasten off and seam.
Checkpoint: Tier 3 should measure approximately 7.5 inches / 19 cm tall. The hemline circumference should measure approximately 45 inches / 114 cm.
Sleeves (make 2)
Sleeve foundation: Ch 44, join with sl st to first ch to form a ring. Total sleeve opening sts: 44
Rnds 1 through 3: Using C-2 / 2.75 mm hook, work puff mesh stitch:
Rnd 1: Ch 4 (counts as dc plus ch 1), sk 1 ch, dc in next ch, ch 1, sk 1 ch, rep around, sl st to 3rd ch of beg ch-4. (22 ch-1 sps)
Rnd 2: Sl st into first ch-1 sp, ch 3, dc in same sp, ch 1, 2 dc in next ch-1 sp, ch 1, rep around, sl st to top of beg ch-3. (22 two-dc groups)
Rnd 3: Ch 4, sk 2 dc, dc in ch-1 sp, ch 1, sk 2 dc, dc in next ch-1 sp, ch 1, rep around, sl st to 3rd ch of beg ch-4. (22 ch-1 sps)
Begin puff increase for balloon effect:
Rnd 4: Sl st into first ch-1 sp, ch 3, 2 dc in same sp, ch 1, 3 dc in next ch-1 sp, ch 1, rep around, sl st to top of beg ch-3. (22 three-dc groups, 66 dc total)
Rnd 5: Ch 4, dc in ch-1 sp, ch 1, rep around, sl st to 3rd ch of beg ch-4. (22 ch-1 sps)
Rnd 6: Sl st into first ch-1 sp, ch 3, 3 dc in same sp, ch 1, 4 dc in next ch-1 sp, ch 1, rep around, sl st. (22 four-dc groups, 88 dc total)
Rnd 7: Ch 4, dc in ch-1 sp, ch 1, rep around, sl st. (22 ch-1 sps)
Rnd 8: Sl st into first ch-1 sp, ch 3, 3 dc in same sp, ch 1, rep around, sl st. (22 three-dc groups)
This is the widest point of the puff. Begin decreasing:
Rnd 9: Ch 3, dc2tog over 2 dc, ch 1, dc2tog over next 2 dc, ch 1, rep around, sl st to top of beg ch-3. (44 dc total, 22 ch-1 sps)
Rnd 10: Sl st into ch-1 sp, ch 3, dc in same sp, ch 1, 2 dc in next sp, ch 1, rep around, sl st. (22 two-dc groups)
Rnd 11: Ch 3, sc in next sp, ch 3, sc in next sp, rep around, sl st. (mesh cuff transition)
Rnd 12: Sl st in first ch-3 sp, ch 1, sc in sp, ch 2, sc in next sp, ch 2, rep around, sl st to first sc. (22 ch-2 sps)
Rnd 13: Ch 1, sc in first sc, 3 sc in ch-2 sp, sc in next sc, 3 sc in ch-2 sp, rep around, sl st to first sc. (approximately 88 sc)
Rnd 14: Ch 1, sc in each st around, sl st. (88 sc)
Fasten off. Sleeve measures approximately 5 inches / 13 cm from top opening to hem.
Attaching Sleeves: Position each sleeve opening at the dropped shoulder point on the bodice side. The top of the sleeve opening sits approximately 1 inch / 2.5 cm below the shoulder strap. Pin in place and sew around using mattress stitch or sc join.
Neckline Edging
Using B-1 / 2.25 mm hook, join yarn at center back neck.
Rnd 1: Ch 1, sc evenly around entire neckline edge including sweetheart curves. (approximately 80 to 90 sc)
Rnd 2: Ch 1, sc in each st around, sl st to join. Fasten off.
Work a scallop border: Sl st into first st, ch 3, 4 dc in same st, sk 2 sts, sl st in next st, rep around entire neckline. Fasten off.
Strap Edging
With B-1 / 2.25 mm hook, work a row of sc along each long edge of each strap.
Embellishments
Make 3 crocheted roses using the instructions above. Arrange 2 roses near the right side of the neckline scallop and 1 rose near the left side. Sew in place with yarn tail.
Arrange pearl beads in a cluster between the roses following an arc along the neckline. Sew each bead individually using white thread doubled through a sewing needle, knotting securely at the back.
Size Customization Tips
To size up or down, adjust the foundation chain of the bodice in increments of 2 stitches.
For each additional size up, add 8 sts to the bodice foundation (4 per side), add one additional fan repeat to each skirt tier, and add 4 sts to each sleeve foundation.
For each size down, remove 8 sts from the bodice foundation, remove one fan repeat from each tier, and remove 4 sts from each sleeve.
To lengthen the skirt, add additional rows to each tier in equal proportion.
Finishing and Blocking Your Dress
Weave in all ends securely using a yarn needle, working each tail in two different directions for security.
Wet block the finished dress by submerging in cool water for 10 minutes, gently pressing out excess water in a towel (do not wring), then pinning flat on a blocking mat. Pin each fan lace tier open firmly to define the scallops and fans. Pin the sleeves open to the widest puff circumference. Allow to dry completely for 24 to 48 hours.
After blocking, sew on roses and beads as described above.
You Did It!
Thank you so much for choosing this blush pink tiered lace puff sleeve dress crochet pattern. This is a true labor of love project, and I am so honored you are making it. I would absolutely love to see your finished dress, so please tag me on Instagram or share your photos in our Facebook group. Seeing your creations truly makes my day.
If you found this crochet tutorial helpful, I hope you will save it to your Pinterest boards so you can find it easily when you are ready to start. And please drop a comment below if you make this dress. I love hearing about your projects and answering any questions along the way. Happy crocheting!
You Might Also Like
- Terracotta Mesh Crochet Flared Sleeve Shrug Pattern
- Sage Green Tiered Wall Planter Free Crochet Pattern
- Lavender Lace Baby Dress Free Crochet Pattern
- Ocean Wave Hexagon Throw Free Crochet Pattern