
I don’t know about you, but I absolutely melt when I see a little one dressed in handmade clothes. There’s something about a toddler in a crocheted outfit that makes my heart skip a beat every single time.
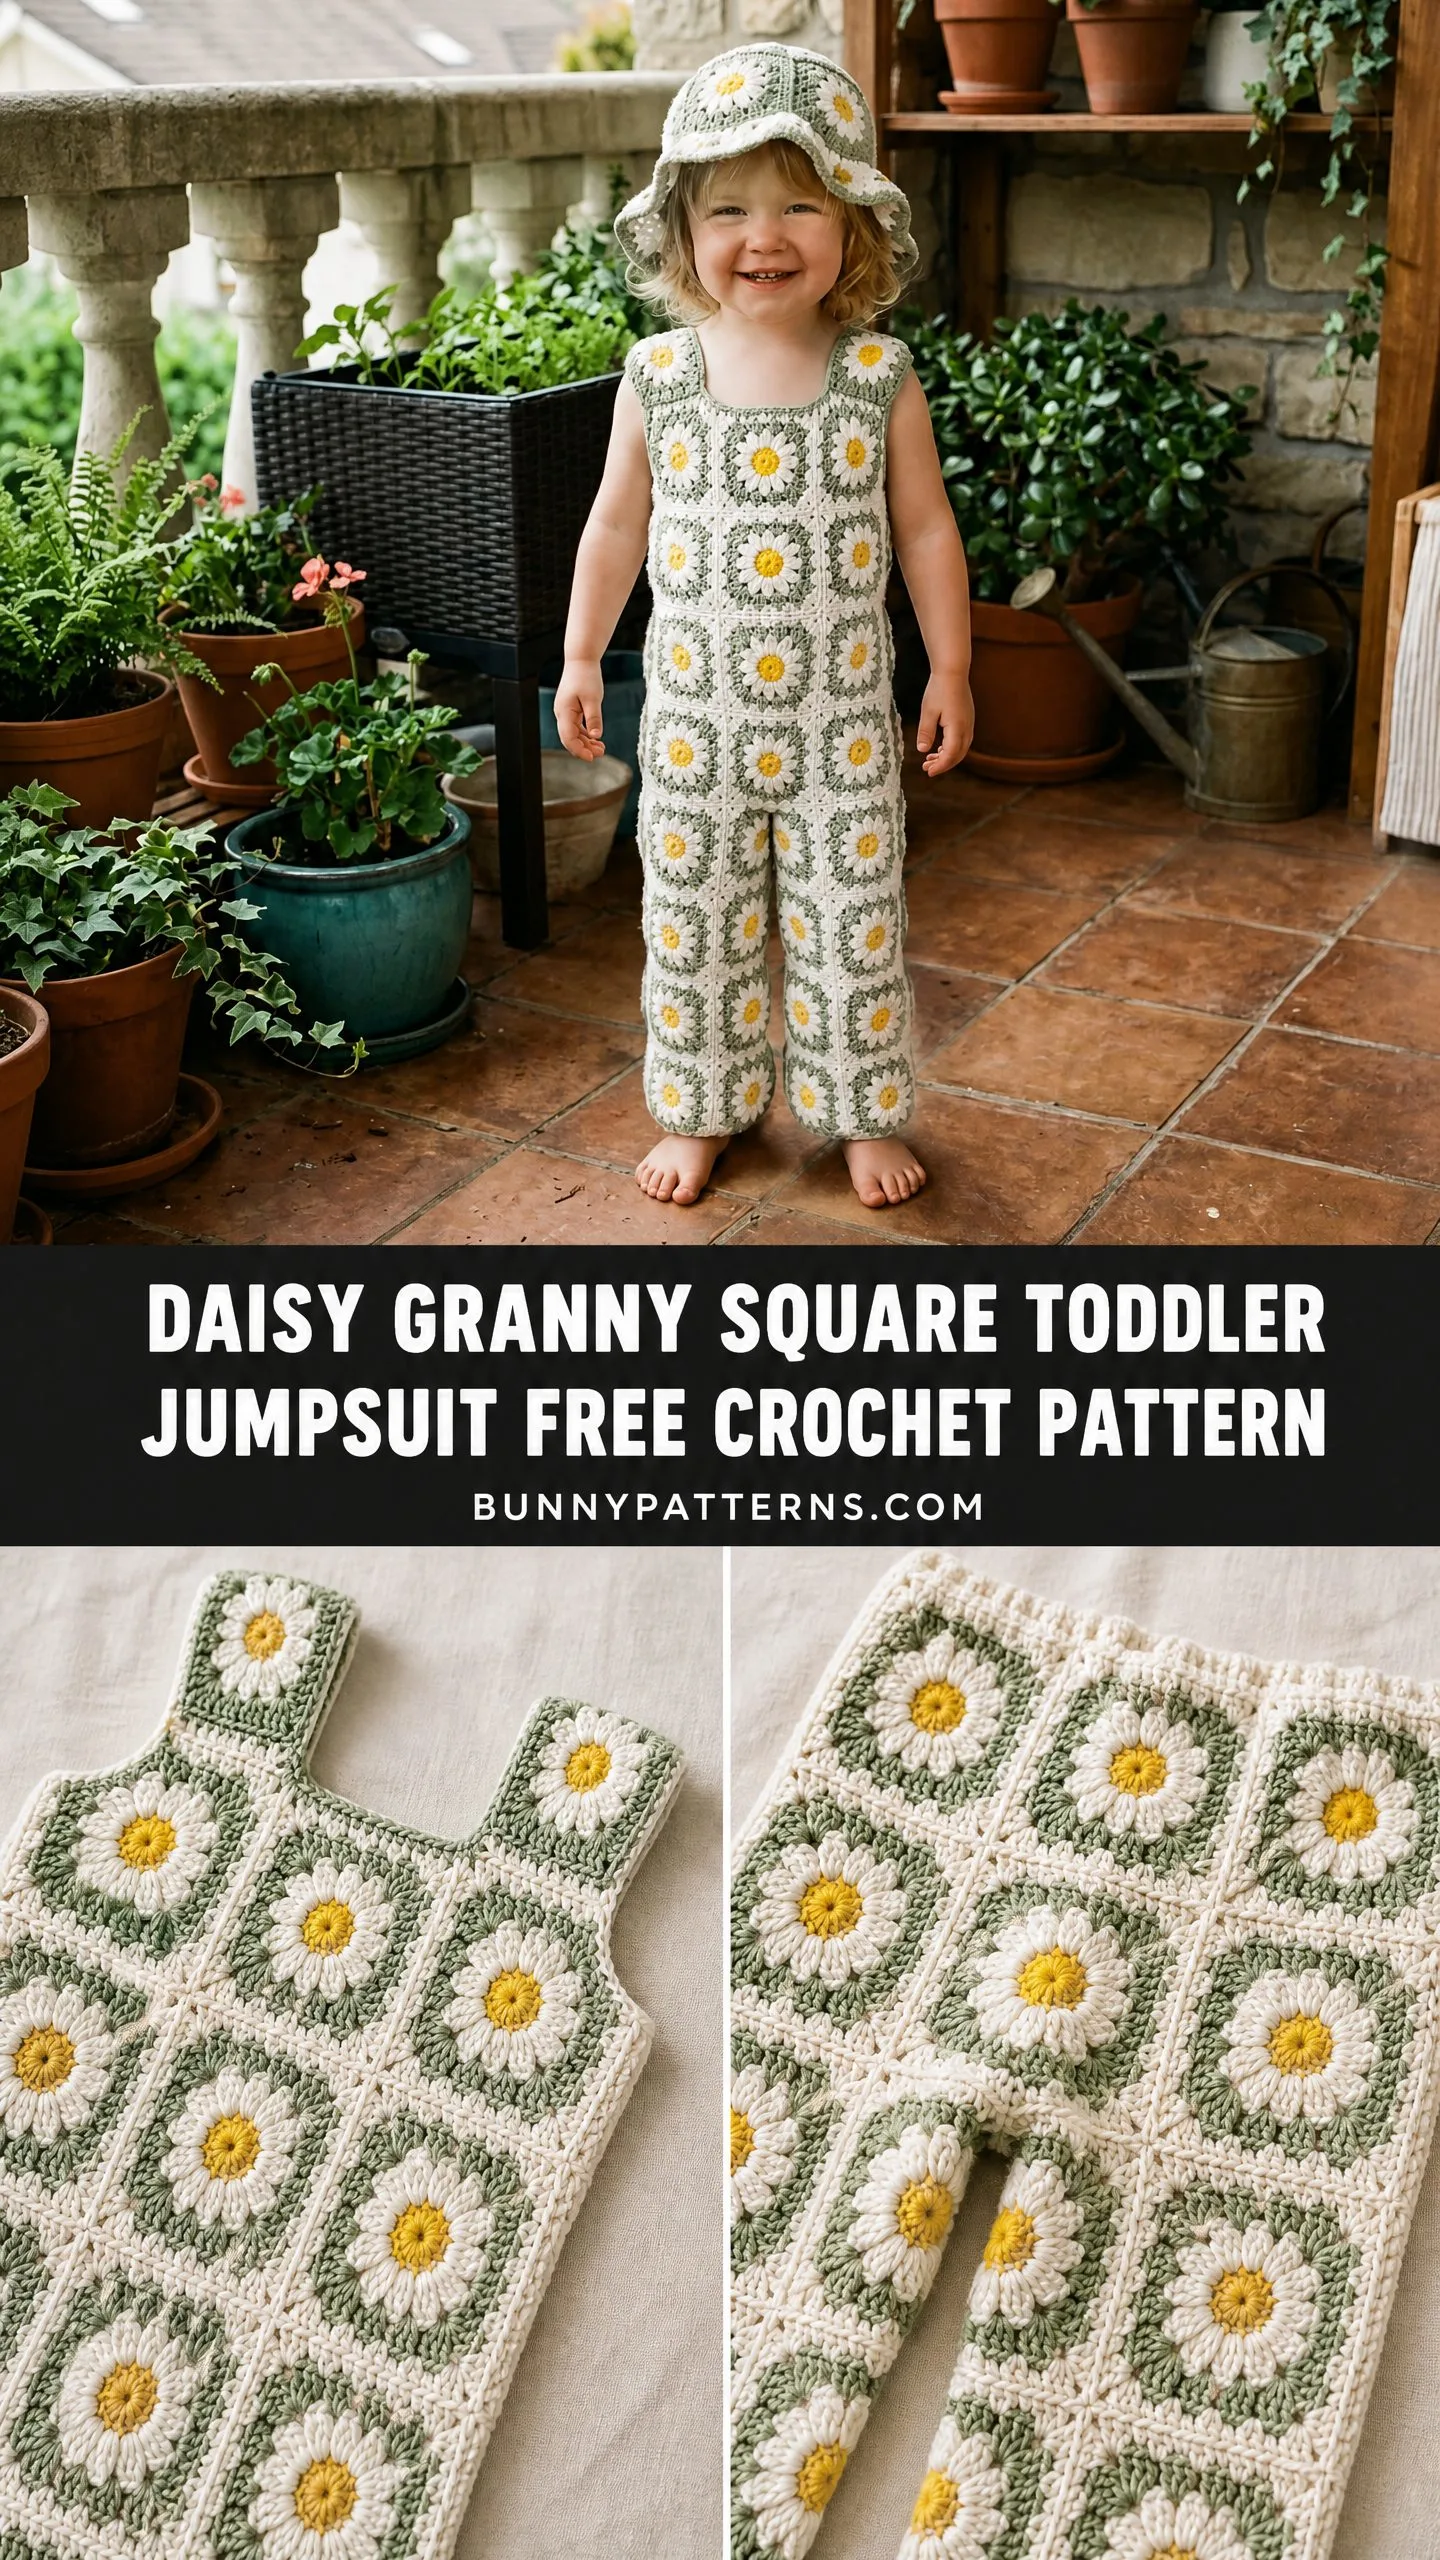
This daisy granny square jumpsuit has been living in my head rent-free for months. It combines the nostalgic charm of classic granny squares with the most adorable raised daisy motifs, and the result is a garment that looks far more complicated than it actually is.
If you’ve ever wanted to make a showstopper piece for a special toddler in your life, this is your sign. Let’s dig in.
Why This Crochet Pattern Works So Beautifully
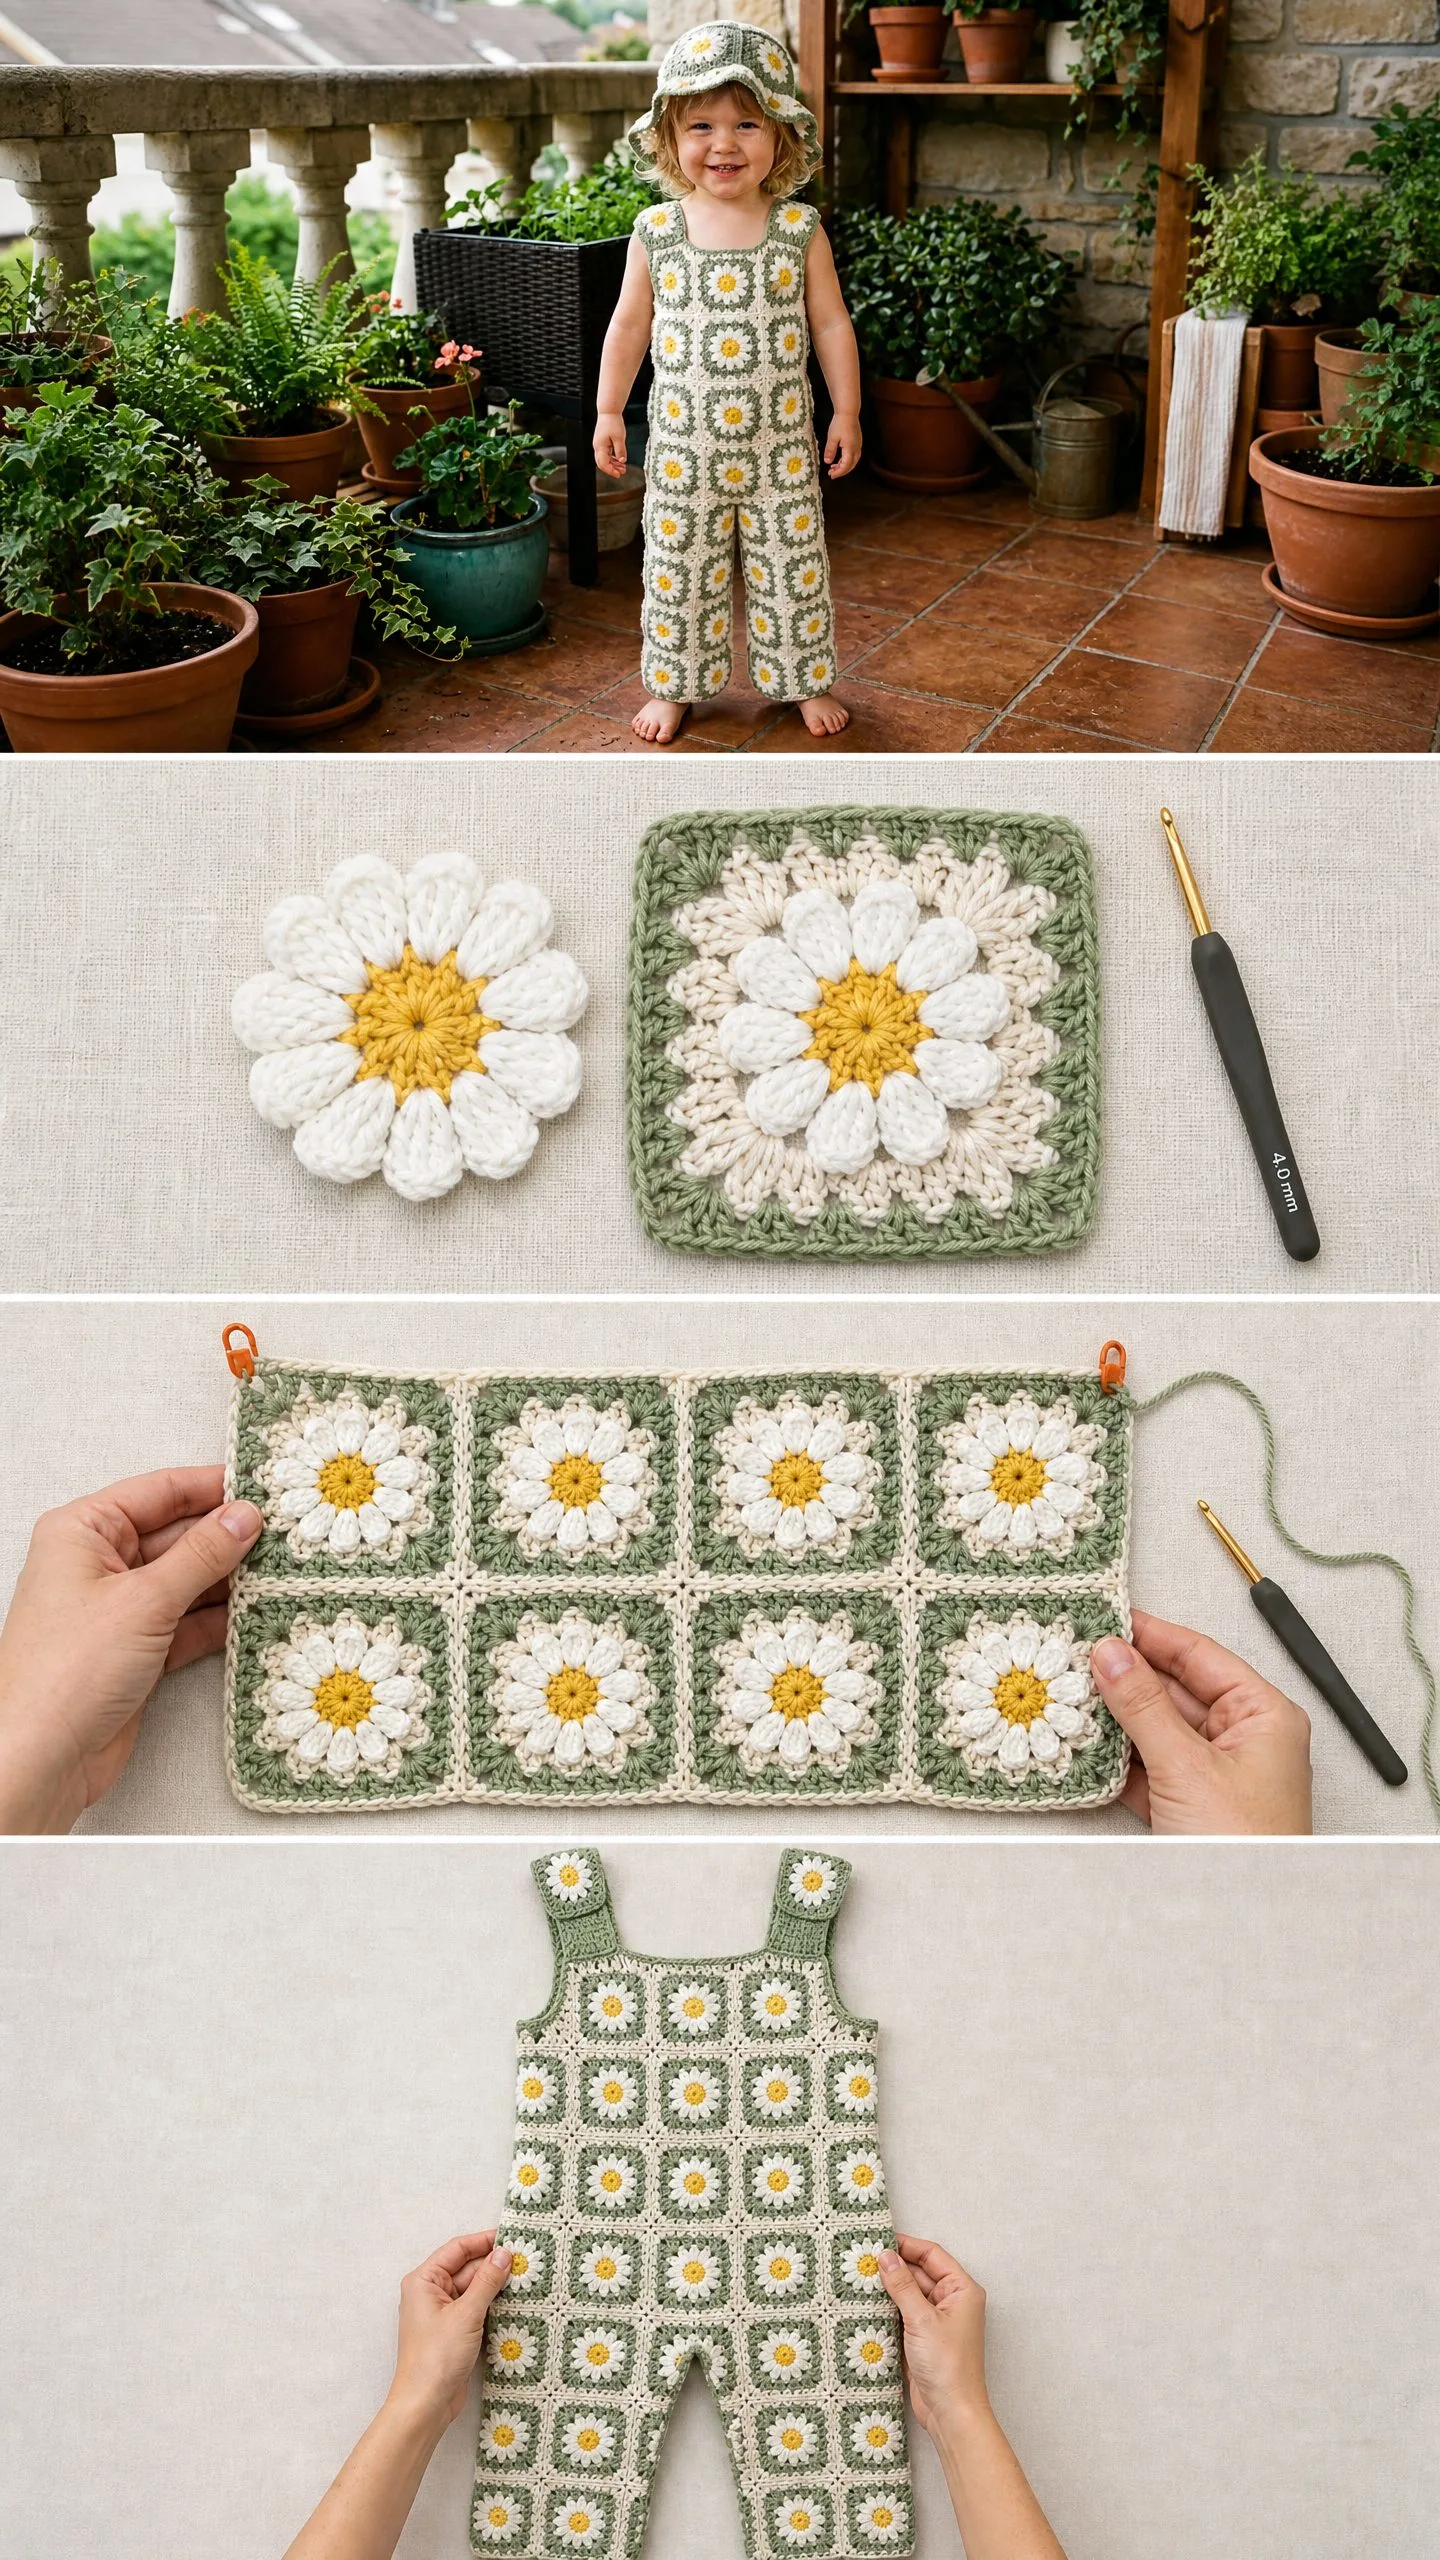
The magic of this toddler jumpsuit lies in its modular construction. You’re not crocheting one intimidating garment from top to bottom. Instead, you’re making individual daisy squares and then joining them together like building blocks. Each square features a cheerful raised yellow center surrounded by white petals, all set against a sage green background with cream borders.
The finished jumpsuit has a classic overall silhouette with a bib front, wide straps, and full-length trouser legs. It’s the kind of piece that will have strangers stopping you in the grocery store to ask where you bought it.
Skill level: Intermediate. You should be comfortable with granny squares, joining as you go, working in rounds, and basic garment seaming.
Time estimate: Approximately 20 to 30 hours for a toddler size 2T, depending on your working speed.
Finished Sizes for This Daisy Jumpsuit Pattern
This crochet pattern is written for size 12 to 18 months, with changes for 18 to 24 months and 2T to 3T in parentheses throughout.
Chest circumference: 19 in / 48 cm (20 in / 51 cm, 21 in / 53 cm)
Overall garment length from shoulder to hem: 22 in / 56 cm (23.5 in / 60 cm, 25 in / 63.5 cm)
Inseam length: 9 in / 23 cm (10 in / 25.5 cm, 11 in / 28 cm)
Each finished square measures: 2.5 in / 6.4 cm (2.75 in / 7 cm, 3 in / 7.6 cm)
Materials You’ll Need
Yarn:
Hooks:
Notions:
Yarn Suggestions That Work Wonderfully
Lion Brand Pound of Love is my top pick for this project. It’s 100% premium acrylic, DK weight, incredibly soft against toddler skin, and machine washable. Perfect for busy parents.
Paintbox Yarns Simply DK offers excellent stitch definition that really shows off those daisy motifs beautifully. The wide color range makes it easy to match the exact shades you want.
Cascade 220 Superwash is the luxury option if your budget allows. This 100% superwash merino wool is machine washable and incredibly soft.
When substituting yarn, prioritize machine washability for a toddler garment. Also check that your chosen yarn has no rough texture when crocheted at the gauge tension, since this jumpsuit will be worn against bare skin.
Gauge
One complete daisy granny square, blocked, should measure 2.5 in x 2.5 in / 6.4 cm x 6.4 cm (2.75 in x 2.75 in / 7 cm x 7 cm, 3 in x 3 in / 7.6 cm x 7.6 cm) using your US E-4 / 3.5 mm hook.
Gauge is critical for a fitted garment. Please make at least two squares before beginning the full project and adjust your hook size as needed. Going up one hook size increases square size, and going down one size decreases it.
Abbreviations Used in This Crochet Tutorial
Special Stitches Explained Step by Step
Daisy Center Bobble (DCB)
This stitch creates that gorgeous raised yellow center of the daisy. Don’t let the name intimidate you. It’s essentially several partial double crochets gathered together at the top.
Step 1: With CB (yellow), make a magic ring.
Step 2: Ch 3 (this counts as your first dc).
Step 3: Yo, insert hook into ring, yo and pull up a loop, yo and draw through 2 loops. You now have two loops remaining on your hook. Repeat this partial dc sequence 4 more times, all into the same magic ring. You should now have six loops on your hook.
Step 4: Yo and draw through all 6 loops on hook. One bobble made.
Step 5: Ch 1 to close and secure the bobble top.
The finished bobble should sit raised and domed on the right side of your work. If it looks flat, gently push it from the wrong side with your finger to pop it forward.
Picot Join (for JAYG Method)
This joining technique creates nearly invisible seams between your squares.
Step 1: Work to the corner or side chain space of the new square as directed.
Step 2: Instead of completing the ch-3 corner, ch 1.
Step 3: Insert hook into the corresponding ch-3 corner space of the adjacent completed square.
Step 4: Sl st through that space to join.
Step 5: Ch 1 to complete the corner join. This counts as the full ch-3 corner of the new square.
How to Crochet the Daisy Granny Square
Make 96 squares for size 12 to 18 months, or 104 squares for sizes 18 to 24 months and 2T to 3T.
Every square follows the same color sequence:
Round 1 (Yellow Center with CB)
Make a magic ring.
Ch 3 (counts as dc throughout).
Yo, insert hook into ring, pull up loop, yo, draw through 2 loops. Repeat 4 more times into ring. Yo, draw through all 6 loops on hook. Ch 1 to close bobble. (1 DCB made.)
Ch 1. Work 7 sc into the ring around the bobble base. Pull magic ring tight. Sl st to first sc to join. (8 sc, 1 bobble center)
Round 2 (White Petals with CC)
Join CC with sl st to any sc from Round 1.
Each petal is worked into each sc as follows: sl st into sc, ch 4, tr into same sc, ch 4, sl st into same sc.
Work one petal into each of the 8 sc around. After the last petal, sl st to first sl st of round. (8 petals)
Gently tug each petal to open it before moving on. This helps the daisy shape really pop.
Round 3 (Sage Green Background with MC)
Join MC with sl st into the top of any petal tr.
Ch 3 (counts as dc).
Work 2 dc into same petal tr. (beginning 3-dc group made)
Ch 2. Sk next petal. Work 3 dc into top of next petal tr.
Ch 1. Sk next petal. Work 3 dc into top of next petal tr.
Ch 2. Sk next petal. Work 3 dc into top of next petal tr.
Ch 1. Sk next petal. Work 3 dc into top of next petal tr.
Ch 2. Sk next petal. Work 3 dc into top of next petal tr.
Ch 1. Sk next petal. Work 3 dc into top of next petal tr.
Ch 2. Sk next petal.
Sl st to top of beg ch-3 to join. (4 corners with ch-2 sp, 4 sides with ch-1 sp, 8 groups of 3 dc = 24 dc)
Round 4 (Cream Border/Joining Round with CA)
Join CA with sl st to any ch-2 corner sp.
Ch 3 (counts as dc).
Work (2 dc, ch 3, 3 dc) into same corner ch-2 sp. (first corner shell made)
Ch 1.
Work 3 dc into next ch-1 side sp.
Ch 1.
Work (3 dc, ch 3, 3 dc) into next ch-2 corner sp.
Ch 1.
Work 3 dc into next ch-1 side sp.
Ch 1.
Repeat from corner to corner until all 4 corners and 4 sides are worked.
Sl st to top of beg ch-3 to join. (4 corner ch-3 sp, 4 side 3-dc groups, 8 corner 3-dc groups = 36 dc, 4 ch-3 corners, 4 ch-1 spaces)
Fasten off CA. Weave in all ends. Block square to correct dimensions before assembly.
Joining Your Squares into Panels
Build your panels by joining squares on Round 4 using the Picot Join method. When working Round 4 of any square that sits next to a completed square, replace the ch-3 corner with a Picot Join at each shared corner. Replace each ch-1 side space with a sl st join through the corresponding ch-1 space of the neighbor square.
Always join squares with right sides facing up. Your joins should be nearly invisible from the front.
Panel Layout for Size 12 to 18 Months
Front Bib and Body Panel: 4 squares wide x 8 squares tall (10 in wide x 20 in tall)
Back Panel: 4 squares wide x 8 squares tall (identical to front)
Right Trouser Leg Panel: 2 squares wide x 4 squares tall (5 in wide x 10 in tall)
Left Trouser Leg Panel: same as right leg
Right Strap Panel: 1 square wide x 2 squares tall (2.5 in wide x 5 in tall)
Left Strap Panel: same as right strap
Step by Step Garment Assembly
Use your yarn needle with CA yarn and mattress stitch for all seaming. Keep seams neat on the wrong side.
Step 1: Side Seams
Lay front and back panels flat with right sides together. Pin side edges. Seam left side from bottom up for 15 in, leaving the top 5 in unseamed to create the armhole opening. Repeat for right side. Turn right side out.
Step 2: Create the Trouser Leg Tubes
Fold each trouser leg panel with right sides together so the 4-square tall edges meet, forming a tube. Seam the back edge of each leg tube from bottom to top.
Step 3: Attach Trouser Legs
Seam the center bottom 5 in of the front panel to the center bottom 5 in of the back panel to begin forming the crotch. Attach the right trouser leg tube by matching its top open edge to the right leg opening of the joined body. Pin with right sides together and seam around. Repeat for left leg.
Step 4: Crotch Seam
With front and back right sides together at the crotch, seam from front to back between the legs for approximately 2 in to define the crotch depth.
Step 5: Attach Straps
Pin each strap panel to the corresponding front bib corner with right sides together. Seam strap bottom edge to bib front top corner. Bring strap over shoulder. Seam strap top edge to back panel top edge approximately 2.5 in in from each side edge.
Edging for a Professional Finish
Work all edging with your US D-3 / 3.25 mm hook and CA.
Leg Hem Edging (work on each leg)
Join CA with sl st to any st at bottom edge of leg.
Round 1: Sc evenly around leg opening, working 1 sc into each dc, 1 sc into each ch-1 sp, and 2 sc into each ch-3 corner sp. Sl st to first sc to join.
Round 2: Ch 1. Sc in each sc around. Sl st to first sc.
Round 3: Ch 1. Work reverse sc (crab stitch) in each sc around. Sl st to first sc. Fasten off.
Armhole Edging (work on each armhole)
Join CA with sl st to any st at armhole edge.
Round 1: Sc evenly around armhole opening. Sl st to join.
Round 2: Ch 1. Sc in each sc around. Sl st to join.
Round 3: Reverse sc around. Sl st. Fasten off.
Neckline and Bib Top Edging
Join CA with sl st at top right corner of bib front.
Row 1: Sc across top of bib front, up right strap, across back top, down left strap, and across bib front top back to start. Work 3 sc into each outer corner. Sl st to join.
Row 2: Sc in each sc, working 3 sc into outer corners. Sl st.
Row 3: Reverse sc all around. Sl st. Fasten off.
Matching Bucket Hat Pattern
Want to complete the look? The matching bucket hat uses 24 additional daisy squares.
Hat crown: 4 squares arranged in a 2×2 grid (approximately 5 in x 5 in)
Hat sides: 8 squares joined into a strip, then seamed into a tube
Hat brim: 12 squares joined into a strip, then seamed into a tube
Attach the side tube to the crown grid with right sides together, easing the crown to fit. Then attach the brim tube to the bottom of the side tube. Finish with 2 rounds of sc edging around the outer brim edge, followed by 1 round of reverse sc.
Blocking and Care Instructions
Wet blocking is strongly recommended for all squares before assembly.
Submerge completed squares in cool water, roll in a towel to remove excess moisture, and pin each square to a blocking mat at exact target dimensions. Allow to dry completely before joining.
Care instructions: Machine wash cold on gentle cycle. Lay flat to dry. Do not tumble dry. Do not wring. Steam blocking between washes will restore the beautiful square definition.
Tips for Customizing Your Daisy Jumpsuit
To make smaller (6 to 12 months): Use a US D-3 / 3.25 mm hook for squares. Each square will measure approximately 2.25 in.
To make larger (3T to 4T): Use a US F-5 / 3.75 mm hook, or add one additional column of squares to the width.
To lengthen or shorten trouser legs: Add or subtract one row of squares from the leg panels.
I really hope you love making this daisy granny square toddler jumpsuit as much as I loved designing it. If this pattern is calling your name, save it to your Pinterest boards so you can find it when you’re ready to start. And please drop a comment below when you make one. I absolutely live for seeing your finished projects!
You Might Also Like
- Charcoal Gray Modern Crochet Backpack Free Pattern
- Lavender Sunflower Granny Square Tote Free Crochet Pattern
- Coral Bloom Baby Dress Free Crochet Pattern
- Blush Pink Lace Baby Dress Free Crochet Pattern