
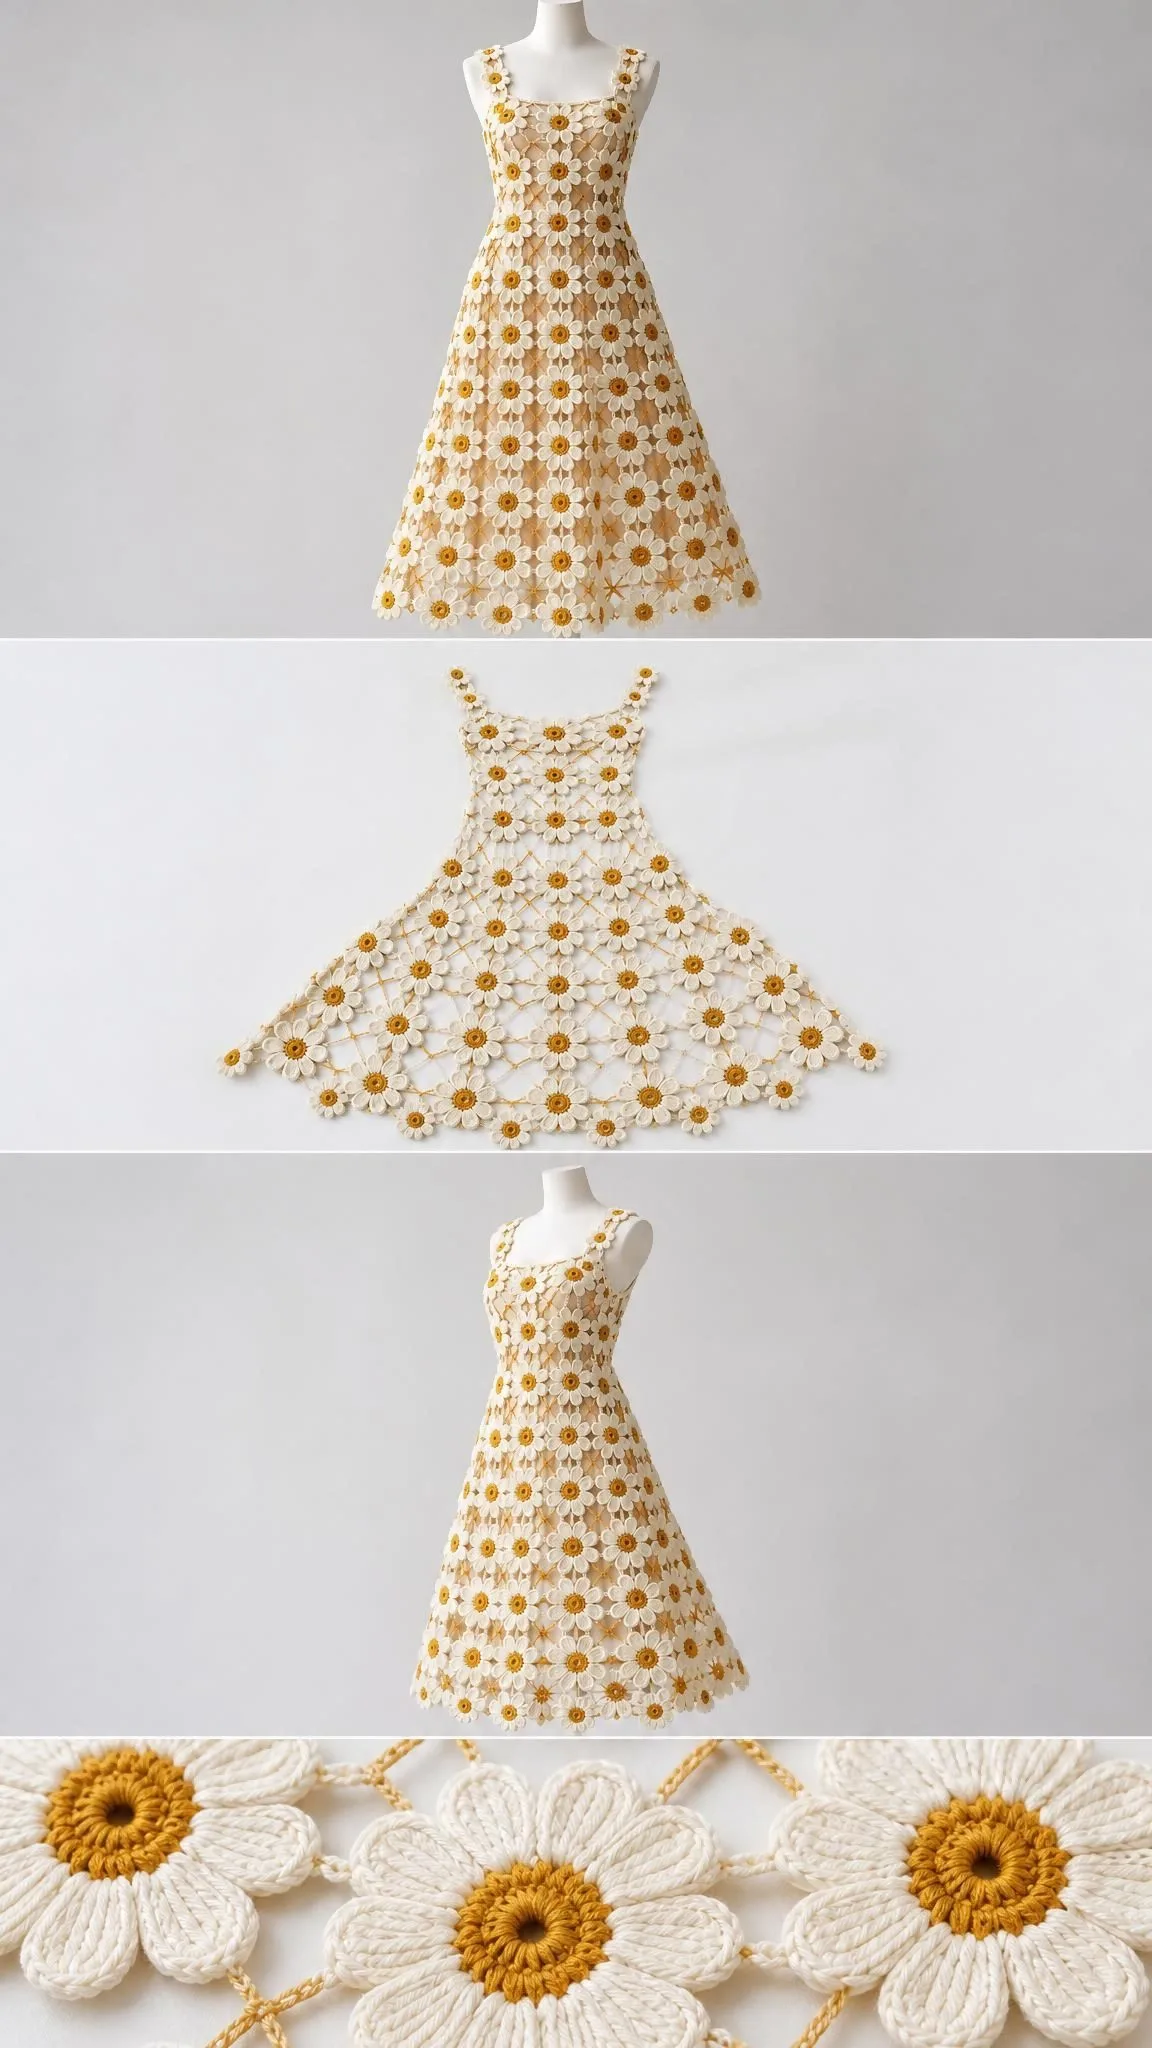
Looking for a statement piece that combines vintage charm with modern elegance? This ivory daisy midi dress delivers exactly that. Built from 192 individual eight-petal flowers joined into shaped horizontal bands, it creates a stunning floral lattice effect that flatters the figure while making a serious style impact.
Get the Ad-Free PDF Pattern
Scroll down for the full pattern, or get the ad-free printable PDF from the shop.
Get the Printable PDF →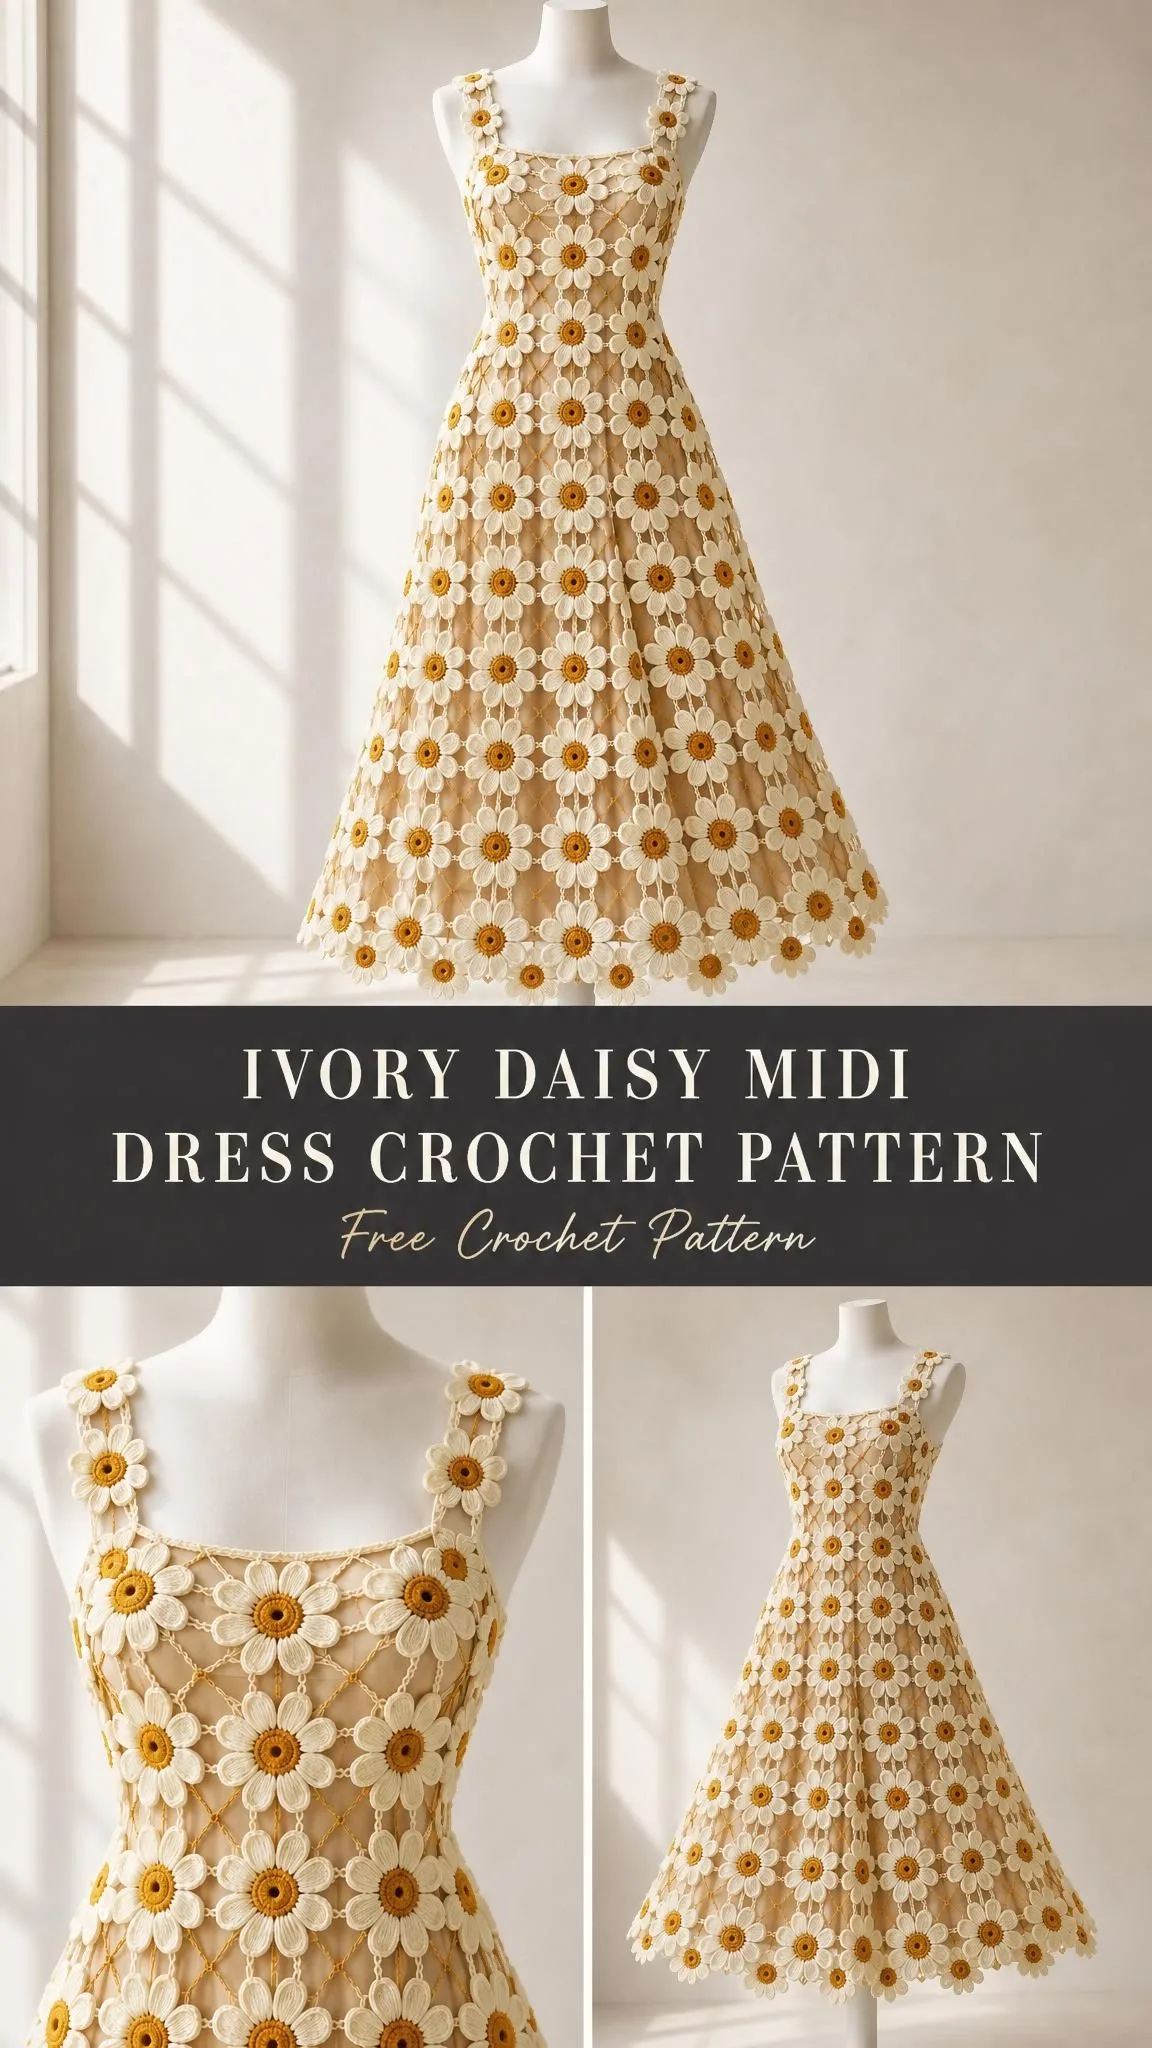
The construction uses beginner-friendly stitches, mainly single crochet, half double crochet, and double crochet, arranged in a clever modular system. Each flower measures just 5 cm across, making this a perfect pick-up-and-put-down project. The dress works up from the bust down, with progressively longer chain bridges between flowers creating natural A-line flare toward the hem.
Whether you are crafting for a garden party, a summer wedding, or simply want a show-stopping addition to your wardrobe, this midi dress pattern gives you everything you need. Paired with an opaque slip underneath, it is elegant, wearable, and absolutely unforgettable.
Why This Daisy Dress Design Works
The genius of this crochet dress pattern lies in its modular construction. Rather than working in continuous rounds or rows that require constant attention, you create individual flower motifs and then join them strategically. This means you can crochet flowers anywhere, anytime, and assemble the dress later.
The fitted waist and flared skirt come not from complicated shaping but from simple math. By varying the chain lengths between flowers (from zero chains at the waist to 12 chains at the hem), the circumference naturally expands from 80 cm at the narrowest point to 128 cm at the bottom. No increases, no decreases, just clever connector lengths.
The ochre centers pop beautifully against the ivory petals, creating that classic daisy look that never goes out of style. And because each flower is self-contained, you can easily customize colors to match your personal aesthetic or a specific event palette.
Materials and Tools
Before you begin, gather everything you need. Having all materials ready prevents frustration and keeps your project moving smoothly.
Yarn
| Color | Amount |
|---|---|
| A – Ivory | 500 g / 1500 m |
| B – Ochre | 150 g / 450 m |
Use a smooth sport weight cotton with approximately 150 m per 50 g. Cotton works best for this dress because it has body, drapes nicely, and holds the flower shapes crisply. Buy all yarn from one dye lot to ensure consistent color throughout.
Hook
3.0 mm crochet hook, adjusted as needed to achieve gauge. If your flowers come out too large, go down a hook size. Too small? Go up.
Notions
- Tapestry needle for weaving ends
- 32 stitch markers
- Measuring tape
- Pins for blocking and assembly
Support Items
- Matching opaque slip (fitted, worn underneath)
- 40 cm side zipper
- Matching sewing thread and needle
- 6 mm stay tape for shoulder and zipper support
Important note: The yarn amounts include a planning allowance and are estimates. The crochet fabric alone is openwork and not opaque. The slip and stay tape provide structure and coverage.
Gauge
Getting gauge right matters enormously on a garment this size. A small error multiplied across 16 flowers per band creates significant measurement differences.
Target gauge: One finished flower = 5 cm across the outer petal tips with a 3.0 mm hook.
Connector measurements:
- A ch-4 horizontal connector adds approximately 1 cm
- Ch-8 vertical connectors add approximately 2 cm
- Four flowers in one bust band, including four connector allowances, span 24 cm
How to Check Your Gauge
- Make four flowers following the pattern below
- Join them in a 2 x 2 swatch
- Wash and pin flat without stretching the petals
- Measure when completely dry
If your flower diameter differs by more than 2 mm, change your hook size. Only adjust connector chains after your motif size is correct. A 1 mm error across 16 flowers changes the circumference by 1.6 cm, which adds up quickly over 11 bands.
Fit tip: Before making all 192 flowers, pin two completed bands over your intended slip. This lets you verify the fit before committing to mass production.
Finished Measurements
This pattern provides one adult reference size:
- Finished bust: approximately 96 cm
- Finished waist: approximately 80 cm
- Length from shoulder: approximately 97 cm
- Intended for: 90-92 cm bust measurement
This is not a graded size range. To alter the circumference, use an even number of motifs (N) and recalculate: N x (5 + connector length in cm). Split the count equally between front and back. Each extra band adds approximately 7 cm in length and N flowers.
Abbreviations and Special Stitches
This pattern uses US crochet terminology. If you typically work from UK patterns, note that the stitch names differ.
| Abbreviation | US Term | UK Equivalent |
|---|---|---|
| ch | chain | chain |
| sl st | slip stitch | slip stitch |
| sc | single crochet | double crochet |
| hdc | half double crochet | half treble |
| dc | double crochet | treble |
| tr | treble crochet | double treble |
| st(s) | stitch(es) | stitch(es) |
| sp | space | space |
| RS/WS | right side/wrong side | right side/wrong side |
| rep | repeat | repeat |
Stitch counts exclude joining slip stitches unless stated otherwise.
Special Stitch: Petal
In one ch-3 loop, work: (sc, hdc, 3 dc, hdc, sc), then sl st in the next anchoring sc.
The middle of the three dc is the petal tip. Each flower has eight petals, and each petal contains seven stitches.
Special Technique: Bridge
Join yarn A with a sl st to one petal tip, chain the specified number, sl st to the opposite tip on the adjacent flower, then fasten off.
For a zero-chain bridge, simply whipstitch the tips together instead of chaining.
Use north/south and east/west tips for main joins. Diagonal tips (NE, SE, SW, NW) carry the stabilizing mesh.
Pattern Notes
Read these notes before starting. They will save you time and prevent confusion.
- Brackets enclose a repeat. Work the bracketed instructions the stated number of times.
- Join each round to its first counted stitch.
- Keep the right side facing for all motifs.
- Change colors on the final yarn-over of the last stitch. Fasten off unused colors.
- All measurements refer to washed, dry, blocked fabric. (1 inch = 2.54 cm)
- Mark one petal as north before joining. Number the eight petals clockwise: N, NE, E, SE, S, SW, W, NW.
- Start at band 1 (upper chest) and work toward the hem.
- Leave the left side open through the first six bands for the zipper.
- All band counts are 16 flowers. Flare comes from progressively longer bridges.
Construction Overview
The dress comes together in logical stages:
- Make and block all flowers
- Assemble horizontal bands
- Connect bands into front/back panels
- Add straps
- Close side seam below the zipper
- Stabilize neckline
- Install slip and closure
Band Circumference Chart
| Band | Horizontal Chain | Approximate Circumference |
|---|---|---|
| 1 | 4 | 96 cm |
| 2 | 2 | 88 cm |
| 3 | 0 | 80 cm |
| 4 | 4 | 96 cm |
| 5 | 6 | 104 cm |
| 6 | 8 | 112 cm |
| 7 | 10 | 120 cm |
| 8 | 12 | 128 cm |
| 9 | 12 | 128 cm |
| 10 | 12 | 128 cm |
| 11 | 12 | 128 cm |
Totals:
- Body flowers: 176
- Upper finish flowers: 16
- Grand total: 192 flowers
- Vertical joins between body bands: 160
Instructions
A. Flower Center (Make 192)
Each daisy flower starts with the ochre center and finishes with ivory petals.
Round 1 (B – ochre): Make an adjustable ring, ch 1, work 8 sc into ring. Tighten the ring and sl st to first sc. [8 sc]
Round 2 (B – ochre): Ch 1, 2 sc in each st around. Sl st to first sc, fasten off. [16 sc]
Round 3 (A – ivory): Join in any st. [Sc in next st, ch 3, skip next st] 8 times. Sl st to first sc. [8 sc, 8 ch-3 loops]
Round 4 (A – ivory): Work one petal in each ch-3 loop as defined above. Fasten off after the eighth petal. [8 petals; 56 petal stitches]
Checkpoint: All 192 flowers should have eight petals and measure 5 cm across the tips. Set aside 16 flowers for the upper finish (straps).
B. Build Each Horizontal Band
For each band, arrange 16 flowers with their centers in a straight line. Bridge the E (east) tip to the W (west) tip of neighboring flowers using the specified chain count. Make 15 bridges now and reserve the closing bridge until fitting.
Band 1: Ch 4 bridges. [16 flowers, 15 bridges; target closed circumference 96 cm]
Band 2: Ch 2 bridges. [16 flowers, 15 bridges; target closed circumference 88 cm]
Band 3: Ch 0 bridges (whipstitch tips together). [16 flowers, 15 bridges; target closed circumference 80 cm]
Band 4: Ch 4 bridges. [16 flowers, 15 bridges; target closed circumference 96 cm]
Band 5: Ch 6 bridges. [16 flowers, 15 bridges; target closed circumference 104 cm]
Band 6: Ch 8 bridges. [16 flowers, 15 bridges; target closed circumference 112 cm]
Band 7: Ch 10 bridges. [16 flowers, 15 bridges; target closed circumference 120 cm]
Band 8: Ch 12 bridges. [16 flowers, 15 bridges; target closed circumference 128 cm]
Band 9: Ch 12 bridges. [16 flowers, 15 bridges; target closed circumference 128 cm]
Band 10: Ch 12 bridges. [16 flowers, 15 bridges; target closed circumference 128 cm]
Band 11: Ch 12 bridges. [16 flowers, 15 bridges; target closed circumference 128 cm]
C. Join Bands from Chest to Hem
Now connect your horizontal bands vertically to create the dress body.
Join Row 1: Place band 2 below band 1. Align all 16 columns. Connect every S (south) tip above to the corresponding N (north) tip below with ch 8. [16 vertical bridges]
Join Row 2: Place band 3 below band 2. Align all 16 columns. Connect S to N with ch 8. [16 vertical bridges]
Continue this process for all remaining bands:
- Join Row 3: Band 4 below band 3, ch 8 [16 vertical bridges]
- Join Row 4: Band 5 below band 4, ch 8 [16 vertical bridges]
- Join Row 5: Band 6 below band 5, ch 8 [16 vertical bridges]
- Join Row 6: Band 7 below band 6, ch 8 [16 vertical bridges]
- Join Row 7: Band 8 below band 7, ch 8 [16 vertical bridges]
- Join Row 8: Band 9 below band 8, ch 8 [16 vertical bridges]
- Join Row 9: Band 10 below band 9, ch 8 [16 vertical bridges]
- Join Row 10: Band 11 below band 10, ch 8 [16 vertical bridges]
Mesh Stabilization
At each space between four flowers, add diagonal bridges to prevent the fabric from stretching out of shape.
Bridge the SE tip of the upper-left flower to the NW tip of the lower-right flower with ch 10.
Bridge the SW of upper-right to the NE of lower-left with ch 5, sl st into the fifth chain of the first bridge, ch 5, and join.
If an intersection pulls or distorts, increase both halves equally until the flat gauge is maintained. [2 diagonal bridges per complete four-flower cell]
D. Upper Finish (Straps)
Upper Row 1: Make two straps, each a rectangle 2 flowers wide x 4 flowers long. Join side tips with ch 0 and end tips with ch 4. [8 flowers per strap; 16 total]
Upper Row 2: Pin each strap between the outer two flowers of the front upper edge and the corresponding back edge. Sew every touching petal tip securely. [2 straps, approximately 10 x 23 cm each]
Neckline options:
- For a square neckline, leave the center four flowers of the front and back upper bands level.
- For an empire version, position the narrowest band (band 3) immediately below the bust and lengthen the shoulder paths only if needed.
Fitting check: Try the pinned garment over your slip. The neckline should sit flat. The shoulders should bear the weight without stretching. Use the side opening for dressing. Do not force the openwork over the hips.
Assembly
Body Seam and Closure
You will need: A (ivory), 3.0 mm hook, tapestry needle, zipper, sewing thread, and stay tape.
Join Round 1: Close each body band from band 7 to band 11 using that band’s scheduled bridge count. [5 closing bridges]
Join Row 2: Connect the seam-adjacent diagonal mesh below the opening using the same crossed-bridge method. [One mesh cell per joined band interval]
Sewing Pass 3: Hand-sew stay tape along both edges of the upper side opening. Then sew the zipper to the tape without catching the teeth. [2 supported zipper edges]
Checkpoint: Closed bust approximately 96 cm. Total shoulder-to-hem length approximately 97 cm. Zipper opens smoothly with no twisted joins.
Slip and Shoulder Support
You will need: A (ivory), 3.0 mm hook available, matching sewing thread, and opaque fitted slip.
Sewing Pass 1: Attach stay tape underneath the straps or halter edges using small catch stitches. [2 supported shoulder paths]
Sewing Pass 2: Tack the crochet to the slip at shoulders and both underarms. Leave the skirt layers independent so they move naturally. [4 anchor points]
Checkpoint: The slip allows comfortable movement and covers all openwork areas intended to be opaque.
Edgings and Details
Neckline and Armholes
You will need: A (ivory), 3.0 mm hook.
Round 1: Sc once in each exposed petal stitch. Work one sc into each chain of each exposed bridge. Do not work across the zipper opening. Record the resulting stitch count (E) separately for each opening. [E sc]
Round 2: Sl st loosely in every sc. Fasten off. [E sl st]
Checkpoint: Both armholes lie flat. Corresponding edges have matching counts.
Hem
You will need: A (ivory), 3.0 mm hook, and tapestry needle.
Finishing Pass 1: Secure every bottom-band bridge end. Keep the lower petals unattached so they create a beautiful scalloped edge. [16 hem flowers]
Checkpoint: The flower scallops hang evenly without curling.
Finishing
Ends and Blocking
You will need: A and B yarns, 3.0 mm hook for repairs, tapestry needle, pins, and towels.
Finishing Pass 1: Weave every end through at least 3 cm of dense stitching in two directions. [0 unsecured ends]
Blocking Pass 2: Dampen the dress and lay it flat according to the band chart measurements. Support the full garment weight. Dry completely before lifting. [16 flowers per band]
Final checkpoint: Length approximately 97 cm. Chest approximately 96 cm. Each flower approximately 5 cm. Hang only briefly for the final fit check.
Care and Safety
Your finished dress deserves gentle care to maintain its beauty.
- Hand wash in cool water with mild detergent
- Support the wet dress with both hands when lifting
- Roll in towels to remove excess water
- Dry flat on a clean surface
- Never wring, tumble dry, or suspend while wet
- Store folded, not hanging
Safety notes: Secure all closures before wearing. Keep long ties and open loops away from machinery, flame, and young children. Always wear the opaque slip underneath. If your hem reaches floor length, consider shortening it to prevent trip hazards.
Tips for Success
Take your time with gauge. Seriously. An extra hour spent getting your flower size right saves many hours of frustration later.
Work in batches. Make all 192 flowers before any assembly. This lets you maintain consistent tension and ensures all your motifs match.
Label your bands. Use scraps of yarn or small tags to mark which band is which. When you have 11 bands of 16 flowers each, they can look confusingly similar.
Block before and after. Block individual flowers lightly before joining, then give the whole dress a final block after assembly. This evens out any tension differences.
Try it on frequently. The pattern includes multiple fitting checkpoints for good reason. Adjustments are much easier before everything is sewn together.
Who Will Love This Pattern
This ivory daisy midi dress crochet pattern suits intermediate crocheters who are ready for a larger project. The individual stitches are beginner-friendly, but the scope and assembly require patience and attention to detail.
It makes a stunning piece for:
- Summer weddings (as a guest or even a bohemian bride)
- Garden parties and outdoor events
- Festival season
- Vacation resort wear
- Special occasion photography
The modular construction also makes it highly customizable. Change the colors, add more bands for a maxi length, or stop earlier for a mini dress. The technique translates beautifully to different visions.
Final Thoughts
This daisy dress is the kind of project that turns heads. The combination of delicate flowers, clever shaping, and that gorgeous ivory-and-ochre palette creates something truly special. Each flower you complete brings you closer to a wearable work of art.
The construction method, building from individual motifs rather than continuous fabric, makes this more approachable than it might first appear. You can work on flowers during lunch breaks, while watching TV, or waiting in the car. The assembly stage requires more focused time, but by then you will be so invested in your creation that it flies by.
Thank you for choosing this pattern for your next crochet adventure. If you make this dress, please share your photos on Instagram or Facebook. Seeing your creations brings so much joy, and your version might inspire another crafter to start their own daisy dress journey.
Save this pattern to your Pinterest boards so you can find it when you are ready to start, and leave a comment below if you give it a try. Your feedback and photos mean the world, and this community is always excited to celebrate finished projects together.
Want a Quick & Easy Printable Version?
Get a clean, beautifully formatted PDF of this pattern — easy to follow step by step, ready to print or save on any device. No scrolling, no distractions, just the pattern.
Get the Printable PDF →You Might Also Like
- Soft Pink Shell Stitch Baby Set Free Crochet Pattern
- Sage Green Lacy Crochet Jumpsuit Free Crochet Pattern
- Peony Pink Lace Placemat Crochet Pattern
- Dusty Rose Pineapple Lace Halter Free Crochet Pattern