
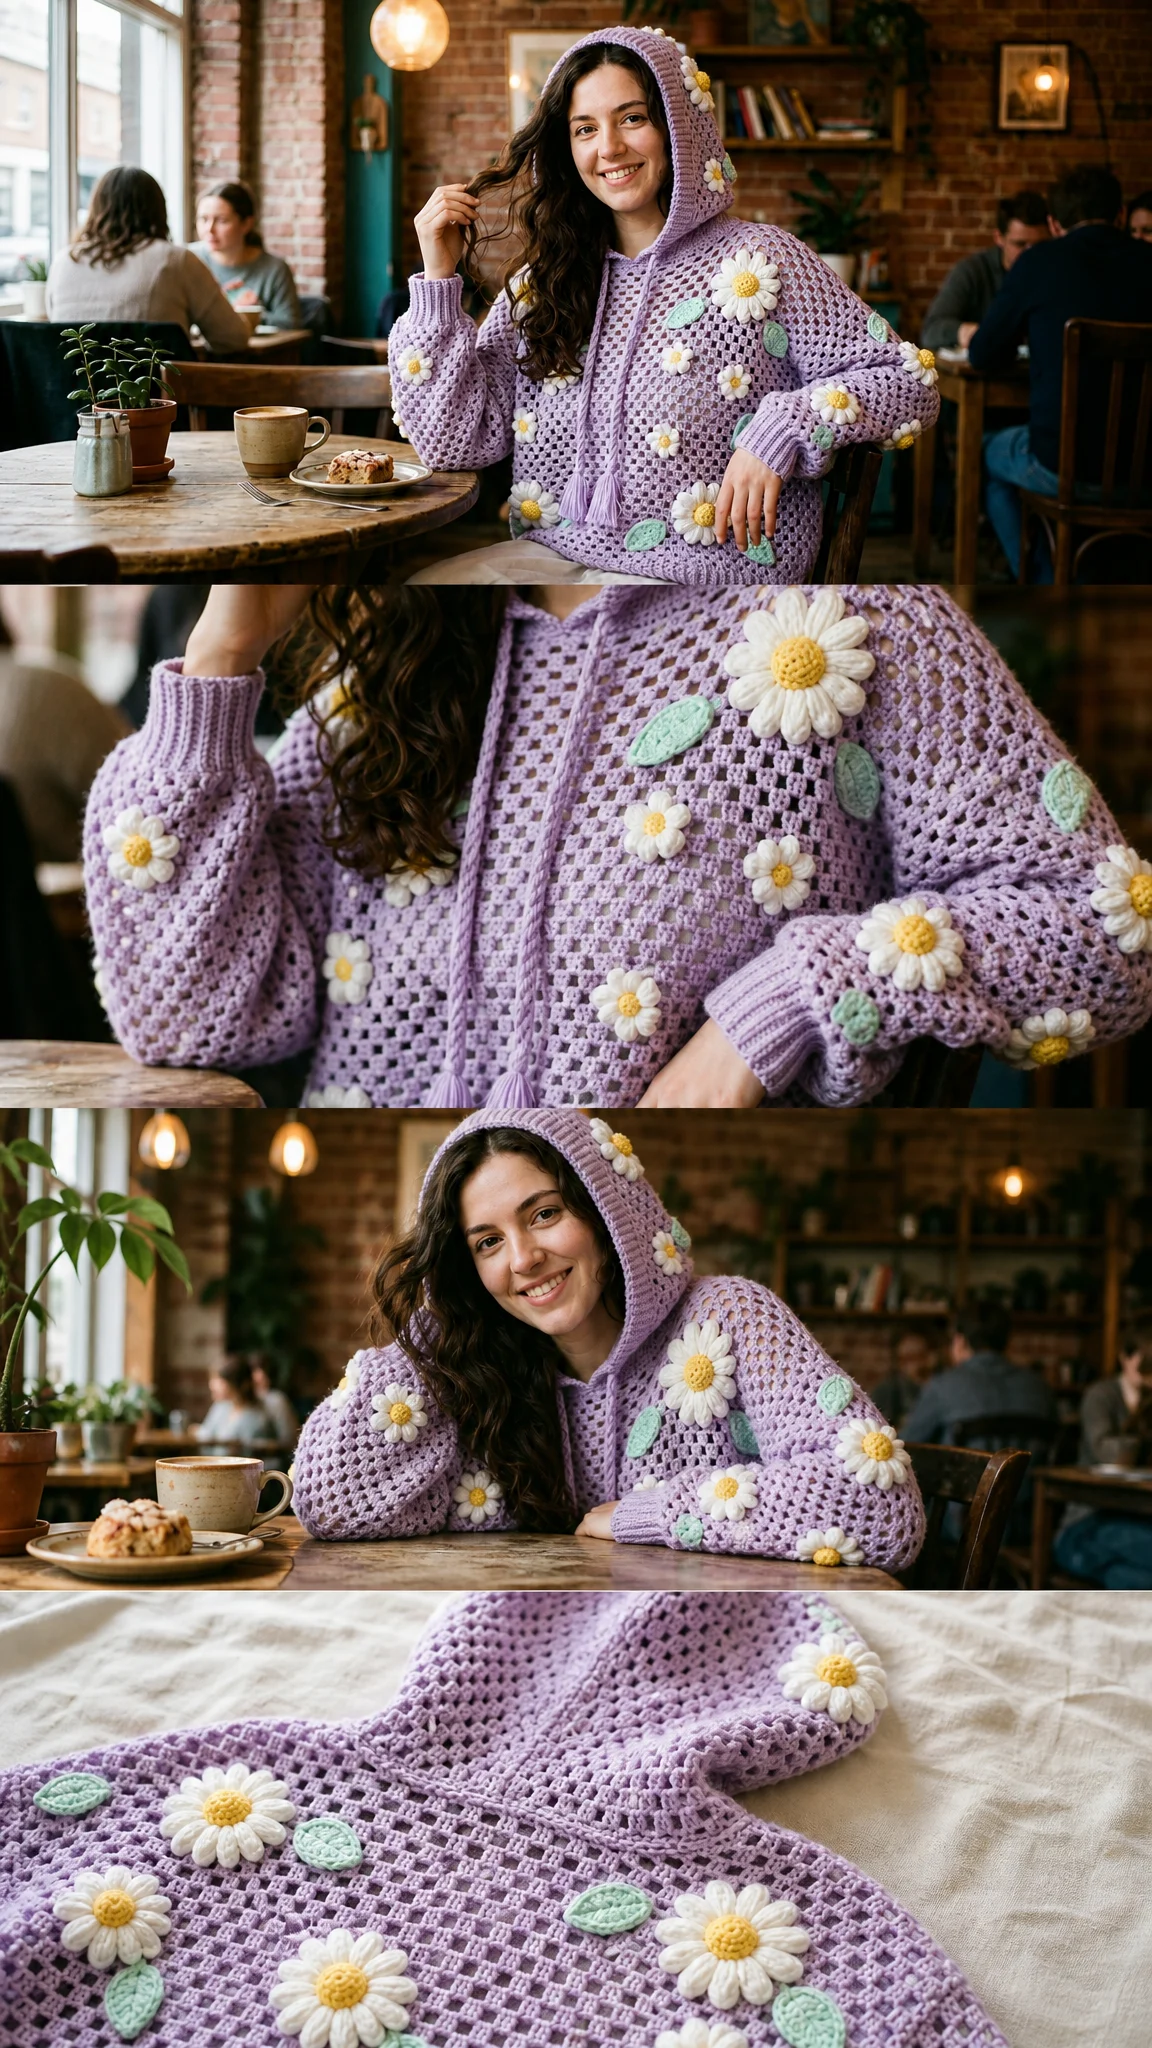
I’ve been on the hunt for the perfect oversized hoodie pattern for months now, and this one has become my absolute favourite. The granny mesh construction keeps things interesting without being fussy, and those dimensional daisy appliques add just the right amount of whimsy. If you’ve been saving a special stash of bulky yarn for something cozy and eye-catching, this is the project to finally pull it out for.
Get the Ad-Free PDF Pattern
You can find the free pattern below, or you can purchase the ad-free printable PDF from my shop.
Get the Printable PDF →
This Pastel Daisy Crochet Hoodie combines classic granny stitch construction with sweet floral embellishments for a garment that looks far more complicated than it actually is. The body is built from simple rectangles, so if you can crochet a granny cluster, you can absolutely make this hoodie. I promise.
Why You’ll Love This Crochet Hoodie Pattern
The beauty of this crochet hoodie pattern lies in its straightforward construction. You’re essentially making flat panels, seaming them together, and then adding all the pretty details at the end. No complicated shaping. No confusing increases. Just simple rectangles that transform into a cozy, oversized pullover.
The granny mesh stitch creates an airy, breathable fabric that drapes beautifully. It works up quickly with bulky yarn and a 6.5 mm hook, so you’ll see progress fast. The ribbed edges give the hem and cuffs a polished, professional finish, while the dimensional daisies and leaves turn a simple hoodie into something truly special.
This pattern is rated intermediate level, but don’t let that intimidate you. If you’re comfortable with double crochet and have made a few projects before, you can handle this. The skills you’ll use include granny clusters, back loop only ribbing, flat garment assembly, seaming, and applique placement.
Finished Measurements
Before you start, here’s what you’re working toward. This hoodie is designed for an oversized adult M/L fit with about 10 to 14 inches of positive ease. That means it’s meant to be roomy and relaxed, perfect for layering over a t-shirt or wearing on its own.
| Measurement | Size |
|---|---|
| Chest circumference | 55 in / 140 cm |
| Body length | 23 in / 58.5 cm |
| Sleeve length from armhole | 18.5 in / 47 cm |
| Hood height | 14 in / 35.5 cm |
| Upper sleeve circumference | 41 in / 104 cm |

Materials Needed
Gather these supplies before you begin your crochet hoodie project:
Yarn:
Hooks:
Notions:
Yarn suggestions: Lion Brand Hue + Me, Paintbox Yarns Simply Chunky, or Knit Picks Brava Bulky all work beautifully. You can substitute any soft bulky yarn that meets gauge and creates a flexible fabric.
Gauge
Getting gauge right matters for garment patterns. With the granny mesh stitch using your 6.5 mm hook, you should get 3.5 cluster spaces and 7 rows = 4 in / 10 cm after blocking.
Swatch at least 6 inches square before starting. If your swatch is too small, go up a hook size. If it’s too large, go down a hook size. Taking time to check gauge now saves frustration later.
Stitch Abbreviations and Definitions
This pattern uses US crochet terms. If you’re a UK crocheter, remember that US dc equals UK tr, US sc equals UK dc, and US sl st equals UK ss.
Special Stitches
Granny cluster: Work 3 dc into the indicated chain or chain-space. This counts as 1 cluster. Think of it as a little bundle of three double crochets all snuggled together in the same spot.
Granny mesh row: Ch 4 to turn, 3 dc in each ch-1 sp across, dc in top of turning chain. The ch-4 counts as 1 dc plus ch-1 edge space.
Ribbing row: Ch 1, sc in BLO of each sc across. Turn. Keep ribbing snug but not tight. Working in the back loop only creates those lovely ridges that give ribbing its stretch.
Small daisy petal: Ch 4, work 2 tr in same st, ch 4, sl st in same st.
Large daisy petal: Ch 5, work 3 tr in same st, ch 5, sl st in same st.
Leaf: Ch 8, sc in 2nd ch from hook, hdc, dc, 2 dc, dc, hdc, sc; rotate and repeat on the other side of the chain. Sl st to first sc.
Important Notes Before You Begin
This pattern is designed to help you create a similar crochet project, but individual results may vary depending on your yarn, tension, hook size, and finishing technique. You may need to make small adjustments on your side to achieve the closest possible result to the finished project shown.
Use stitch markers to mark shoulder seams, armhole openings, neck opening, and the center front of the hood. Left-handed makers can follow the same counts; your applique spiral direction and seaming direction may mirror naturally.
Sizing adjustment tip: For a wider or narrower hoodie, add or remove granny clusters in multiples of 2 per front and back panel. Each 1 cluster changes the flat panel width by about 1.14 in / 2.9 cm. Keep shoulder seam and neck opening balanced.
Back Panel Instructions
With lavender and 6.5 mm hook, ch 78.
Row 1: 3 dc in 6th ch from hook, *sk 2 ch, 3 dc in next ch; rep from * 23 more times, sk 2 ch, dc in last ch. (24 clusters + 2 edge dc)
Rows 2-38: Ch 4, turn, 3 dc in each space between clusters across, dc in top of turning ch. (24 clusters + 2 edge dc)
Checkpoint: Panel measures about 27.5 in / 70 cm wide and 21.75 in / 55 cm tall before ribbing.
Front Panel Instructions
Repeat Back Panel exactly. Mark the center 8 clusters for the neckline before seaming.
Body Assembly
Place front and back with RS together. Seam shoulders across 8 clusters at each outer edge, leaving center 8 clusters open for neck. Seam sides from bottom upward for 24 rows, leaving top 14 rows open for armholes.
Checkpoint: Each armhole opening measures about 8 in / 20.5 cm deep. The lower body circumference is about 55 in / 140 cm before ribbing.
Bottom Ribbing
Join lavender at one side seam with 5.5 mm hook. Ch 11.
Row A: Sc in 2nd ch from hook and each ch across, sl st in next 2 body edge positions, turn. (10 sc)
Row B: Sk the 2 sl sts, sc BLO in 10 sc, ch 1, turn.
Row C: Sc BLO in 10 sc, sl st in next 2 body edge positions, turn.
Repeat Rows B-C around lower edge; seam final ribbing row to first row. Ribbing is about 2 in / 5 cm deep.
Sleeves (Make 2)
With lavender and 6.5 mm hook, ch 60.
Row 1: 3 dc in 6th ch from hook, *sk 2 ch, 3 dc in next ch; rep from * 17 more times, sk 2 ch, dc in last ch. (18 clusters + 2 edge dc)
Rows 2-31: Ch 4, turn, 3 dc in each space between clusters across, dc in top of turning ch. (18 clusters + 2 edge dc)
Fold sleeve with RS together and seam long edge. Pin sleeve to armhole, matching sleeve center to shoulder seam and sleeve seam to underarm. Ease the extra sleeve width evenly into the armhole for a soft gathered look; sew securely.
Sleeve Cuffs
Join lavender at sleeve wrist edge with 5.5 mm hook. Ch 11. Work attached ribbing as for bottom hem, using 2 sleeve edge positions per ribbing ridge. Seam ribbing closed. Cuff is about 2 in / 5 cm deep and intentionally gathers the sleeve.
Hood Panels (Make 2)
With lavender and 6.5 mm hook, ch 45.
Row 1: 3 dc in 6th ch from hook, *sk 2 ch, 3 dc in next ch; rep from * 12 more times, sk 2 ch, dc in last ch. (13 clusters + 2 edge dc)
Rows 2-24: Ch 4, turn, 3 dc in each space between clusters across, dc in top of turning ch. (13 clusters + 2 edge dc)
Place panels RS together. Seam the back and top edges to form the hood. Leave the front opening unseamed. Pin hood lower edge evenly around neckline, starting and ending at center front; sew in place.
Optional front edging: Join lavender at lower center front of hood, sc evenly around face opening, placing 3 sc at each lower front corner. Fasten off.
Hood Drawstrings
Make 2 chains about 23 in / 58.5 cm long. Sl st in each ch back to the start. Attach one to each lower front hood point. Add tassels if desired.
Daisy and Leaf Appliques
These dimensional daisies are what make this crochet hoodie pattern so special. They’re simple to make and create such a cheerful effect scattered across the finished garment.
Large Daisy (Make 7)
With yellow, make magic ring.
Rnd 1: Ch 1, 10 sc in ring, sl st to first sc. (10 sc)
Change to white.
Rnd 2: *Large daisy petal in next sc, sl st in next sc; rep from * 5 times total. (5 petals)
Fasten off, leaving long tail.
Small Daisy (Make 13)
With yellow, make magic ring.
Rnd 1: Ch 1, 8 sc in ring, sl st to first sc. (8 sc)
Change to white.
Rnd 2: *Small daisy petal in next sc, sl st in next sc; rep from * 4 times total. (4 petals)
Fasten off, leaving long tail.
Leaves (Make 18)
With mint and 5.5 mm hook, work Leaf special stitch. Fasten off, leaving long tail for sewing.
Applique Placement Guide
Here’s how to distribute your daisies and leaves for that scattered garden look:
Stagger motifs so no two large daisies sit in a straight vertical line. Keep the placement playful and balanced rather than perfectly symmetrical.
Finishing Your Crochet Hoodie
Weave in all ends on the WS. Steam or wet block panels lightly so the granny mesh opens evenly without stretching the ribbing. Sew daisies and leaves with small whipstitches through the applique edges only, keeping the flower centers slightly raised. Secure drawstring ends and tassels firmly.
Final checkpoint: Hoodie should measure about 23 in / 58.5 cm from shoulder to hem and about 55 in / 140 cm around the chest after blocking.
Care Instructions
Hand wash or machine wash cold on gentle inside a mesh bag. Lay flat to dry. Reshape flowers while damp. Avoid hanging the wet garment, as bulky crochet fabric can stretch.
Troubleshooting Common Issues
Mesh leans: Keep turning chains relaxed and place the final dc into the top of the turning chain every row.
Panel too narrow: Your cluster gauge is tight; go up a hook size or add 2 clusters to each body panel.
Ribbing ruffles: Work fewer body-edge positions between ribbing ridges.
Ribbing pulls in too much: Work more edge positions or loosen your slip stitches.
Motifs curl: Block flowers before sewing and stitch around petals gently without pulling.
Quick Reference Table
| Piece | Foundation | Working rows | Count |
|---|---|---|---|
| Front/Back | ch 78 | 1-38 | 24 clusters + 2 edge dc |
| Sleeve | ch 60 | 1-31 | 18 clusters + 2 edge dc |
| Hood panel | ch 45 | 1-24 | 13 clusters + 2 edge dc |
| Large daisy | ring | Rnd 1-2 | 10 sc, 5 petals |
| Small daisy | ring | Rnd 1-2 | 8 sc, 4 petals |
Time to Get Started on Your Hoodie
This crochet hoodie pattern takes approximately 18 to 26 hours to complete, depending on your pace. It’s the kind of project that’s perfect for working on over a few weekends while watching your favourite shows. The granny mesh works up surprisingly fast, and the appliques are a fun change of pace once the main construction is done.
I hope you love making this Pastel Daisy Crochet Hoodie as much as I enjoyed putting this tutorial together for you. Thank you so much for choosing this pattern for your next project.
If you’d like to save this crochet pattern for later, go ahead and pin it to your favourite Pinterest board so you can find it whenever you’re ready to cast on. And please, if you make this hoodie, drop a comment below. I’d absolutely love to see your colour choices and how it turned out!
Want a Quick & Easy Printable Version?
Get a clean, beautifully formatted PDF of this pattern — easy to follow step by step, ready to print or save on any device. No scrolling, no distractions, just the pattern.
Get the Printable PDF →You Might Also Like
- Mustard Yellow Boho Tote with Brown Leather Tassels Pattern
- Lavender Purple Drawstring Bucket Bag Free Crochet Pattern
- Lavender Dream Ankle Socks Free Crochet Pattern
- Arctic Ice Mermaid Plush Doll Free Crochet Pattern