This one is STUNNING and absolutely worth every stitch. If you’ve been searching for a statement piece that combines lacy elegance with botanical charm, you just found it.
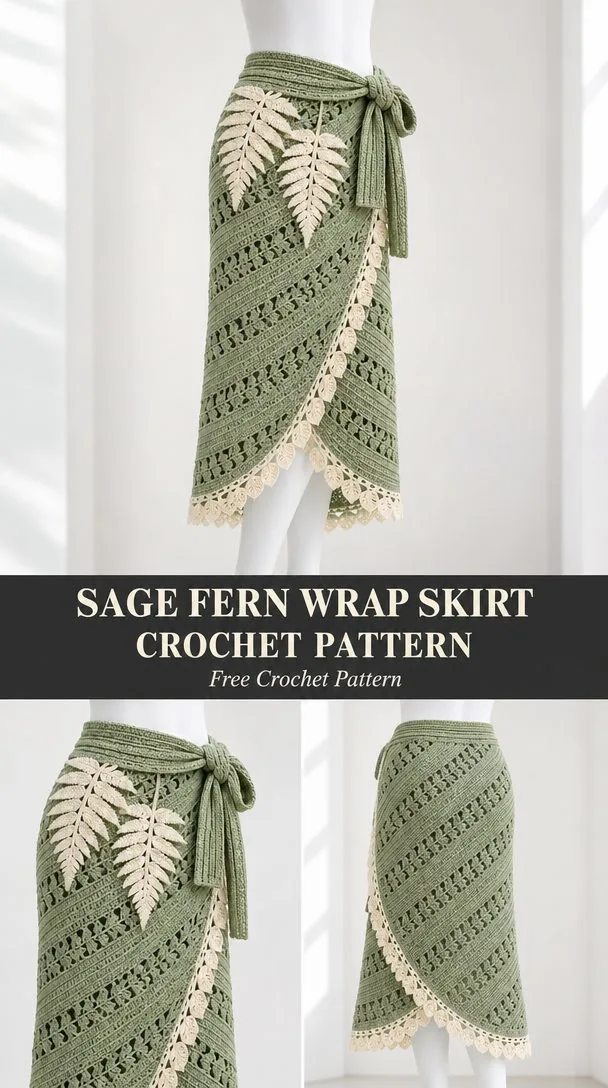
The Sage Fern Wrap Skirt brings together everything you want in a showstopper garment: a flattering diagonal front opening, delicate fern eyelet panels, and those gorgeous oversized ivory leaf appliques at the hip. The finished piece looks like it belongs in a resort boutique, but you’re going to make it yourself.
Fair warning: this is an intermediate to advanced project that takes time and attention. But the construction is straightforward once you understand the rhythm, and the result is a wearable work of art you’ll reach for again and again.
About This Design
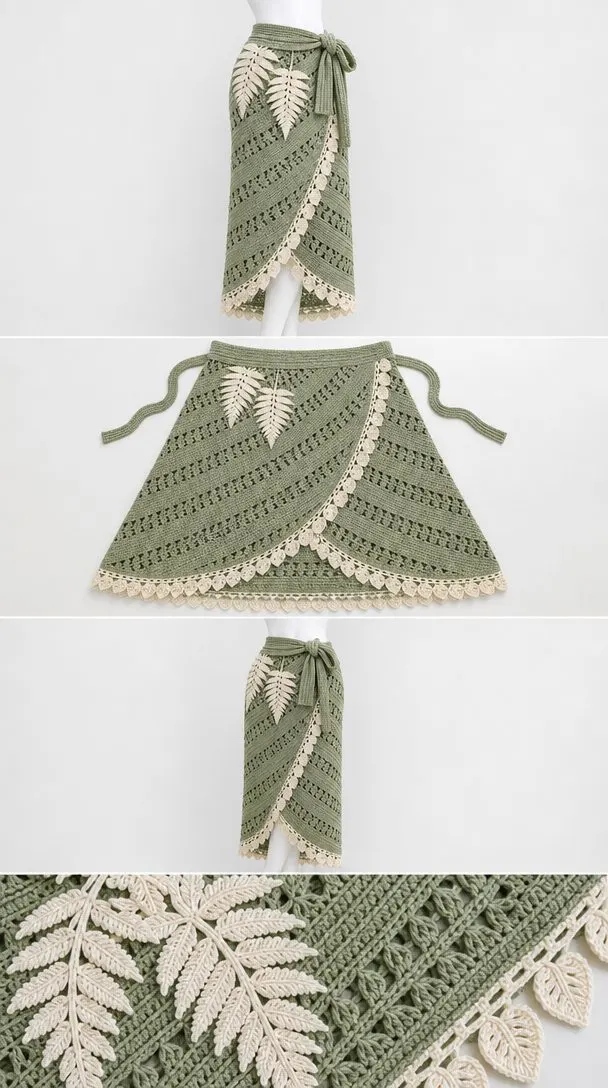
This decorative adult lace wrap skirt features a tapered overlap and gathered waistband with applied details. The design includes a broad ribbed waist tie, calf length wrap with that signature diagonal front opening, fern eyelet panels alternating with solid ribs, an ivory leaf border, and two oversized fern appliques positioned at the hip.
One adjustable sample size fits waist 76 to 84 cm and hips 94 to 102 cm. Because this is an openwork lace piece, you’ll want to wear an opaque underskirt or slip underneath for coverage.
The body texture creates a beautiful leaf pattern using a simple 12 position by 8 row repeat. Solid double crochet stitches alternate with chain spaces to form the delicate eyelet design you see running horizontally across the skirt.
Skill Level
This pattern suits intermediate to advanced crocheters who are comfortable with shaping, reading charts, working applied details, and assembling garment pieces. You’ll work decreases along one edge to create the tapered overlap, gather the top edge to fit the waistband, and attach multiple leaf appliques.
If you’ve made garments before and feel confident with lace patterns, you’ll do beautifully here.
Materials and Tools
Main Yarn (A): Sage sport weight cotton, approximately 300 m per 100 g. You’ll need 550 g, which gives you about 1650 m total.
Accent Yarn (B): Ivory in the same yarn weight. You’ll need 120 g, approximately 360 m.
Center Yarn (C): Ivory or contrasting cotton for embroidered centers, 20 g or about 60 m.
Hooks: 3.5 mm for the main body and 3.0 mm for edging and motifs. Use whatever sizes get you to gauge.
Notions: Tapestry needle, scissors, stitch markers, measuring tape, blocking mats, and rustproof pins.
Additional Materials: 2 m of opaque lining fabric or a separate underskirt, 2 sew on snaps, and an optional purchased belt if desired.
The yarn amounts include an approximate 15% allowance. Weigh your washed swatch and scale by the garment area before buying extra colors, as fiber content and lace density will change your usage.
Gauge
Your blocked target gauge is 20 stitch positions by 12 double crochet (dc) height rows equals 10 cm by 10 cm with your 3.5 mm hook. One chain replacing one stitch counts as one position.
Important: Measure your gauge across the chosen body texture, not across stretched holes.
To Make Your Swatch:
Chain (ch) 43.
Row 1: Double crochet (dc) in 3rd ch from hook and in each remaining ch. You should have 41 dc.
Work 23 more rows using the leaf texture pattern. Wash and dry flat. Measure the center 20 positions and 12 rows without stretching. If either dimension differs from the target, change your hook size and swatch again.
For the motifs, aim for 5 to 6 cm across. Large layered flowers should measure 8 to 9 cm.
Abbreviations and Special Stitches
ch: chain
sl st: slip stitch
sc: single crochet
hdc: half double crochet
dc: double crochet (yarn over, insert hook, pull up loop, yarn over and draw through 2 loops twice)
tr: treble crochet
st(s): stitch(es)
sp: space
RS/WS: right side/wrong side
BLO: back loop only
rep: repeat
yo: yarn over
dc2tog: This is a double crochet decrease that consumes 2 positions and creates 1 stitch. Work it like this: yarn over, insert hook in next stitch, yarn over and pull up a loop, yarn over and draw through 2 loops. Then yarn over, insert hook in the next stitch, yarn over and pull up a loop, yarn over and draw through 2 loops. Finally, yarn over and draw through all 3 loops on your hook.
Increase: Work 2 dc in one stitch. This adds 1 position.
Picot: Chain 3, then slip stitch into the first chain.
Bobble: Yarn over, insert hook in same stitch, pull up a loop, yarn over and draw through 2 loops. Repeat this sequence three more times (4 times total), then yarn over and draw through all 5 loops on your hook. Count as 1 stitch.
Important Pattern Notes
The photograph is an AI concept visualization. The written stitch map and measurements define this original draft interpretation. Small lace motifs and proportions in the photograph are not a stitch by stitch record.
Chain 2 and turn before every dc row. This turning chain never counts as a stitch. Chain 1 before sc rows, and it does not count either.
Work through both loops unless the pattern specifies otherwise. Count chains as positions when they replace a skipped stitch. Work one dc into each chain on the following solid row.
Keep the first and last 3 positions solid at shaped edges. All increases and decreases use dc. Begin the texture after these edge stitches, restarting the repeat from the first full unit on each row. If you end with an incomplete unit, fill it with dc. Never change the required row count just to complete a motif.
All measurements are in centimeters. Divide by 2.54 if you need inches. Dimensions are given before seam take up, so try on basted pieces over the intended lining before final assembly.
This is a single sample size, not a graded size range. For a different size, recalculate panel widths from a washed swatch before you begin.
Body Texture: Leaf Pattern Chart
This 12 position by 8 row chart creates the beautiful fern eyelet texture. Use it between solid edges. Start with chart Row 1 on body Row 2, repeat chart Rows 1 through 8 upward, and repeat the columns across your row.
In the chart, x means dc in next position. o means ch 1, skip next position. Adjacent o symbols form a chain of that length over that many skipped positions. On the following row, work into each individual chain. Every symbol consumes and creates exactly one position.
Chart Row 1: x x x x o x x x o x x x (12 positions)
Chart Row 2: x x x o x x x x x o x x (12 positions)
Chart Row 3: x x o x x x x x x x o x (12 positions)
Chart Row 4: x x x o x x x x x o x x (12 positions)
Chart Row 5: x x x x o x x x o x x x (12 positions)
Chart Row 6: x x x x x o x o x x x x (12 positions)
Chart Row 7: x x x x x x o x x x x x (12 positions)
Chart Row 8: x x x x x o x o x x x x (12 positions)
Read each row in your working direction.
Wrap Body Instructions
Work flat from the waist down.
With yarn A and your 3.5 mm hook, ch 267.
Row 1: Dc in 3rd ch from hook and across. (265 dc) Mark the right edge as the visible overlap. Place a removable marker on the RS.
Row 2: Texture across, no shaping. (265 positions)
Row 3: Texture across, no shaping. (265 positions)
Row 4: Decrease twice at the visible overlap edge using dc2tog over its outermost 4 sts, then work texture across remaining positions. (263 positions)
Rows 5 through 7: Texture across, no shaping. (263 positions)
Row 8: Decrease twice at the visible overlap edge using dc2tog over its outermost 4 sts, then work texture across remaining positions. (261 positions)
Continue in this established pattern. You will work 3 rows of texture with no shaping, then on every 4th row, decrease twice at the visible overlap edge.
The decrease rows occur on Rows 4, 8, 12, 16, 20, 24, 28, 32, 36, 40, 44, 48, 52, 56, 60, 64, 68, 72, 76, 80, and 84.
Row 84: Decrease twice at the visible overlap edge. (223 positions)
At overlap edge decreases, work them at the beginning of RS rows or end of WS rows as needed so only the marked edge slopes.
The body is deliberately wider than the waist. You will gather the top to 110 cm for a 30 cm overlap on an 80 cm waist.
Ribbed Waistband with Ties
With yarn B, ch 12.
Row 1: Sc in 2nd ch from hook and across. (11 sc)
Rows 2 through 220: Ch 1, turn, sc BLO across. (11 sc per row)
Block to 110 cm by 5.5 cm. The row gauge of this ribbing must be checked independently. Stop at 110 cm even if your row count differs.
Make Two Ties:
With yarn B, ch 142.
Row 1: Sc in 2nd ch from hook and across. (141 sc)
Row 2: Sc across. (141 sc)
Each tie should measure at least 65 cm. If yours comes up short, lengthen by adding foundation chains.
Assembly
Block all pieces before joining. Use mattress stitch through matching edge loops and keep seams flat.
Join 1: Mark the top edge in quarters. Gather evenly to 110 cm using two rows of running stitch, creating 4 matched sections.
Join 2: Sew one long waistband edge to the gathered top, matching your quarter markers. This creates a 110 cm seam.
Join 3: Sew one tie to each waistband short end. Secure with two passes through 11 stitches per tie end.
Join 4: Try on over an opaque underskirt. Overlap by about 30 cm at the waist, secure inner and outer waistband ends with sew on snaps, and tie securely. You’ll use 2 snaps total.
Join 5 (Optional Sewn Lining): Trace the open wrap body, add 1.5 cm seam allowances, finish edges, and hem 2 cm shorter than the crochet. Attach the lining to the waistband with a loose hand sewn running stitch.
Checkpoint: Try on with the intended base layer. Seams must lie flat, both sides must hang level, and nothing should pull. Reblock or adjust seam tension before applying motifs.
Edgings and Details
Switch to yarn B, yarn C, and your 3.0 mm hook for this section.
Border Row 1: With B, sc evenly around each exposed edge. Work 1 sc per horizontal position, 2 sc per dc row end, and 3 sc at each outer corner. If your edge ripples, reduce your pickup rate. Record the total for each edge.
Border Row 2: Sc in each base sc, adding a picot after every fourth sc. At corners, retain 3 sc in the corner stitch. Your base stitch count stays the same, plus picots.
Leaf Motif (Make 6):
With yarn B, ch 12.
Round 1: From 2nd ch, work sl st, sc, hdc, dc in next 5 ch, hdc, sc, 3 sc in last ch. Turn around chain underside and work sc, hdc, dc in next 5, hdc, sc, sl st. Join. (23 stitches)
Leaf Center: Surface slip stitch along the foundation chain from stem to tip without pulling. (11 surface stitches)
To Create Fern Sprigs:
Arrange three leaves around each of 2 ch 18 stems. Sew stems and every leaf edge securely. Place leaf pairs alternating along each stem. You will have 2 completed sprigs.
Applique Join: Pin placements while the garment is flat. Sew around every outer edge and through the center with matching yarn, avoiding stretch. Secure all motifs.
Checkpoint: Edges should lie flat and maintain the measured garment outline. Count all motifs, check placement symmetry or deliberate asymmetry, and tug each embellishment gently to confirm secure stitching.
Finishing
Pass 1: Weave every tail through at least 5 cm of dense stitches, reverse direction once, then trim. You should have 0 unsecured tails.
Pass 2: Soak gently, press out water in towels, and lay flat to target measurements. Pin motifs without stretching holes. All pieces should be level.
Pass 3: Allow to dry completely, remove every pin, and inspect seams, closures, and lining. No pins remaining.
Compare your washed dimensions with your target measurements, confirm comfortable movement and coverage, and record any adjustments for future reference.
Care Instructions
Follow the yarn label for best results. For cotton, hand wash gently in cool water with mild detergent. Rinse without wringing, reshape, and dry flat. Store folded rather than hanging, as hanging can stretch lace over time.
Keep long ties away from machinery and open flames. Inspect closures and embroidered details regularly for wear.
Final Thoughts
The Sage Fern Wrap Skirt is the kind of project that makes you fall in love with crochet garments all over again. Yes, it takes patience. Yes, you’ll be counting stitches and blocking pieces. But when you tie that waistband and see those ivory fern appliques catching the light, you’ll understand why this design is worth the effort.
The combination of the delicate leaf eyelet texture with the bold botanical appliques creates something truly special. It’s elegant enough for a garden party, bohemian enough for a beach vacation, and unique enough that you’ll never see another one like it.
If you make this beautiful wrap skirt, I would love to see it! Share your finished piece on Instagram or Facebook and tag your photos so fellow crafters can admire your work.
Save this pattern to your Pinterest boards so you can find it when you’re ready to start, and drop a comment below if you decide to make one. I’d love to hear which colorway you choose!
You Might Also Like
- Rainbow Pastel Granny Square Poncho Free Crochet Pattern
- Lavender Blossom Table Set Crochet Pattern
- Pink Dragon Baby Swaddle Blanket Free Crochet Pattern
- Lavender Butterfly Baby Dress Free Crochet Pattern