
I don’t know about you, but I have a serious weakness for bags that actually stand up on their own. There is nothing more frustrating than a tote that flops over and dumps your yarn all over the floor the second you set it down.
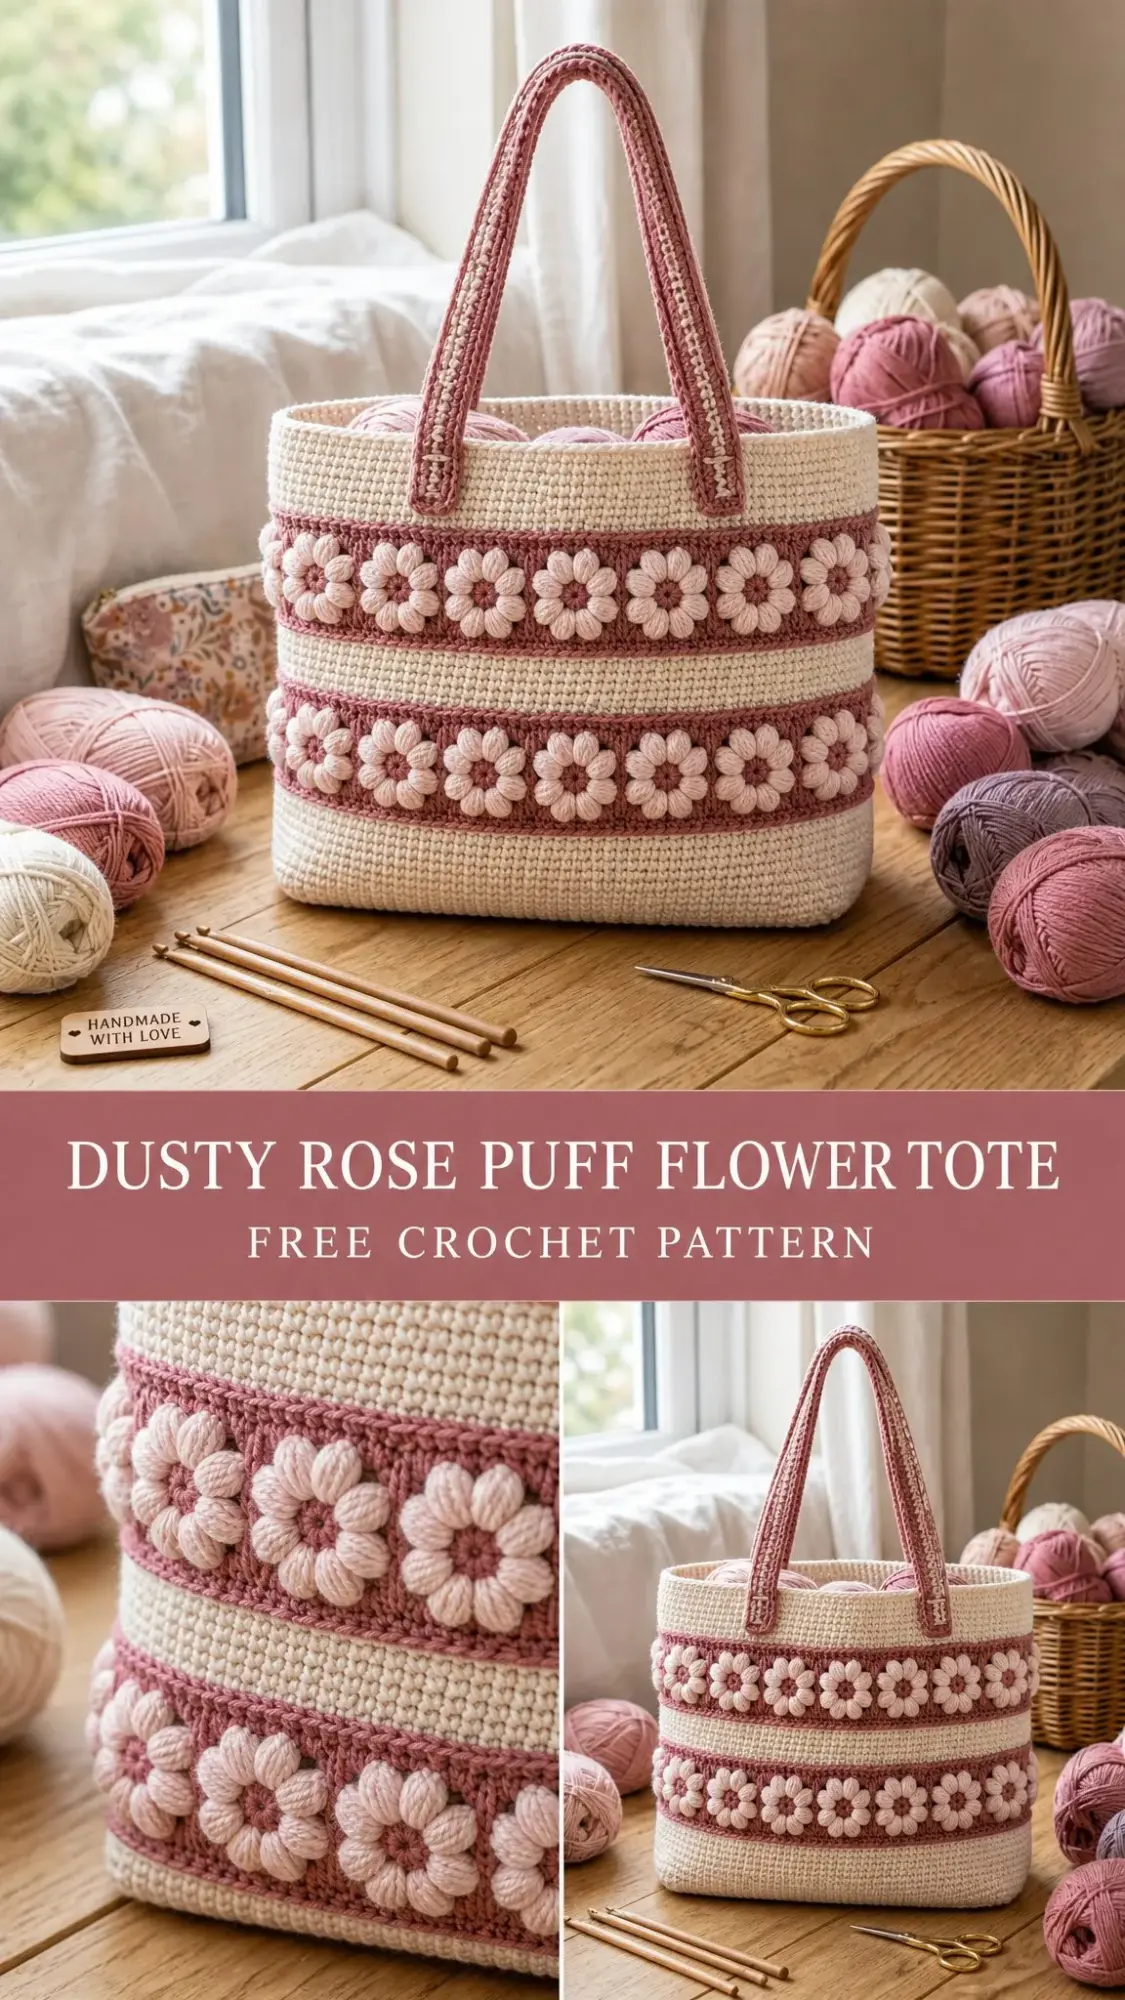
This dusty rose puff flower tote solves that problem completely. The dense single crochet fabric creates a structured bag that holds its shape beautifully, while three bands of raised puff stitch daisies add the kind of texture that makes people stop and ask where you bought it.
The best part? You get to say you made it yourself. Let me walk you through every single step.
Why This Crochet Tote Pattern Works So Well
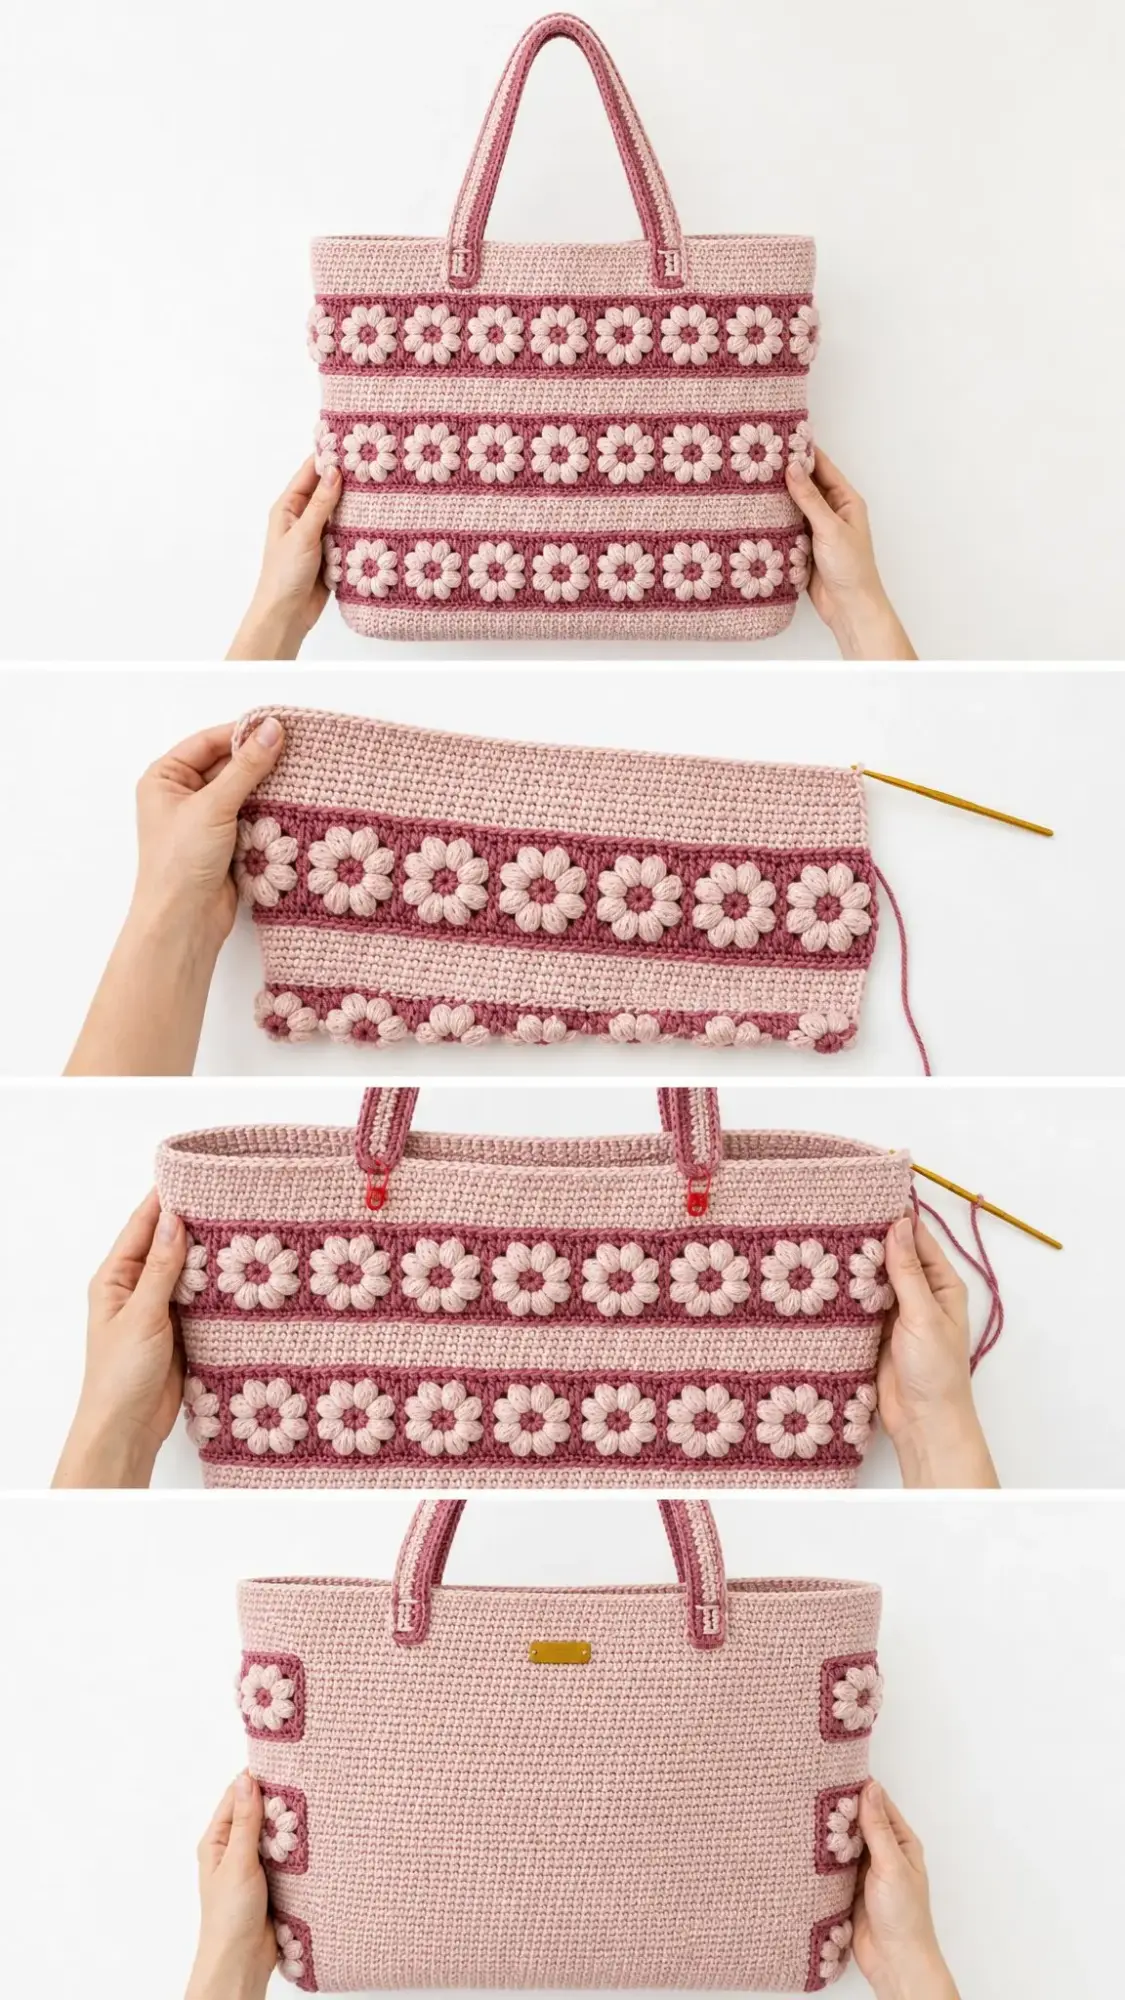
This bag combines function with serious visual appeal. The construction starts from a flat oval base and works upward in continuous rounds, which means no seaming and no fussy shaping. The puff flower bands look intricate, but they follow a predictable repeat that becomes almost meditative once you get the rhythm down.
The color palette uses a soft blush pink as the main color paired with a deeper dusty rose for the flower bands and handles. This combination feels modern and feminine without being overly sweet. Of course, you can swap in any two coordinating colors that speak to you.
Skill level sits at intermediate to advanced intermediate. If you are comfortable with single crochet in the round and willing to tackle puff stitches, you can absolutely make this bag. The puff daisy technique requires managing multiple loops on your hook, but I will break it down step by step.
Time investment runs approximately 18 to 25 hours for an experienced crocheter. The three flower bands account for most of that time, so pace yourself and enjoy the process.
Finished Measurements
Your completed tote will measure:
These measurements reflect a blocked and lightly steamed finished bag.
Materials You Will Need
Yarn
Main Color (MC): Light Blush Pink, approximately 550 yards / 503 meters of worsted weight (category 4) cotton or cotton-blend yarn
Contrast Color (CC): Dusty Rose, approximately 300 yards / 274 meters of the same yarn in the deeper dusty rose shade
Recommended Yarn Options
Lion Brand 24/7 Cotton in Rose (MC) and Dusty Pink (CC) works beautifully. This 100 percent mercerized cotton is smooth with excellent stitch definition and holds structure well.
Paintbox Yarns Cotton DK used doubled, or their Cotton Aran weight in Blush Pink (MC) and Tea Rose (CC), gives the puff flowers a lovely tactile quality.
WeCrochet Dishie in Blush (MC) and Rose Hip (CC) is soft, holds its round shape nicely, and comes in a broad range of coordinating pinks.
Substitution note: Any smooth worsted weight cotton or cotton-acrylic blend will work. Avoid fuzzy or heavily textured yarns because they will obscure the puff daisy details.
Hook
Notions
Gauge
With US size G-6 / 4.0 mm hook and MC:
18 single crochet stitches = 4 inches / 10 cm
20 single crochet rows (or rounds) = 4 inches / 10 cm
Gauge matters for this project. A looser gauge produces a floppy bag that will not hold its shape. If your gauge runs loose, drop down to the F-5 hook for the entire project.
One complete puff daisy (center plus six petals) measures approximately 1.5 inches / 3.8 cm in diameter.
Abbreviations
Special Stitches
Puff Stitch (puff st)
This is the building block for every petal and flower center. Here is how to work it:
Step 1: Insert hook into the designated stitch or space.
Step 2: Yarn over and draw up a loop to a height of approximately 0.5 inch / 1.3 cm. You now have 3 loops on hook.
Step 3: Yarn over and insert hook into the same stitch again.
Step 4: Yarn over and draw up another loop to the same height. You now have 5 loops on hook.
Step 5: Yarn over and insert hook into the same stitch one final time.
Step 6: Yarn over and draw up another loop to the same height. You now have 7 loops on hook.
Step 7: Yarn over and draw through all 7 loops on hook. You now have 1 loop remaining.
Step 8: Chain 1 to lock the puff. This closing chain does NOT count as a stitch.
The completed puff stitch is a rounded, raised bobble sitting on the surface of the fabric. Take your time with these. They get easier with practice.
Joined Chain Cord (for handles)
The handles are worked as a flat single crochet strip, then folded and seamed.
Step 1: With CC, ch 8.
Step 2: Sc across all 8 ch stitches. Turn.
Step 3: Ch 1, sc in BLO across all 8 sts. Turn.
Repeat Step 3 for the entire handle length. The BLO technique creates a subtle ridge texture that matches the visual detailing on the body.
Pattern Notes Before You Begin
1. The bag body is worked in continuous rounds (no joining, no turning) from the base upward. Use a stitch marker in the first stitch of each round and move it up as you go.
2. The outer right side of the bag always faces you as you work rounds.
3. Color changes use a standing stitch at the beginning of the new color round. To do a standing sc: make a slip knot with the new color, place it on hook, insert hook into the first stitch, yarn over and pull through both loops as normal.
4. Do not cut yarn between color rounds unless instructed. Carry the unused color loosely up the inside of the bag, catching it every 2 to 3 rounds to prevent long floats.
5. All stitch counts at the end of each round reflect the total number of stitches in that round.
Step by Step Instructions
Section A: Oval Base
The base is a solid oval of single crochet worked in flat joined rounds, increasing at both short ends to create the elliptical shape.
Foundation Chain: With MC and G-6 hook, ch 28.
Round 1: Working into the back ridge bump of the chain, sc in the 2nd ch from hook, sc in each of the next 25 ch, work 3 sc in the last ch (this is one short end). Rotate work to crochet back along the other side of the foundation chain, sc in each of the next 25 ch along the underside, work 2 sc in the same starting ch as your first sc. Join with sl st to first sc. Do not turn. (56 sc)
Round 2: Ch 1, sc in each of the first 26 sc, 2 sc in each of the next 3 sc (short end increase), sc in each of the next 24 sc, 2 sc in each of the next 3 sc (short end increase). Join with sl st to first sc. (62 sc)
Round 3: Ch 1, sc in each of the first 26 sc, [sc in next sc, 2 sc in next sc] 3 times, sc in each of the next 24 sc, [sc in next sc, 2 sc in next sc] 3 times. Join with sl st to first sc. (68 sc)
Round 4: Ch 1, sc in each of the first 26 sc, [sc in each of next 2 sc, 2 sc in next sc] 3 times, sc in each of the next 24 sc, [sc in each of next 2 sc, 2 sc in next sc] 3 times. Join with sl st to first sc. (74 sc)
Round 5: Ch 1, sc in each of the first 26 sc, [sc in each of next 3 sc, 2 sc in next sc] 3 times, sc in each of the next 24 sc, [sc in each of next 3 sc, 2 sc in next sc] 3 times. Join with sl st to first sc. (80 sc)
Round 6: Ch 1, sc in each of the first 26 sc, [sc in each of next 4 sc, 2 sc in next sc] 3 times, sc in each of the next 24 sc, [sc in each of next 4 sc, 2 sc in next sc] 3 times. Join with sl st to first sc. (86 sc)
Your oval base should measure approximately 10 inches / 25.5 cm long and 6 inches / 15 cm wide. Do not fasten off.
Section B: Bag Body, Lower Plain Section
From Round 7 onward, the bag is worked in continuous rounds. Simply continue working sc into each stitch in a spiral, moving the stitch marker at the beginning of each new round. The stitch count remains constant at 86 sc per round.
Rounds 7 to 14 (8 rounds): Sc in each sc around, working in continuous spiral. Move stitch marker at start of each round. (86 sc per round)
After Round 14, the bag sides should measure approximately 1.75 inches / 4.5 cm above the base.
Section C: First Flower Band (Rounds 15 to 20)
The flower band is worked over 6 rounds. Before beginning, place stitch markers to identify daisy center positions. With 86 stitches around the bag, you will have 12 daisies, each claiming 7 stitches (84 stitches total). The remaining 2 stitches absorb as spacers near the round seam.
Round 15 (CC border): Join CC with a standing sc in first st of new round, sc in each sc around. (86 sc)
Round 16 (CC, daisy petal base): Sc in each sc around. (86 sc)
Round 17 (CC, daisy center round): [Sc in next 3 sc, work puff st in next sc (this is the daisy center stitch), sc in next 3 sc] 12 times, sc in last 2 sc. (86 sts, including 12 puff sts plus 74 sc)
Round 18 (CC, lower and side petals): [Sc in next 2 sc, work puff st in next sc (Petal left-lower), sc in next sc, work puff st in next sc (Petal right-lower), sc in next 2 sc] 12 times, sc in last 2 sc. (86 sts)
Round 19 (MC, upper daisy highlight): Join MC with standing sc. Sc in each st around. (86 sc)
Round 20 (CC, upper border): Join CC with standing sc. Sc in each sc around. (86 sc)
The first flower band is complete. The bag should measure approximately 4.25 inches / 10.8 cm from base.
Section D: Body Middle Section
Rounds 21 to 29 (9 rounds): Join MC with standing sc. Sc in each sc around in continuous spiral. (86 sc per round)
The bag should measure approximately 6.25 inches / 15.9 cm from base.
Section E: Second Flower Band (Rounds 30 to 35)
Repeat the flower band instructions exactly.
Round 30 (CC border): 86 sc.
Round 31 (CC, daisy petal base): 86 sc.
Round 32 (CC, daisy center round): [Sc in next 3 sc, puff st in next sc, sc in next 3 sc] 12 times, sc in last 2 sc. (86 sts)
Round 33 (CC, lower and side petals): [Sc in next 2 sc, puff st in next sc, sc in next sc, puff st in next sc, sc in next 2 sc] 12 times, sc in last 2 sc. (86 sts)
Round 34 (MC): Standing sc, sc in each st around. (86 sc)
Round 35 (CC): Standing sc, sc in each sc around. (86 sc)
The second flower band is complete. The bag should measure approximately 8.25 inches / 21 cm from base.
Section F: Body Upper Section
Rounds 36 to 44 (9 rounds): Join MC with standing sc. Sc in each sc around in continuous spiral. (86 sc per round)
The bag should measure approximately 10.25 inches / 26 cm from base.
Section G: Third Flower Band (Rounds 45 to 50)
Repeat the flower band instructions one final time.
Round 45 (CC border): 86 sc.
Round 46 (CC, daisy petal base): 86 sc.
Round 47 (CC, daisy center round): [Sc in next 3 sc, puff st in next sc, sc in next 3 sc] 12 times, sc in last 2 sc. (86 sts)
Round 48 (CC, lower and side petals): [Sc in next 2 sc, puff st in next sc, sc in next sc, puff st in next sc, sc in next 2 sc] 12 times, sc in last 2 sc. (86 sts)
Round 49 (MC): Standing sc, sc in each st around. (86 sc)
Round 50 (CC): Standing sc, sc in each sc around. (86 sc)
The third flower band is complete. The bag should measure approximately 12 inches / 30.5 cm from base.
Section H: Top Rim
The top rim finishes the bag opening and provides a stable attachment zone for the handles.
Round 51 (MC): Join MC with standing sc. Sc in each sc around. (86 sc)
Round 52 (MC): Sc in each sc around. (86 sc)
Round 53 (CC): Join CC with standing sc. Sc in BLO of each sc around. This creates a subtle turning ridge. (86 sc)
Round 54 (CC): Sc in each sc around. (86 sc)
Fasten off CC. Weave in end.
Round 55 (MC): Join MC with standing sc. Sc in each sc around. (86 sc)
Fasten off MC. Weave in end. The bag body is complete.
Section I: Handles (Make 2)
Each handle is approximately 1.75 inches / 4.5 cm wide and 22 inches / 56 cm long before attachment.
Foundation: With CC and G-6 hook, ch 9.
Row 1: Sc in 2nd ch from hook and in each ch across. Turn. (8 sc)
Row 2 onwards: Ch 1, sc in BLO of each sc across. Turn. (8 sc)
Repeat Row 2 until the strap measures 22 inches / 56 cm from foundation edge. Do not fasten off.
Seam the handle: Fold the strap in half lengthwise (wrong sides together) and sc through both layers along the long open edge to close the strap into a firm tube.
Fasten off. Weave in ends. Make the second handle identical to the first.
Handle Attachment
Lay your finished bag flat. Mark handle attachment points at position 15 from the left corner and position 15 from the right corner at the top rim round on both the front and back faces.
Thread a tapestry needle with a doubled length of CC approximately 24 inches / 61 cm long. Position the short raw end of the handle (approximately 1 inch / 2.5 cm) against the inside of the bag at the marked attachment point. Using whip stitch, stitch through the folded handle end and through the bag rim rounds at least 10 times in each direction, forming a cross-stitch box pattern for maximum security.
Repeat at the second attachment point of the same handle. Repeat for the second handle on the back of the bag.
Finishing and Blocking Your Puff Flower Tote
Weave in all ends securely using a tapestry needle. Ends from color changes should be woven in through at least 1 inch in two different directions.
Turn the bag inside out and lightly mist the exterior with water or steam from a garment steamer held 6 inches away from the surface. Do not press the iron directly onto the puff stitches as this will flatten them.
Gently shape the bag while damp. Stuff the interior loosely with plastic bags or crumpled tissue paper to hold the rectangular silhouette. Prop the bag upright and allow to dry completely.
Once dry, lightly fluff the puff daisies with your fingers to re-lift any petals that compressed during blocking.
Care Instructions
Machine wash on gentle cycle in cold water inside a mesh laundry bag. Use mild detergent. Do not tumble dry. Reshape while damp and lay flat or prop upright to dry. Do not wring or twist. Iron on low heat on the inside only if necessary, using a pressing cloth and avoiding the puff daisy bands.
Size Customization Tips
For a smaller bag (approximately 12 x 10 inches): Use DK weight yarn and a US size E-4 / 3.5 mm hook. Reduce the foundation chain to 22 stitches and adjust the base to produce 70 stitches. Each flower band will contain 10 daisies.
For a larger tote (approximately 16 x 13 inches): Use bulky weight yarn and a US size J-10 / 6.0 mm hook. Increase the foundation chain to 32 stitches and build the base to 98 stitches. Each flower band will contain 14 daisies.
To add height: Add more plain sc rounds in the middle body sections. Each 4 additional rounds adds approximately 0.8 inches of height.
I hope you love making this dusty rose puff flower tote as much as I loved designing it. The puff daisies really do make this bag special, and that structured base means it actually functions as a proper tote instead of a decorative flop.
If you found this crochet tutorial helpful, save it to your Pinterest boards so you can find it when you are ready to start. And please leave a comment below if you make one. I would absolutely love to see your color combinations and hear how the project went for you!
You Might Also Like
- Pastel Rainbow Flower Granny Square Tote Free Crochet Pattern
- Ocean Blue Ombre Crochet Backpack Free Crochet Pattern
- Watermelon Slice Couple Amigurumi Free Crochet Pattern
- Mustard Yellow Duck Toilet Paper Cozy Free Crochet Pattern