
Shell stitches look intimidating, but they’re honestly one of the easiest ways to create stunning texture. If you’ve been scrolling past beautiful layered baby dresses thinking "I could never make that," I’m here to tell you that you absolutely can. This lavender mint shell stitch baby dress breaks down into simple, repeatable steps that build on skills you probably already have.
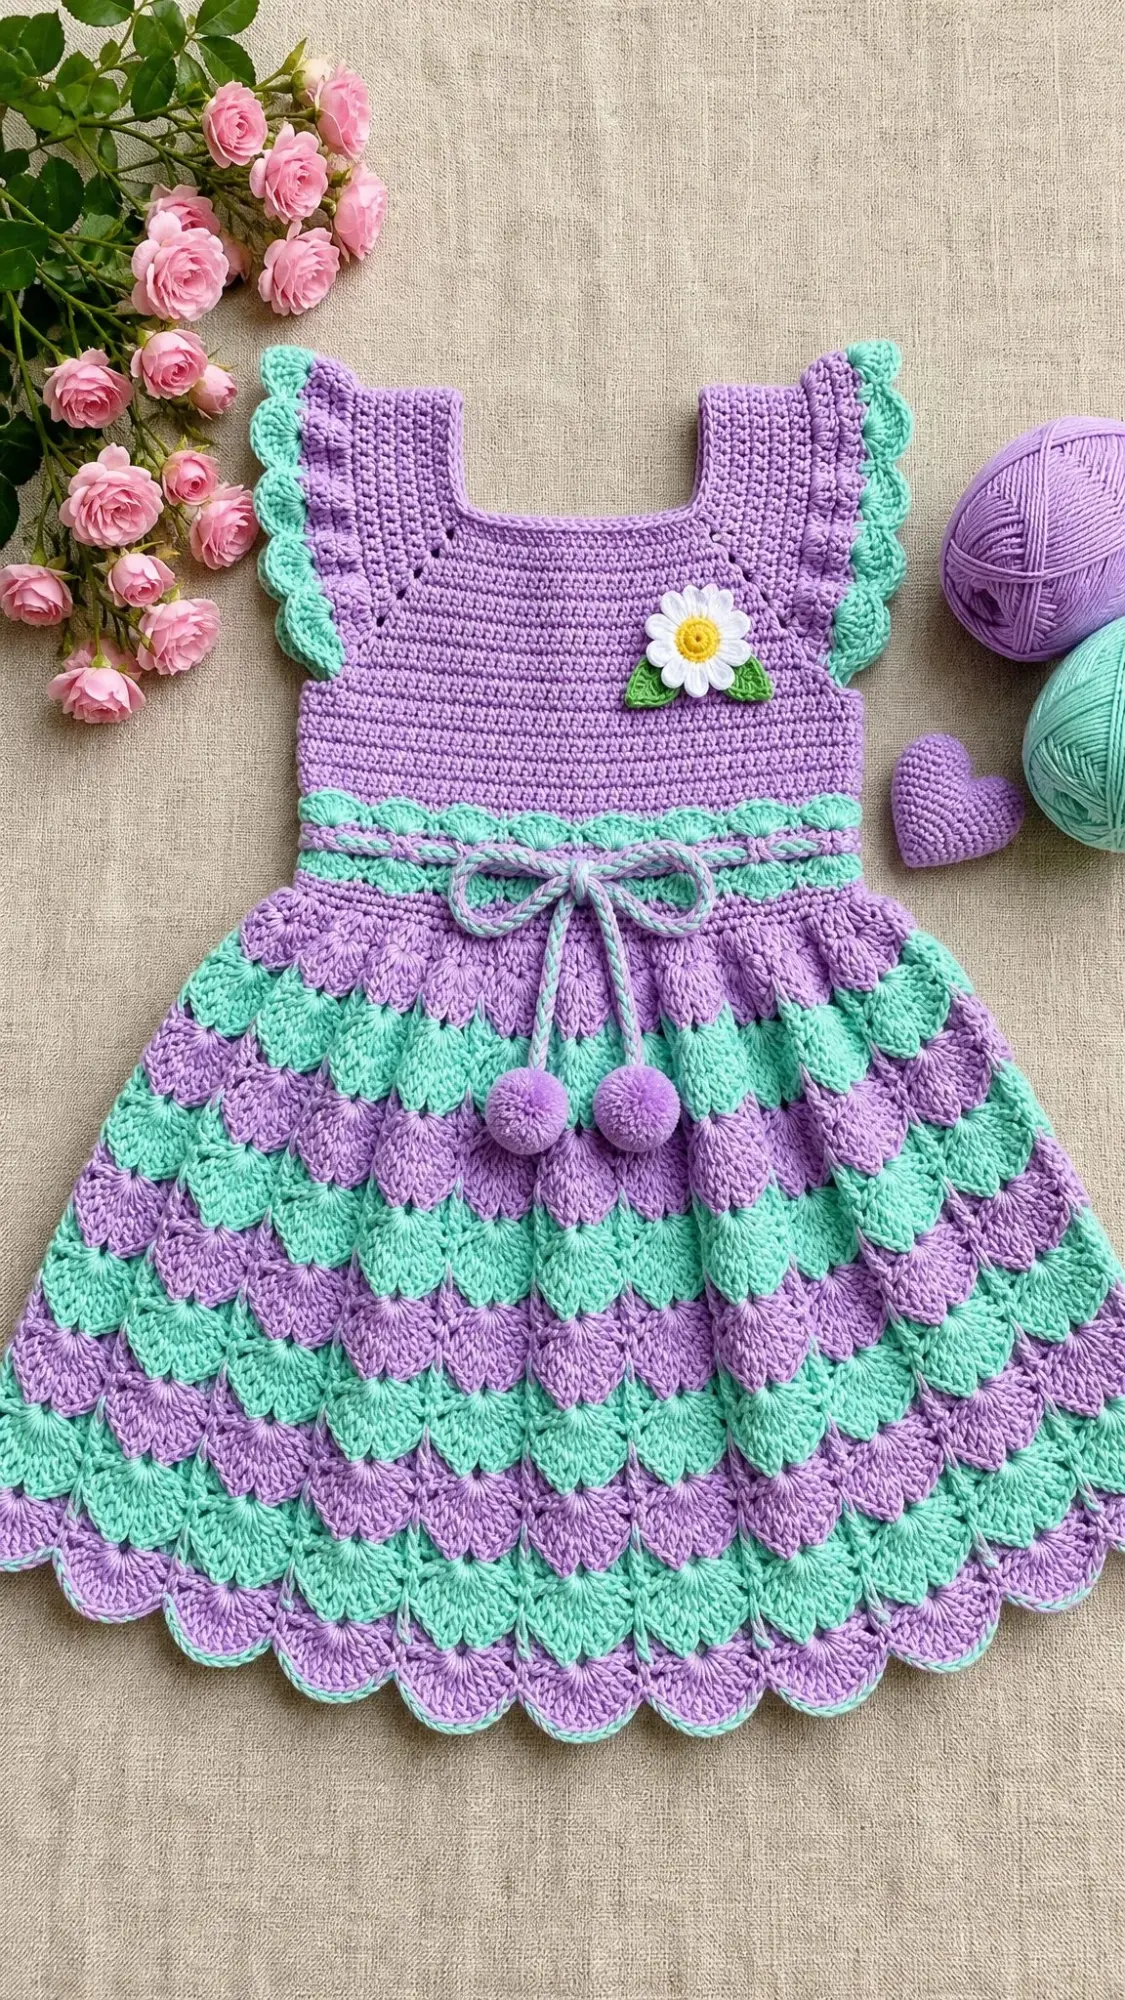
The bodice is just single crochet worked flat. That’s it. If you can single crochet back and forth, you can make the top of this dress. The skirt adds shell stitches, but here’s the secret: a shell is just five double crochets worked into the same stitch. Once you’ve done one, you’ve done them all. The alternating colors create that gorgeous layered scale effect, but the technique stays consistent throughout.
Whether you’re a confident beginner ready to level up or an experienced crocheter looking for a satisfying project, this pattern meets you where you are. I’ve included checkpoints throughout so you can verify your work as you go. No nasty surprises at the end.
Pattern Overview
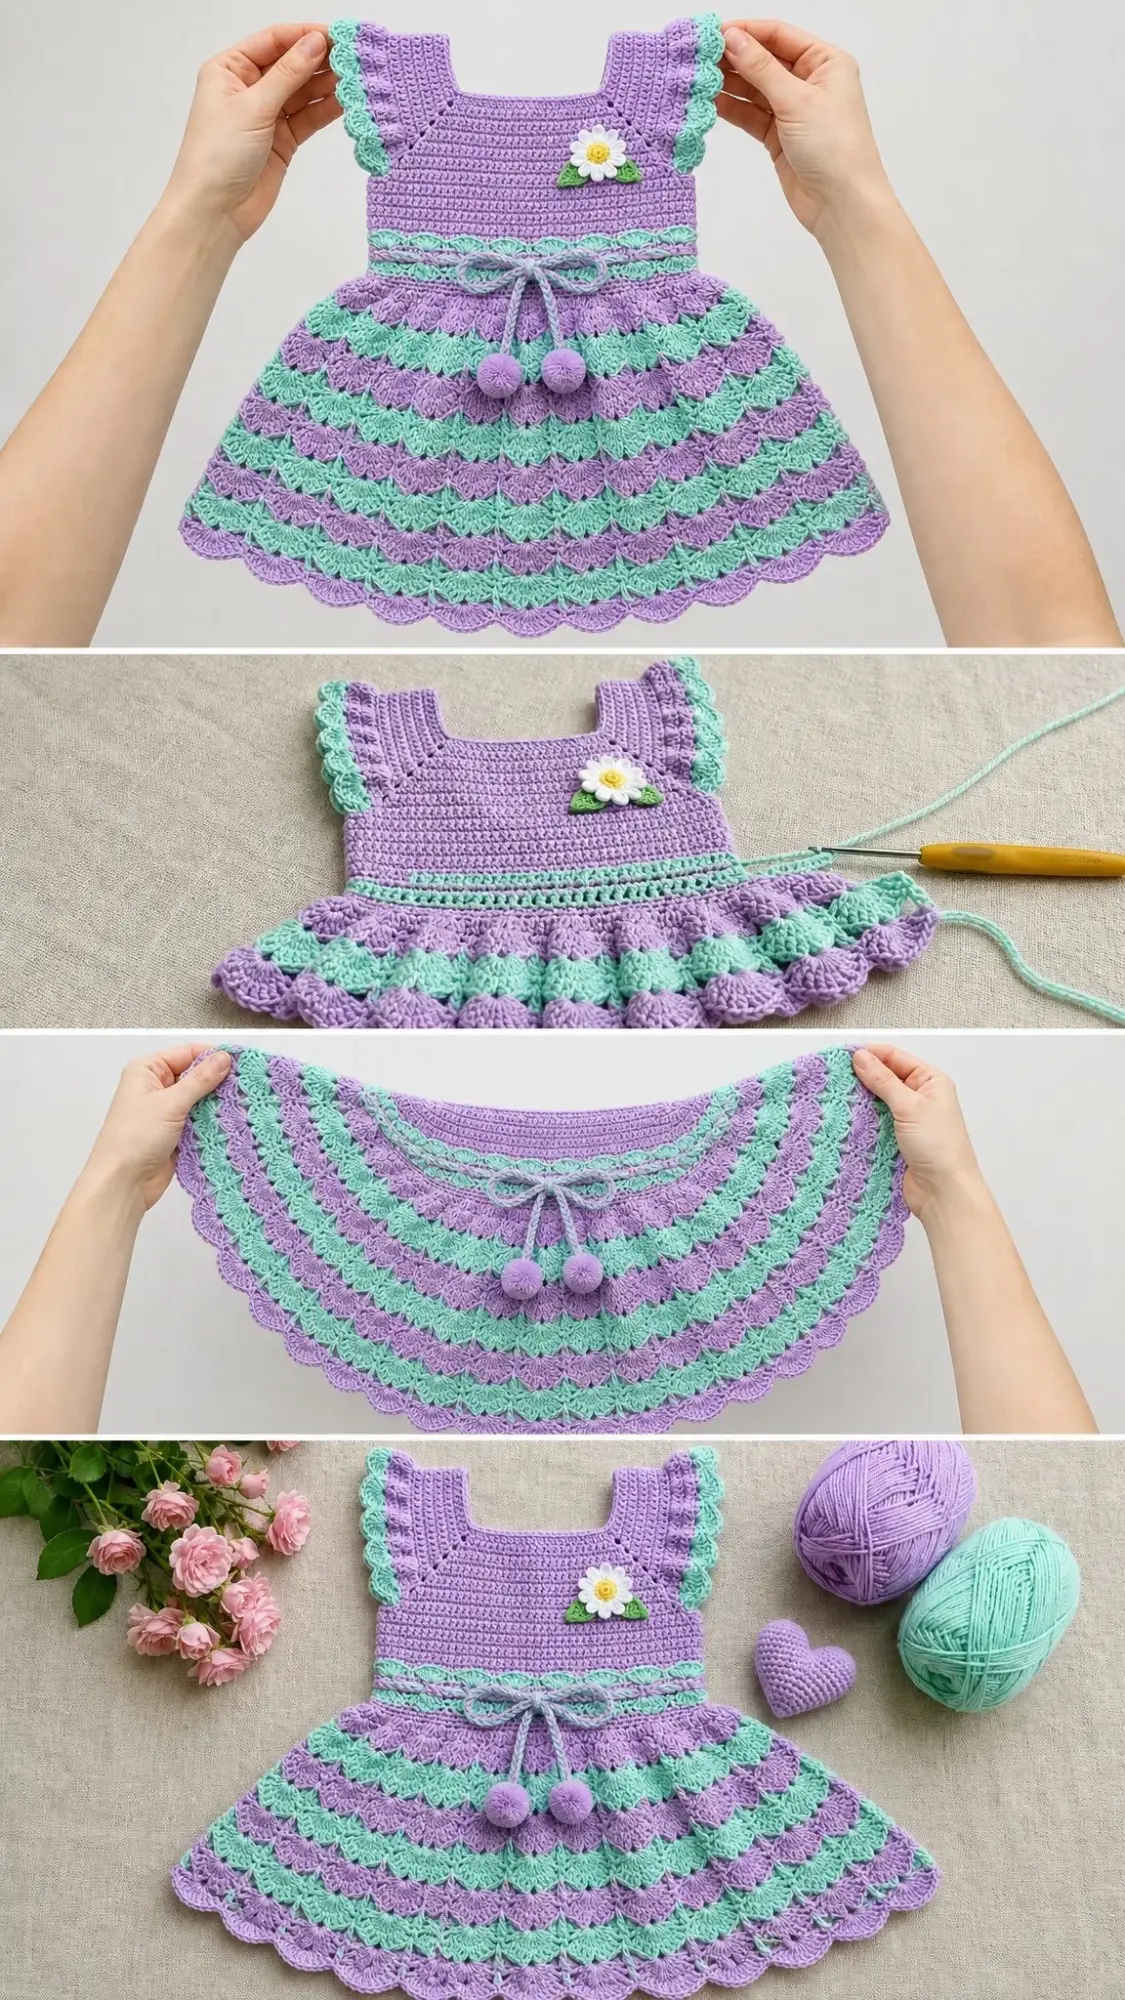
This adorable baby dress combines a classic fitted bodice with a flowing shell stitch skirt in soft lavender and mint green. The construction is straightforward: you’ll make two flat bodice panels, seam them together, then work the skirt in the round from the waist down. Flutter sleeves with scallop edging frame the armholes, while a threaded waist tie with pom-pom embellishments adds the perfect finishing touch.
The finished dress fits a 6-month-old baby with a chest circumference of approximately 17 inches and a total length of 14 inches from shoulder to hem. Size customization tips are included at the end for newborn through 24 months.
Skill Level
Intermediate. The bodice section is beginner-friendly single crochet, but the full project requires comfort with shell stitches, color changes, working in the round, and creating small embellishments. A motivated beginner with solid foundations can complete this dress with patience and careful counting.
Time estimate: Approximately 12 to 18 hours for an experienced intermediate crocheter.
Materials Needed
Yarn: Worsted weight yarn (CYCA 4), 100 percent cotton or cotton-acrylic blend preferred
Recommended yarns:
Hook: US size G-6 / 4.0 mm crochet hook (adjust to meet gauge)
Notions:
Substitution note: Choose any smooth, plied worsted weight yarn that achieves gauge. Avoid fuzzy or bouclé textures as they will obscure the shell stitch detail.
Gauge
With US G-6 / 4.0 mm hook:
Gauge is critical for this garment. Swatch and adjust hook size as needed before beginning.
Abbreviations (US Terms)
Before we dive in, let me define every stitch you’ll encounter:
Special Stitches
Shell Stitch
Work 5 double crochets all into the same stitch or space. This group of 5 dc constitutes one shell. Think of it as five tall stitches sharing the same home base.
Scallop Edging
Skip 2 stitches, work 5 dc into the next stitch, skip 2 stitches, slip stitch into the next stitch. Repeat around. Each scallop consumes 6 stitches total.
Waist Eyelet Row
Chain 3, skip 2 stitches, dc in next stitch. Continue alternating ch 2, skip 2, dc across. This creates evenly spaced holes for threading the waist tie.
Pattern Notes
1. The bodice is worked flat as two identical panels (front and back), then seamed at shoulders and sides.
2. The skirt is worked in joined rounds from the waist downward.
3. Color changes: Color A is used for odd-numbered shell rounds. Color B is used for even-numbered shell rounds and the hem scallop.
4. In the bodice, the turning chain of 1 does not count as a stitch.
5. The dress is designed to be pulled on over the head with no button or zipper closure.
6. Join all rounds with a slip stitch to the first stitch unless otherwise instructed.
7. Stitch counts appear in parentheses at the end of each row or round.
Bodice Front Panel Instructions
Foundation: With Color A and G-6 hook, chain 40.
Row 1 (RS): Sc in second ch from hook, sc in each ch across. Turn. (39 sc)
Row 2: Ch 1, sc in each st across. Turn. (39 sc)
Rows 3 through 22: Repeat Row 2. Work even in sc for a total of 22 rows from the foundation. (39 sc each row)
After Row 22, the bodice front panel should measure approximately 4.5 inches tall.
Armhole and Neck Shaping (Bodice Front)
Row 23 (RS): Sl st across first 4 sts. Ch 1, sc in same st as last sl st, sc across to last 4 sts. Leave last 4 sts unworked. Turn. (31 sc)
Row 24: Ch 1, sc2tog over first 2 sts, sc across to last 2 sts, sc2tog. Turn. (29 sc)
Row 25: Ch 1, sc2tog, sc across to last 2 sts, sc2tog. Turn. (27 sc)
Row 26: Ch 1, sc in each st across. Turn. (27 sc)
Neck Split (Bodice Front)
Row 27 (Left Shoulder): Ch 1, sc across first 9 sts. Leave remaining sts unworked for now. Turn. (9 sc)
Row 28: Ch 1, sc2tog, sc to end. Turn. (8 sc)
Row 29: Ch 1, sc across. Turn. (8 sc)
Row 30: Ch 1, sc2tog, sc to end. Turn. (7 sc)
Rows 31 through 34: Ch 1, sc across. Turn. (7 sc each row)
Fasten off Color A. This completes the left shoulder strap.
Row 27 (Right Shoulder): With RS facing, skip center 9 sts of Row 26 for neck opening, rejoin Color A in next st. Ch 1, sc across remaining 9 sts. Turn. (9 sc)
Row 28: Ch 1, sc across to last 2 sts, sc2tog. Turn. (8 sc)
Row 29: Ch 1, sc across. Turn. (8 sc)
Row 30: Ch 1, sc across to last 2 sts, sc2tog. Turn. (7 sc)
Rows 31 through 34: Ch 1, sc across. Turn. (7 sc each row)
Fasten off Color A. This completes the right shoulder strap.
Bodice Back Panel Instructions
Work exactly as the bodice front panel through Row 26. (27 sc)
Neck Split (Bodice Back)
Row 27 (Left Shoulder): Ch 1, sc across first 9 sts. Turn. (9 sc)
Rows 28 through 34: Ch 1, sc across. Turn. (9 sc each row)
Note: The back shoulder straps are not shaped at the neck edge, leaving 9 sts rather than the 7 sts of the front. This creates a natural overlap at the shoulder for easy dressing.
Fasten off.
Row 27 (Right Shoulder): Rejoin Color A in next st after center 9 sts of Row 26. Ch 1, sc across remaining 9 sts. Turn. (9 sc)
Rows 28 through 34: Ch 1, sc across. Turn. (9 sc each row)
Fasten off Color A.
Checkpoint: Each bodice panel should measure approximately 6 inches from foundation to top of shoulder strap.
Joining the Bodice
Align front and back panels with right sides together.
Shoulder seams: With Color A and yarn needle, whipstitch or mattress stitch the right front strap to the right back strap at the top edge. Repeat for left side.
Side seams: With right sides together, seam from the bottom edge upward to the armhole bind-off row on each side. Leave armhole areas open.
Turn right side out.
Checkpoint: The joined bodice should measure approximately 17 inches in circumference at the waist.
Flutter Sleeve Edging
Work both armhole openings identically.
With Color B, join yarn at the base of the armhole at the side seam with a sl st.
Round 1: Ch 1, work 1 sc evenly around the entire armhole opening. Aim for approximately 36 sc total. Sl st to first sc to join. (36 sc)
Round 2 (Scallop): Ch 1. [Skip 2 sts, 5 dc in next st, skip 2 sts, sl st in next st] 6 times around. Sl st to join. (6 scallops)
Fasten off Color B. Weave ends.
Repeat for second armhole.
Note: If 36 doesn’t work for your armhole, adjust Round 1 count to the nearest multiple of 6 (30, 36, or 42).
Neckline Edging
With Color B, join at back right shoulder seam with sl st.
Round 1: Ch 1, sc evenly around entire neckline. Aim for 54 sc total. Sl st to first sc to join. (54 sc)
Round 2 (Scallop): Ch 1. [Skip 2 sts, 5 dc in next st, skip 2 sts, sl st in next st] 9 times around. Sl st to join. (9 scallops)
Fasten off Color B. Weave ends.
Waist Eyelet Row
With Color A, join at any side seam at the bottom edge of the bodice with a sl st. The bottom edge has 78 stitches total (39 from front plus 39 from back).
Round 1: Ch 1, sc in each st around. Sl st to first sc to join. (78 sc)
Round 2 (Eyelet Round): Ch 5 (counts as dc plus ch 2). Skip 2 sts. [Dc in next st, ch 2, skip 2 sts] 25 times. Sl st to third ch of beg ch-5 to join. (26 dc plus 26 ch-2 spaces)
Round 3: Ch 1, sc in first dc. [2 sc in next ch-2 sp, sc in next dc] 25 times. 2 sc in final ch-2 sp. Sl st to first sc to join. (78 sc)
Skirt Instructions
The skirt is worked in continuous joined rounds from the waist downward. The current stitch count of 78 divides evenly into 13 shell repeats.
Color sequence: Shell rounds alternate between Color A and Color B. Single crochet transition rounds are worked in the same color as the shell round just completed.
Beginning Skirt Rounds
Skirt Round 1 (sc foundation, Color A): With Color A, ch 1, sc in each st around. Sl st to first sc. (78 sc)
Skirt Round 2 (Shell Round 1, Color A): Ch 1. [Sc in next st, sk 2 sts, 5 dc in next st, sk 2 sts] 13 times around. Sl st to first sc to join. (13 sc, 13 shells / 78 sts)
Skirt Round 3 (sc transition, Color A): Ch 1. [Sc in sc, sc in each of next 5 dc] 13 times around. Sl st to first sc to join. (78 sc)
Skirt Round 4 (Shell Round 2, Color B): Drop Color A. Join Color B. Ch 1. [Sc in next st, sk 2 sts, 5 dc in next st, sk 2 sts] 13 times around. Sl st to first sc. (78 sts)
Skirt Round 5 (sc transition, Color B): Ch 1. [Sc in sc, sc in each of 5 dc] 13 times. Sl st to first sc. (78 sc)
Skirt Round 6 (Shell Round 3, Color A): Drop Color B. Rejoin Color A. Ch 1. [Sc in next st, sk 2 sts, 5 dc in next st, sk 2 sts] 13 times. Sl st to first sc. (78 sts)
Skirt Round 7 (sc transition, Color A): Ch 1. [Sc in sc, sc in each of 5 dc] 13 times. Sl st to first sc. (78 sc)
First Increase Section
Skirt Round 8 (increase, Color B): Join Color B. Ch 1. Sc in each of first 2 sts. [2 sc in next st, sc in next 5 sts] 12 times. 2 sc in next st. Sc in last 3 sts. Sl st to first sc. (90 sc)
Skirt Round 9 (Shell Round 4, Color B): Ch 1. [Sc in next st, sk 2 sts, 5 dc in next st, sk 2 sts] 15 times around. Sl st to first sc. (90 sts, 15 shells)
Skirt Round 10 (sc transition, Color B): Ch 1. [Sc in sc, sc in each of 5 dc] 15 times. Sl st to first sc. (90 sc)
Skirt Round 11 (Shell Round 5, Color A): Drop Color B. Join Color A. Ch 1. [Sc in next st, sk 2 sts, 5 dc in next st, sk 2 sts] 15 times. Sl st to first sc. (90 sts)
Skirt Round 12 (sc transition, Color A): Ch 1. [Sc in sc, sc in each of 5 dc] 15 times. Sl st to first sc. (90 sc)
Second Increase Section
Skirt Round 13 (increase, Color B): Join Color B. Ch 1. [Sc in each of next 4 sts, 2 sc in next st] 18 times around. Sl st to first sc. (108 sc)
Skirt Round 14 (Shell Round 6, Color B): Ch 1. [Sc in next st, sk 2 sts, 5 dc in next st, sk 2 sts] 18 times around. Sl st to first sc. (108 sts, 18 shells)
Skirt Round 15 (sc transition, Color B): Ch 1. [Sc in sc, sc in each of 5 dc] 18 times. Sl st to first sc. (108 sc)
Skirt Round 16 (Shell Round 7, Color A): Join Color A. Ch 1. [Sc in next st, sk 2 sts, 5 dc in next st, sk 2 sts] 18 times. Sl st to first sc. (108 sts)
Skirt Round 17 (sc transition, Color A): Ch 1. [Sc in sc, sc in each of 5 dc] 18 times. Sl st to first sc. (108 sc)
Third Increase Section
Skirt Round 18 (increase, Color B): Join Color B. Ch 1. [Sc in each of next 5 sts, 2 sc in next st] 18 times around. Sl st to first sc. (126 sc)
Skirt Round 19 (Shell Round 8, Color B): Ch 1. [Sc in next st, sk 2 sts, 5 dc in next st, sk 2 sts] 21 times around. Sl st to first sc. (126 sts, 21 shells)
Skirt Round 20 (sc transition, Color B): Ch 1. [Sc in sc, sc in each of 5 dc] 21 times. Sl st to first sc. (126 sc)
Skirt Round 21 (Shell Round 9, Color A): Join Color A. Ch 1. [Sc in next st, sk 2 sts, 5 dc in next st, sk 2 sts] 21 times. Sl st to first sc. (126 sts)
Skirt Round 22 (sc transition, Color A): Ch 1. [Sc in sc, sc in each of 5 dc] 21 times. Sl st to first sc. (126 sc)
Checkpoint: The skirt should measure approximately 7 inches from the waist eyelet row.
Final Increase and Hem
Skirt Round 23 (increase, Color B): Join Color B. Ch 1. [Sc in each of next 6 sts, 2 sc in next st] 18 times around. Sl st to first sc. (144 sc)
Skirt Round 24 (Shell Round 10, Color B): Ch 1. [Sc in next st, sk 2 sts, 5 dc in next st, sk 2 sts] 24 times around. Sl st to first sc. (144 sts, 24 shells)
Skirt Round 25 (sc transition, Color B): Ch 1. [Sc in sc, sc in each of 5 dc] 24 times. Sl st to first sc. (144 sc)
Skirt Round 26 (Hem Scallop): Ch 1. [Sk 2 sts, 5 dc in next st, sk 2 sts, sl st in next st] 24 times around. Sl st to join at base of first scallop. (24 scallops)
Fasten off Color B. Weave ends securely.
Final Checkpoint: The finished skirt should measure approximately 8 inches from waist to hem. Total dress length is approximately 14 inches from shoulder to hem.
Waist Tie
With Color B, chain 110 (approximately 24 inches when relaxed). Sl st back in second ch from hook and each ch across to create a firm rounded cord. Fasten off, leaving a 6-inch tail at each end.
Thread the tie through the ch-2 eyelet spaces at the waist, beginning and ending at center front.
Attach one lavender pom-pom to each end of the tie by threading the yarn needle through the center of the pom-pom several times and knotting securely.
Daisy Applique
Petals: With white yarn, make a magic ring. Chain 3, dc 2 tog in ring (counts as first petal base). Chain 3, sl st in ring. Repeat 5 more times to create 6 petals. Pull ring closed. Fasten off.
Center: With yellow yarn, join in center. Work 6 sc in center hole. Sl st to join. Fasten off.
Leaves: With green yarn, chain 7. Work hdc in second ch from hook, hdc in next 2 chs, sl st in next ch, sl st in last 2 chs. Fasten off. Make 2 leaves.
Arrange leaves and daisy at the upper left chest of the dress, just below the neckline scallop. Sew securely with yarn needle.
Size Customization Tips
Newborn: Reduce foundation chain to 34 (33 working sts). Adjust waist to 66 sts. Remove one increase round. Target hem circumference of 22 to 24 inches.
12 months: Increase foundation chain to 46 (45 working sts). Adjust waist to 90 sts. Add one additional increase round. Target hem circumference of 36 inches.
18 to 24 months: Increase foundation chain to 52 (51 working sts). Waist circumference 102 sts. Add two additional increase rounds. Target hem circumference of 42 to 44 inches. Total dress length 16 to 17 inches.
Important: All waist and hem stitch counts must be multiples of 6 to accommodate the shell repeat evenly.
Finishing
Weave in all remaining yarn ends. Block gently if desired by laying flat and steaming lightly, being careful not to flatten the shell texture.
Thank you so much for choosing this pattern! I hope you love making this sweet little dress as much as I loved designing it. If you create one, I’d absolutely love to see it. Tag me on Instagram or share a photo in my Facebook group.
If this pattern caught your eye, go ahead and save it to your Pinterest boards so you can find it when you’re ready to start. And please drop a comment below if you make one. I love hearing which color combinations you choose!
You Might Also Like
- Lavender Dreams Candy Bolster Pillow Free Crochet Pattern
- Autumn Fox Lace Crochet Sweater Free Pattern
- Pastel Rainbow Daisy Backpack Free Crochet Pattern
- Dusty Rose Floral Lace Bucket Bag Free Crochet Pattern