
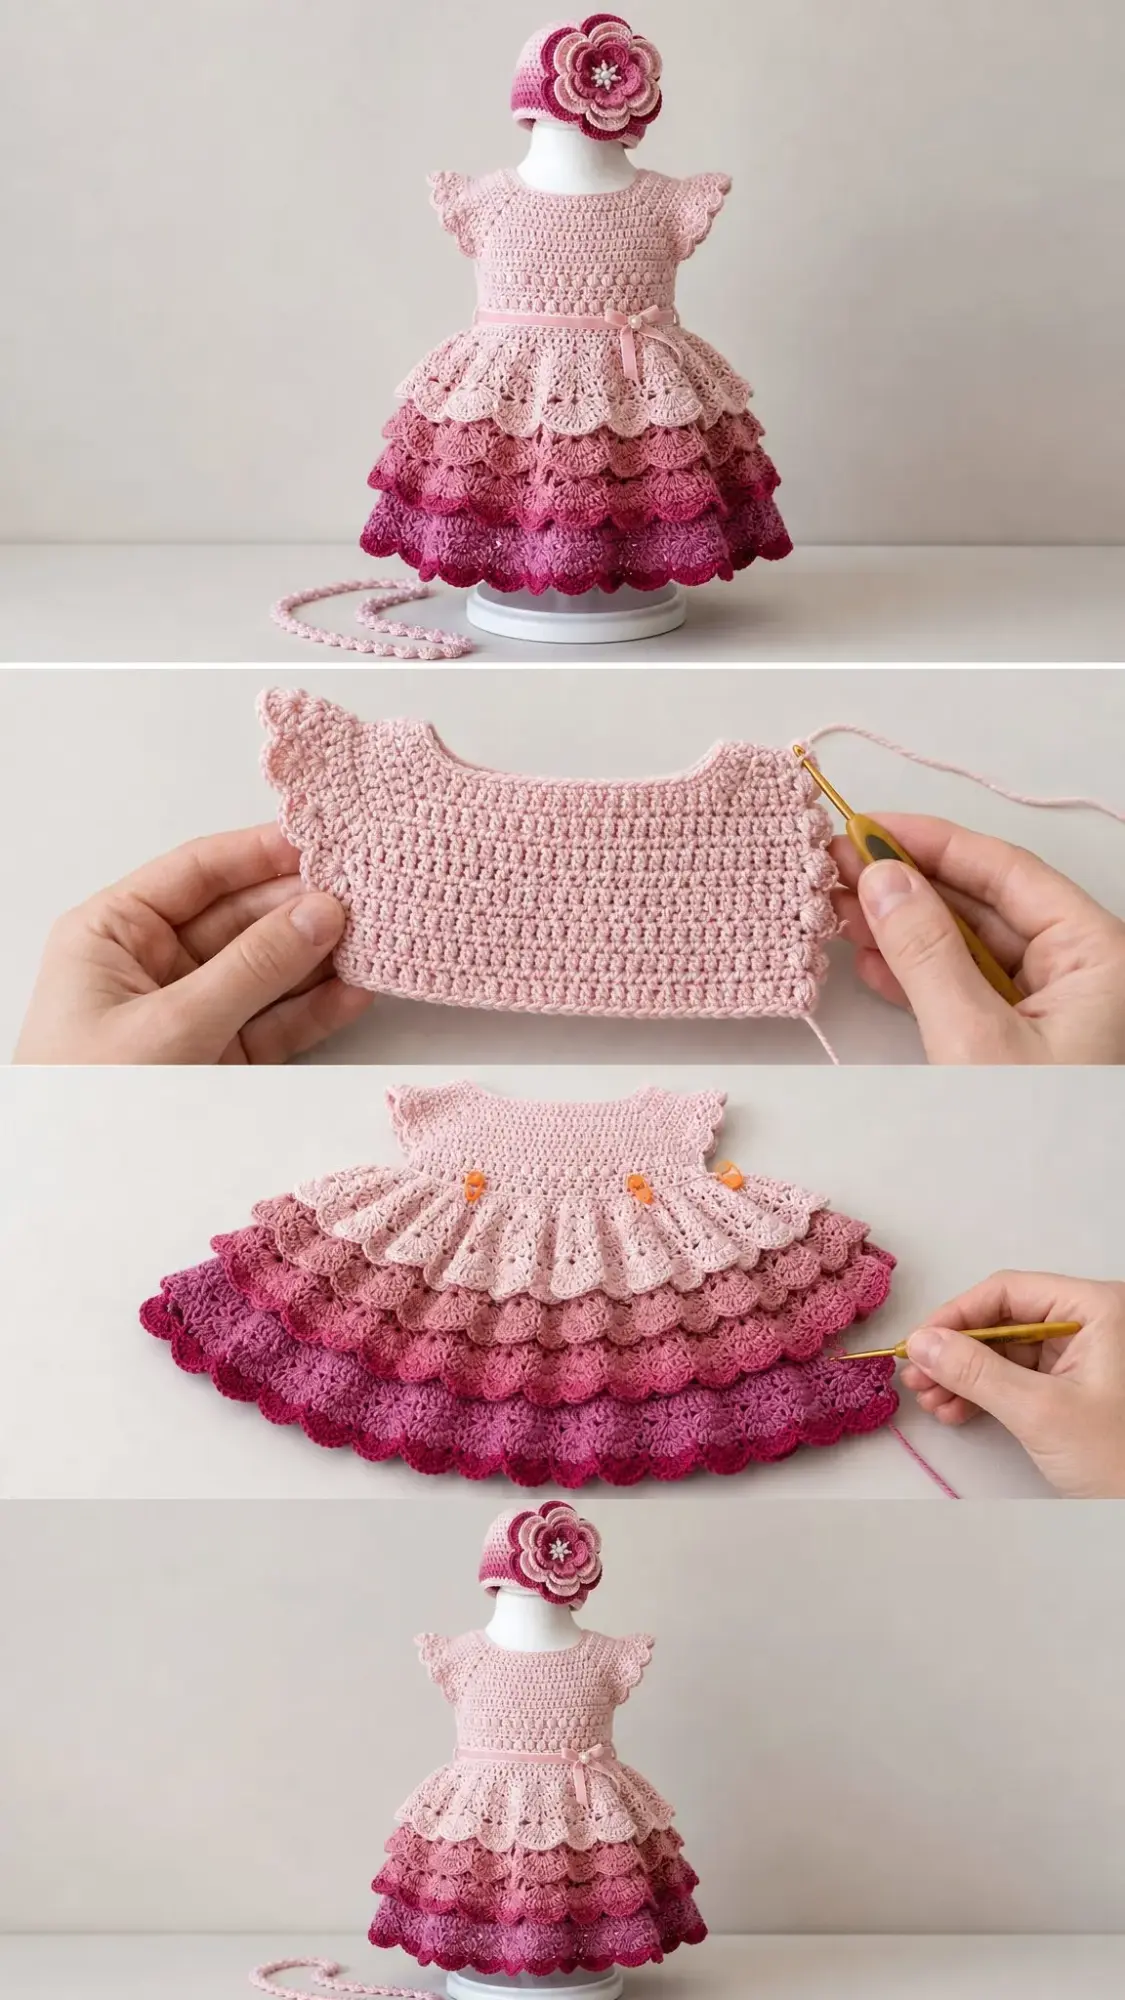
If you need a showstopping gift for a baby shower, christening, or first birthday celebration, this is the crochet pattern you have been searching for. This tiered baby dress features a fitted bodice with delicate flutter sleeves and five layers of scalloped ruffles that graduate from the palest blush pink down to a rich magenta hem. The construction uses single crochet for the bodice and a satisfying fan stitch for the dramatic skirt.
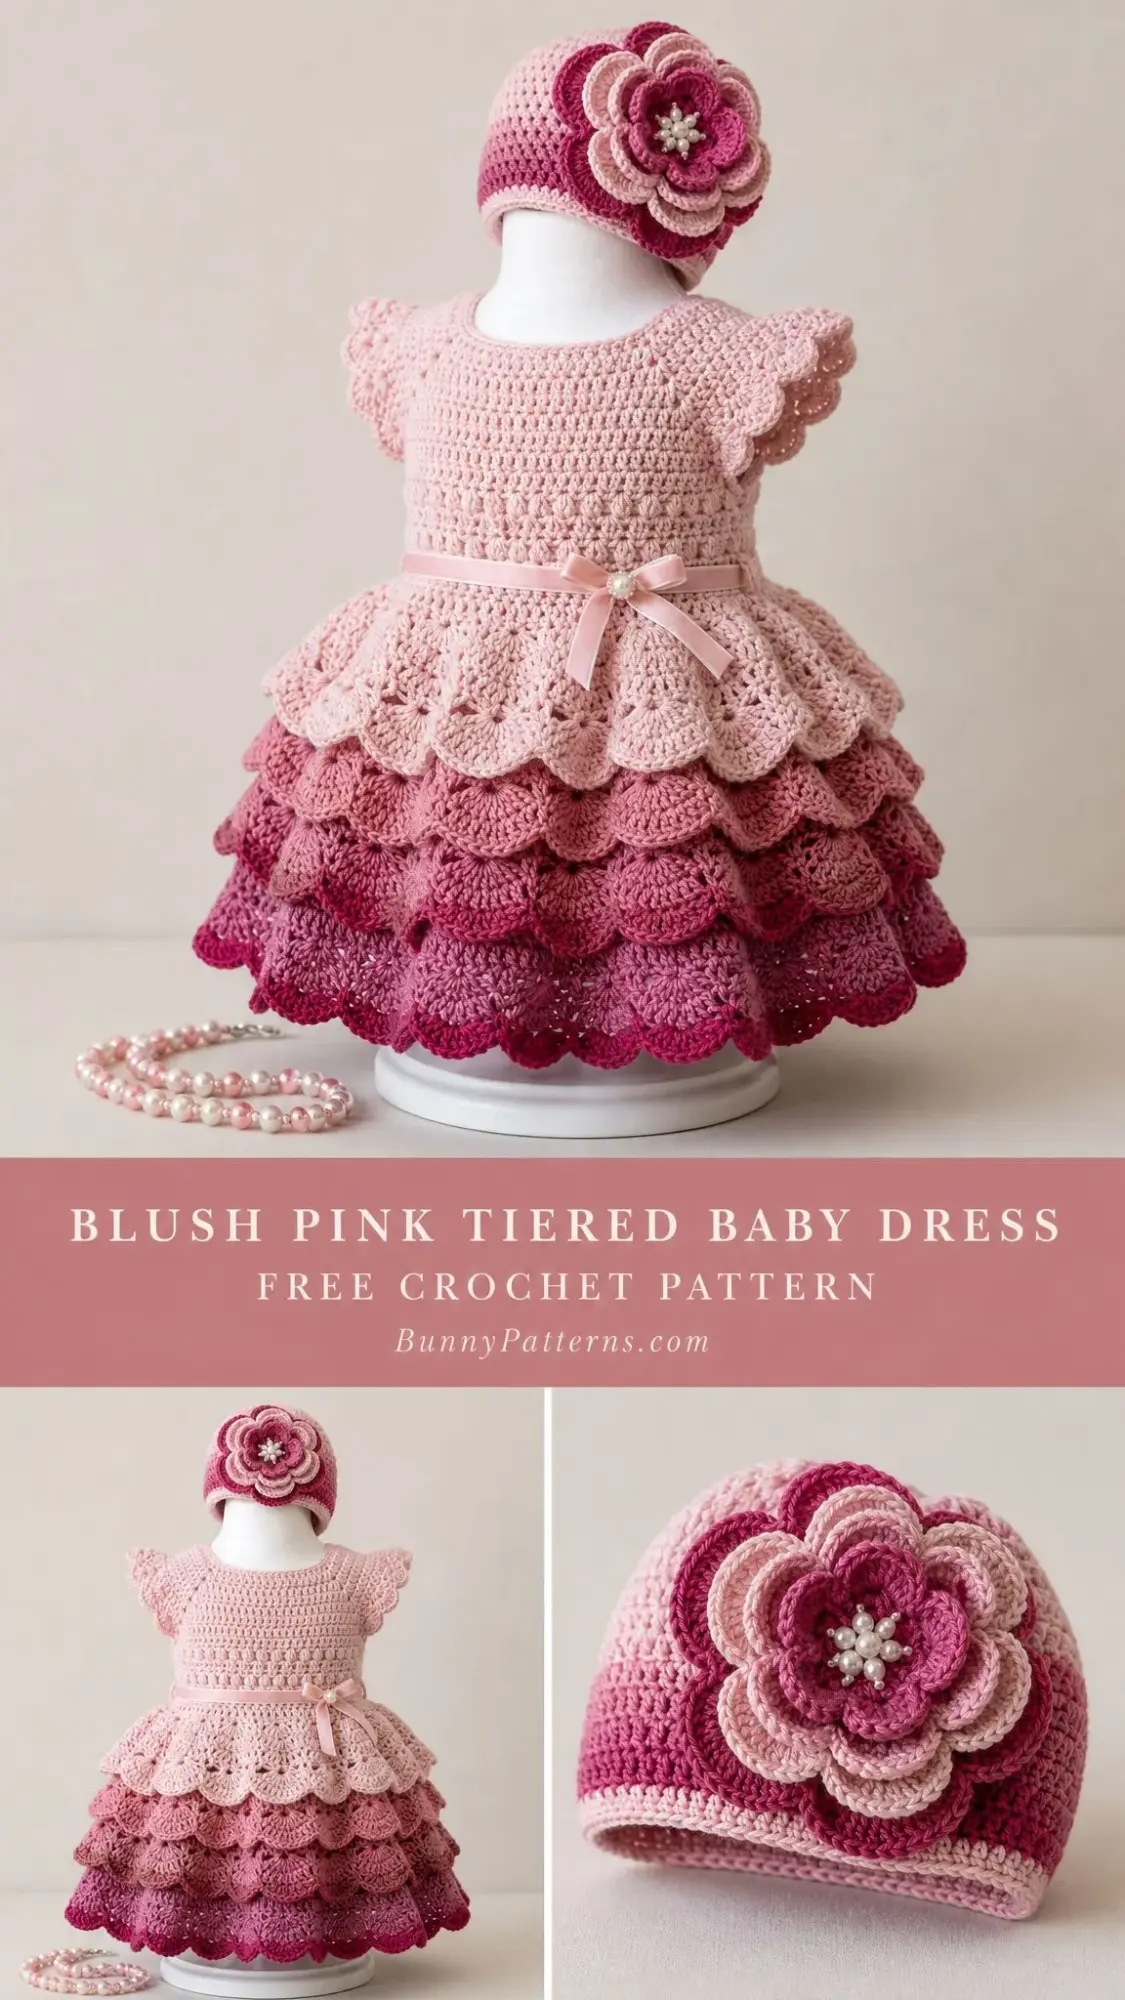
This pattern works up beautifully in sport weight yarn and includes a matching headband with a layered flower embellishment. The whole set makes an heirloom quality gift that parents will treasure for years. Whether you are making this for your own little one or for someone special in your life, the finished dress photographs like a dream and fits babies around 12 months old.
I want to be upfront with you about the skill level here. This is an advanced beginner to intermediate project. The bodice is straightforward single crochet worked in the round, but the skirt tiers require careful stitch counting and confidence with fan stitch repeats. If you can follow a pattern, count stitches accurately, and change colors cleanly, you absolutely can make this dress.
What You Will Need
Gather your materials before you start. Having everything ready makes the process so much smoother.
Yarn: Sport weight yarn (CYCA 2) in five colors
Hook: US size E-4 (3.5 mm)
Notions:
Yarn Suggestions: Lion Brand Pound of Love in Pastel Pink works wonderfully for this project. Paintbox Yarns Simply DK used at a tighter gauge also produces crisp stitch definition. For a cotton option, try Scheepjes Catona in shades Powder Pink (238), English Tea (404), Antique Mauve (254), Old Rose (408), and Tulip (222).
Gauge Information
22 stitches and 24 rows equal 4 inches in single crochet worked in the round with Color A on a US E-4 (3.5 mm) hook.
Fan stitch gauge: One complete fan repeat (5 stitches plus 2 chain spaces) worked over 7 stitches across equals approximately 1.5 inches wide. One fan tier (3 rounds) equals approximately 1.75 inches tall.
Please swatch before beginning. Gauge determines whether this dress will actually fit a 12 month old baby. If your swatch is too big, go down a hook size. Too small, go up a hook size.
Finished Size
This pattern is written for a 12 month size baby, approximately 18 to 22 pounds, with a chest measurement of 19 inches. The dress length from shoulder to hem measures approximately 16 inches.
Abbreviations and Stitch Definitions
Let me walk you through every abbreviation you will encounter in this pattern.
ch = chain. Wrap yarn over hook and pull through the loop on your hook.
sl st = slip stitch. Insert hook into stitch, yarn over, pull through both the stitch and the loop on your hook in one motion.
sc = single crochet. Insert hook into stitch, yarn over and pull up a loop (2 loops on hook), yarn over and pull through both loops.
dc = double crochet. Yarn over, insert hook into stitch, yarn over and pull up a loop (3 loops on hook), yarn over and pull through 2 loops (2 loops remain), yarn over and pull through remaining 2 loops.
inc = increase. Work 2 single crochet stitches into the same stitch.
sk = skip. Pass over the indicated stitch without working into it.
st(s) = stitch(es)
rnd = round
sp = space
ch-sp = chain space
Special Stitches for This Crochet Pattern
Shell Stitch: Work 5 double crochet stitches all into the same stitch or space. This creates a small fan shape and appears in the yoke texture.
Scallop Fan: This is the signature stitch for the tiered skirt. Here is how it works: Skip 2 stitches, work 5 double crochet into the next stitch (this is the center of your fan), skip 2 stitches, then work 1 single crochet into the next stitch (this anchors between fans). This 6 stitch sequence repeats around each tier.
Flutter Sleeve Scallop Edge: Work (sc, ch 2, 3 dc) all into the same stitch, then skip 2, and repeat. This creates the ruffled wing effect at the armhole edges.
Pattern Notes Before You Begin
Read through these notes carefully. They will save you confusion later.
1. The bodice is worked in joined rounds without turning unless stated. After the join, begin each new round in the first stitch of the previous round.
2. The dress is worked in one piece from the neck down through the bodice. The skirt tiers are then worked in rounds from stitches picked up at the waist.
3. Right side is always facing throughout.
4. Color changes for the skirt tiers happen at the start of each new tier. Fasten off the old color and join the new color with a standing single crochet or slip stitch join.
5. Chain 3 at the start of a double crochet round counts as 1 double crochet throughout.
6. Stitch counts in parentheses at the end of each round reflect the total number of working stitches, not counting turning chains.
7. Mark the beginning of each round with a locking stitch marker and move it up as you work.
Section 1: Neckline and Shoulder Foundation
Using Color A, make a magic ring or chain 4 and join with slip stitch to form a ring.
Rnd 1: Ch 1, work 48 sc into the ring, join with sl st to first sc. (48 sc)
Rnd 2: Ch 1, sc in each st around, join. (48 sc)
Rnd 3 (yoke shaping): Ch 1, (sc in next 3 sts, inc in next st) 12 times, join. (60 sc)
Rnd 4: Ch 1, sc in each st around, join. (60 sc)
Rnd 5 (shell yoke row): Ch 3 (counts as dc), skip next st, (shell of 5 dc in next st, skip 2 sts, dc in next st, skip 2 sts) 9 times, shell in next st, skip 2 sts, join with sl st to top of ch-3. (10 shells plus connecting dc stitches)
Rnd 6: Ch 1, sc in each dc and each shell top across, working 1 sc into each of the 5 dc of each shell and 1 sc in each connecting dc. Join. (60 sc)
Rnd 7: Ch 1, (sc in next 4 sts, inc) 12 times, join. (72 sc)
Rnd 8: Ch 1, sc in each st around, join. (72 sc)
Rnd 9: Ch 1, (sc in next 5 sts, inc) 12 times, join. (84 sc)
Rnd 10: Ch 1, sc in each st around, join. (84 sc)
Rnd 11: Ch 1, (sc in next 6 sts, inc) 12 times, join. (96 sc)
Rnd 12: Ch 1, sc in each st around, join. (96 sc)
Checkpoint: After Round 12 the neckline opening should measure approximately 8.5 inches in circumference. The piece should be approximately 2 inches deep from the magic ring to the working edge.
Section 2: Bodice Body
The next rounds form the main bodice below the yoke with a light textured check pattern.
Rnd 13: Ch 1, (sc in back loop only in next 3 sts, sc in both loops in next st) 24 times, join. (96 sc)
Rnd 14: Ch 1, sc in each st around, join. (96 sc)
Rnd 15: Ch 1, sc in each st around, join. (96 sc)
Rnd 16: Ch 1, (sc in back loop only in next 3 sts, sc in both loops in next st) 24 times, join. (96 sc)
Rnd 17: Ch 1, sc in each st around, join. (96 sc)
Rnd 18: Ch 1, sc in each st around, join. (96 sc)
Rnd 19: Ch 1, (sc in back loop only in next 3 sts, sc in both loops in next st) 24 times, join. (96 sc)
Rnd 20: Ch 1, sc in each st around, join. (96 sc)
Rnd 21: Ch 1, sc in each st around, join. (96 sc)
Rnd 22: Ch 1, (sc in back loop only in next 3 sts, sc in both loops in next st) 24 times, join. (96 sc)
Rnd 23: Ch 1, sc in each st around, join. (96 sc)
Rnd 24: Ch 1, sc in each st around, join. (96 sc)
Checkpoint: After Round 24 the bodice from neckline to working edge should measure approximately 4 inches. The circumference should be approximately 17.5 inches.
Armhole Shaping Note: Mark stitches 1 and 49 as front/back dividers before proceeding.
Rnd 25 (armhole openings): Ch 1, sc in first 23 sts, ch 4, skip 2 sts (first armhole), sc in next 46 sts, ch 4, skip 2 sts (second armhole), sc in rem 23 sts, join. (92 sc plus two ch-4 bridges)
Rnd 26: Ch 1, sc in each sc and 4 sc across each ch-4 bridge, join. (96 sc)
Rnd 27: Ch 1, sc in each st around, join. (96 sc)
Rnd 28: Ch 1, sc in each st around, join. (96 sc)
Section 3: Flutter Sleeves
Work the sleeves now before continuing the bodice.
Sleeve Setup: Attach Color A with sl st to the first skipped stitch of one armhole opening.
Rnd S1: Ch 1, work 12 sc evenly around the armhole opening, join. (12 sc)
Rnd S2 (flutter scallop): Ch 1, (sc in next st, ch 2, 3 dc in same st, skip 2 sts) 4 times, join. (4 scallop shells)
Fasten off. Weave in ends. Repeat for second sleeve.
Section 4: Waistband Eyelet Round
Continue on main bodice from Rnd 28.
Rnd 29 (waistband eyelet): Ch 4 (counts as dc plus ch 1), skip next st, (dc in next st, ch 1, skip next st) 47 times, join with sl st to third ch of beginning ch-4. (48 dc plus 48 ch-1 spaces)
Rnd 30: Ch 1, sc in each dc and sc in each ch-1 space around, join. (96 sc)
Rnd 31: Ch 1, sc in each st around, join. (96 sc)
Checkpoint: After Round 31 the bodice including neckline should measure approximately 6 inches from crown to working edge.
Section 5: Waist Transition and First Tier Setup
The skirt begins here. The first tier uses Color A to maintain the blush tone at the top.
Rnd 32 (increase round): Ch 1, (sc in next 3 sts, inc) 24 times, join. (120 sc)
Rnd 33: Ch 1, sc in each st around, join. (120 sc)
Rnd 34: Ch 1, (sc in next 4 sts, inc) 24 times, join. (144 sc)
Rnd 35: Ch 1, sc in each st around, join. (144 sc)
Section 6: Tier 1 (Color A, Blush Pink)
Rnd 36 (begin fan pattern): Join Color A if not already attached. Ch 3 (counts as first dc), skip 2 sts, (5 dc in next st, skip 2 sts, sc in next st, skip 2 sts) 23 times, 5 dc in next st, skip 2 sts, join with sl st to top of ch-3. (24 fans)
Rnd 37: Ch 1, sc in same st, (ch 2, 5 dc in next sc, ch 2, sc in center dc of next shell) 23 times, ch 2, 5 dc in next sc, ch 2, join with sl st to first sc. (24 fans)
Rnd 38: Ch 1, sc in same st, (2 sc in ch-2 sp, sc in each of 5 dc, 2 sc in ch-2 sp, sc in sc) 23 times, 2 sc in ch-2 sp, sc in each of 5 dc, 2 sc in ch-2 sp, join. (264 sc)
Rnd 39 (Tier 2 setup increase): Ch 1, (sc in next 10 sts, inc) 24 times, join. (288 sc)
Section 7: Tier 2 (Color B, Soft Pink)
Fasten off Color A. Join Color B with standing sc at the first stitch of Rnd 39.
Rnd 40: Ch 3, skip 2 sts, (5 dc in next st, skip 2 sts, sc in next st, skip 2 sts) 47 times, 5 dc in next st, skip 2 sts, join with sl st to top of ch-3. (48 fans)
Rnd 41: Ch 1, sc in joining sp, (ch 2, 5 dc in next sc, ch 2, sc in center dc of next shell) 47 times, ch 2, 5 dc in next sc, ch 2, join. (48 fans)
Rnd 42: Ch 1, sc in same st, (2 sc in ch-2 sp, sc in each of 5 dc, 2 sc in ch-2 sp, sc in sc) 47 times, 2 sc in ch-2 sp, sc in each of 5 dc, 2 sc in ch-2 sp, join. (528 sc)
Rnd 43 (Tier 3 setup): Ch 1, (sc in next 10 sts, inc) 48 times, join. (576 sc)
Section 8: Tier 3 (Color C, Medium Rose)
Fasten off Color B. Join Color C with standing sc.
Rnd 44: Ch 3, skip 2 sts, (5 dc in next st, skip 2 sts, sc in next st, skip 2 sts) 95 times, 5 dc in next st, skip 2 sts, join. (96 fans)
Rnd 45: Ch 1, sc in joining sp, (ch 2, 5 dc in next sc, ch 2, sc in center dc of next shell) 95 times, ch 2, 5 dc in next sc, ch 2, join. (96 fans)
Rnd 46: Ch 1, sc in same st, (2 sc in ch-2 sp, sc in each of 5 dc, 2 sc in ch-2 sp, sc in sc) 95 times, 2 sc in ch-2 sp, sc in each of 5 dc, 2 sc in ch-2 sp, join. (1056 sc)
Rnd 47 (Tier 4 setup): Ch 1, (sc in next 10 sts, inc) 96 times, join. (1152 sc)
Section 9: Tier 4 (Color D, Deep Rose)
Fasten off Color C. Join Color D with standing sc.
Rnd 48: Ch 3, skip 2 sts, (5 dc in next st, skip 2 sts, sc in next st, skip 2 sts) 191 times, 5 dc in next st, skip 2 sts, join. (192 fans)
Rnd 49: Ch 1, sc in joining sp, (ch 2, 5 dc in next sc, ch 2, sc in center dc of next shell) 191 times, ch 2, 5 dc in next sc, ch 2, join. (192 fans)
Rnd 50: Ch 1, sc in same st, (2 sc in ch-2 sp, sc in each of 5 dc, 2 sc in ch-2 sp, sc in sc) 191 times, 2 sc in ch-2 sp, sc in each of 5 dc, 2 sc in ch-2 sp, join. (2112 sc)
Rnd 51 (Tier 5 setup): Ch 1, (sc in next 10 sts, inc) 192 times, join. (2304 sc)
Section 10: Tier 5 (Color E, Magenta, Hem Tier)
Fasten off Color D. Join Color E with standing sc.
Rnd 52: Ch 3, skip 2 sts, (5 dc in next st, skip 2 sts, sc in next st, skip 2 sts) 383 times, 5 dc in next st, skip 2 sts, join. (384 fans)
Rnd 53: Ch 1, sc in joining sp, (ch 2, 5 dc in next sc, ch 2, sc in center dc of next shell) 383 times, ch 2, 5 dc in next sc, ch 2, join. (384 fans)
Rnd 54 (hem edging): Ch 1, (sc in sc, 2 sc in ch-2 sp, sc in each of 5 dc, 2 sc in ch-2 sp) 384 times, join with sl st. Fasten off. (3456 sc hem edge)
Checkpoint: After completing all five tiers the dress from neckline to hem should measure approximately 16 inches.
Section 11: Back Opening Edging
With Color A, attach yarn at top right corner of back opening.
Back edging: Work 1 row of sc evenly up the right back opening, 3 sc in corner, sc across the back neckline, 3 sc in corner, sc down the left back opening. Turn.
Button loop row (right side of back): Ch 1, sc in each sc to first corner, ch 3 skip 2 sc (first button loop), sc in next 8 sts, ch 3 skip 2 sc (second button loop), sc in rem sts. Fasten off.
Sew buttons to left back opening aligned with button loops.
Section 12: Headband with Layered Flower
Headband Base
Using Color A, ch 72, join with sl st to form a ring, being careful not to twist.
Rnd 1: Ch 1, sc in each ch around, join. (72 sc)
Rnd 2: Ch 1, sc in each st around, join. (72 sc)
Rnd 3: Ch 3, skip 1 st, (dc in next st, ch 1, skip 1 st) 35 times, join with sl st to second ch of ch-3. (36 dc plus 36 ch-1 sp)
Rnd 4: Ch 1, sc in each dc and sc in each ch-1 space, join. (72 sc)
Rnd 5: Ch 1, sc in back loop only in each st around, join. (72 sc)
Fasten off. Weave in ends.
Large Flower (Color E, Magenta, bottom layer)
Ch 6, join with sl st to form ring.
Rnd 1: Ch 1, 12 sc in ring, join. (12 sc)
Rnd 2: (Ch 4, 3 dc in same st, ch 4, sl st in next st) 6 times. (6 petals)
Fasten off.
Medium Flower (Color C, Medium Rose, middle layer)
Ch 5, join with sl st to form ring.
Rnd 1: Ch 1, 10 sc in ring, join. (10 sc)
Rnd 2: (Ch 3, 2 dc in same st, ch 3, sl st in next st) 5 times. (5 petals)
Fasten off.
Small Flower (Color A, Blush, top layer)
Ch 4, join with sl st to form ring.
Rnd 1: Ch 1, 8 sc in ring, join. (8 sc)
Rnd 2: (Ch 2, dc in same st, ch 2, sl st in next st) 4 times. (4 petals)
Fasten off.
Layer the three flowers largest to smallest. Sew a pearl or crystal bead through the center of all three layers to secure them together. Sew the assembled flower to the headband at center front.
Finishing and Blocking Your Baby Dress
Weave in all yarn ends securely using a tapestry needle.
Wet blocking is recommended. Submerge the dress in cool water, gently squeeze out excess water without wringing, and lay flat on a blocking mat. Pin the hem scallops out to their full width to define the fan points. Pin the bodice to the correct chest measurement. Allow to dry completely for 12 to 24 hours.
Once dry, thread the satin ribbon through the waistband eyelet round (Round 29). Begin at center front, weave the ribbon in and out through ch-1 spaces all the way around, and bring both ends to the front. Tie in a bow. Sew the pearl button to the center of the bow knot with needle and thread.
Sew the two buttons to the left back opening aligned with the loops created in the back edging section.
Care Instructions
Hand wash in cool water with mild soap. Do not wring. Lay flat to dry. Do not tumble dry. Do not iron directly on crochet. If pressing is needed, use a damp pressing cloth and low heat. Store folded, not hung, to prevent stretching.
Size Customization Tips
For newborn (up to 8 pounds): Begin with 40 sc in the magic ring. Work increases to reach 80 sc at the bodice body. Reduce the waist increase to reach 120 sc at Tier 1. Work only 4 tiers total. Overall length will be approximately 12 to 13 inches.
For 18 month size: Begin with 52 sc in the magic ring. Work increases to reach 104 sc at the bodice body. Proceed to 156 sc at Tier 1 setup. Add one additional increase round between each tier. Overall length will be approximately 18 to 19 inches.
For chest sizing: Begin with a neckline circumference of approximately 8 to 8.5 inches, then increase to a chest circumference of 1 inch greater than the baby’s actual chest measurement for ease.
To add length to the bodice: Insert additional plain sc rounds between the textured check rounds in Section 2.
To change the number of tiers: Each tier adds approximately 1.75 to 2 inches of length. Add or subtract tiers as needed.
Time Estimate
Expect approximately 18 to 25 hours for the dress and an additional 3 to 4 hours for the headband. This varies depending on your experience level and how much time you spend on your gauge swatch.
Thank you so much for choosing this pattern for your next project. I truly hope this little dress brings joy to both the making and the giving. If you complete this blush pink tiered baby dress crochet pattern, I would absolutely love to see your finished piece. Tag me on Instagram or share in my Facebook group.
Go ahead and save this pattern to your Pinterest boards so you can find it easily when you are ready to start. And please drop a comment below if you make one. I love hearing about your color choices and seeing how these turn out in real life!
You Might Also Like
- Ocean Blue Ombre Crochet Platform Wedge Sandals Pattern
- Mint and Cream Baby Dress Free Crochet Pattern
- Sunshine Daisy Bow Crochet Vest Free Crochet Pattern
- Sunset Gradient Grid Tote Free Crochet Pattern