
Crocheted jellyfish look complicated. All those spiraling tentacles, that perfectly shaped dome, the delicate ruffled frill. I get it. When I first saw these hanging in a friend’s nursery, I assumed they required some kind of advanced witchcraft I hadn’t unlocked yet.
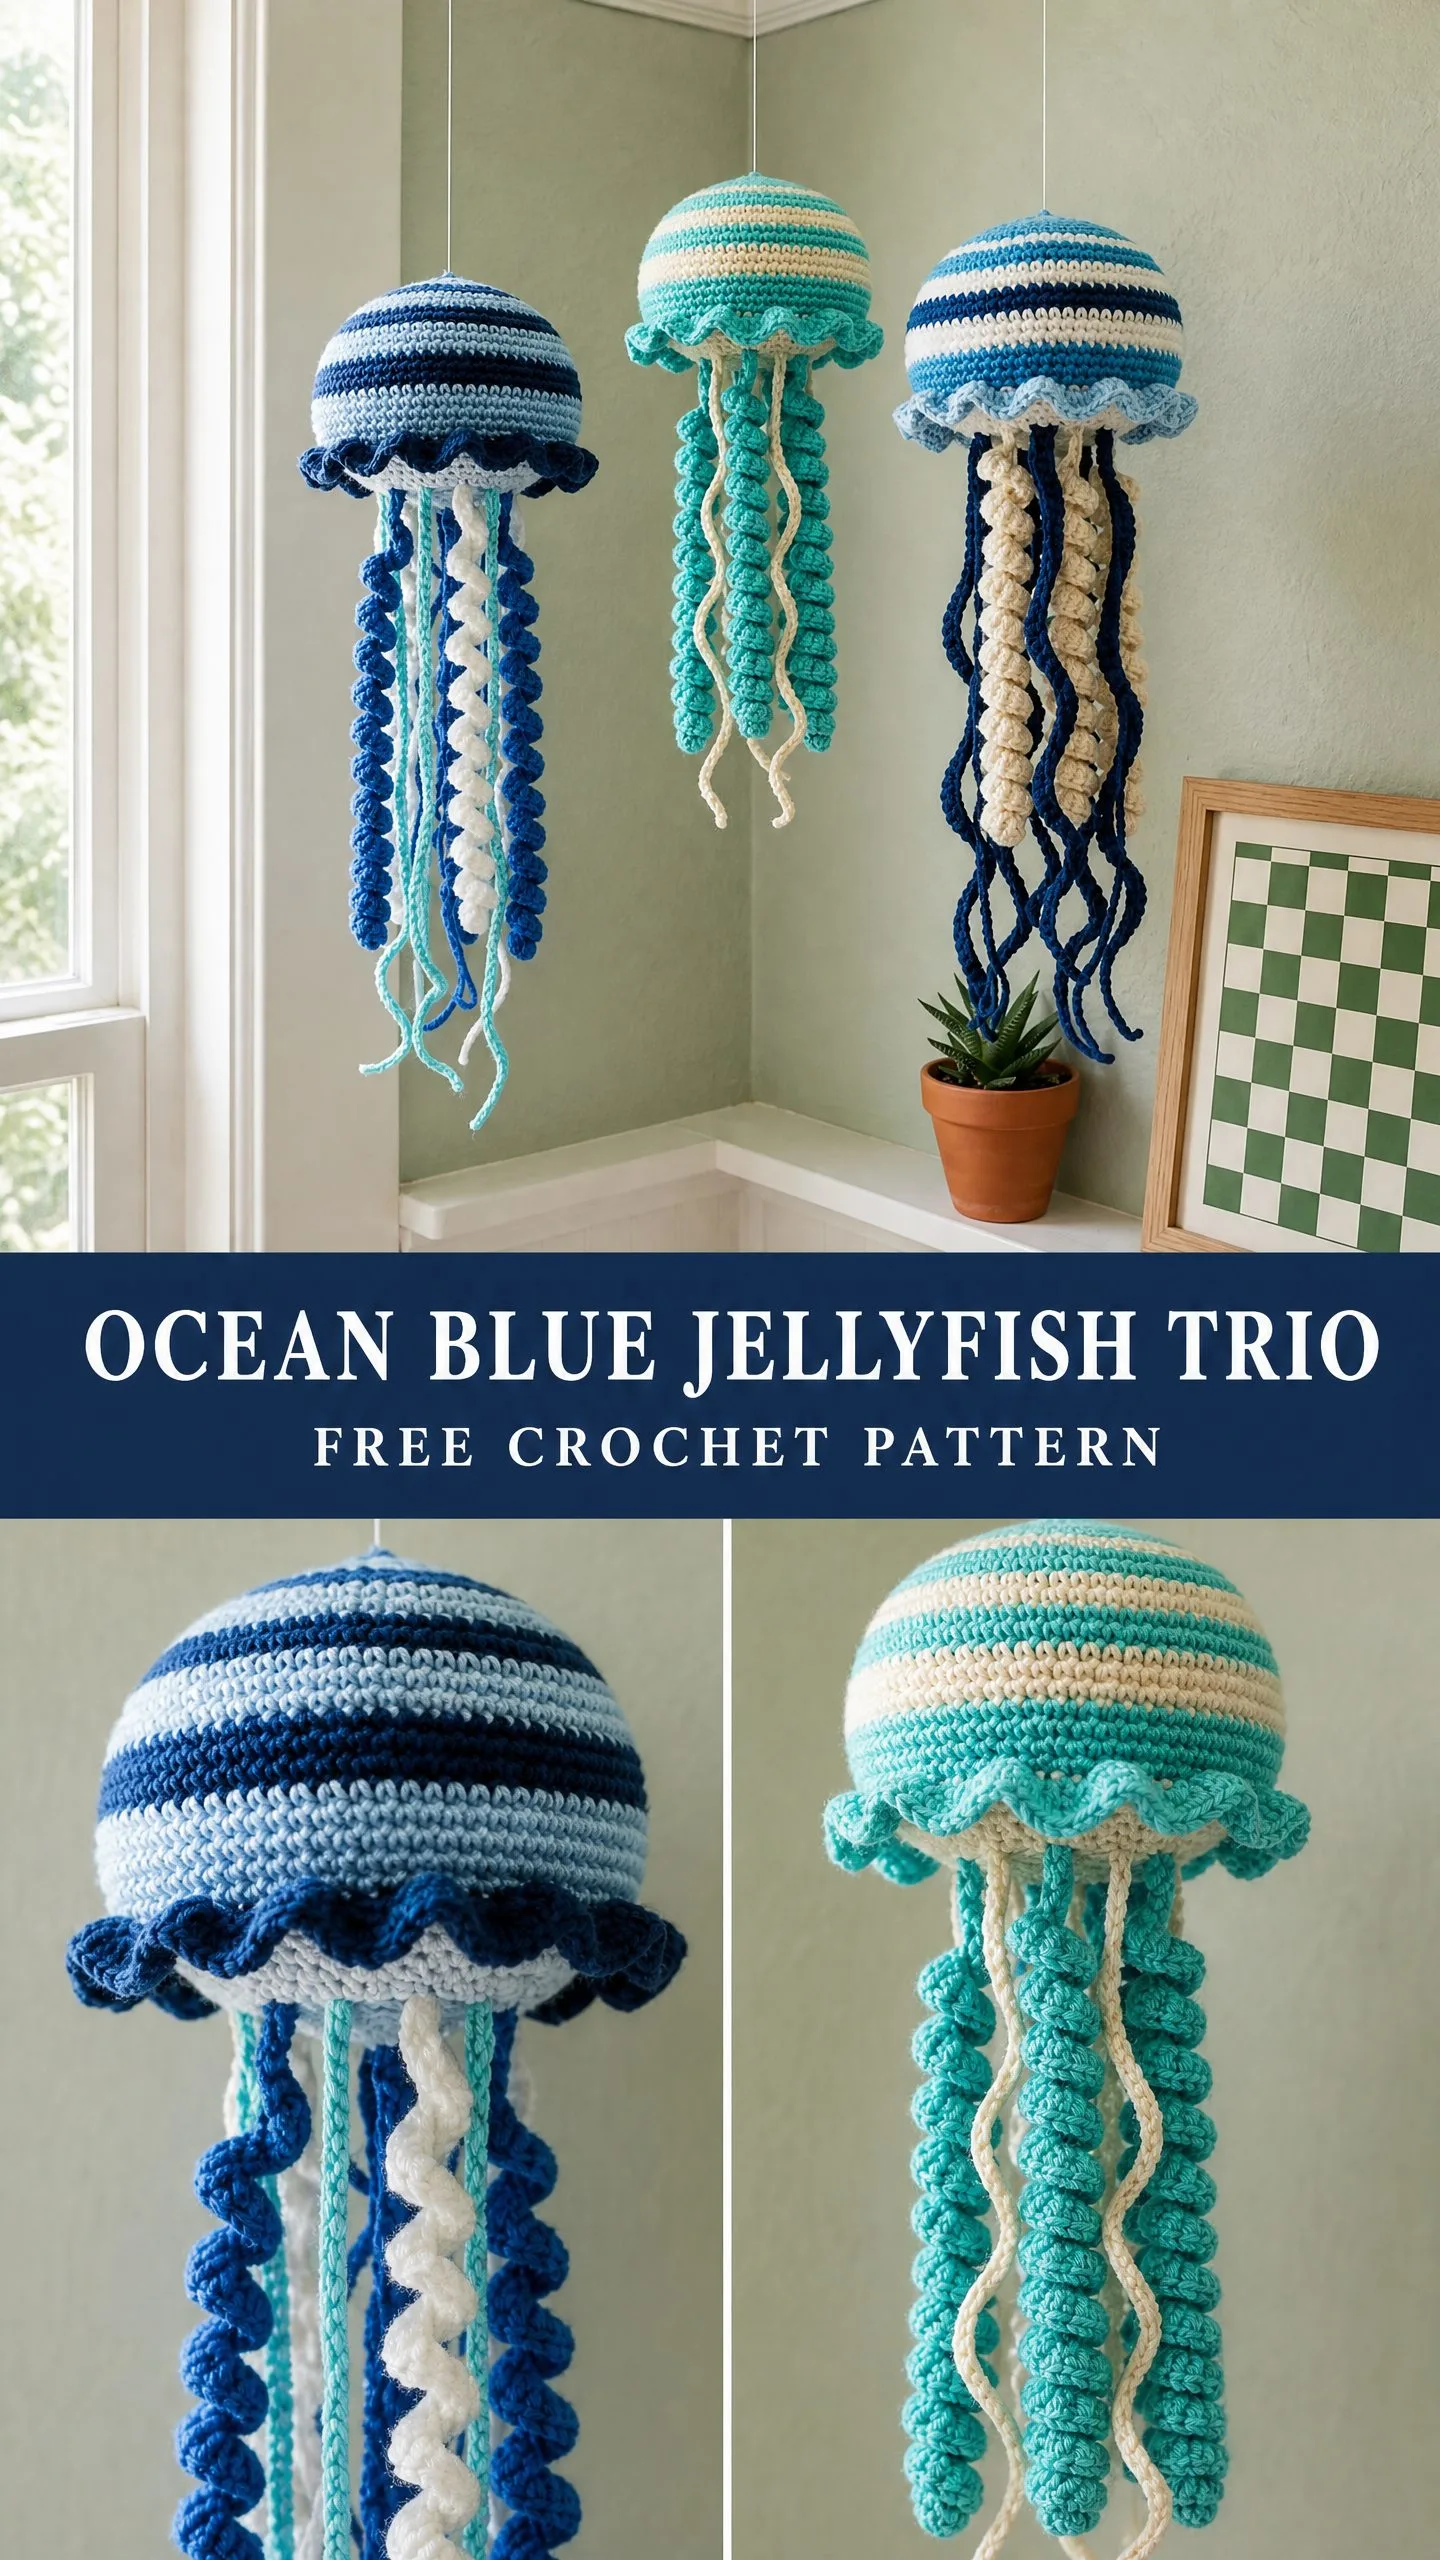
But here’s the truth. If you can work in the round and count to six, you can absolutely make these. The bell is just a stuffed sphere with stripes. The tentacles are chains with extra stitches crammed in to make them curl. The frill is a simple fan stitch repeated around the edge. That’s it. No magic required.
Whether you’re a confident beginner ready to level up or an experienced crocheter looking for a satisfying project, this jellyfish trio pattern breaks everything down into manageable pieces. I’ll walk you through every single step, explain the techniques as we go, and give you checkpoints so you always know you’re on track.
Why You’ll Love This Jellyfish Crochet Pattern
These crocheted jellyfish make stunning coastal home decor. Hang them in a nursery, a reading nook, near a sunny window, or anywhere that needs a touch of whimsy. The trio includes three different sizes in coordinating ocean colors, so they look incredible displayed together at varying heights.
The construction is satisfying and methodical. You’ll work each bell from the top down in continuous rounds, stuff it as you go, add a frilly edge, then attach a mix of curly and smooth tentacles. The whole process is meditative once you get into the rhythm.
Each jellyfish takes about 4 to 6 hours to complete. Plan for 12 to 18 hours total if you’re making all three. That sounds like a lot, but the repetitive nature of the work makes it perfect for binge-watching your favorite show or listening to podcasts.
Finished Sizes
Large Jellyfish (Version A, navy and white):
Medium Jellyfish (Version B, teal and cream):
Small Jellyfish (Version C, blue and cream):
Materials Needed for This Crochet Jellyfish Pattern
Yarn:
You’ll need worsted weight yarn (also labeled as size 4 or aran weight) in three coordinating colors. Here are the yardage requirements for all three jellyfish:
Yarn Suggestions:
Stick with smooth yarns. Fuzzy or chenille textures will obscure the beautiful stitch definition in the stripes and bobble tentacles.
Hook: US size H-8 / 5.0 mm crochet hook
Notions:
Gauge
14 single crochet stitches x 16 rounds = 4 inches / 10 cm in single crochet worked in the round, not blocked.
Gauge matters here. The dome needs to be large enough to stuff firmly and hold its rounded shape. A looser gauge gives you a larger, softer bell. A tighter gauge produces a firmer, smaller bell. Both work fine for a decorative piece, but your finished size will differ from the measurements above if your gauge is significantly off.
Abbreviations and Stitch Definitions
Let me break down every stitch and term you’ll encounter:
Special Techniques
Bobble Cord (for spiral tentacles)
This technique creates those gorgeous bumpy, curling tentacles. Don’t let it intimidate you. It’s just chains with extra stitches.
Step 1: Make a slip knot and chain the number specified in the tentacle section.
Step 2: Working back along the chain from the hook toward the slip knot, work 3 sc into each chain stitch all the way back to the beginning. Three single crochets per chain causes the cord to spiral and curl automatically.
Step 3: Fasten off leaving a 6 inch / 15 cm tail for attaching to the bell.
The finished cord will be approximately one third the length of your starting chain due to all that curling. The pattern accounts for this.
Frilled Ruffle Stitch (for the bell edge)
This creates the wavy frill at the bell’s lower edge. It looks fancy but it’s just a simple fan repeated around.
Step 1: Join yarn to the designated round at the bottom edge of the bell.
Step 2: Work (sc, dc, dc, sc) all in the same stitch, then sl st to the next stitch.
Step 3: Repeat (sc, dc, dc, sc, sl st) all the way around.
The four-stitch fan with a slip stitch between each creates a loose, ruffly wave that mimics real jellyfish.
Twisted Smooth Cord (for straight tentacles)
These hang straight and smooth among the curling bobble tentacles, providing beautiful textural contrast.
Step 1: Cut a strand of yarn approximately three times the desired finished cord length.
Step 2: Fold the strand in half, holding both ends together.
Step 3: Twist the folded strand clockwise continuously until it begins to kink back on itself.
Step 4: Fold the twisted length in half again (so it’s now four plies), hold the fold and allow the cord to twist back on itself naturally.
Step 5: Tie a knot at the open end to secure. Attach the folded end to the bell base.
Pattern Notes Before You Begin
Version A: Large Jellyfish (Navy and White) Step by Step Instructions
Stripe Sequence for Version A
Bell Instructions
Begin with Color 1 (navy).
Round 1: MR, work 6 sc into ring, pull ring closed, pm. (6 sc)
Round 2: Inc in each st around. (12 sc)
Round 3: (Sc in next st, inc in next st) rep 6 times. (18 sc)
Round 4: Change to Color 2 (white) on last yarn-over of last st of Round 3. (Sc in next 2 sts, inc in next st) rep 6 times. (24 sc)
Round 5: Change to Color 1 (navy). (Sc in next 3 sts, inc in next st) rep 6 times. (30 sc)
Round 6: (Sc in next 4 sts, inc in next st) rep 6 times. (36 sc)
Round 7: Change to Color 2 (white). (Sc in next 5 sts, inc in next st) rep 6 times. (42 sc)
Round 8: Change to Color 1 (navy). (Sc in next 6 sts, inc in next st) rep 6 times. (48 sc)
Round 9: (Sc in next 7 sts, inc in next st) rep 6 times. (54 sc)
Round 10: Change to Color 2 (white). (Sc in next 8 sts, inc in next st) rep 6 times. (60 sc)
Round 11: Change to Color 1 (navy). (Sc in next 9 sts, inc in next st) rep 6 times. (66 sc)
Round 12: (Sc in next 10 sts, inc in next st) rep 6 times. (72 sc)
Round 13: Change to Color 2 (white). Sc in each st around. (72 sc)
Round 14: Sc in each st around. (72 sc)
Round 15: Change to Color 1 (navy). Sc in each st around. (72 sc)
Round 16: Sc in each st around. (72 sc)
Checkpoint: After Round 16 your bell should measure approximately 7 inches / 18 cm in diameter across the widest point and approximately 3.5 inches / 9 cm tall from the top center. You should see a smooth rounded dome shape forming.
Round 17: (Sc in next 10 sts, sc2tog) rep 6 times. (66 sc)
Round 18: (Sc in next 9 sts, sc2tog) rep 6 times. (60 sc)
Round 19: (Sc in next 8 sts, sc2tog) rep 6 times. (54 sc)
Begin stuffing the bell now. Insert fiberfill firmly. The bell should feel full and hold its rounded dome shape without being so tight that stitches gap. Continue stuffing as you complete the remaining decrease rounds.
Round 20: (Sc in next 7 sts, sc2tog) rep 6 times. (48 sc)
Round 21: (Sc in next 6 sts, sc2tog) rep 6 times. (42 sc)
Round 22: (Sc in next 5 sts, sc2tog) rep 6 times. (36 sc)
Add additional stuffing if needed to fill the bell completely before the opening becomes too small.
Round 23: (Sc in next 4 sts, sc2tog) rep 6 times. (30 sc)
Round 24: (Sc in next 3 sts, sc2tog) rep 6 times. (24 sc)
Round 25: (Sc in next 2 sts, sc2tog) rep 6 times. (18 sc)
Round 26: (Sc in next st, sc2tog) rep 6 times. (12 sc)
Round 27: (Sc2tog) rep 6 times. (6 sc)
Fasten off leaving a 10 inch / 25 cm tail. Thread tail onto yarn needle and weave through remaining 6 sts, pulling to close the opening. Weave in end securely on the inside.
Important: The bell is worked top to bottom. The magic ring forms the top center of the dome, and the opening you just closed is the underside. Reorient the bell so the magic ring is at the top and the flat closed circle faces downward.
Frill Instructions
The frill is worked into Round 12 of the bell (the last increase round, with 72 sts). With the bell held underside up, join Color 2 (white) with sl st into any stitch of Round 12 using the FLO only.
Frill Round: Working in FLO of Round 12 sts only: (sc, dc, dc, sc) all in first st, sl st in next st. Rep (sc, dc, dc, sc) in next st, sl st in next st around until all 72 sts of Round 12 are worked. (36 fan units, 36 sl sts between them)
Fasten off and weave in ends.
Checkpoint: After attaching the frill the bell should look like a mushroom cap with a decorative wavy edge at its widest point. The smooth dome rises above the frill and the closed underside faces down.
Tentacles for Version A
Version A has 12 tentacles total: 6 bobble cords and 6 twisted smooth cords, alternating around the underside of the bell.
Tentacle color distribution:
Bobble Cord Tentacles (make 4 in Color 1, make 2 in Color 3):
Chain 90. Work 3 sc in each ch back to beginning. Fasten off leaving a 6 inch / 15 cm tail. This produces a bobble cord approximately 12 to 14 inches / 30 to 36 cm long after curling. Make 6 total.
Twisted Smooth Cord Tentacles (make 4 in Color 2, make 2 in Color 1):
Cut a length of yarn 48 inches / 122 cm long. Follow the Twisted Smooth Cord technique. The finished cord will be approximately 10 to 12 inches / 25 to 30 cm long. Make 6 total.
Attaching Tentacles:
Using a yarn needle and the tail of each tentacle, attach tentacles to the underside of the bell evenly spaced around the closed bottom circle (Round 27 area and inward). Alternate bobble cord and smooth cord tentacles. Arrange colors so navy bobble cords and white smooth cords alternate with aqua and navy accent cords distributed evenly.
Thread the tail onto a yarn needle, push it through the closed bottom center area of the bell from outside to inside and back out, pulling the cord flush against the bell base. Tie a secure double knot on the inside. Trim tails after securing.
With 12 tentacles evenly distributed, space each attachment point approximately 1 inch / 2.5 cm from center, arranging in a loose ring so they fall naturally downward and outward.
Hanging Cord
Cut 12 inches / 30 cm of fishing line or clear nylon thread. Thread it onto a yarn needle and pass it through the very center top stitch (the original magic ring pull-tight point) from outside to inside and back to outside, forming a loop. Tie a secure double overhand knot at the desired loop size for hanging. Trim excess. Optionally thread a small bead onto both strands before knotting to prevent the line from pulling through.
Version B: Medium Jellyfish (Teal and Cream)
Version B uses Color 1 as teal, Color 2 as cream, and Color 3 as light aqua.
Stripe Sequence for Version B
Bell Instructions for Version B
Round 1: MR, 6 sc into ring, pm. (6 sc)
Round 2: Inc in each st around. (12 sc)
Round 3: Change to Color 2. (Sc in next st, inc) rep 6 times. (18 sc)
Round 4: Change to Color 1. (Sc in next 2 sts, inc) rep 6 times. (24 sc)
Round 5: (Sc in next 3 sts, inc) rep 6 times. (30 sc)
Round 6: Change to Color 2. (Sc in next 4 sts, inc) rep 6 times. (36 sc)
Round 7: Change to Color 1. (Sc in next 5 sts, inc) rep 6 times. (42 sc)
Round 8: (Sc in next 6 sts, inc) rep 6 times. (48 sc)
Round 9: Change to Color 2. (Sc in next 7 sts, inc) rep 6 times. (54 sc)
Round 10: Change to Color 1. (Sc in next 8 sts, inc) rep 6 times. (60 sc)
Round 11: Sc in each st around. (60 sc)
Round 12: Sc in each st around. (60 sc)
Checkpoint: Bell should measure approximately 6 inches / 15 cm in diameter.
Round 13: (Sc in next 8 sts, sc2tog) rep 6 times. (54 sc)
Round 14: (Sc in next 7 sts, sc2tog) rep 6 times. (48 sc)
Round 15: (Sc in next 6 sts, sc2tog) rep 6 times. (42 sc)
Begin stuffing.
Round 16: (Sc in next 5 sts, sc2tog) rep 6 times. (36 sc)
Round 17: (Sc in next 4 sts, sc2tog) rep 6 times. (30 sc)
Round 18: (Sc in next 3 sts, sc2tog) rep 6 times. (24 sc)
Round 19: (Sc in next 2 sts, sc2tog) rep 6 times. (18 sc)
Round 20: (Sc in next st, sc2tog) rep 6 times. (12 sc)
Round 21: (Sc2tog) rep 6 times. (6 sc)
Fasten off and close as for Version A.
Frill for Version B
Work frill as for Version A into the FLO of Round 10 (60 sts). The repeat is: (sc, dc, dc, sc) in one st, sl st in next st, across all 60 sts. (30 fan units, 30 sl sts)
Tentacles for Version B
Make 10 tentacles total: 5 bobble cords (3 in Color 1 teal, 2 in Color 3 aqua) and 5 twisted smooth cords (3 in Color 2 cream, 2 in Color 1 teal).
Bobble cords: Chain 75. Work 3 sc in each ch back. Finished cord approximately 10 to 12 inches / 25 to 30 cm.
Twisted smooth cords: Cut 40 inches / 102 cm. Twist as before. Finished cord approximately 9 to 10 inches / 23 to 25 cm.
Attach evenly to bell underside as for Version A.
Version C: Small Jellyfish (Blue and Cream)
Version C uses Color 1 as medium blue, Color 2 as cream, and Color 3 as navy.
Stripe Sequence for Version C
Bell Instructions for Version C
Round 1: MR, 6 sc into ring, pm. (6 sc)
Round 2: Inc in each st around. (12 sc)
Round 3: Change to Color 2. (Sc in next st, inc) rep 6 times. (18 sc)
Round 4: Change to Color 1. (Sc in next 2 sts, inc) rep 6 times. (24 sc)
Round 5: (Sc in next 3 sts, inc) rep 6 times. (30 sc)
Round 6: Change to Color 2. (Sc in next 4 sts, inc) rep 6 times. (36 sc)
Round 7: Change to Color 1. (Sc in next 5 sts, inc) rep 6 times. (42 sc)
Round 8: (Sc in next 6 sts, inc) rep 6 times. (48 sc)
Round 9: Sc in each st around. (48 sc)
Checkpoint: Bell should measure approximately 5.5 inches / 14 cm in diameter.
Round 10: (Sc in next 6 sts, sc2tog) rep 6 times. (42 sc)
Round 11: (Sc in next 5 sts, sc2tog) rep 6 times. (36 sc)
Round 12: (Sc in next 4 sts, sc2tog) rep 6 times. (30 sc)
Begin stuffing.
Round 13: (Sc in next 3 sts, sc2tog) rep 6 times. (24 sc)
Round 14: (Sc in next 2 sts, sc2tog) rep 6 times. (18 sc)
Round 15: (Sc in next st, sc2tog) rep 6 times. (12 sc)
Round 16: (Sc2tog) rep 6 times. (6 sc)
Fasten off and close as for Version A.
Frill for Version C
Work frill into the FLO of Round 8 (48 sts). Repeat: (sc, dc, dc, sc) in one st, sl st in next st, across all 48 sts. (24 fan units, 24 sl sts)
Tentacles for Version C
Make 8 tentacles total: 4 bobble cords (2 in Color 1 blue, 2 in Color 3 navy) and 4 twisted smooth cords (2 in Color 2 cream, 2 in Color 3 navy).
Bobble cords: Chain 60. Work 3 sc in each ch back. Finished cord approximately 8 to 10 inches / 20 to 25 cm.
Twisted smooth cords: Cut 32 inches / 81 cm. Twist as before. Finished cord approximately 7 to 8 inches / 18 to 20 cm.
Attach evenly to bell underside as for Version A.
Finishing Your Jellyfish Crochet Project
Weave in all remaining yarn tails on tentacles by threading onto a yarn needle and running through the cord for at least 1 inch / 2.5 cm before trimming.
Light steaming with a garment steamer held 2 inches / 5 cm from the surface will help the frill relax and open up if it appears tight. Do not press an iron directly against the bell as this will compress the fiberfill and distort the dome shape.
Hang the finished jellyfish from the fishing line and allow gravity to arrange the tentacles naturally for 24 hours before final placement. The bobble cords will loosen and fall into their characteristic spiral curl after hanging.
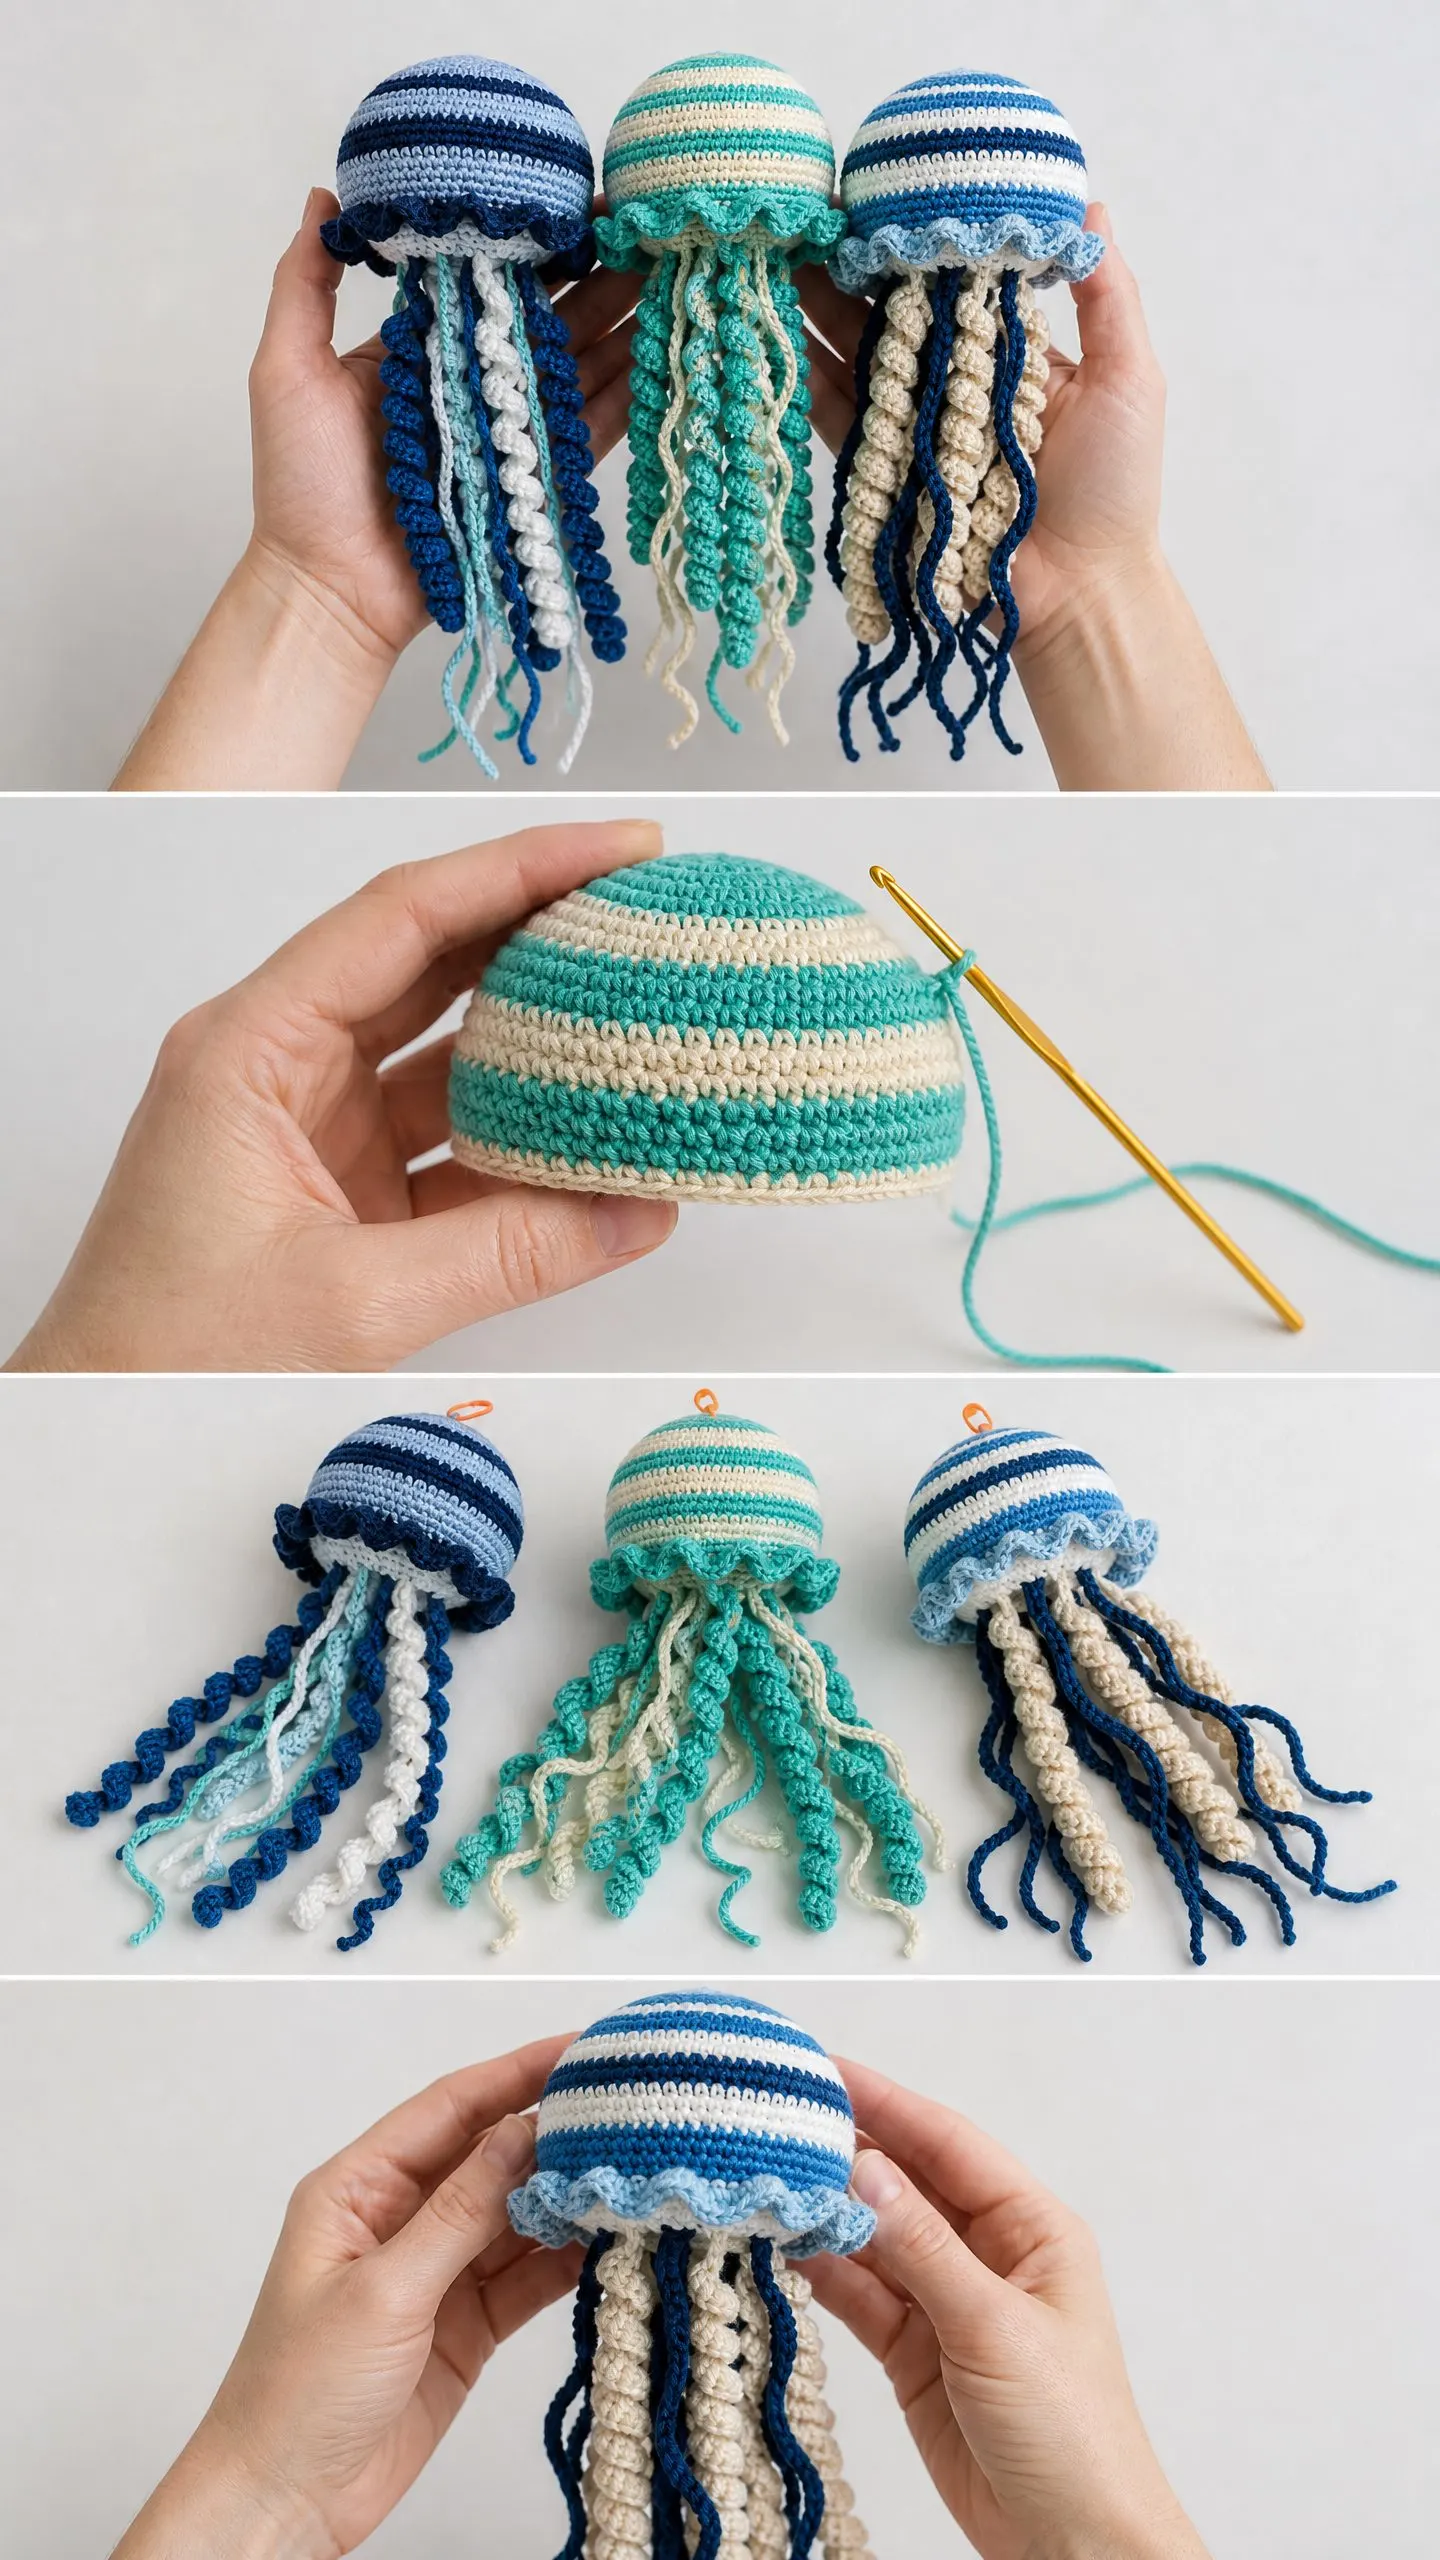
Display tip: Space the three jellyfish at varying heights on a ceiling hook or curtain rod. Version A hangs highest, Version B at mid-height, and Version C at the lowest point for a beautiful tiered display effect.
Care Instructions
Hand wash gently in cool water with mild soap if made in acrylic yarn. Do not wring or twist. Press gently between towels to remove excess water. Hang to dry or lay flat. The fiberfill filling may take up to 24 hours to dry completely.
If made in wool, dry clean or hand wash in cool water with wool wash. Do not agitate. Lay flat to dry only.
Do not machine wash or machine dry. Do not bleach.
Dust the jellyfish lightly with a soft brush or blow gently with a hairdryer on cool setting to refresh between washings.
Final Thoughts on This Ocean Jellyfish Crochet Tutorial
I hope this step by step crochet pattern gives you everything you need to create your own stunning jellyfish trio. They make incredible gifts for new parents, ocean lovers, or anyone who appreciates handmade home decor. And honestly, they’re just plain fun to make.
Thank you so much for choosing this pattern. I’d absolutely love to see your finished jellyfish! Tag me on Instagram or share your photos in my Facebook group. Seeing your creations genuinely makes my day.
If you loved this project, save it to your Pinterest boards so you can find it easily when you’re ready to start. And please drop a comment below if you make these cuties. I want to hear how they turned out!
You Might Also Like
- Mint Garden Baby Crochet Dress Free Pattern
- Daisy Meadow Crochet Tote Free Pattern
- Coral Sunset Granny Square Maxi Dress Free Crochet Pattern
- Coral Sunset Ruffled Baby Romper Free Crochet Pattern