
Dimensional applique flowers on a crochet bag? That sounds intimidating, right? I hear this all the time from crafters who assume flower embellishments require advanced skills or years of experience. Here is the truth: if you can single crochet in rows and sew two pieces together, you can absolutely make this bag.
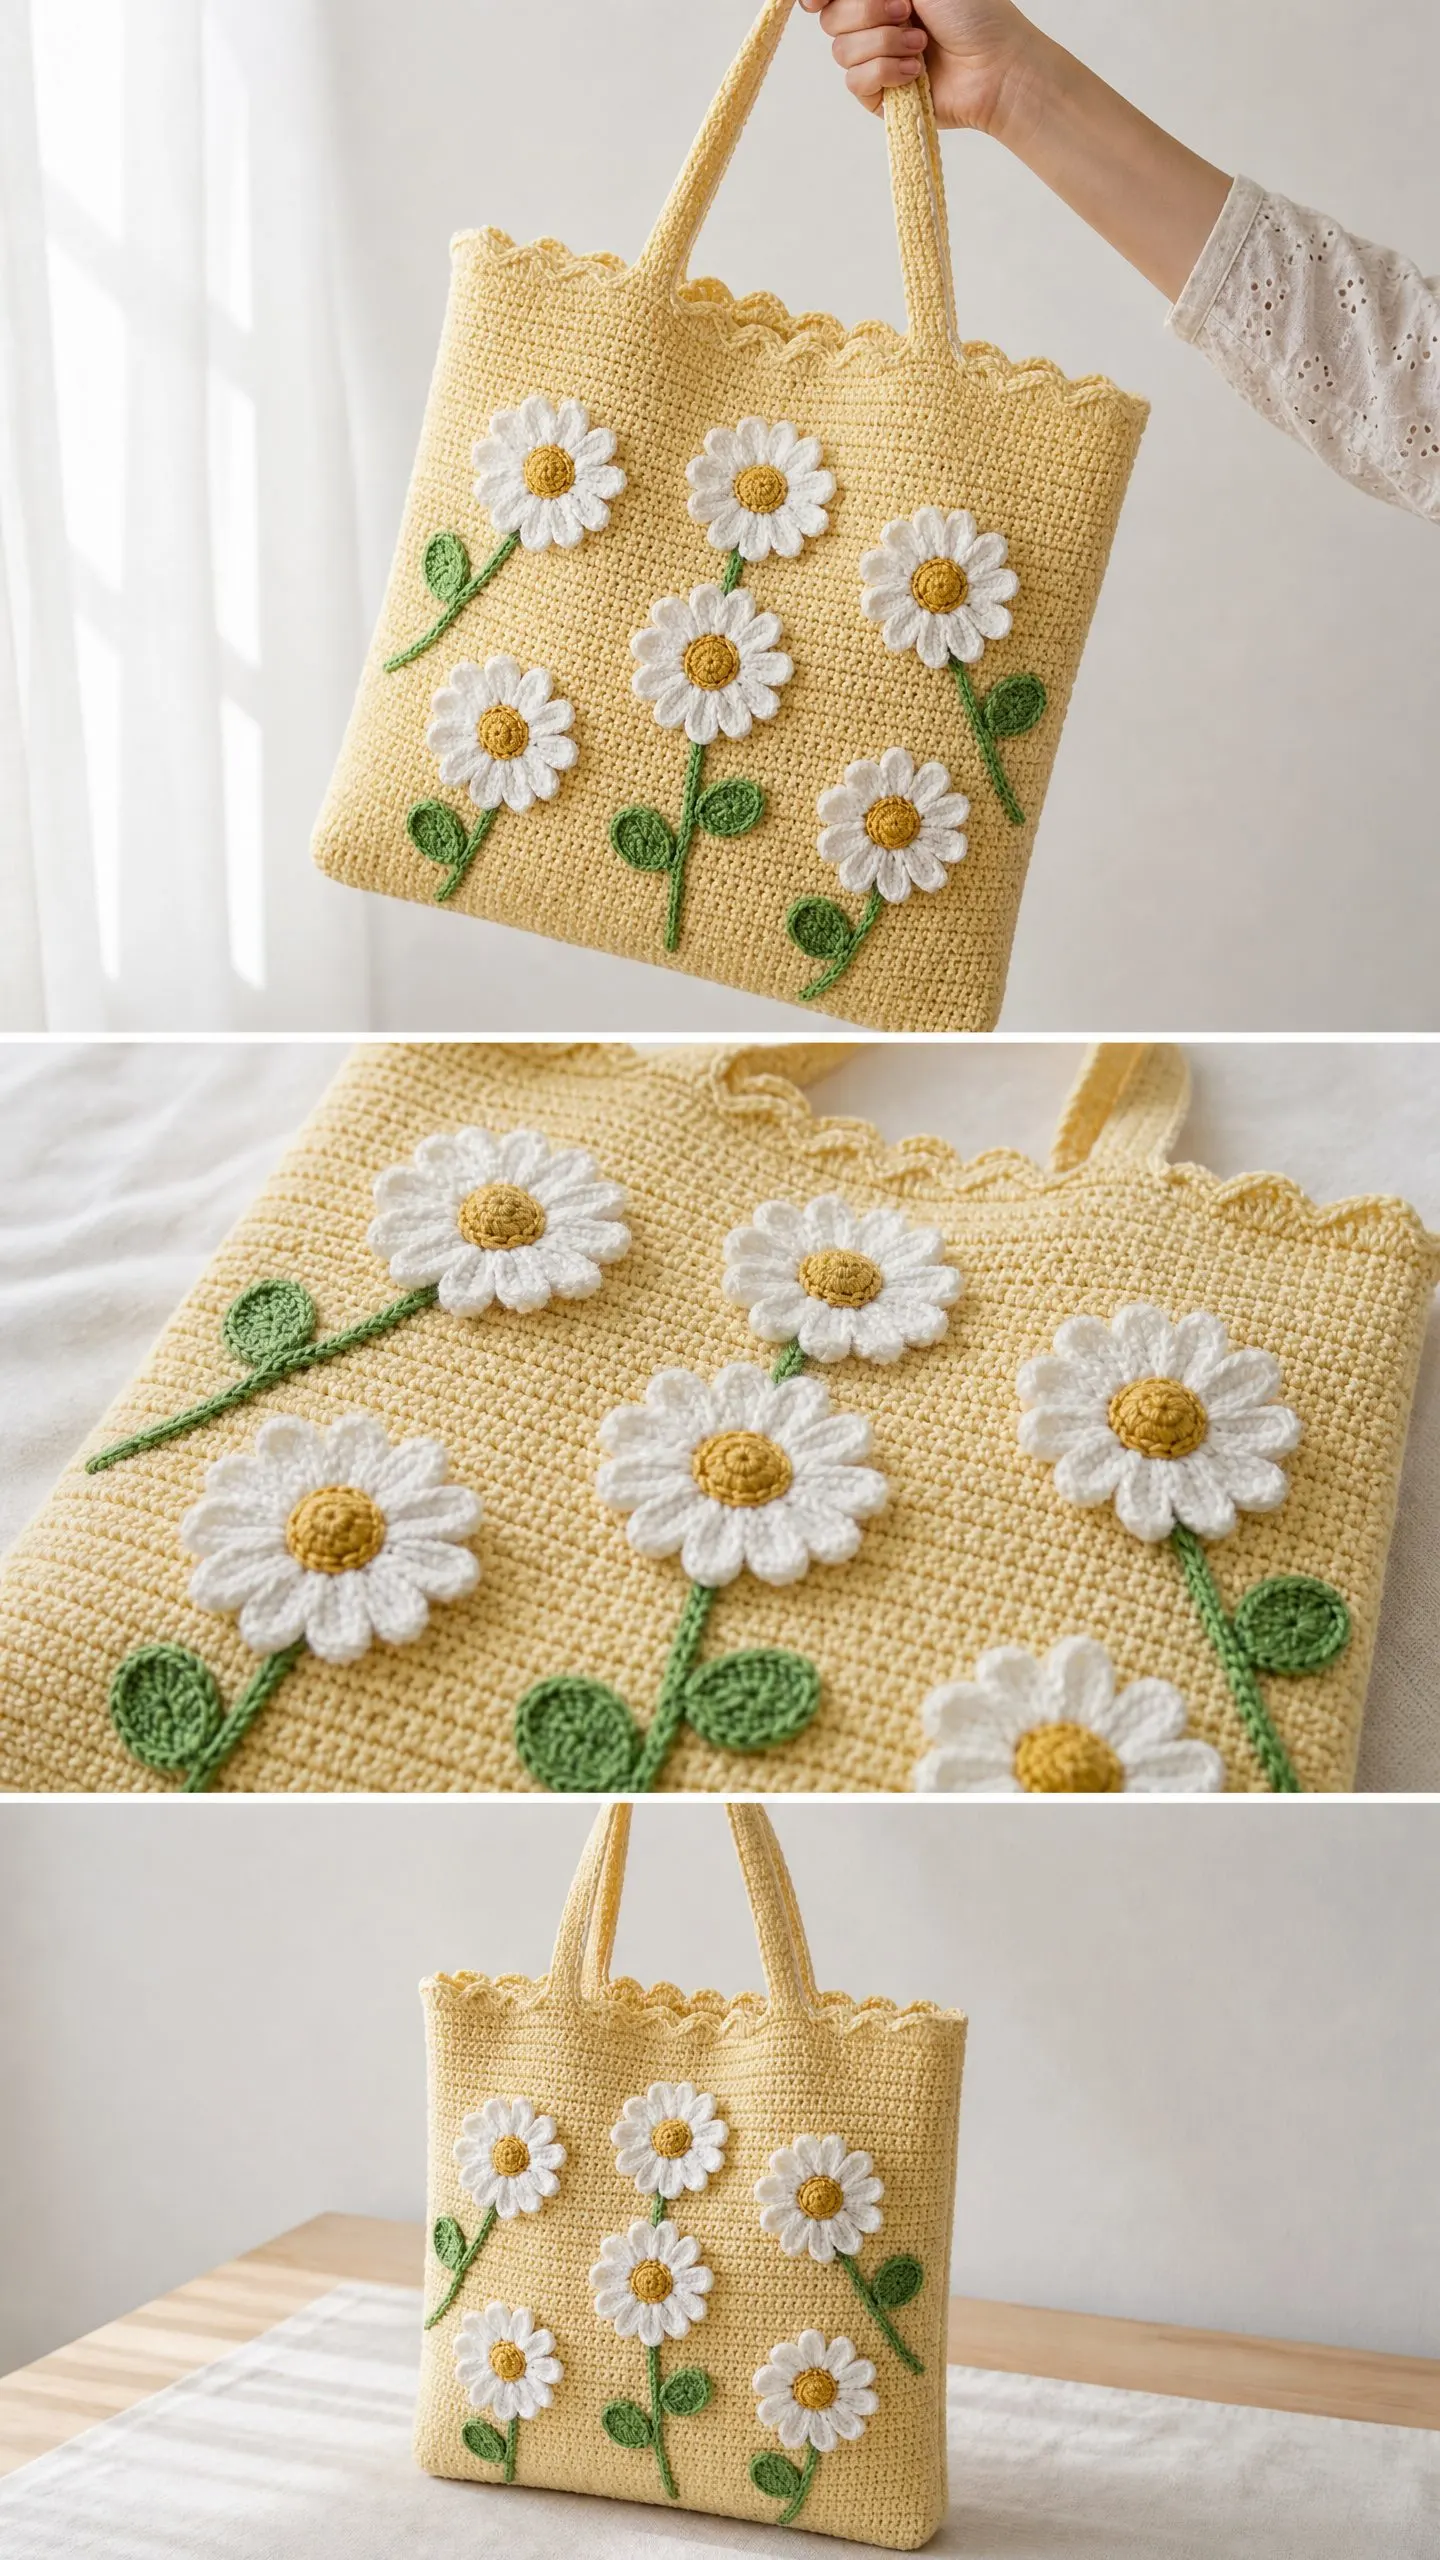
The daisy appliques look impressive, but each petal is just a simple chain with basic stitches worked back across it. The bag body itself is nothing more than two flat rectangles joined at the sides and bottom. No complicated shaping. No tricky increases. No magic you need to figure out on your own.
Whether you are a confident beginner ready to level up or an experienced crocheter looking for a cheerful project, this tote breaks down into manageable pieces that come together beautifully. Let me walk you through every step.
About This Crochet Tote Pattern
This Daisy Meadow Crochet Tote features a soft butter yellow body decorated with ten dimensional daisy flowers, complete with golden centers, green embroidered stems, and crocheted leaves. The scalloped top edge adds a sweet feminine detail, and the long shoulder straps make it practical for everyday use.
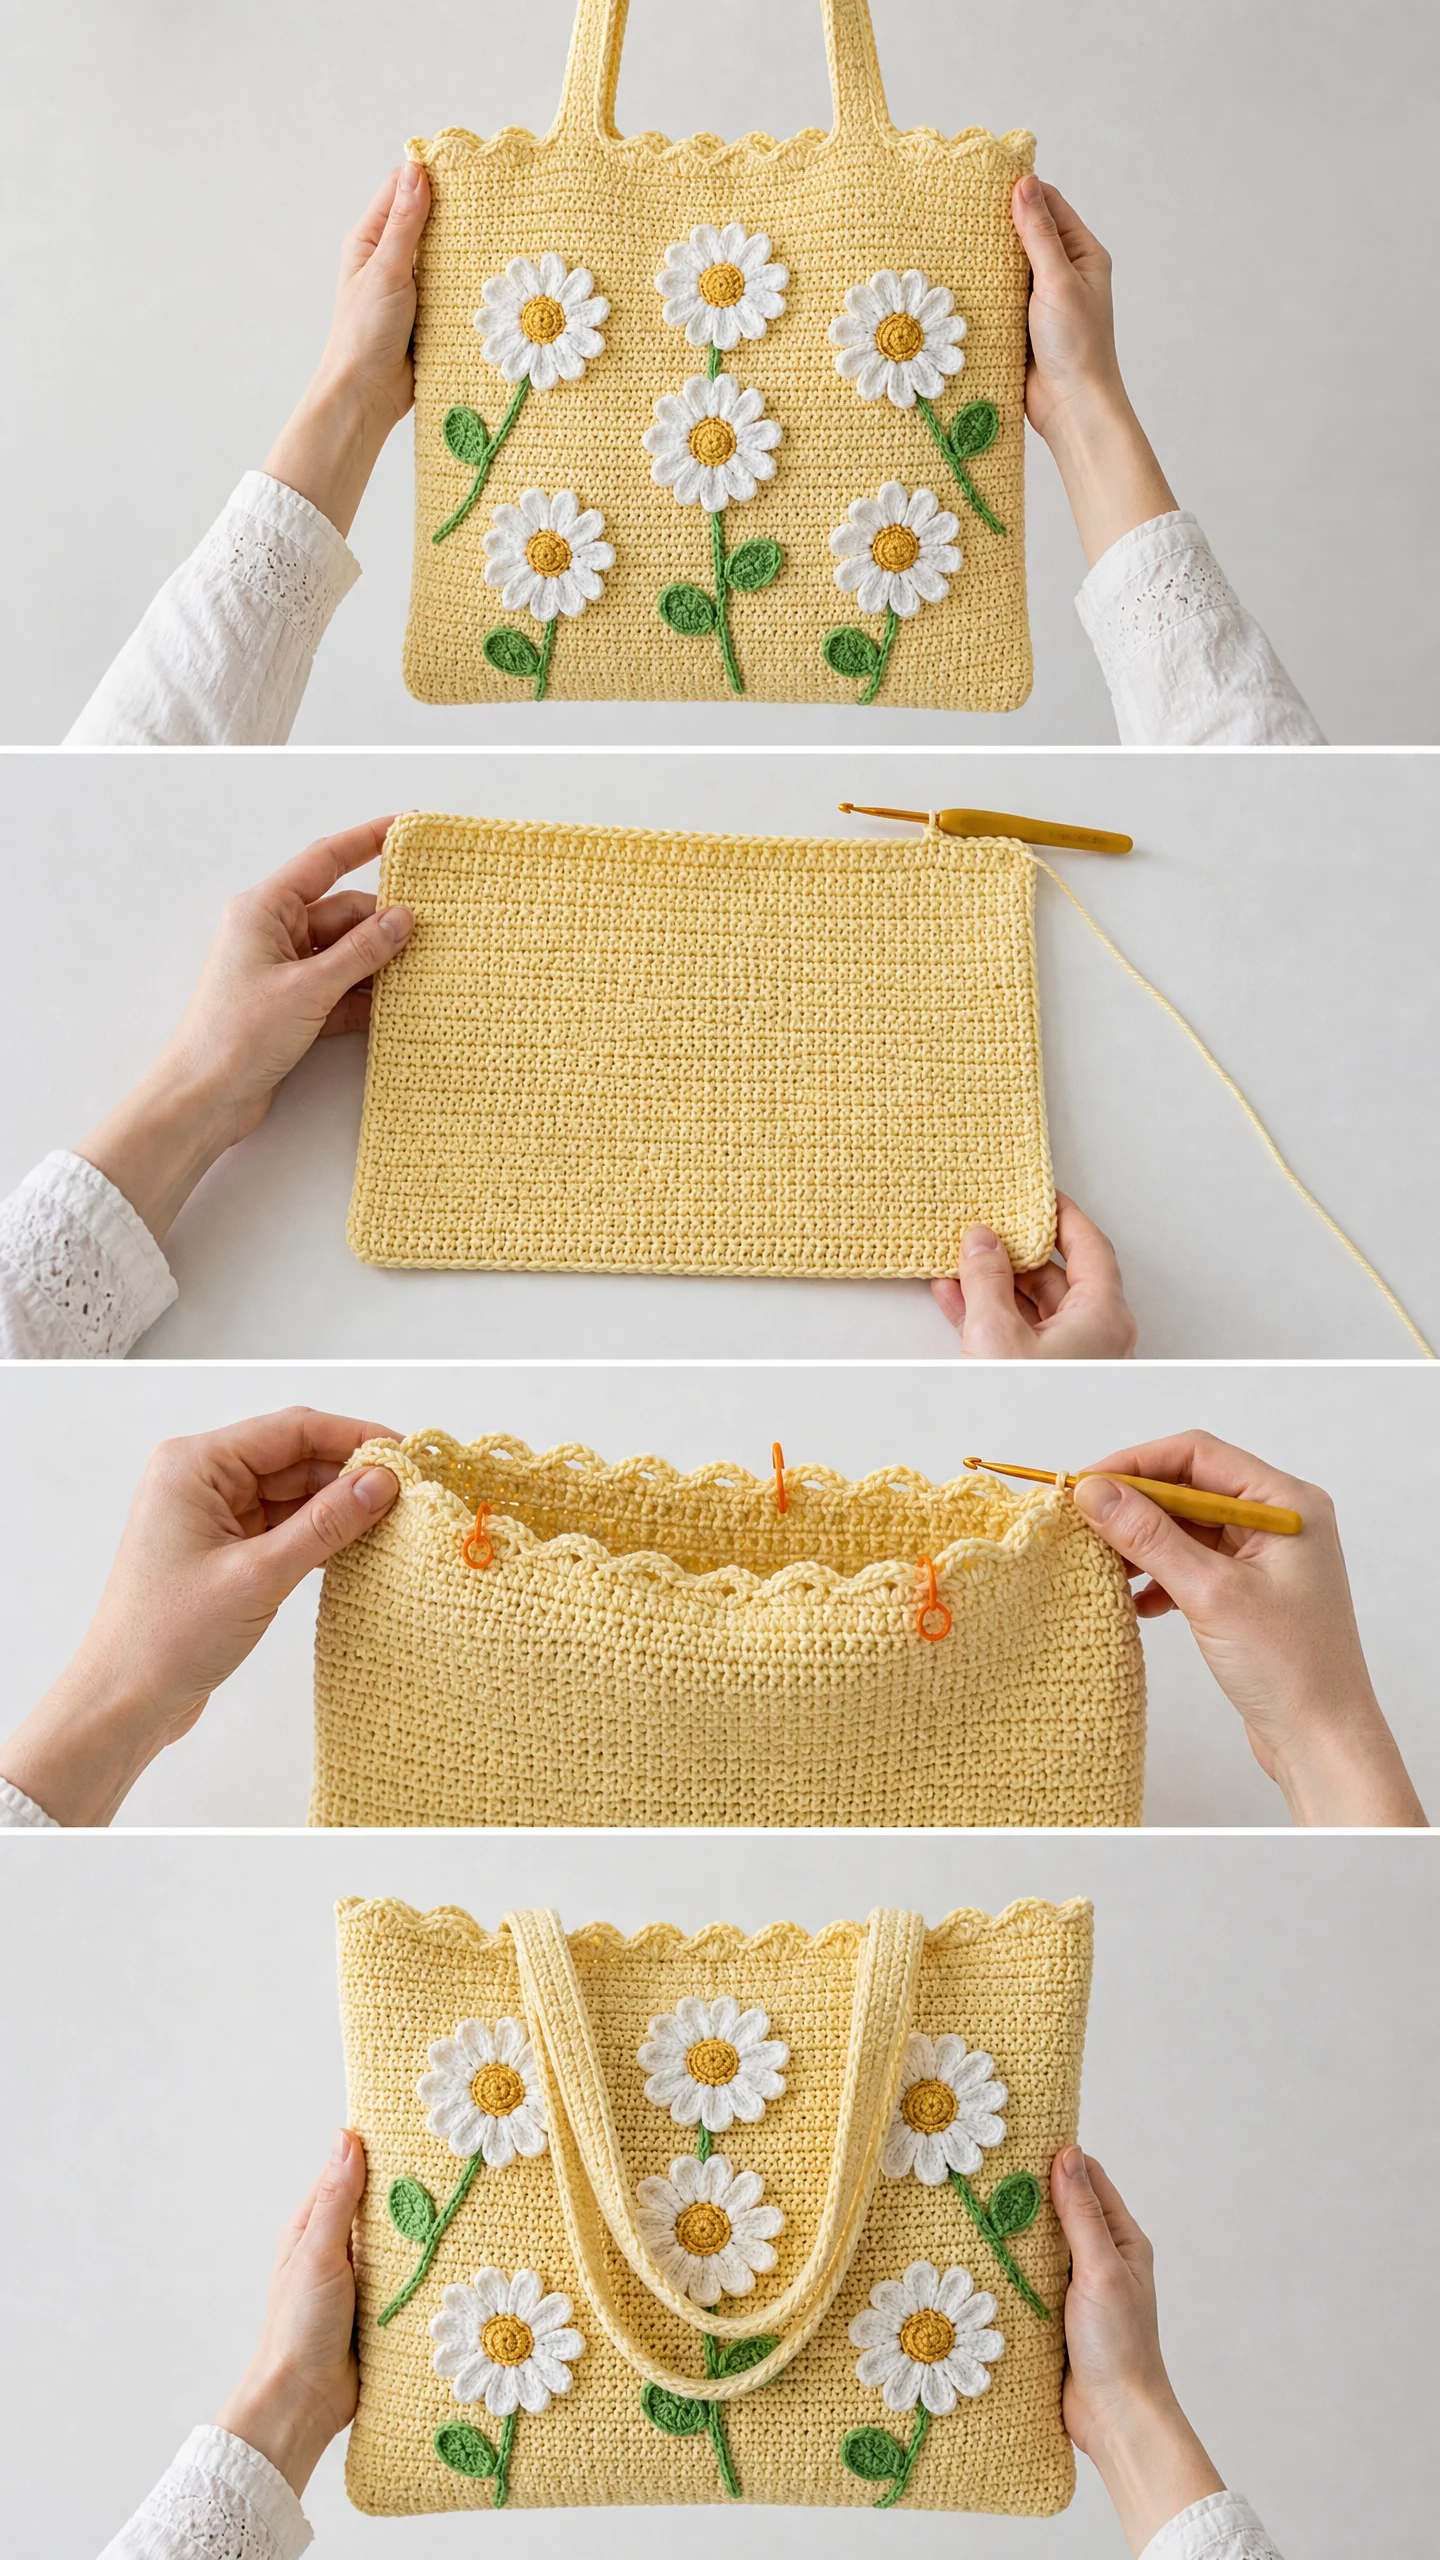
The construction is straightforward. You will crochet two identical flat panels using single crochet (sc), which is simply inserting your hook into a stitch, pulling up a loop, then pulling through both loops on your hook. These panels get seamed together along three sides. Then you add a pretty scalloped edging around the top opening, attach the straps, and sew on your daisy appliques.
The finished bag measures approximately 14 inches wide by 14 inches tall, not including the straps. The straps add another 22 inches of length, giving you a comfortable 11 inch shoulder drop. This is a substantial tote, perfect for farmers market trips, library runs, or carrying your current project.
Skill Level
I rate this pattern as intermediate. The bag body uses only single crochet worked back and forth in rows, which beginners handle easily. The intermediate rating comes from the detail work: crocheting small flower petals, assembling the daisies, embroidering stems, and sewing everything neatly onto the finished bag.
If you have never made appliques before, this is actually a wonderful learning project. Each daisy uses the same techniques repeated, so you will get plenty of practice. By your third or fourth flower, you will feel like a pro.
Time Estimate
Plan for 12 to 18 hours total, spread across multiple sessions. The two bag panels take roughly 4 to 6 hours. The applique work, including flowers, leaves, and finishing details, takes another 6 to 10 hours depending on your pace with small fiddly pieces.
This is not a one evening project, but it is deeply satisfying work. I recommend making all your daisies in one batch while watching a favorite show.
Materials Needed
Yarn
Recommended Yarn Brands
1. Lion Brand 24/7 Cotton in Butter, White, Goldenrod, and Grass
2. Paintbox Yarns Simply DK Cotton (runs heavy, check gauge carefully)
3. WeCrochet Dishie in Custard, White, Canary, and Aloe
Important: Avoid acrylic yarn for this project. Cotton or cotton blend yarns provide the structural integrity a loaded tote bag needs. Acrylic stretches and distorts under weight.
Tools
Gauge
With the G-6 hook and Yarn A:
18 sc by 22 rows = 4 inches by 4 inches (10 cm by 10 cm) in single crochet, blocked.
Gauge matters for this project. Your finished bag dimensions depend on accurate gauge to ensure both panels match and the bag holds its shape when you fill it with books, produce, or yarn.
Abbreviations
Special Stitches
Scallop Stitch (for top edging):
Skip 2 stitches, work 5 dc into the next stitch, skip 2 stitches, slip stitch into the next stitch. This creates one shell over 6 stitches. Repeat across.
Daisy Petal:
Chain 11. Starting in the 2nd chain from hook, work 1 sc, 1 hdc, 3 dc, 1 hdc, 1 sc. Slip stitch into the last chain of the original chain to close the petal into a teardrop shape. Each finished petal measures approximately 0.75 inch long.
Leaf:
With Yarn D, ch 10. Row 1: Starting in the 2nd ch from hook, sc in next 3 sts, hdc in next 2 sts, dc in next 2 sts, 3 dc in last ch (this is the tip of the leaf). Now working back along the opposite side of the foundation chain: dc in next 2 sts, hdc in next 2 sts, sc in next 3 sts, sl st to first sc to join. Fasten off, leaving a tail for sewing.
Magic Ring:
Make a loop with the yarn, insert hook through the loop, pull up a loop of working yarn, chain 1 to secure. Work stitches into the ring, then pull the tail to close the center hole tightly.
Pattern Notes
1. The bag is worked in two flat panels, each crocheted from the bottom edge upward.
2. Panels are joined with RS held together so the seam ridge sits on the inside of the bag.
3. Turn at the end of every row. The turning chain counts as 0 stitches in this pattern. Always chain 1 to turn, skip no stitches, and work the first sc into the first stitch of the previous row.
4. Block your panels before seaming. Cotton yarn relaxes significantly when wet blocked.
5. Weave in all ends securely. Cotton is slippery, so weave each tail at least 1 inch in two directions.
Bag Panels (Make 2)
Foundation: With Yarn A and G-6 hook, ch 64.
Row 1 (WS): Sc in 2nd ch from hook and in each ch across. Ch 1, turn. (63 sc)
Row 2 (RS): Sc in each st across. Ch 1, turn. (63 sc)
Row 3: Sc in each st across. Ch 1, turn. (63 sc)
Rows 4 through 77: Repeat Row 2 (sc in each st across, ch 1, turn) for 74 more rows. (63 sc at the end of every row)
After Row 77, your panel should measure approximately 14 inches tall and 14 inches wide.
Fasten off the first panel, leaving a long tail.
For the second panel, do not fasten off. Leave a long tail of approximately 24 inches for seaming.
Checkpoint: Each finished panel measures approximately 14 inches wide by 14 inches tall. The stitch count at the top of each panel is 63 sc. Confirm both panels are the same size before seaming.
Joining the Panels
Place the two panels with RS held together (WS facing out). Align all edges carefully. Pin or use stitch markers to hold them in place.
With Yarn A and G-6 hook, join yarn at the bottom right corner.
Bottom seam: Working through both panels at once, sc across 63 sts along the bottom edge. (63 sc)
At the corner, work 2 sc to turn the corner.
Right side seam: Sc up 77 row-end stitches along the right side, working through both panels. (77 sc)
At the corner, work 2 sc to turn the corner.
Do not seam the top opening. Fasten off and weave in ends.
Left side seam: With RS still held together, join yarn at the bottom left corner. Sc up 77 row-end stitches along the left side. (77 sc)
Fasten off and weave in ends.
Turn the bag RS out. The seam ridges are now on the inside.
Checkpoint: The bag body is now a rectangular pouch open at the top, approximately 14 inches wide by 14 inches tall.
Scalloped Top Edging
Setup Round: With RS facing and Yarn A, join yarn at the right side seam at the top edge. Work 1 sc in each stitch around the top opening as follows:
Sc across 63 sts of the front panel. At the left side seam, sc into the seam st (1 sc). Sc across 63 sts of the back panel. At the right side seam, sc into the seam st (1 sc). Join with sl st to first sc. (128 sc)
Decrease Round: Sc in first 31 sts, sc2tog over next 2 sts, sc in next 30 sts across the remainder of the front, sc in the seam st, sc in first 31 sts of back, sc2tog over next 2 sts, sc in remaining 30 sts of back, sc in the seam st, join with sl st. (126 sc)
Scallop Round: Ch 1 (does not count as a st). Working around the top: sk 2 sts, 5 dc in next st, sk 2 sts, sl st in next st. Repeat around until all 126 sts are consumed, ending with sl st. (21 scallops total)
Fasten off Yarn A. Weave in ends.
Checkpoint: The scalloped edging runs smoothly around the entire top opening with 21 evenly spaced scallop shells.
Straps (Make 2)
With Yarn A and G-6 hook, ch 102.
Row 1: Sc in 2nd ch from hook and in each ch across. Ch 1, turn. (101 sc)
Row 2: Sc in each st across. Ch 1, turn. (101 sc)
Row 3: Sc in each st across. Ch 1, turn. (101 sc)
Row 4: Sc in each st across. Do not ch or turn. (101 sc)
Fold the strap in half lengthwise with WS together. Using Yarn A and a yarn needle, whipstitch the long open edge to the last row edge to create a doubled strap tube.
The finished strap measures approximately 22 inches long and 0.75 inch wide.
Make 2 straps.
Strap Attachment: On the front panel, measure in 3.5 inches from each side seam along the top edge. Insert the short end of one strap between the scallop edge and the top of the panel, approximately 1 inch down from the top. Sew a square of stitches (back and forth at least 4 times in two directions) to secure each strap end firmly.
Repeat on the back panel, aligning the strap attachment points to match the front.
Daisy Flowers (Make 10 Total)
Flower Center:
With Yarn C and E-4 hook, make a magic ring.
Round 1: Ch 1, work 6 sc into the ring, pull ring closed, join with sl st to first sc. (6 sc)
Round 2: Ch 1, work 2 sc in each st around, join with sl st to first sc. (12 sc)
Round 3: Ch 1, work 2 sc in each st around, join with sl st to first sc. (24 sc)
Fasten off Yarn C, leaving a tail for sewing. The center is approximately 1 inch in diameter.
Petals:
With Yarn B and E-4 hook, ch 11. Starting in the 2nd ch from hook: sc in next st, hdc in next st, dc in next 3 sts, hdc in next st, sc in next st, sl st into the last ch of the original chain.
Without fastening off, ch 11 again and work another petal the same way. Continue making petals connected at their base until 14 petals are complete.
After the 14th petal, sl st to the base of the first petal to form a ring. Fasten off, leaving a tail for sewing.
Assembly: Center the Yarn C disc on top of the petal ring. Using the tail, sew the center disc to the petal ring with a few stitches around the perimeter of the disc.
Make 10 daisies total.
Stems (Embroidered)
For each daisy, use a double strand of Yarn D threaded on a yarn needle. Work a straight stitch approximately 2.5 inches long running vertically downward from where each daisy will be placed. Work 2 to 3 straight stitches side by side to create a stem with visible thickness.
Leaves (Make 20 Total)
Work each leaf as described in Special Stitches using Yarn D and E-4 hook. Make 20 leaves total, 2 per stem.
Applique Placement
Top row (2 daisies per panel):
Bottom row (3 daisies per panel):
Pin each daisy in place before sewing. Using the Yarn B tail, sew each daisy to the panel with small stitches around the outer edge of the petal ring.
Embroider stems after each daisy is sewn down. Attach 2 leaves per stem, one on each side, approximately 1 inch below the daisy base. Angle each leaf outward at 30 to 45 degrees from the stem.
Repeat for the back panel.
Finishing and Blocking
Before seaming the panels, wet block them by soaking in cool water for 10 minutes. Squeeze out excess water gently, lay flat, and pin to 14 by 14 inches. Allow to dry completely.
After all assembly is complete, lightly steam block the finished bag by holding a steam iron 1 inch above the surface. Do not press directly onto the crochet.
Weave in all remaining ends, pulling them through at least 6 loops in two different directions.
Optional Lining: Cut two pieces of cotton quilting fabric to 15 by 15 inches. Sew them together along three sides with a 0.5 inch seam allowance. Fold the top edge down 1 inch and press. Insert the lining into the bag and slip stitch the folded top edge to the inside of the bag just below the scalloped edging.
Care Instructions
Machine wash on gentle cycle in cool water using a mesh laundry bag. Lay flat to dry. Do not tumble dry. Steam only if needed, never iron directly. Store stuffed loosely with tissue paper to maintain the shape.
Size Customization Tips
To make the bag wider, add stitches to the foundation chain in multiples of 6. Each 6 stitches adds approximately 1.33 inches of width.
To make the bag taller, add rows in pairs. Each 2 rows adds approximately 0.36 inch of height.
For longer straps suitable for crossbody wear, increase the strap foundation chain to 160 chains for a finished strap of approximately 35 inches.
Always re-check scallop divisibility if you change the panel width. The total top opening stitch count must adjust to the nearest multiple of 6 before working the scallop round.
This Daisy Meadow Crochet Tote is the kind of project that makes people stop you on the street and ask where you bought your bag. The satisfaction of saying "I made it" never gets old. Thank you so much for choosing this pattern, and I truly hope you love creating it as much as I loved designing it.
If you make this tote, I would absolutely love to see it! Tag me on Instagram or share a photo in our Facebook group. And if you want to come back to this pattern later, go ahead and save it to your Pinterest boards so you can find it whenever inspiration strikes. Drop a comment below if you have any questions or just want to share your progress. Happy crocheting!
You Might Also Like
- Dusty Rose Garden Bobble Sweater Free Crochet Pattern
- Dusty Rose Granny Square Mini Dress Free Crochet Pattern
- Sunset Orange Ruffle Crochet Dress Free Crochet Pattern
- Ocean Breeze Granny Tote Bag Free Crochet Pattern