
This is a fitted crochet sundress with a daisy granny square bodice, filet waistband, and an A-line shell lace skirt. It uses double crochet, single crochet, chains, and basic cluster stitches. The pattern comes in sizes XS through 3XL.
Get the Ad-Free PDF Pattern
You can find the free pattern below, or you can purchase the ad-free printable PDF from my shop.
Get the Printable PDF →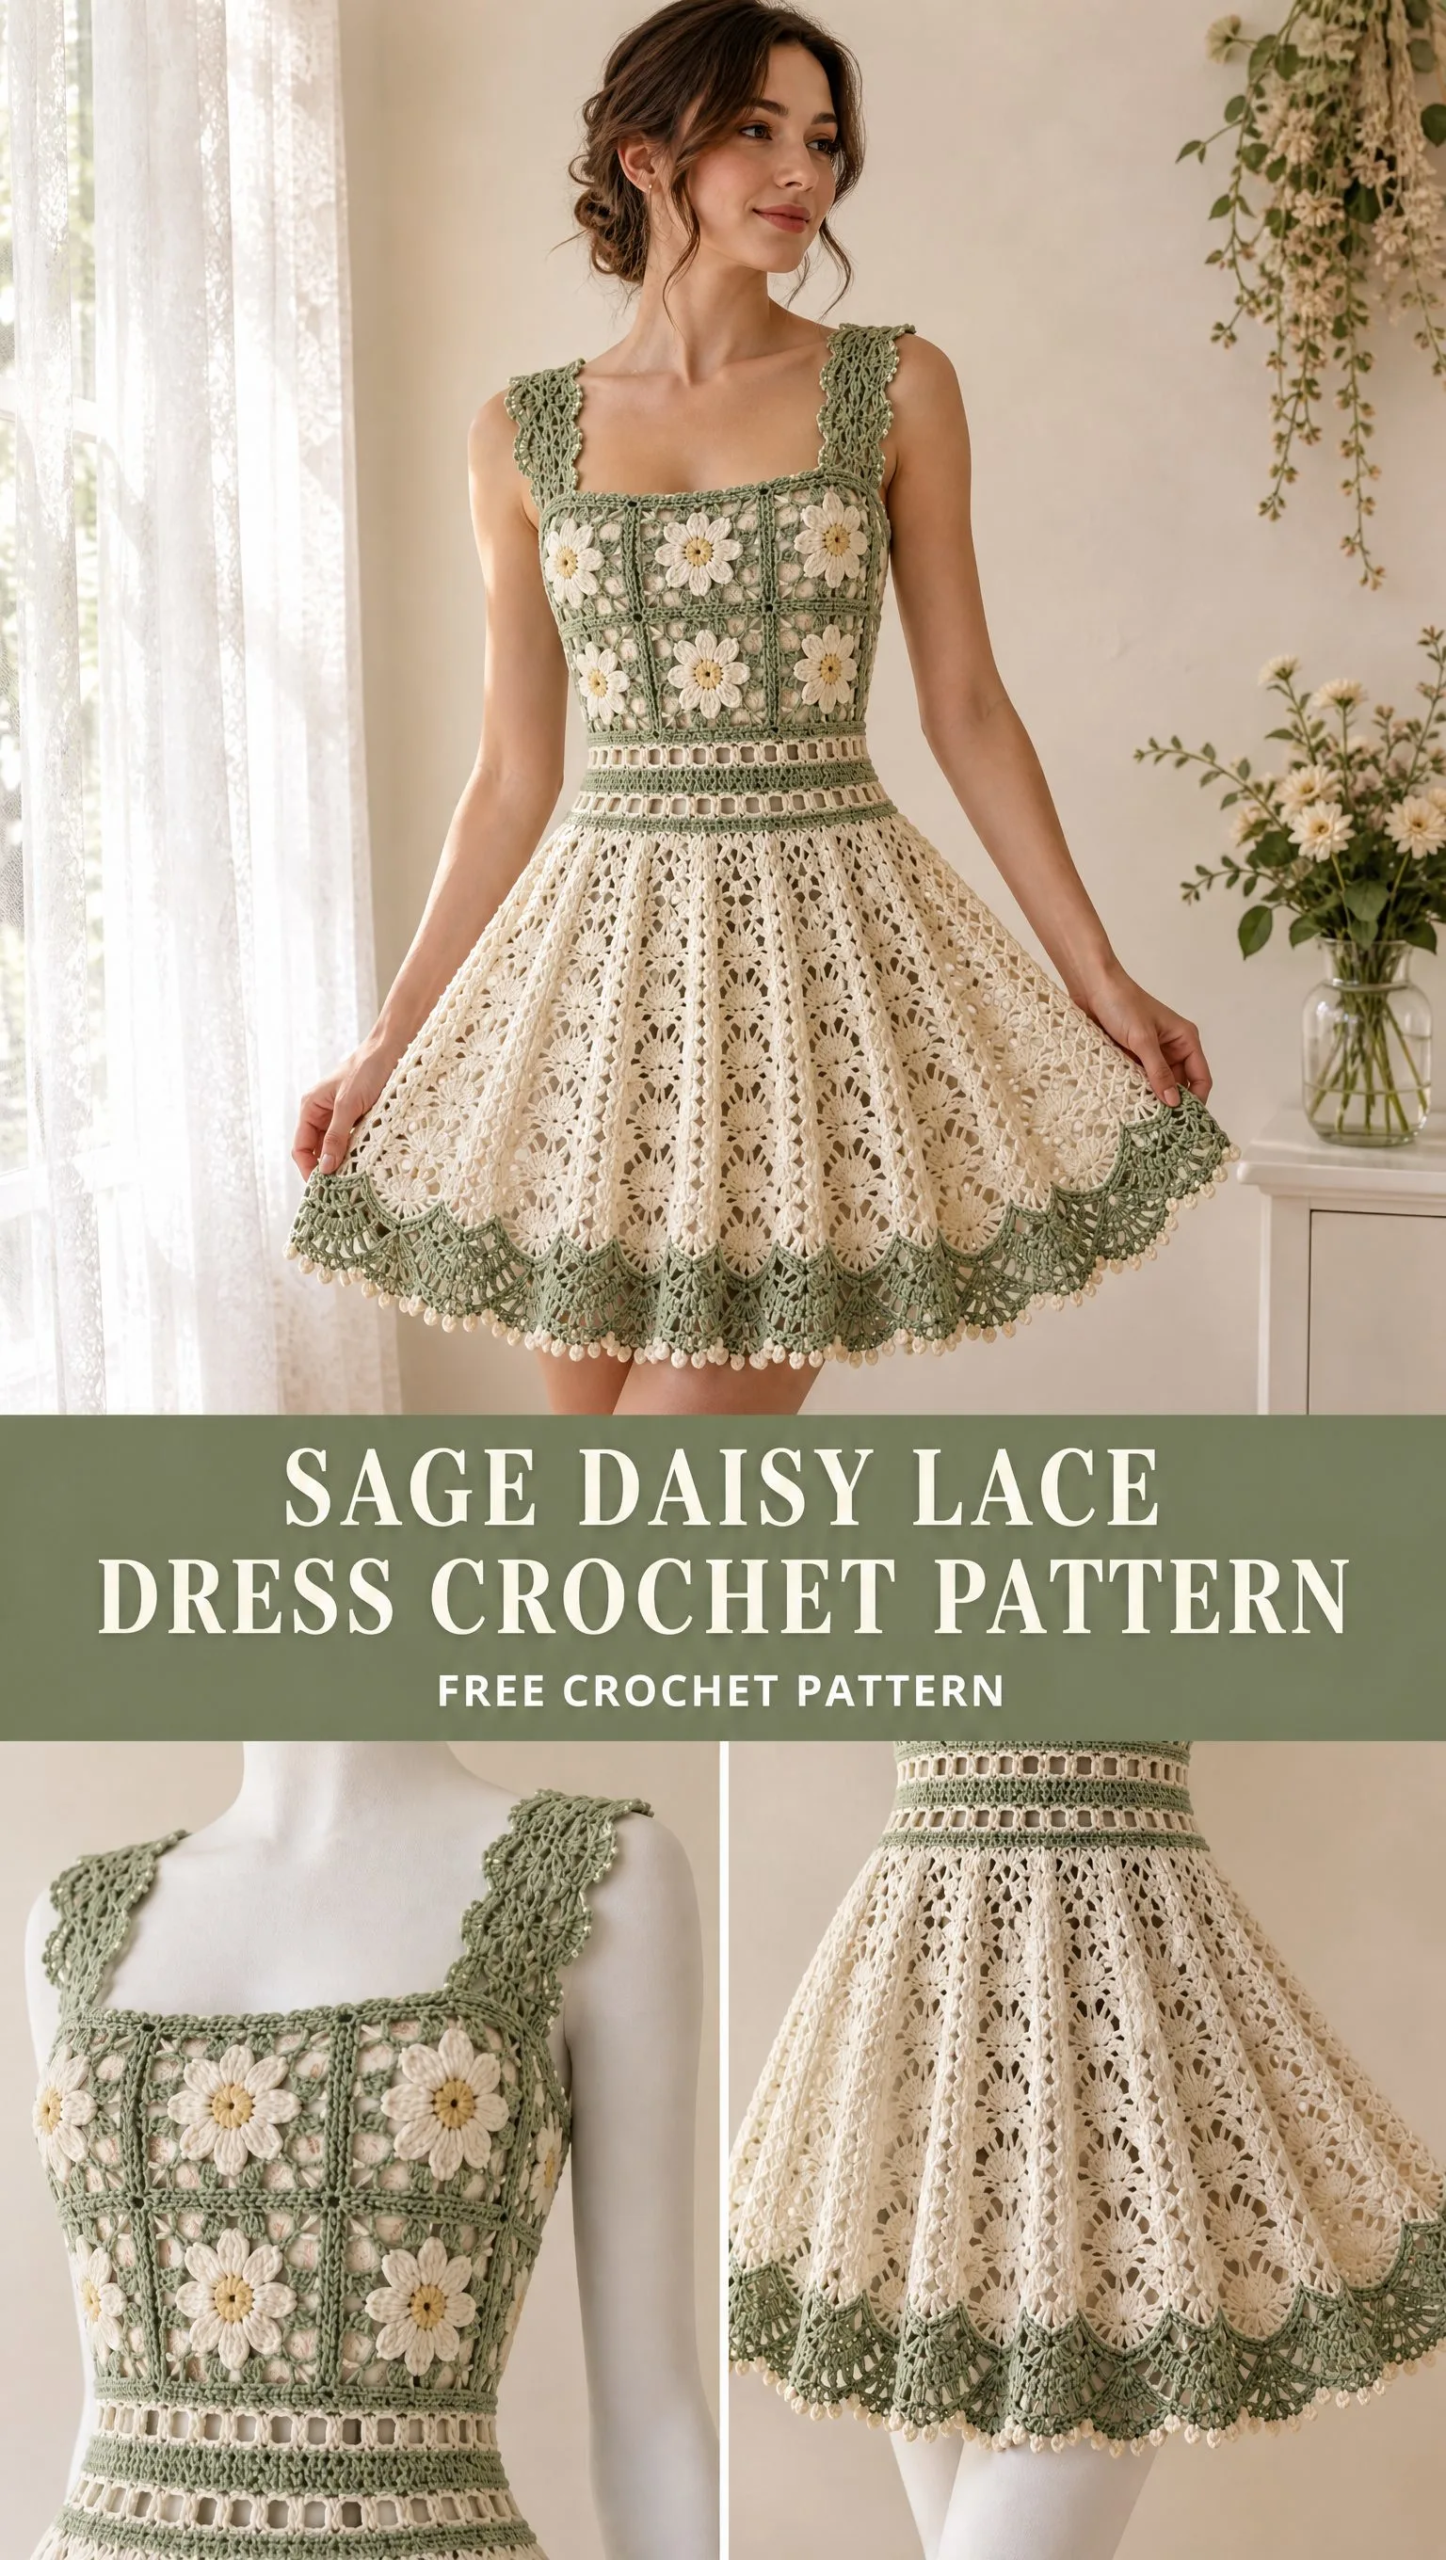
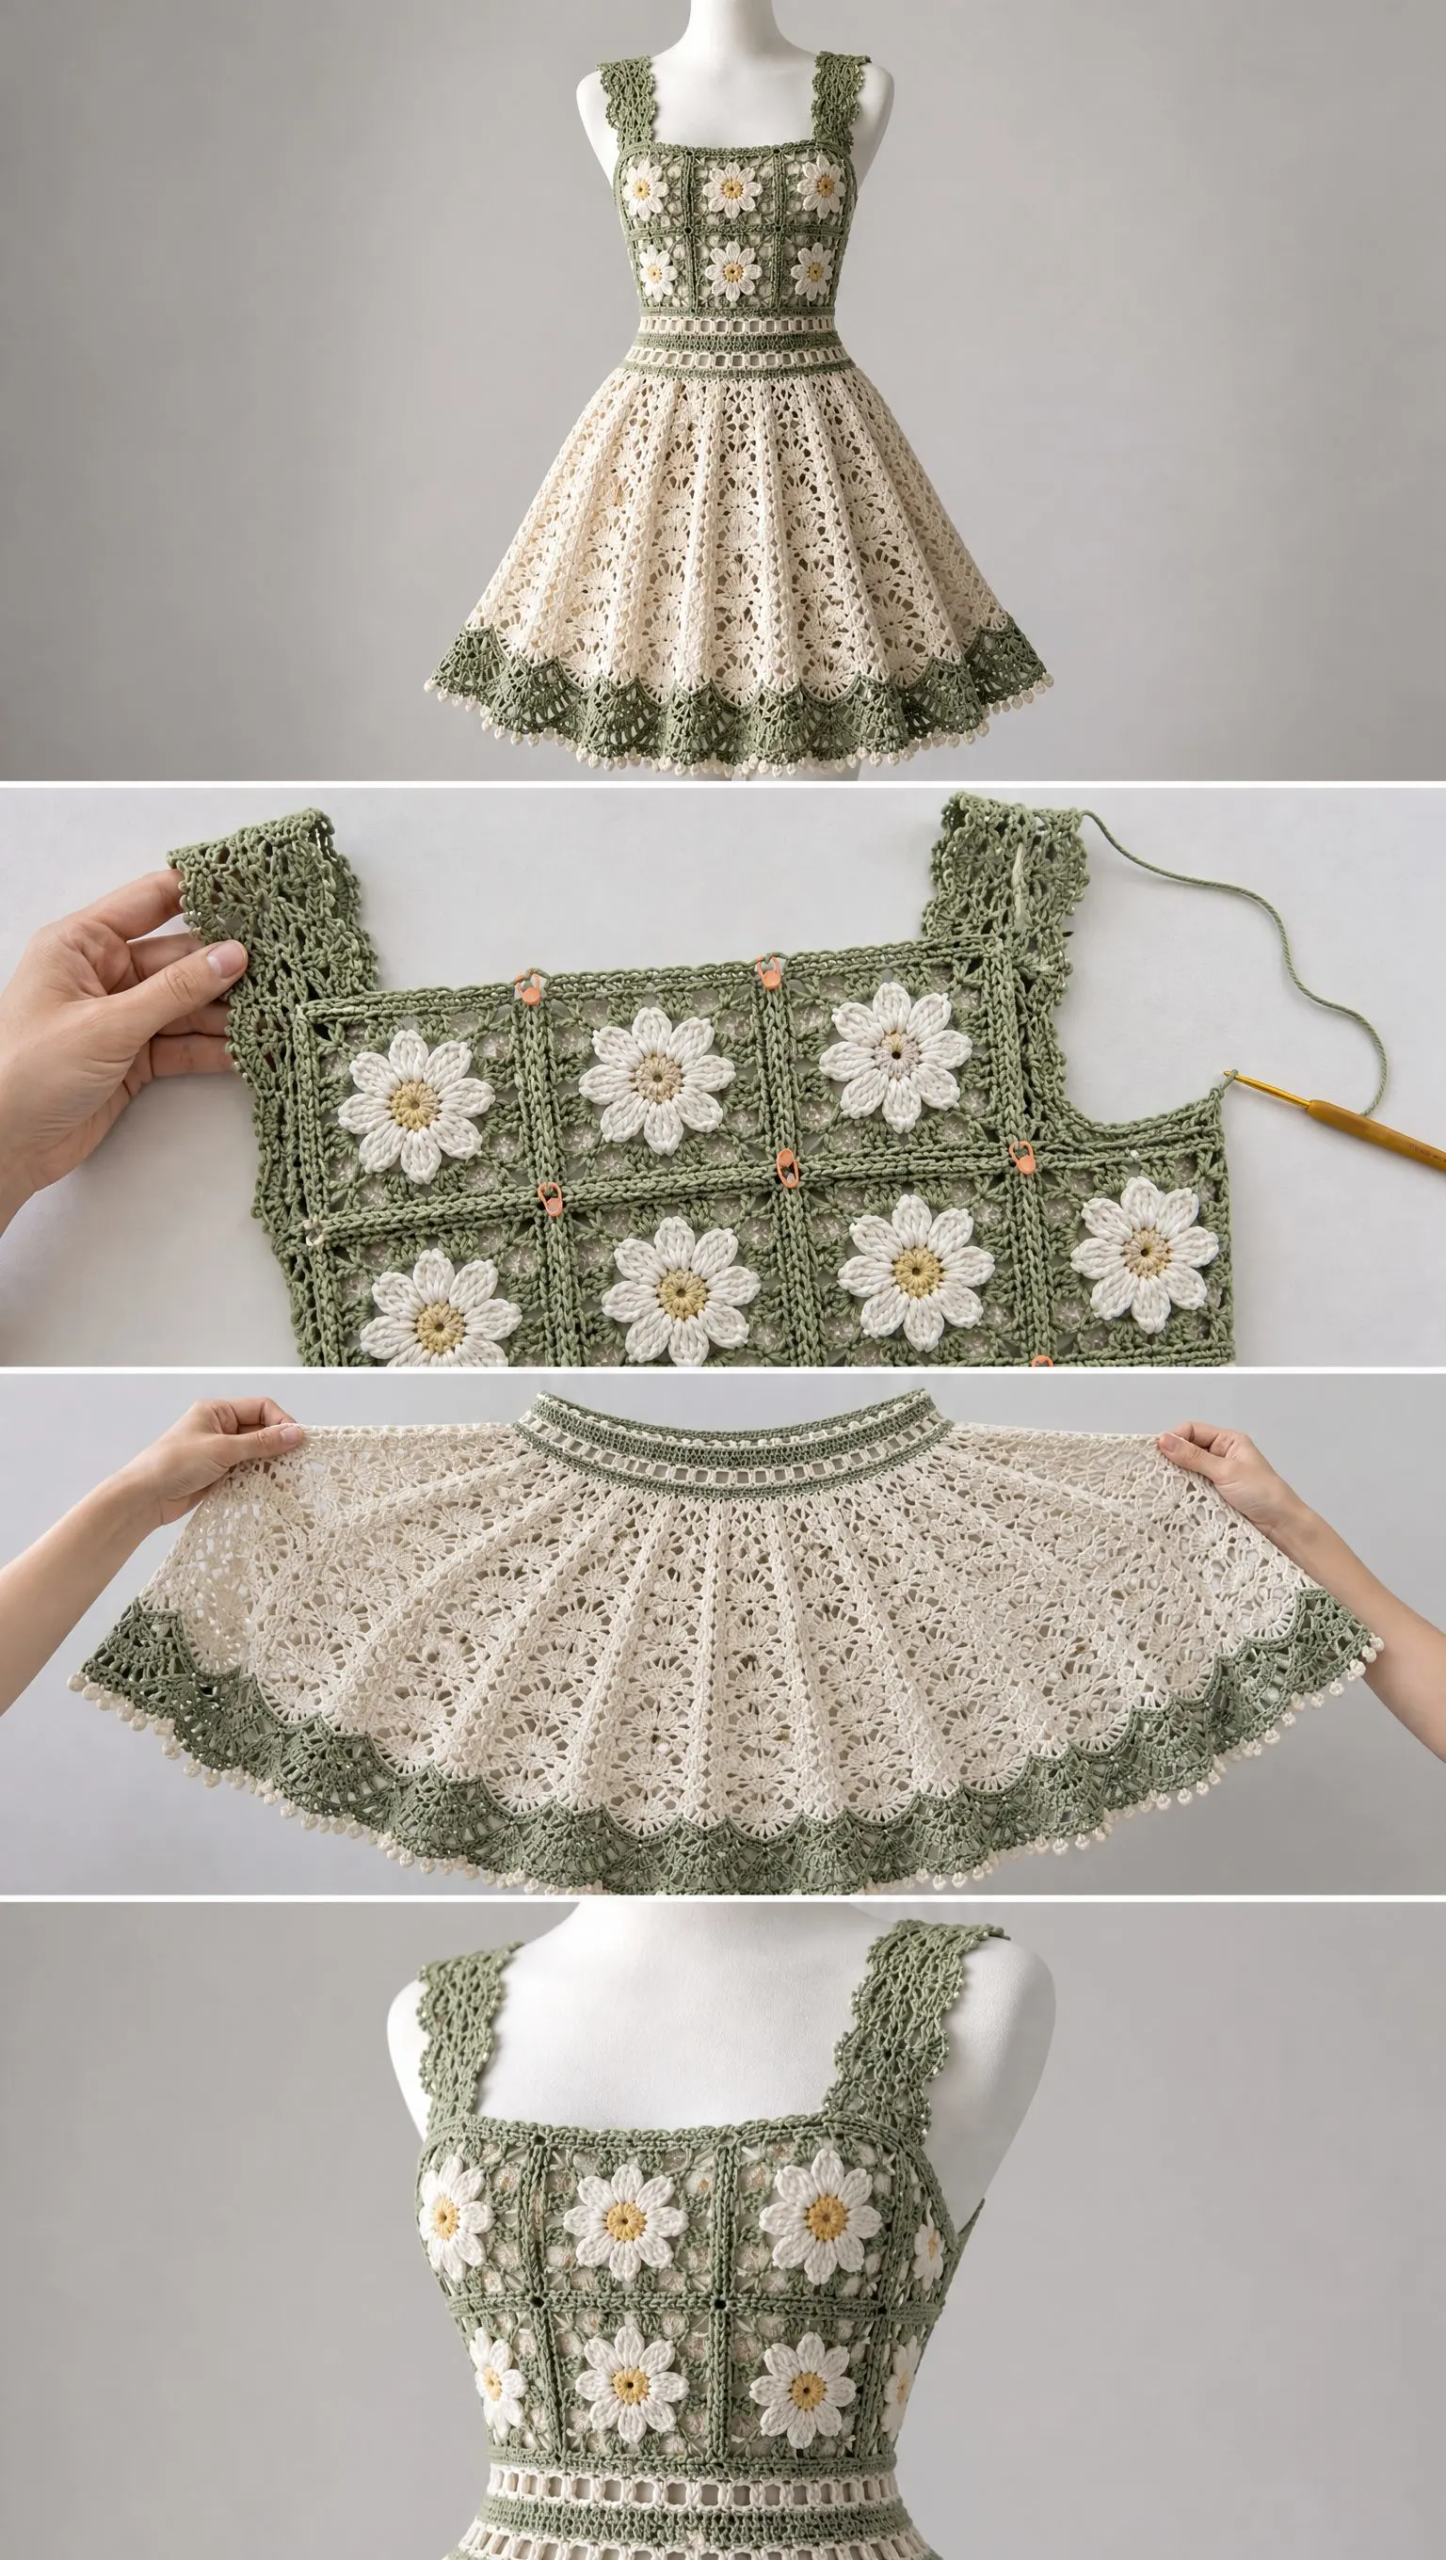
The construction is modular and top-down. You make the daisy squares first, join them into a bodice tube, add scalloped straps, work a structured waistband, then crochet the skirt in vertical lace panels. The sage fan hem finishes everything with a gorgeous scallop border.
If you can make a granny square and follow a lace repeat, you can make this dress. The pattern includes fit checkpoints along the way so you can adjust as you go.
Pattern Overview
The Sage Daisy Lace Dress combines several elements that work together beautifully. The bodice features daisy granny squares with butter yellow centers, ivory petals, and sage green frames. Below that sits a filet waistband with rectangular openings separated by a dense sage stripe. The skirt flows from the waist in vertical shell-and-chain lace panels that gradually flare into an A-line shape. The sage fan-lace hem creates those stunning scallops you see at the bottom.
This dress is designed for mannequin display as shown, but for everyday wear, you will want to pair it with a slip or sew in a lightweight lining after blocking. The openwork is intentionally transparent.
Skill Level: Intermediate. This pattern is for crocheters comfortable with motif joining, lace repeats, garment fitting, and blocking.
Estimated Time: 24 to 40 hours depending on your size and speed.
Sizes and Finished Measurements
The pattern includes seven sizes. Here are the key measurements:
| Size | To Fit Bust | Finished Bust | Waist Target | Approx. Dress Length |
|---|---|---|---|---|
| XS | 30-32 in / 76-81 cm | 31.5 in / 80 cm | 27.2 in / 69 cm | 31 in / 79 cm |
| S | 34-36 / 86-91 | 36 / 91 | 30.4 / 77 | 32 / 81 |
| M | 38-40 / 97-102 | 39 / 99 | 33.6 / 85 | 33 / 84 |
| L | 42-44 / 107-112 | 44 / 112 | 36.8 / 93 | 34 / 86 |
| XL | 46-48 / 117-122 | 48 / 122 | 40 / 102 | 35 / 89 |
| 2XL | 50-52 / 127-132 | 52 / 132 | 44.8 / 114 | 36 / 91 |
| 3XL | 54-56 / 137-142 | 56 / 142 | 48 / 122 | 37 / 94 |
The daisy-square bodice is designed with approximately -1 to +1 inch of ease depending on size and blocking. Cotton relaxes with wear, so do not oversize the bodice. The waistband should sit close to your natural waist without pulling the filet openings out of shape.
Materials Needed
Yarn:
Use fine cotton in sport to light DK weight, approximately 250 to 330 yards per 100 grams. A firmly spun cotton gives the clearest daisies and hem fans.
Recommended yarn options:
Avoid very elastic wool blends unless you intentionally want a softer, springier fit.
Hooks:
Notions:
Gauge
Blocked gauge: 20 dc (double crochet) x 10 rows = 4 inches / 10 cm in plain double crochet with the main hook.
One base daisy square after Round 6 = about 5.25 inches / 13.3 cm. Add or omit sage frame rounds as instructed to reach the target square width for your size. Gauge is measured after wet blocking and full drying.
| Size | Squares Around | Front / Back | Target Square Width | Bodice Depth (2 rows) |
|---|---|---|---|---|
| XS | 6 | 3 / 3 | 5.25 in / 13.3 cm | 10.5 in / 26.7 cm |
| S | 6 | 3 / 3 | 6 in / 15.2 | 12 / 30.5 |
| M | 6 | 3 / 3 | 6.5 in / 16.5 | 13 / 33 |
| L | 8 | 4 / 4 | 5.5 in / 14 | 11 / 28 |
| XL | 8 | 4 / 4 | 6 in / 15.2 | 12 / 30.5 |
| 2XL | 8 | 4 / 4 | 6.5 in / 16.5 | 13 / 33 |
| 3XL | 8 | 4 / 4 | 7 in / 17.8 | 14 / 35.6 |
Fit Checkpoint #1: Make one complete square, block it, and compare its width with the target above. Adjust hook size first. If still needed, add one sage frame round for roughly 0.4 to 0.6 inches additional width, or omit the final frame round. All squares used in the dress must finish the same size.
Abbreviations
Special Stitches and Techniques
2dc cluster (2dc-cl): Yarn over, insert hook in indicated stitch or space, yarn over and pull up a loop, yarn over and draw through 2 loops. Repeat once more in the same place, yarn over and draw through all 3 loops on hook.
3dc shell: Work 3 dc in the same stitch or chain space.
5dc fan: Work 5 dc in the same chain space. The fan-lace hem later uses 7 dc and 9 dc fans for extra flare.
Picot: Ch 3, sl st in first ch. For a very small picot, ch 2 instead.
Flat slip-stitch join: With wrong sides together and loops aligned, insert hook through the back loop of the motif nearest you and the front loop of the motif behind it. Slip stitch through both. Keep the joining yarn relaxed so the seam remains flexible.
Invisible round join: After the final stitch, cut yarn leaving a 4 inch / 10 cm tail. Pull the tail through the final loop, thread it on a needle, pass under both loops of the first stitch, then back through the center of the last stitch. Weave in.
For left-handed crocheters: Work the written rounds counterclockwise instead of clockwise. Stitch counts and placement do not change. For joining layouts, mirror the diagrams mentally and begin at the opposite side seam while keeping right/left strap placement symmetrical.
Daisy Granny Square Motif
Make 12 motifs for XS, S, M. Make 16 motifs for L, XL, 2XL, 3XL.
Color sequence: Butter yellow center, ivory petals, sage frame. The open chain-loop corners create the airy look seen in the sample.
Rnd 1 (CC2 – Butter Yellow): Ch 4, sl st to first ch to form ring. Ch 2 (does not count as dc), work 12 dc into ring. Invisible join. Fasten off. [12 dc]
Rnd 2 (MC – Ivory petals, front loops only): Join MC in the front loop of any Rnd 1 dc. In the same front loop work (sl st, ch 2, 2 dc, ch 2, sl st). In the front loop of the next dc work (sl st, ch 2, 2 dc, ch 2, sl st); rep from around. Fasten off. [12 petals] The back loops of Rnd 1 remain free behind the petals.
Rnd 3 (CC1 – Sage foundation behind flower): Join sage in the unused back loop of any Rnd 1 dc. Ch 3 (counts as dc), dc in same back loop, ch 1; 2 dc in back loop of next Rnd 1 dc, ch 1; rep from around. Join. [12 groups of 2 dc, 12 ch-1 sps]
Rnd 4 – Square setup (CC1): Sl st to first ch-1 sp. (3 dc, ch 1) in each of next 2 ch-1 sps, (3 dc, ch 3, 3 dc, ch 1) in next ch-1 sp; rep from 3 more times. Join. [4 corner ch-3 sps; 2 side groups between corners]
Rnd 5 (CC1): Sl st to next ch-1 sp. Ch 3, 2 dc in same sp, ch 1; work 3 dc, ch 1 in each side ch-1 sp; in each corner ch-3 sp work (3 dc, ch 3, 3 dc), ch 1. Continue around and join. Each side gains one granny group.
Rnd 6 and optional frame rnds (CC1): Continue standard granny-square rounds: 3 dc in every ch-1 side space with ch 1 between groups, and (3 dc, ch 3, 3 dc) in each corner. Add rounds until the blocked square reaches the target width for your size. Keep the final round sage.
Motif Check: Lay the square flat before blocking. It should be square without cupping. If the flower puckers, loosen the petal rounds or increase the ch-2 spaces in Round 2 to ch 3. If the square ripples, reduce Round 4 ch-3 arches to ch 2.
Blocking the Motifs
Bodice Assembly
Layout
Arrange motifs in two horizontal rows. For XS, S, M: 3 squares across front + 3 across back per row (12 total). For L through 3XL: 4 across front + 4 across back per row (16 total). Join squares within each row first, then join the two rows together. Finally close the left and right side seams so the bodice forms a tube.
Join the Squares
Step 1: With wrong sides together, flat-slip-stitch the vertical seams in each motif row. Keep the seam tension looser than your normal slip stitch.
Step 2: Place the two completed motif rows together. Join the lower edge of the upper row to the upper edge of the lower row, matching every ch-1 space and corner.
Step 3: Close both side seams. Try the tube on over a thin camisole. The top edge should sit securely across the upper bust and back without gaping.
Step 4 – Top edge stabilization: Join sage at a side seam. Ch 1, sc evenly around the entire top edge, working 1 sc in each dc and 1 to 2 sc in each chain space as needed. Join. Work 1 more rnd sc. Do not add stitches if the edge is already loose.
Step 5 – Lower edge preparation: Join sage at a side seam and sc evenly around lower bodice edge. On the next rnd, decrease evenly to the waistband foundation count shown below. Space decreases symmetrically around front and back.
Fit Checkpoint #2: Before adding straps, the bodice tube should stay in place when gently supported at the top. If it is more than 1 inch too loose, undo the side seams and remove the final frame round from all motifs, or use a firmer seam. If it is too tight, add one narrow sage sc/ch-1 frame round to each motif and rejoin.
Square Neckline and Scalloped Straps
The neckline is created by the straight top edge of the motif tube and two broad lace straps. Strap width is approximately 2 to 2.5 inches.
Strap Placement
| Size | Front Strap Begins | Back Strap Begins | Suggested Strap Length |
|---|---|---|---|
| XS | 0.75 in / 2 cm in from outer front corner | same | 10.5 in / 26.5 cm |
| S | 1 in / 2.5 cm | same | 11 / 28 |
| M | 1 in / 2.5 cm | same | 11.5 / 29 |
| L | 1.25 in / 3 cm | same | 12 / 30.5 |
| XL | 1.25 in / 3 cm | same | 12.5 / 32 |
| 2XL | 1.5 in / 4 cm | same | 13 / 33 |
| 3XL | 1.5 in / 4 cm | same | 13.5 / 34.5 |
Row 1 (CC1): Join sage at marked front strap point. Ch 1, sc in next 11 (13, 13, 15, 15, 17, 17) sts. Turn.
Row 2: Ch 3, sk 2, 5 dc in next st, sk 2, sc in next st; *ch 3, sk 2, 5 dc in next st, sk 2, sc in next st; rep across as space allows. Turn.
Row 3: Ch 1, sc in first sc, *ch 4, sc in center dc of next 5-dc fan; rep across, ending sc in last sc. Turn.
Row 4: Ch 1, *(sc, hdc, 3 dc, hdc, sc) in next ch-4 sp; rep across. Turn.
Rows 5+: Repeat Rows 3-4 until strap reaches suggested length or the back attachment point without stretching. End after Row 3 for a flatter joining edge.
Join: With wrong side facing, sl st strap to the corresponding marked back stitches. Fasten off. Repeat for second strap.
Edge finish (MC): Join ivory at lower outer corner of strap. Sc evenly up outer edge, working a picot every 3 to 4 sc; continue across the top shoulder edge and down the inner edge. Keep the picots small so they do not distort the strap. Repeat for second strap.
Strap Fitting Tip: Try the bodice on before permanently joining each strap. Cotton straps lengthen slightly after washing. Aim for a secure fit with no more than 0.5 inch of vertical stretch at the shoulder.
Filet Waistband
The waistband uses two rows of rectangular openings separated by a dense sage stripe. Foundation counts are multiples of 8 so the filet repeat and skirt setup both work cleanly.
| Size | Foundation sc | Approx. Waistband Circ. | Filet Repeats |
|---|---|---|---|
| XS | 136 | 27.2 in / 69 cm | 17 |
| S | 152 | 30.4 / 77 | 19 |
| M | 168 | 33.6 / 85 | 21 |
| L | 184 | 36.8 / 93 | 23 |
| XL | 200 | 40 / 102 | 25 |
| 2XL | 224 | 44.8 / 114 | 28 |
| 3XL | 240 | 48 / 122 | 30 |
Setup rnd (CC1): After the lower-edge preparation round, confirm you have the size-specific foundation count above. Join with sl st.
Rnd 1 (MC): Ch 3 (counts as dc), dc in each st around. Join. [same count]
Rnd 2 – First filet row (MC): Ch 3 (counts as dc), dc in next st, ch 2, sk 2 sts; dc in next 2 sts, ch 2, sk 2 sts; rep from around. Join to top of ch-3. The round closes exactly because every size count is divisible by 4.
Rnd 3 (MC): Ch 3, dc in next dc, 2 dc in next ch-2 sp, dc in next 2 dc; rep from around, ending with 2 dc in the final ch-2 sp. Join. [foundation count restored]
Rnd 4 (CC1 dense stripe): Join sage. Ch 1, sc in each st around. Join. Work a second sc round if you want a firmer waist.
Rnd 5 (MC): Ch 3, dc in each st around. Join.
Rnd 6 – Second filet row (MC): Repeat Rnd 2.
Rnd 7 (MC): Repeat Rnd 3.
Rnd 8 (CC1): Sc in each st around. This is the skirt foundation round.
A-Line Shell and Chain Skirt
Worked in continuous joined rounds from the waistband down.
The skirt is organized into vertical lace panels. Place a marker every 8 waistband stitches. Each 8-st segment becomes one panel. The panel expands by increasing the chain spaces at controlled intervals, creating gradual A-line flare without abrupt ruffles.
Number of panels: XS 17, S 19, M 21, L 23, XL 25, 2XL 28, 3XL 30. Place a marker at the first stitch of every 8-st group around the final sage waistband round.
Skirt Rnd 1 (MC): Join ivory. Sc in marked st, ch 2, sk 1, 3 dc in next st, ch 2, sk 1, sc in next st, ch 2, sk 3; rep from for each 8-st panel. Join. Each repeat consumes exactly 8 waistband stitches.
Rnd 2: Sl st into first ch-2 sp. *Sc in ch-2 sp, ch 3, (3 dc, ch 1, 3 dc) in center dc of 3-dc group, ch 3, sc in next ch-2 sp, ch 2; rep around. Join.
Rnd 3: *Sc in next ch-3 sp, ch 3, 3 dc in ch-1 center sp, ch 1, 3 dc in same sp, ch 3, sc in next ch-3 sp, ch 2; rep around. Join.
Rnds 4-5: Repeat Rnd 3. These form the straight upper-skirt panels.
Increase Rnd 6: Work as Rnd 3, but make the final ch-2 between panels ch 3. This adds ease between panels without disturbing the central shell.
Rnds 7-10: Repeat Rnd 3, working the between-panel chain as ch 3.
Increase Rnd 11: Work as established, but make each side ch-3 before and after the central shell ch 4. Keep the between-panel chain ch 3.
Rnds 12-15: Maintain ch-4 side spaces and ch-3 between-panel spaces.
Increase Rnd 16: In each central ch-1 shell space, work (4 dc, ch 1, 4 dc) instead of (3 dc, ch 1, 3 dc).
Rnds 17-20: Maintain the 4-dc shells and current chain spaces.
Increase Rnd 21: Make between-panel ch 4. Continue the same central 4-dc shell.
Rnds 22+: Continue in pattern, adding one chain to the between-panel space every 5th round if more flare is desired. Stop when skirt is 15 (16, 17, 18, 19, 20, 21) inches from waistband, or 2.5 to 3 inches shorter than desired finished length.
Length Customization
For a longer dress, continue the established panel round. Every additional 4 rounds adds approximately 1.5 to 1.75 inches after blocking. Purchase about 90 to 150 extra yards of ivory per added 2 inches, depending on size.
Sage Fan-Lace Hem
The border converts the expanding ivory panel edge into the scalloped sage fans seen in the sample.
Hem Rnd 1 (CC1): Join sage in a between-panel chain space. Ch 1, sc in same sp, *ch 4, sc in next side chain space, ch 4, sc in central ch-1 shell space, ch 4, sc in next side chain space, ch 4, sc in next between-panel space; rep around. Join.
Hem Rnd 2: Sl st into first ch-4 sp. Ch 1, *5 dc in next ch-4 sp, sc in next ch-4 sp; rep around. Join. If your round begins on a sc space, shift with slip stitches so fans alternate cleanly.
Hem Rnd 3: Sl st to center dc of first 5-dc fan. Ch 1, sc in center dc, *ch 5, sc in center dc of next fan; rep around. Join.
Hem Rnd 4: In each ch-5 sp work (sc, hdc, 7 dc, hdc, sc). Join. [sage fans]
Hem Rnd 5 (MC picot edge): Join ivory at first fan. *Sc in first hdc of fan, sc in next 2 dc, picot, sc in next 3 dc, picot, sc in final dc and hdc; ch 1; rep around. Join invisibly.
Fuller Hem Option: For a more dramatic scallop, use 9 dc instead of 7 dc in Hem Round 4 and work three picots over each fan in the final ivory round. Check that the hem lies flat after the first 2 to 3 fans. If it waves, return to 7 dc.
Finishing and Blocking
Weave in Ends
Final Wet Block
Step 1: Soak the completed dress in cool water with a small amount of wool/cotton wash for 15 to 20 minutes. Do not agitate.
Step 2: Support the full weight of the wet dress with both hands. Press water out in towels. Never wring.
Step 3: Lay flat on blocking mats. Square the bodice first, pinning side seams and top edge.
Step 4: Shape the waistband to the target circumference without over-stretching filet openings.
Step 5: Fan the skirt evenly. Pin each vertical panel at the same length and open every sage hem scallop.
Step 6: Allow to dry completely before removing pins. Re-measure length and straps after drying.
Important note about drape: Fine cotton becomes noticeably heavier after washing. The finished skirt may gain 0.5 to 1.5 inches in length. Always block before deciding whether to add or remove skirt rounds.
Optional Lining
For wear, use a simple lightweight slip in ivory, nude, or sage. If sewing a permanent lining, attach it only at the upper bodice and waistband seam allowances so the crochet skirt can move independently. Do not stitch the lining to the fan hem.
Troubleshooting Common Issues
Daisy square cups inward: Petal/bridge rounds too tight. Use a larger hook for Rnds 2-4 or change ch-2 spaces to ch 3.
Square ripples: Too much chain length in open rounds. Reduce ch-3 arches to ch 2 or use smaller hook for frame.
Bodice gaps at side seam: Join too loose or square too large. Redo seam with slightly firmer slip stitches. Check blocked square width.
Top edge rolls outward: Stabilizing sc too loose. Redo second sc round with smaller hook and evenly spaced decreases.
Filet openings lean: Round join drifting or count off. Place marker at round start. Confirm multiple-of-8 foundation count.
Skirt looks tubular: Not enough flare increases. Add between-panel chain increase one or two rounds earlier.
Skirt ruffles: Too many chain increases. Hold between-panel chains at current length for 6 to 8 rounds.
Hem waves: Fans too full. Use 7 dc instead of 9 dc, or reduce ch-5 arches to ch 4.
Straps stretch: Cotton relaxed after blocking. Shorten by one lace repeat and rejoin. Edge with smaller hook.
Dress grows in length: Cotton weight after wash. Remove 2 to 4 skirt rounds before hem, then re-block.
Care Instructions
Construction Sequence Checklist
Use this checklist to track your progress:
1. ☐ Swatch and one blocked daisy square (Square matches target size and lies flat)
2. ☐ All 12 or 16 daisy squares (Every motif matches within 1/8 inch)
3. ☐ Join bodice tube (Bust fit is secure; side seams are vertical)
4. ☐ Stabilize top edge (No gaping across front or back)
5. ☐ Crochet and fit straps (Shoulder length is comfortable after light steam/wet set)
6. ☐ Decrease lower bodice to foundation count (Count is divisible by 8 and matches size chart)
7. ☐ Work filet waistband (Openings are rectangular, not stretched diamonds)
8. ☐ Work shell-panel skirt (Panel markers stay vertically aligned)
9. ☐ Work sage fan hem (Border lies flat with no ruffling)
10. ☐ Final wet block (Bodice, waist, and hem dimensions are balanced)
Customization Ideas
Color variations:
Skirt fullness: For a slimmer A-line, delay Increase Rounds 11, 16, and 21 by 3 to 5 rounds each. For more fullness, advance them by 2 to 3 rounds. Make changes consistently across all panels.
Petite/tall adjustment: Adjust length in the skirt rather than the bodice whenever possible. Remove or add full skirt rounds before the hem. If the torso is long, add 1 to 2 plain dc/sc rounds between the lower motif row and the filet waistband.
Bust shaping option: For a fuller bust without enlarging the entire bodice, add one extra sage frame round only to the center-front squares, then ease the slightly larger front into the side seams. Keep the back squares at the original target width.
Thank you so much for choosing this Sage Daisy Lace Dress crochet pattern. I really hope you love making it as much as I enjoyed designing it. If you found this pattern helpful, I would love it if you saved it to your Pinterest boards so you can find it easily later. And please, if you make this dress, leave a comment below or tag me on Instagram or Facebook. Seeing your finished projects absolutely makes my day!
Want a Quick & Easy Printable Version?
Get a clean, beautifully formatted PDF of this pattern — easy to follow step by step, ready to print or save on any device. No scrolling, no distractions, just the pattern.
Get the Printable PDF →You Might Also Like
- Sunshine Daisy Book Cover Free Crochet Pattern
- Mint Green Daisy Baseball Cap Free Crochet Pattern
- Sage Green Botanical Lace Belt Free Crochet Pattern
- Mint Garden Baby Crochet Dress Free Pattern