
I have been dreaming about designing a crocheted baseball cap for ages. Not just any cap, but one that actually looks like a real baseball cap while still being undeniably handmade and charming. I wanted that structured crown, that proper curved brim, and something sweet to set it apart from anything you could buy in a store.
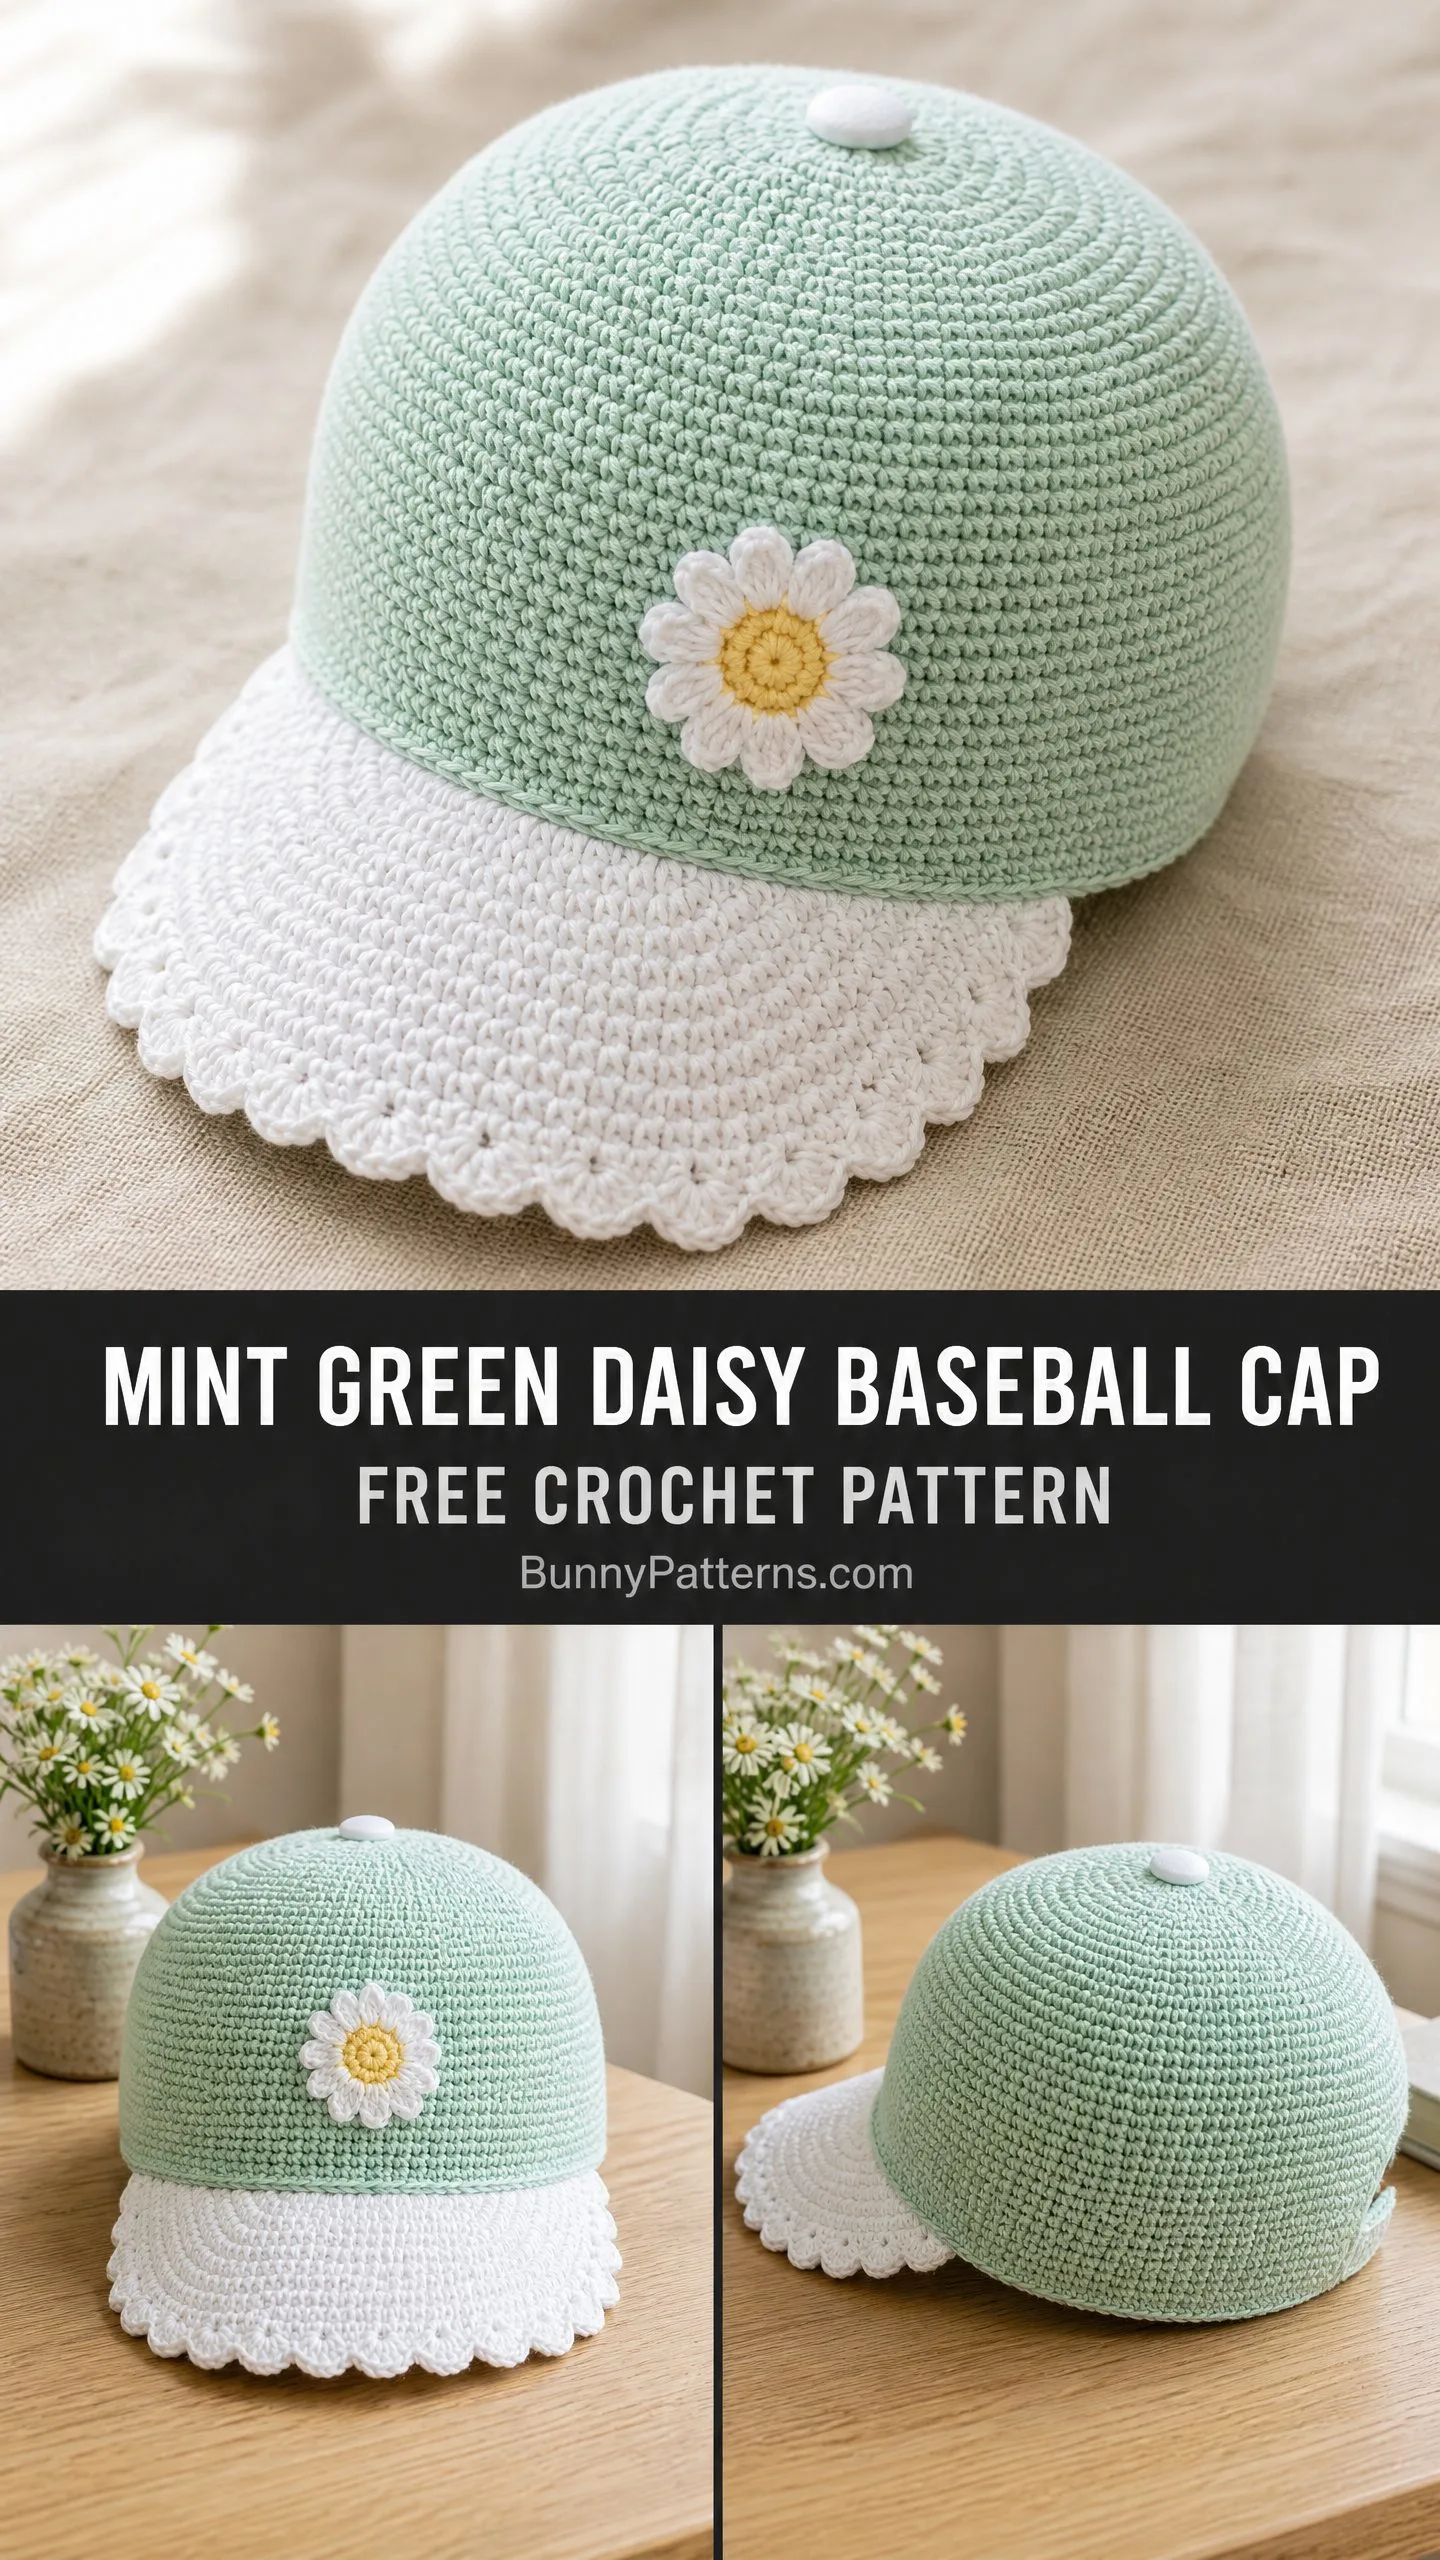
When I finally sat down to work out the construction, I made a few key decisions. The whole cap needed to be worked in back loop only single crochet to get that dense, almost knit-like texture you see in the photos. The brim had to be separate and sturdy with a pretty scalloped edge. And of course, there had to be a daisy. Because why not?
I am SO pleased with how this turned out. The mint green and white color combination feels fresh and springy. The little daisy applique adds personality without being fussy. And the whole thing actually fits like a proper cap. Let me walk you through every step.
What You Need to Know Before Starting
This baseball cap pattern is rated intermediate. If you are comfortable working single crochet in continuous rounds and have made a basic hat before, you can absolutely handle this project. The construction is straightforward, but you do need consistent tension to maintain the structured fabric.
Total time estimate: 8 to 12 hours including all pieces and finishing. If you crochet on the slower side, budget closer to 14 hours.
Finished measurements:
The cap fits snugly with minimal ease. I have included sizing tips at the end if you need to go smaller or larger.
Materials for Your Crochet Baseball Cap
Yarn (worsted weight cotton, category 4):
Suggested yarns: Lion Brand 24/7 Cotton works beautifully for this project. Paintbox Yarns Simply DK Cotton or Drops Safran are also excellent choices. Whatever you pick, avoid fuzzy or textured yarn. You want smooth cotton that shows off the back loop texture clearly.
Hook: US size G-6 / 4.0 mm crochet hook (or whatever size gets you gauge)
Notions:
Gauge (Please Do Not Skip This)
18 single crochet stitches x 22 rounds = 4 inches (10 cm) worked in back loop only single crochet, in the round, after blocking.
I know gauge swatches are not the fun part. But this cap needs to fit a human head, and even one stitch per inch difference will throw off the circumference by over an inch. Swatch at least 24 stitches and 28 rounds before you begin. Trust me on this one.
Abbreviations and Stitch Definitions
Let me break down every abbreviation you will see in this pattern:
sc = single crochet (insert hook, yarn over, pull up loop, yarn over, pull through both loops)
BLO sc = back loop only single crochet. This means you insert your hook into only the back loop of the stitch, which is the loop farthest from you as you look at your work. This creates that beautiful ribbed texture.
inc = increase. Work 2 single crochet stitches into the same stitch. You just added one stitch to your count.
ch = chain
sl st = slip stitch
hdc = half double crochet
dc = double crochet
sc2tog = single crochet two together. This is a decrease. Insert hook into next stitch, pull up a loop. Insert hook into following stitch, pull up another loop. You have 3 loops on your hook. Yarn over and pull through all 3. Two stitches become one.
magic ring = adjustable loop that lets you start working in the round with no hole in the center
st(s) = stitch or stitches
rnd = round
Part One: Crown and Body
This is the main hat portion. You will work from the top down, starting with the crown increases and then working straight for the sides. The whole thing is worked in Color A (mint green).
Important note: Rounds 1 through 16 are worked through BOTH loops (regular single crochet) to create a flat crown disk. Starting at Round 17, you switch to BLO sc for all remaining rounds. Do not skip this switch or your texture will not match.
Start with a magic ring in Color A.
Round 1: 6 sc into magic ring. Do not join. Place stitch marker. (6 sts)
Round 2: Inc in each st around. (12 sts)
Round 3: (Sc in next st, inc in next st) 6 times. (18 sts)
Round 4: (Sc in next 2 sts, inc in next st) 6 times. (24 sts)
Round 5: (Sc in next 3 sts, inc in next st) 6 times. (30 sts)
Round 6: (Sc in next 4 sts, inc in next st) 6 times. (36 sts)
Round 7: (Sc in next 5 sts, inc in next st) 6 times. (42 sts)
Round 8: (Sc in next 6 sts, inc in next st) 6 times. (48 sts)
Round 9: (Sc in next 7 sts, inc in next st) 6 times. (54 sts)
Round 10: (Sc in next 8 sts, inc in next st) 6 times. (60 sts)
Round 11: (Sc in next 9 sts, inc in next st) 6 times. (66 sts)
Round 12: (Sc in next 10 sts, inc in next st) 6 times. (72 sts)
Round 13: (Sc in next 11 sts, inc in next st) 6 times. (78 sts)
Round 14: (Sc in next 12 sts, inc in next st) 6 times. (84 sts)
Round 15: (Sc in next 13 sts, inc in next st) 6 times. (90 sts)
Round 16: (Sc in next 14 sts, inc in next st) 6 times. (96 sts)
Checkpoint: Your crown disk should measure approximately 7 inches (17.5 cm) across when laid flat. If it is smaller, your tension is too tight. Go up a hook size. If it is larger, go down a hook size.
Now switch to BLO sc for all remaining rounds.
Rounds 17 through 30: BLO sc in each st around. (96 sts each round)
That is 14 rounds of straight sides with no shaping.
Round 31 (brim join-ridge round): Working through BOTH loops, sc in each st around. Join with sl st to first sc of round. Fasten off Color A. (96 sts)
This round creates a visible ridge where the brim will attach.
Checkpoint: Your cap body should measure approximately 7 inches (18 cm) from top to bottom and about 22 to 23 inches (56 to 58 cm) around the opening. Try it on if you can. It should sit snugly without feeling tight.
Part Two: The Brim
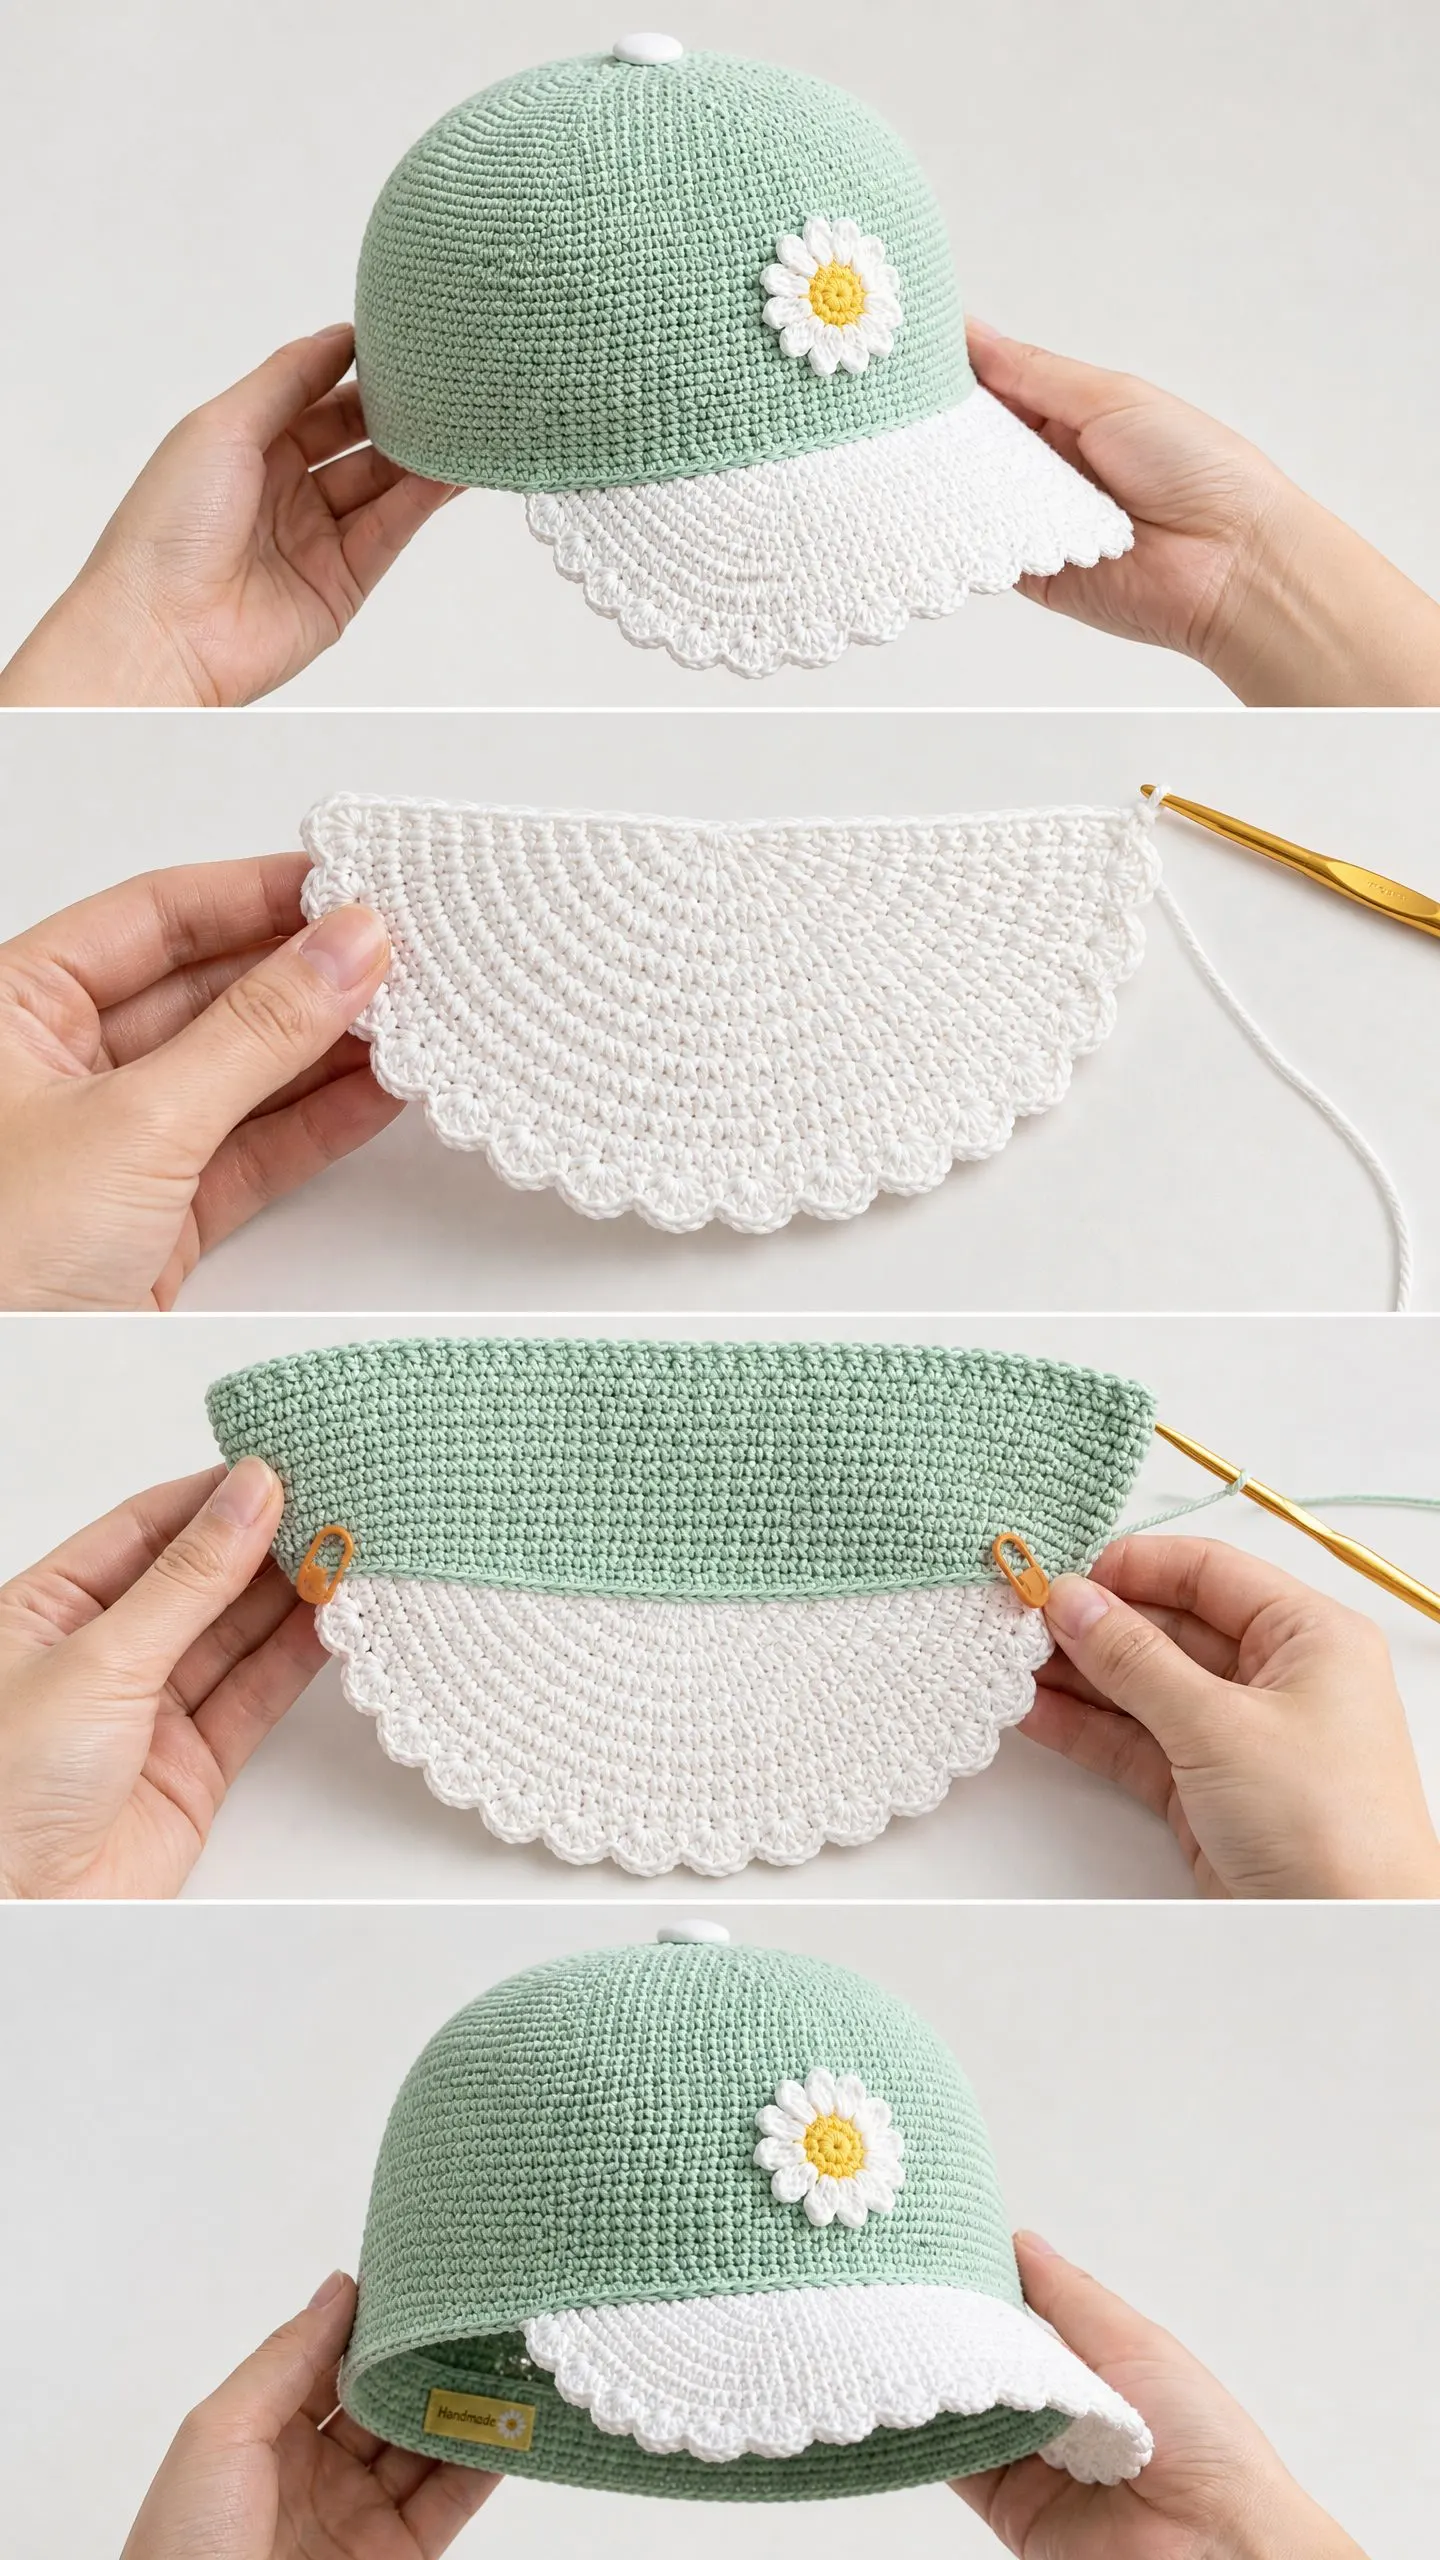
The brim is worked separately as a flat piece in Color B (white), then attached to the front of the cap. This is what gives the cap that authentic baseball cap look.
Foundation chain: With Color B, ch 37.
Row 1: Sc in 2nd ch from hook, sc in each ch across. (36 sts) Ch 1, turn.
Rows 2 through 11: BLO sc in each st across. (36 sts) Ch 1, turn.
After Row 11, do not turn. Do not fasten off. You now have a rectangle that is 36 stitches wide and 11 rows tall.
Brim Border Round 1: Work sc evenly around the entire perimeter:
Join with sl st to first sc. (102 sts)
Brim Border Round 2: Sc in each st around, working 3 sc in each of the two outer corners (the corners along the curved outer edge you will scallop). Join. (approximately 106 sts on outer edge)
Scallop Edging: The scalloped edge runs along the three outer sides only, not the straight attachment edge.
Work the scallop pattern across 60 outer edge stitches using this 5-stitch repeat for 12 total scallops:
Skip 2 sts, work (sc, hdc, 3 dc, hdc, sc) all into the next stitch, skip 2 sts, sl st into following stitch as anchor. Repeat this sequence around the outer edge until you have 12 scallops.
Sl st to first sl st to close. Fasten off. Weave in ends.
The straight top edge (36 sts) remains plain for attachment.
Part Three: Attaching the Brim
Hold your cap with the right side facing out and the opening at the bottom. Find the front center. Count 18 stitches to the left and 18 to the right, marking both points. This 36-stitch section is where your brim attaches.
Lay the brim against the front of the cap with the right side of the brim facing up and the straight edge aligned with those 36 front stitches.
Using a yarn needle and Color B, whipstitch or mattress stitch the brim firmly to the cap. Pull your stitches snug but do not distort the fabric.
If you want to add an internal stiffener, insert a piece of craft foam cut to the brim shape now before folding the brim forward.
Part Four: Daisy Applique
This sweet little daisy is what makes the whole cap special. It is worked in two parts: a yellow center and white petals.
Daisy Center (Color C, yellow):
Start with a magic ring.
Round 1: 6 sc into ring. Do not join. (6 sts)
Round 2: 2 sc in each st around. (12 sts)
Round 3: (Sc in next st, 2 sc in next st) 6 times. (18 sts)
Sl st to first sc to join. Fasten off leaving a 12-inch tail for sewing.
Daisy Petals (make 14 in Color B, white):
Leave a 6-inch tail, then ch 8.
Sc in 2nd ch from hook, sc in next 2 ch, hdc in next 2 ch, sc in next ch, sl st in last ch. Do not turn.
Working down the opposite side of the chain: sl st, sc in next 2 loops, hdc in next 2 loops, sc in next 2 loops, sc2tog at tip to close the oval.
Fasten off leaving a tail. Each petal is a small narrow oval about 3/4 inch long.
Assembly: Arrange 14 petals in a circle, overlapping slightly at the inner ends. Sew each petal base together to form a ring. Place the yellow center on top, covering all the petal bases. Sew the center down through all layers securely. Weave in all tails.
Your finished daisy should measure about 2.5 to 3 inches across.
Attach to cap: Position the daisy on the front right panel of the cap (as worn), centered between the brim line and mid-crown height. Pin in place. Sew around the outer edge of the yellow center through all layers. The petals hang freely at their tips.
Part Five: Crown Button
Sew your white button to the very top of the cap, right over the magic ring closure. Use sewing thread and a regular needle. The button covers the starting tails and adds that classic baseball cap finish.
Size Adjustments for Your Crochet Cap Pattern
For a smaller cap (20 to 21 inch head): Stop the crown increases at Round 14 (84 sts). Work all body rounds at 84 sts. Reduce brim attachment to 28 stitches and foundation chain to ch 29.
For a larger cap (23.5 to 24.5 inch head): Add two more increase rounds after Round 16 to reach 108 sts. Work all body rounds at 108 sts. Increase brim attachment to 42 stitches and foundation chain to ch 43.
For an adjustable back: After attaching the brim, fold 1/2 inch of the back edge to the inside and hand stitch a channel, inserting a 7-inch piece of non-roll elastic as you go. Overlap and sew the elastic ends before closing.
Blocking and Finishing
Weave in all your ends, working tails at least 1 inch in two directions so nothing comes loose.
For wet blocking, soak the finished cap in cool water for 10 minutes. Gently press out excess water with a towel. Shape the cap on a head form, hat block, or a bowl padded with towels. Pin the scallop edge outward to open the shells fully. Let it dry completely, which may take 12 to 24 hours.
Your finished baseball cap is machine washable on a gentle cycle in cool water inside a mesh bag. Always lay flat or reshape on a form to dry. Never tumble dry.
You Did It
This crochet baseball cap tutorial covered a lot of ground, but now you have every step you need to create something truly special. The combination of that structured crown, the pretty scalloped brim, and the cheerful daisy applique makes this a standout accessory for spring and summer.
I hope you love making this as much as I loved designing it. Thank you for trusting me with your crafting time.
If you want to find this pattern again later, go ahead and save it to your Pinterest boards. And please leave a comment below if you make one. I would absolutely love to see your version in mint, or whatever colors call to you.
You Might Also Like
- Lavender Bunny Baby Dress Set Free Crochet Pattern
- Ocean Wave Butterfly Halter Top Free Crochet Pattern
- Crimson Valentine Rose Crochet Dress Free Crochet Pattern
- Dusty Rose Cable Cuff Slipper Boots Free Crochet Pattern