
Last spring, I found myself completely obsessed with the wisteria blooming in my neighbor’s garden. I would walk past it every single day, watching those cascading purple flowers drape and sway in the breeze. One afternoon, I sat down with my hooks and thought, what if I could wear that feeling? What if I could create something that captured that romantic, ethereal quality of wisteria in full bloom?
Get the Ad-Free PDF Pattern
You can find the free pattern below, or you can purchase the ad-free printable PDF from my shop.
Get the Printable PDF →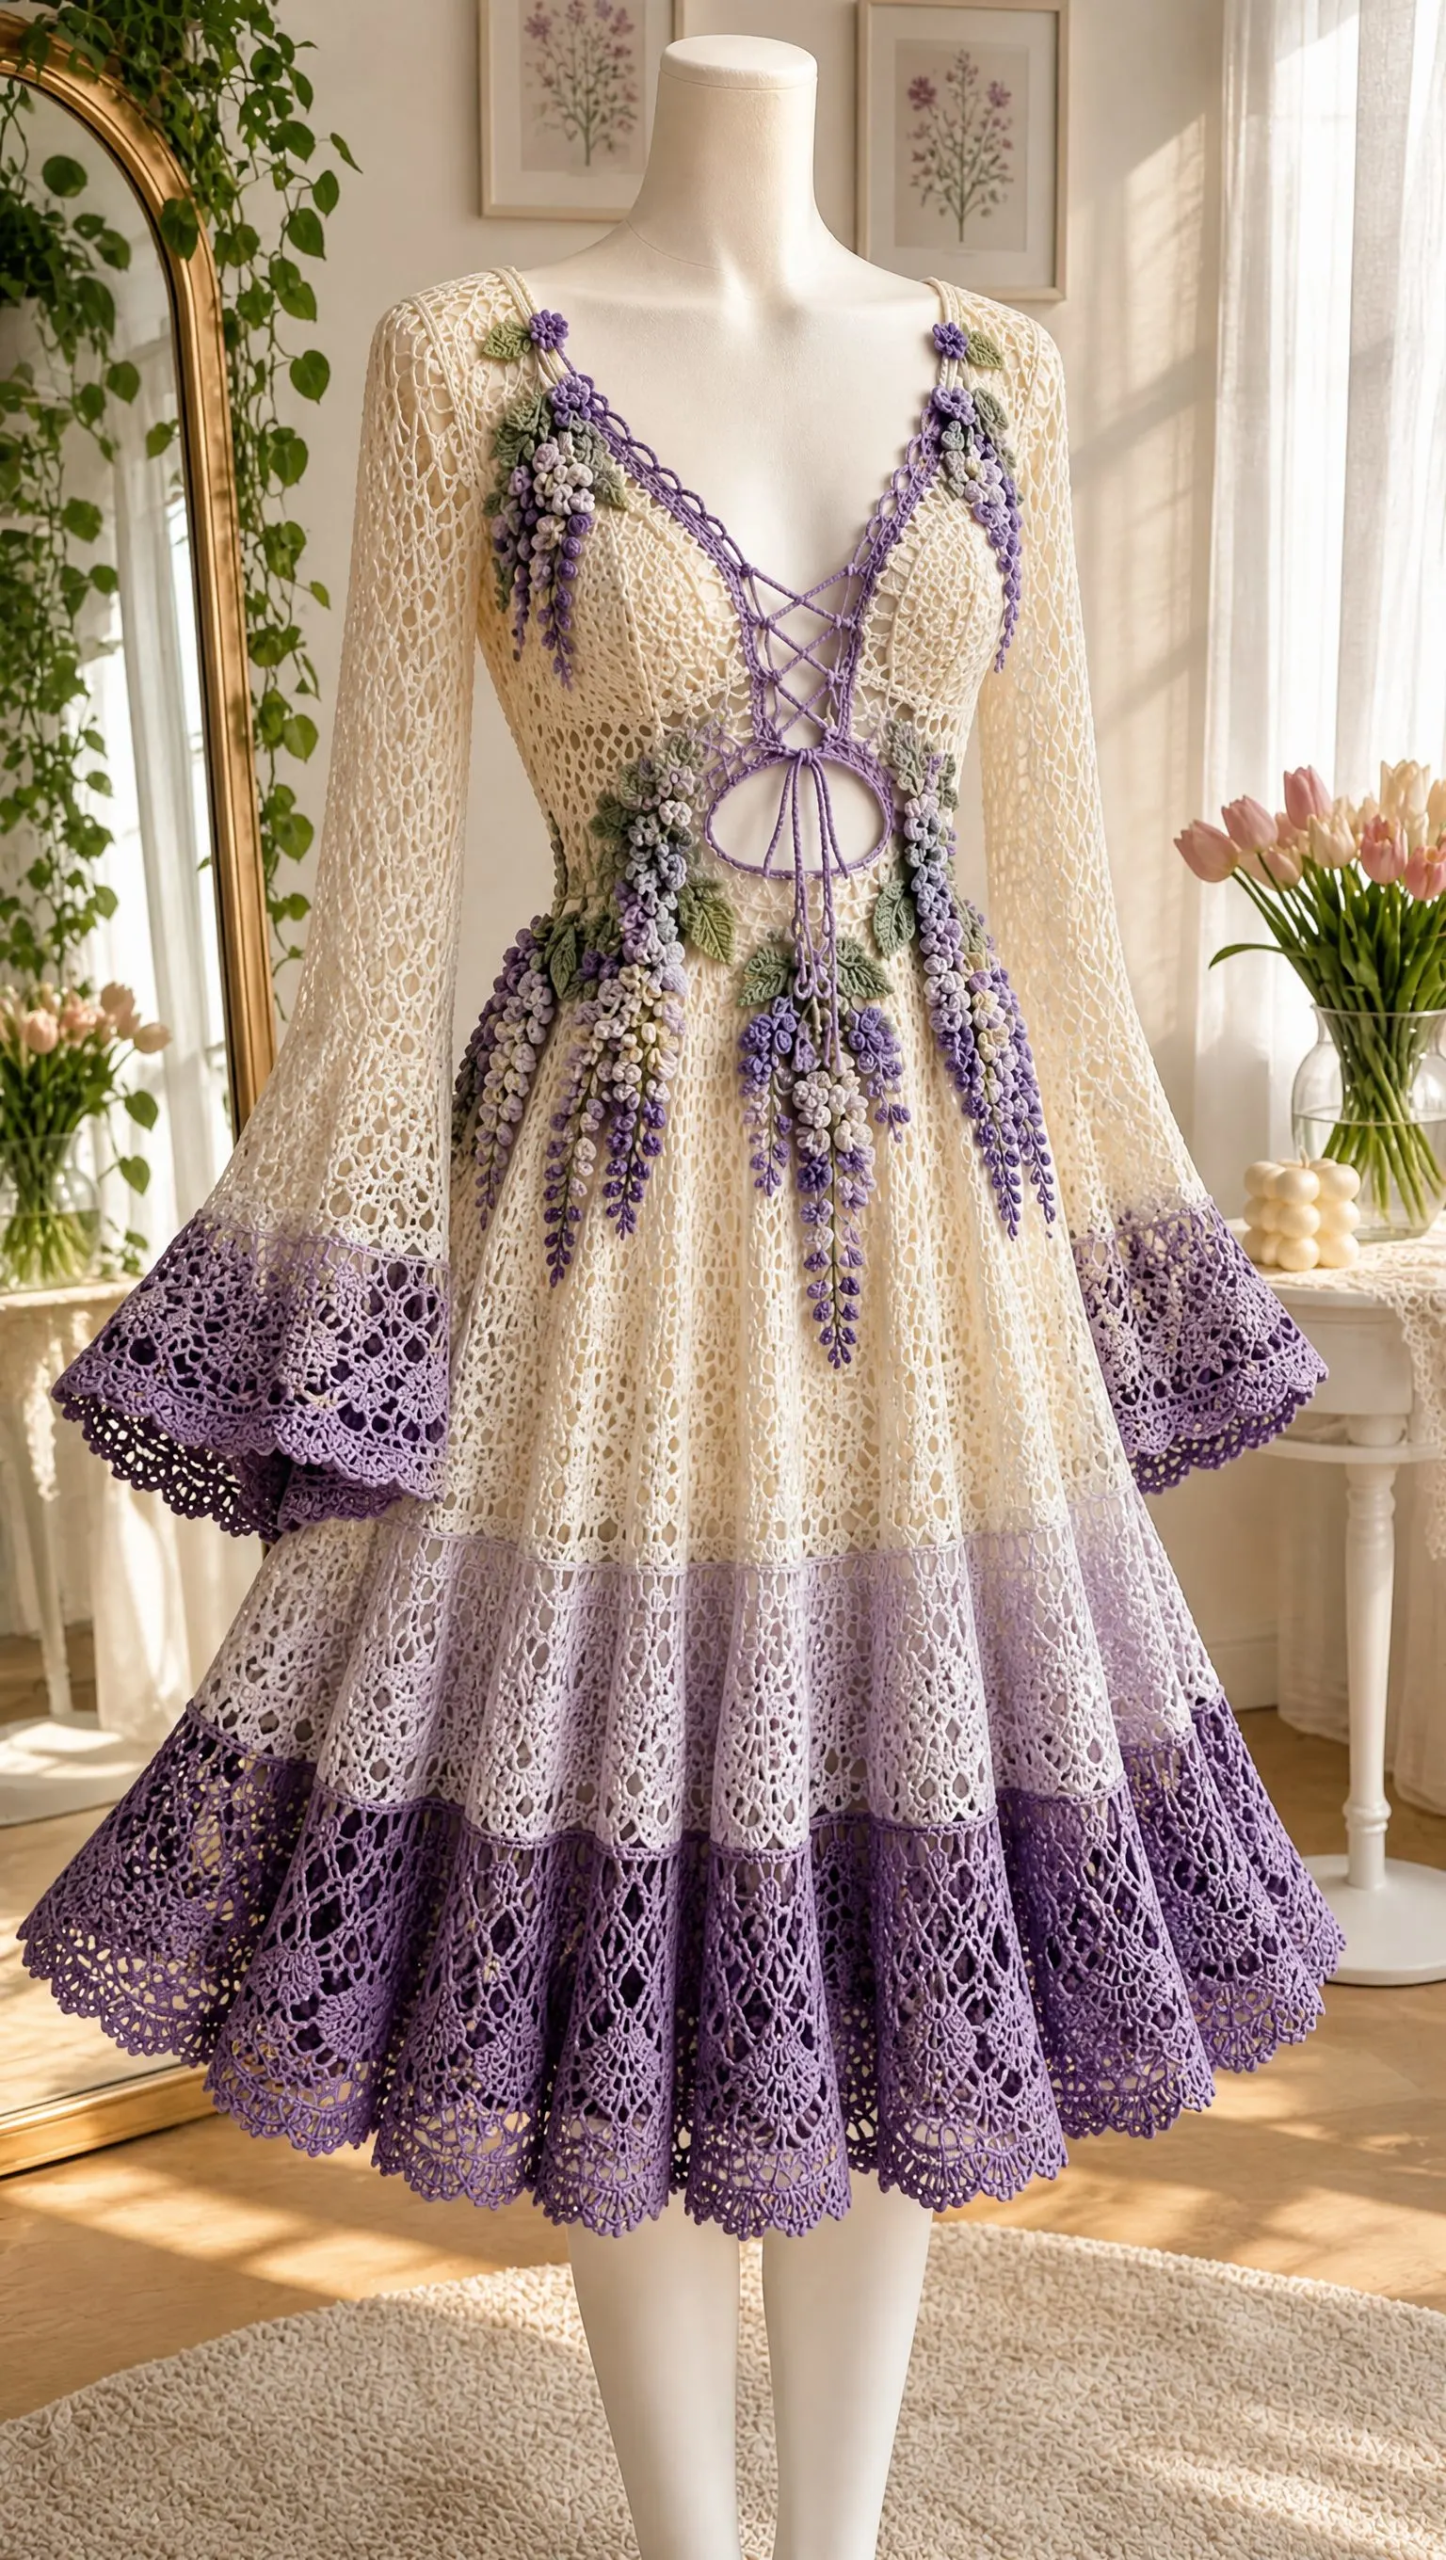
That daydream turned into months of swatching, frogging, and experimenting until I finally landed on this design. The Lilac Wisteria Lace Dress combines everything I love about delicate lacework with the drama of those gorgeous hanging flower clusters. It is hands down one of the most ambitious projects I have ever tackled, and I could not be more thrilled to share it with you.
I will be honest with you. This is not a weekend project. But if you have been crocheting for a while and you are ready to challenge yourself with something truly spectacular, this dress will reward every hour you put into it. Let me walk you through everything you need to know to bring this beauty to life.
Project Overview and Skill Level
This pattern is rated as advanced intermediate, which means you should be comfortable with basic stitches, increasing and decreasing, working in the round, and following multi-step instructions. If you have successfully completed lace shawls, fitted garments, or detailed appliqué work before, you are ready for this.
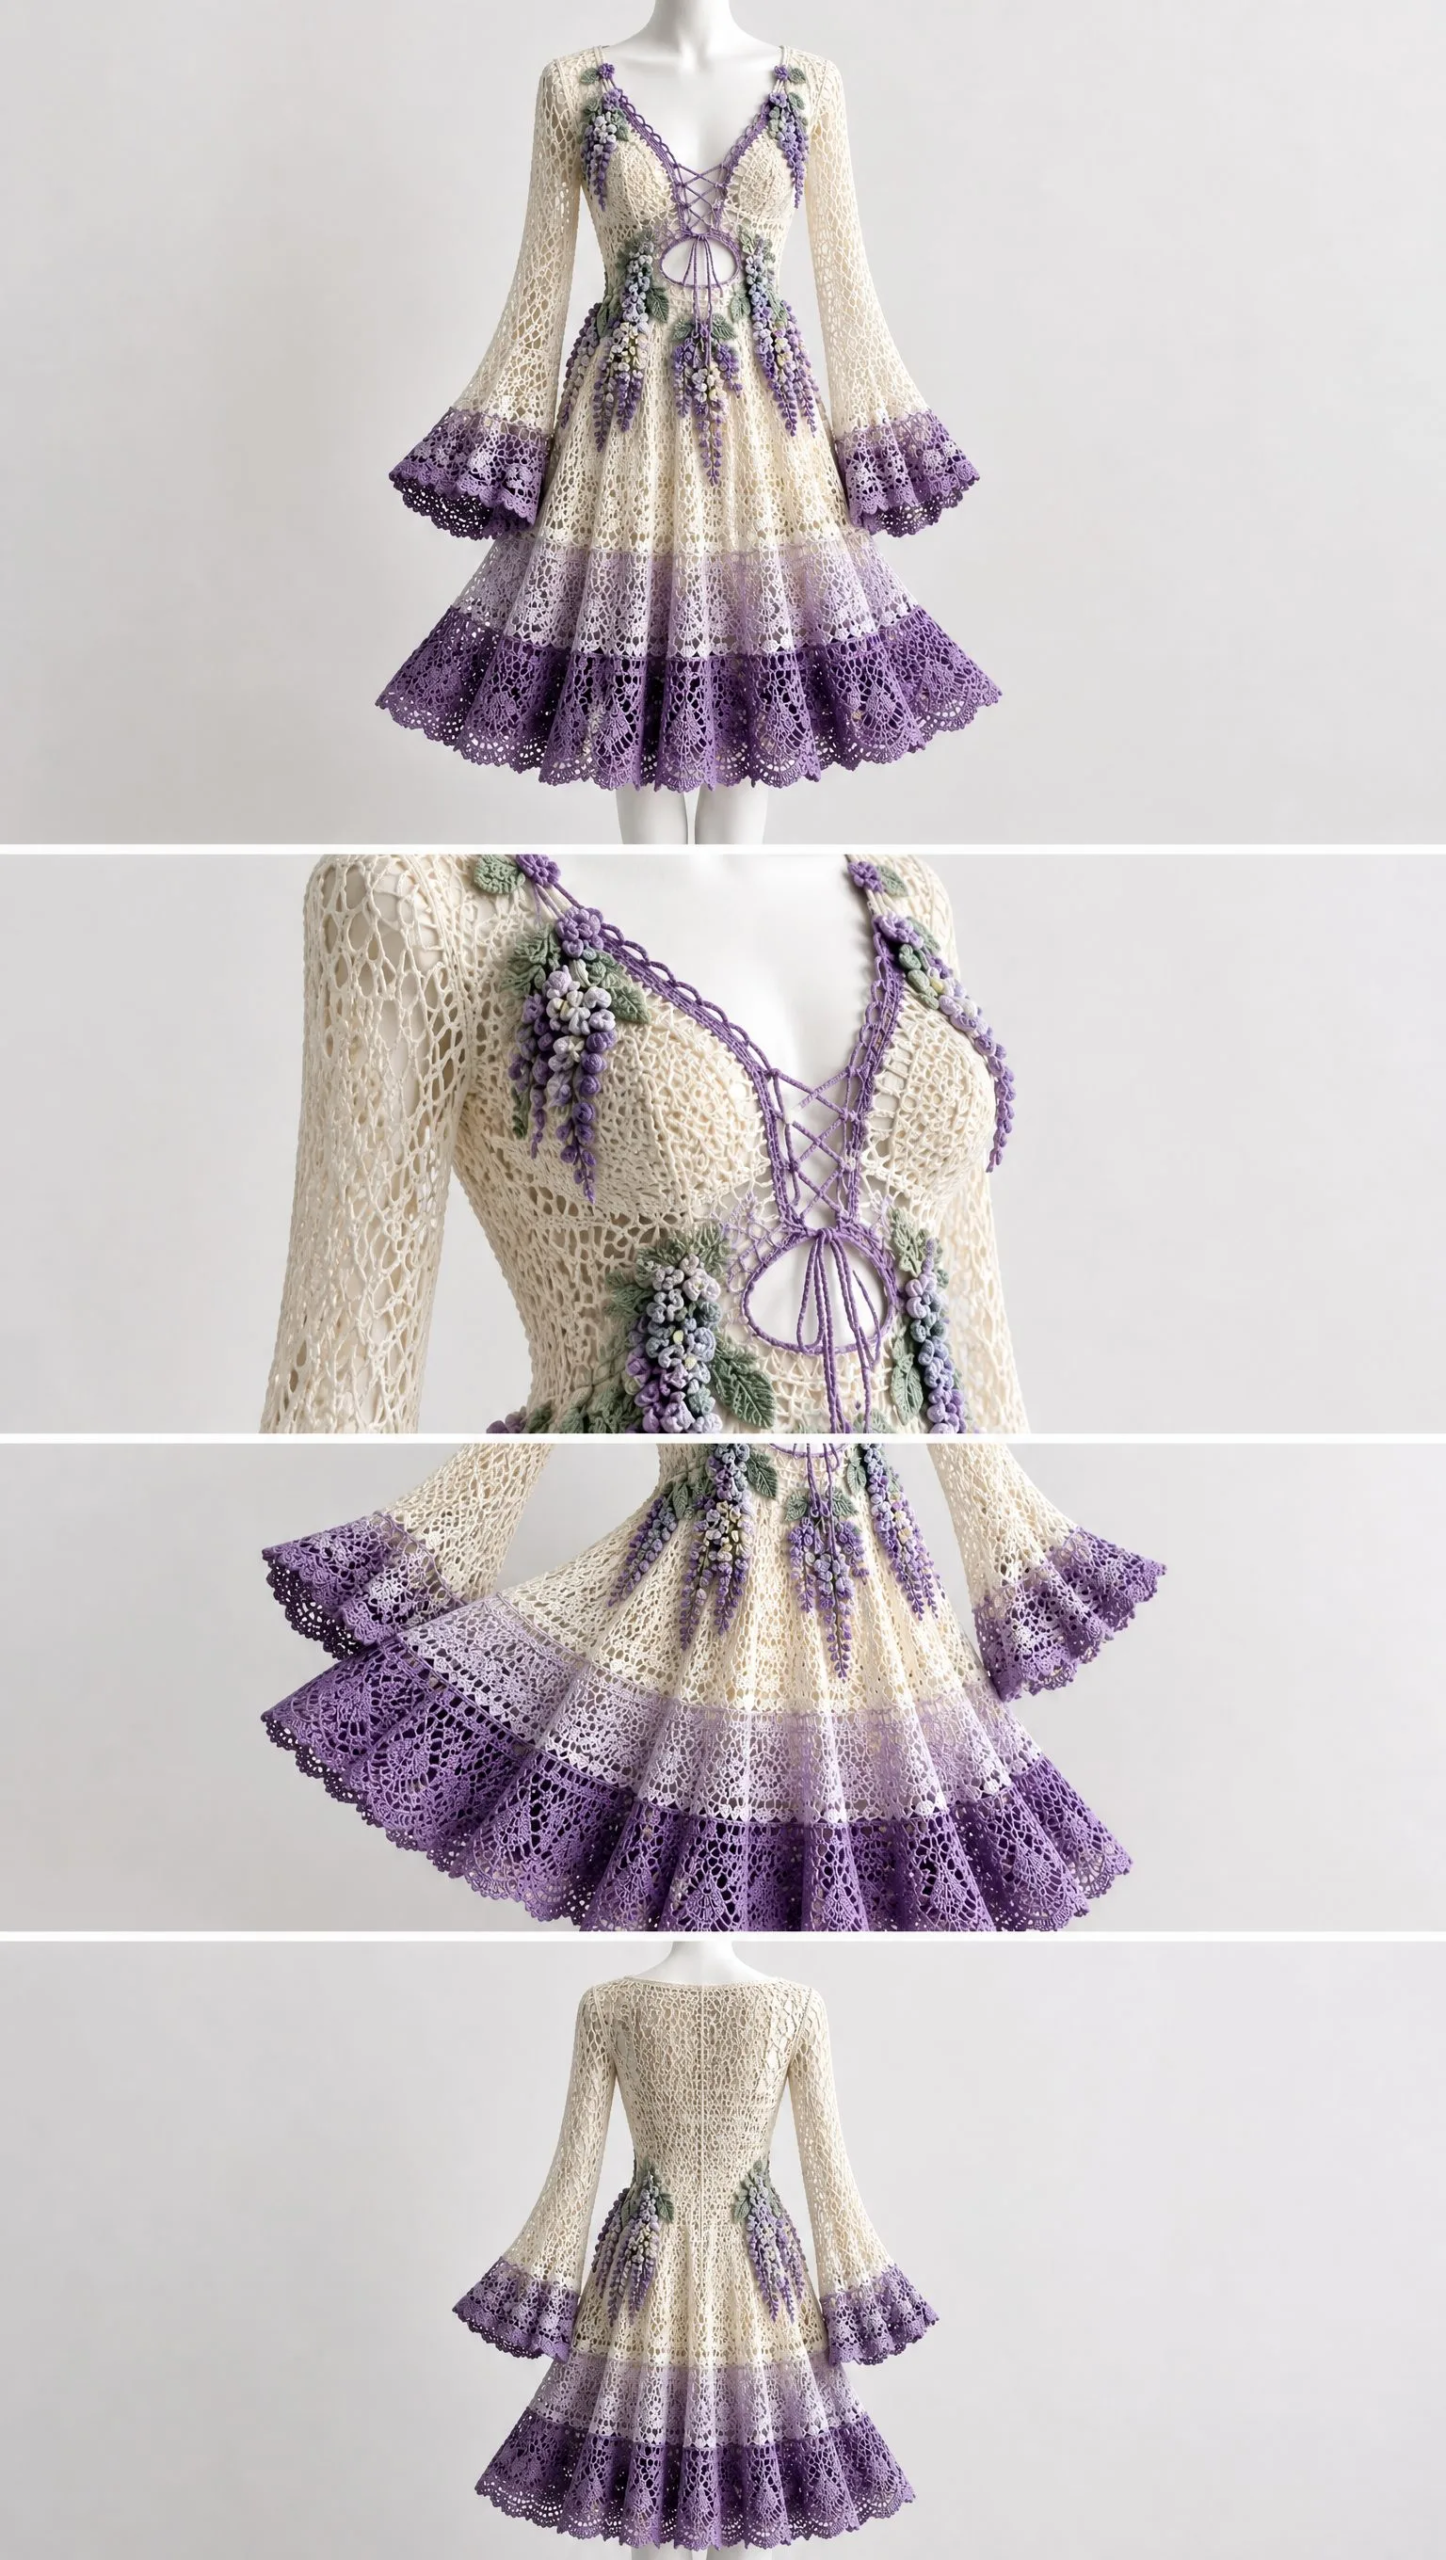
The finished design features a fitted V-neck lace bodice with a lace-up detail, an oval underbust opening that adds visual interest, long diamond-mesh sleeves with scalloped bell cuffs, beautiful wisteria puff-stitch appliqués, a three-tier flared skirt, and a stunning pineapple lace hem. It sounds like a lot because it is a lot, but we will break it down piece by piece.
The pattern includes custom sizing instructions, so you can adjust it to fit your measurements perfectly. A well-fitted crocheted garment is worth its weight in gold, and taking the time to customize will make all the difference.
Materials You Will Need
Before you begin, gather all your supplies so you can work uninterrupted. There is nothing worse than getting into a flow state only to realize you are missing something essential.
Yarn: Fine matte cotton crochet thread or sport cotton yarn. Cotton is ideal for this project because it gives the lace definition, drapes beautifully, and holds up well to the detailed stitch work. You will need yarn in four colors:
Hook: 2.0 mm to 2.5 mm crochet hook, depending on your personal yarn tension. The smaller hook creates tighter, more defined lacework, while the larger hook gives you a softer drape. You will need to swatch to determine which works best for your hands.
Additional Materials:
Understanding Gauge
Gauge is absolutely critical for a fitted garment like this. If your gauge is off, your dress will not fit properly, and all that beautiful work will be for nothing.
Work a 10 cm square in your chosen mesh stitch. Adjust your hook size until the fabric has an airy drape while still keeping its shape. The lace should be open and delicate but not so loose that it stretches out of shape when worn.
Take your time with this step. I know swatching feels tedious when you are excited to start, but I promise it will save you heartache later.
Stitch Abbreviations and Definitions
Let me walk you through all the stitches you will encounter in this pattern. Even if you know them well, it helps to have everything defined in one place.
ch (chain): The foundation of most crochet. Yarn over, pull through the loop on your hook. One chain made.
sc (single crochet): Insert hook into stitch, yarn over and pull up a loop (two loops on hook), yarn over and pull through both loops. This is your shortest, tightest stitch.
hdc (half double crochet): Yarn over, insert hook into stitch, yarn over and pull up a loop (three loops on hook), yarn over and pull through all three loops. Slightly taller than single crochet.
dc (double crochet): Yarn over, insert hook into stitch, yarn over and pull up a loop (three loops on hook), yarn over and pull through two loops (two loops remain), yarn over and pull through remaining two loops. This is your workhorse stitch for the mesh sections.
tr (treble crochet): Yarn over twice, insert hook into stitch, yarn over and pull up a loop (four loops on hook), yarn over and pull through two loops three times until one loop remains. Taller than double crochet, used in the lace details.
sl st (slip stitch): Insert hook into stitch, yarn over and pull through both the stitch and the loop on your hook in one motion. Used for joining and moving across stitches invisibly.
sp (space): Refers to the gap created by chain stitches in lace patterns. When a pattern says "work into the space," you are working into the hole, not into a specific stitch.
inc (increase): Adding stitches to make your work wider. The method varies depending on context.
Bodice Pattern
The bodice is constructed in three panels: two front panels and one back panel. This construction method allows for the V-neckline and the fitted shaping.
Step 1: Create two front lace panels and one back panel.
Step 2: Work foundation chains to match your bust measurement. This is where your custom sizing comes in. Measure carefully and calculate how many chains you need based on your gauge swatch.
Step 3 (Row 1): Double crochet (dc) across your foundation chain.
Step 4: Continue with diamond mesh pattern. This creates the beautiful open lacework you see in the sleeves and bodice. Work as follows: (ch 3, skip 2 stitches, dc in next stitch) repeat across the row.
Step 5: Shape the V neckline by decreasing one mesh repeat at each front edge every few rows. This gradual decrease creates that elegant plunging neckline.
Step 6: Add side shaping with waist decreases for a fitted silhouette. You want the bodice to hug your curves, so pay attention to where you place your decreases.
Step 7: Join shoulders and sides with invisible mattress-style crochet seams. Take your time here. Good seaming makes the difference between a handmade look and a professional finish.
Step 8: Add front lace-up loops using small chain arches. These will hold your ribbon or crochet cord.
Step 9: Create the oval underbust opening by leaving a centered opening and reinforcing the border with single crochet (sc) stitches. This detail adds visual interest and a touch of romantic drama to the design.
Sleeves
The sleeves are worked directly onto the bodice, starting at the armhole and working down to the dramatic bell cuff.
Step 1: Attach yarn at the armhole.
Step 2: Work diamond mesh in rounds, using the same (ch 3, skip 2 stitches, dc in next stitch) pattern from the bodice.
Step 3: Increase gradually toward the cuff for a flowing sleeve. This creates that beautiful bell shape.
Step 4: Finish with a wide bell cuff using the following rounds:
The deep lavender color at the cuffs ties beautifully into the hem color, creating visual cohesion throughout the dress.
Wisteria Appliqué
These cascading flower clusters are what make this dress truly magical. You will make multiple hanging clusters and attach them strategically.
Flowers
Step 1: Begin with a magic ring (also called a magic circle). This technique creates a tight, closed center with no hole.
Step 2: Work 6 puff stitches separated by chains into the magic ring. Puff stitches create that dimensional, textured look that mimics real wisteria blossoms.
Step 3: Add small lavender blossoms along a chain stem to create the cascading effect.
Step 4: Sew flowers cascading from the waist downward. Refer to the image for placement. The clusters should look natural and organic, not perfectly symmetrical.
Leaves
Step 1: Chain 8.
Step 2: Work sc, hdc, dc, hdc, sc around the chain. This creates a simple leaf shape.
Step 3: Attach leaves beside the flower sprays using sage green yarn.
The combination of pale lilac and deep lavender flowers with sage green leaves creates that authentic wisteria look that inspired this entire design.
Skirt Construction
The skirt is constructed in three tiers, each with its own color and texture. This creates beautiful visual movement and that romantic ombre effect.
Upper Ivory Band
Step 1: Continue from the waist with mesh stitch in ivory.
Step 2: Increase evenly every few rounds to create flare. The skirt should gradually widen as you work down.
Pale Lilac Band
Step 1: Change to pale lilac yarn.
Step 2: Work lace repeats with gradual increases.
Step 3: Maintain a soft A-line drape. You want the skirt to flow and move, not stand stiffly.
Deep Lavender Hem
Step 1: Change to deep lavender.
Step 2: Work pineapple lace motifs. Create fan shapes using double crochet (dc) clusters and chain spaces. Pineapple lace is a classic crochet technique that creates those gorgeous scalloped shapes you see at the hem.
Step 3: Repeat the pineapple motifs around the skirt edge.
Step 4: Finish with scalloped picot edging for a polished look.
Assembly and Finishing
Once all your pieces are complete, it is time to bring everything together.
Blocking: Block all pieces gently. Wet blocking works well for cotton. Pin your pieces to measurements and allow them to dry completely. This step is not optional for lacework. It opens up the stitches and gives your dress a professional finish.
Seaming: Sew all motifs securely with hidden stitches. Use a tapestry needle and matching thread to attach the wisteria appliqués.
Lining: Add lining if desired. A simple slip dress or attached lining fabric provides modesty and comfort.
Final Checks: Check sleeve symmetry and hem shaping. Make any adjustments before weaving in all your ends.
Finishing Touches: Weave in ends thoroughly, steam lightly without flattening the texture, and shape the skirt flare while drying.
Care Instructions
Your finished dress deserves gentle care to maintain its beauty.
Hand wash cold using a mild detergent. Do not wring or twist the fabric. Reshape the dress flat on a clean towel and allow it to air dry completely. Store flat or hanging to prevent stretching.
Tips for Success
This dress is a significant undertaking, so here are some additional tips to help you succeed:
Work in sections. Complete one piece before moving to the next. This prevents overwhelm and gives you a sense of accomplishment along the way.
Use stitch markers liberally. Mark the beginning of rounds, increase points, and pattern repeats. You will thank yourself later.
Take breaks. Detailed lacework requires concentration. Work in shorter sessions to maintain accuracy.
Trust the process. Lace often looks like a tangled mess until it is blocked. Do not judge your work until you have blocked it properly.
Photograph your progress. You will want to remember this journey, and photos help you track where you left off.
This pattern is a custom reconstruction guide inspired by the Lilac Wisteria Lace Dress design and should be adjusted using personal measurements for a perfect fit. Take your measurements carefully, reference your gauge swatch frequently, and do not be afraid to try on as you go.
Final Thoughts on the Lilac Wisteria Lace Dress Crochet Pattern
Creating this dress is a labor of love, but the result is absolutely breathtaking. When you slip it on for the first time and see those wisteria clusters cascading down the bodice, those bell sleeves flowing, and that gorgeous ombre skirt swirling around your knees, you will understand why every single stitch was worth it.
This is the kind of project that reminds us why we fell in love with crochet in the first place. It challenges us, teaches us, and rewards us with something truly one of a kind. No fast fashion piece could ever compare to a handmade garment crafted with this much intention and care.
I hope this crochet pattern brings you as much joy to make as it brought me to design. Whether you are creating it for a special occasion, a photoshoot, or simply because you deserve something beautiful, I know you will do an amazing job.
If you loved this pattern, I would be so grateful if you saved it to your Pinterest boards so you can find it easily when you are ready to start. And please, if you make this dress, leave a comment below or tag me on social media. Seeing your finished projects absolutely makes my day, and I would love to celebrate your hard work with you. Happy crocheting, friend!
Want a Quick & Easy Printable Version?
Get a clean, beautifully formatted PDF of this pattern — easy to follow step by step, ready to print or save on any device. No scrolling, no distractions, just the pattern.
Get the Printable PDF →You Might Also Like
- Sunshine Daisy Book Cover Free Crochet Pattern
- Lavender Dream Mesh Crochet High Tops Free Pattern
- Sage Green Lacy Crochet Jumpsuit Free Crochet Pattern
- Sunflower Granny Square Market Bag Free Crochet Pattern