This design brings together classic filet mesh construction with a bold ochre daisy motif for a dress that feels both vintage-inspired and completely modern. The sleeveless silhouette flatters with its fitted bodice and gently flared skirt, while the open mesh creates beautiful drape and movement.
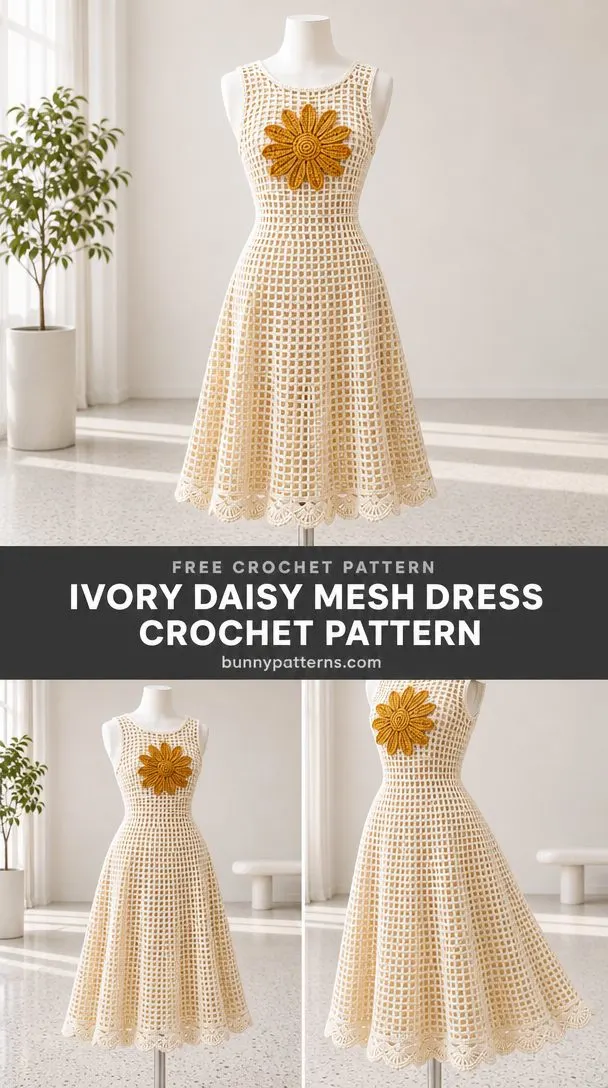
What makes this pattern special is how it balances simplicity with impact. The mesh stitch is wonderfully repetitive once you get going, making it meditative to work. Then the oversized daisy appliqué adds that statement piece energy without complicating the construction. You work the bodice as two flat panels, seam the shoulders and sides, then join the skirt in the round and work downward.
The shell edging along the hem gives the dress a scalloped finish that catches light beautifully. If you’re comfortable with basic double crochet and can follow a simple increase pattern, you’ll love how this one comes together.
About This Crochet Dress Pattern
This Ivory Daisy Mesh Dress crochet pattern creates a sleeveless garment with a flared skirt and sewn crochet motifs. It fits one adult size with an intended bust of 88 to 94 centimeters and a finished bust measurement of 100 centimeters total panel width. The finished shoulder to hem length is 88 centimeters.
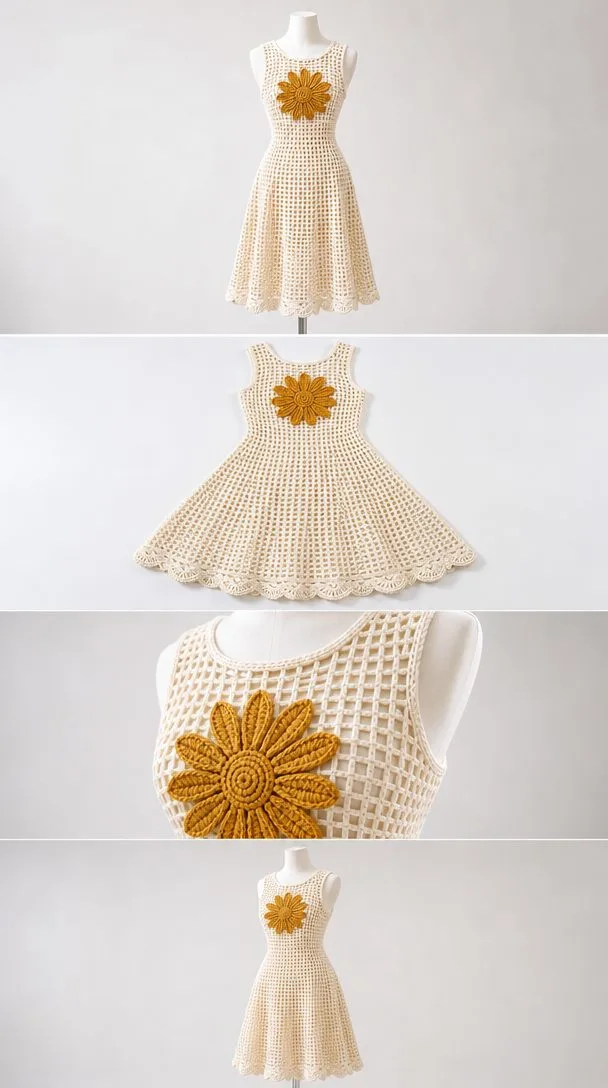
The dress is constructed in three main sections: a front bodice panel, a back bodice panel, and a circular skirt worked from the waist down. The daisy motifs are made separately and sewn on after assembly. This construction method keeps the work manageable and allows you to adjust fit as you go.
The open filet mesh creates a lace effect, so plan to wear this dress over an opaque slip or liner. The pattern recommends 6 to 12 centimeters of ease at the bust for comfortable fit.
Materials and Tools You’ll Need
Yarn:
- Main color (ivory): Smooth DK weight cotton, approximately 714 grams or 1571 meters. This assumes a yarn with 220 meters per 100 grams.
- Accent color (ochre): 120 grams or 264 meters. If using the same color throughout, simply combine the totals.
These amounts include a 15% allowance for variations in tension and any mistakes along the way.
Hooks:
- 3.5 mm hook for mesh fabric and edgings
- 3 mm hook for daisy motifs and any fan overlays
Adjust your mesh hook size as needed to achieve gauge. Going up or down half a millimeter can make a real difference in how your fabric drapes.
Notions:
- Tapestry needle for weaving ends and seaming
- Removable stitch markers
- Tape measure
- Rust-resistant blocking pins
- Scissors
No beads, wire, or buttons are required for this pattern.
Gauge
Getting gauge right matters for garment fit. Here’s exactly what you’re aiming for:
Blocked mesh: 18 underlying stitch positions and 10 rows equals 10 by 10 centimeters. This is equivalent to 6 square cells and 10 rows.
A cell in filet mesh consists of chain 2 plus the next double crochet (dc). When measuring mesh width, exclude the initial edge dc.
How to Make a Gauge Swatch
Chain 41 stitches. Work a double crochet in the eighth chain from hook, then repeat the following sequence 11 times: chain 2, skip 2 chains, double crochet in the next chain. You should have 12 cells including the initial skipped chain cell, with 13 dc posts total.
Continue working mesh rows until you have 16 rows total. Wash and dry flat, just as you would the finished garment. Measure the central 6 cells and 10 rows. If your measurements don’t match, change your hook size and swatch again.
Abbreviations and Special Stitches
This pattern uses US crochet terminology. Here’s every abbreviation you’ll encounter:
- ch = chain
- sl st = slip stitch
- sc = single crochet (insert hook, yarn over, pull up a loop, yarn over, draw through both loops)
- hdc = half double crochet
- dc = double crochet (yarn over, insert hook, yarn over, pull up a loop, yarn over and draw through 2 loops twice)
- tr = treble crochet
- st(s) = stitch(es)
- RS = right side
- WS = wrong side
- rep = repeat
- sc2tog = single crochet 2 together (a decrease). Yarn over and draw up a loop in each of 2 stitches, yarn over and draw through all 3 loops.
Special Stitches
Mesh row: Chain 3 (this counts as your first dc), turn. Work chain 2, dc in next dc across the row. Each cell contains one chain 2 gap bounded by dc posts. Work the last dc into the top of the turning chain 3. The turning chain counts as an edge dc, never as an extra cell.
Picot: Chain 3, slip stitch in first chain.
Shell: 5 dc worked into one base stitch.
Magic ring: An adjustable yarn loop. Work your stitches around the loop, pull the tail to close, then secure the tail after joining.
Pattern Notes Before You Begin
Read through this entire pattern before you start crocheting. It helps to understand the construction sequence before you’re mid-project.
Row 1 is the right side (RS). Work flat unless the instructions say otherwise. Brackets indicate sections to repeat, and you repeat them only the stated number of times. All row numbers include the foundation row. Stitch counts describe cells and dc posts separately. Chain spaces are not counted as dc.
This is a one size pattern, not a graded multi-size pattern. If you need to adjust length, add or remove plain mesh rows before the armhole shaping. Each row adds approximately 1 centimeter of length. If you change the length, recalculate your yarn needs.
Step by Step Instructions
Bodice (Make Front and Back Identical)
Foundation: Chain 95.
Row 1: Double crochet in the eighth chain from hook. Work the following sequence 29 times: chain 2, skip 2 chains, dc in next chain. You now have 30 cells and 31 dc.
Rows 2 through 10: Work mesh row. Each row maintains 30 cells and 31 dc.
Row 11 (Armhole Shaping): Slip stitch along the first 3 cells. Chain 3, then work mesh across the next 24 cells, leaving the last 3 cells unworked. You now have 24 cells and 25 dc.
Rows 12 through 25: Work mesh row. Maintain 24 cells and 25 dc per row.
Left Strap
Row 26: Work mesh across the first 6 cells only. Turn.
Rows 27 through 32: Continue working mesh over these 6 cells. Fasten off. Each row has 6 cells and 7 dc.
Right Strap
Row 26: Rejoin yarn at the opposite outer edge. Work 6 cells inward.
Rows 27 through 32: Work mesh over these 6 cells. Leave the center 12 cells unworked for the neckline. Each row has 6 cells and 7 dc.
Make two identical panels for front and back.
Assembly
Gather your main color yarn and either a 3.5 mm hook for slip stitch joins or a tapestry needle for mattress stitch seaming.
Seam 1 (Shoulders): With right sides together, join the 6 cell front straps to the matching back straps. Use 1 slip stitch per dc and 2 slip stitches per chain 2 gap. This creates 19 joining positions per strap. Repeat for the opposite shoulder.
Seam 2 (Sides): Using mattress stitch, join the side edges from the waist through Row 10. Work 1 seam pass per row edge. Leave Rows 11 through 32 open as the armhole. Repeat for the opposite side. You’ll have 10 row edge pairs on each side.
Checkpoint: Both shoulders should lie flat. Side seams should match row for row. Each armhole measures 22 centimeters deep. Waist circumference is 100 centimeters before attaching the skirt.
Skirt
Turn the bodice right side out before beginning the skirt.
Round 1: Join main yarn at a waist side seam. Work 1 dc into each waist dc post with chain 2 between posts. Join to initial dc with slip stitch. The chain 3 counts as your initial dc. Be careful not to double up at seam posts. Count 30 cells across each panel. Total: 60 cells and 60 dc.
Rounds 2 through 4: Chain 3, then work chain 2, dc in next dc around. End with chain 2 and slip stitch to top of chain 3. Maintain 60 cells and 60 dc per round.
Round 5 (Increase Round): Mark every fourth dc post. You should have 15 marked posts. Chain 3 at an unmarked post. Work dc in each unmarked post and work (dc, chain 2, dc) in each marked post, with chain 2 between all posts. Finish with chain 2 and join to top of chain 3. You now have 75 cells and 75 dc.
Rounds 6 through 52: Work mesh around with no increases. Maintain 75 cells and 75 dc per round.
Round 52 is your last skirt round. The skirt measures 52 centimeters before adding the 4 centimeter hem. At stated gauge, finished hem width is 125 centimeters.
Daisy Motifs (Make 2 for Dress)
Use ochre yarn and your 3 mm hook.
Center Round 1: Work 8 single crochet into a magic ring. Join with slip stitch. (8 sc)
Petal Round 2: In each sc, work the following sequence: chain 6, dc in third chain from hook, dc in next 3 chains, slip stitch in the same center sc. Join. (8 petals)
Fasten off and block to 13 centimeters diameter. Spread petals evenly around the center.
Edgings and Details
Use ivory yarn and your 3.5 mm hook for borders. Use ochre yarn and 3 mm hook for motifs.
Border Round 1: With RS facing, work sc evenly around each armhole and neckline. Work 2 sc per dc row edge, 1 sc per dc post, and 2 sc per chain 2 gap. Add 2 sc at each outer corner. Use sc2tog at sharp inward corners. Join with slip stitch. Record your actual count.
Border Round 2: Chain 1, sc in each sc around. Join. Keep tension loose enough to lie flat.
Hem Foundation: Work sc across the lower edge. Work 1 sc per dc and 2 sc per chain 2 gap. For the dress, this creates 225 sc around 75 cells. Adjust by at most 3 evenly spaced increases or sc2tog decreases to reach a multiple of 6. Target is 228 sc.
Hem Round 1: Work the following pattern around: sc in next sc, skip 2 sc, 5 dc in next sc, skip 2 sc. Join. (38 shells)
Hem Round 2: Slip stitch into each stitch around without tightening. Fasten off. (228 sl sts)
Block the lower edging to 4 centimeters depth.
Attaching Motifs: Pin one daisy motif at center chest and one on upper back. Sew through motif edges and mesh dc posts. Never sew through only chain gaps.
Checkpoint: Edges lie flat with no pulling. Motifs are securely sewn. Check both motif placement and garment fit before securing final tails.
Finishing Your Mesh Dress
Weaving Ends: Thread each tail through at least 5 centimeters of dense stitches in two directions. Do not thread across open mesh gaps.
Blocking: Soak briefly in cool water. Support the garment when lifting to prevent stretching. Press gently in a towel, lay flat, and pin to measurements. Keep front and back rows aligned.
Final Shaping: Shape motifs and hem gently. Allow to dry fully before removing pins. Trim tails close to the fabric.
Final Measurements: Length 88 centimeters. Bust circumference 100 centimeters. Hem 120 to 125 centimeters.
Care Instructions
Follow your yarn label for specific guidance. Hand wash in cool water with mild detergent. Reshape and dry flat. Do not hang while wet, as the mesh will stretch significantly. Avoid hot ironing.
This adult garment is not intended for children. Long loops can snag, so secure every motif thoroughly. Keep loose yarn away from babies and pets.
Tips for Success with This Pattern
On gauge: Filet mesh can be deceptive. It looks simple, but tension variations show clearly in the grid pattern. Take time with your swatch.
On seaming: Mattress stitch creates nearly invisible seams in mesh fabric. Work slowly and check alignment frequently.
On the daisy motifs: Block these firmly before attaching. They’ll lay flatter and look more polished on the finished dress.
On wearing: The mesh is completely see-through. A fitted slip in ivory, nude, or a contrasting color underneath creates different effects. Try a few options before your first outing.
Who This Pattern Is For
This crochet dress pattern suits intermediate crocheters who are comfortable with basic stitches and ready to tackle garment construction. If you’ve made accessories and want to try wearables, this is an excellent next step. The mesh stitch is repetitive and calming, while the shaping and assembly introduce new skills without overwhelming complexity.
The finished dress makes a stunning summer piece, a beach coverup over a swimsuit, or a layered statement for special occasions. The bold daisy motif gives it personality without being overly complicated to create.
Thank you so much for choosing this pattern. It’s such a satisfying project to watch come together, from those first mesh rows to the moment you attach the finished daisy. If you make this dress, please share your photos on Instagram or Facebook. Seeing your finished makes is genuinely one of the best parts of designing.
Save this Ivory Daisy Mesh Dress crochet pattern to your Pinterest boards so you can find it when you’re ready to start. And if you do make it, drop a comment below. Your feedback helps other crocheters decide if this project is right for them, and it’s always wonderful to hear how the pattern worked up for you.
You Might Also Like
- Ocean Breeze Granny Tote Bag Free Crochet Pattern
- Coral Sunset Tiered Ruffle Crochet Dress Free Pattern
- Mint Sage Gradient Bow Sweater Free Crochet Pattern
- Lavender Butterfly Baby Dress Free Crochet Pattern