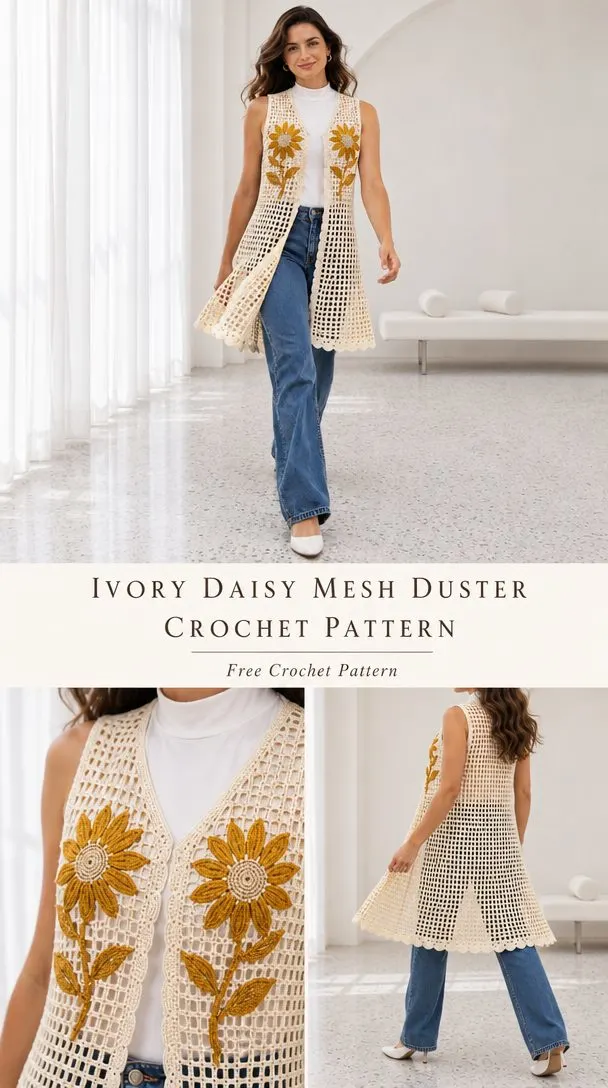
If you’ve been searching for an open-front layering piece that feels both effortless and special, this design deserves a closer look. The Ivory Daisy Mesh Duster stands out from typical cardigans and kimonos with its airy filet mesh construction, elegant length, and those stunning golden ochre daisy motifs that transform a simple silhouette into wearable art.
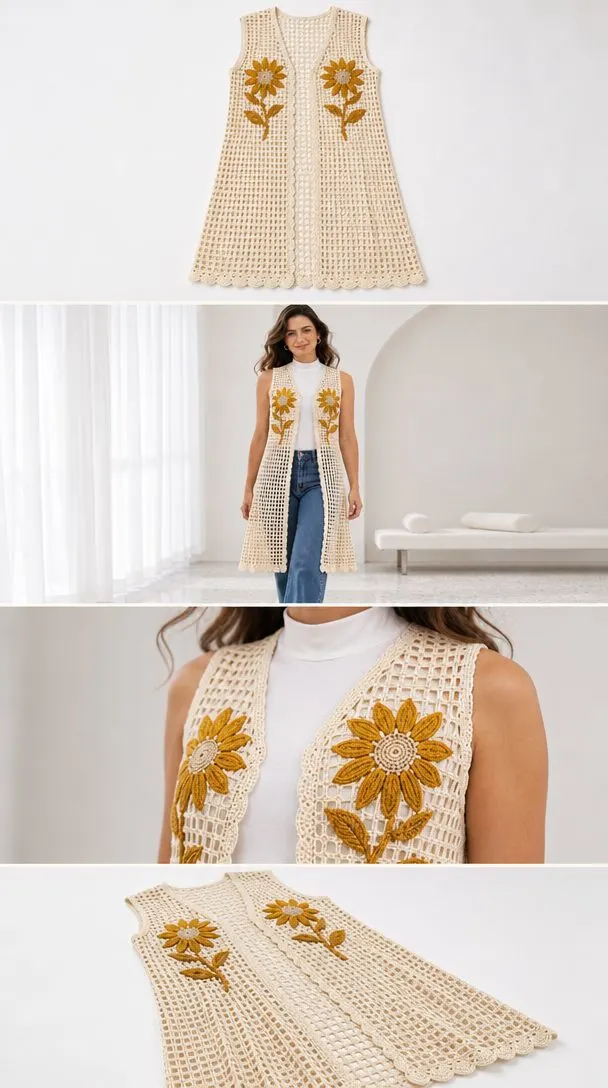
What makes this duster particularly appealing is how the design balances simplicity with visual impact. The mesh body works up in a straightforward rhythm of chains and double crochets, making it accessible even if you’re newer to garment construction. Yet the finished piece looks anything but basic.
The sleeveless, open-front silhouette drapes beautifully over jeans and a tee or dressed up over a simple dress. It’s the kind of piece you’ll reach for constantly once it’s hanging in your closet.
About This Design
This mesh duster crochet pattern creates a sophisticated layering piece perfect for transitional weather or air-conditioned spaces. The garment features an open front with no closures needed, a flattering length that hits at approximately 78 cm from shoulder to hem, and beautiful scalloped shell edging along the bottom.
The construction is surprisingly straightforward. You’ll work a back panel and two mirrored front panels from the hem upward, then seam them together at the shoulders and sides. The front panels include gentle neck shaping over the final rows to create a smooth, tapered neckline that frames the face beautifully.
The star of this design is undoubtedly the daisy motifs worked separately and sewn onto the chest areas. These golden ochre flowers with their elongated petals add a bohemian, artisan quality that elevates the entire piece.
Skill Level
This pattern is best suited for confident beginners to intermediate crocheters. If you’re comfortable with double crochet, chain spaces, and basic shaping, you have everything you need to complete this project successfully.
The filet mesh technique used throughout might sound intimidating if you haven’t tried it before, but it’s actually one of the most rhythmic and relaxing forms of crochet once you get the hang of it. Each row follows the same simple pattern, so you can easily work while watching television or chatting with friends.
The daisy motifs require working in the round with a magic ring, which is a technique worth learning if you haven’t already. It creates a tightly closed center that looks professional and polished.
Materials & Tools
Yarn:
- Main color (warm ivory): Smooth DK weight cotton, approximately 550 g / 1210 m (yarn with 220 m per 100 g)
- Accent color (golden ochre): 120 g / 264 m of the same weight
These amounts include a 15% allowance for peace of mind. If you prefer to work the entire duster in a single color, simply combine the totals.
Hooks:
- 3.5 mm hook for mesh panels and edgings
- 3 mm hook for motifs and any fan overlays
Adjust your mesh hook size as needed to achieve gauge. Going up or down half a millimeter can make a significant difference in your finished measurements.
Additional Supplies:
- Tapestry needle for weaving ends and seaming
- Removable stitch markers
- Tape measure
- Rust-resistant blocking pins
- Scissors
No beads, wire, or buttons are required for this pattern.
Gauge
Getting gauge right matters for garment fit, so please take the time to swatch before diving into the panels.
Blocked mesh gauge: 18 underlying stitch positions and 10 rows = 10 x 10 cm, which equals 6 square cells and 10 rows.
A cell in filet mesh consists of a chain 2 (ch 2) plus the next double crochet (dc). When measuring width, exclude the initial edge dc.
To make your gauge swatch:
Chain (ch) 41. Work a double crochet (dc) in the eighth chain from hook, then work [ch 2, skip 2 ch, dc in next ch] 11 times. This gives you 12 cells including the initial skipped-chain cell, with 13 dc posts total.
Continue working mesh rows until you have 16 rows total. Wash your swatch and dry it flat to simulate how the finished garment will behave. Measure the central 6 cells and 10 rows. If your measurements don’t match, change your hook size and try again.
Abbreviations & Special Stitches
This pattern uses US crochet terminology throughout.
- ch = chain
- sl st = slip stitch
- sc = single crochet
- hdc = half double crochet (yarn over, insert hook, pull up loop, yarn over and draw through all 3 loops)
- dc = double crochet (yarn over, insert hook, pull up loop, yarn over and draw through 2 loops twice)
- tr = treble crochet
- st(s) = stitch(es)
- RS = right side
- WS = wrong side
- rep = repeat
- sc2tog = single crochet 2 together (yarn over and draw up a loop in each of 2 stitches, yarn over and draw through all 3 loops)
Mesh Row: Ch 3 (this counts as first dc), turn. Work [ch 2, dc in next dc] across the row. Each cell contains one ch-2 gap bounded by dc posts. Work the last dc in the top of the turning ch-3. The turning chain counts as an edge dc, never as an extra cell.
Picot: Ch 3, sl st in first ch.
Shell: 5 dc in one base stitch.
Magic Ring: An adjustable yarn loop. Work your stitches around the loop, pull the tail to close it tightly, and secure the tail after joining.
Finished Measurements
This pattern is written for one adult size with the following dimensions:
- Intended bust: 88-94 cm
- Finished bust/total panel width: 100 cm
- Shoulder-to-hem length: 78 cm
- Back panel width: 50 cm
- Each front panel width: 25 cm
- Armhole depth: 22 cm
Choose a fit with 6-12 cm of ease at the bust. If you need to adjust the length, add or remove plain mesh rows before the armhole shaping. Each row equals approximately 1 cm. Remember to recalculate your yarn requirements if you make length changes.
Pattern Instructions
Back Panel
Foundation: Ch 95.
Row 1 (RS): Dc in eighth ch from hook, [ch 2, skip 2 ch, dc in next ch] 29 times. (30 cells, 31 dc)
Rows 2-74: Work mesh row. Fasten off after the final row. (30 cells, 31 dc per row)
Front Panels (Make 2 Mirror Images)
Foundation: Ch 50.
Row 1 (RS): Dc in eighth ch from hook, [ch 2, skip 2 ch, dc in next ch] 14 times. (15 cells, 16 dc)
Rows 2-60: Work mesh row. Mark one long side as the neck edge. (15 cells, 16 dc per row)
Neck Shaping (Rows 61-74, worked as local rows 1-14):
Decrease 1 cell at the neck edge on odd-numbered local rows (1, 3, 5, 7, 9, 11, and 13). Work even local rows plain with no shaping.
Cell counts for local rows 1-14: 14, 14, 13, 13, 12, 12, 11, 11, 10, 10, 9, 9, 8, 8. Each row has the stated number of cells plus 1 dc.
To decrease at the beginning of a row: Turn, sl st into the ch-2 gap and the next dc, ch 3, then continue the mesh pattern from that dc.
To decrease at the end of a row: Finish at the penultimate dc, leaving the final cell unworked.
Keep the outer (side seam) edge straight throughout shaping. Mirror the neck side placement on the second front panel. Fasten off. (8 cells, 9 dc each shoulder)
Daisy Motifs (Make 3)
Use the 3 mm hook and golden ochre yarn.
Center Round 1: Work 8 sc in a magic ring. Join with sl st to first sc. (8 sc)
Petal Round 2: In each sc, work [ch 6, dc in third ch from hook, dc in next 3 ch, sl st in same center sc]. Join. (8 petals)
Fasten off and block each motif to 13 cm diameter. The petals are elongated and should spread evenly around the center.
Assembly
You’ll need main-color yarn and either a 3.5 mm hook for slip-stitch joins or a tapestry needle for mattress stitch.
Shoulder Seams (Seam 1):
Lay the front and back panels with right sides together. Join the outer 8 cells of each shoulder using 1 sl st per dc and 2 sl sts per ch-2 gap. Leave the center 14 back cells unjoined for the neck opening. (25 joining positions each shoulder)
Side Seams (Seam 2):
Using mattress stitch, join each side from the hem upward through Row 52, working 1 pass per row edge. Leave the top 22 rows open on each side for the armholes. (52 row-edge pairs each side)
Checkpoint: Both shoulders should lie flat with side seams matching row for row. Each armhole should measure 22 cm deep. The flat back width should be 50 cm, and each front should be 25 cm below the neckline.
Edgings & Details
You’ll need warm ivory yarn with a 3.5 mm hook for borders, golden ochre yarn with a 3 mm hook for motifs, and a tapestry needle.
Border Round 1: With RS facing, work sc evenly around each armhole and around the entire neckline/front opening. Use 2 sc per dc row edge, 1 sc per dc post, and 2 sc per ch-2 gap. Add 2 sc at each outer corner. Use sc2tog at any sharp inward corners. Join with sl st. (Record your actual count as it will vary based on edges)
Border Round 2: Ch 1, sc in each sc around. Join. Keep your tension loose enough for the border to lie flat. (Same count as Round 1)
Hem Foundation: Work sc across the lower edge, using 1 sc per dc and 2 sc per ch-2 gap. The combined total after seams should reach approximately 180 sc. Adjust by at most 3 evenly spaced increases or sc2tog decreases to reach a multiple of 6.
Hem Round 1: [Sc in next sc, skip 2 sc, 5 dc in next sc, skip 2 sc] around. Join. (30 shells)
Hem Round 2: Sl st into each stitch around without tightening. Fasten off. (180 sl sts)
Block the lower edging to 4 cm depth.
Motif Attachment:
Pin one daisy motif on each front chest area and one on the upper back. Sew through the motif edges and mesh dc posts. Never sew only through chain gaps, as this won’t provide enough stability.
Checkpoint: All edges should lie flat with no pulling. Embellishments should be securely sewn. The front opening should remain usable.
Finishing
Weaving Ends: Weave each tail through at least 5 cm of dense stitches, changing direction at least once. Do not thread tails across open mesh gaps.
Blocking: Soak the finished garment briefly in cool water. Support the garment when lifting to avoid stretching. Press gently in a towel to remove excess water. Lay flat and pin to measurements, keeping front and back rows aligned.
Final Steps: Shape the motifs and hem gently. Allow to dry fully before removing pins and trimming tails.
Final Checkpoint: Finished length should be 78 cm. Bust/panel circumference should be 100 cm. Back width should be 50 cm, and each front should be 25 cm below the taper.
Care Instructions
Follow your yarn label for specific care requirements. Generally, hand wash in cool water with mild detergent, reshape, and dry flat. Do not hang the garment while wet, as the mesh may stretch. Avoid hot ironing.
This adult garment is not intended for children. Long loops can snag, so secure every motif thoroughly and keep loose yarn away from babies and pets.
Pattern Notes & Tips
Read through the entire pattern before starting. Row 1 is always the right side. Work flat unless instructed otherwise. Brackets indicate sections to be repeated only the stated number of times. All row numbers include the foundation row.
Stitch counts describe cells and dc posts separately. Chain spaces are not counted as dc stitches.
This open lace garment is designed to be worn over an opaque layer underneath.
Thank you so much for choosing this pattern for your next project. The Ivory Daisy Mesh Duster is truly a beautiful piece that showcases the elegance of filet crochet combined with charming floral details. If you make one, I would absolutely love to see it. Share your photos on Instagram or Facebook and tag us so we can admire your work!
If this crochet duster pattern has inspired you, go ahead and save it to your Pinterest boards so you can find it whenever you’re ready to cast on. And if you do make this beautiful piece, please leave a comment below. Seeing your finished projects and hearing about your experience is always the best part.
You Might Also Like
- Sage Green Flutter Sleeve Baby Dress Free Crochet Pattern
- Terracotta Desert Shell Purse Free Crochet Pattern
- Sunset Orange Ruffle Crochet Dress Free Crochet Pattern
- Ocean Blue Seashell Crochet Set Free Pattern