
Thread crochet on your nose? I know what you’re thinking. It sounds impossibly delicate, maybe even intimidating. But here’s the truth: if you can chain, slip stitch, and half double crochet, you already have every skill you need to make this stunning little floral accessory.
Get the Ad-Free PDF Pattern
You can find the free pattern below, or you can purchase the ad-free printable PDF from my shop.
Get the Printable PDF →
This Blue Forget-Me-Not Nose Cuff looks intricate, but it’s really just five tiny flowers, a few pointed leaves, and a simple foundation strip worked in basic stitches. The magic happens when you assemble them together. Each component takes just minutes to complete, and the whole project uses less than a few meters of thread total.
Whether you’re a confident beginner ready to try something new or an experienced thread crocheter looking for a quick, impressive project, this pattern breaks everything down into manageable pieces. Let’s demystify miniature crochet together.
About This Pattern
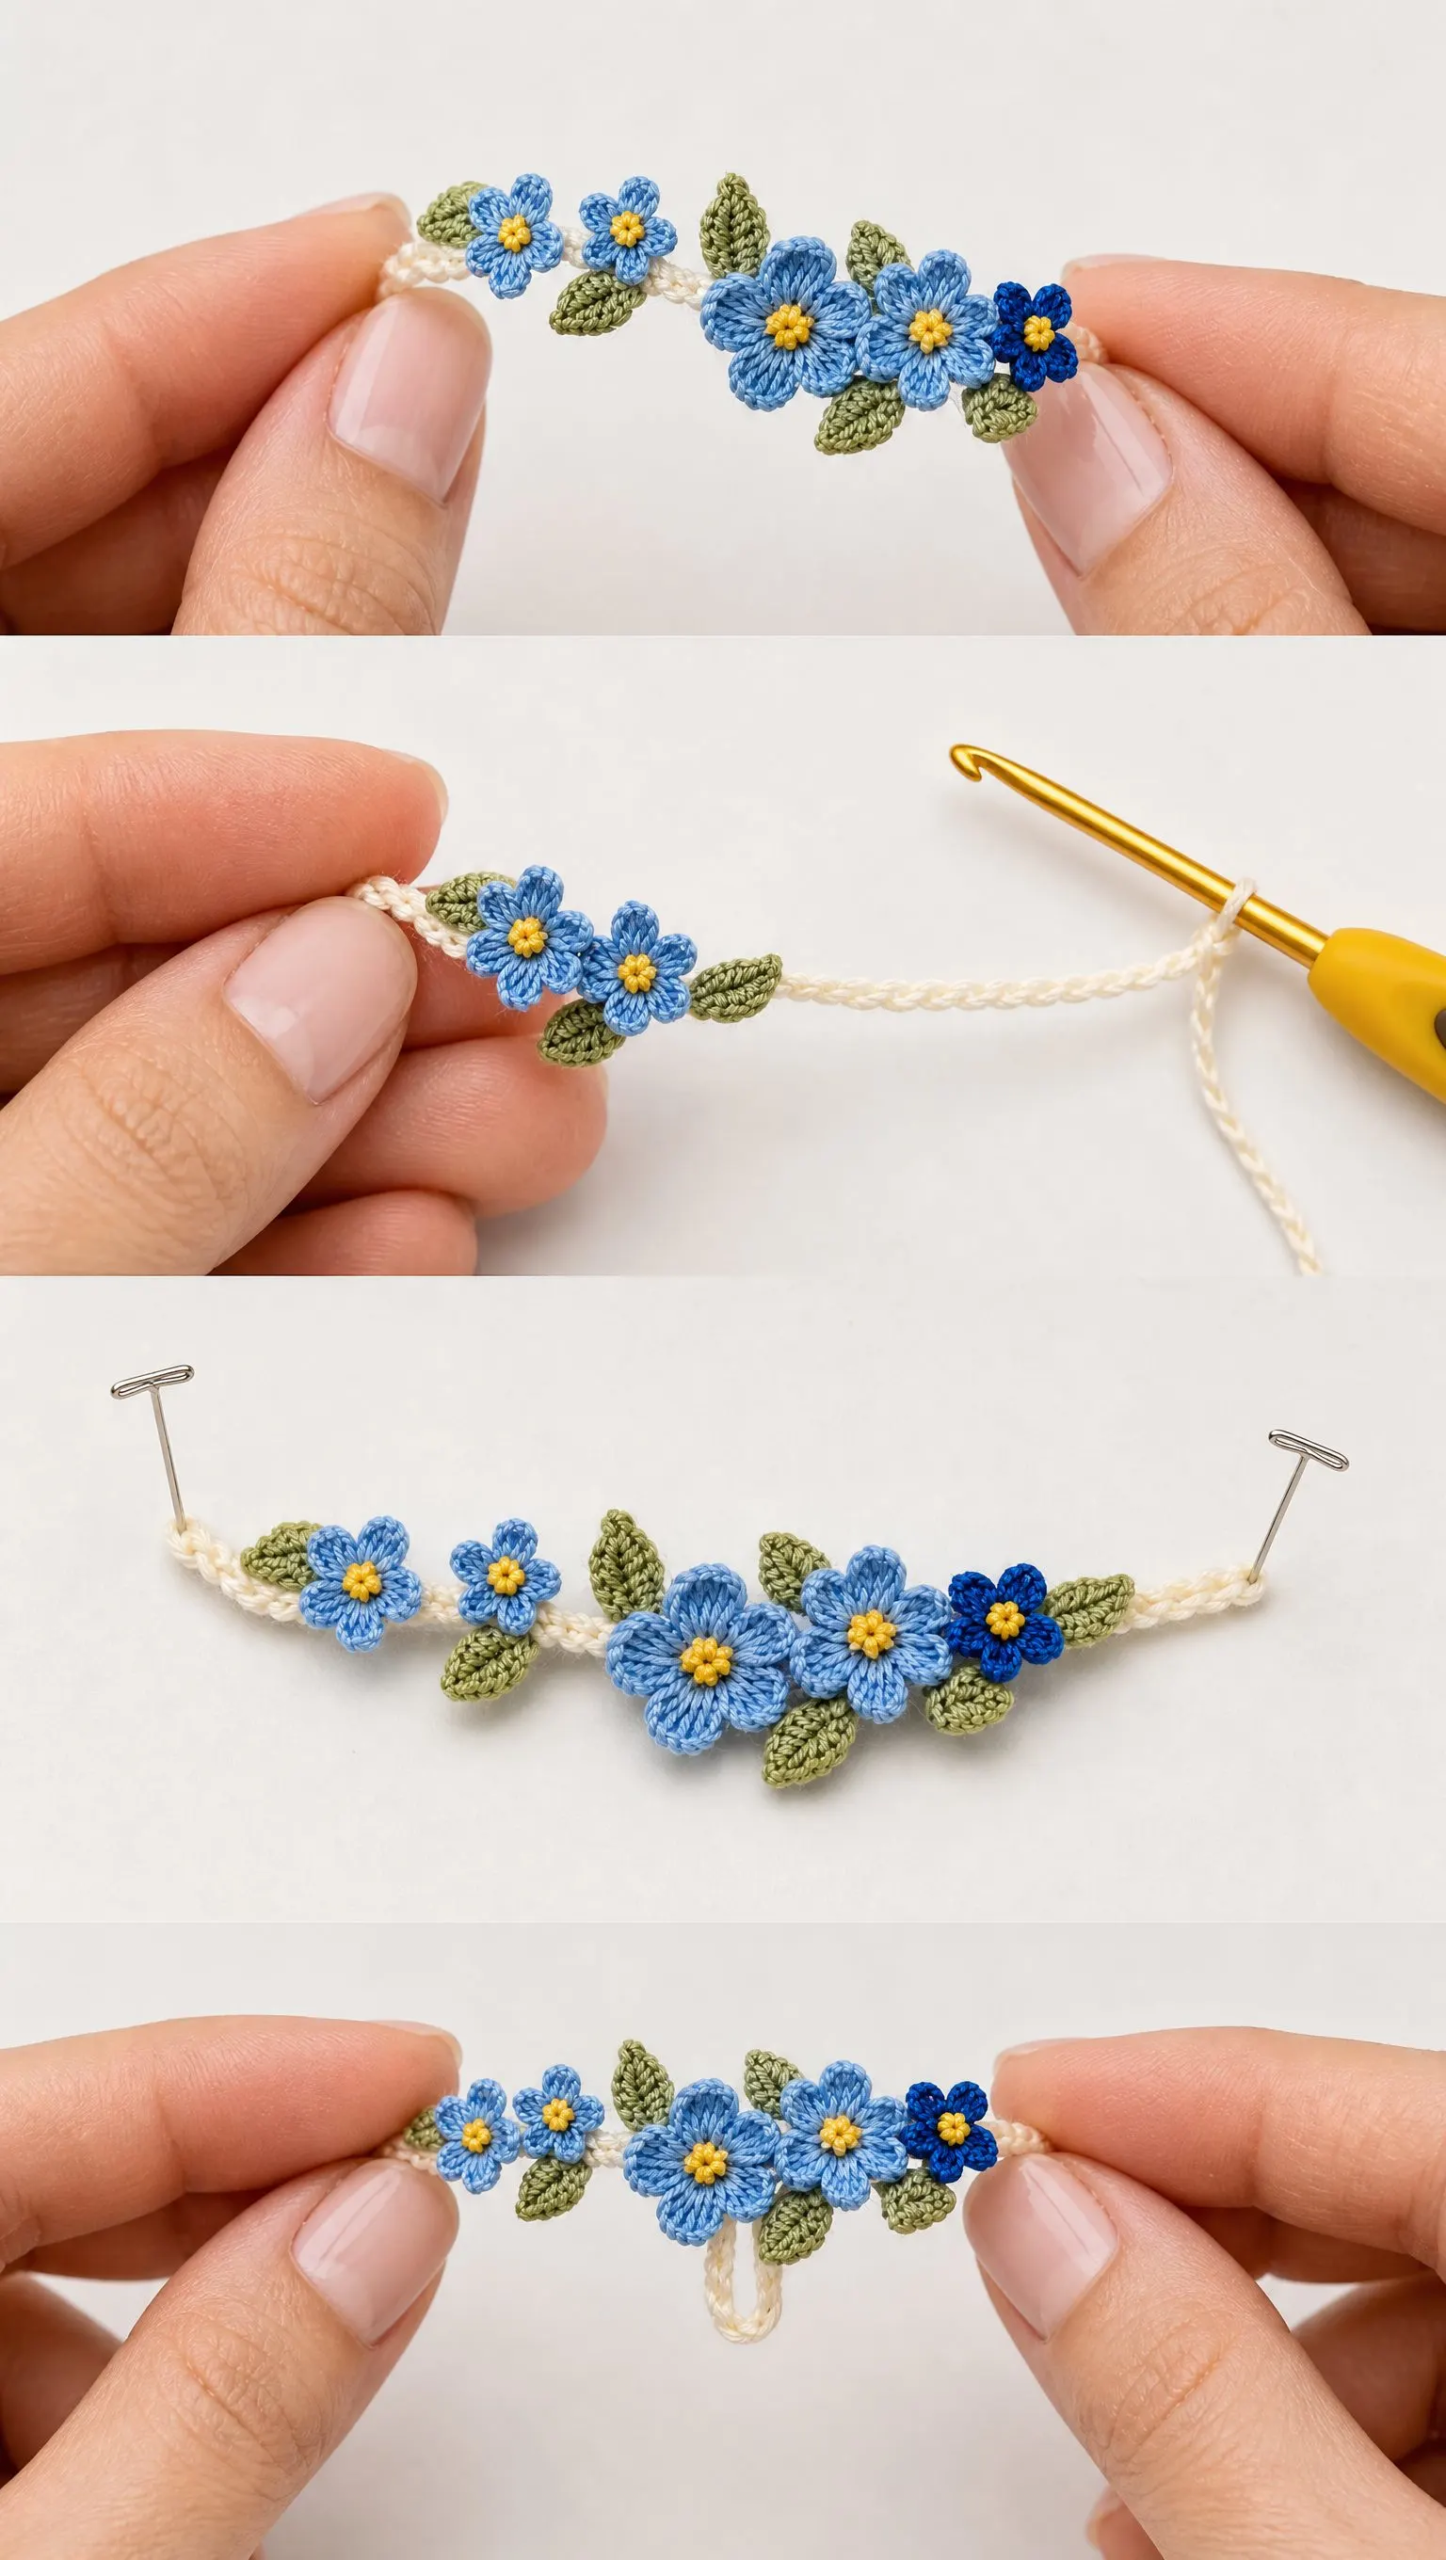
This miniature nose cuff features five separately crocheted forget-me-not flowers attached to a slim ivory foundation strip. The design includes three fuller flowers toward the cheek and lower bridge, two smaller blooms toward the upper bridge, and one deeper cobalt-blue accent blossom near the lower end. Tiny pointed sage leaves alternate between the flowers for a natural, botanical look.
The finished piece measures approximately 45 to 55 mm (about 1¾ to 2¼ inches) long, with flowers ranging from 6 to 10 mm across. A soft cream loop beside the nostril keeps everything in place without any pinching or discomfort.
Skill Level: Confident beginner to intermediate thread crochet
Materials You’ll Need
Gathering your supplies before you start makes the whole process smoother. Here’s everything the pattern calls for:
Thread:
Hook:
Finishing Supplies:
Don’t worry if you’ve never worked with thread this fine before. The small hook feels different at first, but you’ll adjust quickly. Take your time and keep your tension firm but not tight.
Abbreviations Used
Before we dive in, let’s define every stitch abbreviation you’ll encounter:
Gauge and Sizing Notes
Here’s something that might surprise you: exact gauge isn’t critical for this project. What matters most is firmness and scale. You want a chain cord that lies flat without stretching.
As a starting point, 10 to 12 compact chain stitches may measure about 20 to 25 mm (¾ to 1 inch), but thread and hand tension vary widely from person to person. The pattern adjusts by length rather than stitch count alone.
To measure for fit: Use a soft measuring tape to measure the diagonal path where the floral strip will sit, from the upper bridge toward the near nostril. Subtract about 2 to 3 mm so the finished strip rests neatly without buckling. The nostril loop should merely curve beside the nostril, never tight.
Part 1: Ivory Foundation Strip
The foundation is a narrow flat cord that disappears visually beneath the flowers while providing sturdy support.
Step 1: Make the starting chain
With ivory thread, ch 22 to 28, or enough chains to match your measured diagonal path. Stop when the chain reaches the required length without stretching.
Step 2: Flatten the chain
Turn your work. Slip stitch (sl st) in the back bump of the 2nd chain from hook and in each chain across. This creates a neat, flat chain-and-slip-stitch cord that lies beautifully against the skin.
Step 3: Keep the lower end live
Do not fasten off yet. The working end becomes the nostril loop in the next section.
Step 4: Test the placement
Lay the strip gently along the side of the nose. Mark the upper end and lower end with removable thread markers. If it bows or feels long, undo 1 to 2 stitches. If it’s too short, add chains before the slip stitch return row.
Part 2: Rounded Nostril Loop
The loop is decorative and stabilizing rather than tight-fitting. It should curve alongside the nostril and leave the airway completely open.
1. At the lower end of the foundation strip, ch 9 to 13. The exact number depends on thread size and the wearer. The loop should form a soft teardrop or oval, usually about 12 to 18 mm around.
2. Without twisting the chain, bring it gently back to the lower end of the foundation. Sl st into the same lower foundation stitch to close the loop.
3. For a smoother loop, sl st once into each loop chain around, using very loose tension. Skip this reinforcement step if it makes the loop bulky.
4. FO, leaving a 7 to 8 cm tail. Weave the tail through the underside of the foundation for several stitches and trim.
Important safety note: The loop must never constrict the nostril, press into the nasal rim, or require force to put on. This is a lightweight decorative accessory. Remove it for sleeping, exercise, showering, or any activity where it could snag.
Part 3: Forget-Me-Not Flowers
Make five flowers total. The petals are short rounded stitch clusters, and each petal should remain distinct and slightly cupped. You’ll make four in cornflower blue and one in cobalt blue.
Standard Flower (Make 3 Cornflower + 1 Cobalt)
Finished diameter: approximately 8 to 10 mm
1. With blue thread, make a magic ring (MR).
2. Into the ring work: ch 2, 2 hdc, ch 2, sl st into MR; repeat from to 5 times total to form five petals.
3. Pull the MR nearly closed, but leave a pinhole center for the yellow knot. Arrange all five petals evenly before tightening fully.
4. FO with a 10 cm tail. Use this tail later to tack the back of the flower flat when attaching it to the foundation.
Small Flower (Make 1 Cornflower)
Finished diameter: approximately 6 to 7 mm. This becomes the smallest upper-bridge blossom.
1. With cornflower thread, make a MR.
2. Into the ring work: ch 1, 1 hdc, ch 1, sl st into MR; repeat 5 times.
3. Pull the ring closed and FO with a 10 cm tail.
Optional variation: If you want a stronger taper effect, make the second upper flower using the small flower instructions instead of the standard flower. The reference image shows one small flower and four standard flowers, with the cobalt standard flower positioned at the lower end.
Butter-Yellow Knotted Centers
1. Thread a fine needle with 15 to 20 cm of butter-yellow cotton.
2. Bring the thread from the back through the center hole. Wrap the thread around the needle twice and return the needle close to the entry point, making a compact French-knot-style center.
3. For a fuller center, make a second tiny knot beside the first. Keep the center smaller than one-third of the flower diameter.
4. Tie the two yellow tails together securely on the back and trim very close, or weave them under the blue stitches.
Petal shaping tip: After finishing each flower, pinch the base of each petal lightly between your finger and thumb so the petal cups upward. Do not steam or flatten the petals. That slight sculptural curve is part of what makes these flowers so charming.
Part 4: Tiny Sage Leaves
Make 5 to 6 leaves total. Each leaf should be pointed and narrow.
1. With pale sage thread, ch 4.
2. Sl st in 2nd ch from hook, sc in next ch, hdc in last ch.
3. Ch 1, then work down the opposite side of the starting chain: sc in the next loop and sl st in the last loop near the point.
4. FO with an 8 to 10 cm tail. Pull the starting tail gently to sharpen the tip.
For an even smaller leaf: Ch 3, sl st in 2nd ch, sc in last ch, ch 1, sl st back into the base. This tiny version works well near the two smallest flowers.
Part 5: Assembly
Before sewing anything permanently, lay all your pieces on the foundation strip. Compare the overall line to the intended taper. Flowers should overlap the ivory strip slightly while the leaves peek out from alternating sides.
Assembly Map:
| Position | Flower | Leaf Placement |
|---|---|---|
| Upper bridge | Small cornflower flower | Tiny sage leaf angled upward |
| Just below | Standard cornflower flower | Leaf angled toward cheek |
| Center | Standard cornflower flower | Leaf on opposite side |
| Lower bridge / near cheek | Standard cornflower flower | Two small leaves framing the flower |
| Near nostril loop | Cobalt standard flower | One tiny leaf tucked behind or just above it |
Sewing the Pieces in Place
1. Lay the ivory strip on a flat surface with the nostril loop at the lower end. Position the five flowers in a gentle diagonal taper, leaving small glimpses of ivory between blossoms.
2. Start with the center flower. Using its blue tail, make 2 to 3 tiny stitches through the back of the flower and the foundation strip only. Keep all sewing on the underside.
3. Attach the remaining flowers one by one. Rotate each flower slightly so the petals do not line up mechanically. The cobalt blossom should sit close to the lower end but not on the loop itself.
4. Tuck leaves behind the flower edges and sew each leaf through its base with its green tail. Alternate leaf direction to create a natural spray.
5. After every two attachments, hold the strip vertically and check that it still lies flat. If the strip curls, loosen the most recent sewing stitches.
6. Weave all tails under the back of the foundation and flower bases. Trim closely. If needed, use the tiniest dot of flexible fabric glue on the hidden back only, and allow it to dry completely before wearing.
Part 6: Final Shaping and Finishing
Shape the flowers: With clean fingertips, lift each petal slightly at the outer edge. Keep the center low and the petals softly cupped.
Shape the leaves: Pinch each sage leaf lengthwise so it forms a subtle ridge and a pointed tip.
Flatten the back: Place the cuff wrong-side up under a clean cloth and press gently with your fingers. Do not flatten the flowers.
Optional damp block: Lightly mist only the ivory foundation and green leaves. Pin the strip straight on a towel, avoiding the petals. Let it dry fully.
Final fit: Place the cuff gently against the intended side of the nose. The floral strip should follow the bridge, and the cream loop should curve beside the nostril without covering it.
Troubleshooting Common Issues
| Issue | Solution |
|---|---|
| Flowers look like one blue blob | Use firmer tension, keep the slip stitch between petals tight, and gently separate each petal after the MR is closed |
| Flower is too large | Use size 30 thread, a smaller hook, or replace 2 hdc in each petal with 1 hdc |
| Flower is too flat | Pinch each petal at its base and slightly tighten the MR. Avoid blocking the petals flat |
| Foundation curls | Work slip stitches more loosely or remake the cord with one hook size larger |
| Loop feels tight | Undo the loop and add 2 to 4 chains. It should rest beside the nostril, never grip it |
| Accessory tips away from skin | Use fewer sewing stitches through the flower center and more through the lower back of each flower so the backs sit flush |
Care Instructions
Store your nose cuff flat in a small box so the petals do not crush. To clean, spot clean with cool water and a tiny amount of mild soap. Blot dry, reshape the petals and leaves, and air dry flat. Avoid machine washing or high heat.
Before Wearing Checklist
Run through this quick checklist every time:
Customization Ideas
For a subtler piece, use only three flowers. For a longer bridge decoration, extend the foundation strip and add one flower at a time, keeping the total weight very light.
This same construction technique also works beautifully as a tiny brooch, hair clip embellishment, or miniature floral applique on a special garment. Once you’ve mastered these tiny flowers, you’ll find endless ways to use them.
You Did It!
Thank you so much for trusting this pattern for your project. I hope you love making this delicate little piece as much as I loved designing it. The first time you see those tiny forget-me-nots come together, you’ll realize thread crochet isn’t nearly as scary as it seems.
I would absolutely love to see your finished nose cuff! Tag me on Instagram or share a photo in my Facebook group. Seeing your creations honestly makes my whole day.
If you found this pattern helpful, go ahead and save it to your Pinterest boards so you can find it again later. And please drop a comment below if you make one. I’d love to hear how it turned out for you!
Want a Quick & Easy Printable Version?
Get a clean, beautifully formatted PDF of this pattern — easy to follow step by step, ready to print or save on any device. No scrolling, no distractions, just the pattern.
Get the Printable PDF →You Might Also Like
- Sunset Gradient Fairy Dress Free Crochet Pattern
- Lavender Dream Bow Crochet Vest Free Crochet Pattern
- Sage Green Ribbed Flared Dress Free Crochet Pattern
- Sunset Ombre Floral Square Poncho Free Crochet Pattern