
This is a statement piece. Eight crocheted peacock feather motifs, a wrapped wire support, seed beads, crystals, and silver thread outlining. The Amethyst Peacock Ear Cuff uses fine thread crochet and basic stitches to create wearable art that curves around the outer ear.
Get the Ad-Free PDF Pattern
You can find the free pattern below, or you can purchase the ad-free printable PDF from my shop.
Get the Printable PDF →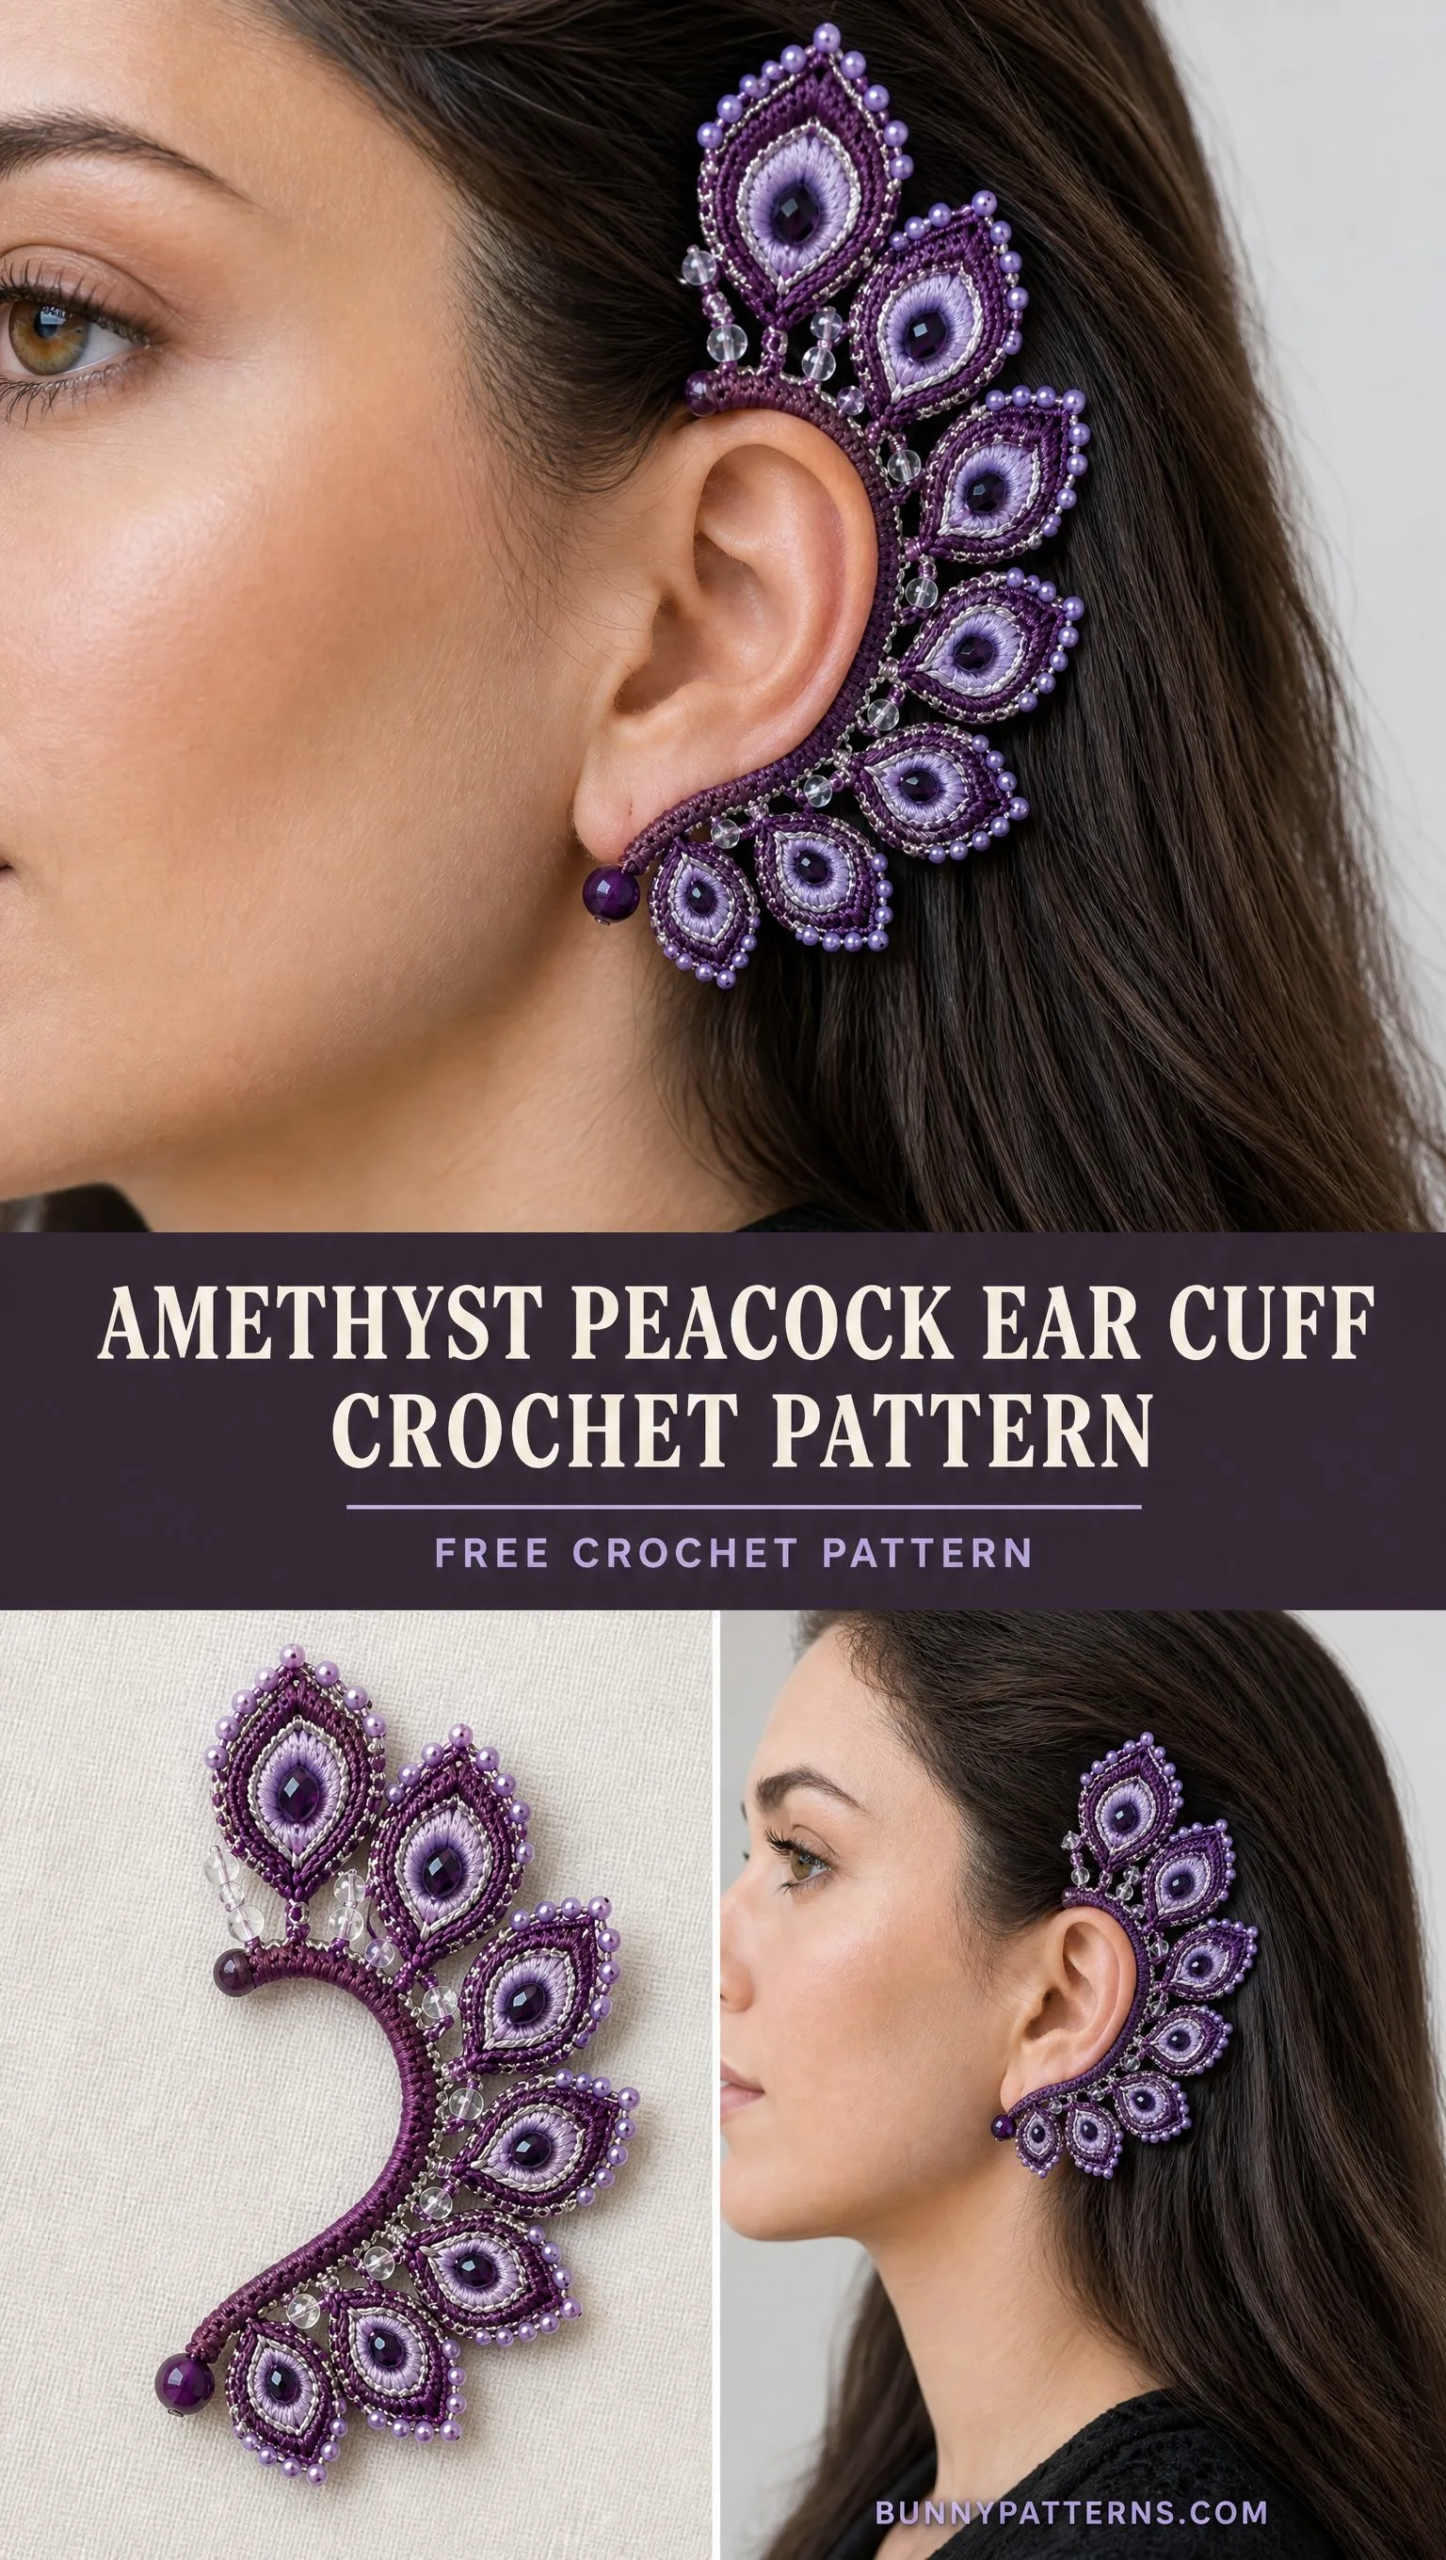
If you have been wanting to try fine thread crochet or push your skills into jewelry making, this is the project. The construction is modular, so you work each feather separately and then assemble everything onto a wrapped support. No piercing required.
The finished cuff stands approximately 10.5 to 12.5 centimeters tall and spans 7.5 to 9 centimeters along the outer ear curve. It looks intricate, but each feather follows the same base pattern. Once you make one, the rest come together quickly.
Why This Ear Cuff Pattern Works
The design keeps the inner ear completely open and unobstructed. The wire support traces the outer ear from above the helix down toward the lobe, holding the feather fan in place without pinching or pressing into the ear canal. This makes it surprisingly comfortable for such a dramatic piece.
Each peacock feather motif is worked in the round, starting from a pale lilac center eye, building outward through orchid and deep plum layers, and finishing with a silver surface slip stitch outline. The graduated sizing means the two smallest feathers sit near the lobe, three medium feathers fill the middle section, and three tall feathers crown the upper helix.
The beadwork is restrained but effective. A single dark purple faceted bead centers each feather eye. Lavender seed beads scatter along the outer scallops. Clear crystals connect the feathers through delicate chain bridges. The effect is sparkling but airy, exactly right for this kind of sculptural jewelry.
Materials You Will Need
Gather everything before you start. Fine thread crochet requires good lighting and the right tools.
Thread:
Hook:
Support:
Beads:
Tools:
Skill Level and Terminology
This pattern is rated intermediate to advanced thread crochet. You should be comfortable working with very fine thread, reading crochet patterns, and handling small beads.
All instructions use US crochet terms.
Abbreviations and Definitions
Before you begin, familiarize yourself with these abbreviations. Each one is defined with a plain English explanation.
ch = chain. Wrap yarn over hook, pull through loop on hook. This creates the foundation and spaces in your work.
sl st = slip stitch. Insert hook into stitch, yarn over, pull through both the stitch and the loop on your hook in one motion. Used for joining and surface decoration.
sc = single crochet. Insert hook into stitch, yarn over, pull up a loop (2 loops on hook), yarn over, pull through both loops. The shortest standard stitch.
hdc = half double crochet. Yarn over, insert hook into stitch, yarn over, pull up a loop (3 loops on hook), yarn over, pull through all 3 loops. Slightly taller than single crochet.
dc = double crochet. Yarn over, insert hook into stitch, yarn over, pull up a loop (3 loops on hook), yarn over, pull through 2 loops, yarn over, pull through remaining 2 loops. A medium height stitch.
tr = treble crochet. Yarn over twice, insert hook into stitch, yarn over, pull up a loop (4 loops on hook), then yarn over and pull through 2 loops three times until one loop remains. The tallest stitch used in this pattern.
st/sts = stitch or stitches
sp = space
BLO = back loop only. Work into just the back loop of the stitch instead of both loops.
RS/WS = right side or wrong side
Special Techniques
Surface Slip Stitch
This technique creates the silver outline around each feather eye. Hold the silver thread on the wrong side of your work. Bring a loop to the right side. Insert your hook along the chosen ridge, draw up a loop, and pull it through the loop already on your hook. Keep your tension relaxed so the motif stays flat. This is like embroidery but with your crochet hook.
Beaded Picot Scallop
Work 1 single crochet (sc), slide one pre strung seed bead to the hook, chain 2 (ch 2), slip stitch (sl st) in the first chain, then single crochet (sc) into the next edge position. Repeat only where the pattern marks a bead point. This creates the delicate beaded edge.
Wrapped Support
Anchor your thread near one rounded end of the wire support. Work closely packed single crochet (sc) around the support, pushing stitches together as you go until no wire is visible. Your tension should be snug but not so tight that it distorts the curve.
Blocking
Pin your motifs to an exact teardrop shape before adding beads. Lightly steam or damp block the cotton thread. Do not press faceted beads with an iron.
Gauge
Motif gauge matters more than row gauge for this pattern. Your tall feather should measure approximately 34 to 38 millimeters long after blocking.
If your feathers are significantly larger or smaller, adjust your hook size. A smaller hook creates tighter, smaller motifs. A larger hook creates looser, larger motifs.
Feather Size Chart
You will make 8 feathers total in three sizes:
| Size | Quantity | Approximate Length | Placement |
|---|---|---|---|
| Small | 2 | 24 to 28 mm | Lowest lobe side positions |
| Medium | 3 | 29 to 33 mm | Lower and middle outer ear |
| Tall | 3 | 34 to 38 mm | Upper helix and crown |
All eight feathers follow the same base construction. You control the size by adjusting the number of tall stitches in the outer rounds.
Feather Motif Base Pattern
Make all eight feathers using this construction. Work firmly so the center bead does not make the motif sag.
Step 1: Lilac Eye Center
With pale lilac thread, make a magic ring.
Round 1: Chain 1 (ch 1), work 10 single crochet (sc) into the ring, join with a slip stitch (sl st). Pull the ring firmly closed.
Step 2: Shape the Eye
Round 2: Chain 1 (ch 1), 2 single crochet (sc) in next stitch, half double crochet (hdc) in next 2 stitches, double crochet (dc) in next 2 stitches, (double crochet, chain 2, double crochet) in next stitch to form the pointed top, double crochet (dc) in next 2 stitches, half double crochet (hdc) in next 2 stitches, 2 single crochet (sc) in final stitch. Join. Fasten off.
Step 3: Add Orchid Field
Join orchid thread at the bottom center. Chain 1 (ch 1). Work evenly around: single crochet (sc) along the lower curve, half double crochet (hdc) along the sides, double crochet (dc) near the upper third, then (2 double crochet, chain 2, 2 double crochet) in the top chain 2 point. Mirror the stitches down the second side. Join at the lower center.
Step 4: Extend to Teardrop
Continue in orchid or plum thread. Chain 1 (ch 1), single crochet (sc) in first 2 stitches, half double crochet (hdc) in next 2, double crochet (dc) across the side, treble crochet (tr) across the upper side section. At the point, work (2 treble crochet, chain 2, 2 treble crochet). Mirror stitch heights down the opposite side, ending with single crochet (sc). Join.
Step 5: Plum Border
Join deep plum thread. Work 1 single crochet (sc) in each edge stitch. At the tip: (single crochet, chain 2, single crochet) in the chain 2 point. On the long sides, place a tiny chain 1 (ch 1) space after every 3 to 4 single crochet (sc) to create mounting points and a delicate scalloped contour.
Step 6: Silver Outline
Block first. Using silver thread, surface slip stitch (sl st) around the boundary between the lilac eye and the orchid field. Optionally add a second fine outline just inside the plum border.
Step 7: Center Bead
Sew one dark purple faceted bead into the exact center of the lilac eye. Pass through the crochet fabric and bead at least three times, knot on the wrong side, and bury the tail between dense stitches.
Step 8: Outer Seed Beads
Sew lavender seed beads to alternating outer scallops. Use approximately 5 to 9 beads per motif depending on size. Keep them on the outer half only so adjacent feathers can overlap cleanly.
Sizing Adjustments for Feathers
| Size | Foundation/Expansion Change | Recommended Border Beads |
|---|---|---|
| Small | Use fewer dc/tr on Rounds 3 and 4; finish at 24 to 28 mm | 5 to 6 |
| Medium | Work base pattern as written; finish at 29 to 33 mm | 6 to 8 |
| Tall | Add 1 extra round in plum: sc lower, hdc sides, dc upper third, point (dc, ch 2, dc) | 8 to 10 |
Construct the C Shaped Rim
The support is the hidden skeleton of your ear cuff. Fit it to the wearer before wrapping. It should trace the outer ear from just above the helix, behind the outer rim, and toward the lower lobe without entering the ear canal.
Step 1: Measure and Bend
Cut a support length of approximately 11 to 13 centimeters. Curl both raw ends inward into tiny closed loops with pliers. Shape it into a relaxed C around a paper tracing or directly beside the ear without pressing into skin.
Step 2: Establish the Lower Forward Tip
At the lower end, allow approximately 12 to 15 millimeters to angle slightly forward toward the lobe. This is where the smooth plum bead will sit.
Step 3: Wrap with Thread
Join deep violet thread with a secure knot hidden at the back. Work dense single crochet (sc) around the support from lower end to upper end, packing each stitch against the last. Aim for an even cord like rim 2.5 to 3.5 millimeters thick.
Step 4: Second Crochet Pass
Turn. Work slip stitch (sl st) or back loop only single crochet (BLO sc) along the outer side of the wrapped rim. This makes a firm ridge for attaching feathers while keeping the inner face smooth against the ear.
Step 5: Lower Tip Bead
Thread or sew the smooth plum bead onto the forward lower tip. If the support passes through the bead, cover the exposed support again with thread. If sewn, use at least four secure thread passes.
Step 6: Fit Check
Place the unadorned rim on the ear. It should stay in position with light contact only. Adjust the curve now. After motifs are mounted, the structure is harder to reshape.
Open Chain Bridges
The crystals sit in small open connectors rather than solid fabric. At each planned gap between neighboring feathers, join violet thread to the outer ridge of the rim, chain 4 to 7 (ch 4 to ch 7), optionally slide one clear crystal bead into the chain or sew it on afterward, then anchor the chain to the next mounting point with a slip stitch (sl st). Keep the bridges slightly slack so they do not pull the rim straight.
Recommended Feather Order
| Position | Motif | Angle/Role |
|---|---|---|
| 1 (bottom front) | Small | Points down forward near lobe |
| 2 | Small | Points down outward |
| 3 | Medium | Points outward |
| 4 | Medium | Slightly up outward |
| 5 | Medium | Diagonal toward upper helix |
| 6 | Tall | Upper back fan |
| 7 | Tall | Highest crown feather |
| 8 (upper front) | Tall | Leans slightly forward above helix |
Assembly Step by Step
Step 1: Lay Out the Fan
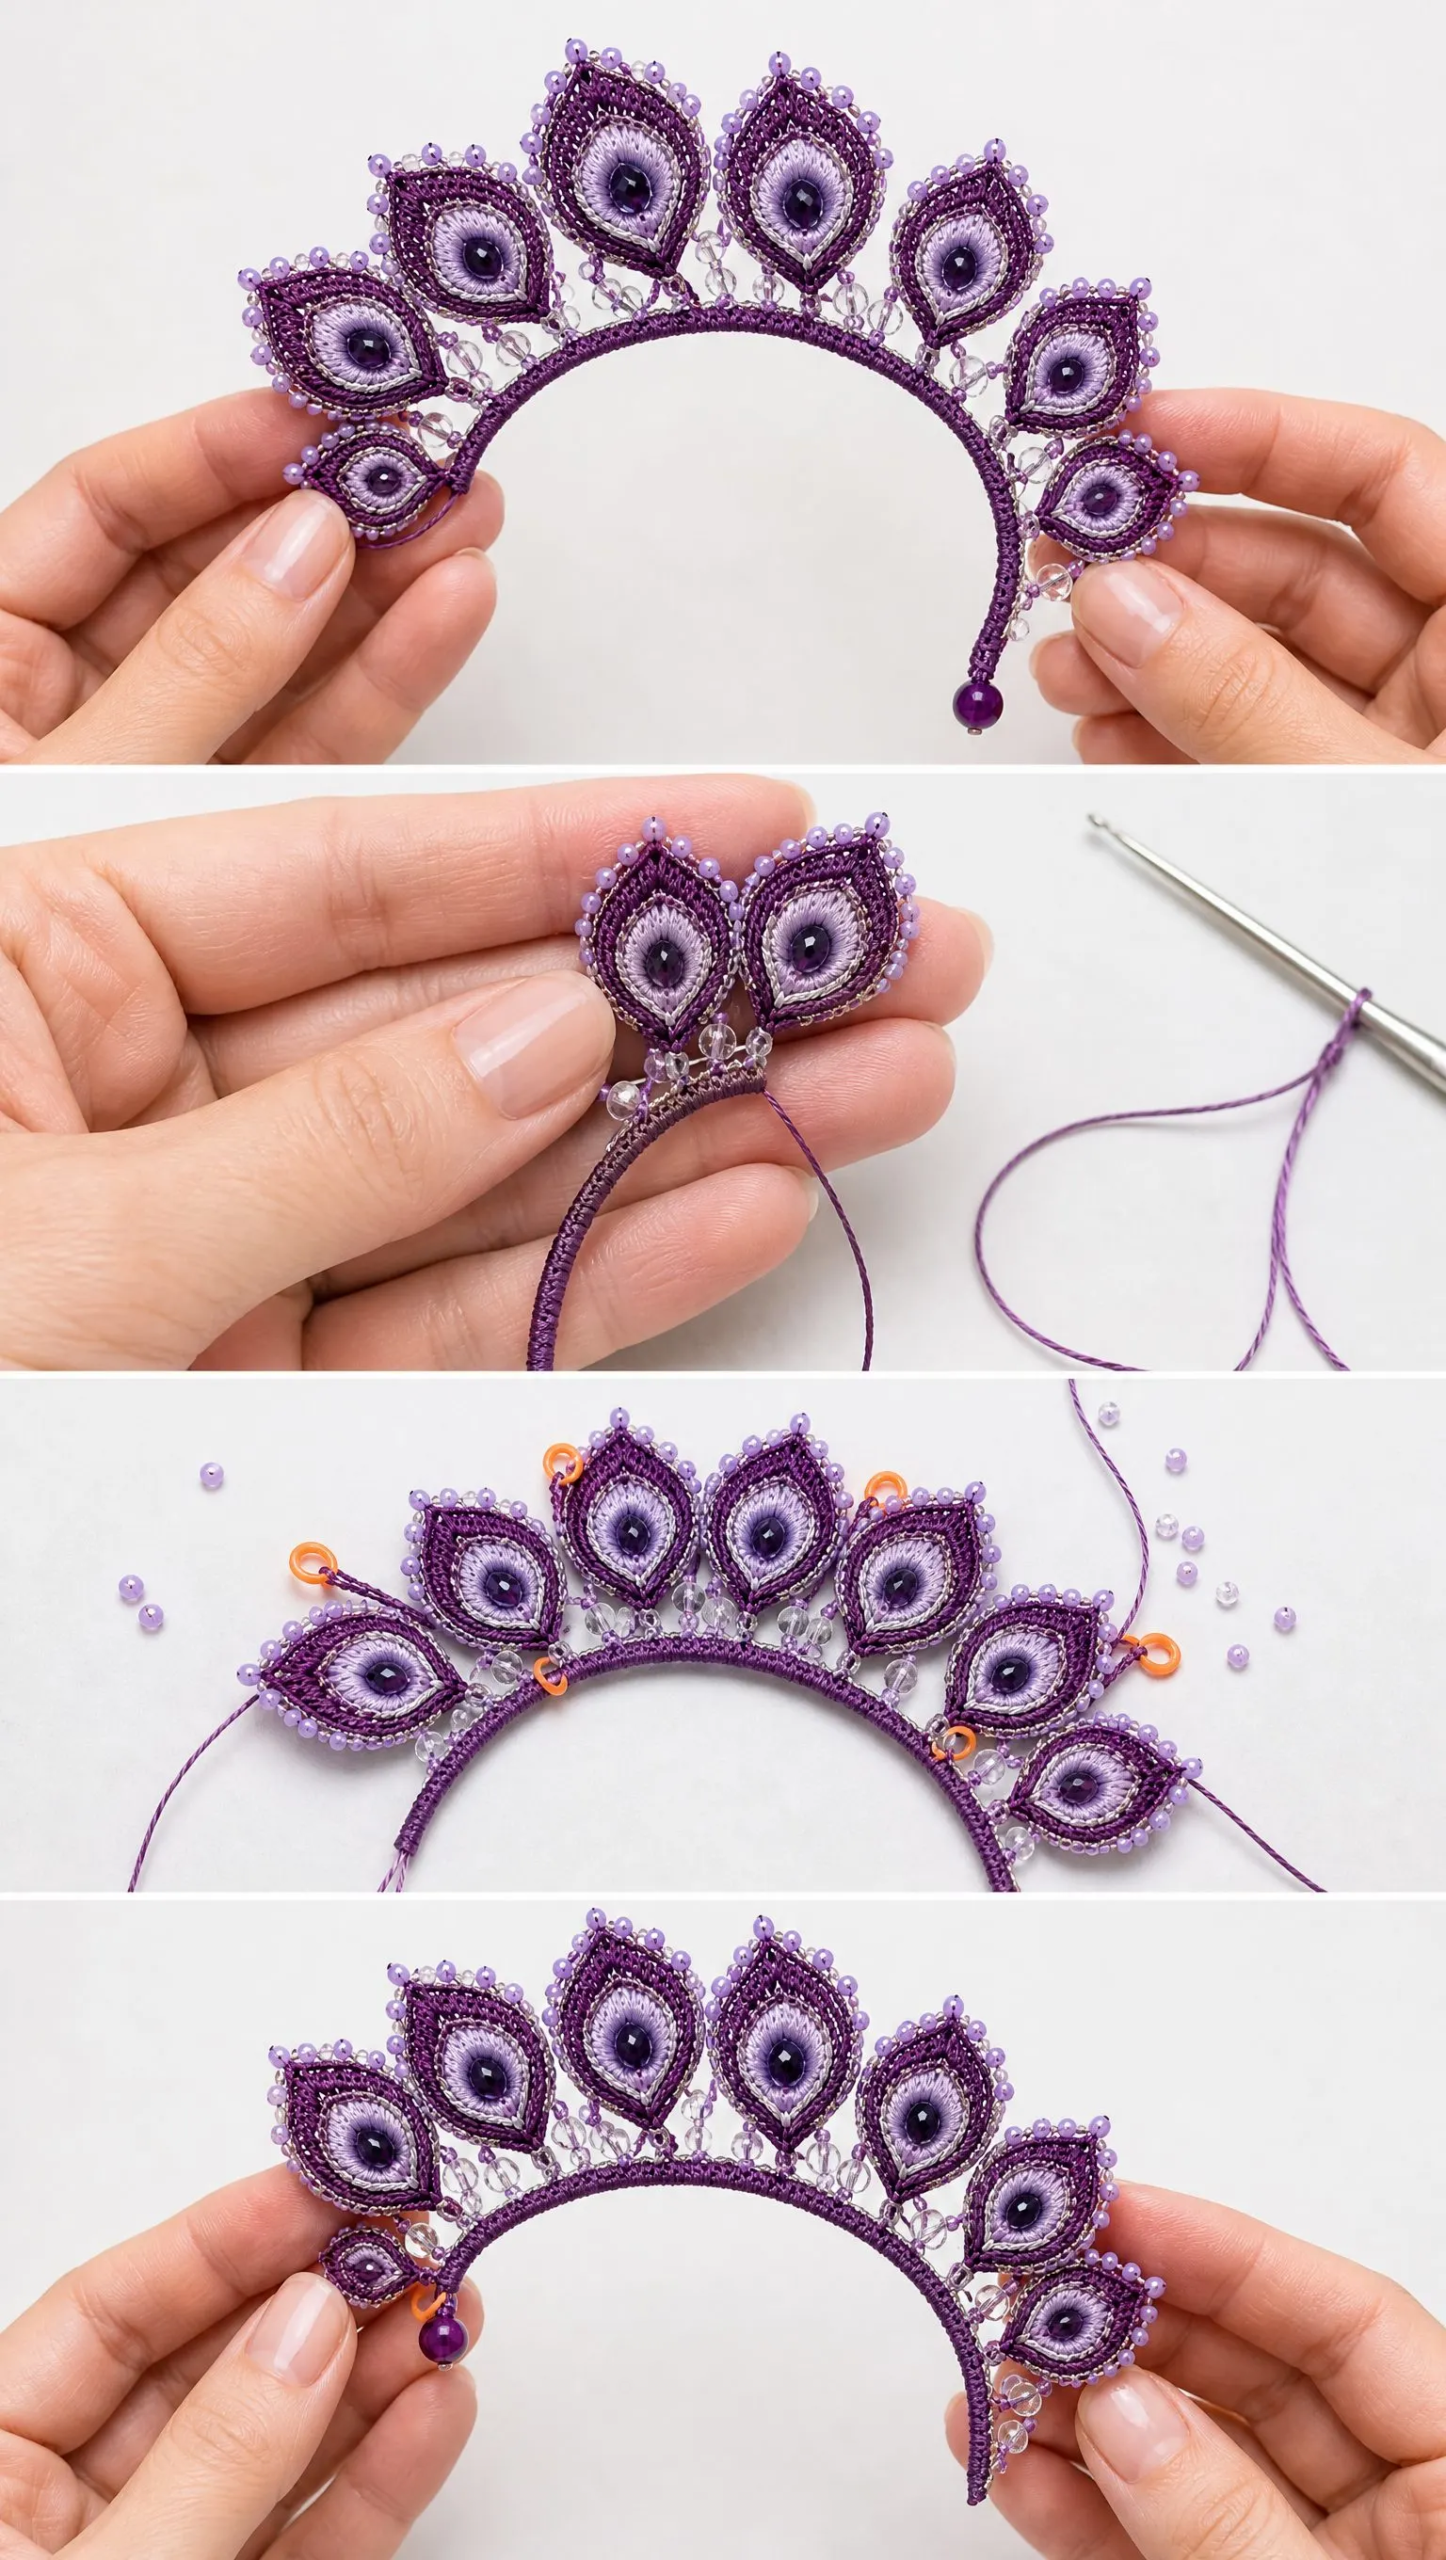
Place the wrapped rim on a flat surface with its outside curve facing you. Arrange all eight blocked feathers beside it in graduated order. Overlap motif edges only 2 to 4 millimeters.
Step 2: Mount the Crown First
Attach the highest tall feather near the top center using matching plum thread. Stitch through the dense bottom edge of the motif and through the outer crochet ridge on the rim. Make 4 to 6 small anchoring passes.
Step 3: Add Adjacent Tall Motifs
Mount the remaining two tall feathers on either side of the crown. Keep their pointed tips separated so each teardrop silhouette remains readable.
Step 4: Work Downward
Attach the three medium feathers, then the two small feathers toward the lobe. Frequently hold the cuff in a C shape. Do not assemble it completely flat or the outer fan may buckle when worn.
Step 5: Stabilize Overlap Points
Where feather edges touch, make one or two concealed tack stitches between motifs. Do not sew the entire edges together. Small flexible connections give the fan movement and prevent twisting.
Step 6: Add Chain Bridges
Fill selected gaps with chain 4 to chain 7 bridges. Add sparse clear crystals. A good target is one crystal between every second feather, with a few extra near the upper crown.
Step 7: Complete Bead Border
After all motifs are mounted, inspect the outer silhouette. Add missing lavender seed beads only where they will not rub against hair or skin.
Step 8: Finish the Back
Bury every thread tail through dense crochet on the wrong side. Trim close. If desired, apply a tiny amount of clear flexible textile adhesive only to buried knots, never to the visible stitch surface.
Step 9: Final Shaping
Place the cuff on a padded cylindrical form or wear it briefly. Nudge feather angles until the fan follows the ear rather than standing straight out.
Step 10: Comfort Test
Wear for 10 to 15 minutes indoors. Check the upper and lower support ends, the lower plum bead, and every crystal connector. Nothing should scratch, pinch, or press into the concha.
Troubleshooting Common Issues
Cuff slides downward: Tighten the C curve slightly at the upper helix and lobe contact points. Do not tighten the middle against the ear canal.
Fan tilts backward: Move one or two upper motif anchor points 2 to 3 millimeters toward the front edge of the rim.
Feathers curl: Re block with light steam or dampness and pin until completely dry. Cotton can also be lightly stiffened on the wrong side.
Motifs look bulky: Use size 30 thread or a smaller hook. Reduce one border round before changing the whole design.
Center bead droops: Add a tiny hidden stitch from the bead backing to the dense lilac center and tighten the motif against it.
Seed beads crowd together: Use every second scallop rather than every scallop. The reference effect is sparkling but airy.
Wire or support can be felt: Add another pass of tight single crochet (sc) wrapping over the contact area, especially the two ends.
Bridge chains sag: Shorten by 1 to 2 chains or tack the center crystal lightly to the adjacent motif edge.
Care Instructions
Store flat in a small box so the feather points are not crushed. Spot clean with a barely damp cloth. Avoid soaking the wrapped support, metallic thread, and crystal beads. Keep perfume, hairspray, and cosmetic oils away from the beadwork when possible.
Customization Ideas
For a lighter everyday cuff, make six motifs and omit most crystals. For a more dramatic peacock fan, add a ninth tall feather at the crown while keeping the total width balanced. The same construction works beautifully in emerald, sapphire, bronze, or monochrome black.
Quick Make Checklist
1. Shape and round the support ends. Test the bare C curve on the ear.
2. Wrap the support completely in dense violet crochet.
3. Crochet 2 small, 3 medium, and 3 tall teardrop feathers.
4. Block all eight motifs before embellishing.
5. Surface stitch silver outlines.
6. Sew one dark purple faceted bead into each feather eye.
7. Add lavender seed beads to outer scallops.
8. Mount tall feathers first, then medium, then small.
9. Add open chain bridges and sparse clear crystals.
10. Attach the lower plum tip bead and bury all ends.
11. Final fit the cuff so the inner ear remains open and nothing pinches.
Safety Notes
Round and cover every support end. The cuff should rest on the outer ear without pinching. Remove it if there is pain, numbness, or skin irritation. Secure beads with multiple passes. This design is not suitable for young children due to small parts.
The Finished Look
The completed Amethyst Peacock Ear Cuff should read as one sculptural amethyst peacock fan: a clean violet C rim tracing the outer ear, eight distinct lilac centered teardrops graduating upward, silver highlights defining each eye, and restrained bead sparkle that does not overpower the crochet texture.
This is the kind of piece that stops people in their tracks. Whether you wear it to a special event, a costume party, or just because you want to feel extraordinary on a Tuesday, it delivers.
I hope you love making this Amethyst Peacock Ear Cuff as much as I loved writing up this pattern. If you give it a try, save this page to your Pinterest boards so you can find it again easily. And please drop a comment below if you make one. I would absolutely love to see your finished cuffs and hear which color combinations you chose!
Want a Quick & Easy Printable Version?
Get a clean, beautifully formatted PDF of this pattern — easy to follow step by step, ready to print or save on any device. No scrolling, no distractions, just the pattern.
Get the Printable PDF →You Might Also Like
- Dusty Rose Babydoll Crochet Dress Free Pattern
- Monarch Butterfly Shawl Free Crochet Pattern
- Lavender Sunflower Granny Square Tote Free Crochet Pattern
- Berry Blossom Lace Cardigan Free Crochet Pattern