
This is one of those patterns that looks WAY more complicated than it actually is. Seriously. If you can single crochet and roll fabric into a spiral, you can absolutely make this stunning wrist cuff that will have everyone asking where you bought it.
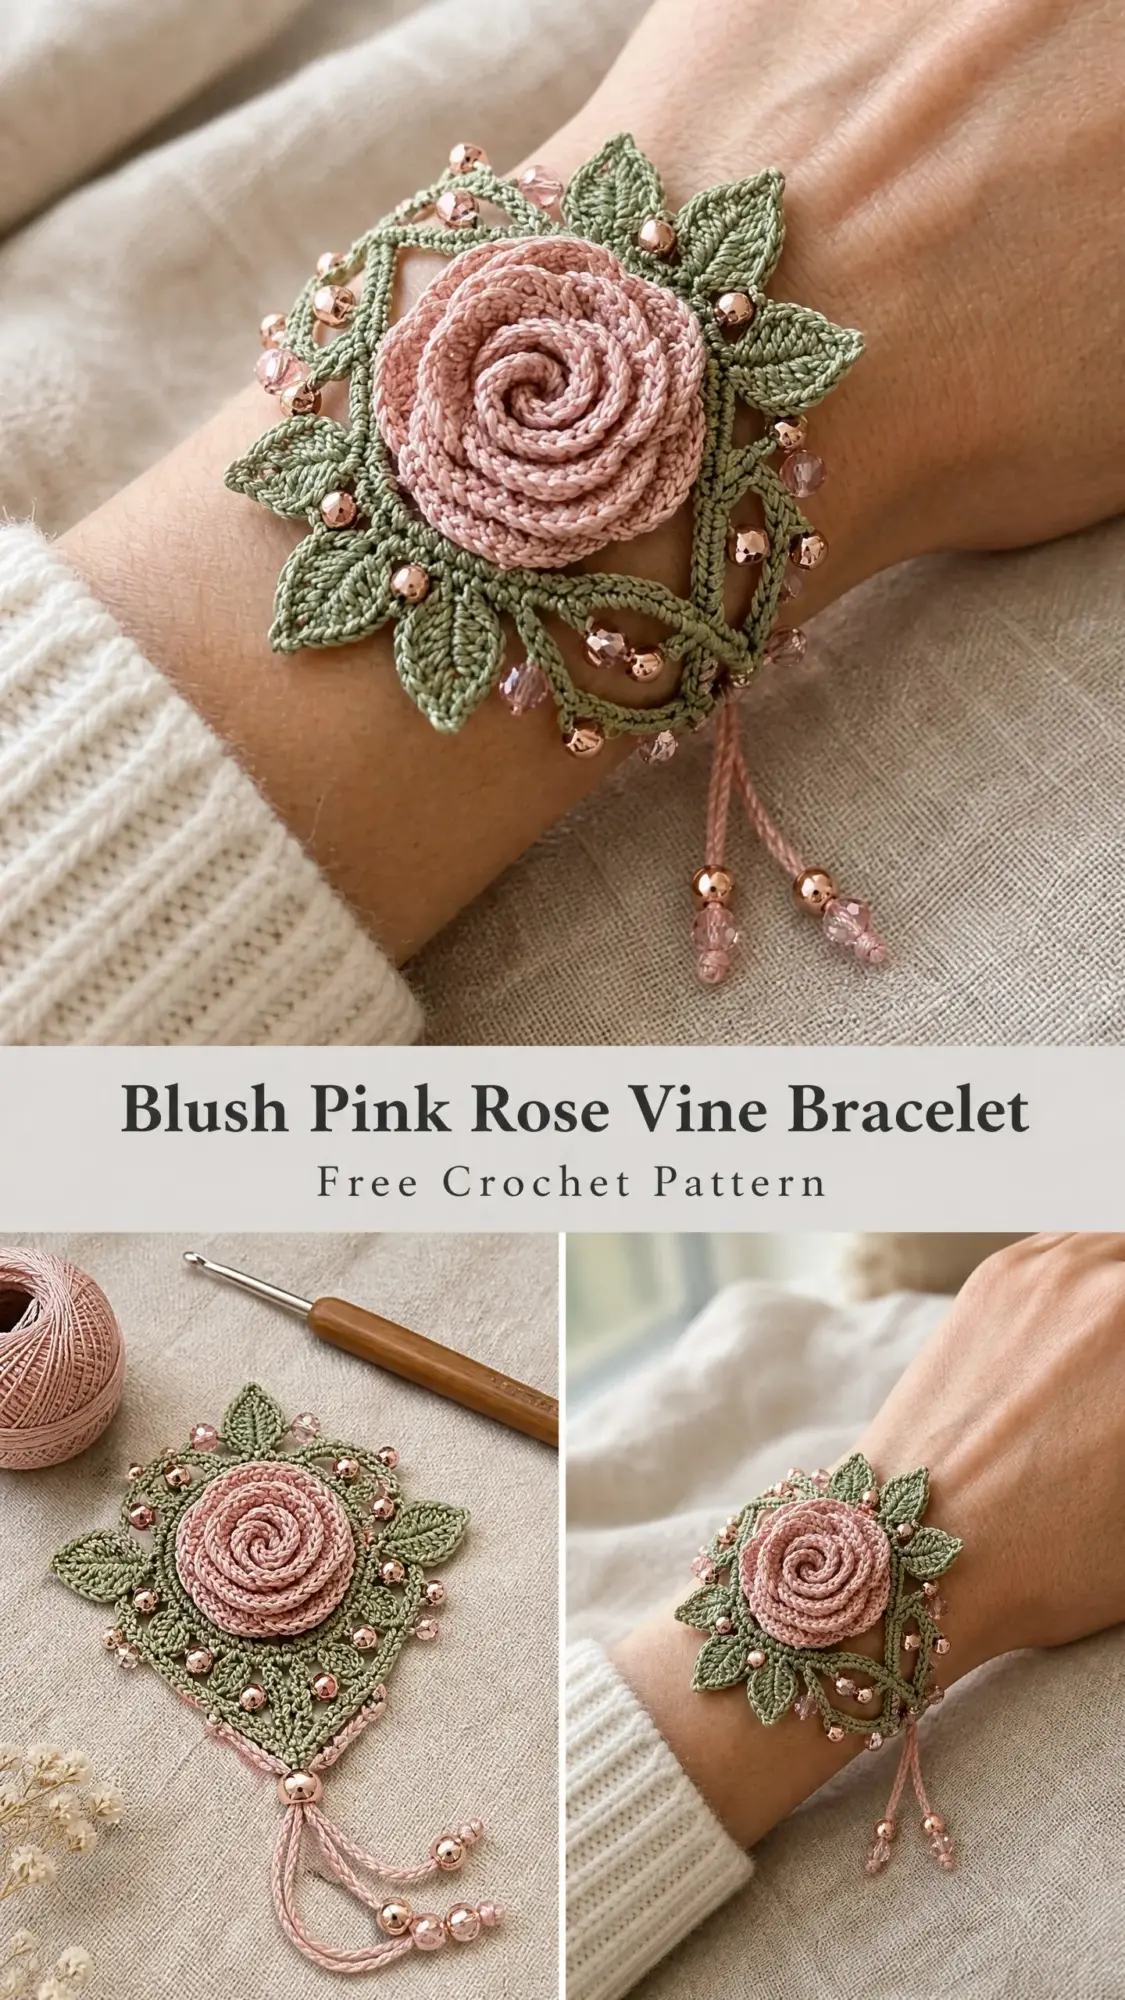
The secret is that this bracelet is worked in separate pieces, then assembled. No crazy stitch combinations. No following a complex chart. Just simple shapes that come together into something truly special. The finished piece takes about 4 to 6 hours spread across a few sessions, making it perfect for a weekend project or a thoughtful handmade gift.
And can we talk about the adjustable sliding knot closure? It fits wrists from 5.5 inches all the way up to 8 inches, so you can make this for practically anyone without stressing about measurements. That alone makes this a fantastic gift option for birthdays, bridal showers, or just because.
What Makes This Rose Vine Bracelet Pattern Special
This delicate wrist bracelet features a dimensional crocheted rose sitting on a lace diamond frame with trailing vines and pointed leaves. The whole piece gets embellished with rose gold seed beads and faceted pink crystal beads for that extra touch of elegance.
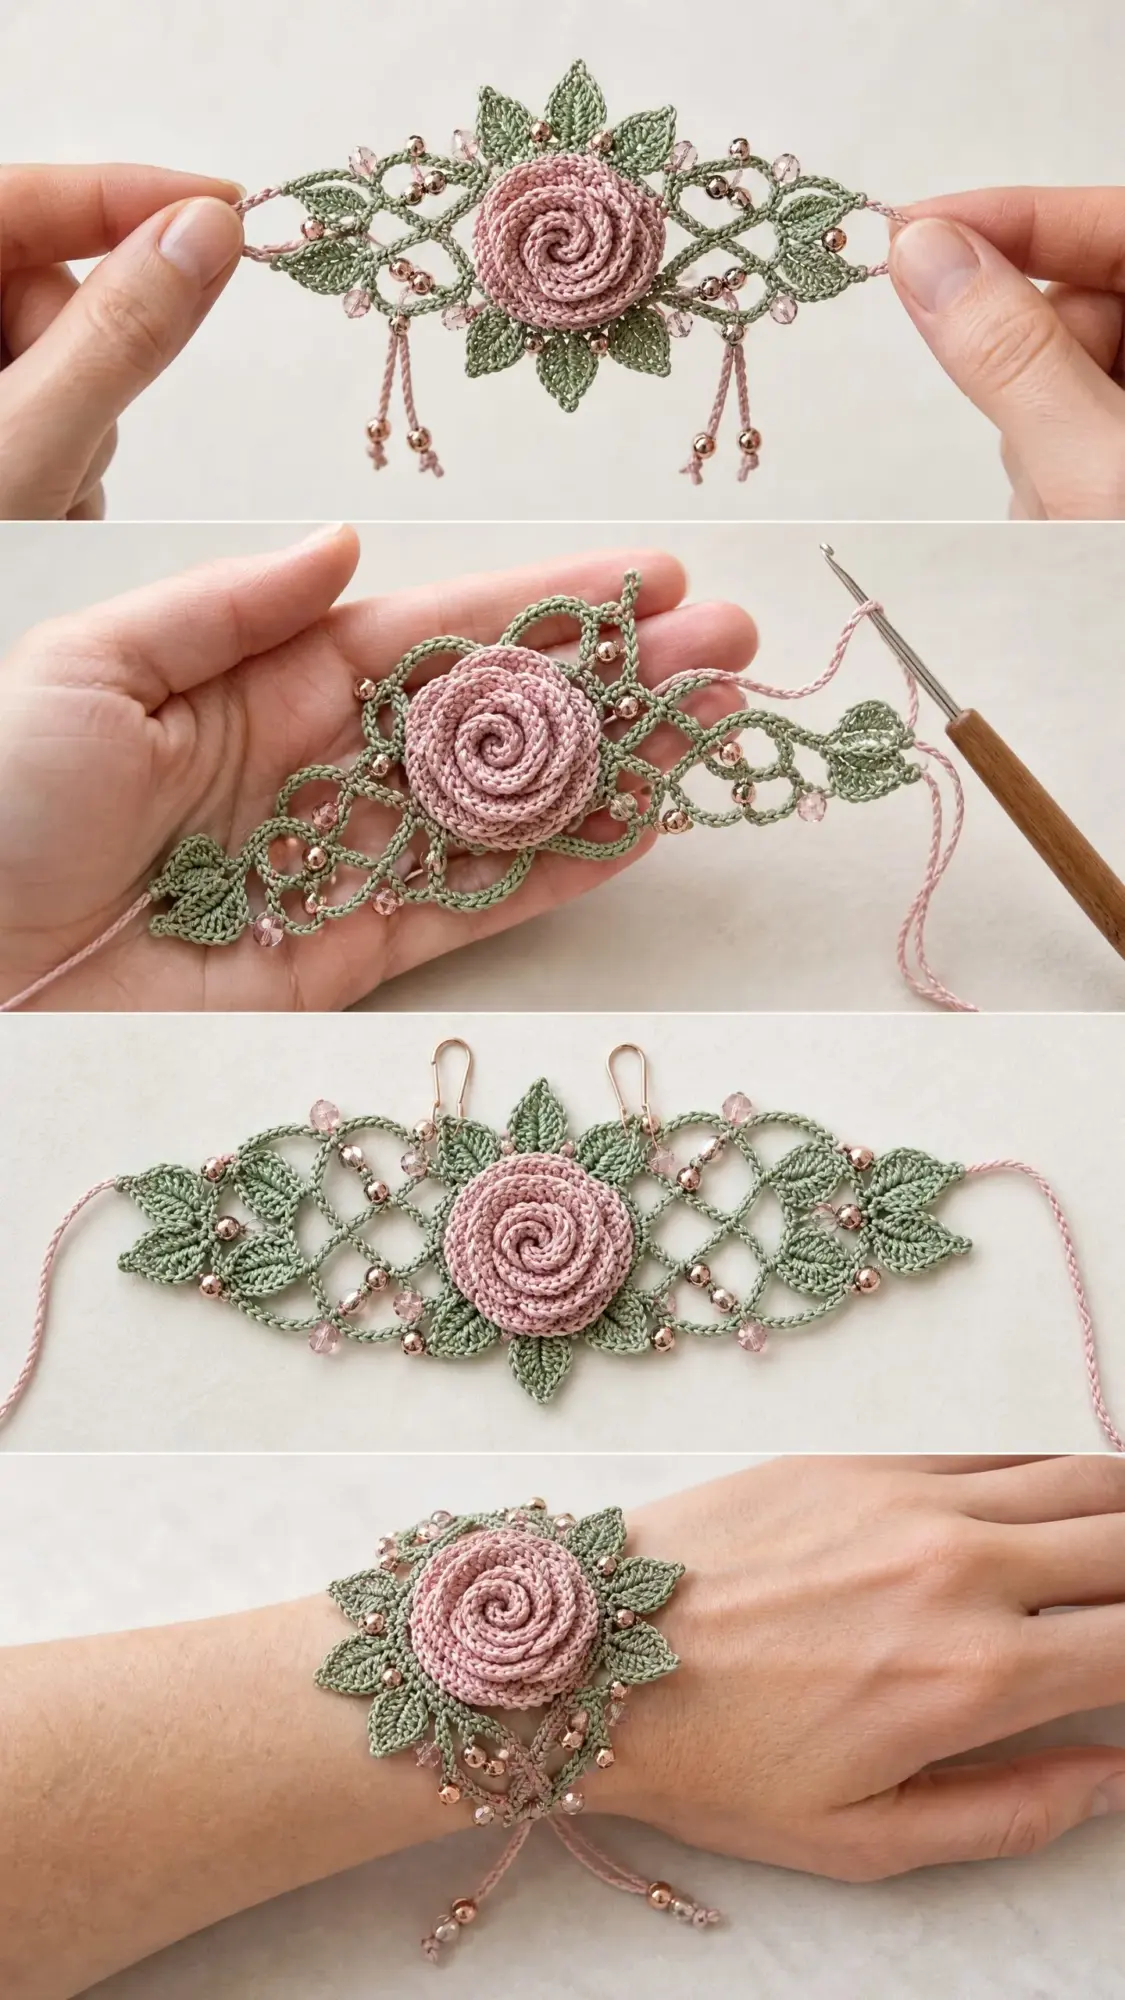
The construction might sound intimidating, but here is the breakdown. You work four separate components: a lace vine base panel, a dimensional rose, individual leaves, and a beaded edging. Then you assemble everything and add the braided adjustable band. Each piece on its own uses basic stitches you probably already know.
The finished centerpiece measures approximately 2.75 inches wide by 2.75 inches tall. It sits flat against your wrist like a cuff, creating a beautiful focal point without being bulky or uncomfortable.
Skill Level
This crochet pattern is rated Advanced Beginner to Intermediate. The individual stitches are simple, but working with fine thread, incorporating beads before stitching, and joining multiple motifs requires patience. If you are comfortable with single crochet (sc), slip stitches (sl st), and working in continuous rounds, you will succeed here with careful attention to the bead placement steps.
Do not let the thread work scare you. Fine thread just means smaller stitches, not harder stitches. Take your time, work in good lighting, and you will be amazed at what your hands can create.
Materials You Will Need
Thread and Yarn
You will need Size 10 crochet cotton thread in two colors:
Hook
Beads and Notions
Yarn Suggestions
Here are three excellent thread options that work beautifully for this project:
1. Lizbeth 100% Egyptian Cotton Thread, Size 10 in colors Dusty Rose Medium and Sage Green. Excellent sheen and consistent twist, widely available.
2. DMC Traditions Crochet Cotton Thread, Size 10 in colors closest to Ecru Rose and Khaki Green. Widely available at craft chain stores and budget-friendly.
3. Aunt Lydia’s Classic Crochet Thread, Size 10 in colors Soft Mauve and Sage. Very consistent for beginners working with thread.
Substitution note: Any size 10 crochet cotton in comparable colorways will work. Avoid mercerized threads with very high sheen if you prefer a matte, romantic look. Do not substitute with yarn heavier than fingering weight or the lace panel will lose its delicate structure.
Gauge
Using size 7 steel hook and size 10 crochet cotton:
For this project, gauge determines the overall size of the centerpiece panel. Work a small swatch of the vine lace pattern and measure before starting. If your panel comes out significantly larger than 2.75 inches square, try the next smaller hook size.
Abbreviations (US Terms)
Before diving into the crochet tutorial, let me define all the abbreviations you will encounter:
Special Stitches and Techniques
Beaded Single Crochet (bsc)
Before beginning this stitch, pre-string your beads onto the working yarn using a beading needle. To work: insert hook into indicated stitch or space, yarn over and pull up a loop (two loops on hook), slide one bead snugly up the working yarn so it sits against the back of the fabric (WS side, which will face outward once the bracelet is worn right side up), yarn over and draw through both loops. The bead is now locked into the stitch. When the beaded edge is folded into position, beads face the RS.
Petal Spiral Strip (used for the rose)
Work a foundation chain of the stated length, then crochet increasing heights of stitches (sc, hdc, dc, tr) evenly along the strip to create a tapered ruffle. This strip is then rolled from the narrow end outward to form the rose, and the base is secured with several whipstitches or slip stitches.
Leaf Construction
Each leaf is worked along a chain foundation with single crochets and half double crochets on both sides, with a slip stitch at the tip. This creates a pointed oval leaf shape.
Sliding Knot Closure
Cut a 6-inch (15 cm) length of thread separate from your main ball. Fold it into a small loop around both strands of the bracelet band. Wrap the tail of this cut piece around both band strands 4 times, then pass the tail through the loop end and pull to tighten. This creates a sliding knot that allows the band to adjust. Repeat on the other side with a second cut piece so both ends slide independently.
Important Pattern Notes
1. The bracelet is worked in four parts: Part A is the lace vine diamond base panel, Part B is the rose, Part C is the individual leaves (worked separately and sewn on), and Part D is the braided adjustable band.
2. Pre-string all beads onto your dusty rose thread before beginning Part A edging and the braided band tails. Count and string approximately 40 seed beads and 30 crystal beads onto the rose thread before winding it onto a bobbin or small card so you can work from it without tangling.
3. All turning chains count as the first stitch of their row unless noted otherwise.
4. The vine base panel is worked flat in rows, creating a diamond-shaped lace grid. Then a decorative edging with beads is worked around all four sides.
5. Leaves are worked individually and pinned into position before sewing. Refer to the finished measurements and the assembly instructions in the finishing section.
6. Weave in all ends securely, as thread ends in lace work can work loose over time with wear.
7. The rose is not stuffed. Its dimensional quality comes from the rolled petal strip technique. Do not press the rose flat during blocking.
8. Right side of the lace panel is the side facing up when you work the foundation row from left to right.
Step by Step Instructions
Part A: Lace Vine Diamond Base Panel
The base panel is a flat diamond-shaped lace grid measuring approximately 2.75 inches by 2.75 inches (7 cm by 7 cm). It is worked in sage green thread.
Foundation: With sage green thread and size 7 steel hook, ch 6, sl st in first ch to form a ring.
Row 1 (RS): Ch 1, work 8 sc into ring, sl st to first sc to join. (8 sc)
Checkpoint: You have a small flat ring of 8 sc. This is the center anchor for the lace panel.
Row 2: Ch 5 (counts as first dc plus ch 2), skip 1 sc, dc in next sc, (ch 2, skip 1 sc, dc in next sc) 2 times, ch 2, sl st in 3rd ch of beg ch-5 to join. (4 dc, 4 ch-2 spaces)
Row 3: Sl st into first ch-2 sp, ch 1, (sc, ch 3, sc) in each ch-2 sp around, sl st to first sc. (8 sc, 4 ch-3 loops)
Row 4: Sl st into first ch-3 loop, ch 1, (sc, ch 5, sc) in each ch-3 loop around, sl st to first sc. (8 sc, 4 ch-5 loops)
Row 5: Sl st into first ch-5 loop, ch 1, (sc, hdc, dc, hdc, sc) in each ch-5 loop around, sl st to first sc. (20 sts total, 5 sts per loop, 4 loops)
Row 6: Ch 1, sc in first sc, (ch 5, skip 3 sts, sc in next sc, ch 5, sc in next sc) 3 times, ch 5, skip 3 sts, sc in next sc, ch 5, sl st to first sc. (8 sc, 8 ch-5 loops)
Row 7: Sl st into first ch-5 loop, ch 1, (sc, hdc, 3 dc, hdc, sc) in each ch-5 loop around, sl st to first sc. (56 sts total, 7 sts per loop, 8 loops)
Row 8: Ch 1, sc in first sc, (ch 6, skip 5 sts, sc in next sc) 7 times, ch 6, sl st to first sc. (8 sc, 8 ch-6 loops)
Checkpoint: After Row 8, your lace base should be roughly circular with 8 scallop loops radiating outward. It should measure approximately 1.75 inches (4.5 cm) across at this point.
Row 9: Sl st into first ch-6 loop, ch 1, (sc, hdc, dc, ch 2, dc, hdc, sc) in each ch-6 loop around, sl st to first sc. (48 sts, 8 ch-2 corner picots)
Row 10 (establishing diamond corners): This row shapes the piece from circular to diamond by working longer chains at four corner positions and shorter chains at four side positions.
Sl st into first ch-2 sp, ch 1.
Corner position 1: (sc, ch 7, sc) in ch-2 sp.
Sc in each of next 6 sts.
Side position 1: (sc, ch 4, sc) in next ch-2 sp.
Sc in each of next 6 sts.
Corner position 2: (sc, ch 7, sc) in next ch-2 sp.
Sc in each of next 6 sts.
Side position 2: (sc, ch 4, sc) in next ch-2 sp.
Sc in each of next 6 sts.
Corner position 3: (sc, ch 7, sc) in next ch-2 sp.
Sc in each of next 6 sts.
Side position 3: (sc, ch 4, sc) in next ch-2 sp.
Sc in each of next 6 sts.
Corner position 4: (sc, ch 7, sc) in next ch-2 sp.
Sc in each of next 6 sts.
Side position 4: (sc, ch 4, sc) in next ch-2 sp.
Sc in each of next 6 sts.
Sl st to first sc.
Total sts in Row 10: 4 corner ch-7 loops plus 4 side ch-4 loops plus 48 sc = 56 sc, 4 ch-7 loops, 4 ch-4 loops.
Row 11 (leaf accent row): Work (sc, hdc, 5 dc, hdc, sc) in each ch-7 corner loop. Work (sc, hdc, dc, hdc, sc) in each ch-4 side loop. Work sl st across the 6 sc between loops (do not increase or decrease the sc).
Total sts: 4 corner shells of 9 sts = 36, plus 4 side shells of 5 sts = 20, plus 4 sets of 6 sl sts = 24 sl sts. (80 working sts and sl sts)
Row 12 (outer lace diamond edge): Ch 1, sc in first sc of corner shell, (ch 5, skip 3 sts, sc in next st) across each shell section, placing ch 3 between corner and side shell segments, ending each side with sc in last st of shell.
Work as follows:
Corner shell: sc, (ch 5, skip 3, sc) twice. (2 ch-5 loops per corner)
Between corner and side: ch 3.
Side shell: sc, ch 5, skip 3, sc. (1 ch-5 loop per side)
Between side and corner: ch 3.
Rep 3 more times around to complete diamond outline.
Sl st to first sc.
Total loops: 8 ch-5 loops (2 per corner, 4 corners) plus 4 ch-5 loops (1 per side) = 12 ch-5 loops total, plus 8 ch-3 connector arches.
Row 13 (final outer edge shells): (sc, hdc, dc, hdc, sc) in each ch-5 loop. (sc, ch 2, sc) in each ch-3 connector arch.
Total sts: 12 shells of 5 sts = 60 sts, 8 connector arches of 2 sc each = 16 sc plus 8 ch-2 picots.
Fasten off sage green. Weave in ends.
Checkpoint: The finished base panel should be a clear diamond shape measuring approximately 2.5 to 2.75 inches (6.5 to 7 cm) across the widest points. The center hole is approximately 0.75 inch (2 cm) in diameter. The outer edge has pointed leaf-like shells at each corner and smaller shells along each side.
Beaded Edging on Base Panel
Pre-string 30 seed beads and 20 crystal beads alternating (seed, crystal, seed, crystal) onto a new length of dusty rose thread.
Join dusty rose thread at any outer shell tip on the base panel.
Edging Round 1: Ch 1, bsc in first st (slide one bead into place), sc around entire outer edge working into the tip of each shell and into each connector arch. Place one bead every 3rd stitch until all beads are used or the round is complete. Sl st to first sc to join.
Place approximately 1 bead every 3 stitches around the perimeter. With approximately 80 outer sts, you will use approximately 26 to 28 beads in this round, which matches the pre-strung count.
Fasten off. Weave in end.
Part B: Dimensional Rose
The rose is made from two petal spiral strips: one small inner strip and one larger outer strip, both in dusty rose thread.
Inner Petal Strip
With dusty rose thread and size 7 steel hook, ch 32.
Row 1: Starting in 2nd ch from hook, work as follows:
(29 sts total)
Row 2 (ruffle row): Ch 1, turn. Work 2 sc in each sc, 2 hdc in each hdc, 2 dc in each dc across. Do not work into turning chain.
Total sts: 10 sc plus 16 hdc plus 16 dc = 42 sts. (42 sts)
Do not fasten off. Begin rolling strip from the narrow sc end, with RS facing outward. After rolling approximately 2 full rotations, secure the base with 3 to 4 whipstitches through the lower edge. Continue rolling and securing every half rotation until the full strip is used. Fasten off and weave end into base of rose.
Outer Petal Strip
With dusty rose thread, ch 48.
Row 1: Starting in 2nd ch from hook:
(47 sts total)
Row 2 (ruffle row): Ch 1, turn. Work 2 sc in each sc, 2 hdc in each hdc, 2 dc in each dc, 2 tr in each tr across.
Total sts: 26 sc plus 16 hdc plus 36 dc plus 16 tr = 94 sts. (94 sts)
Begin rolling the outer strip around the base of the completed inner rose, with RS facing outward. Secure with whipstitches every half rotation through the combined lower edge. Fasten off and weave in all ends through the base.
Checkpoint: The finished rose should be approximately 1 to 1.25 inches (2.5 to 3 cm) in diameter and stand approximately 0.5 inch (1.3 cm) tall from base to highest petal tip.
Part C: Individual Leaves
Make 8 leaves total in sage green thread. Four leaves will be longer and four will be shorter.
Long Leaf (make 4)
With sage green thread, ch 12.
Row 1: Starting in 2nd ch from hook, sc in first st, hdc in next 2 sts, dc in next 3 sts, hdc in next 2 sts, sc in next 2 sts, 3 sc in last ch (tip of leaf). Do not turn. Work back along the opposite side of the foundation chain: sc in next 2 sts, hdc in next 2 sts, dc in next 3 sts, hdc in next 2 sts, sc in next st, sl st to first sc to join leaf base. (25 sts around leaf plus sl st join)
Fasten off, leaving a 6-inch (15 cm) tail for sewing.
Short Leaf (make 4)
With sage green thread, ch 9.
Row 1: Starting in 2nd ch from hook, sc in first st, hdc in next 2 sts, dc in next 2 sts, hdc in next st, sc in next st, 3 sc in last ch (tip). Do not turn. Work back along opposite side: sc in next st, hdc in next st, dc in next 2 sts, hdc in next 2 sts, sc in next st, sl st to first sc to join. (19 sts around leaf plus sl st join)
Fasten off, leaving a 6-inch (15 cm) tail for sewing.
Part D: Braided Adjustable Band
Cut 6 strands of dusty rose thread, each 40 inches (102 cm) long. Group into 2 sets of 3 strands. Braid each set for approximately 5 inches (12.7 cm). Both braided sections will serve as the two sides of the wristband passing through the base panel.
Thread one braided cord through the upper left side of the base panel, passing under the lace on the back, and bring both ends out to the right side. Thread the second braided cord through the lower right side of the base panel in the same manner. The two cords cross behind the panel.
Create a sliding knot closure on each pair of cord ends as described in the Special Stitches section. Thread one seed bead and one crystal bead onto each cord tail and knot to secure the decorative end.
Checkpoint: With the closure slid fully open, the bracelet should comfortably accommodate a wrist up to 8 inches (20.5 cm). Slid closed, it sits snug on a wrist as small as 5.5 inches (14 cm).
Assembly Instructions
Step 1: Block the base panel (see Finishing and Blocking section). Allow to dry completely before sewing on components.
Step 2: Place the completed rose at the center of the blocked base panel. Thread a tapestry needle with a doubled length of dusty rose thread and sew the base of the rose to the center of the lace panel with 6 to 8 secure stitches catching both the rose base and the lace grid threads beneath.
Step 3: Arrange 4 long leaves evenly around the rose at the cardinal positions (top, bottom, left, right), tucking their base ends slightly under the rose. Pin in place.
Step 4: Arrange 4 short leaves at the diagonal positions (upper left, upper right, lower left, lower right). Pin in place.
Step 5: Sew each leaf to the lace panel using its 6-inch tail, catching 2 to 3 sts of the leaf base and 2 to 3 threads of the lace beneath. The leaves should lie flat against the panel but angle upward at their tips to create a layered, dimensional appearance.
Step 6: Thread the braided band through the panel as described in Part D. Create sliding knots. Add bead ends.
Step 7: Weave in all remaining ends. Apply a very small amount of fabric stiffener to the base panel and leaf tips only if desired.
Finishing and Blocking
1. With all components assembled except the band, mist the base panel and leaves lightly with water or spray starch.
2. Pin the panel face-up onto a foam blocking board, stretching gently to reveal the diamond shape and open up the lace grid.
3. Allow to dry completely, 1 to 4 hours depending on humidity.
4. Do not block the rose. Leave it unblocked to preserve its dimensional shape.
5. Once dry, remove pins and thread the band.
6. Trim all tails flush after weaving in.
Size Customization Tips
To make the centerpiece slightly larger: Add one additional lace round after Row 13 of the base panel by working (sc, ch 5, sc) into each corner shell tip and connecting with ch 3 between. This will add approximately 0.25 inch (0.6 cm) in each direction.
To make the rose smaller or larger: Adjust the foundation chain of each petal strip by 6 to 8 chains. A shorter strip produces a tighter, smaller bud. A longer strip produces a larger open rose.
To lengthen the band: Simply braid or chain additional length before threading through the panel. The sliding knot closure accommodates a wide range of wrist sizes without any change to the crochet.
Care Instructions
Hand wash only in cool water with a small amount of mild soap. Gently squeeze but do not wring or twist. Roll in a clean towel to remove excess moisture. Reshape by hand and allow to air dry flat, away from direct sunlight. Do not machine wash or tumble dry. Do not iron directly over the rose. If the panel loses stiffness with wear, a very light application of spray starch after washing and air drying will restore crispness. Store flat or coiled loosely in a small pouch to prevent the lace loops from catching.
You Did It!
Thank you so much for choosing this rose vine bracelet crochet pattern for your next project. I truly hope you enjoy making it as much as I enjoyed designing it. This piece makes such a beautiful gift, and honestly, you deserve to keep one for yourself too.
If you make this bracelet, I would absolutely love to see your finished creation. Tag me on Instagram or share a photo in my Facebook group. Seeing your makes is the best part of sharing patterns.
Save this pattern to your Pinterest boards so you can find it when you are ready to start stitching, and please leave a comment below if you give it a try. I love hearing how your projects turn out and answering any questions along the way. Happy crocheting!
You Might Also Like
- Ocean Blue Chevron Lace Dress Free Crochet Pattern
- Sage Green Botanical Lace Maxi Skirt Free Crochet Pattern
- Ocean Breeze Granny Square Tote Free Crochet Pattern
- Dusty Rose Cable Cuff Slipper Boots Free Crochet Pattern