
THIS is the one. This is the summer crochet project you have been waiting for. A gorgeous halter dress that looks like you spent weeks on it but actually comes together faster than you would expect. The shell stitch hem border gives it that wow factor, the mesh midriff adds a flirty touch, and the whole thing screams "I made this myself" in the best possible way.
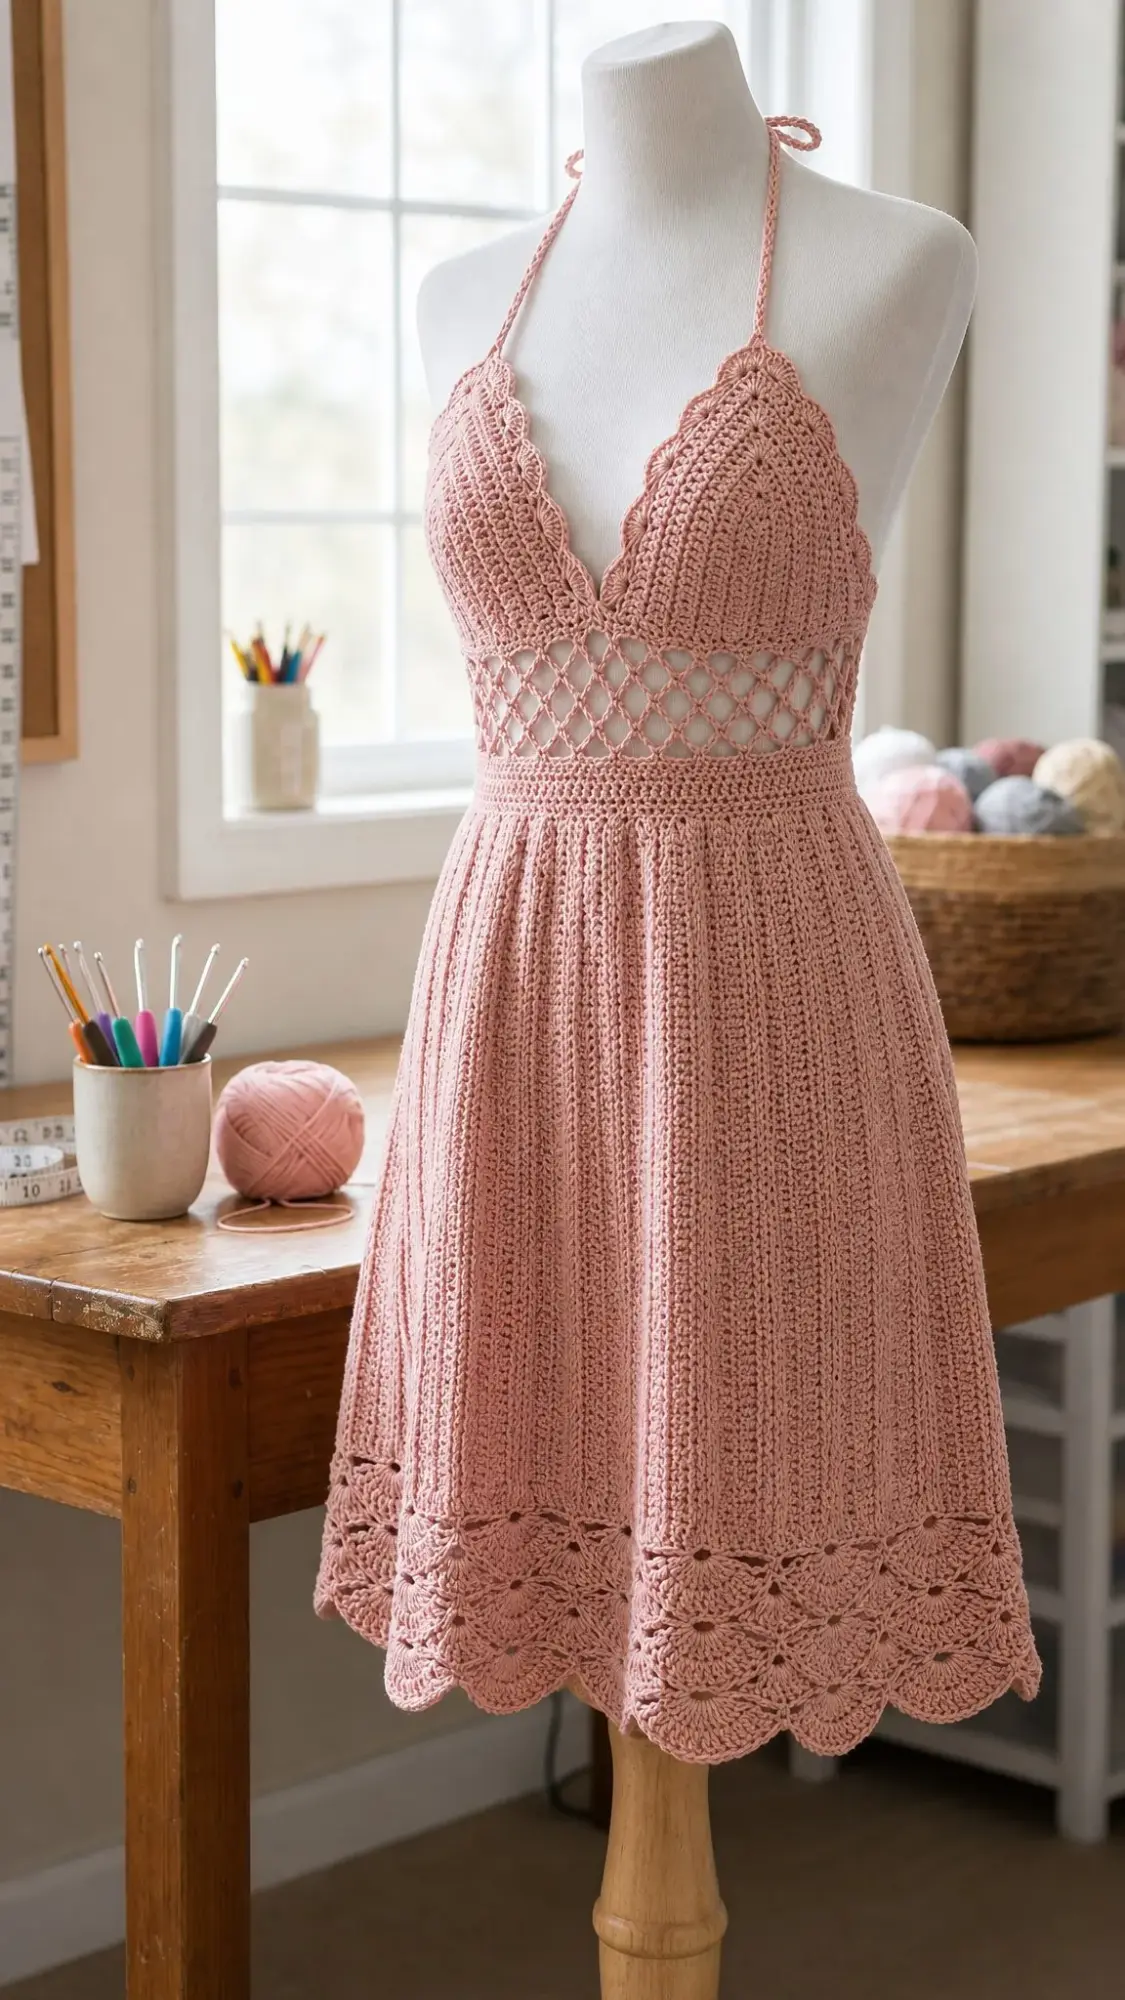
If you have been scrolling Pinterest looking for a wearable crochet piece that actually flatters, stop right here. This blush pink beauty hits all the marks. Structured bodice cups, an A-line skirt with subtle ribbing, scalloped edges everywhere. It is the dress version of a standing ovation.
And here is the best part. Despite how intricate it looks, the stitches are all ones you probably already know. Single crochet, double crochet, shells, and a simple mesh pattern. If you can chain and count, you can absolutely make this dress. Let me walk you through every single step.
Why This Halter Dress Pattern Works So Well
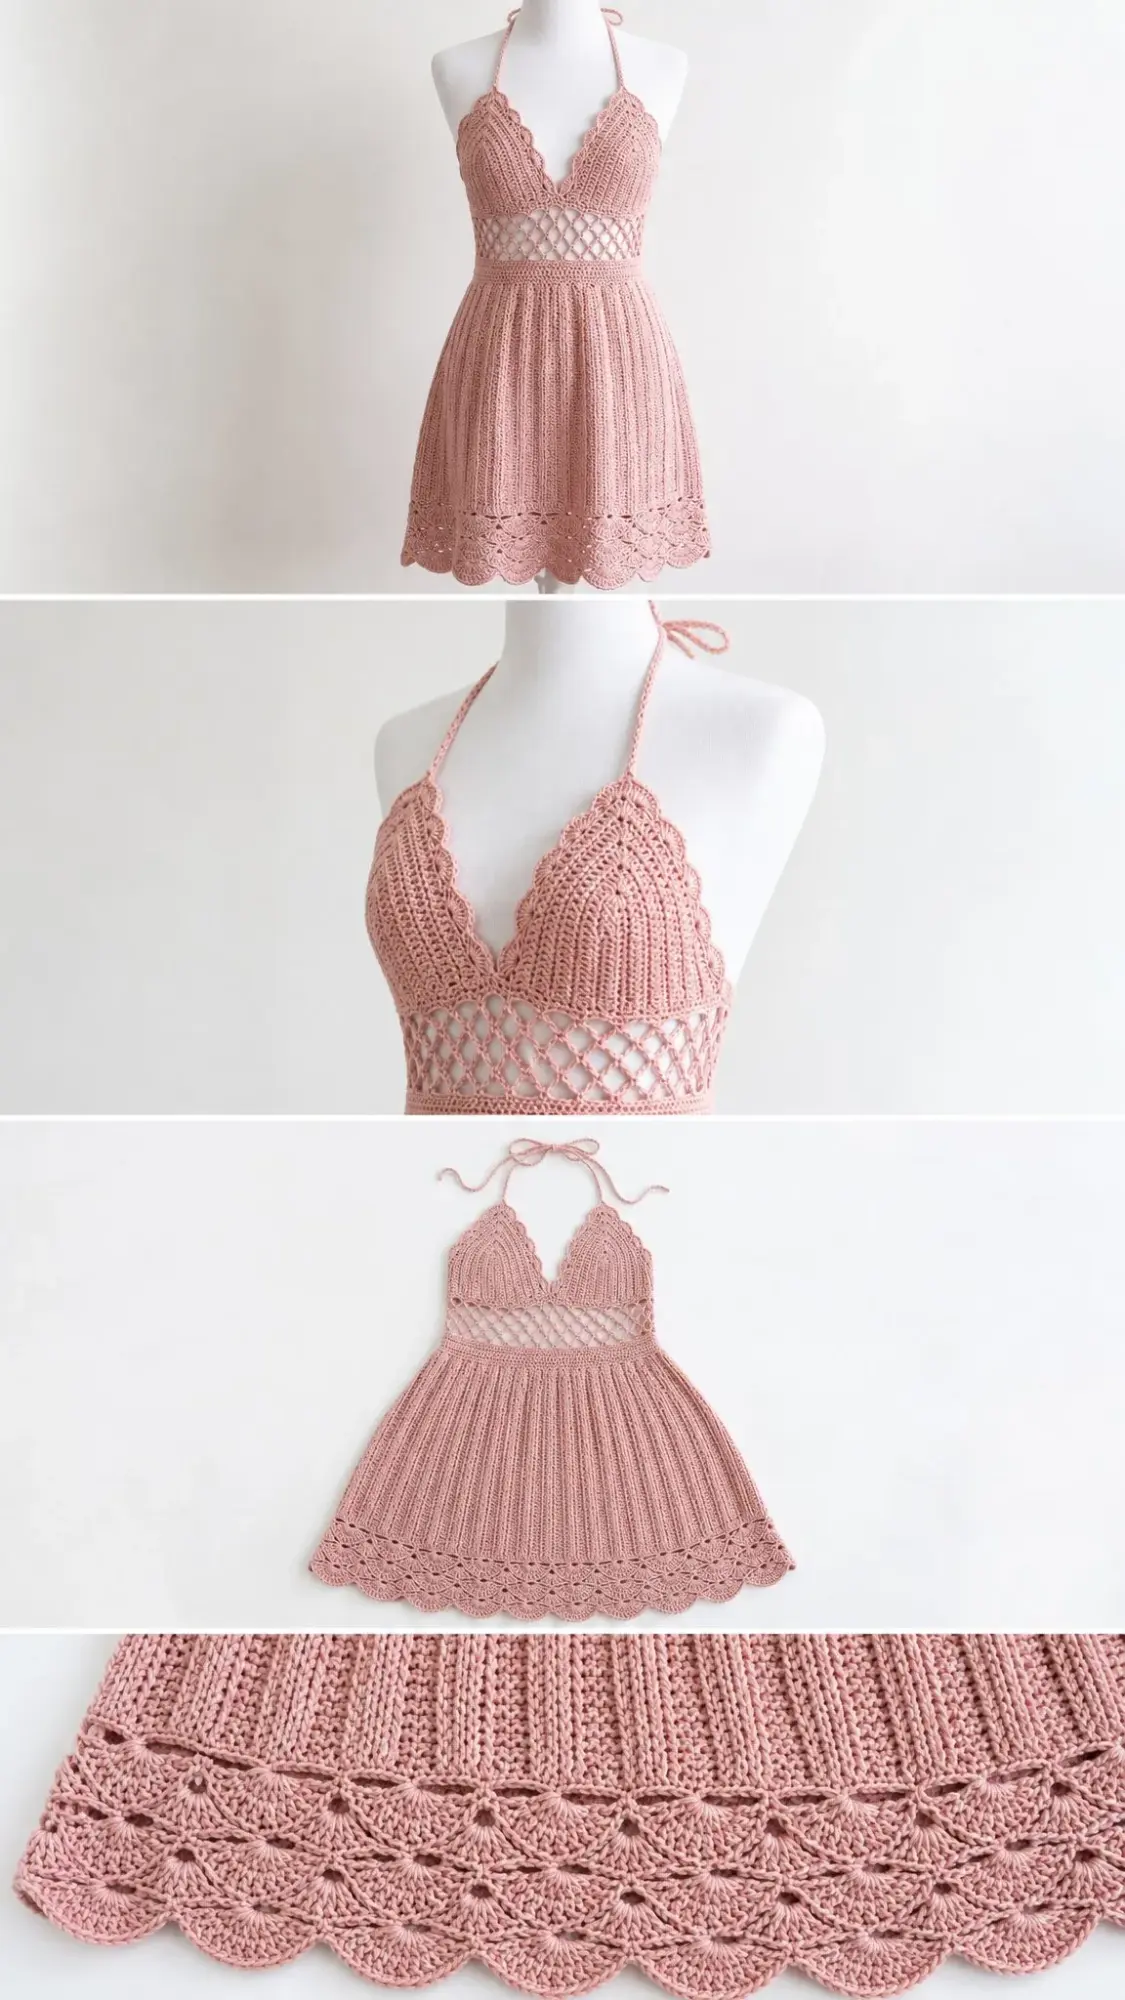
This crochet halter dress combines several clever construction techniques that make the finished piece look professionally designed. The bodice is worked flat in two separate cup pieces, then joined at the center front to create that deep V-neckline. The mesh midriff band is worked in the round and creates the open diamond lattice you see peeking through at the waist. The skirt flows down from there in back loop only stitches, which creates those beautiful vertical ridges.
The shell and picot hem border adds the perfect finishing touch. Those scalloped edges catch the light and give the whole dress a romantic, vintage feel. The halter ties are simple crocheted chains that tie behind the neck, leaving the back open and breezy.
This pattern is rated Advanced Beginner to Intermediate. You should be comfortable working in the round, joining pieces, and following shaping instructions. But do not let that intimidate you. I will explain every technique as we go.
Materials You Will Need
Before you start, gather these supplies:
Yarn: DK weight yarn, also called Category 3 or Light Worsted. You will need approximately 900 to 1100 yards total in blush pink. I recommend cotton or cotton blend yarn for the best drape and stitch definition.
Yarn Suggestions:
Avoid fuzzy or textured yarns. The mesh and shell stitches need a smooth yarn to really shine.
Hooks: US Size E-4 (3.5 mm) for the bodice and edging, US Size F-5 (3.75 mm) for the skirt and mesh band.
Notions: Yarn needle, at least 4 stitch markers, scissors, blocking mats and pins, measuring tape.
Gauge Information
Getting gauge right is critical for a wearable garment. Please do not skip this step.
With E-4 hook: 20 single crochet (sc) stitches and 22 rows = 4 inches (10 cm)
With F-5 hook: 18 double crochet (dc) stitches and 9 rows = 4 inches (10 cm)
Make a 6 inch square swatch in each stitch pattern before beginning. A difference of even one stitch per 4 inches will change your finished measurements significantly.
Finished Measurements
This pattern is written for Size Small, which fits:
Size customization tips are included at the end of the pattern.
Abbreviations and Stitch Definitions
Let me break down every abbreviation you will see. If any of these are new to you, practice them on a small swatch first.
ch = chain. Wrap yarn over hook and pull through the loop on your hook.
sl st = slip stitch. Insert hook, yarn over, pull through both the stitch and the loop on your hook in one motion.
sc = single crochet. Insert hook, yarn over and pull up a loop (2 loops on hook), yarn over and pull through both loops.
hdc = half double crochet. Yarn over, insert hook, pull up a loop (3 loops on hook), yarn over and pull through all 3 loops.
dc = double crochet. Yarn over, insert hook, pull up a loop (3 loops on hook), yarn over and pull through 2 loops, yarn over and pull through remaining 2 loops.
sk = skip. Pass over the indicated stitch without working into it.
st/sts = stitch/stitches
sp = space
ch-sp = chain space. The gap created by a chain in the previous row.
rep = repeat
RS/WS = right side/wrong side
yo = yarn over. Wrap the yarn over your hook from back to front.
sc2tog = single crochet two together. A decrease. Insert hook in first stitch, pull up a loop, insert hook in next stitch, pull up a loop (3 loops on hook), yarn over and pull through all 3 loops.
dc2tog = double crochet two together. A decrease worked over two stitches.
BLO = back loop only. Work into only the back loop of the stitch, leaving the front loop unworked. This creates the ribbed texture.
pm = place marker
rnd = round
Special Stitches
Shell Stitch: Work 5 dc all into the same stitch or space. This creates a fan shape. Each shell counts as one unit in the pattern.
V-Stitch: Work (dc, ch 2, dc) all into the same stitch or space. This creates an open V shape used in the mesh midriff.
Scallop Edging: Work (sc, hdc, 3 dc, hdc, sc) all into the same stitch. This 7-stitch scallop creates the curved decorative edge.
Picot: Ch 3, then slip stitch into the first of those 3 chains. This makes a tiny decorative loop.
Mesh Diamond Stitch: A simple pattern of (dc, ch 2, skip 2) that creates the open lattice at the midriff.
Pattern Notes Before You Begin
Read these carefully. They will save you confusion later.
1. The bodice cups are worked flat, then joined at the center front.
2. The mesh midriff band is worked in the round after joining the bodice to a back foundation strip.
3. The skirt is worked in the round from the waist down with gradual increases for the A-line shape.
4. All turning chains in the bodice count as the first stitch.
5. The back of the dress is open. The bodice cups do not connect at the back.
6. Stitch counts at the end of each row show the total working stitches.
Step by Step Crochet Pattern Instructions
Section 1: Right Bodice Cup
The right cup is worked from the bottom edge upward toward the shoulder.
Foundation: Ch 22.
Row 1 (RS): Sc in 2nd ch from hook and in each ch across. Turn. (21 sc)
Row 2: Ch 1, sc in each st across. Turn. (21 sc)
Row 3: Ch 1, sc2tog over first 2 sts, sc to last 2 sts, sc2tog. Turn. (19 sc)
Row 4: Ch 1, sc in each st across. Turn. (19 sc)
Row 5: Ch 1, sc2tog over first 2 sts, sc to last 2 sts, sc2tog. Turn. (17 sc)
Row 6: Ch 1, sc in each st across. Turn. (17 sc)
Row 7: Ch 1, sc2tog over first 2 sts, sc to last 2 sts, sc2tog. Turn. (15 sc)
Row 8: Ch 1, sc in each st across. Turn. (15 sc)
Row 9: Ch 1, sc2tog over first 2 sts, sc to end. Turn. (14 sc)
Row 10: Ch 1, sc in each st across. Turn. (14 sc)
Row 11: Ch 1, sc2tog over first 2 sts, sc to end. Turn. (13 sc)
Row 12: Ch 1, sc in each st across. Turn. (13 sc)
Row 13: Ch 1, sc2tog over first 2 sts, sc to end. Turn. (12 sc)
Row 14: Ch 1, sc in each st across. Turn. (12 sc)
Row 15: Ch 1, sc2tog over first 2 sts, sc to end. Turn. (11 sc)
Row 16: Ch 1, sc in each st across. Turn. (11 sc)
Row 17: Ch 1, sc2tog over first 2 sts, sc to end. Turn. (10 sc)
Row 18: Ch 1, sc in each st across. Turn. (10 sc)
Row 19: Ch 1, sc2tog over first 2 sts, sc to end. Turn. (9 sc)
Rows 20 to 22: Ch 1, sc in each st across. Turn. (9 sc each row)
Fasten off. This forms the shoulder strap foundation.
Section 2: Left Bodice Cup
Work exactly like the right cup through Row 8.
Rows 1 to 8: Same as Right Bodice Cup. (15 sc at end of Row 8)
Row 9: Ch 1, sc to last 2 sts, sc2tog. Turn. (14 sc)
Row 10: Ch 1, sc in each st across. Turn. (14 sc)
Row 11: Ch 1, sc to last 2 sts, sc2tog. Turn. (13 sc)
Row 12: Ch 1, sc in each st across. Turn. (13 sc)
Row 13: Ch 1, sc to last 2 sts, sc2tog. Turn. (12 sc)
Row 14: Ch 1, sc in each st across. Turn. (12 sc)
Row 15: Ch 1, sc to last 2 sts, sc2tog. Turn. (11 sc)
Row 16: Ch 1, sc in each st across. Turn. (11 sc)
Row 17: Ch 1, sc to last 2 sts, sc2tog. Turn. (10 sc)
Row 18: Ch 1, sc in each st across. Turn. (10 sc)
Row 19: Ch 1, sc to last 2 sts, sc2tog. Turn. (9 sc)
Rows 20 to 22: Ch 1, sc in each st across. Turn. (9 sc each row)
Fasten off.
Checkpoint: Each completed cup should measure approximately 4.25 inches wide at the base and 4 inches tall at the outer edge.
Section 3: Joining the Bodice Cups
Place both cups with RS facing you, V-neck center edges together. Using a yarn needle, whipstitch the center front V edges together from the bottom point upward for approximately 1.5 inches.
With RS facing and E-4 hook, attach yarn at the bottom right outer corner of the right cup.
Set-up Row: Ch 1, sc evenly across the entire bottom edge of the joined bodice. Work approximately 42 sc across. Turn. (42 sc)
Row 2: Ch 1, sc in each st across. (42 sc)
Do not fasten off. Mark this edge for the midriff band.
Section 4: Neckline Scallop Edging
With RS facing and E-4 hook, attach yarn at the top right corner of the right shoulder strap.
Work sc evenly around the neckline: approximately 9 sc along the right strap, 14 sc down the right V-neck slope, 1 sc at the V junction, 14 sc up the left slope, and 9 sc along the left strap. (approximately 47 sc)
Scallop Row: Sl st in first sc, skip 1 sc, work (sc, hdc, 3 dc, hdc, sc) in next sc, skip 1 sc, sl st in next sc. Repeat this pattern across the V-neck portion, working plain sc across the strap tops.
Fasten off.
Section 5: Mesh Midriff Band
Switch to F-5 hook.
First, create the back foundation. Ch 44, sc in 2nd ch from hook and each ch across (43 sc), decrease 1 at each end to reach 42 sc. Join this back panel to the bodice bottom at each side seam using whipstitch for approximately 3 inches on each side.
Your tube circumference is now 84 stitches around.
Round 1: Ch 3 (counts as dc), dc in next st, (ch 2, sk 2 sts, dc in next 2 sts) around, ending ch 2, sk 2. Sl st to top of beg ch-3. (84 sts)
Round 2: Ch 5 (counts as dc plus ch 2), work into ch-2 spaces to create offset diamond lattice. Sl st to 3rd ch of beg ch-5. (84 sts)
Rounds 3 to 5: Continue the mesh diamond pattern, alternating between Rounds 1 and 2 style. Sl st to join each round. (84 sts)
Round 6: Ch 1, sc in each st and 2 sc in each ch-2 sp around. Sl st to join. (84 sc)
Section 6: Waistband Transition
Round 7: Ch 2 (counts as hdc), hdc in each st around. Sl st to join. (84 hdc)
Round 8: Ch 2, hdc in each st around. Sl st to join. (84 hdc)
Section 7: Skirt
Continue with F-5 hook. Work all dc stitches in BLO for the ribbed texture.
Round 1 (Increase): Ch 3, dc BLO in next 2 sts, 2 dc BLO in next st, (dc BLO in next 3 sts, 2 dc BLO in next st) around. Sl st to join. (105 dc)
Rounds 2 to 4: Ch 3, dc BLO in each st around. Sl st to join. (105 dc)
Round 5 (Increase): Ch 3, (dc BLO in next 6 sts, 2 dc BLO in next st) 15 times. Sl st to join. (120 dc)
Rounds 6 to 9: Ch 3, dc BLO in each st around. Sl st to join. (120 dc)
Round 10 (Increase): Ch 3, (dc BLO in next 7 sts, 2 dc BLO in next st) 15 times. Sl st to join. (135 dc)
Rounds 11 to 14: Ch 3, dc BLO in each st around. Sl st to join. (135 dc)
Round 15 (Increase): Ch 3, (dc BLO in next 8 sts, 2 dc BLO in next st) 15 times. Sl st to join. (150 dc)
Rounds 16 to 19: Ch 3, dc BLO in each st around. Sl st to join. (150 dc)
Round 20 (Increase): Ch 3, (dc BLO in next 9 sts, 2 dc BLO in next st) 15 times. Sl st to join. (165 dc)
Rounds 21 to 24: Ch 3, dc BLO in each st around. Sl st to join. (165 dc)
Section 8: Hem Border
Adjustment Round: Ch 1, sc in each st around, working 3 evenly spaced sc2tog to reduce count. Sl st to join. (162 sc)
Border Round 1: Ch 3, dc in same st, ch 1, sk 2 sts, (dc, ch 1, dc) in next st, ch 1, sk 2 sts. Repeat around. Sl st to join. (54 V-stitch units)
Border Round 2 (Shells): Ch 3, 4 dc in same sp (first shell), sk next ch-1 sp, sc in next sp, sk ch-1 sp, (5 dc shell in next sp, sk ch-1, sc in next sp, sk ch-1) around. Sl st to join. (27 shells)
Border Round 3 (Picot): Sl st to center dc of first shell, ch 1, (sc in center dc of shell, ch 3, sl st in first of ch-3 just made, ch 3, sc in next sc) around. Sl st to join. Fasten off. (27 picots)
Section 9: Halter Neck Ties
Make 2 ties.
Attach yarn at the inner corner of each shoulder strap top. Chain until the chain measures approximately 18 inches. Fasten off, leaving a 6 inch tail.
Finishing Your Crochet Dress
Weave in all loose ends securely, drawing them through the backs of multiple stitches.
Blocking: Wet block your dress by submerging it in cool water. Gently press out excess water without wringing. Lay flat on blocking mats and pin the hem scallops flat. Pin the bodice cups to shape. Allow to dry completely for 24 to 48 hours.
Care: Machine wash on gentle in cold water, or hand wash. Lay flat to dry. Do not tumble dry or iron directly.
Size Customization Tips
To size up: Add 2 stitches to each bodice cup foundation chain per size. Adjust decrease rows proportionally. For the midriff and skirt, add stitches in multiples of 6.
To lengthen the skirt: Work additional plain rounds between increase rounds. Each round adds approximately 0.44 inches.
To shorten: Skip the last increase round and proceed to the hem border at 150 stitches.
Time to Make Your Dream Dress
This crochet halter dress pattern brings together everything I love about handmade garments. Structure where you need it, flow where you want it, and details that make people ask "wait, you MADE that?" The combination of the mesh midriff, shell stitch hem border, and ribbed skirt creates a piece that looks complex but builds on simple techniques you can master.
Take your time with the bodice shaping. That is where the magic of the fit comes from. And please, please do a gauge swatch. Your future self will thank you when the dress fits perfectly.
Thank you so much for choosing this pattern for your next project. I genuinely hope you love making it as much as I loved designing it. If you give it a try, I would be absolutely thrilled to see your finished dress. Tag me on Instagram or share a photo on Facebook. Nothing makes my day quite like seeing your beautiful creations come to life.
If this blush pink shell stitch halter dress is calling your name but you are not quite ready to start today, go ahead and pin this pattern to your Pinterest boards so you can find it easily later. And if you do make it, please drop a comment below. I love hearing how your projects turn out and seeing the color combinations you choose. Happy crocheting!
You Might Also Like
- Cozy Gray Hexagon Sofa Throw Free Crochet Pattern
- Sage Green Textured Clutch Bag Free Crochet Pattern
- Sunset Gradient Grid Tote Free Crochet Pattern
- Coastal Blue Granny Square Patchwork Cardigan Free Pattern