
I call this one the Coral Reef set because of an old sketch I found tucked inside my pattern notebook from years ago. I had drawn these chunky African flower hexagons surrounded by scribbled notes about making something "boho but tiny" for my niece’s second birthday. Life got busy, the sketch sat forgotten, and my niece grew up.
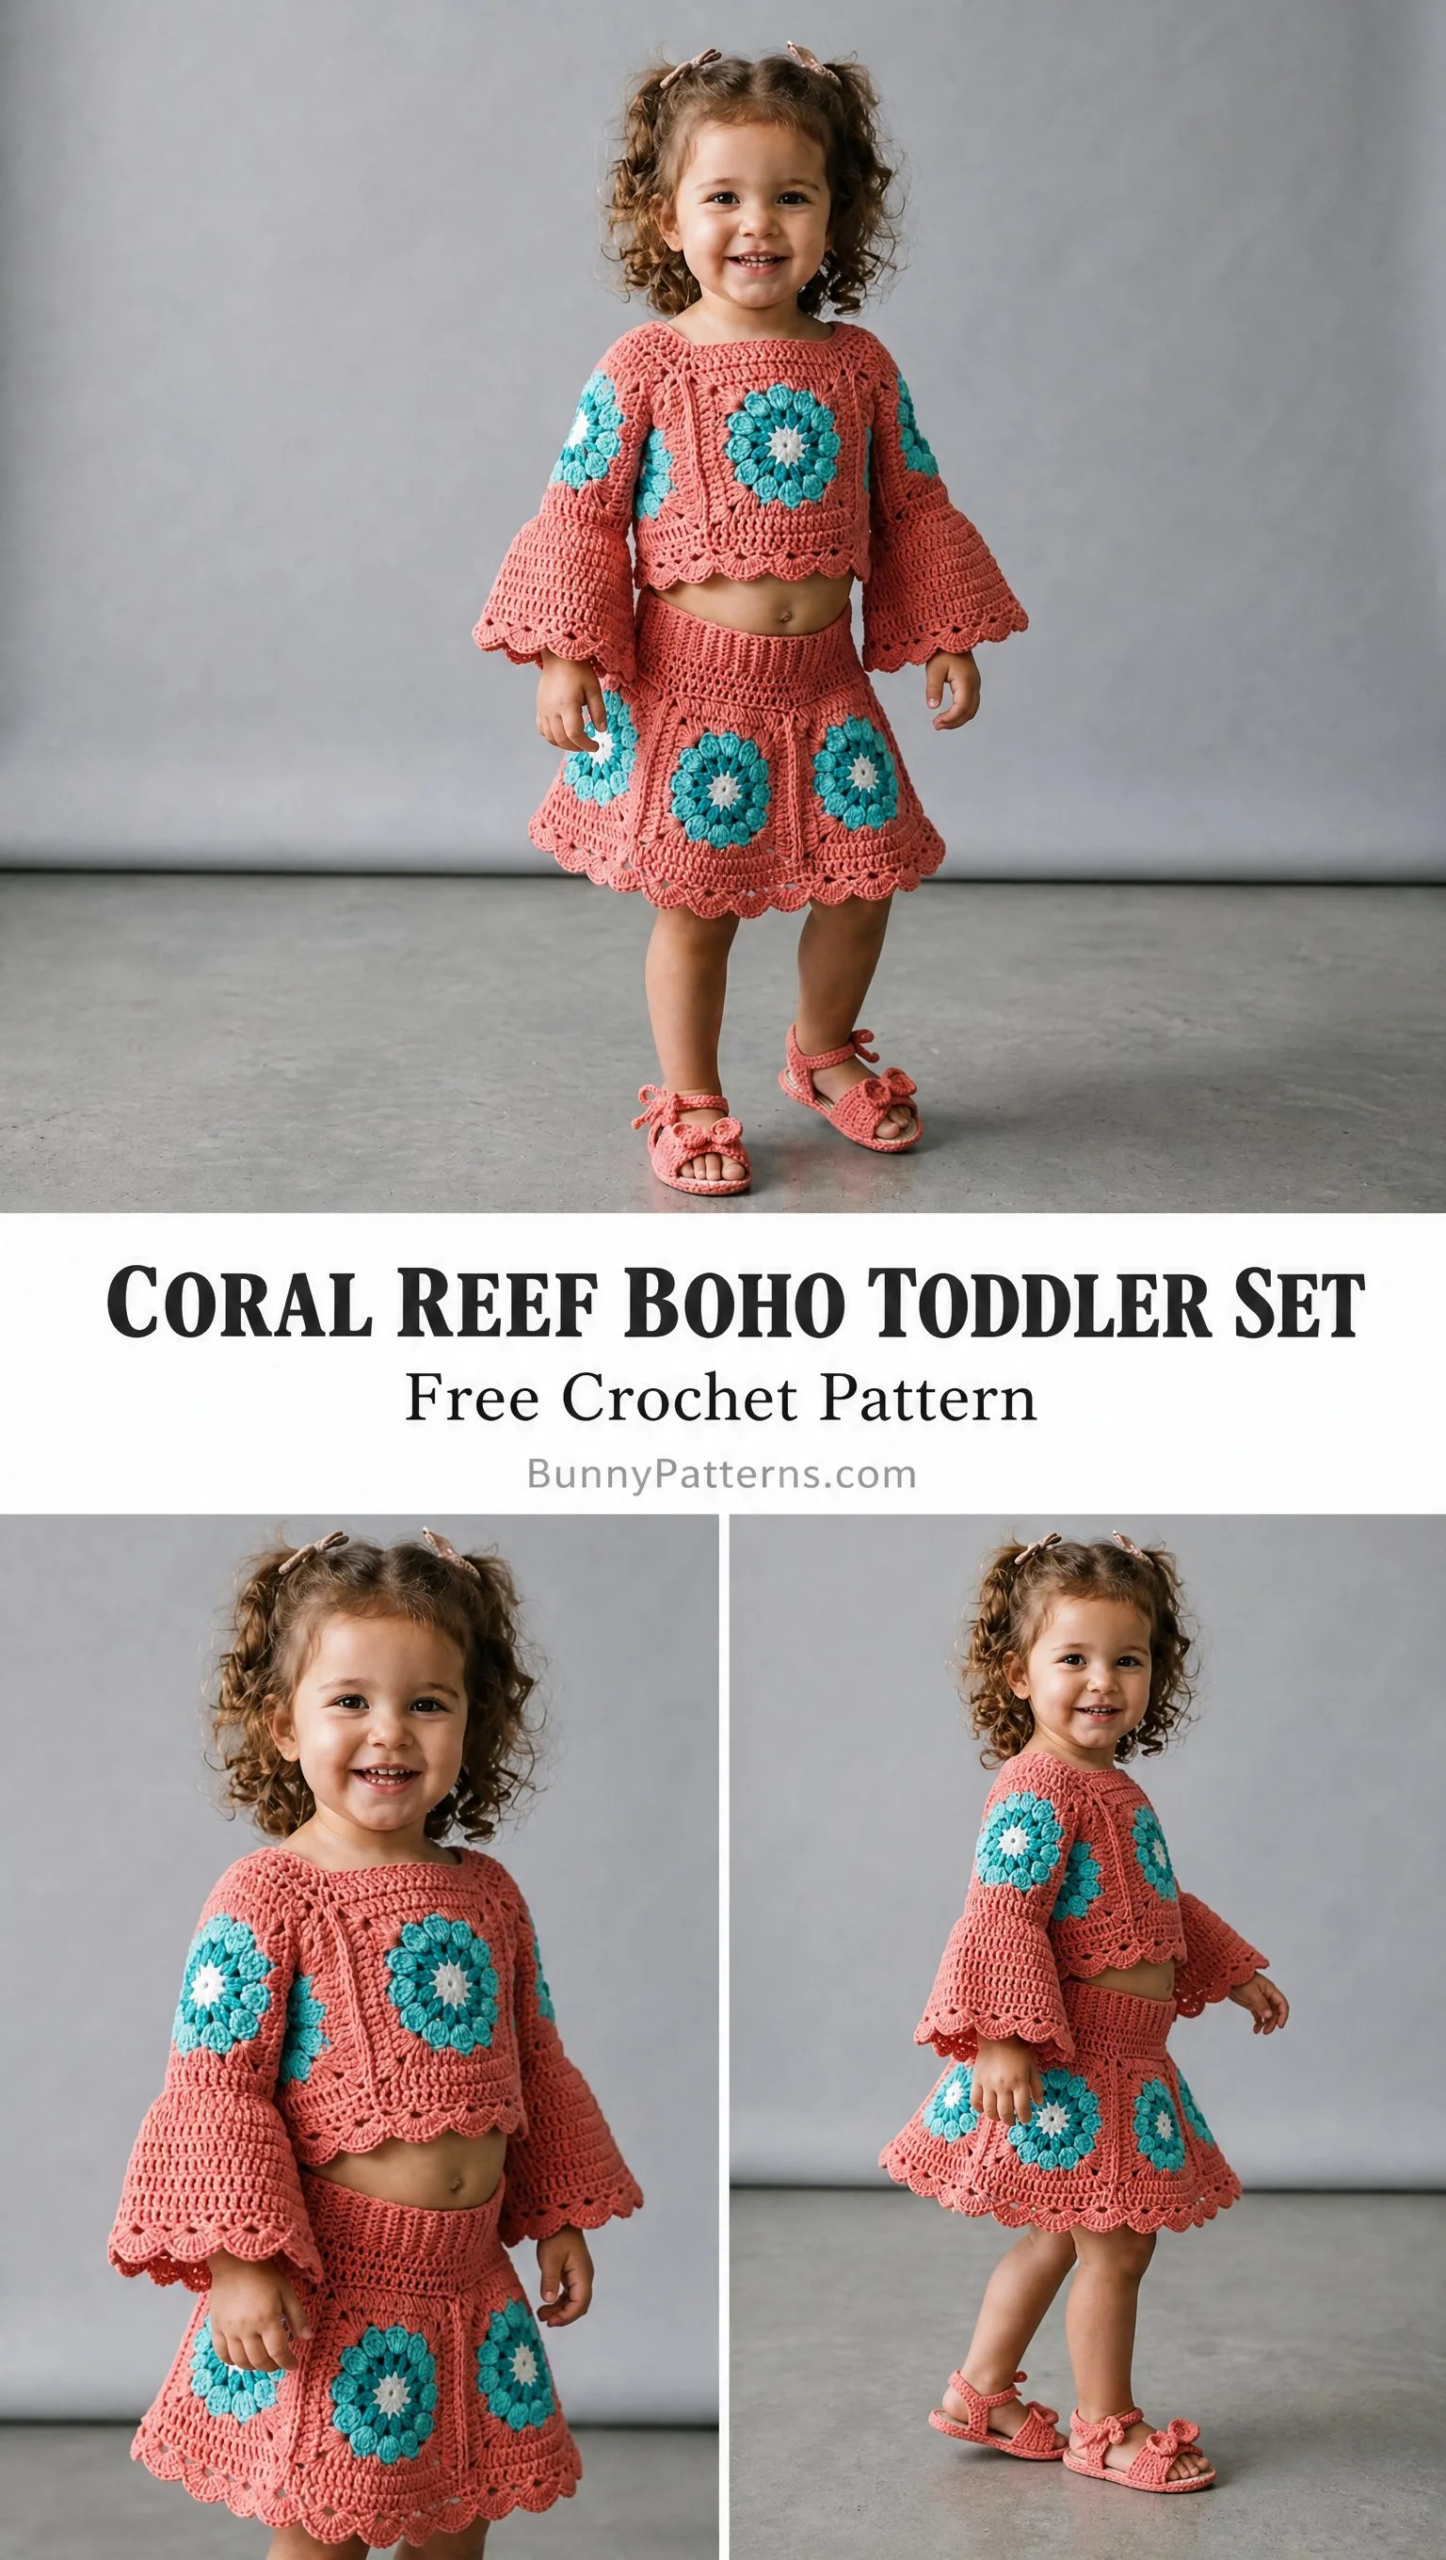
Last month I finally pulled that notebook out and decided this design deserved to exist. The cropped bell sleeves, the flared mini skirt, those bold teal flowers against warm coral. It all came together exactly how I had imagined it would back then.
Now I get to share it with you. Whether you are making this for your own little one, a grandchild, or a friend’s toddler, this set is going to turn heads. The matching sandals seal the deal.
What You Are Making
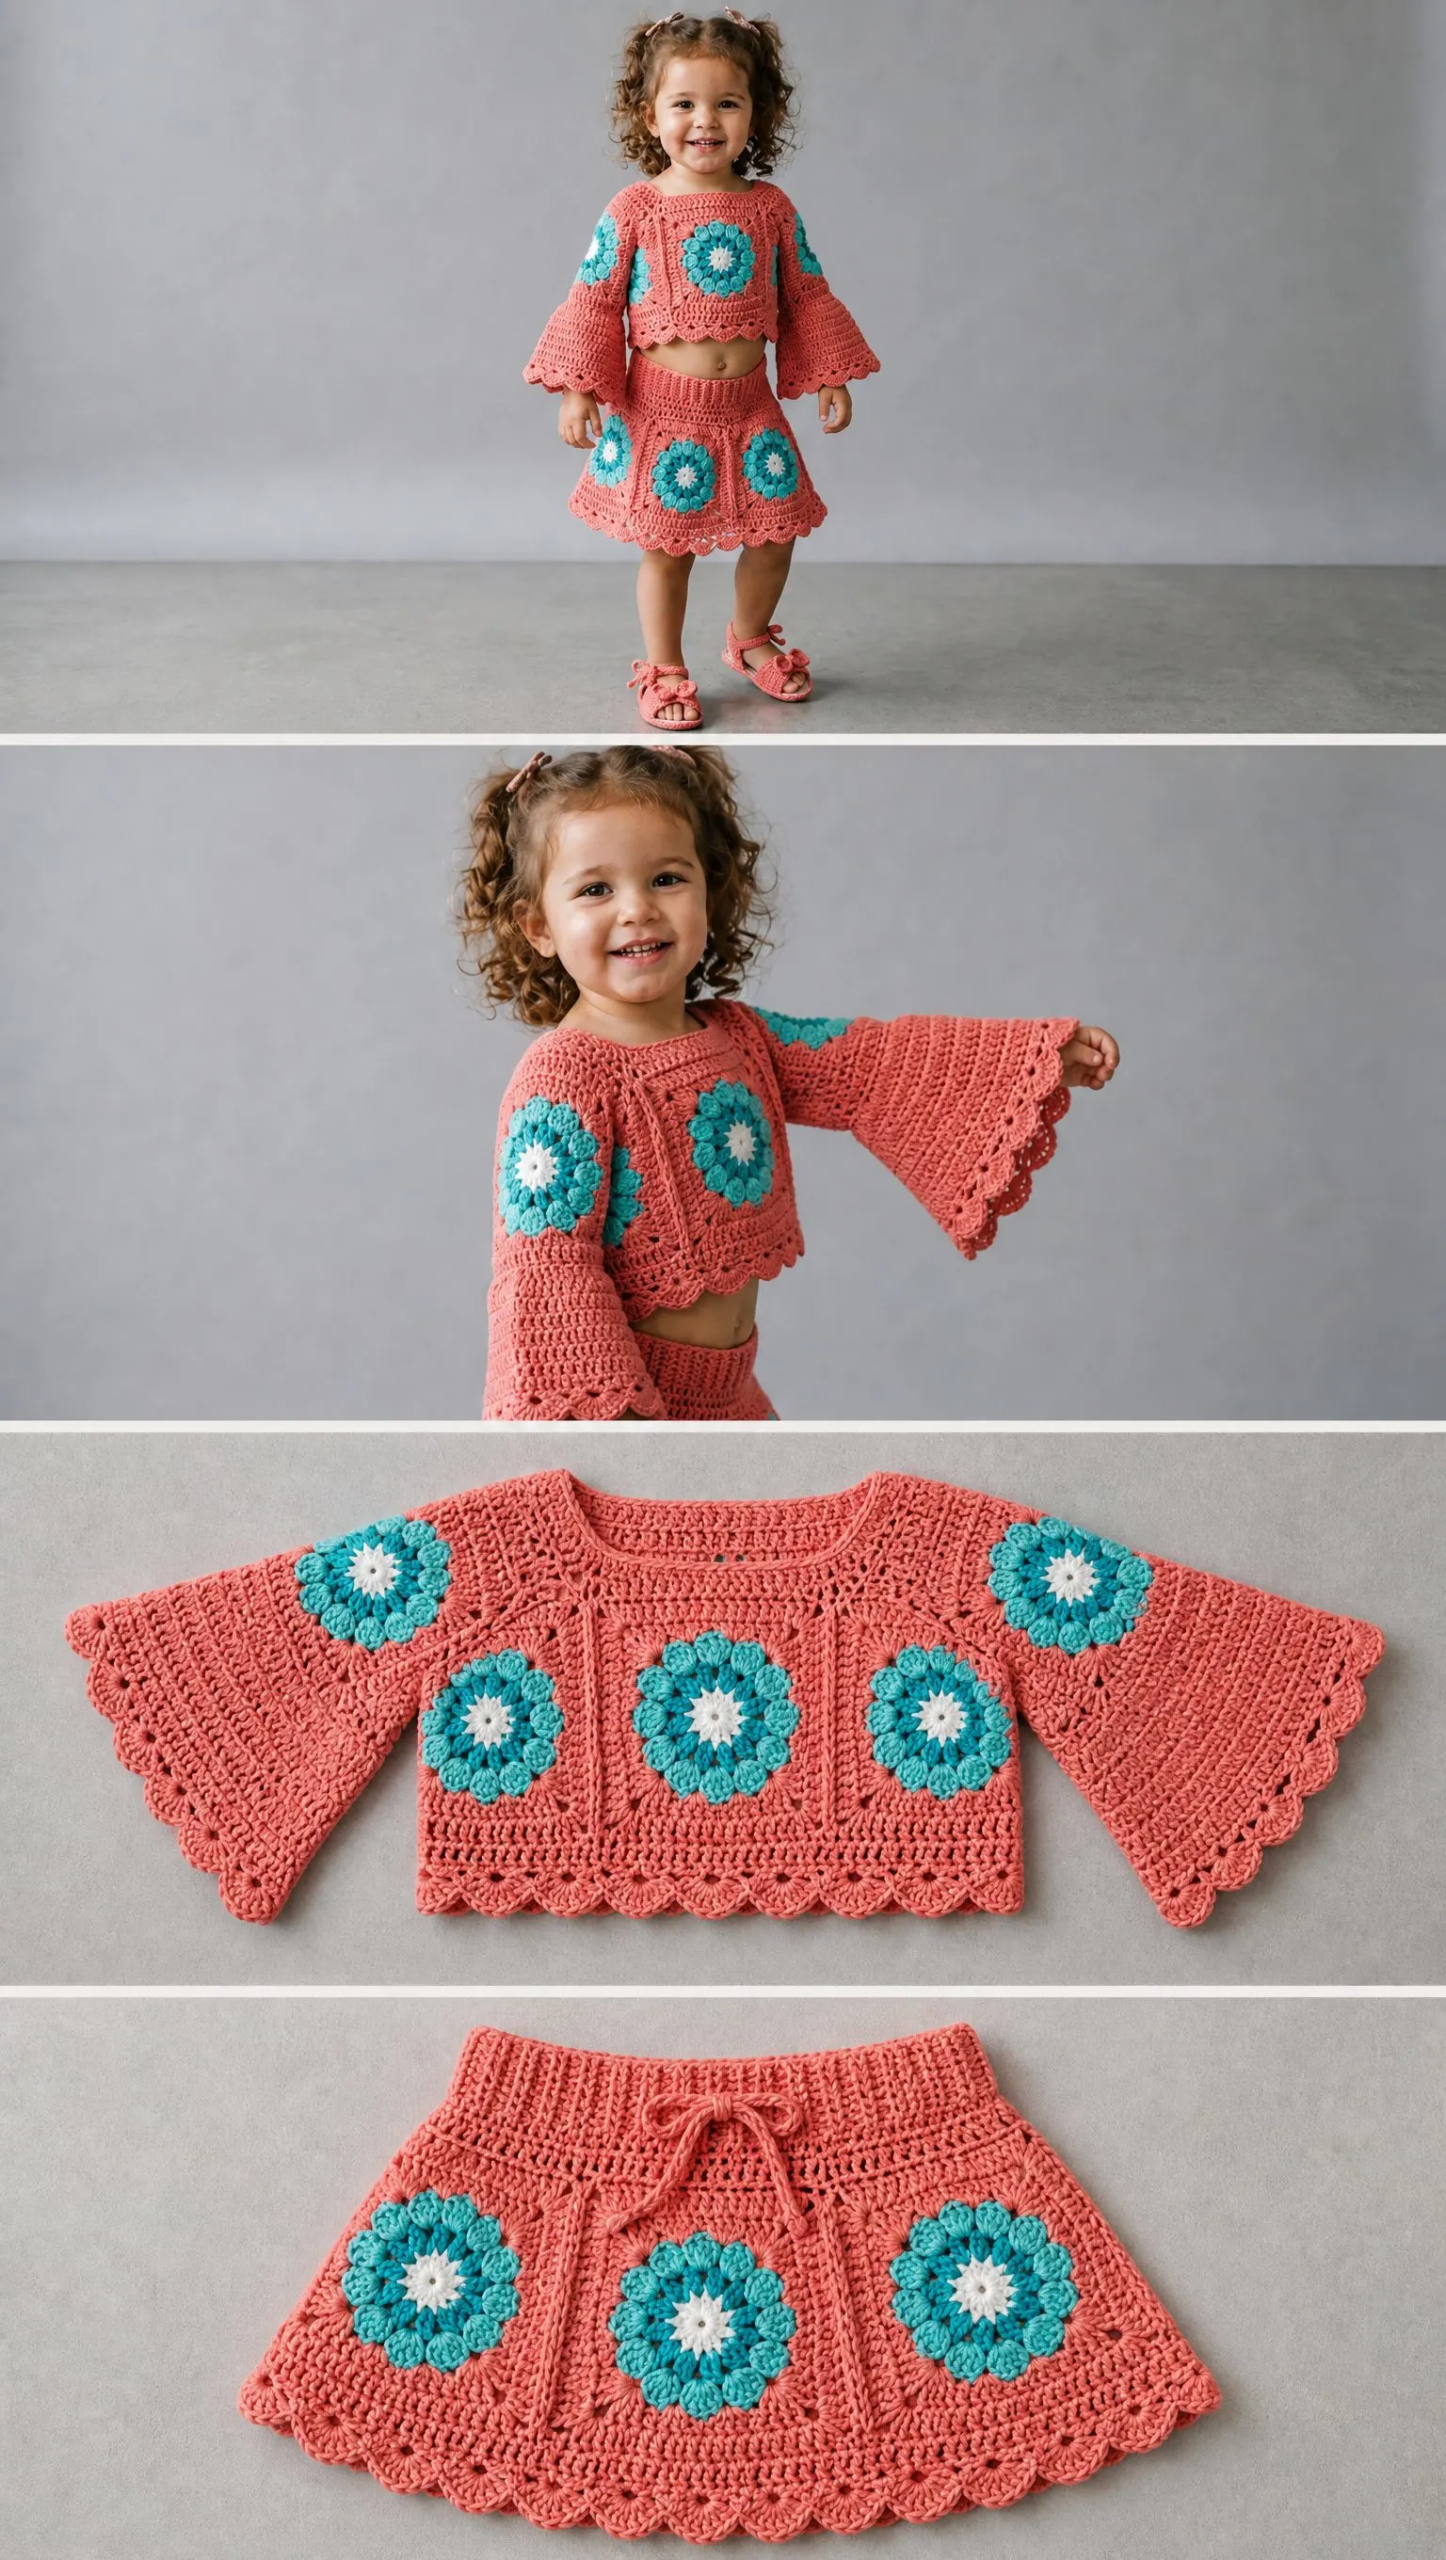
This crochet pattern creates a coordinating two piece outfit for toddlers sized 18 months through 3T. You get a cropped bell sleeve top and a flared mini skirt, both built from large African flower hexagon motifs. The motifs are joined together and finished with beautiful scalloped edging. Matching crochet sandals complete the whole look.
The construction method is clever. You make individual hexagon motifs first, join them using the join as you go (JAYG) method, then pick up stitches along the motif edges to work the body fabric. The bell sleeves gradually flare outward with increase rounds. The skirt uses an elasticated waistband for easy on and off.
Skill level: Intermediate. You should be comfortable working in the round, joining motifs, reading motif construction rounds, and executing shaped bell sleeves. If you have made granny squares and joined them before, you can absolutely handle this project.
Time estimate:
Finished Sizes
Size 18 months
Size 2T
Size 3T
All instructions are written for size 18 months with changes for 2T and 3T in parentheses as (2T / 3T) throughout.
Materials Needed
Yarn A (Coral): DK weight, 100 percent cotton or cotton-acrylic blend
Yarn B (Teal): DK weight, same fiber as Yarn A
Yarn C (White): DK weight, same fiber as Yarn A
Hooks:
Notions:
Yarn Suggestions
Option 1: Lion Brand 24/7 Cotton in Terracotta (Yarn A), Jade (Yarn B), and White (Yarn C). This yarn is 100 percent mercerized cotton with excellent stitch definition.
Option 2: Paintbox Yarns Simply DK in Vintage Pink (Yarn A), Spearmint Green (Yarn B), and Paper White (Yarn C). A cotton-acrylic blend with excellent drape.
Option 3: Drops Safran in Coral (Yarn A), Turquoise (Yarn B), and Off-White (Yarn C). A slightly heavier DK cotton with crisp stitch definition.
Substitution note: Avoid 100 percent acrylic for this pattern. It will not block flat and the motifs will curl.
Gauge
With G-6 hook and Yarn A:
Gauge is critical for fit. Please swatch before beginning and adjust hook size as needed.
Abbreviations and Stitch Definitions
Let me walk you through every abbreviation you will encounter. If you are newer to reading patterns, bookmark this section.
Special Stitches Explained
African Flower Hexagon Motif
This motif creates a hexagonal tile with a raised puff flower at the center. It is worked in 5 rounds. Do not worry if this sounds complicated. Once you make one, the rest flow quickly.
Round 1 (CC2, White):
Make a magic ring. Ch 2 (counts as first dc). Work 11 dc into ring. Sl st to top of beg ch-2 to join. (12 dc)
Round 2 (CC1, Teal):
Join CC1 in any st. Ch 1. Work 1 sc in same st, then work 1 sc in next st. Ch 2. Work 1 sc in each of next 2 sts. Rep from 4 more times. Ch 2. Sl st to first sc to join. You now have 6 pairs of sc separated by 6 ch-2 spaces. (12 sc, 6 ch-2 sps)
Round 3 (CC1, Teal):
Sl st into ch-2 sp. Ch 3 (counts as first dc). Work 4 dc into same ch-2 sp. Ch 1. Work 5 dc into next ch-2 sp. Rep from 4 more times. Ch 1. Sl st to top of beg ch-3 to join. (30 dc, 6 ch-1 sps)
Round 4 (MC, Coral):
Join MC in any ch-1 sp. Ch 2 (counts as first hdc). Work 1 hdc in same sp. Work 1 hdc in each of next 5 dc, then work 2 hdc in ch-1 sp. Rep from 4 more times. Work 1 hdc in each of next 5 dc. Sl st to top of beg ch-2 to join. (42 hdc)
Round 5 (MC, Coral):
Ch 3 (counts as first dc). Work 1 dc in next hdc. Work (2 dc, ch 2, 2 dc) in next hdc to form corner point. Work 1 dc in each of next 5 hdc. Rep from 5 more times, ending last rep with 1 dc in each of last 3 hdc. Sl st to top of beg ch-3 to join. Do not fasten off if joining more motifs immediately. Fasten off if making standalone motifs.
Each completed motif has 6 corner ch-2 spaces and 7 dc along each side (not counting corner sts), for a total of 54 dc per motif perimeter.
Shell Scallop Edging
Work 5 dc into the same st or sp to form a shell. Sk 2 sts. Sl st into next st. Sk 2 sts. Rep shell as instructed. This creates those beautiful wavy edges you see on the hem and sleeves.
Joining Method (JAYG)
When joining a new motif to a finished motif, replace each ch-2 corner space with: ch 1, sl st into corresponding corner ch-2 sp of adjacent motif, ch 1. Replace each ch-1 between dc groups along a shared edge with: sl st into corresponding sp of adjacent motif. This creates a flat, invisible join.
Pattern Notes Before You Begin
1. The top and skirt are each constructed by making individual African Flower Hexagon motifs and joining them, then picking up stitches along the motif edges to work the body fabric in hdc rows or rounds.
2. The bell sleeve is created by gradually increasing stitches in the lower sleeve to flare outward.
3. The scallop edging is applied last to all lower edges of both the top and the skirt and to the neckline of the top.
4. Turn work at the end of every row in flat sections unless instructed otherwise. Rounds are worked with RS always facing.
5. Ch-3 counts as a dc throughout this pattern. Ch-2 at the start of a hdc round counts as a hdc.
6. Stitch counts in parentheses at the end of each row or round reflect the total working stitches not counting foundation chains unless specified.
7. All sizes use the same African Flower Hexagon motif. Sizing is adjusted by adding hdc rows in the body sections.
8. Before joining motifs, lay them flat and plan the orientation so flower centers all face the same direction.
9. Weave in all color-change ends on the WS after each motif is complete before proceeding.
Cropped Bell Sleeve Top Instructions
Section 1: Make the Motifs
Make 5 (5 / 6) African Flower Hexagon motifs in the color sequence described above (CC2 center, CC1 flower, MC background). For sizes 18 months and 2T, make 5 motifs. For size 3T, make 6 motifs. Do not join yet. Set aside.
Section 2: Join Motifs for Front and Sleeve Panels
Layout for all sizes:
Place 3 motifs in a horizontal row. This is the front yoke panel. The center motif will sit at center front. The left and right motifs will become the sleeve cap foundations.
Place 1 motif below the left motif (this will become the left sleeve lower panel). Place 1 motif below the right motif (right sleeve lower panel). For size 3T, the 6th motif is placed as an additional sleeve width motif but this adjustment is described in the sleeve section.
Join the 3 top-row motifs together using the JAYG method. When joining along a shared edge, join at 1 corner ch-2 space and 7 intermediate spaces along the shared side to the corresponding spaces on the adjacent motif. The result is a horizontal panel of 3 joined hexagons.
Now join the sleeve lower motifs to the outermost motifs of the top row. Each sleeve motif shares one full side with its corresponding top-row motif. Join at 1 corner space and 7 intermediate spaces.
After joining you have a cross-shaped arrangement: 3 motifs across the top, 1 motif hanging from each end.
Section 3: Make 1 Additional Motif for Back Yoke Center
Make 1 more motif using the same color sequence. This is the back yoke center motif. Join it to the center back of the top row panel using JAYG along its top edge. You now have a T-shape with 4 motifs across (3 front plus 1 back) when viewed from above.
Note: The back yoke uses only 1 motif at center back. The back body fabric is worked in hdc picked up along the lower motif edges, as described in Section 5.
Section 4: Neckline
The neckline opening sits between the front center motif and the back center motif. It is the natural opening at the top of the cross arrangement. The width of this opening spans the top edges of the center front and center back motifs minus their corner join points.
Neckline edging:
Join MC with a sl st at any point along the neckline opening. Ch 1. Work 1 sc evenly around the entire neckline edge. Aim for approximately 54 (56 / 58) sc around the neckline. Sl st to first sc to join. (54, 56, or 58 sc)
Round 2 of neckline:
Ch 1. Work 1 sc in each sc around. Sl st to join. (54 / 56 / 58 sc)
Fasten off and weave in ends. The neckline has a simple boat-neck silhouette with no additional shaping required.
Section 5: Body Fabric Below Yoke
With RS facing, join MC at the lower right corner of the center front motif. Ch 2 (counts as hdc). Pick up and work hdc stitches across the lower edge of all 3 front motifs, working approximately 7 hdc per side of each motif (not into the corner spaces, which are reserved for sleeve attachment). You will work across 3 motif lower halves.
Target stitch count along lower front yoke edge:
Continue across the lower back yoke edge in the same manner, picking up hdc along the lower edge of the back motif. For the side panels (the gap between front and back motifs), pick up 6 (6 / 7) hdc along each side edge to close the body tube.
Total round 1 body:
Join to work in the round. Pm at both side seam join points.
Round 2: Ch 2. Work 1 hdc in each hdc around. Sl st to join. (96 / 96 / 112 hdc)
Round 3 through Round 5 (all sizes 18 months and 2T) or Round 6 (3T):
Rep Round 2, working even with no increases. (96 / 96 / 112 hdc per round)
After these rounds the body should measure approximately 2 in / 5 cm below the yoke.
Body Hem Scallop Edging:
Round: Ch 1. Work 5 dc in same st (shell). Sk 2 sts. Sl st in next st. Sk 2 sts. Rep from around. Sl st to first sl st to join.
For this to divide evenly, the stitch count must be divisible by 6. Check:
Fasten off after scallop edging.
Checkpoint: After completing the body section and before the scallop edging, the top body tube should measure approximately 3.5 to 4 in / 9 to 10 cm in circumference and the total top length from neckline to lower hem should be approximately 9 (9.5 / 10) in / 23 (24 / 25) cm.
Section 6: Sleeves
The sleeve is formed by the two lower sleeve motifs plus additional hdc rows worked into the motif edges and then flared downward.
The sleeve opening (the armhole) is bounded by the side edge of the top-row outer motif (front) and the corresponding back motif edge. This opening spans approximately 2 full motif side lengths = approximately 8.5 (8.5 / 8.5) in / 22 cm around.
Round 1 of sleeve (pick up round):
Join MC at the bottom of the sleeve opening. Ch 2. Pick up and work 1 hdc in each available st or sp around the entire sleeve opening edge. Target count: 48 (48 / 54) hdc around. Pm. Sl st to join.
Round 2: Ch 2. Work 1 hdc in each hdc around. Sl st to join. (48 / 48 / 54 hdc)
Round 3: Ch 2. Work 1 hdc in each hdc around. Sl st to join. (48 / 48 / 54 hdc)
Now begin bell flare increases. Work 6 increase rounds spaced as follows. An increase round adds 6 sts evenly (one every 8th stitch).
Bell Round 1: Ch 2. Work 1 hdc in each of next 7 hdc, 2 hdc in next hdc. Rep from 5 (5 / 5) more times. Work 0 (0 / 6) hdc to end. Sl st to join.
Bell Round 2: Ch 2. Work 1 hdc in each hdc around. Sl st to join. (54 / 54 / 60 hdc)
Bell Round 3: Ch 2. Work 1 hdc in each of next 8 hdc, 2 hdc in next hdc. Rep from 5 (5 / 5) more times. Work 0 (0 / 6) hdc to end. Sl st to join.
Bell Round 4: Ch 2. Work 1 hdc in each hdc around. Sl st to join. (60 / 60 / 66 hdc)
Bell Round 5: Ch 2. Work 1 hdc in each of next 9 hdc, 2 hdc in next hdc. Rep from 5 (5 / 5) more times. Work 0 (0 / 6) hdc to end. Sl st to join.
Bell Round 6: Ch 2. Work 1 hdc in each hdc around. Sl st to join. (66 / 66 / 72 hdc)
Sleeve Length Rounds:
Work 2 (3 / 4) more even rounds in hdc. (66 / 66 / 72 hdc per round)
Sleeve Scallop Edging:
Adjust count to nearest multiple of 6 if needed.
Round: Ch 1. Work 5 dc in same st (shell). Sk 2 sts. Sl st in next st. Sk 2 sts. Rep from around. Sl st to first sl st to join. Fasten off.
Repeat sleeve instructions for second sleeve.
Checkpoint: Each completed sleeve should measure approximately 5.5 (6 / 6.5) in / 14 (15 / 16.5) cm from shoulder to cuff edge, and the cuff opening should measure approximately 8.25 (8.25 / 9) in / 21 (21 / 23) cm in circumference before the scallop edging.
Flared Skirt Instructions
Section 1: Make the Motifs
Make 4 (4 / 4) African Flower Hexagon motifs in the same color sequence as the top.
Section 2: Join Motifs
Arrange 2 motifs side by side for the front skirt panel. Join using JAYG method along one full shared side (1 corner space and 7 intermediate spaces). Repeat for the back panel with the remaining 2 motifs.
Do not join front panel to back panel yet.
Section 3: Waistband Setup
The skirt waist is worked from the top of the motif panels downward after the waistband is attached.
With RS facing, join MC at upper right corner of front panel. Ch 1. Work 1 sc across the top edges of both front motifs. Work approximately 7 sc per top side of each motif.
Join yarn at upper right corner of back panel. Work same as front.
Now join front and back panels at the side edges. With RS facing, hold front and back panels together. Join MC at one side. Work 6 (6 / 7) sc across each side edge to close the tube.
Total waist round stitch count:
Waistband Rounds:
Work even in sc for 8 rounds. (40 / 40 / 42 sc per round)
On Round 9, fold the waistband in half to the inside and sl st loosely to the first pick-up row on the WS, leaving a 1.5 in / 3.8 cm gap for elastic insertion. Thread elastic through the channel. Overlap elastic ends by 0.5 in / 1.3 cm and sew securely. Close the gap with sl sts. This creates a clean folded elastic waistband.
Section 4: Skirt Body Below Motifs
With RS facing, join MC at the lower right corner of the front motif panel, working below the motifs.
Round 1: Ch 2. Pick up and work 1 hdc in each st along the bottom edges of the front panel, then across the right side, across the back panel bottom edge, then across the left side.
Target pick-up per edge:
Join to work in the round. Pm at side seam points. (42 hdc)
Increase Round 1: Ch 2. Work 1 hdc in each of next 6 hdc, 2 hdc in next hdc. Rep from around. Sl st to join. (48 hdc)
Even Round: Ch 2. Work 1 hdc in each hdc around. Sl st to join. (48 hdc)
Increase Round 2: Ch 2. Work 1 hdc in each of next 7 hdc, 2 hdc in next hdc. Rep from around. Sl st to join. (54 hdc)
Even Round: Ch 2. Work 1 hdc in each hdc around. Sl st to join. (54 hdc)
Increase Round 3: Ch 2. Work 1 hdc in each of next 8 hdc, 2 hdc in next hdc. Rep from around. Sl st to join. (60 hdc)
Even Round: Ch 2. Work 1 hdc in each hdc around. Sl st to join. (60 hdc)
Size 18 months: Work 2 more even rounds. (60 hdc per round)
Size 2T: Increase Round 4: Ch 2. Work 1 hdc in each of next 9 hdc, 2 hdc in next hdc. Rep from around. Sl st to join. (66 hdc)
Then work 2 more even rounds. (66 hdc per round)
Size 3T: Work Increase Round 4 as in 2T to 66 hdc. Then work Increase Round 5: Ch 2. Work 1 hdc in each of next 10 hdc, 2 hdc in next hdc. Rep from around. Sl st to join. (72 hdc)
Then work 2 more even rounds. (72 hdc per round)
Hem Scallop Edging:
Check divisibility by 6:
Round: Ch 1. Work 5 dc in same st (shell). Sk 2 sts. Sl st in next st. Sk 2 sts. Rep from around. Sl st to first sl st to join. Fasten off.
Checkpoint: The skirt from top of waistband to lower hem should measure approximately 8.5 (9 / 9.5) in / 22 (23 / 24) cm. The hem circumference before scallop edging should measure approximately 15 (16.5 / 18) in / 38 (42 / 46) cm.
Crochet Sandal Instructions
Make 2 sandals.
Section 1: Sole
With Yarn A and F-5 hook, ch 18 (19 / 20).
Round 1 (foundation):
Work 3 sc in 2nd ch from hook. Work 1 sc in each of next 14 (15 / 16) ch. Work 3 sc in last ch. Now work along the opposite side of the foundation chain: 1 sc in each of next 14 (15 / 16) ch. Sl st to first sc to join. (36 / 38 / 40 sc)
Round 2:
Ch 1. Work 3 sc in first sc (toe point increase). Work 1 sc in each of next 16 (17 / 18) sc. Work 3 sc in next sc (heel point increase). Work 1 sc in each of next 16 (17 / 18) sc. Sl st to join. (40 / 42 / 44 sc)
Round 3:
Ch 1. Work 1 sc in each sc around, working 2 sc in each of the 2 center toe sts and 2 sc in each of the 2 center heel sts. Sl st to join. (44 / 46 / 48 sc)
Round 4:
Ch 1. Work 1 sc in each sc around, working 2 sc in each of the 2 center toe sts. Sl st to join. (46 / 48 / 50 sc)
Rounds 5 and 6:
Ch 1. Work 1 sc in each sc around. Sl st to join. (46 / 48 / 50 sc)
Do not fasten off. Set marker at center front toe position.
Section 2: Toe Strap
The toe strap is a small bow-tied piece positioned at the top of the foot.
Join Yarn A at center front toe marker. Ch 1. Work 1 sc in each of next 5 sc across the toe. Turn. Work 3 more rows of 5 sc. Fasten off. This tab forms the center of the bow.
Bow ties:
Make 2 chains of ch 25 (27 / 29). Join at each side of the toe tab. These tie at the top of the foot. Set aside.
Section 3: Ankle Strap
Join Yarn A at center back heel. Ch 1. Work 1 sc in each of next 5 sc across the heel. Turn. Work 3 rows of 5 sc. Fasten off.
Make 2 chains of ch 20 (22 / 24) and attach one to each end of the ankle strap. These wrap and tie at the ankle.
Section 4: Sandal Edging
Join Yarn A at the sole edge. Ch 1. Work 1 sc evenly around the entire sole perimeter. Sl st to join. Fasten off and weave in ends.
For a more finished look, work 1 round of sc in Yarn A through both layers of the sole (top and bottom held together) for added stiffness and definition before adding straps.
Size Customization Tips
1. Motif size is fixed. To change the finished garment size, adjust the number of hdc rows in the body sections rather than the motif itself.
2. To size up significantly (4T
You Might Also Like
- Snowman Hooded Poncho Cape Free Crochet Pattern
- Ocean Blue Ombre Drawstring Bucket Bag Free Crochet Pattern
- Lavender Tiered Ruffle Doll Dress Free Crochet Pattern
- Lavender Dream Pompom Crochet Top Free Crochet Pattern