
This doll dress uses basic crochet stitches to create a stunning tiered ruffle effect. The bodice is simple single crochet worked from the top down. The skirt features three layered ruffles in an ombre purple gradient that fans out beautifully.
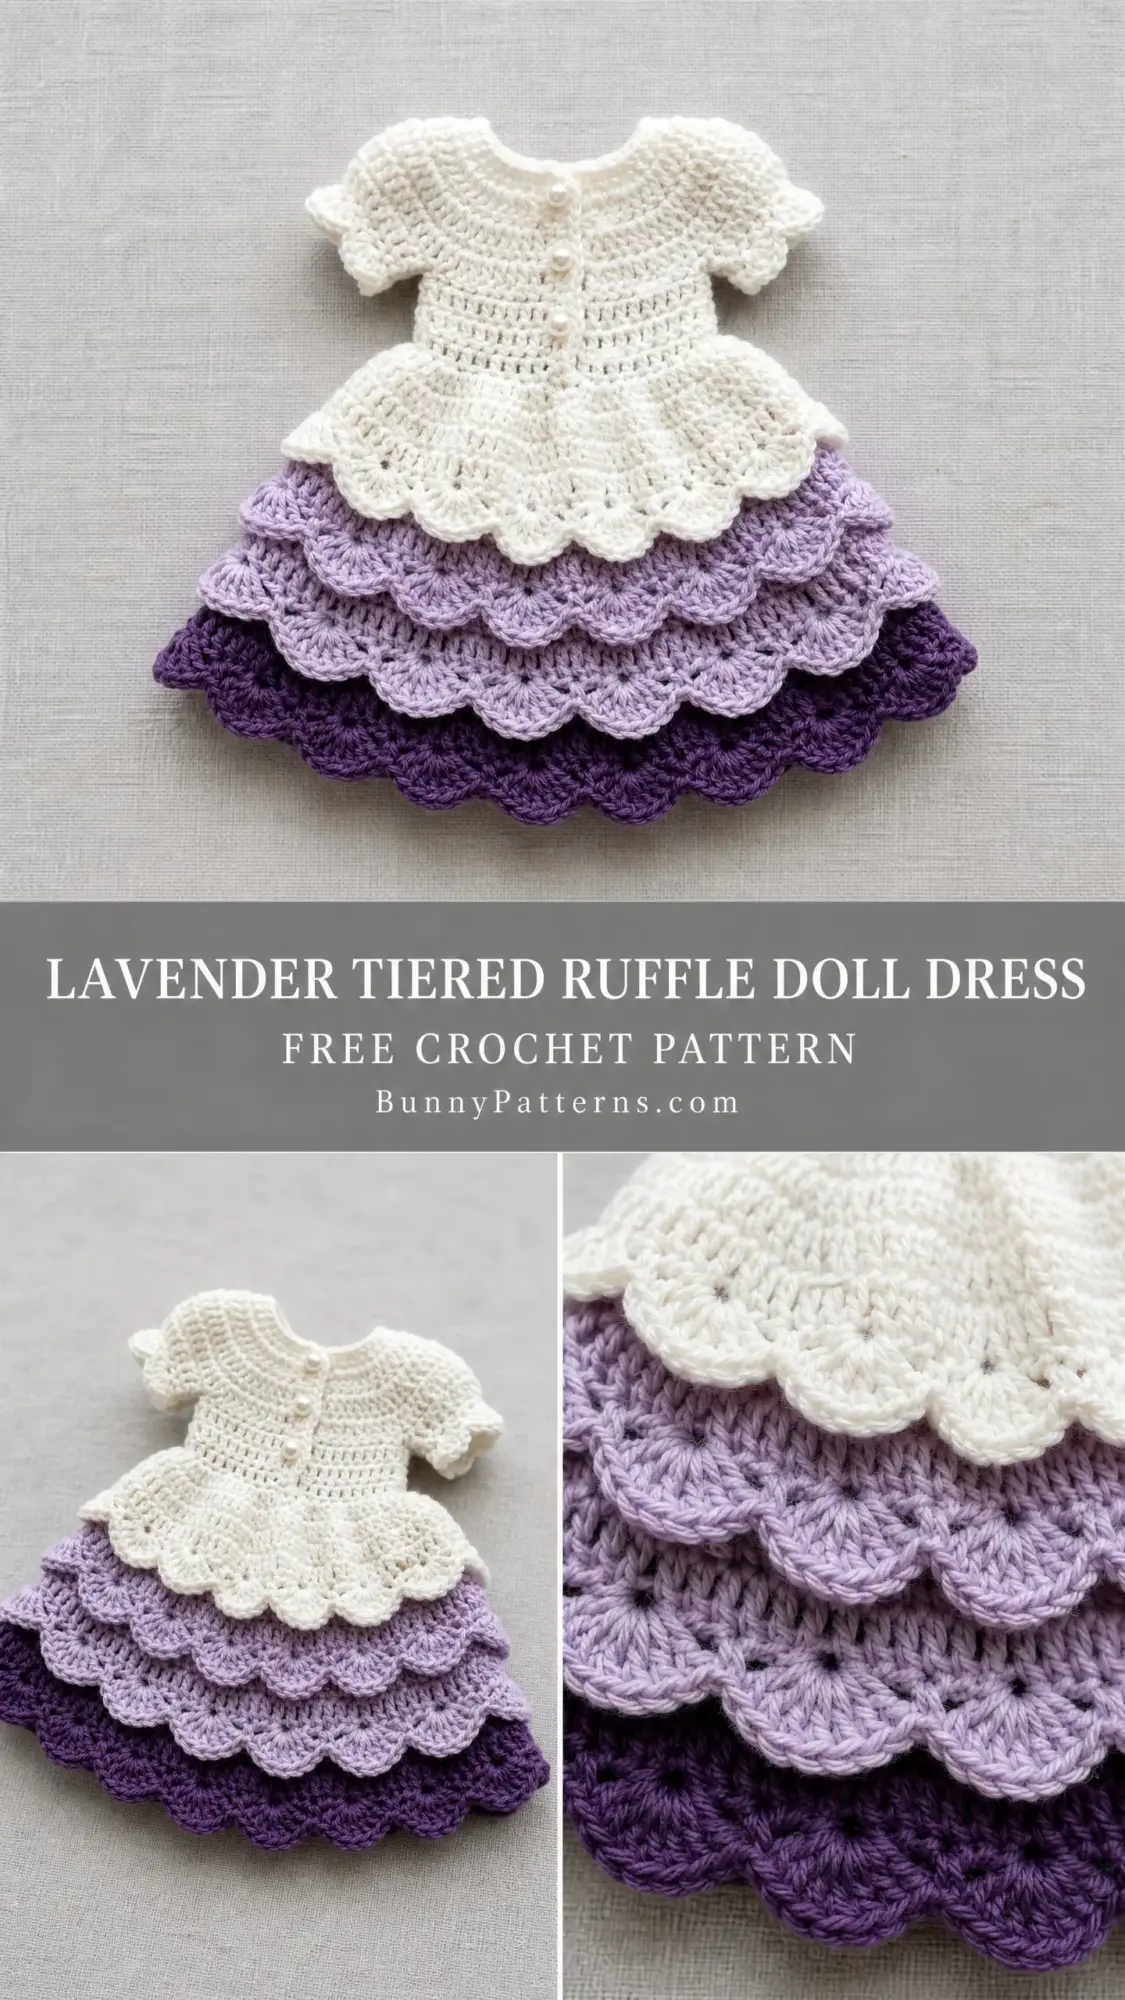
If you can work single crochet, double crochet, and follow a shell stitch pattern, you can make this dress. The construction is straightforward once you understand the raglan shaping at the yoke.
Designed to fit a standard 18-inch doll, this little dress makes a perfect gift for any child who loves their baby dolls or fashion dolls. The pearl button details add an heirloom quality that looks far more complicated than it actually is.
About This Crochet Pattern
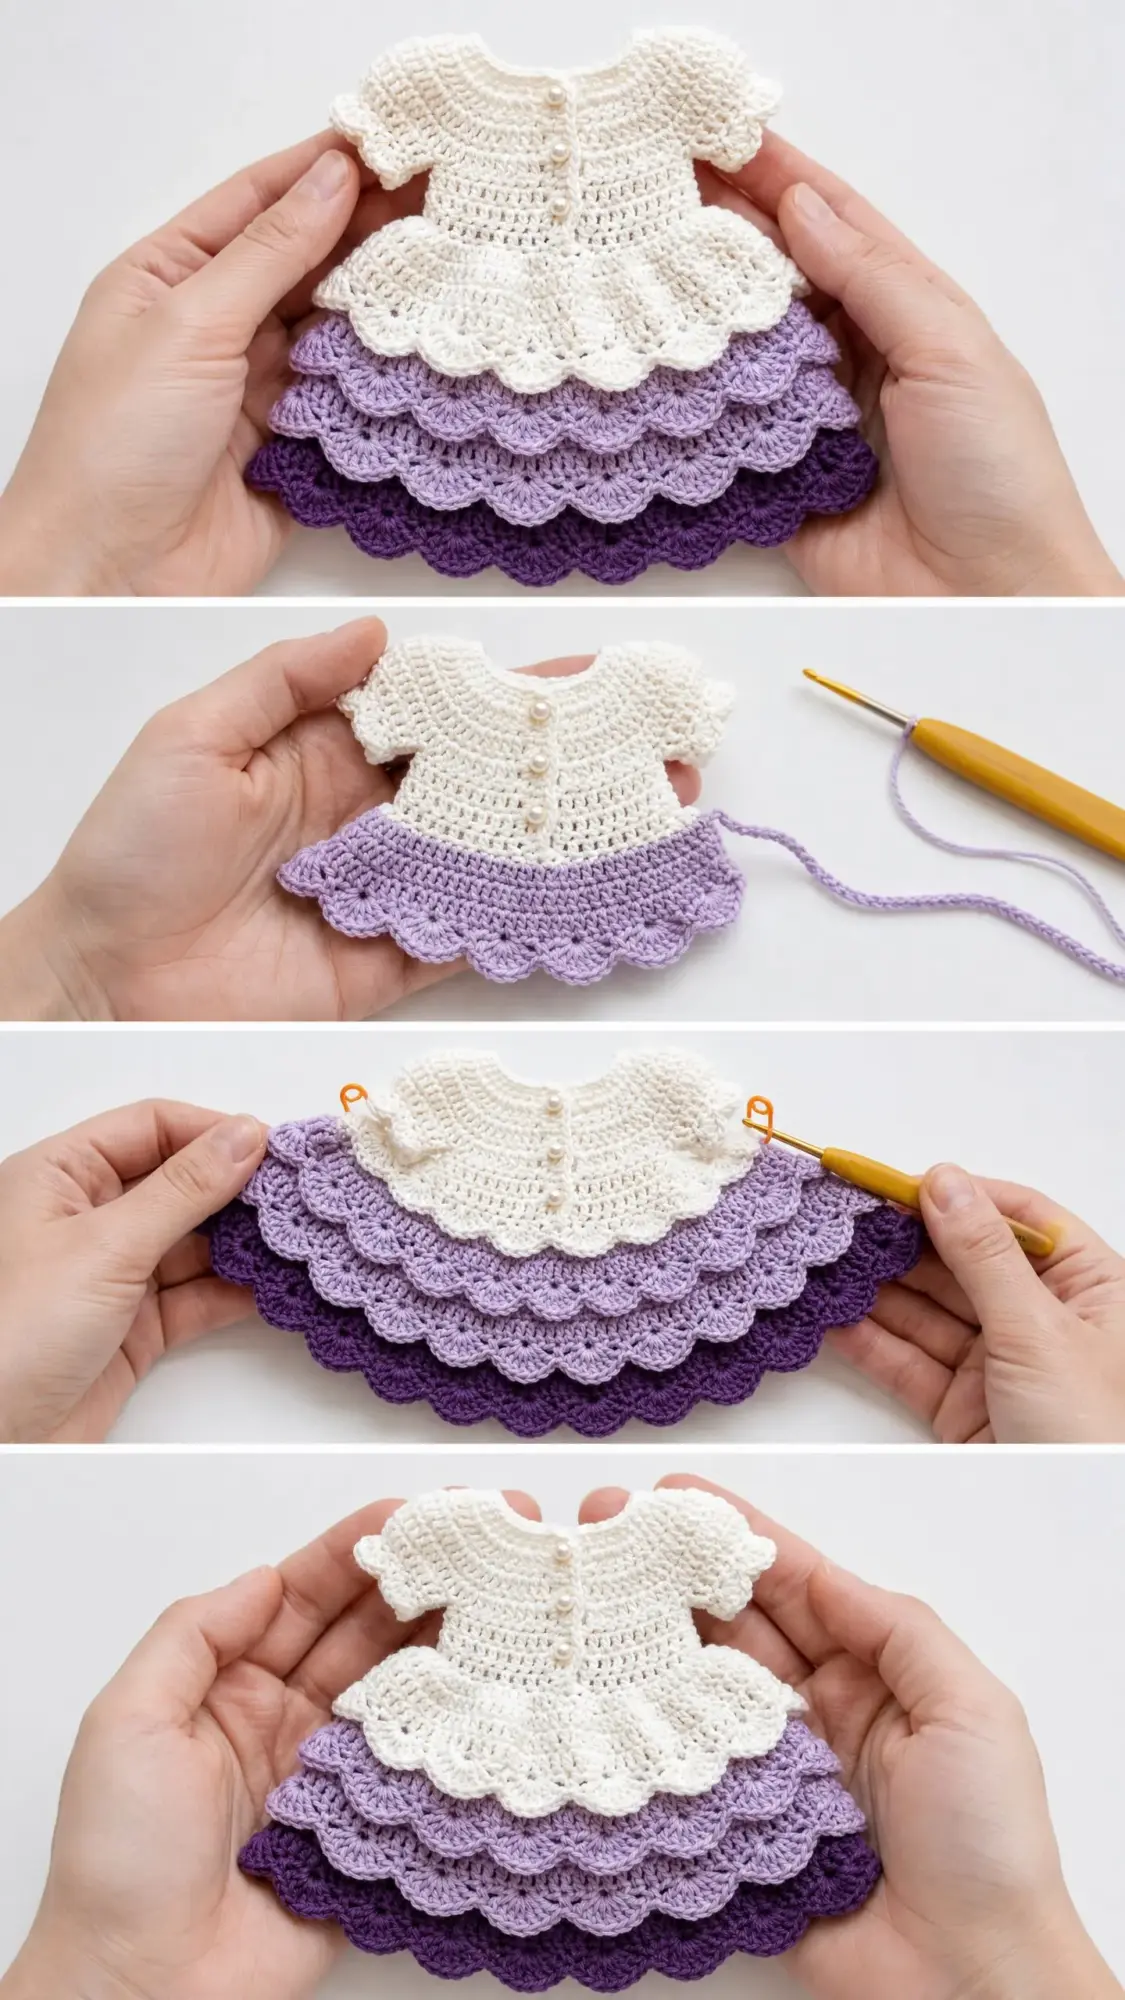
This charming tiered ruffle dress works up from the neckline down, which means minimal seaming and a satisfying build as you watch each section come together. The bodice uses raglan-style increases to shape a fitted yoke, then the skirt attaches at the waist and cascades into three gorgeous graduated ruffle tiers.
The color story here is what really makes this piece special. Starting with cream white at the bodice and first ruffle, the dress transitions through soft lavender at the middle tier and finishes with deep purple at the hem. This creates that beautiful ombre gradient effect you see in the finished photos.
What makes this pattern intermediate level? You will need to be comfortable working in the round, managing raglan increases, picking up stitches along row edges, and working shell stitch repeats. If you have made a few projects before, you will manage just fine with a little patience.
Materials You Will Need
Yarn:
Use DK weight yarn (also called light worsted or weight 3) for best results.
Recommended Yarn Options:
Paintbox Yarns Simply DK works beautifully for this project. It is 100% acrylic with a smooth, consistent twist that shows stitch definition clearly. The purple color range is excellent.
Lion Brand Pound of Love is another solid choice. One skein provides far more yardage than needed, making it economical if you plan to make multiple dresses.
For a more structured finish, try Drops Safran in 100% cotton. Cotton gives the dress a slightly stiffer body, which helps the tiers hold their shape beautifully.
Hook:
US size D/3 (3.25 mm)
Notions:
Gauge Information
18 single crochet stitches and 20 rows = 4 inches / 10 cm, worked in single crochet in the round using US D/3 (3.25 mm) hook with DK weight yarn.
Shell gauge: One 5-double crochet shell with its adjacent chain-2 spaces = approximately 1 inch / 2.5 cm wide.
Gauge matters here. If your gauge is off, your dress may not fit the doll correctly. Make a quick swatch before diving in.
Finished Measurements
This dress fits a standard 18-inch (45.7 cm) doll.
Abbreviations and Stitch Definitions
Before we begin, let me walk you through every abbreviation you will encounter. I have included plain-English definitions so nothing catches you off guard.
ch = chain: Yarn over, pull through loop on hook. The foundation of most crochet projects.
sl st = slip stitch: Insert hook, yarn over, pull through both the stitch and the loop on your hook in one motion. Used for joining and moving across stitches without adding height.
sc = single crochet: Insert hook into stitch, yarn over and pull up a loop (2 loops on hook), yarn over and pull through both loops. Your most basic stitch.
hdc = half double crochet: Yarn over, insert hook into stitch, yarn over and pull up a loop (3 loops on hook), yarn over and pull through all 3 loops.
dc = double crochet: Yarn over, insert hook into stitch, yarn over and pull up a loop (3 loops on hook), yarn over and pull through 2 loops (2 loops remain), yarn over and pull through remaining 2 loops.
inc = increase: Work 2 single crochets in one stitch. This adds one stitch to your count.
dec = single crochet decrease: Insert hook into first stitch, pull up a loop, insert hook into second stitch, pull up a loop (3 loops on hook), yarn over and pull through all 3 loops. This removes one stitch from your count.
sk = skip: Pass over the indicated stitch without working into it.
sp = space: The gap created by chain stitches in previous rows.
ch-sp = chain space: Specifically refers to a space created by chains.
st(s) = stitch(es)
blo = back loop only: Work into only the back loop of the stitch (the loop farthest from you).
flo = front loop only: Work into only the front loop of the stitch (the loop closest to you).
pm = place marker
RS = right side: The side of the fabric that will face outward when worn.
WS = wrong side: The inside of the fabric.
rem = remaining
rep = repeat
rnd = round
yo = yarn over: Wrap yarn over hook from back to front.
Special Stitches Explained
Shell Stitch (shell):
Work 5 double crochets all into the same stitch or space. This creates a beautiful fan-shaped cluster. When instructions say "shell in next ch-2 sp," insert your hook into the chain-2 space itself, not the individual chains, and complete all five double crochets in that same spot.
Shell Stitch Scallop Edge (scallop-shell):
A smaller variation used on ruffle tier edges. Work (2 dc, ch 1, 2 dc) into one stitch or space. This produces a more rounded scallop than the full 5-dc shell.
Picot:
Chain 3, then slip stitch into the first chain you made. This creates a small decorative knob. Used optionally on sleeve edges.
Important Pattern Notes
Before you start stitching, read through these notes. They will save you confusion later.
1. The dress works from the top down, beginning at the neckline.
2. The bodice opens at the center back. You will turn at the end of each row through the yoke section so this opening remains for button closure.
3. After separating the underarm stitches, the body joins to work in continuous rounds with no seam.
4. Stitch markers are essential. Mark the four raglan points (2 at front-yoke joins, 2 at back-yoke joins) and move them up every round.
5. Ruffle tiers are worked by picking up stitches into the working loops of the previous tier’s last round.
6. The shell pattern repeat is a multiple of 6 stitches plus 1.
7. All ruffle tiers are worked with the RS facing. Do not turn at the end of ruffle rounds unless specified.
8. Ch 1 turning chains at the start of single crochet rows do NOT count as a stitch. Ch 3 turning chains at the start of double crochet rows DO count as the first dc.
Step-by-Step Crochet Pattern Instructions
Bodice Yoke
Using Color A and US D/3 hook, begin with the neckline.
Foundation: Ch 37. (This chain forms the neckline. 37 chains provide 36 working stitches.)
Row 1 (RS): Sc in second ch from hook and in each ch across. Turn. (36 sc)
You are now working flat, back and forth, to form the center-back opening.
Row 2 (WS): Ch 1, sc in first 5 sts (left back panel), pm in last st of this group, sc in next 4 sts (left sleeve), pm in last st of this group, sc in next 14 sts (front yoke), pm in last st of this group, sc in next 4 sts (right sleeve), pm in last st of this group, sc in last 5 sts (right back panel). Turn. (36 sc)
Your sections are: 5 / 4 / 14 / 4 / 5 = 36 confirmed.
Row 3 (Raglan Increase Row, RS): Ch 1. Sc in each st to 1 st before first marker, inc in next st, move marker to new st, inc in st after marker, sc to 1 st before second marker, inc in next st, move marker, inc in st after marker, sc to 1 st before third marker, inc in next st, move marker, inc in st after marker, sc to 1 st before fourth marker, inc in next st, move marker, inc in st after marker, sc to end. Turn. (44 sc)
You added 8 increases. Sections now: 6 / 6 / 16 / 6 / 6 = 44 confirmed.
Row 4 (WS): Ch 1, sc in each st across. Turn. (44 sc)
Row 5 (Raglan Increase Row, RS): Repeat Row 3 increase pattern. (48 sc)
Sections: 7 / 8 / 18 / 8 / 7 = 48 confirmed.
Row 6 (WS): Ch 1, sc in each st across. Turn. (48 sc)
Row 7 (Raglan Increase Row, RS): Work increases at all 4 raglan points as established. (56 sc)
Sections: 8 / 10 / 20 / 10 / 8 = 56 confirmed.
Row 8 (WS): Ch 1, sc in each st across. Turn. (56 sc)
Row 9 (Raglan Increase Row, RS): Work increases at all 4 raglan points. (64 sc)
Sections: 9 / 12 / 22 / 12 / 9 = 64 confirmed.
Row 10 (WS): Ch 1, sc in each st across. Turn. (64 sc)
Row 11 (Raglan Increase Row, RS): Work increases at all 4 raglan points. (72 sc)
Sections: 10 / 14 / 24 / 14 / 10 = 72 confirmed.
Row 12 (WS): Ch 1, sc in each st across. Turn. (72 sc)
Checkpoint: You should have 72 stitches total in 5 sections: 10 back left / 14 left sleeve / 24 front / 14 right sleeve / 10 back right. The yoke should measure approximately 1.75 inches / 4.4 cm tall.
Armhole Separation and Body Join
Row 13 (RS, Divide for Armholes): Ch 1. Sc in first 10 sts (left back panel). Ch 4 (underarm bridge), skip the 14 left sleeve sts (place these 14 sts on a stitch holder or length of yarn). Sc in next 24 sts (front). Ch 4 (underarm bridge), skip the 14 right sleeve sts (place on holder). Sc in last 10 sts (right back panel). Turn. (48 sc + 8 ch = 56 working positions)
Row 14 (Joining Round): Ch 1. Do not turn. Slip stitch the last stitch of Row 13 to the first stitch of Row 13 to join in the round. Working into the ch-4 bridge, sc in each of the 4 ch (right underarm). Continue sc across the 24 front sts. Sc in each of the 4 ch (left underarm bridge). Sc across 20 back sts (10 right back + 10 left back joined). Join with sl st to first sc of this round. (56 sc in round)
The body tube is now joined. Total body circumference is 56 sc.
Body
All body rounds are worked in continuous rounds. Place a stitch marker at the beginning of each round and move it up.
Round 1: Sc in each st around. Join. (56 sc)
Round 2: Sc in each st around. Join. (56 sc)
Round 3: Sc in each st around. Join. (56 sc)
Round 4 (Waist Decrease Round): (Sc in next 5 sts, dec) around. (48 sc)
Round 5: Sc in each st around. Join. (48 sc)
Round 6: Sc in each st around. Join. (48 sc)
Round 7: Sc in each st around. Join. (48 sc)
Round 8: Sc in each st around. Join. (48 sc)
Checkpoint: Your dress body from neckline to current round should measure approximately 3.25 inches / 8.3 cm. Fasten off Color A, leaving a 6-inch tail for weaving.
Ruffle Tier 1 (Color A, Cream)
This tier is worked into the front loops only of Round 8, creating a ridge and the first scalloped ruffle at the waist.
Tier 1 Round 1 (Pick-up, flo): With RS facing, join Color A with sl st in flo of first st of Body Round 8. Ch 1. Sc in flo of each st around. Join with sl st to first sc. (48 sc)
Tier 1 Round 2: Ch 3 (counts as dc). Dc in same st. Ch 2. Sk next 2 sts. (V-st in next st, ch 2, sk next 2 sts) around. Join with sl st to top of ch-3. (16 V-stitches, 16 ch-2 spaces)
Tier 1 Round 3 (Shell Round): Ch 3 (counts as dc). Work 4 more dc in same sp at base of ch-3 (first shell made). Ch 1. (Shell of 5 dc in next ch-2 sp, ch 1) around. Join with sl st to top of ch-3. (16 shells, 16 ch-1 spaces)
Tier 1 Round 4 (Scallop Edge): Ch 1. Sc in first ch-1 sp. Ch 3. (Sc in next ch-1 sp, ch 3) around. Join with sl st to first sc. (16 sc, 16 ch-3 arches)
Fasten off Color A. Weave in ends.
Checkpoint: The first ruffle should extend approximately 0.75 to 1 inch below the waist ridge with 16 clean shell fans around the circumference.
Ruffle Tier 2 (Color B, Soft Lavender)
This tier picks up from the back loops of Body Round 8, creating the second layer sitting just behind and below Tier 1.
Tier 2 Round 1 (Pick-up, blo): With RS facing, join Color B with sl st in blo of first st of Body Round 8. Ch 1. Sc in blo of each st around. Join. (48 sc)
Tier 2 Round 2: Ch 1. (Inc in next st, sc in next 2 sts) around. Join. (64 sc)
Tier 2 Round 3: Ch 3 (counts as dc). Dc in same st. Ch 2. Sk 3. (V-st in next st, ch 2, sk 3) around. Adjust final repeat to meet start. Join. (16 V-sts)
Tier 2 Round 4 (Shell Round): Ch 3. 4 dc in same ch-2 sp (shell made). Ch 1. (Shell in next ch-2 sp, ch 1) around. Join. (16 shells)
Tier 2 Round 5 (Shell Expansion): Sl st across top of first shell to ch-1 sp. Ch 3. 4 dc in same ch-1 sp. Ch 2. Sc in top of next shell (in 3rd dc of that shell). Ch 2. (Shell in next ch-1 sp, ch 2, sc in top of next shell, ch 2) around. Join to top of ch-3. (16 shells, 16 sc, 32 ch-2 sps)
Tier 2 Round 6 (Scallop Edge): Ch 1. Sc in first sc. Ch 3. Sc in top of next shell (3rd dc). Ch 3. (Sc in next sc, ch 3, sc in top of next shell, ch 3) around. Join. (32 sc, 32 ch-3 arches)
Fasten off Color B. Weave in ends.
Checkpoint: Tier 2 should extend approximately 1.5 inches below Tier 1’s pickup round and show 16 larger shell fans with scallop arches.
Ruffle Tier 3 (Color C and Color D)
This is the largest tier and uses two colors. Because both loops of Body Round 8 are already used, Tier 3 attaches to the ridge between Body Round 7 and Round 8.
Tier 3 Anchor Round: With RS facing, join Color C with sc in the join ridge between Body Round 7 and Body Round 8 (the horizontal bar between rows). Work 1 sc into the bar between each pair of stitches around the full circumference. Join. (48 sc)
Tier 3 Round 1: Ch 1. (Inc in next st, sc in next st) around. Join. (72 sc)
Tier 3 Round 2: Ch 1. (Inc in next st, sc in next 2 sts) around. Join. (96 sc)
Tier 3 Round 3 (V-stitch Foundation): Ch 3. Dc in same st. Ch 2. Sk 3 sts. (V-st in next st, ch 2, sk 3 sts) around. Adjust to close. Join. (24 V-sts)
Tier 3 Round 4 (Shell Round, Color C): Ch 3. 4 dc in same ch-2 sp (shell made). Ch 1. (Shell in next ch-2 sp, ch 1) around. Join. (24 shells)
Fasten off Color C, leave tail.
Tier 3 Round 5 (Expansion, Color D): Join Color D with sl st in any ch-1 sp. Ch 3. 4 dc in same sp. Ch 2. Sc in top of next shell. Ch 2. (Shell in next ch-1 sp, ch 2, sc in top of next shell, ch 2) around. Join. (24 shells, 24 sc, 48 ch-2 sps)
Tier 3 Round 6 (Color D): Ch 1. Sc in same sc. Ch 3. Sc in top of next shell. Ch 3. (Sc in next sc, ch 3, sc in top of next shell, ch 3) around. Join. (48 sc, 48 ch-3 arches)
Tier 3 Round 7 (Final Scallop Hem, Color D): Sl st into next ch-3 arch. Ch 3. 4 dc in same arch. Ch 1. (Shell in next ch-3 arch, ch 1) around. Join to top of ch-3. (48 shells)
Tier 3 Round 8 (Picot Bind-off, Color D): Sc in top of first shell. (Ch 3, sl st in first ch, sc in ch-1 sp, sc in top of next shell) around. Finish with sl st to first sc. (48 picots)
Fasten off Color D. Weave in ends.
Checkpoint: The third tier should be the widest and longest, extending approximately 2.5 to 3 inches below the anchor round with 48 shell fans at the outer hem.
Sleeves
Each sleeve uses the 14 held stitches plus 4 underarm bridge chains for 18 working stitches total.
Right Sleeve Setup: With RS facing, join Color A with sc in first held sleeve st at underarm. Sc across all 14 held sleeve sts. Sc in each of 4 underarm bridge chains. Join to first sc. (18 sc)
Right Sleeve Round 1: Sc in each st around. Join. (18 sc)
Right Sleeve Round 2: Sc in each st around. Join. (18 sc)
Right Sleeve Cap Shaping (Ruffle Edge): Ch 3. Dc in same st. Ch 1. Sk 1 st. (V-st in next st, ch 1, sk 1) around. Join. (9 V-sts)
Right Sleeve Ruffle Round: Ch 3. 4 dc in same ch-1 sp. Ch 1. (Shell in next ch-1 sp, ch 1) around. Join. (9 shells)
Right Sleeve Edge Round: Ch 1. Sc in ch-1 sp between shells. Ch 3. (Sc in next ch-1 sp, ch 3) around. Join. Fasten off. (9 sc, 9 ch-3 arches)
Repeat all sleeve instructions for Left Sleeve.
Back Opening and Button Bands
Right Back Button Band (Buttonhole Edge): With RS facing, join Color A with sc at bottom right corner of back opening. Work sc evenly up the right back edge, placing approximately 1 sc per row edge (approximately 18 to 20 sc total). Work 3 buttonholes evenly spaced: when you reach each buttonhole position, ch 2 and skip 2 sc. Space buttonholes at rows 3, 7, and 11 approximately. Fasten off.
Left Back Button Band: With RS facing, join Color A with sc at top left corner of back opening. Work sc evenly down the left back edge. Fasten off.
Sew 3 pearl buttons to the left back band aligned with the buttonholes.
Front Decorative Buttons
Sew 3 pearl buttons vertically down the center front of the bodice, evenly spaced between the neckline and waist. These are purely decorative.
Finishing and Blocking
Weave in all remaining ends using a yarn needle, working tails in for at least 1 inch and then back in the opposite direction to prevent unraveling.
Wet blocking is recommended. Submerge the dress in cool water and gently press out excess water without wringing. Lay flat on a blocking mat and shape the ruffle tiers outward with your fingers, pinning each shell fan lightly. Allow to dry completely.
For acrylic yarn, steam blocking works too. Hold a steam iron approximately 1 inch above the surface, never touching the yarn, and pass steam across the tiers. Smooth the shells while warm and allow to cool.
Care Instructions
Machine wash on a gentle cycle in cool water. Lay flat to dry. Do not wring or tumble dry on high heat. Acrylic yarns can be tumble dried on a low or no-heat setting. Cotton yarns should always be laid flat.
Size Customization Tips
For a larger doll (20-inch): Use a US size E/4 (3.5 mm) or F/5 (3.75 mm) hook with the same yarn. Alternatively, work one to two additional raglan increase rows before the armhole separation.
For a smaller doll (12-inch or 14-inch): Use a US size B/1 or C/2 hook. Reduce the foundation chain to 27 stitches and adjust section splits in Row 2 to: 4 back / 3 sleeve / 10 front / 3 sleeve / 4 back. Work 4 raglan increase rows instead of 6.
To lengthen the bodice: Add 2 additional plain sc rounds to the body section before the waist decrease.
To add a fourth ruffle tier: After completing Tier 3, work an additional anchor row and create a fourth tier with 32 V-stitches and 32 shells using a new accent color.
Thank you so much for choosing this pattern for your next crochet project. I hope you love making this sweet tiered dress as much as I loved designing it. If you finish one, I would absolutely love to see it. Tag me on Instagram or share a photo in my Facebook group.
If this pattern caught your eye, save it to your Pinterest boards so you can find it when you are ready to start stitching. And please drop a comment below if you make one. I read every single message and your photos always make my day!
You Might Also Like
- Dusty Rose Open Weave Crochet Bolero Free Pattern
- Sage Green Boho Crochet Backpack Free Pattern
- Pastel Rainbow Unicorn Granny Square Blanket Free Pattern
- Sage Green Woodland Baby Dress Free Crochet Pattern