A crocheted lace dress with flutter sleeves, a fitted ribbed bodice, and a flowing midi skirt. That’s what you’re looking at here.
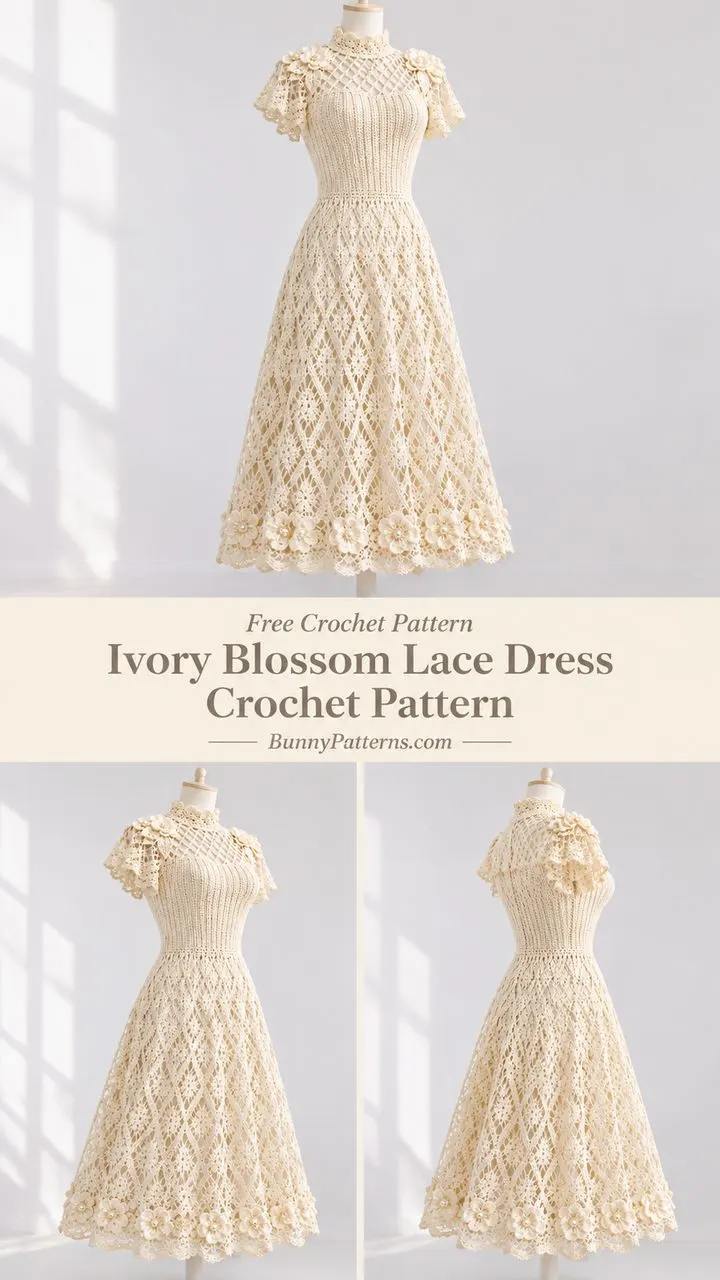
The Ivory Blossom Lace Dress uses fingering weight mercerized cotton, a 3.0 mm hook, and a combination of mesh yoke construction, textured bodice ribs, and graduated chain loop mesh for the skirt. The floral appliques with pearl centers add a romantic finishing touch at the shoulders and hem. This is a single sample size pattern designed to fit an adult bust of 84 to 88 cm with positive ease.
If you’re ready for an intermediate to advanced project that results in a stunning wearable garment, this dress delivers. The construction moves from the neck down through the yoke, separates for the sleeves, shapes the bodice with decreases, then flares into a beautiful lace skirt. Let’s walk through everything you need to bring this elegant piece to life.
About This Design
The Ivory Blossom Lace Dress combines several classic crochet techniques into one cohesive garment. The mesh yoke creates an airy, delicate look across the shoulders and upper chest. Below that, the fitted bodice uses front post double crochet (FPdc) ribbing to create vertical texture and gentle shaping that cinches at the waist. The skirt transitions into diamond mesh using progressively longer chain loops, allowing the fabric to flare naturally without adding stitches.
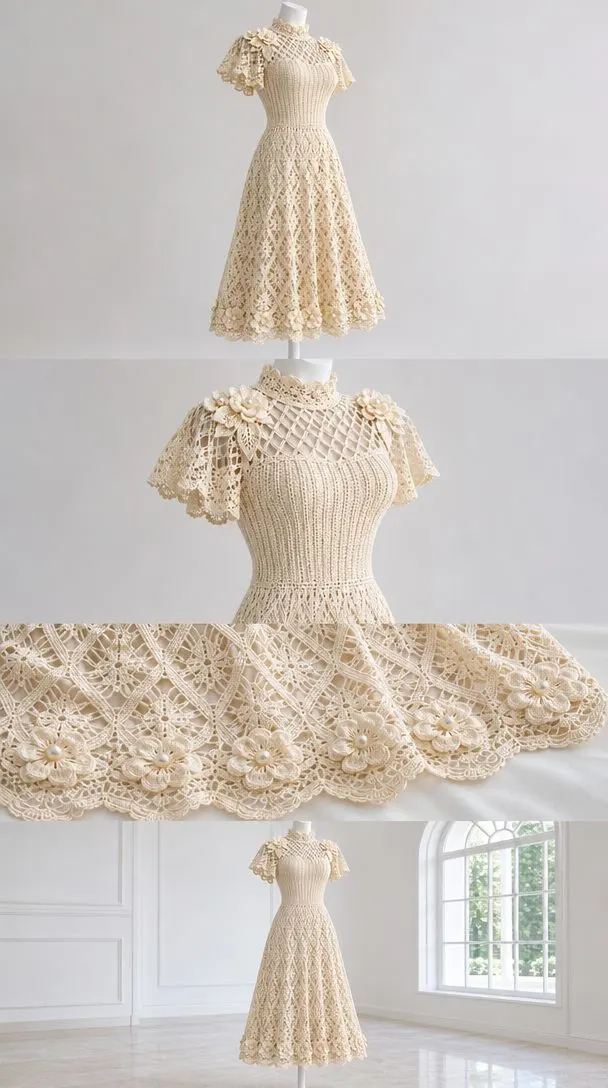
The short flutter lace sleeves mirror the skirt’s mesh construction on a smaller scale, creating visual harmony throughout the dress. Twenty handmade floral appliques with optional pearl bead centers are placed at the shoulders, sleeves, and hem for a romantic, vintage inspired finish.
This is a draft AI assisted pattern that has been reviewed for internal counts and document structure, but it has not been tested with a physical crocheted sample. The pattern provides checkpoints throughout construction so you can verify your measurements against the target dimensions.
Finished Measurements
Before you begin, compare these finished measurements to your own body measurements:
| Measurement | Sample Size |
|---|---|
| Bust | 92 cm |
| Waist | 80 cm |
| Neck to Waist | 42.5 cm |
| Waist to Hem | 70 cm plus edging |
| Upper Sleeve | 37 cm base with flutter edge |
This pattern fits an adult bust of 84 to 88 cm with 4 to 8 cm of positive ease at the bust. The finished waist measures 80 cm. This is one measured sample size, not a graded size range, so please compare these numbers carefully with your measurements before casting on.
Materials and Tools
Yarn: Fingering weight, category 1 mercerized cotton, approximately 400 meters per 100 grams.
Soft Ivory: 800 grams, approximately 3200 meters total.
The estimated quantity includes the belt, appliques, and a modest allowance. Buy an extra 15 to 20 percent if you plan to alter the length or if your gauge swatch is denser than specified.
Hooks:
- Main hook: 3.0 mm, or size needed for gauge
- Edging hook: 2.5 mm, or size needed for gauge
Notions:
- Tapestry needle
- Scissors
- Measuring tape
- 12 locking stitch markers
- Blocking mat and pins
- Matching strong sewing thread and needle
- Two 8 mm buttons for back neck closure
- 80 to 100 smooth 4 mm sew on pearl or silver beads (for floral centers)
Important: This lace dress requires an opaque separate slip for wearing. The mannequin photography does not imply opacity.
Gauge
Getting gauge correct is essential for this fitted garment. Take the time to swatch before beginning.
Blocked main fabric: 20 stitch positions and 12 rows or rounds equals 10 x 10 cm with the main 3.0 mm hook. A chain space position counts as one position in the mesh yoke. Ribbing is measured relaxed, not pulled sideways.
Main Fabric Swatch:
Chain 35. Double crochet (dc) in third chain from hook and in each chain across. You should have 33 dc. Work 20 more rows in the bodice stitch, using chain 2 to turn. Wash and dry flat. Measure the central 10 cm away from edges. Change hook size and repeat until both stitch and row gauge are close.
Skirt Mesh Swatch:
Chain 41. Single crochet (sc) in second chain and across. You should have 40 sc. Work Mesh Round 1 as a flat row with edge stitches, then work 12 rows of chain 5 loops. Target 5 complete loops per 10 cm across and about 10 rounds per 10 cm high. Later longer loops are blocked to measurement rather than forced to this gauge.
Abbreviations and Special Stitches
Here are all the abbreviations used in this pattern with their definitions:
- ch = chain
- sl st = slip stitch
- sc = single crochet (insert hook, yarn over, pull up loop, yarn over, pull through both loops)
- hdc = half double crochet
- dc = double crochet (yarn over, insert hook, pull up loop, yarn over, pull through 2 loops, yarn over, pull through remaining 2 loops)
- FPdc = front post double crochet
- BPdc = back post double crochet
- BLO = back loop only
- st(s) = stitch(es)
- sp(s) = space(s)
- RS/WS = right side/wrong side
- rnd = round
- rep = repeat
- inc = increase
- dec = decrease
Special Stitch Definitions
FPdc/BPdc (Front Post Double Crochet / Back Post Double Crochet): Yarn over, insert the hook around the post from the front or back, pull up a loop, finish as a regular dc. Do not also crochet into the top loops of that same stitch.
dc2tog (Double Crochet Two Together): Work a partial dc in each of the next 2 stitches, leaving the last loop of each on the hook. Yarn over and draw through all 3 loops. This consumes 2 stitches and produces 1 stitch. The sc2tog uses the same principle without the initial yarn overs.
Bodice Ribs: Repeat [FPdc in next st, dc in next 3 sts] in unturned rounds.
Mesh Yoke Segments: Dc in the first and last position of each segment. Between those edges, alternate [ch 1, skip 1 position, dc in next position]. If one position remains, dc in it. On the next row, dc into the designated dc or chain position to keep the same position count.
Picot: Chain 3, slip stitch into the first of these 3 chains.
Shell: 5 dc into the same specified stitch or space.
Written repeats in square brackets are worked exactly the stated number of times.
Pattern Notes
Read these notes carefully before beginning. They will help you understand how the pattern is constructed.
- Chain 2 at a dc row start does not count as a stitch. Work into the first stitch.
- Chain 1 at a sc row start does not count as a stitch.
- Joined rounds end with slip stitch in the first actual stitch. Never count the join.
- Do not turn joined rounds unless directed.
- Mark the first stitch and move the marker each round.
- Four chain 2 corner spaces separate the yoke segments. Corner chains are excluded from dc position totals.
- An increase corner is [dc, ch 2, dc] into that corner space. The two new dc belong to the adjacent segments, adding 8 positions across all four corners.
- After the underarm split, there are no corner spaces.
- Count underarm foundation chains as stitches on the next round.
- Work shaping stitches as ordinary dc, then resume the established texture.
- At each increase round, distribute the additions in plain columns. Do not double work a rib post.
Important: Gauge and finished measurements take priority over any reference image. The illustration is an AI generated design guide. The written stitch route is an original interpretation of the visible features.
Construction Overview
The dress is worked in this order:
- Neck foundation
- Shaped yoke (worked flat)
- Underarm split (joins to work in the round)
- Fitted bodice
- Flared skirt
- Sleeves
- Collar, neck edge, and floral motifs
- Assembly and blocking
Try on the dress over a slip after the underarm split and again at the waist to verify fit before continuing.
Length and Width Adjustments
Length adjustment: Add or remove plain rounds between shaping rounds.
Width adjustment: First make the sample swatch. Each 8 stitch change adds about 4 cm circumference. Changing yoke depth affects sleeve and body counts, so record your new segment totals before continuing. Those alterations require a fresh fitting check.
Yoke Instructions
The yoke is worked flat, beginning at center back. The yoke remains open until the underarm split.
Foundation: Chain 86. Place a marker in each corner space.
Row 1 (RS): Dc in third ch and next 14 ch (15 dc). Ch 2. Dc 12. Ch 2. Dc 30. Ch 2. Dc 12. Ch 2. Dc 15. Turn. (84 dc total; 4 corner spaces)
Rows 2 through 28: Work mesh yoke fabric across each segment. Work an increase corner into each corner space. Chain 2 and turn after every row. Count dc plus ch 1 positions in the mesh version.
Here is the position count for each row:
- Row 2: Work texture and 4 increase corners. (92 positions; 4 corner spaces)
- Row 3: Work texture and 4 increase corners. (100 positions; 4 corner spaces)
- Row 4: Work texture and 4 increase corners. (108 positions; 4 corner spaces)
- Row 5: Work texture and 4 increase corners. (116 positions; 4 corner spaces)
- Row 6: Work texture and 4 increase corners. (124 positions; 4 corner spaces)
- Row 7: Work texture and 4 increase corners. (132 positions; 4 corner spaces)
- Row 8: Work texture and 4 increase corners. (140 positions; 4 corner spaces)
- Row 9: Work texture and 4 increase corners. (148 positions; 4 corner spaces)
- Row 10: Work texture and 4 increase corners. (156 positions; 4 corner spaces)
- Row 11: Work texture and 4 increase corners. (164 positions; 4 corner spaces)
- Row 12: Work texture and 4 increase corners. (172 positions; 4 corner spaces)
- Row 13: Work texture and 4 increase corners. (180 positions; 4 corner spaces)
- Row 14: Work texture and 4 increase corners. (188 positions; 4 corner spaces)
- Row 15: Work texture and 4 increase corners. (196 positions; 4 corner spaces)
- Row 16: Work texture and 4 increase corners. (204 positions; 4 corner spaces)
- Row 17: Work texture and 4 increase corners. (212 positions; 4 corner spaces)
- Row 18: Work texture and 4 increase corners. (220 positions; 4 corner spaces)
- Row 19: Work texture and 4 increase corners. (228 positions; 4 corner spaces)
- Row 20: Work texture and 4 increase corners. (236 positions; 4 corner spaces)
- Row 21: Work texture and 4 increase corners. (244 positions; 4 corner spaces)
- Row 22: Work texture and 4 increase corners. (252 positions; 4 corner spaces)
- Row 23: Work texture and 4 increase corners. (260 positions; 4 corner spaces)
- Row 24: Work texture and 4 increase corners. (268 positions; 4 corner spaces)
- Row 25: Work texture and 4 increase corners. (276 positions; 4 corner spaces)
- Row 26: Work texture and 4 increase corners. (284 positions; 4 corner spaces)
- Row 27: Work texture and 4 increase corners. (292 positions; 4 corner spaces)
- Row 28: Work texture and 4 increase corners. (300 positions; 4 corner spaces)
Checkpoint: You should have two edge half panels of 42 positions, one center panel of 84 positions, and two sleeves of 66 positions each. Total: 300 positions. Depth: approximately 23.3 cm.
Underarm Split and Bodice
This is where the flat yoke joins into the round for the body.
Underarm Split: Work first 42 position half panel. Chain 8. Skip 66 sleeve positions. Work center 84 position panel. Chain 8. Skip 66 sleeve positions. Work final 42 position half panel. Join to first stitch. Leave the four corner spaces unworked. (184 body positions; 66 held positions per sleeve)
The join closes the bottom of the back keyhole. Switch from mesh to opaque bodice ribs, working dc into each chain position as needed.
The split is not counted as Bodice Round 1. Work over the chains on Round 1. Mark 8 equally spaced points, 23 stitches apart in the initial 184 stitch round. Move these markers to keep the next decreases evenly distributed.
Bodice Round 1: Work established bodice texture in every position. (184 sts)
Bodice Round 2: Work established bodice texture in every position. (184 sts)
Bodice Round 3: Work established bodice texture in every position. (184 sts)
Bodice Round 4: Work established bodice texture in every position. (184 sts)
Bodice Round 5: Work established bodice texture in every position. (184 sts)
Bodice Round 6: [21 stitches in texture, dc2tog] 8 times. (176 sts)
Bodice Round 7: Work established bodice texture in every position. (176 sts)
Bodice Round 8: Work established bodice texture in every position. (176 sts)
Bodice Round 9: Work established bodice texture in every position. (176 sts)
Bodice Round 10: Work established bodice texture in every position. (176 sts)
Bodice Round 11: Work established bodice texture in every position. (176 sts)
Bodice Round 12: [20 stitches in texture, dc2tog] 8 times. (168 sts)
Bodice Round 13: Work established bodice texture in every position. (168 sts)
Bodice Round 14: Work established bodice texture in every position. (168 sts)
Bodice Round 15: Work established bodice texture in every position. (168 sts)
Bodice Round 16: Work established bodice texture in every position. (168 sts)
Bodice Round 17: Work established bodice texture in every position. (168 sts)
Bodice Round 18: [19 stitches in texture, dc2tog] 8 times. (160 sts)
Bodice Round 19: Work established bodice texture in every position. (160 sts)
Bodice Round 20: Work established bodice texture in every position. (160 sts)
Bodice Round 21: Work established bodice texture in every position. (160 sts)
Bodice Round 22: Work established bodice texture in every position. (160 sts)
Bodice Round 23: Work established bodice texture in every position. (160 sts)
Checkpoint: 160 stitches equals 80 cm waist. Neck to waist length is about 42.5 cm, before any added collar. If the fit is wrong, correct it here before adding the skirt.
Skirt Instructions
The skirt uses graduated chain loops to create natural flare without adding stitch counts.
Skirt Foundation Round: 2 dc in each of the 160 waist stitches. Join. (320 dc)
Mesh Round 1: [Sc in next st, ch 5, skip next 3 sts] 80 times. Join in first sc. (80 sc; 80 ch 5 loops)
For every subsequent mesh round: Slip stitch into the first chain loop. Chain 1, sc in that loop. [Ch L, sc in next loop] 79 times. Ch L and join in first sc. This offsets the loops to create diamond mesh. Never work into the old sc between the loops.
Mesh Rounds 2 through 12: Use L = 5. (80 sc; 80 ch 5 loops per round)
Mesh Rounds 13 through 24: Use L = 6. (80 sc; 80 ch 6 loops per round)
Mesh Rounds 25 through 36: Use L = 7. (80 sc; 80 ch 7 loops per round)
Mesh Rounds 37 through 70: Use L = 8. (80 sc; 80 ch 8 loops per round)
Do not add loops. Flare comes from the longer chain spans. Block toward an approximately 240 cm hem. Longer chains change row height, so stop early or add an extra full round if the measured length requires it. Record the actual last round. Keep 80 loops throughout.
Skirt Checkpoint: 70 cm waist to hem before edging. The planned neck to hem length is approximately 112.5 cm, plus 1 to 3 cm for edging. Hold the garment upright for a few minutes to check cotton stretch before committing to the hem.
Sleeves (Make Two)
Sleeve Base Round: Join at underarm. Work 8 sc across underarm chains and 66 sc across held sleeve positions. Join. (74 sc)
Sleeve Setup Round: [Sc in next st, ch 3, skip next st] 37 times. Join. (37 sc; 37 ch 3 loops)
Sleeve Round 1: Slip stitch into first loop. [Sc in loop, ch 5] 37 times. Join. (37 sc; 37 ch 5 loops)
Sleeve Rounds 2 through 6: Use the offset loop method from the skirt, 37 loops and L = 5. (37 sc; 37 loops per round)
Sleeve Rounds 7 through 10: Use L = 6 and the offset loop method. (37 sc; 37 loops per round)
Checkpoint: Approximately 12 cm long from underarm after light blocking, with a loose flutter edge. Adjust whole mesh rounds to the stated measurement while retaining 37 loops.
Assembly
You will need: Main color yarn (soft ivory), 3.0 mm hook for joining gaps, tapestry needle, matching sewing thread, markers. Work with the garment right side out.
Pass 1: Close any small hole at the underarm corners with a short duplicate stitch pass through adjacent stitch legs. Do not tighten the opening. (2 underarms closed)
Pass 2: Secure the bottom of the placket or keyhole with 3 small sewn reinforcing stitches across the join. Keep the opening above it separate. (1 reinforced opening when present)
Pass 3: Lay the garment flat and compare sleeve seams, waist, and hem. Remove temporary construction markers after the checks. (2 sleeves matched)
Checkpoint: The garment hangs level, the underarms contain no gaps, and the neck or front opening remains usable. Check bust and waist circumference again. Never force a too small neck opening over the head.
Edgings and Details
You will need: Main yarn and any accent color listed in Materials. 2.5 mm hook for neck and cuffs. 3.0 mm hook for motifs. Tapestry needle and matching thread.
Detail plan: Ivory floral appliques at shoulders and hem, small pearl centers.
Neck Band
Neck Band Row 1: With back opening separate, pick up 80 sc evenly across neck foundation, excluding corner chains. Turn. (80 sc)
Neck Band Rows 2 through 5: Ch 1, sc BLO across. Turn. (80 sc per row)
Neck Picot Row: [Sc in next 4 sts, picot] 20 times. Fasten off. (80 sc; 20 picots)
Back Opening Edge
Back Opening Edge: Sc evenly down one opening edge and up the other. Work 3 sc at bottom turn. At the top of one edge, ch 5 and sl st to make one button loop. (1 edged opening; 1 top loop)
Second Closure Loop: Join yarn 3 cm below the first loop. Ch 5, sl st at same edge point and fasten off. (1 additional loop; 2 total)
Sew the two 8 mm buttons opposite their loops. Never join the entire neck band into a tight closed ring. The back opening is needed for dressing.
Skirt Hem
Skirt Hem Round 1: [Sc in next chain loop, 5 dc in same loop] 80 times. Join. (80 sc; 400 dc; 80 shells)
Skirt Hem Round 2: [Sc in first 3 dc of each shell, picot, sc in last 2 dc; skip the separating sc] 80 times. Join. (400 sc; 80 picots)
Sleeve Edge
Sleeve Edge Round: [Sc in next loop, 5 dc in same loop] 37 times. Join. (37 sc; 185 dc; 37 shells per sleeve)
Floral Appliques
Flower Round 1: Make a magic ring. Ch 1, 10 sc into ring. Join and close center firmly. (10 sc)
Flower Round 2: [Sl st in next sc, ch 2, 3 dc in same sc, ch 2, sl st in next sc] 5 times. Join. (5 petals; 15 dc)
Optional Layer Round 3: Behind petals, [ch 4, sl st around base of next petal] 5 times. (5 back loops)
Optional Layer Round 4: [Sc, hdc, 5 dc, hdc, sc] in each back loop. Fasten off. (5 larger petals; 45 sts)
Make 20 flowers total. Place 4 around the yoke, 2 on each sleeve, and the remaining 12 evenly around the hem, about 2 cm above the edging. For rosettes, use the same placement. Embroider centers in matching yarn unless the design calls for pearl or silver beads. If using beads, sew 1 to 3 beads per center with doubled thread.
Checkpoint: Edges lie flat without rippling. Buttons pass through their loops or holes. Motifs are securely sewn and do not pull the lace out of shape. Compare the detail count with this design before weaving in ends.
Finishing
You will need: Matching yarn tails, tapestry needle, blocking pins and mat. Main 3.0 mm hook only if a repair is needed. Use water suited to the yarn label.
Pass 1: Weave every yarn end through the wrong side of at least 6 stitches. Reverse direction twice. Trim only after washing. (All ends secured)
Pass 2: Soak briefly in cool water with gentle detergent. Squeeze in a towel without twisting. Lay flat and pin the waist and skirt to the planned measurements. (1 blocked garment)
Pass 3: Let dry completely. Remove pins and measure again. Support the heavy skirt when lifting. Do not hang wet cotton. (1 final measurement check)
Final Checkpoint: Bust approximately 92 cm. Waist 80 cm. Skirt length 70 cm before edging. Sleeve lengths match within 0.5 cm. Record any difference and your actual yarn use before making another size.
Care and Safety
Follow the yarn label for care instructions. Hand wash cool, support the weight, reshape, and dry flat. Do not wring or tumble dry unless the yarn permits it. Test strong colors for bleeding before combining them with pale yarn. Remove or protect delicate beads before laundering.
This adult garment is not a toy or a children’s pattern. Beads and buttons are small parts. Check their stitching before each wear and keep them away from babies and young children. Long belts and ties can catch, so secure them during wear. Lace needs an appropriate opaque slip for coverage.
Tips for Success
Here are a few thoughts to keep in mind as you work through this project:
Take your time with gauge. This is a fitted garment. A small difference in gauge can mean a big difference in the final fit. The extra hour spent swatching is worth it.
Use the checkpoints. The pattern includes measurement checkpoints at the yoke, bodice, and skirt. Use them. Try on the dress over a slip at each checkpoint. It is much easier to fix a sizing issue before you have crocheted 70 rounds of skirt mesh.
Block generously. Cotton lace opens up beautifully with wet blocking. Pin the skirt to approximately 240 cm at the hem and let gravity do the work. The diamond mesh will relax into an elegant drape.
Keep your flowers consistent. Making 20 small flowers can feel repetitive, but it is worth making them all the same size. Consider making a few extras in case one comes out larger or smaller than the rest.
Secure those beads. If you are using pearl beads in the flower centers, use doubled thread and check that each bead is firmly attached. Lace fabric moves and stretches, and you want those pearls to stay put.
This dress is a substantial project. It will take time and concentration. But the result is a wearable piece of lace art, something truly special.
Thank you so much for choosing this pattern. It is a beautiful design and I hope you enjoy every stitch of it. If you make the Ivory Blossom Lace Dress, I would love to see your finished piece. Share your photos on Instagram or Facebook and tag your work so other crocheters can admire your creation.
If this pattern caught your eye, save it to your Pinterest boards so you can find it when you are ready to start. And if you do make this dress, please leave a comment below. I always love hearing how projects turn out.
You Might Also Like
- Sage Green Woodland Baby Dress Free Crochet Pattern
- Blue Morpho Butterfly Cape Crochet Pattern
- Ocean Blue Starfish Baby Blanket Free Crochet Pattern
- Ocean Wave Granny Square Bag Free Crochet Pattern