
I know what you might be thinking. A three-piece baby set with flowers, straps, and buttons? That sounds like a project for advanced crocheters only. But here is the truth: if you can single crochet in a straight line and work in the round, you already have the skills to make this entire set.
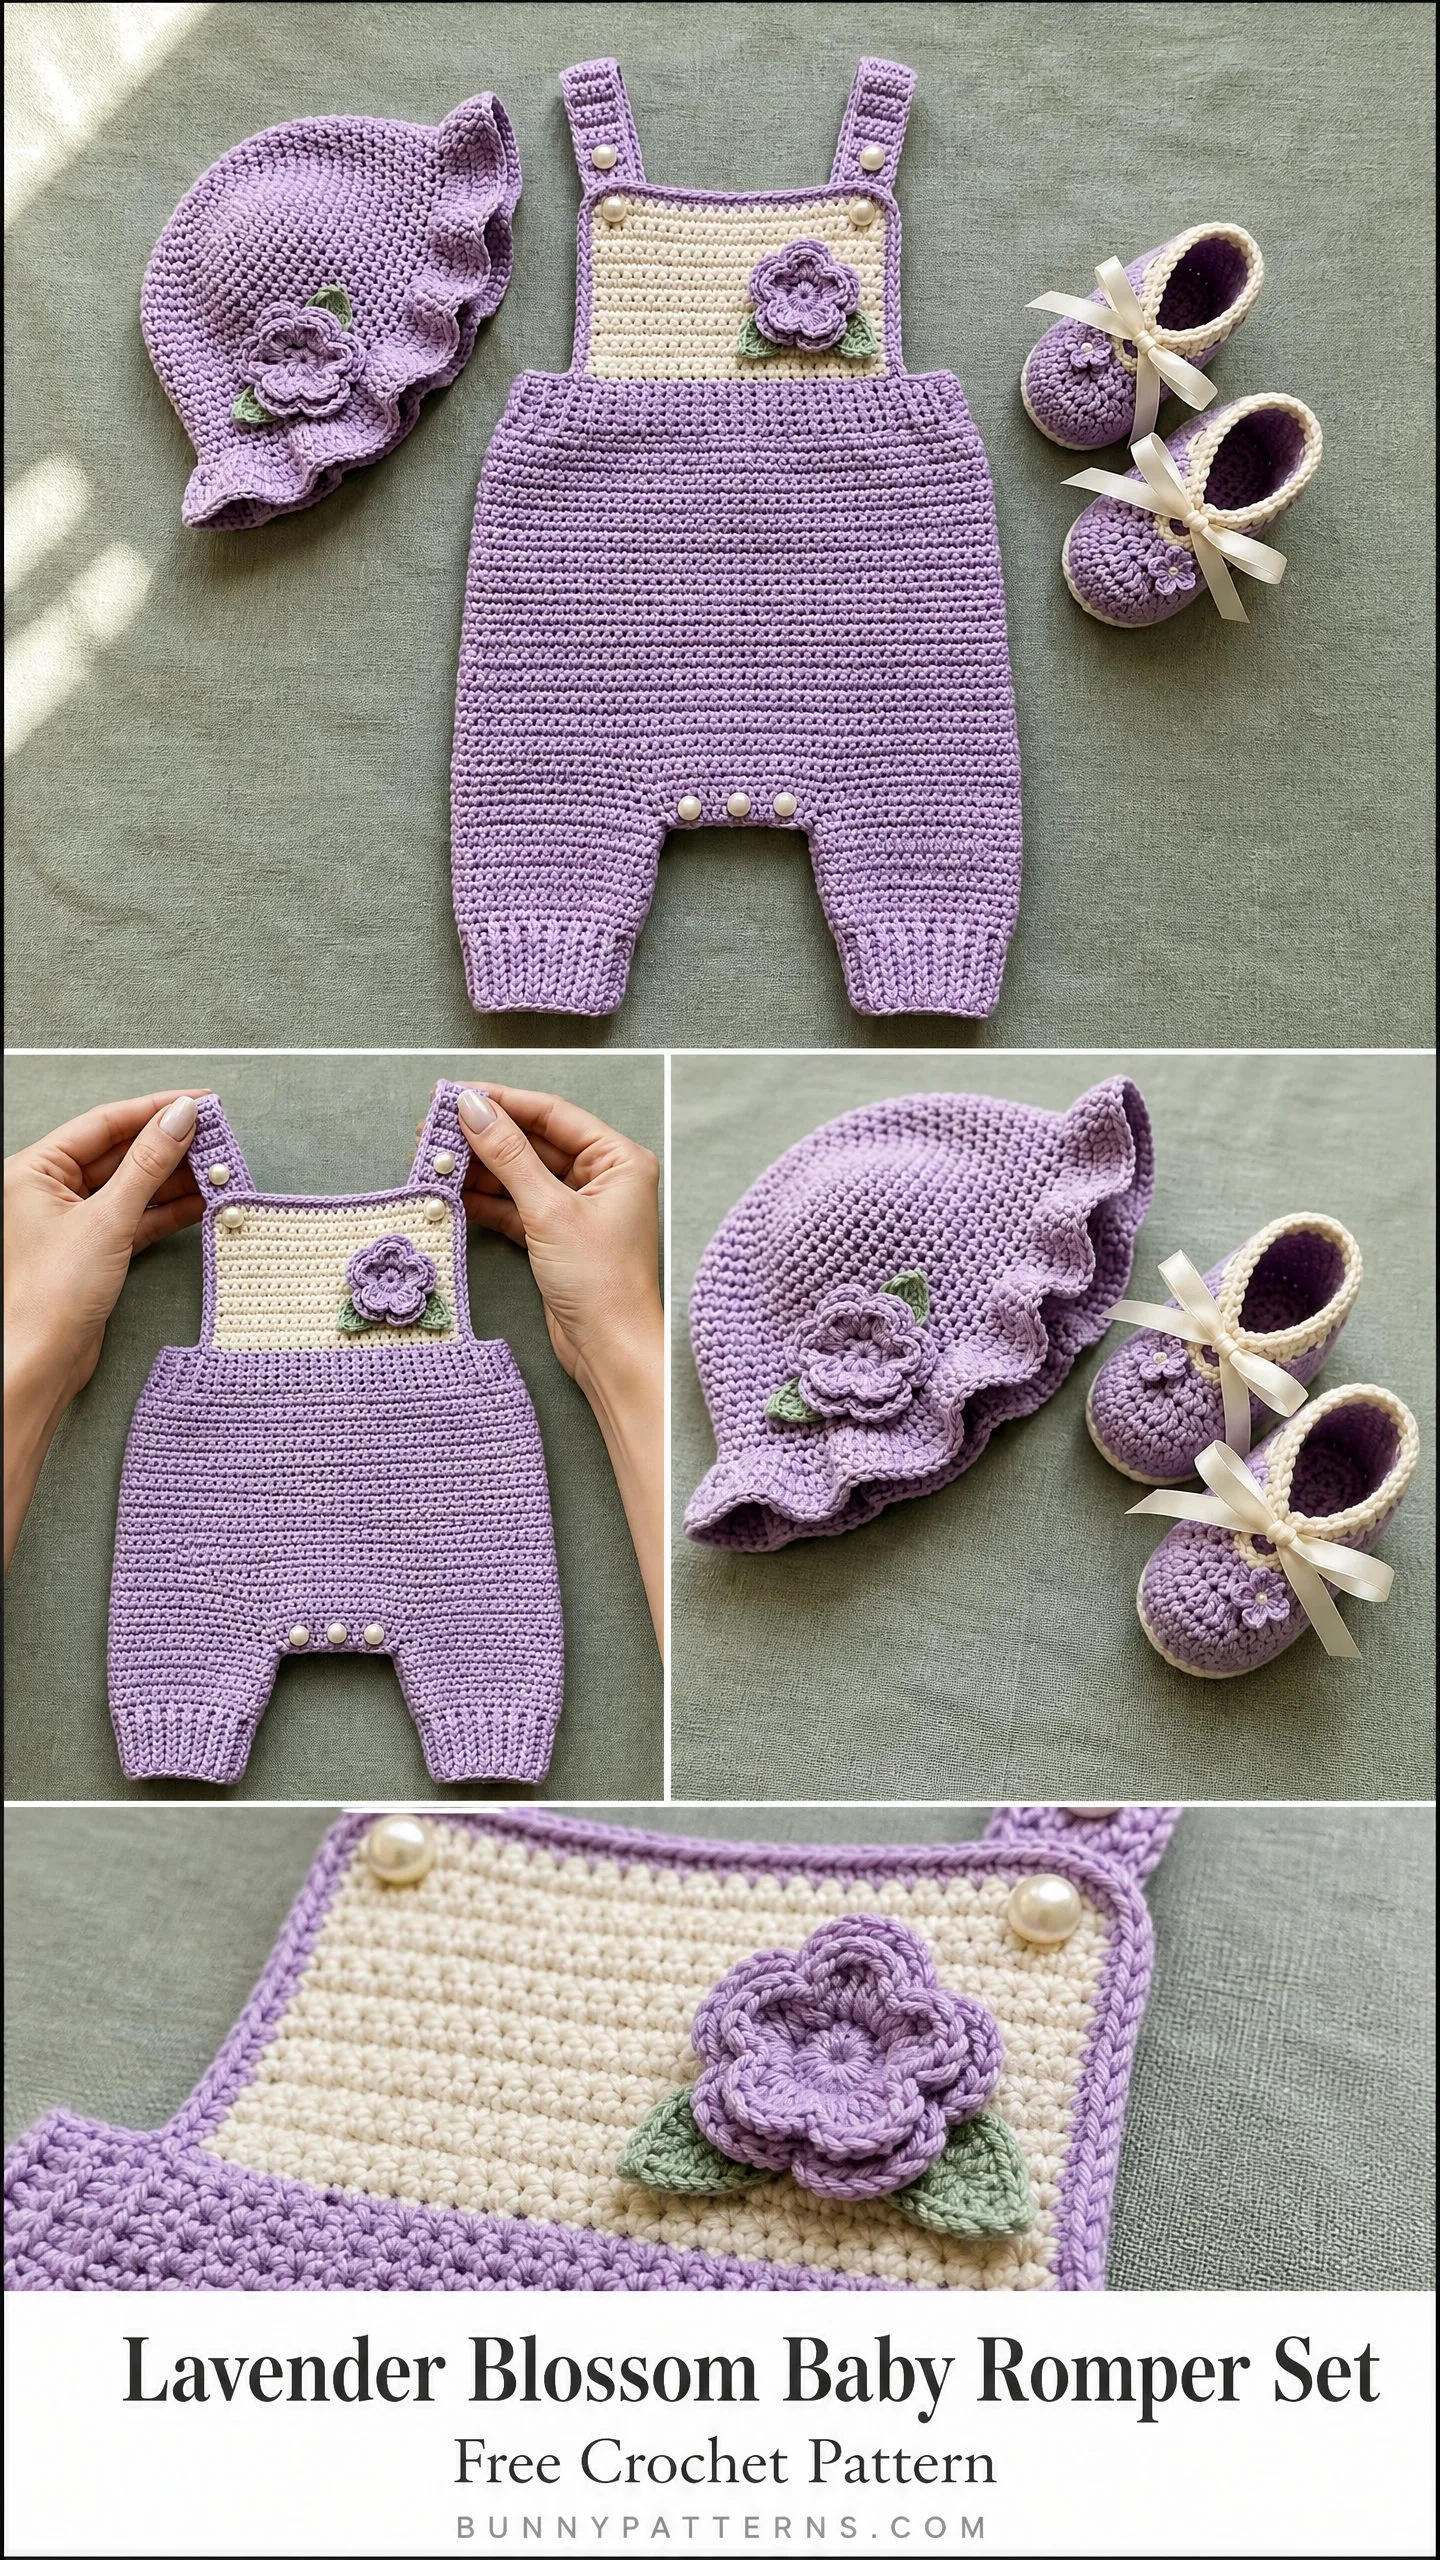
The Lavender Blossom Baby Romper Set looks impressive on the outside, yet the construction breaks down into simple, manageable sections. The romper is basically two tubes joined together with a rectangle on top. The hat is a flat circle that becomes a bowl with a flouncy edge. The booties are tiny cups with ribbon threaded through. Each piece builds on skills you probably already have.
Whether you are an intermediate crocheter looking for your next baby gift project or a confident beginner ready to level up, this pattern meets you where you are. I walk you through every step with clear stitch counts, checkpoints to verify your progress, and tips for the tricky spots. By the end, you will have a gorgeous coordinated set that looks like it came from a boutique.
About This Baby Romper Crochet Pattern
This complete crochet pattern includes three coordinating pieces: a bib-front overalls-style romper with adjustable shoulder straps, a ruffled sun hat, and a pair of slip-on booties with ribbon ties. The set is worked primarily in a soft lavender with a cream bib panel, darker purple flowers, and sage green leaves. Pearl buttons add an elegant finishing touch.
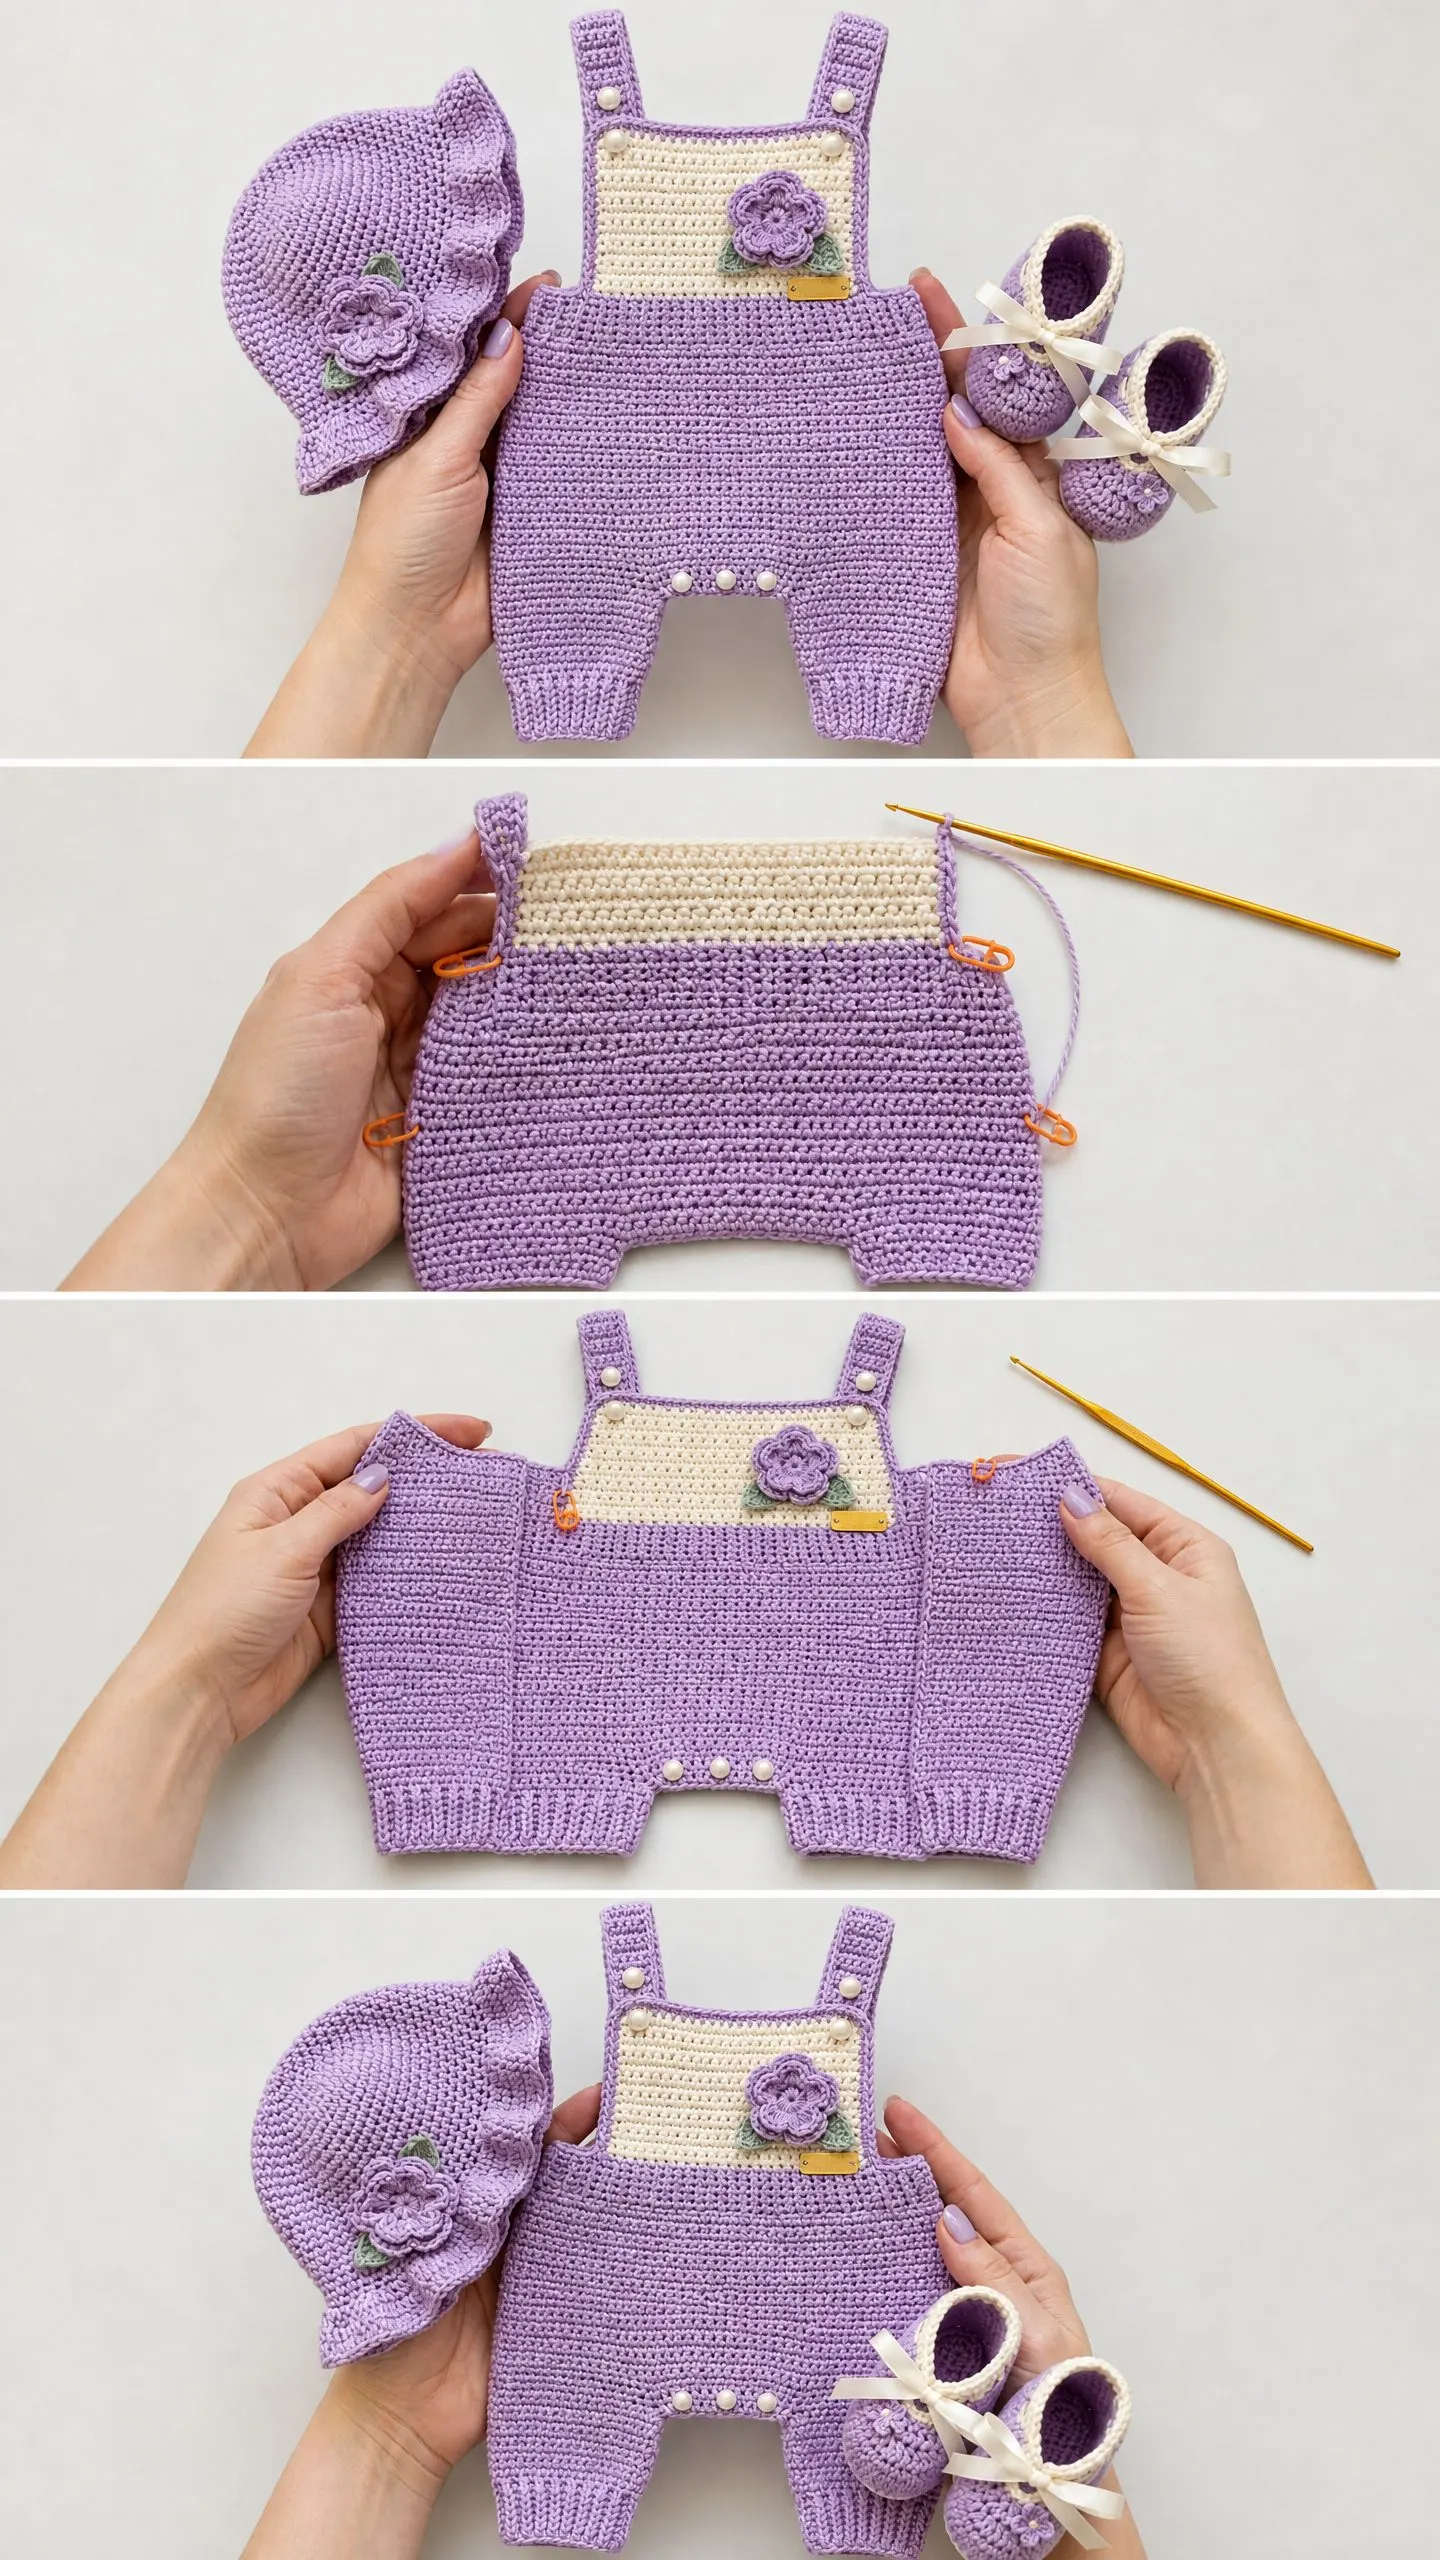
The romper features a clever construction. You work each leg separately from the bottom up, join them at the crotch, then continue the body in the round up to the underarms. The cream bib is worked flat, and narrow straps attach at the back and button to the front. A button placket at the crotch makes diaper changes easy.
Skill level: Intermediate. You need comfortable knowledge of working in the round, joining pieces, working flat sections, simple increases and decreases, and basic seaming. A patient beginner can absolutely tackle this pattern with extra time.
Time estimate: Romper takes 10 to 14 hours. Hat takes 3 to 4 hours. Booties take 2 to 3 hours. Total set runs approximately 15 to 21 hours.
Finished Measurements
The romper fits 3 to 6 months with these approximate dimensions:
The hat circumference measures approximately 16 inches / 40.5 cm.
The bootie foot length measures approximately 3.5 inches / 9 cm.
See the size customization section at the end for guidance on adjusting for newborn or 6 to 12 month sizes.
Materials Needed
Yarn (all DK weight, CYCA 3):
Yarn suggestions: Lion Brand Pound of Love in Blossom and Fisherman works beautifully. Paintbox Yarns Simply DK in Lavender Pink and Champagne White gives excellent stitch definition. For warmer weather, try Scheepjes Stonewashed in Lilac Quartz and Moonstone.
Hook: US size E-4 / 3.5 mm crochet hook, or size needed to meet gauge
Notions:
Gauge
18 single crochet stitches and 20 rows equals 4 inches / 10 cm, worked in single crochet (sc), blocked.
Gauge matters for this garment. Work a swatch at least 5 x 5 inches, wash and block it, then measure. Go up one hook size if your stitches are too tight, or down one if they are too loose.
Abbreviations and Stitch Definitions
Let me walk you through every abbreviation used in this pattern. I define each one with a plain-English explanation so you know exactly what to do.
ch: Chain. Yarn over, pull through the loop on your hook. Creates the foundation or adds height.
sl st: Slip stitch. Insert hook, yarn over, pull through both the stitch and the loop on hook in one motion. Used for joining.
sc: Single crochet. Insert hook in stitch, yarn over, pull up a loop (2 loops on hook), yarn over, pull through both loops. The main stitch for this entire pattern.
inc: Increase. Work 2 sc in the same stitch. This adds one stitch to your count.
sc2tog: Single crochet two together (decrease). Insert hook in next stitch, yarn over, pull up a loop, insert hook in following stitch, yarn over, pull up a loop (3 loops on hook), yarn over, pull through all 3 loops. This removes one stitch from your count.
BLO: Back loop only. Instead of inserting your hook under both loops of the stitch, insert it under only the back loop (the one farther from you). Creates a ribbed texture.
pm: Place marker. Drop a stitch marker into the current stitch to track your position.
RS: Right side. The public-facing side of your work.
WS: Wrong side. The inside of your work.
rnd: Round. One complete pass around your work when crocheting in the round.
Special Techniques
Single Crochet Rib (sc-rib): Worked in BLO throughout every row. This creates a stretchy, ridged fabric perfect for cuffs. You will see this on the leg cuffs of the romper.
Magic Ring: A method for starting circular work that leaves no hole in the center. Make a loop with your yarn tail crossing behind the working yarn. Insert hook through the loop, yarn over, pull up a loop, chain 1, then work your stitches into the ring. Pull the tail tight to close.
Crochet Flower: Make a magic ring. Round 1: ch 1, work 6 sc into ring, sl st to first sc. (6 sc) Round 2: ch 1, in each stitch work (sc, hdc, dc, hdc, sc), sl st to first sc. (6 petals) Fasten off with a long tail for sewing.
Crochet Leaf: Ch 9. Sc in 2nd ch from hook, hdc in next, dc in next 2, hdc in next, sc in next 2, work 3 sc in last ch (this pivots you around to the other side), sc in next 2, hdc in next, dc in next 2, hdc in next, sc in last, sl st to first sc. Fasten off with a long tail.
Pattern Notes Before You Begin
Read through these notes before starting. They will save you confusion later.
1. The romper body is worked in continuous spiral rounds after the legs join. Do not join at the end of each round. Use a stitch marker to track the beginning of each round and move it up as you go.
2. All turning chains of 1 count as nothing. Do not count them as a stitch anywhere in this pattern.
3. The front bib is worked flat in cream after the body reaches the underarms. The back is also worked flat, then the sides are seamed.
4. Pearl buttons are sewn on at the shoulder strap ends (2 per strap), along the bib top edge (3 buttons), and at the crotch placket (3 buttons for closure).
5. Right side (RS) faces out as you work. When working flat, RS rows go from right to left for right-handed crocheters on odd-numbered rows.
Romper Instructions
Section 1: First Leg
Ribbed Cuff (worked flat, then seamed):
With MC, ch 7.
Row 1: Sc in 2nd ch from hook and each ch across. Turn. (6 sc)
Rows 2 to 30: Ch 1, sc in BLO of each st across. Turn. (6 sc per row)
After row 30, fold the strip and sl st the short edges together to form a tube. The long edge becomes the top of the cuff. You will pick up 30 stitches around this edge.
Pick-up round: Attach MC to any stitch of the cuff top edge. Ch 1, work 30 sc evenly around the top edge of the cuff tube. (30 sc) Pm at beginning of round. Do not join. Work in continuous spiral from here.
Leg Body:
Rnds 1 to 8: Sc in each st around. (30 sc each rnd)
Rnd 9 (increase rnd): (Sc in 9 sts, inc in next st) 3 times. (33 sc)
Rnds 10 to 13: Sc in each st around. (33 sc each rnd)
Rnd 14 (increase rnd): (Sc in 10 sts, inc in next st) 3 times. (36 sc)
Rnds 15 to 18: Sc in each st around. (36 sc each rnd)
Fasten off first leg. Leave a long tail for joining.
Checkpoint: First leg should measure approximately 4.5 inches from cast-on edge, not including cuff height. Cuff adds about 0.5 inches. Total leg length should be approximately 5 inches.
Section 2: Second Leg
Repeat all instructions for the first leg exactly. Do not fasten off. The working yarn at the end of the second leg begins the join round.
Section 3: Joining the Legs
Hold both legs with right sides facing out. The last stitch completed on the second leg is your joining point.
Join rnd: With MC still attached to second leg, ch 3 (this creates the crotch bridge at the front), sc in each st around the first leg (36 sc), ch 3 (this creates the crotch bridge at the back), sc in each st around the second leg (36 sc), then sc across the 3 ch at the front, sc across the 3 ch at the back. (36 + 3 + 36 + 3 = 78 sc) Pm at beginning of round.
Section 4: Body
The body is worked in continuous rounds upward toward the chest.
Rnds 1 to 5: Sc in each st around. (78 sc each rnd)
Rnd 6 (waist shaping, decrease): Sc in 8 sts, sc2tog, (sc in 17 sts, sc2tog) 3 times, sc in 9 sts. (74 sc)
Rnds 7 to 9: Sc in each st around. (74 sc each rnd)
Rnd 10 (restore width): (Sc in 36 sts, inc in next st) twice. (76 sc)
Rnds 11 to 14: Sc in each st around. (76 sc each rnd)
Rnd 15 (increase): (Sc in 18 sts, inc in next st) 4 times. (80 sc)
Rnds 16 to 18: Sc in each st around. (80 sc each rnd)
Checkpoint: After rnd 18, the piece from crotch join to current row should measure approximately 5 inches. Total from bottom of cuff to current round should be approximately 9.5 to 10 inches.
Section 5: Dividing for Front Bib and Back
At the end of rnd 18, divide the 80 sts evenly: 40 for front, 40 for back. Place markers at the beginning and end of the front 40 stitches.
Back:
With MC, attach yarn to back right edge where the armhole begins.
Row 1 (RS): Ch 1, sc in 40 sts across back. Turn. (40 sc)
Rows 2 to 6: Ch 1, sc in each st across. Turn. (40 sc each row)
Fasten off MC. Set back aside.
Front Bib:
With CA (cream), attach yarn to front right edge.
Row 1 (RS): Ch 1, sc in 40 sts across front. Turn. (40 sc)
Rows 2 to 10: Ch 1, sc in each st across. Turn. (40 sc each row)
Checkpoint: The cream bib panel should measure approximately 2 inches tall after row 10.
Row 11 (bib top edge with button loops): Ch 1, sc in 3 sts, ch 2, sk 2, (sc in 6 sts, ch 2, sk 2) twice, sc in 3 sts. Turn. (34 sc plus 3 ch-2 spaces)
Row 12: Ch 1, sc across, working 2 sc in each ch-2 sp. (40 sc)
Fasten off CA.
Section 6: Straps (make 2)
With MC, ch 5.
Row 1: Sc in 2nd ch from hook and each ch across. Turn. (4 sc)
Rows 2 to 38: Ch 1, sc in each st across. Turn. (4 sc each row)
Fasten off, leaving a long tail for sewing.
Each strap measures approximately 7.5 inches long and 0.75 inches wide.
Sew one end of each strap to the back top edge, placing straps approximately 1 inch in from each side edge. On each strap front end, work a small button loop by attaching MC, ch 3, sl st in same st, fasten off.
Sew the side seams: with RS together, align front and back side edges and whip stitch from underarm to the top of the joined-leg section.
Section 7: Crotch Placket
With MC, attach yarn to one side of the crotch opening.
Row 1: Ch 1, sc evenly along one crotch edge, approximately 9 to 12 sc depending on opening size. Turn.
Row 2: Ch 1, sc across. Turn.
Row 3 (button loops on one side only): Ch 1, sc in 2 sts, (ch 2, sk 1, sc in 2 sts) 3 times. Turn.
Row 4: Ch 1, sc across, working 2 sc in each ch-2 sp. Fasten off.
Repeat rows 1 to 2 on the other side of crotch opening (no button loops). Sew 3 pearl buttons to align with button loops.
Sun Hat Instructions
Section 1: Crown
With MC, make a magic ring.
Rnd 1: Ch 1, 6 sc into ring, sl st to first sc. (6 sc)
Rnd 2: Ch 1, 2 sc in each st around, sl st to first sc. (12 sc)
Rnd 3: Ch 1, (sc in 1 st, inc in next st) around, sl st to first sc. (18 sc)
Rnd 4: Ch 1, (sc in 2 sts, inc in next st) around, sl st to first sc. (24 sc)
Rnd 5: Ch 1, (sc in 3 sts, inc in next st) around, sl st to first sc. (30 sc)
Rnd 6: Ch 1, (sc in 4 sts, inc in next st) around, sl st to first sc. (36 sc)
Rnd 7: Ch 1, (sc in 5 sts, inc in next st) around, sl st to first sc. (42 sc)
Rnd 8: Ch 1, (sc in 6 sts, inc in next st) around, sl st to first sc. (48 sc)
Rnd 9: Ch 1, (sc in 7 sts, inc in next st) around, sl st to first sc. (54 sc)
Rnd 10: Ch 1, (sc in 8 sts, inc in next st) around, sl st to first sc. (60 sc)
Rnd 11: Ch 1, (sc in 9 sts, inc in next st) around, sl st to first sc. (66 sc)
Rnd 12: Ch 1, (sc in 10 sts, inc in next st) around, sl st to first sc. (72 sc)
Section 2: Hat Body
Rnds 13 to 26: Ch 1, sc in each st around, sl st to first sc. (72 sc each rnd)
Checkpoint: After rnd 26, the hat should measure approximately 5.5 inches from crown to brim edge with a circumference of approximately 16 inches.
Section 3: Brim
Rnd 27 (increase): Ch 1, (sc in 3 sts, inc in next st) around, sl st to first sc. (90 sc)
Rnd 28: Ch 1, sc in each st around, sl st to first sc. (90 sc)
Rnd 29 (increase): Ch 1, (sc in 4 sts, inc in next st) around, sl st to first sc. (108 sc)
Rnd 30: Ch 1, sc in each st around, sl st to first sc. (108 sc)
Rnd 31 (ruffle increase): Ch 1, (sc in 1 st, inc in next st) around, sl st to first sc. (162 sc)
Rnd 32: Ch 1, sc in each st around, sl st to first sc. (162 sc)
Rnd 33: Ch 1, sc in each st around, sl st to first sc. (162 sc)
Fasten off.
Booties Instructions (make 2)
Section 1: Sole
With CA (cream), make a magic ring.
Rnd 1: Ch 1, 6 sc into ring, sl st to join. (6 sc)
Rnd 2: Ch 1, 2 sc in each st around, sl st to join. (12 sc)
Rnd 3: Ch 1, (inc in 1 st, sc in 1 st) around, sl st to join. (18 sc)
Rnd 4: Ch 1, sc in 1 st, inc, (sc in 2 sts, inc) 5 times, sc in 1 st, sl st to join. (24 sc)
Rnd 5: Ch 1, sc in each st around, sl st to join. (24 sc)
Section 2: Sides
Switch to MC.
Rnd 6: Ch 1, sc in BLO of each st around, sl st to join. (24 sc) Working in BLO creates a crisp fold between sole and sides.
Rnds 7 to 9: Ch 1, sc in each st around, sl st to join. (24 sc each rnd)
Section 3: Toe Shaping
Rnd 10: Ch 1, sc in 8 sts, (sc2tog) 4 times, sc in 8 sts, sl st to join. (20 sc)
Rnd 11: Ch 1, sc in 7 sts, (sc2tog) 3 times, sc in 7 sts, sl st to join. (17 sc)
Fasten off. Close the toe with a whip stitch seam using the tail.
Section 4: Cuff and Ribbon
Attach MC to back of bootie at rnd 9.
Row 1: Ch 1, sc in 14 sts across back and sides, leaving front toe area unworked. Turn. (14 sc)
Rows 2 to 5: Ch 1, sc in each st across. Turn. (14 sc each row)
Row 6 (ribbon holes): Ch 1, sc in 3 sts, ch 2, sk 2, sc in 4 sts, ch 2, sk 2, sc in 3 sts. Turn. (10 sc plus 2 ch-2 spaces)
Row 7: Ch 1, sc across, working 2 sc in each ch-2 sp. (14 sc)
Fasten off.
Thread the 12-inch ribbon through the two ribbon holes, centering so tails are even. Tie in a bow.
Flowers and Leaves Assembly
Make 4 flowers total (1 for romper bib, 1 for hat, 1 for each bootie) using CB (medium purple).
Make 6 to 8 leaves using CC (sage green). You will use at least 6.
Sew one flower to the romper bib center, approximately 3 inches down from the bib top edge. Sew one flower to the hat near the brim on either side. Sew one flower to the front toe area of each bootie. Place one or two leaves behind each flower and sew down.
Button placement: Sew 3 pearl buttons along the bib top edge (aligned with button loops). Sew 2 buttons at each strap end (4 total). Sew 3 buttons at the crotch placket aligned with loops.
Size Customization Tips
For newborn (0 to 3 months): Reduce leg circumference to 27 stitches at foundation. Work only 6 increase rounds instead of 8 in the leg body. Reduce body rounds by 3. Total leg length without cuff should be approximately 3.5 inches.
For 6 to 12 months: Increase leg foundation to 33 stitches. Add 4 additional body rounds after the join. Increase bib height to 12 rows in CA instead of 10. Extend straps to 42 rows each.
General guideline: Each additional round adds approximately 0.2 inches to length. Each additional stitch adds approximately 0.22 inches to circumference.
Finishing and Care
Weave in all ends securely using a tapestry needle, running ends in two directions for security.
Wet blocking is recommended. Soak finished pieces in cool water with gentle baby-safe detergent for 15 minutes. Squeeze out water gently without wringing. Roll in a clean towel to remove excess moisture. Lay flat, pin to measurements, and allow to dry completely before unpinning.
Care instructions: Machine wash cold on gentle cycle in a mesh laundry bag. Lay flat to dry. Do not tumble dry at high heat. Remove ribbon from booties before washing.
You Made It!
This Lavender Blossom Baby Romper Set is one of those projects that gets compliments every single time. The coordinated pieces, the sweet flower details, the pearl buttons. It all comes together into something truly special for a little one.
Thank you so much for choosing this pattern. I hope you enjoyed making it as much as I enjoyed designing it. If you finish your set, I would absolutely love to see it! Tag me on Instagram or share in our Facebook group. Seeing your finished projects is honestly the best part of my day.
If you love this baby romper crochet pattern, save it to your Pinterest boards so you can find it when you are ready to start. And if you make this set, please drop a comment below. I read every single one, and your photos make my heart so happy!
You Might Also Like
- Strawberry Baby Bonnet and Romper Free Crochet Pattern
- Coral Sunset Mandala Crochet Two-Piece Free Pattern
- Ocean Teal Woven Purse on Linen Free Pattern
- Sage Green Tiered Wall Planter Free Crochet Pattern