
Last summer, my niece turned two, and I found myself scrambling for a gift that felt special. Store-bought clothes felt too easy, too forgettable. I wanted something she could wear to her strawberry-themed birthday party that would make her feel like the guest of honor she was.
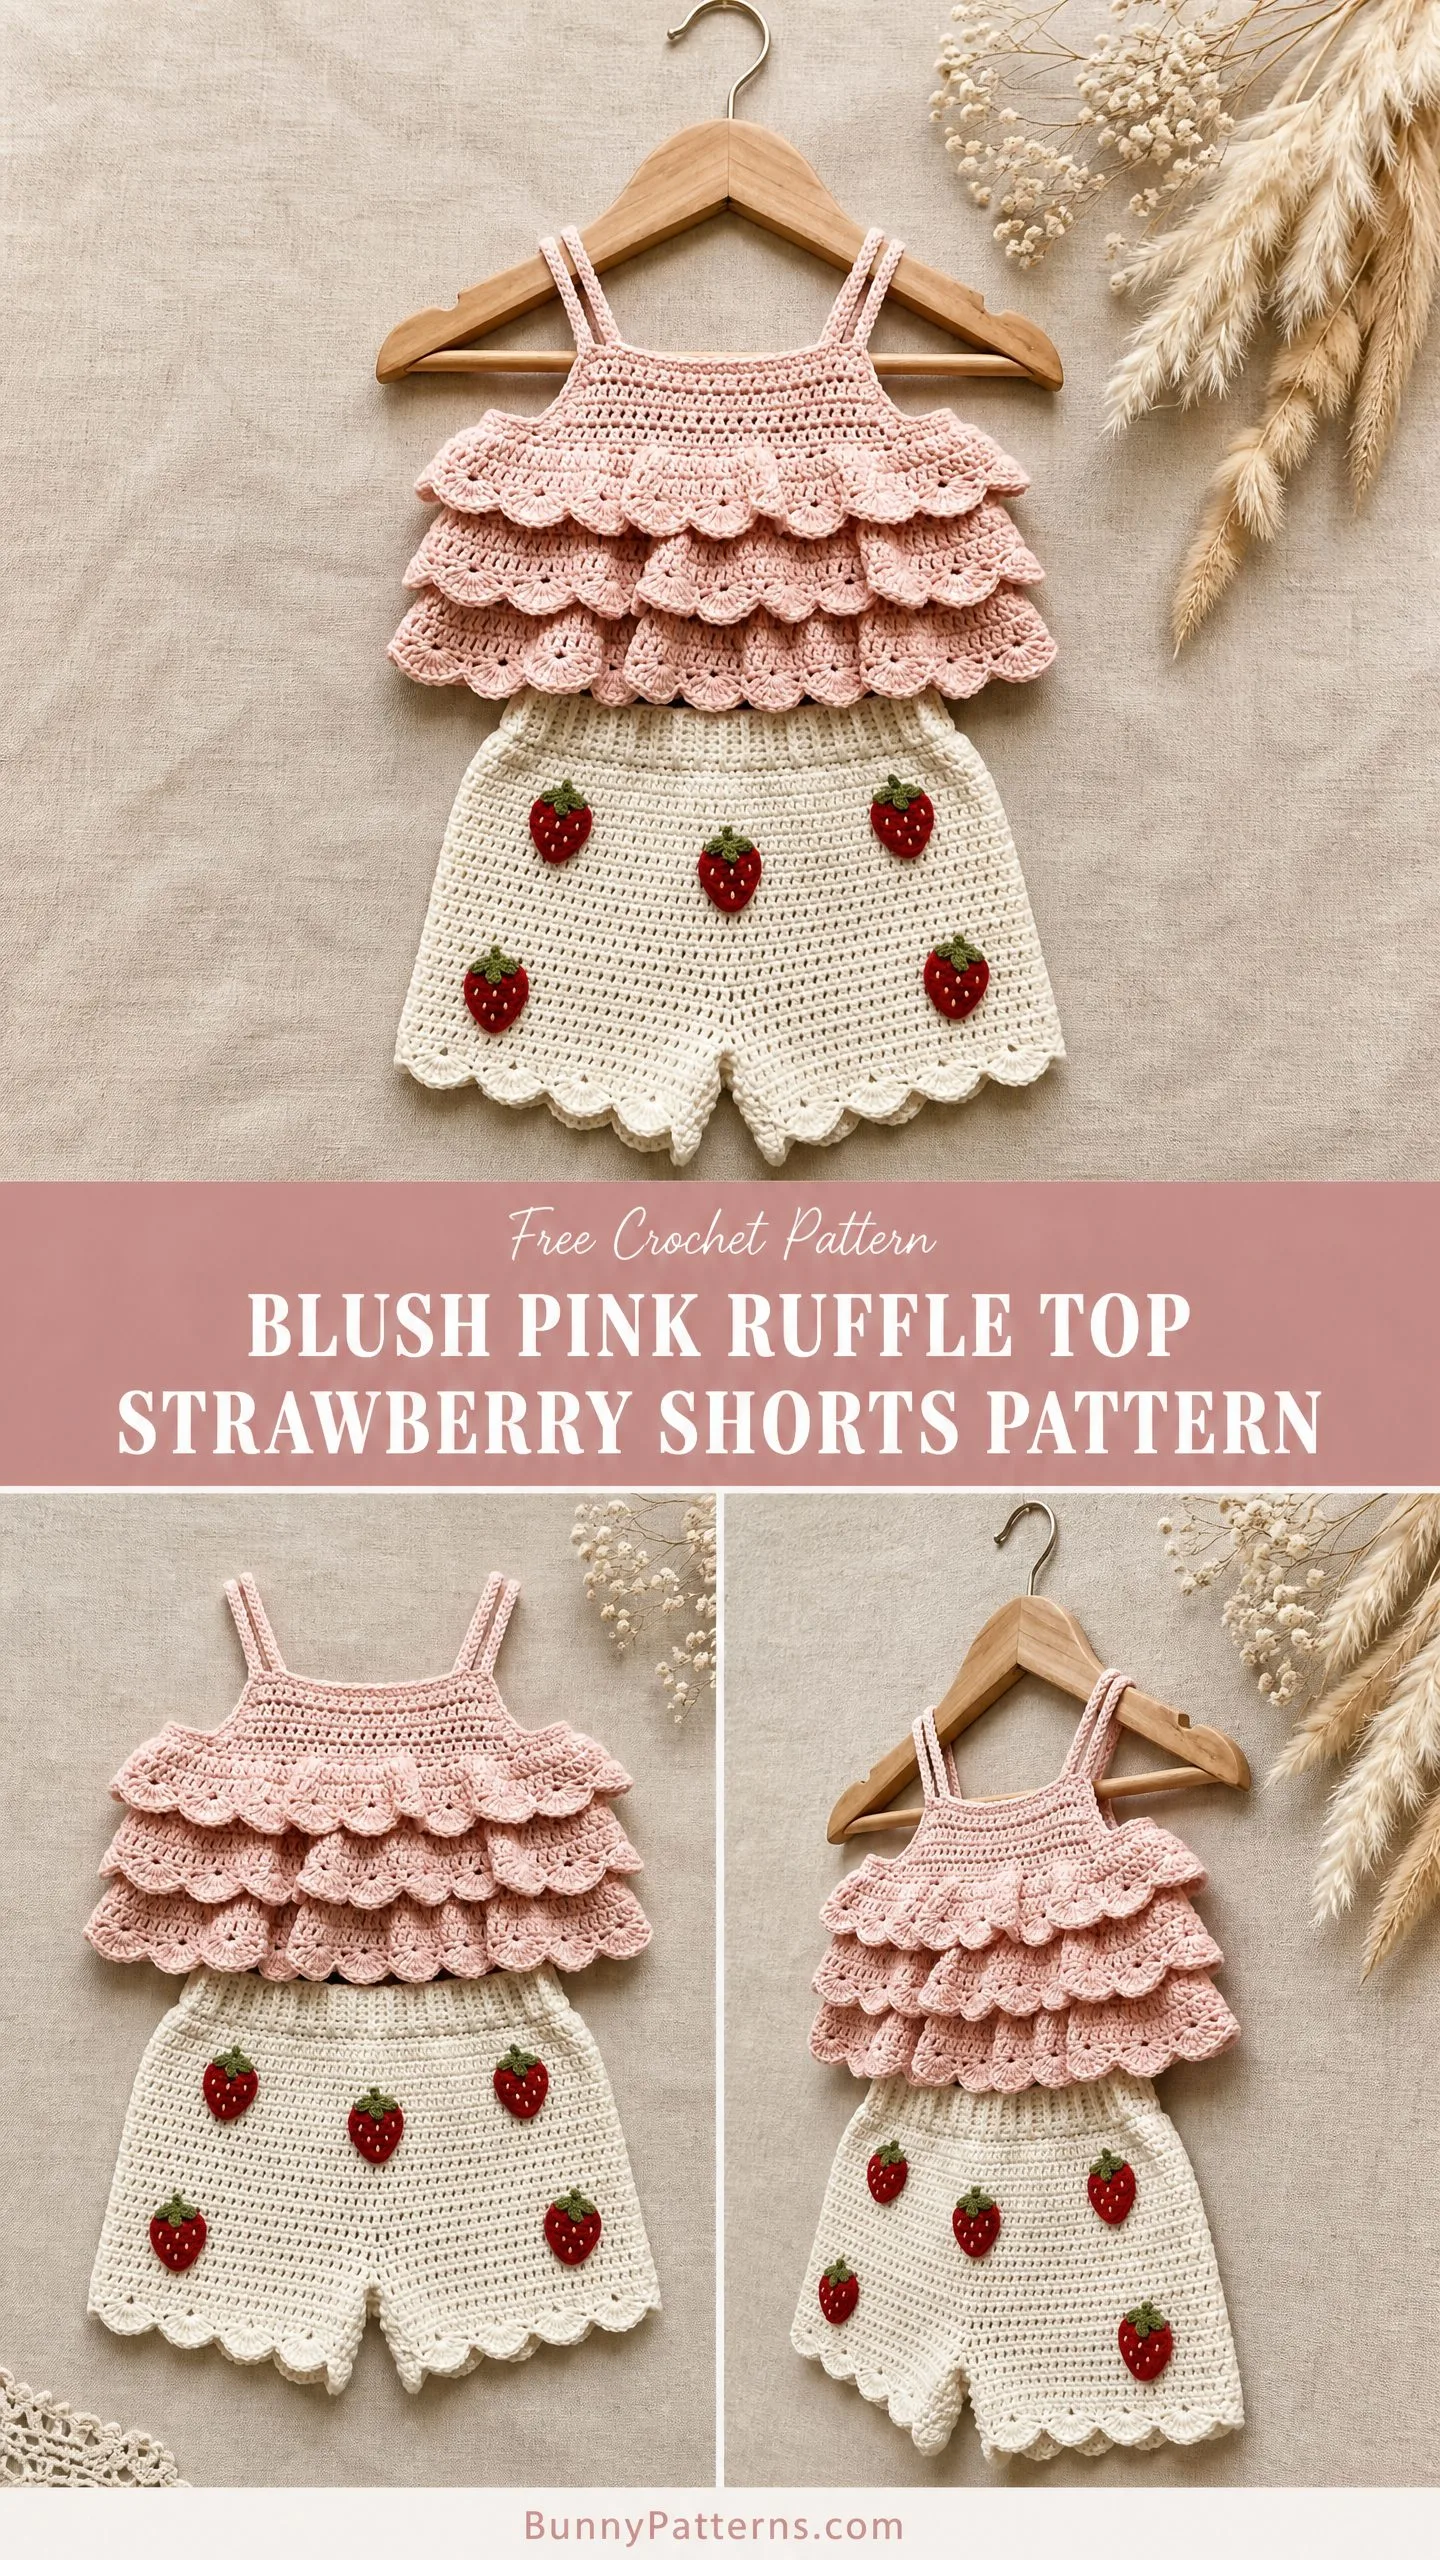
That’s when this little outfit came together in my hands, one stitch at a time. The soft pink ruffles, the sweet cream shorts with those tiny red strawberries scattered across them. When she wore it to her party, her mom teared up a little. That’s the moment I knew I had to write this pattern down properly.
If you’re looking for a handmade gift that will absolutely steal the show, this is it. The blush pink ruffle top and strawberry shorts crochet pattern is perfect for toddlers, works up in soft cotton yarn, and features the kind of details that make people ask, "Did you really make that yourself?"
What You’re Making
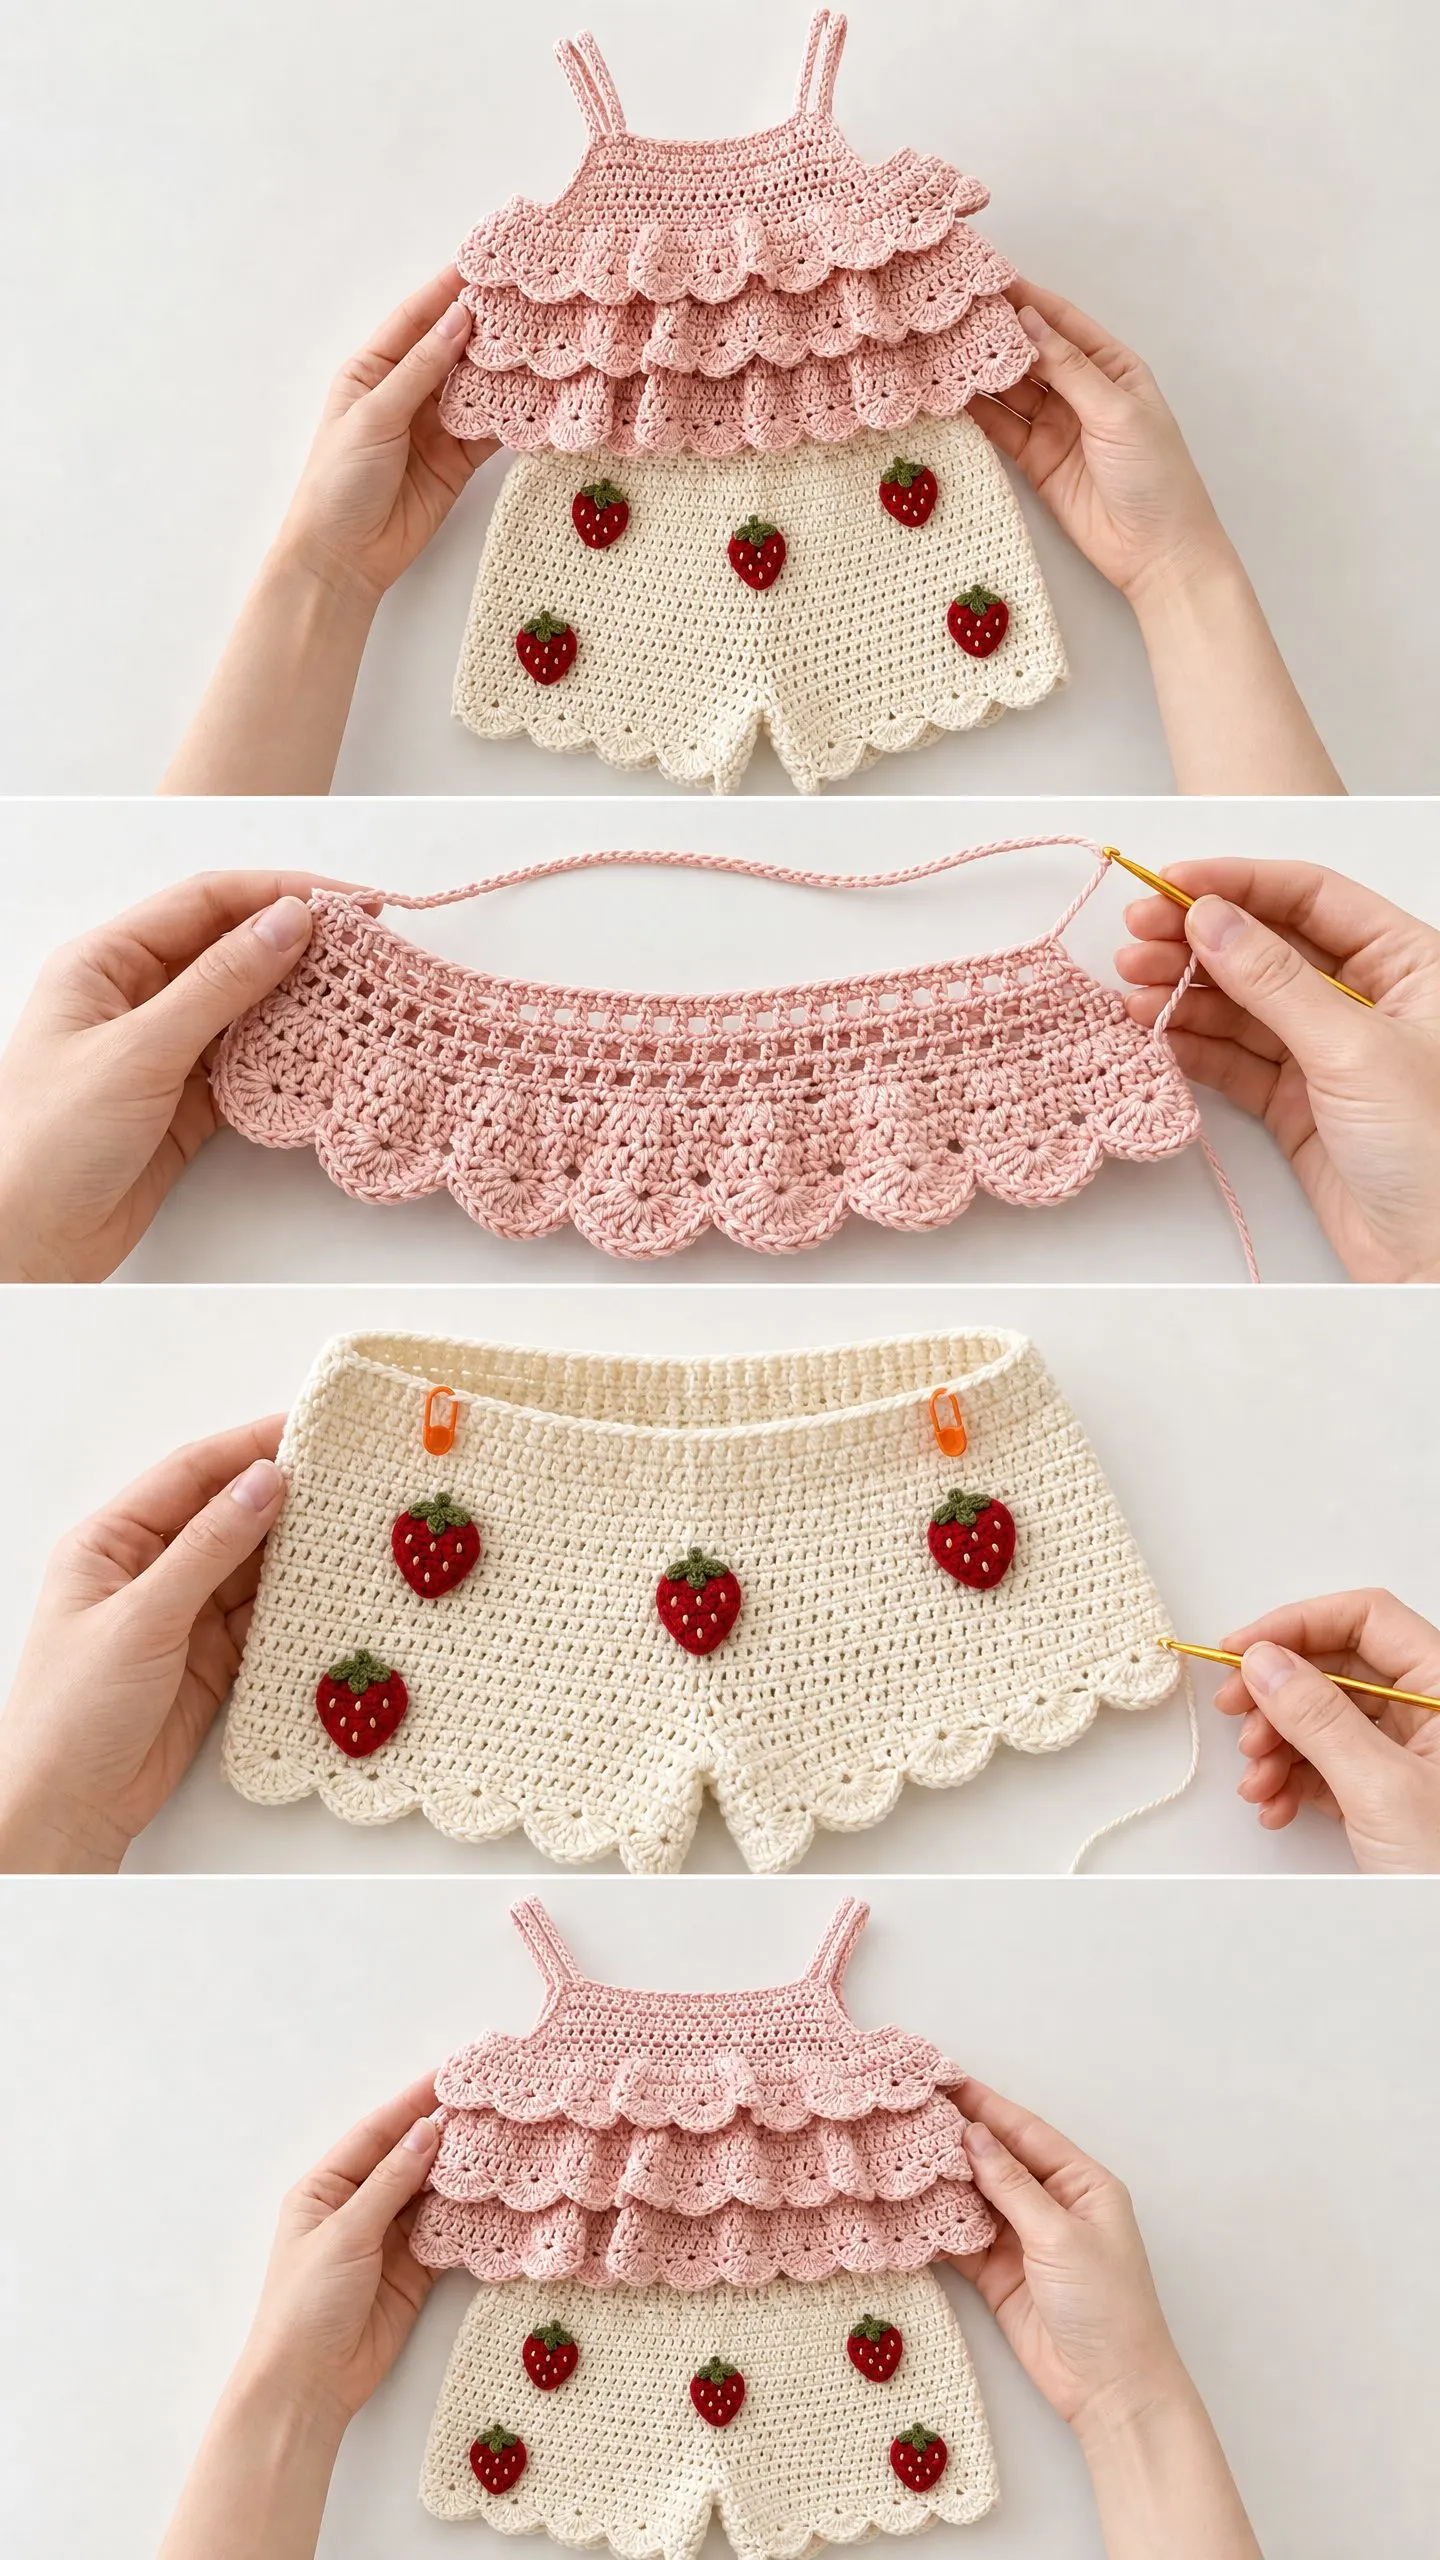
This two-piece set includes a tiered ruffle camisole top in blush pink and cream-colored crochet shorts decorated with adorable strawberry appliques. The top has spaghetti-style double straps, a solid bodice, and three cascading ruffle tiers finished with scalloped shell edging. The shorts feature a simple elastic waistband, five scattered strawberry motifs, and a matching scalloped hem.
Both pieces are worked flat and seamed together. The ruffle tiers are the exception. Those are worked in joined rounds directly onto the bodice. Construction starts at the top and works downward for the camisole, and from waist to hem for the shorts.
This set fits a toddler approximately 2 to 3 years old, with sizing notes included if you need to go smaller or larger.
Skill Level
I’d call this an intermediate project. You should be comfortable working flat single crochet fabric, shell stitches, joining rounds, reading stitch counts, and attaching appliques. The scallop edging and three-tier ruffle construction need careful attention to stitch placement, but nothing here is truly advanced.
If you’re a confident beginner who has completed a few projects and you’re ready to stretch yourself a bit, you can absolutely do this. Just take your time and count your stitches.
Time Estimate
Plan for approximately 18 to 26 hours total, depending on your working speed.
This is not a one-evening project, but it’s absolutely manageable over a week or two of relaxed stitching.
Finished Measurements
Top:
Shorts:
Materials You’ll Need
Yarn:
Hook:
Additional Materials:
Yarn Suggestions
Option 1: Paintbox Yarns Cotton DK (100% cotton, 137 yards / 125 meters per 50g ball). Use in Ballet Pink and Champagne White. Approximately 3 balls of Color A and 3 to 4 balls of Color B.
Option 2: Lion Brand 24/7 Cotton in Blush and Ecru (100% cotton, 186 yards / 170 meters per 100g ball). Approximately 2 balls of Color A and 3 balls of Color B.
Option 3: Scheepjes Catona (100% Egyptian cotton, 62 yards / 57 meters per 25g ball). Use in Oud Rose and Bridal White. Approximately 6 balls of Color A and 7 balls of Color B.
Substitution Note: Use any sport weight or DK weight cotton or cotton-blend yarn that achieves the stated gauge. Avoid acrylic for toddler garments worn directly on skin, particularly in warm weather.
Gauge
With US D-3 / 3.25 mm hook and sport weight cotton:
20 single crochet stitches x 24 rows = 4 inches / 10 cm in single crochet, blocked.
Check your gauge before beginning. Every quarter inch of gauge difference over 4 inches will result in approximately 1 to 1.5 inches of size difference over the full garment width. That matters a lot on a toddler-sized piece!
Abbreviations (US Terms)
Let me walk you through every abbreviation you’ll encounter. If you’re new to reading patterns, bookmark this section.
Special Stitches
Scallop Shell Stitch
This creates the beautiful wavy edging on the ruffle tiers and shorts hem. Here’s how it works:
Work 5 double crochet stitches all into the same stitch. This creates a fan or shell shape.
The pattern sequence is: skip 2 stitches, work 5 dc into the next stitch, skip 2 stitches, slip stitch into the next stitch. Repeat this across. Each scallop "shell" uses 6 stitches total (2 skipped, 1 worked into, 2 skipped, 1 slip stitched).
Strawberry Applique (Make 5 Total)
The strawberry is worked in the round from the top down. Don’t worry if you’ve never made appliques before. These are small and forgiving.
Strawberry Body:
Step 1: With Color C (Red), make a magic ring. (Or ch 2 and work into second ch from hook if magic rings stress you out.)
Step 2 (Round 1): Work 6 sc into the ring. Do not join. Work in a continuous spiral. Place a stitch marker in the first stitch of each round so you don’t lose track. (6 sc)
Step 3 (Round 2): Work 2 sc in each stitch around. (12 sc)
Step 4 (Round 3): Work (sc in next st, 2 sc in next st) 6 times. (18 sc)
Step 5 (Round 4): Work sc in each stitch around. (18 sc)
Step 6 (Round 5): Work sc in each stitch around. (18 sc)
Step 7 (Round 6): Work (sc in next st, sc2tog) 6 times. (12 sc)
Step 8 (Round 7): Work (sc2tog) 6 times. (6 sc)
Step 9: Stuff lightly if desired, or leave flat for a flatter applique. Sl st to close. Fasten off, leaving a long tail for attaching.
Strawberry Leaf Cap (Make 1 per strawberry):
Step 1: With Color D (Green), ch 2.
Step 2: Work 5 sc into the second chain from hook. (5 sc)
Step 3: Work (sl st, ch 3, sl st) into each of the 5 sc across. You’ll have 5 small pointed leaves. Fasten off, leaving a tail. Attach on top of the strawberry body.
Seed Details: Using white embroidery floss or a single strand of cream yarn, make small straight stitches scattered across the strawberry body to suggest seeds. This step is optional but adds such a sweet touch.
Tip: For a flat applique that photographs better and lays flatter on the garment, do not stuff. Simply flatten the piece before sewing on.
Pattern Notes Before You Begin
1. The top is worked in two flat panels (front and back) that are identical, then seamed at the sides. The ruffle tiers are worked onto the joined panels in attached rounds.
2. Turning chains: For sc rows, ch 1 and turn. The turning chain does NOT count as a stitch in this pattern. Always work the first sc into the first stitch at the base of the turning chain.
3. The ruffle tiers are created by working directly into the stitch row of the bodice below the previous tier, picking up stitches and then working increases to create fullness.
4. Stitch counts in parentheses at the end of each row or round reflect the TOTAL stitch count.
5. The shorts are worked in two flat panels (front and back), seamed at the sides and inner leg, with a folded waistband channel for elastic.
6. Mark the right side with a stitch marker at the beginning so you don’t lose track.
7. Blocking: Both pieces should be wet blocked before assembly. This evens out tension and opens up the scallop edging beautifully.
Blush Pink Ruffle Top Instructions
Bodice Front Panel
With Color A and US D-3 / 3.25 mm hook, ch 51.
Row 1 (WS): Sc in the second ch from hook and in each ch across. Turn. (50 sc)
Row 2 (RS): Ch 1, sc in each st across. Turn. (50 sc)
Rows 3 through 20: Ch 1, sc in each st across. Turn. (50 sc each row)
After Row 20, you have completed the bodice front panel. It should measure approximately 3.5 inches / 9 cm tall and 10 inches / 25.5 cm wide at gauge.
Checkpoint: If your measurement is off by more than half an inch, check your gauge and adjust hook size before continuing.
Do not fasten off. Place a stitch marker in the working loop and set aside.
Bodice Back Panel
Work exactly as the Bodice Front Panel, Rows 1 through 20.
After Row 20, fasten off and weave in ends.
Seaming the Bodice
Lay both panels with right sides facing each other (WS facing out). Using a tapestry needle and Color A, whipstitch or mattress stitch the two side edges together, leaving the top edge and bottom edge open. Turn right side out.
The bodice tube should now measure approximately 20 inches / 51 cm in circumference and 3.5 inches / 9 cm tall.
Straps (Make 4 Total for Double Strap Look)
With Color A, ch 85.
Row 1: Sc in the second ch from hook and in each ch across. Fasten off, leaving a long tail. (84 sc)
For a cord-like strap, fold lengthwise and sl st or whipstitch the long edge together. Alternatively, use as a single-layer strap.
Each finished strap should measure approximately 9 inches / 23 cm after folding or seaming.
Attachment: Pin straps to the inside top edge of the bodice front and back panels, approximately 1.5 inches / 4 cm from each side seam. For the double strap look, place two straps side by side, approximately half an inch / 1.5 cm apart at each shoulder. Try the top against the child’s body before permanently sewing.
Top Edge Finishing
With RS facing, join Color A at any side seam along the top edge of the bodice. Work 1 round of sc evenly around the entire top opening, working approximately 1 sc per row end along the sides and 1 sc per stitch along the front and back. Join with sl st to first sc. Fasten off. (Approximately 100 sc around the top edge)
Ruffle Tier Construction
The three ruffle tiers are placed as follows:
Use stitch markers to identify attachment rows before beginning.
Tier 1
With RS facing and Color A, join yarn at the right side seam at Row 14 of the bodice.
Pickup Round: Insert hook into the side of each sc row end and draw up a loop, working a sl st into each row end all the way around. Pick up 40 sl sts. Join with sl st. (40 sl sts)
Increase Round 1: Ch 3 (counts as first dc), work 1 more dc in the same stitch, work 2 dc in each remaining sl st around. Join with sl st to top of ch-3. (80 dc)
Increase Round 2: Ch 3 (counts as first dc), 1 dc in same st, dc in next st, (2 dc in next st, dc in next st) to last st, 2 dc in last st. Join with sl st to top of ch-3. (120 dc)
Scallop Edge Round: Ch 1. (Sl st in next st, ch 1, skip 2 sts, 5 dc in next st, skip 2 sts) around. Work 20 scallop shell repeats. Join with sl st. Fasten off. (20 scallop shells)
Tier 2
With RS facing and Color A, join yarn at the right side seam at Row 10 of the bodice.
Pickup Round: Pick up 48 sl sts. Join with sl st. (48 sl sts)
Increase Round 1: Ch 3 (counts as first dc), 1 dc in same st, 2 dc in each st around. Join with sl st to top of ch-3. (96 dc)
Increase Round 2: Ch 3, 1 dc in same st, dc in next st, (2 dc in next st, dc in next st) around. Join with sl st to top of ch-3. (144 dc)
Scallop Edge Round: Work 24 scallop shell repeats. Join with sl st. Fasten off. (24 scallop shells)
Tier 3
With RS facing and Color A, join yarn at the right side seam at Row 6 of the bodice.
Pickup Round: Pick up 48 sl sts. Join with sl st. (48 sl sts)
Increase Round 1: Ch 3, 1 dc in same st, 2 dc in each st around. Join with sl st to top of ch-3. (96 dc)
Increase Round 2: Ch 3, 1 dc in same st, dc in next st, (2 dc in next st, dc in next st) around. Join with sl st to top of ch-3. (144 dc)
Increase Round 3: Ch 3, 1 dc in same st, dc in each of the next 2 sts, (2 dc in next st, dc in next 2 sts) around. Join with sl st to top of ch-3. (192 dc)
Scallop Edge Round: Work 32 scallop shell repeats. Join with sl st. Fasten off. (32 scallop shells)
Checkpoint: After all three tiers are attached, the overall length from top edge to bottom scallop should measure approximately 9 to 10 inches / 23 to 25.5 cm.
Weave in all ends. Block before seaming (see Finishing section).
Strawberry Shorts Instructions
Shorts Front Panel
With Color B and US D-3 / 3.25 mm hook, ch 56.
Row 1 (WS): Sc in the second ch from hook and in each ch across. Turn. (55 sc)
Rows 2 through 4: Ch 1, sc in each st across. Turn. (55 sc)
Row 5: Ch 1, 2 sc in first st, sc in each st to last st, 2 sc in last st. Turn. (57 sc)
Rows 6 through 8: Ch 1, sc in each st across. Turn. (57 sc)
Row 9: Ch 1, 2 sc in first st, sc in each st to last st, 2 sc in last st. Turn. (59 sc)
Rows 10 through 12: Ch 1, sc in each st across. Turn. (59 sc)
Row 13: Ch 1, 2 sc in first st, sc in each st to last st, 2 sc in last st. Turn. (61 sc)
Rows 14 through 18: Ch 1, sc in each st across. Turn. (61 sc)
Row 19: Ch 1, 2 sc in first st, sc in each st to last st, 2 sc in last st. Turn. (63 sc)
Rows 20 through 25: Ch 1, sc in each st across. Turn. (63 sc)
Row 26: Ch 1, 2 sc in first st, sc in each st to last st, 2 sc in last st. Turn. (65 sc)
Rows 27 through 30: Ch 1, sc in each st across. Turn. (65 sc)
Row 31 (Crotch shaping): Ch 1, sc2tog, sc in each st to last 2 sts, sc2tog. Turn. (63 sc)
Row 32: Ch 1, sc2tog, sc in each st to last 2 sts, sc2tog. Turn. (61 sc)
Row 33: Ch 1, sc2tog, sc in each st to last 2 sts, sc2tog. Turn. (59 sc)
Rows 34 through 40: Ch 1, sc in each st across. Turn. (59 sc)
Waistband Fold-Over Rows 41 through 46: Ch 1, sc in each st across. Turn. (59 sc)
These 6 rows will be folded over to create the elastic casing.
Shorts Front Hem Scallop
With RS facing, join Color B along the bottom edge of the front panel. Work 1 row of sc evenly across, picking up 54 sc (adjust for divisibility by 6).
Scallop Row: (Sl st in next st, skip 2 sts, 5 dc in next st, skip 2 sts) across. Work 9 scallop repeats. Fasten off. (9 scallop shells)
Checkpoint: The shorts front panel before seaming should measure approximately 11 inches / 28 cm wide and 8.5 inches / 21.5 cm tall.
Shorts Back Panel
Work exactly as the Shorts Front Panel, Rows 1 through 46, including the waistband fold-over rows and bottom scallop edging.
Seaming the Shorts
Lay the front and back panels with right sides together.
Step 1: Seam the left side edge from waist to hem using whipstitch or mattress stitch.
Step 2: Seam the right side edge from waist to hem.
Step 3: Open the tube and refold so the side seams align at center. Seam the inner leg / crotch seam from one leg opening to the other.
Turn right side out.
Waistband Elastic Casing
Fold the waistband rows (Rows 41 through 46) to the inside of the shorts. Pin in place. Whipstitch the folded edge to the inside along Row 40, leaving a 1.5 inch / 4 cm gap for inserting elastic.
Cut elastic to approximately 17 to 18 inches / 43 to 46 cm. Thread through the casing using a safety pin. Overlap ends by 1 inch / 2.5 cm and sew together. Distribute gathers evenly. Sew the gap closed.
Strawberry Applique Placement
Make 5 strawberry appliques as directed earlier.
Suggested placement:
Sew each strawberry firmly to the garment. Attach green leaf caps on top. Add seed details with white embroidery floss.
Size Customization Tips
To size up for 3T to 4T: Add 6 stitches to the bodice foundation chain (56 instead of 50) and 4 stitches to the shorts panels (59 instead of 55). Work 2 additional rows before shaping in the shorts. Increase tier pickup by 8 stitches per tier.
To size down for 18 to 24 months: Subtract 6 stitches from the bodice (44 stitches) and 4 stitches from the shorts (51 stitches). Reduce length by 2 rows in each section. Shorten straps by approximately 1 inch each.
General rule: At gauge, every 5 stitches equals approximately 1 inch in width. Every 6 rows equals approximately 1 inch in height.
Finishing and Blocking
Wet blocking is strongly recommended. Fill a basin with cool water and a drop of wool wash. Submerge each piece and gently squeeze. Do not wring. Press out excess water with a clean towel. Lay flat on a blocking mat. Use blocking pins to open up the scallop edging. Allow to dry completely.
After blocking, weave in any remaining ends and trim close to the fabric.
Care Instructions
Hand wash in cool water with gentle detergent. Do not wring. Lay flat to dry. Do not tumble dry. Iron on low if needed, using a pressing cloth. Store flat or loosely rolled to preserve the ruffle tiers.
You Did It!
Thank you so much for making this pattern with me. I hope this little outfit brings as much joy to your life as it did to mine when I first saw my niece twirling around in hers. The ruffles, the strawberries, that perfect blush pink. It’s the kind of handmade piece that becomes a keepsake.
If you make this blush pink ruffle top and strawberry shorts crochet pattern, I would absolutely love to see it! Tag me on Instagram or share in our Facebook group. There’s nothing better than seeing your finished projects come to life.
If this pattern is calling your name but you’re not quite ready to start today, go ahead and save it to your Pinterest boards so you can find it later. And if you do make it, please drop a comment below. I read every single one, and hearing about your projects honestly makes my day!
You Might Also Like
- Sage Green Botanical Barrel Bag Free Crochet Pattern
- Coral Sunset Mandala Crochet Two-Piece Free Pattern
- Cream Boho Tassel Fringe Clutch Free Crochet Pattern
- Blush Pink Crochet Mini Backpack Free Pattern