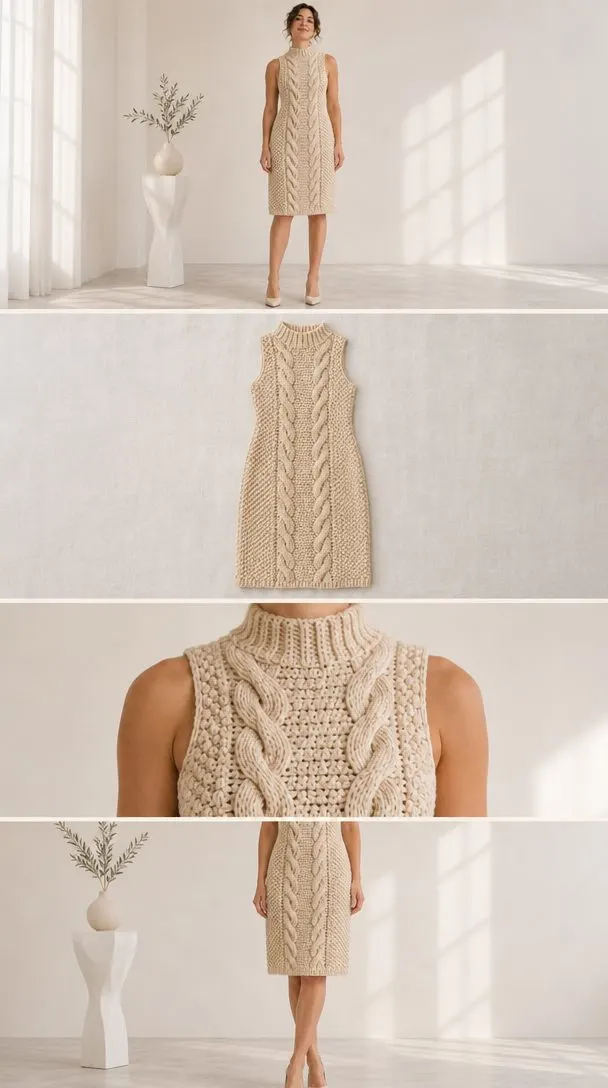
Looking for a stunning garment that keeps you warm while turning heads? This cable dress delivers exactly that. With its twin rope cables running elegantly down the front and back, textured stitches creating visual interest, and a sophisticated mock-neck collar, this dress works beautifully for cooler weather occasions.
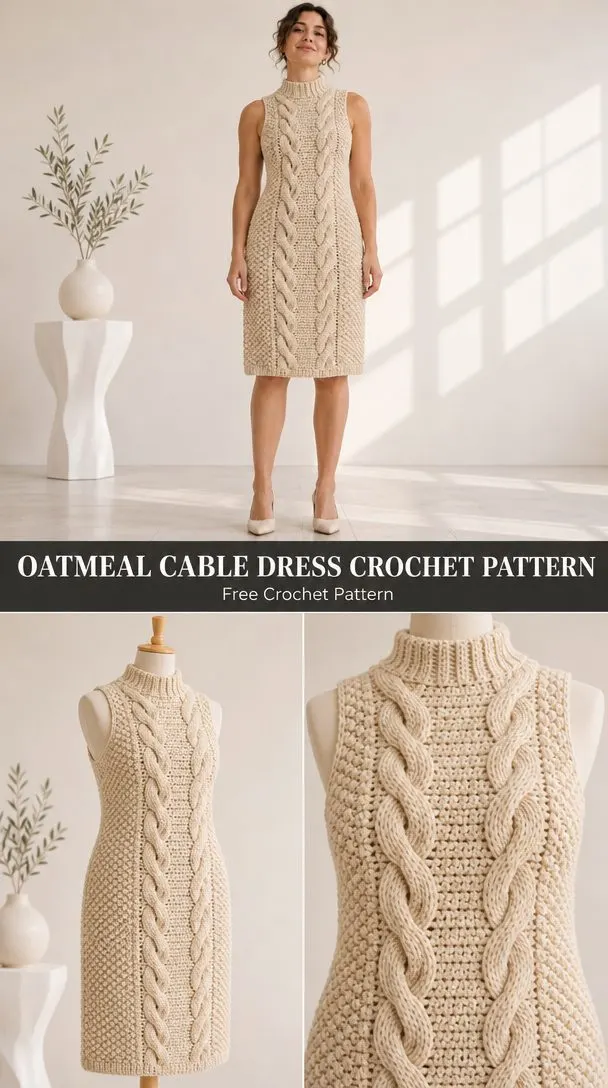
The construction uses double crochet as the foundation, with front post treble crochet creating those gorgeous braided cables. You’ll work two flat panels from the hem up, shape the armholes and neckline, then seam everything together. It’s a satisfying build that results in a polished, professional-looking garment.
This pattern fits a body bust of 96 to 100 cm with positive ease of about 7.5 to 11.5 cm, making it a relaxed, comfortable fit. Whether you’re dressing up for work or layering over tights for a weekend outing, this oatmeal cable dress becomes a wardrobe staple you’ll reach for again and again.
Why This Crochet Cable Dress Pattern Works
The twin rope cable technique creates that classic Aran-inspired look without the complexity of knitting cables. By using front post treble crochet (FPtr) stitches that cross over each other, you achieve deep, dimensional braids that catch the light beautifully.
The dress features a straight silhouette with stepped armholes, which means no complicated curved shaping. You simply stop working certain stitches at the armhole point, creating clean lines that are easy to seam later.
The mock-neck collar adds sophistication while keeping your neck warm. It’s worked separately as a ribbed strip, then sewn around the neckline. This method gives you full control over the fit, so you can ensure it stretches comfortably over your head before attaching it permanently.
Materials You’ll Need
Before you begin, gather these supplies. Having everything ready makes the process smoother and more enjoyable.
Yarn:
- DK weight smooth wool/cotton blend, 120 m per 50 g
- Oatmeal cream color
- 850 g total (approximately 2040 m)
Choose a smoothly plied yarn to show off the cable texture. Fuzzy or highly textured yarns will obscure the beautiful stitch definition.
Hooks:
- 4 mm hook for the main body
- 3.5 mm hook for edgings and hem band
Tools:
- Tapestry needle
- Measuring tape
- 10 stitch markers
- Blocking mat
Understanding the Gauge
Getting gauge right matters especially for garments. Your finished dress needs to fit properly, and that starts here.
Target gauge: 16 pattern positions and 12 rows = 10 x 10 cm in the selected texture after washing.
For moss stitch sections, count each single crochet (sc) or chain space as one position. Measure ribbing relaxed, without stretching it.
Making your gauge swatch:
Chain 38 stitches (2 edges plus 36 texture positions). Work at least 20 rows deep. For the cable section, work one centered 6-stitch cable with plain ground on either side.
Wash your swatch, dry it flat, then measure the center 10 cm. If your width is off, change your hook size. If only your height differs, work to the measurements in the pattern and record your actual row count.
Abbreviations and Special Stitches
Understanding these terms before you begin will make following the pattern much easier.
Standard Abbreviations:
- ch = chain
- sl st = slip stitch
- sc = single crochet (insert hook, yarn over, pull through, yarn over, pull through both loops)
- hdc = half double crochet
- dc = double crochet (yarn over, insert hook, yarn over, pull through, yarn over, pull through 2 loops, yarn over, pull through remaining 2 loops)
- tr = treble crochet
- st(s) = stitch(es)
- sp = space
- sk = skip
- rep = repeat
- RS/WS = right side/wrong side
- BLO = back loop only
- yo = yarn over
- rnd = round
Special Stitches:
FPdc (Front Post double crochet): Yarn over, insert hook from front to back around the post of the indicated stitch, yarn over and pull up a loop, complete the dc as normal.
BPdc (Back Post double crochet): Same as FPdc, but insert hook from back to front around the post.
FPtr (Front Post treble crochet): Work a treble crochet around the indicated post from the front. This taller stitch allows the cables to cross over each other.
dc2tog (double crochet 2 together): Work 2 incomplete dc over the next 2 stitches (yarn over, insert, pull up loop, yarn over, pull through 2 loops for each), then yarn over and pull through all 3 loops on hook. This decreases 2 stitches to 1.
Working the Twin Rope Cables
This is where the magic happens. The cable pattern uses an 8-row repeat.
Cable placement across 86 stitches:
Work 19 dc, 6 cable stitches, 36 dc, 6 cable stitches, 19 dc.
On RS cable rows 1 and 5 of each 8-row repeat:
Skip 3 posts, FPtr around next 3 posts, then FPtr around the skipped 3 posts working in front. This creates the cable crossing.
Other RS cable rows: Work FPdc across all 6 cable stitches.
WS cable rows: Work BPdc across all 6 cable stitches.
All ground stitches: Work in dc.
Important note: Once you begin armhole and neck shaping, preserve existing columns in their original positions. Use plain dc for any incomplete edge repeat. Never add stitches to complete a partial repeat.
Pattern Notes Before You Begin
Read through the entire pattern before starting. All measurements are after washing and drying flat. Yarn amounts include approximately 15% allowance.
Turning and counting:
- Turn after every flat row
- Ch 1 for sc/hdc and ch 2 for dc/post-stitch fabric do NOT count as stitches
- Work the first stitch in the first stitch
- End every joined round with sl st to the first stitch (the join does not count)
Sizing information:
This worked example fits body bust 96 to 100 cm and hip no more than 100 cm. The garment has about 7.5 to 11.5 cm positive ease.
To change circumference by 15 cm, add or remove 12 positions per panel. Recalculate shoulder widths while preserving a centered neckline.
Construction Overview
You’ll make matching front and back panels from the hem upward. Work the hem band separately and sew it on. At each armhole, stop working 6 positions at each side. Split for the neck and finish the shoulders. Join seams, then add the collar and armhole borders.
Key Measurements:
- Body width, one panel: 53.75 cm / 86 positions
- Upper yoke width: 46.25 cm / 74 positions
- Armhole depth: 22.5 cm / 27 nominal rows
- Shoulder width: 13.75 cm / 22 positions
- Neck width: 18.75 cm / 30 positions
- Total length: 92.5 cm including 5 cm hem band
Step-by-Step Instructions
Back Lower Panel
Foundation: Ch 88; dc in 3rd ch and every remaining ch. [86 dc]
Body Rows 2-78: Work the chosen texture across all 86 positions; stop at 65 cm from foundation. [86 positions]
Back Yoke (restart row numbering)
Yoke Row 1: Sl st across first 6 positions; ch 2, work next 74 in established texture; leave final 6 unworked and turn. [74 positions]
Yoke Rows 2-24: Work even. [74 positions]
Yoke Row 25: Work first 22 positions; leave middle 30 and opposite 22 unworked. [22 positions]
Yoke Rows 26-27: Work shoulder even; fasten off. [22 positions]
Other shoulder Rows 25-27: Rejoin at outer edge of opposite 22 positions; work even. [22 positions]
Front Lower Panel
Foundation and Body Rows 2-78: Repeat the back lower panel. [86 positions]
Front Yoke
Yoke Row 1: Repeat back Yoke Row 1. [74 positions]
Yoke Rows 2-15: Work even. [74 positions]
Yoke Row 16: Work first 22 positions; leave middle 30 and opposite 22 unworked. [22 positions]
Yoke Rows 17-27: Work first shoulder even. [22 positions]
Other shoulder Rows 16-27: Rejoin at outer edge of final 22 positions; work even. [22 positions]
Hem Band (make two)
Band Row 1: With 3.5 mm hook, ch 11; sc in 2nd ch and each remaining ch. [10 sc]
Band Row 2: Ch 1, turn; sc BLO in each sc. [10 sc]
Repeat Band Row 2 until the strip measures 53.75 cm without stretching. Record your row count as B. Make the second strip with the same number of rows. Each strip should be 5 cm deep.
Assembly Instructions
You’ll need: Oatmeal cream yarn, tapestry needle, 4 mm hook, markers.
Seam pass 1: Join matching shoulder stitches with mattress stitch. [2 seams x 22 positions]
Seam pass 2: Join each side below the stepped armholes. [2 seams x 78 body row ends]
Seam pass 3: Sew each hem strip to its matching lower panel edge, easing B band rows across 86 body stitches; join band ends at sides. [2 strips]
Checkpoint: Garment circumference about 107.5 cm; length about 92.5 cm. Shoulders align; both armholes are 22.5 cm deep.
Edgings and Details
You’ll need: 3.5 mm hook, main yarn, tapestry needle.
Neckline Border
Neck Round 1: Sc in each exposed neckline stitch and 2 sc in each dc row end (1 sc per sc row end). Add sc at corners only if needed to keep flat. Record total as N. [N sc]
Neck Round 2: Sc in every stitch. [N sc]
Mock-Neck Band
Ch 9, sc in second ch and next 7 ch (8 sc). Ch 1, turn; sc BLO across for each subsequent row (8 sc). Make the strip long enough to fit the measured neckline without stretching; record K rows.
Sew both ends together, then sew K row ends around N neckline stitches evenly. The band is approximately 4 cm deep.
Important: Verify the band stretches enough to pass over the head before sewing it in place.
Armhole Borders
Armhole Round 1: Sc in each stitch across the underarm step and 2 sc per dc side row end. Record count A for one opening. [A sc]
Armhole Round 2: Sc in each sc; repeat identically on second opening. [A sc per opening]
Checkpoint: Borders lie flat, collar passes over the head comfortably. Measure after border work and adjust tight edging before finishing.
Finishing Your Cable Dress
You’ll need: Matching yarn tails, tapestry needle, cool water, towel, and blocking mat.
Finishing pass 1: Weave each tail through at least 5 cm of matching stitches, reverse direction and repeat. [0 loose ends]
Finishing pass 2: Wash gently, support the weight, and dry flat to schematic measurements. Shape raised stitches with fingertips rather than hard pressing. [1 garment]
Final checkpoint: Dried garment measures approximately 107.5 cm around body and 92.5 cm long. Confirm comfortable stride, arm movement, and neckline fit before wearing.
Care Instructions
Follow your yarn label for specific guidance. Hand wash gently in cool water with mild detergent. Do not wring. Support the wet garment, reshape on a towel, and dry flat away from direct heat. Store folded to prevent stretching.
Tips for Success
Cable confidence: If you’ve never worked cables before, practice the 6-stitch cable crossing on a small swatch first. Once you understand how the FPtr stitches wrap around skipped posts, it becomes rhythmic and satisfying.
Blocking matters: Wet blocking opens up the stitches and evens out your tension. The cables will relax into beautiful definition, and the garment will drape properly.
Check as you go: Count your stitches at the end of every few rows, especially in the body section. Catching a mistake early saves frogging later.
Seaming tip: Mattress stitch creates nearly invisible seams. Take your time with the shoulder and side seams for a polished finish.
This oatmeal cable dress crochet pattern creates a timeless wardrobe piece that showcases your skills beautifully. The combination of textured stitches and elegant cables results in a garment that looks far more complicated than it actually is to make. You’ll love wearing something you created with your own hands.
Thank you so much for choosing this pattern! If you make this cable dress, I’d love to see it. Share your finished project on Instagram or Facebook and tag your photos so fellow crocheters can admire your work. Happy hooking!
If you love this pattern, go ahead and save it to your Pinterest boards so you can find it whenever you’re ready to cast on. And if you do make this dress, drop a comment below. I’d love to hear how it turned out for you!
You Might Also Like
- Rainbow Butterfly Wings Cardigan Free Crochet Pattern
- Ocean Waves Baby Romper Free Crochet Pattern
- Terracotta Mesh Crochet Flared Sleeve Shrug Pattern
- Sunflower Granny Square Market Bag Free Crochet Pattern