
I designed this purse with one clear goal in mind: create the perfect first "real" bag project that looks polished without being overwhelming. I wanted something with small, satisfying squares that build into a sturdy structured tote you will actually carry. The mauve frame around every square does the styling for you, so even slightly mismatched tension looks intentional and pretty.
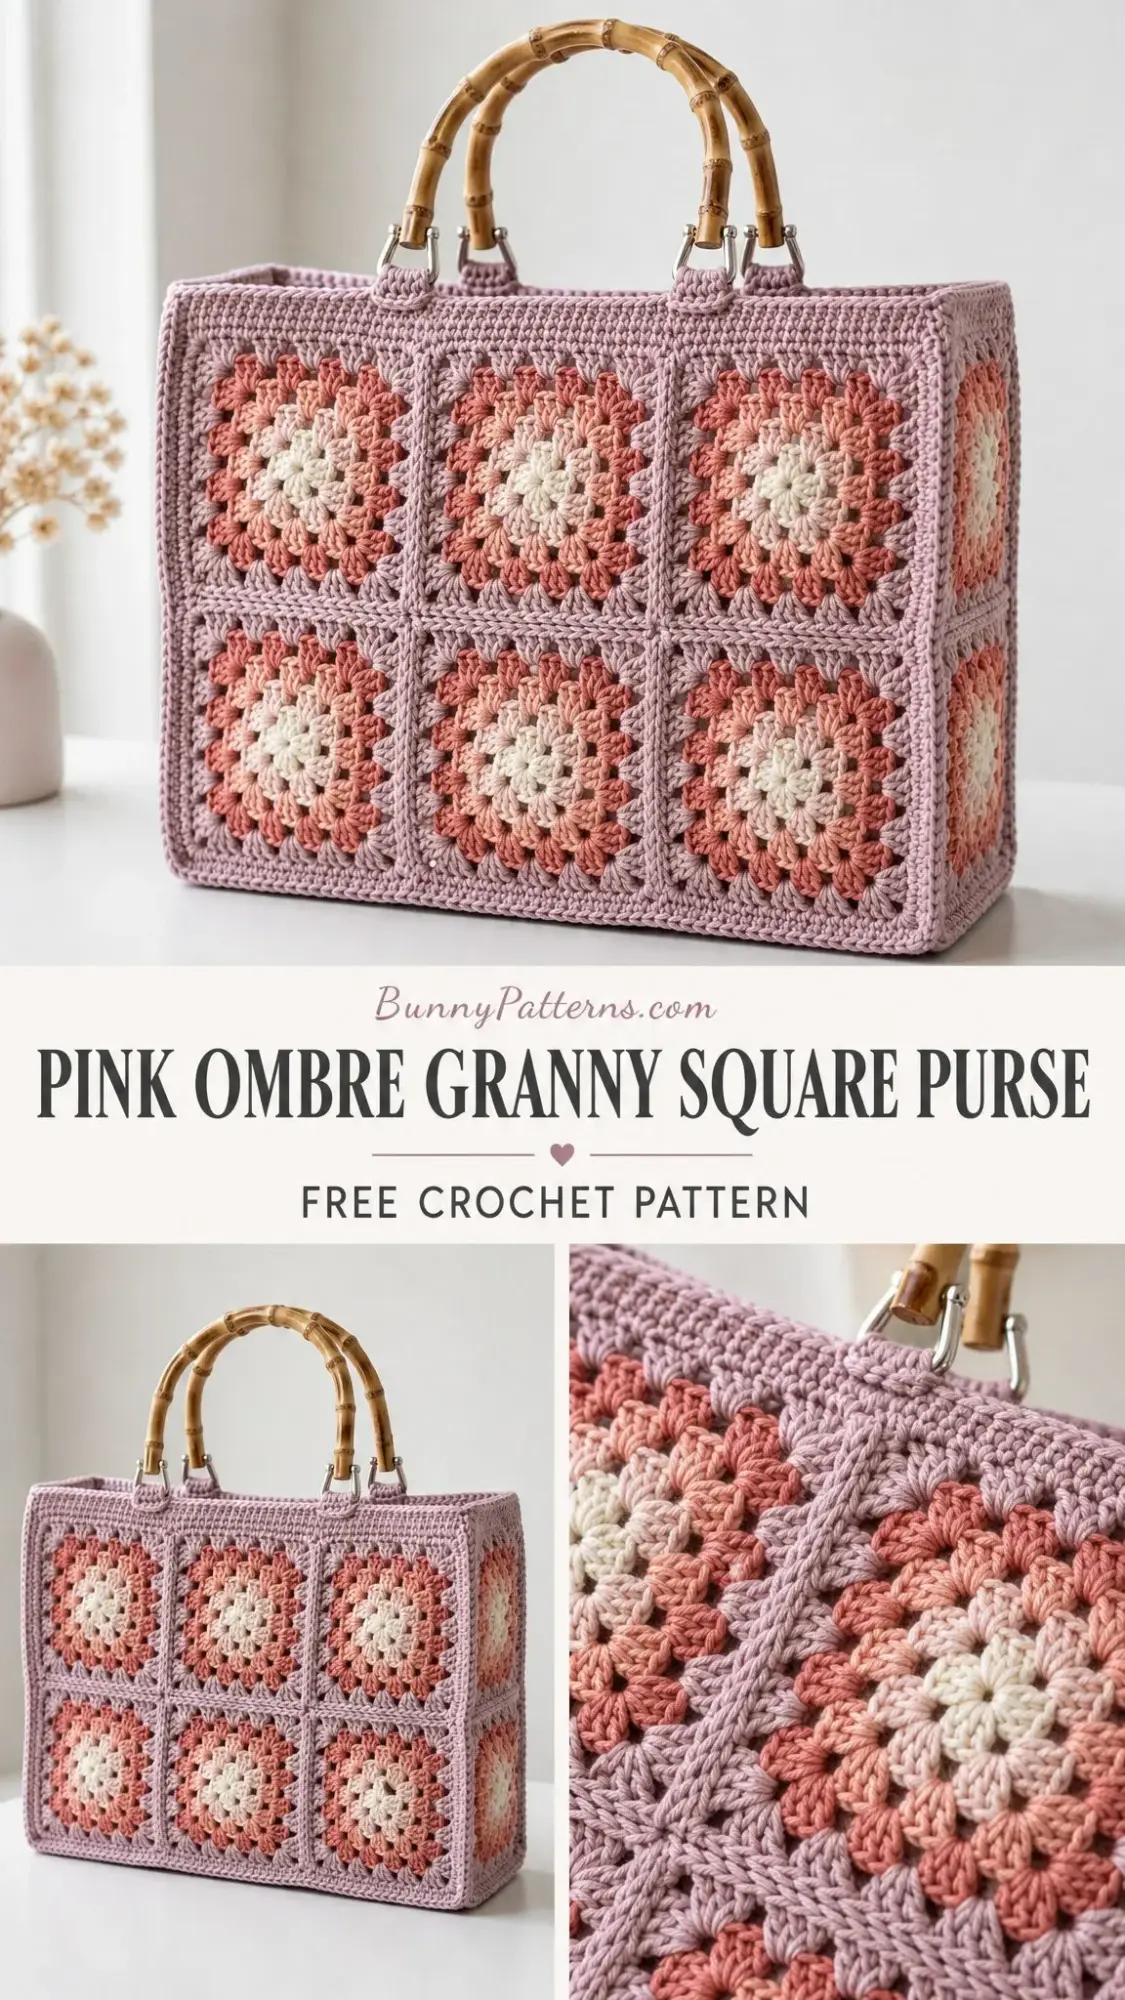
The warm ombre of rose, peach, and cream framed in dusty mauve creates such a beautiful gradient effect. Those curved bamboo handles add the perfect finishing touch. I am SO pleased with how this one turned out, and I think you are going to love making it too.
Whether you are new to bag construction or just want a relaxing project to work on while watching your favorite show, this granny square purse hits all the right notes. Work the squares while you relax, block them lightly, then spend one happy afternoon joining everything into shape.
About This Granny Square Purse Pattern
This structured little box tote is worked in cheerful granny squares using aran or worsted weight cotton yarn. The construction is straightforward: you will make 19 individual granny squares, join them into panels, then assemble those panels into a box shape. The whole project takes about 10 to 14 hours from start to finish.
Skill Level: Easy / Advanced Beginner
Finished Size: 12 × 9.5 × 4 inches (30 × 24 × 10 cm), measured after light blocking and excluding the bamboo handles. Each square finishes at about 4 inches (10 cm). The body is 3 squares wide by 2 squares tall, with a one square depth.
This pattern is perfect if you have made granny squares before but have never assembled them into a three dimensional project. The joining method is simple, and the box construction makes sense once you see how the panels come together.
Materials You Will Need
Yarn: Aran or worsted weight cotton in four shades
Hook: 4.0 mm (US G/6) crochet hook
Notions:
Yarn Suggestions:
Cotton yarn is ideal for this project because it holds its shape beautifully and gives the finished tote those crisp, structured walls.
Gauge
One completed 4 round granny square measures 4 inches (10 cm) square after light blocking.
If your square is larger, drop to a 3.5 mm hook. If smaller, go up to 4.5 mm. Matching the square size keeps the finished bag in proportion, so taking a few minutes to check your gauge is worth it.
Abbreviations and Special Stitches
This pattern uses US crochet terms. UK crocheters should note that US single crochet (sc) equals UK double crochet (dc), and US double crochet (dc) equals UK treble crochet (tr).
Special Stitches:
Pattern Notes Before You Begin
The beginning ch 3 of each round counts as the first dc. Each square uses four colors in the same order: Cream center, then Peach, Rose, and a Mauve frame. You will make 19 squares total: 6 for the front, 6 for the back, 2 per side (×2), and 3 for the base.
Here is a tip that will save you time later: weave in your ends as you go. It saves a long finishing session at the end of the project.
Please keep in mind that individual results may vary depending on your yarn, tension, hook size, and finishing technique. You may need to make small adjustments to achieve the closest possible result to the finished project shown.
The Granny Square Pattern
Make 19 of these squares. Each square is four rounds, with one color per round. Join with a slip stitch to the top of the beginning ch 3 unless noted. Fasten off at the end of each round and join the next color in any corner space.
Color Order: Cream center → Peach → Rose → Mauve frame
Round 1 (Cream)
Make a magic ring. Ch 3 (counts as dc), 2 dc in ring, ch 2, [3 dc in ring, ch 2] 3 times; join to top of beg ch 3. Fasten off. (12 dc, 4 corner spaces)
The magic ring, sometimes called a magic loop, lets you pull the center hole closed tightly. If you prefer, you can chain 4 and slip stitch to form a ring instead.
Round 2 (Peach)
Join in any corner sp. Ch 3, (2 dc, ch 2, 3 dc) in same sp, [ch 1, (3 dc, ch 2, 3 dc) in next corner sp] 3 times, ch 1; join. Fasten off. (24 dc)
Round 3 (Rose)
Join in any corner sp. Ch 3, (2 dc, ch 2, 3 dc) in same sp, ch 1, 3 dc in next ch-1 sp, ch 1, (3 dc, ch 2, 3 dc) in next corner sp; rep from twice more, ch 1, 3 dc in next ch-1 sp, ch 1; join. Fasten off. (36 dc)
Round 4 (Mauve Frame)
Join in any corner sp. Ch 3, (2 dc, ch 2, 3 dc) in same sp, (ch 1, 3 dc in next ch-1 sp) twice, ch 1, (3 dc, ch 2, 3 dc) in next corner sp; rep from twice more, (ch 1, 3 dc in next ch-1 sp) twice, ch 1; join. Fasten off. (48 dc, 16 clusters)
This mauve round is what gives the bag its tidy framed look once the squares are joined. Every square ends with the same four cluster sides and clean ch 2 corners, so they line up neatly during assembly.
Blocking the Squares
Lightly steam or wet block all 19 squares to a true 4 inch (10 cm) square. Cotton holds its shape beautifully, and even, squared up edges make joining far easier. This step gives the finished tote its crisp, structured walls.
Do not skip blocking. It makes such a difference in how professional your finished bag looks.
Building the Panels
Group your 19 squares into five panels before joining the bag. Lay them out with the cream centers facing up and the ombre running the same direction across each panel.
Panel Layout:
Joining Method
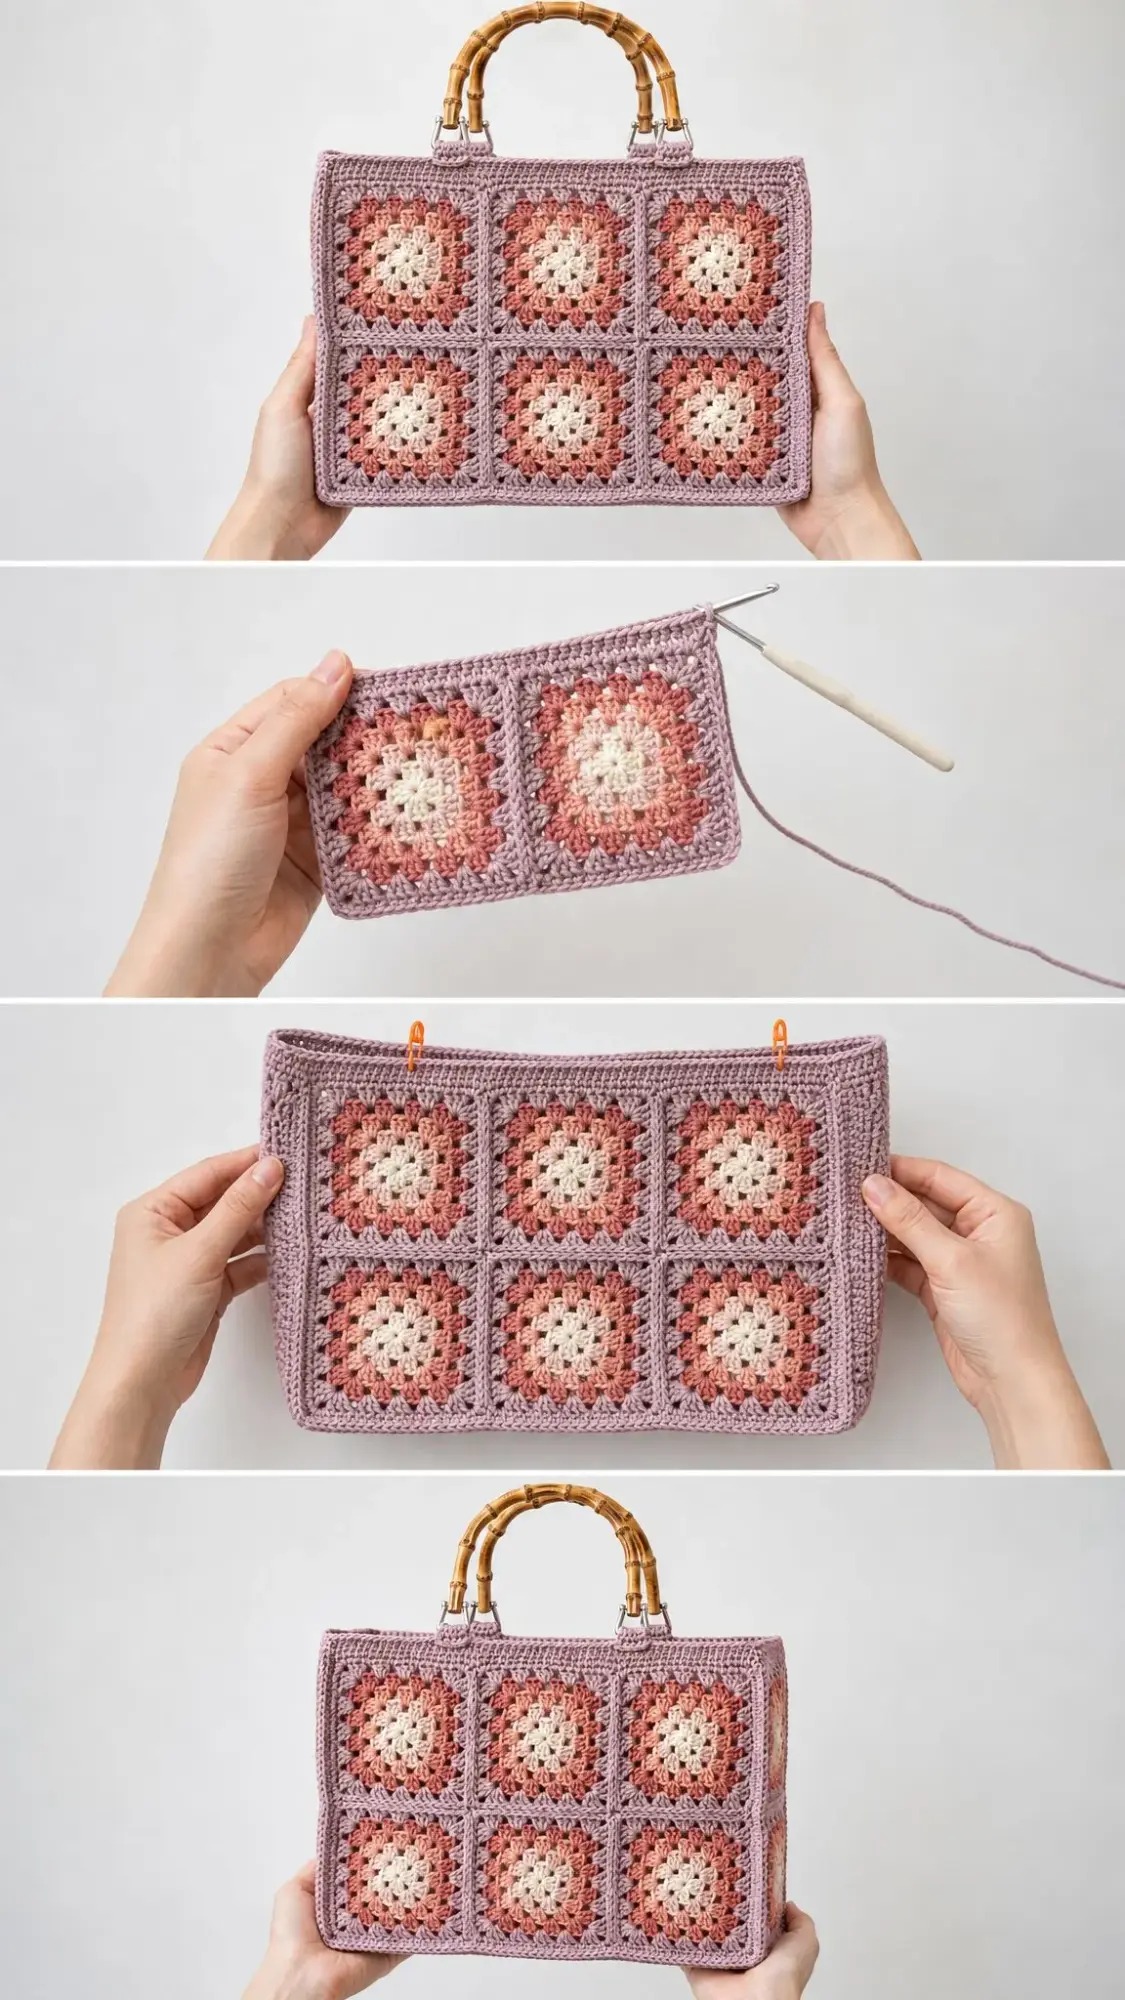
With Mauve and the tapestry needle, join squares using a whip stitch through the back loops only, working into each stitch along the touching edges. This keeps a soft ridge on the inside and an almost invisible seam on the right side.
Step 1: Hold two squares right sides together. Anchor your yarn in the corner, then whip stitch loop to loop across the edge. You will work about 16 stitches per edge.
Step 2: Join squares into rows first, then join the rows together to complete each full panel.
Step 3: Press each finished panel flat and weave in the join tails.
Important tip: Keep your join tension relaxed. Pulling the whip stitches too tight will pucker the seams and round off the box corners you are aiming for.
Assembly and Box Shape
Now bring the five panels together into the structured box tote. Work with Mauve and the same back loop whip stitch throughout.
Step 1: Start with the base (3 square row) flat. Join the lower long edge of the front panel to one long edge of the base. This covers 3 square edges.
Step 2: Join the lower long edge of the back panel to the opposite long edge of the base. Again, 3 square edges.
Step 3: Join the bottom edge of each side panel to the short ends of the base. This is 1 square edge on each side.
Step 4: Stand the panels up and join the side panels to the front and back along the four vertical seams, closing the box. Each vertical seam covers 2 square edges.
As you close the final vertical seams, gently coax each corner into a right angle. Cotton blocks square and will hold the shape once the top border is added. Take your time here, and the crisp corners will make your bag look professionally made.
Top Border and Handles
Top Border
Three firm rounds give the opening a clean, self supporting rim that frames the granny squares and keeps the bag mouth open.
Round 1 (Mauve): Join at any top corner. Sc evenly around the entire opening, working about 12 sc per square edge and 1 sc in each corner; join with sl st. (approximately 96 sc)
Round 2: Ch 1, sc in each st around; join. (96 sc)
Round 3: Ch 1, sc in each st around; join. Fasten off. (96 sc)
Handle Loops
Make 4 loops to carry the bamboo handles. Place two on the front rim and two on the back, spaced to match your handle width.
Step 1: With Mauve, join to the rim. Ch 10, skip about 2 inches (5 cm) along the rim, sl st down. Turn and work 14 sc back along the chain; fasten off and secure. (14 sc per loop)
Step 2: Thread each loop through a swivel clasp before closing, then clip the clasps onto the bamboo handles. If your handles have fixed rings, fold each loop over the ring and stitch the end down securely.
Step 3: Check that both handles sit level, then reinforce each loop base with a few extra stitches.
Finishing Your Purse
Weave in all remaining ends on the inside and trim closely. Give the assembled bag a final light steam, shaping the corners square.
Optional: Add a fabric lining or a stiff base insert for extra structure and to carry heavier items. A piece of plastic canvas cut to fit the base works wonderfully for added stability.
Care Instructions
Making It Your Size
One of the wonderful things about granny square construction is how easy it is to customize the size.
Bigger tote: Add a column of squares to the front, back and base (for example, 4 wide) for a roomier bag.
Taller bag: Add a third row of squares to the front, back and side panels.
Deeper bag: Widen the side and base panels to 2 squares for extra depth.
Mini version: Drop to a 3.0 mm hook and sport weight cotton for a smaller square and a dainty pouch.
A note on yarn: Swapping yarn weight changes the square size and the yardage needed. Make one square first, measure it, and scale the finished dimensions from there.
Helpful Tips for Success
For joining: Take your time with the whip stitch joins. Consistent, relaxed tension creates the cleanest seams and sharpest corners.
For color placement: Lay out all your squares before joining to make sure the ombre flows in the same direction across the entire bag. A quick photo on your phone helps you remember the layout.
For the handles: Measure twice before attaching your loops. Symmetrical handle placement makes a big difference in how the finished bag hangs.
For structure: Cotton yarn is key to this design. Acrylic will create a softer bag that may not hold the box shape as crisply.
Why This Granny Square Purse Works
This crochet pattern succeeds because it takes a familiar technique, the classic granny square, and transforms it into something practical and modern. The box construction gives you sharp lines and real structure. The ombre color scheme creates visual interest without complicated colorwork. And those bamboo handles elevate the whole piece.
If you have been wanting to try making a crocheted bag but felt intimidated by more complex patterns, this is your project. The granny squares work up quickly, the joining is straightforward, and the finished result looks far more impressive than the skill level required to make it.
I hope you absolutely love making this pink ombre granny square purse. It is such a satisfying project, and the finished bag gets compliments everywhere it goes. If you make one, I would love to see your color combinations. Tag me on Instagram or share a photo in our Facebook group.
Save this granny square purse pattern to your Pinterest boards so you can find it when you are ready to start. And please leave a comment below if you make one. I love hearing which colors you chose and seeing your finished projects.
You Might Also Like
- Pink Strawberry Couple Amigurumi Free Crochet Pattern
- Coral Sunset Granny Square Tote Free Crochet Pattern
- Coral Sunset Ruffled Baby Romper Free Crochet Pattern
- Lavender Dream Ankle Socks Free Crochet Pattern