
I don’t know about you, but I have a soft spot for heirloom pieces that look like they took months to create. The kind that make guests pause and ask, "Did you make that?" This pink rose garden table topper delivers exactly that reaction.
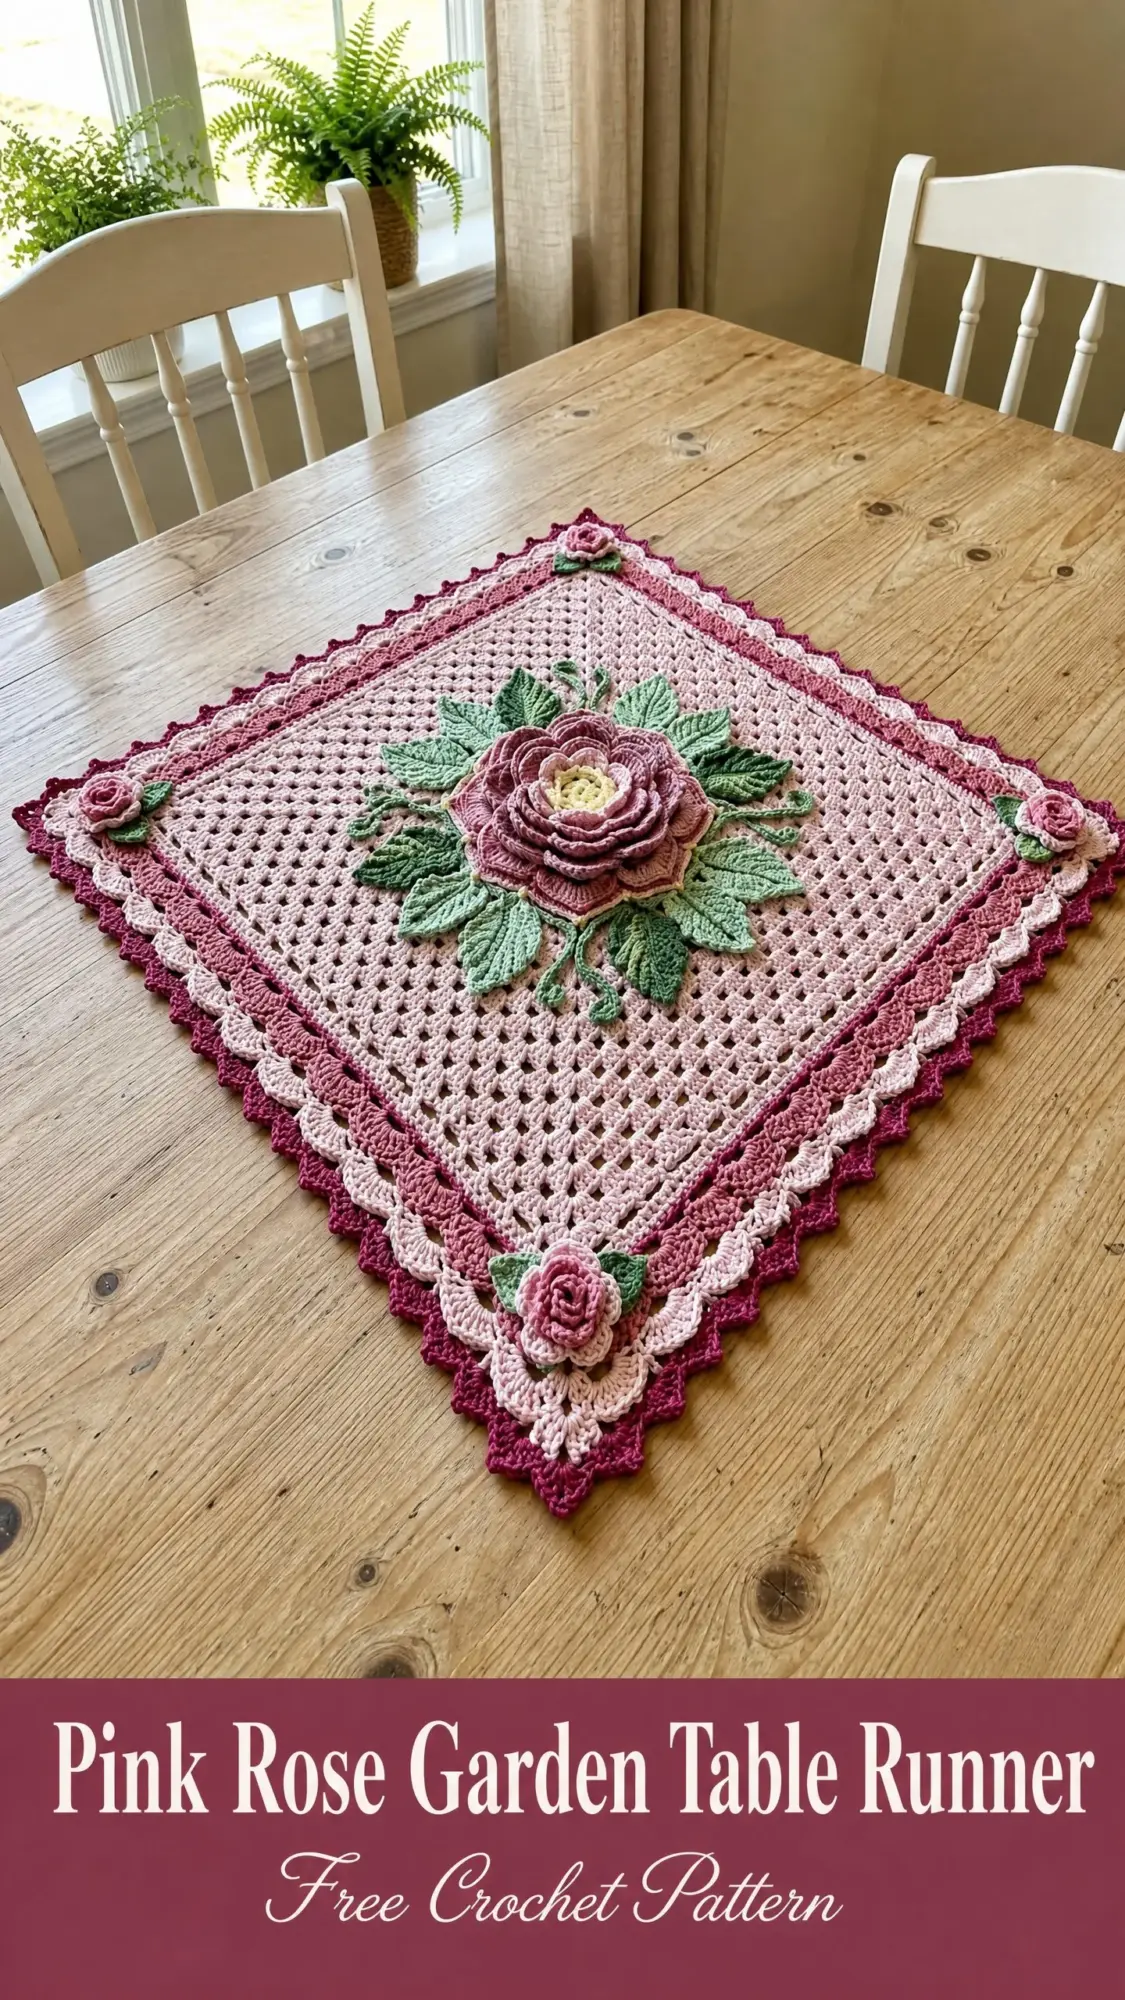
Here’s the thing though. It’s not nearly as complicated as it looks. Yes, there are three-dimensional roses. Yes, there are multiple border rounds and delicate leaves. But when you break it down, this is a classic granny square at its heart with some beautiful embellishments sewn on at the end.
The finished piece sits on your table like a diamond, with sculptural roses at the center and each corner point. It’s romantic, it’s vintage, and it’s absolutely stunning as a centerpiece or a thoughtful handmade gift. Let me walk you through every single step.
About This Crochet Table Topper Pattern
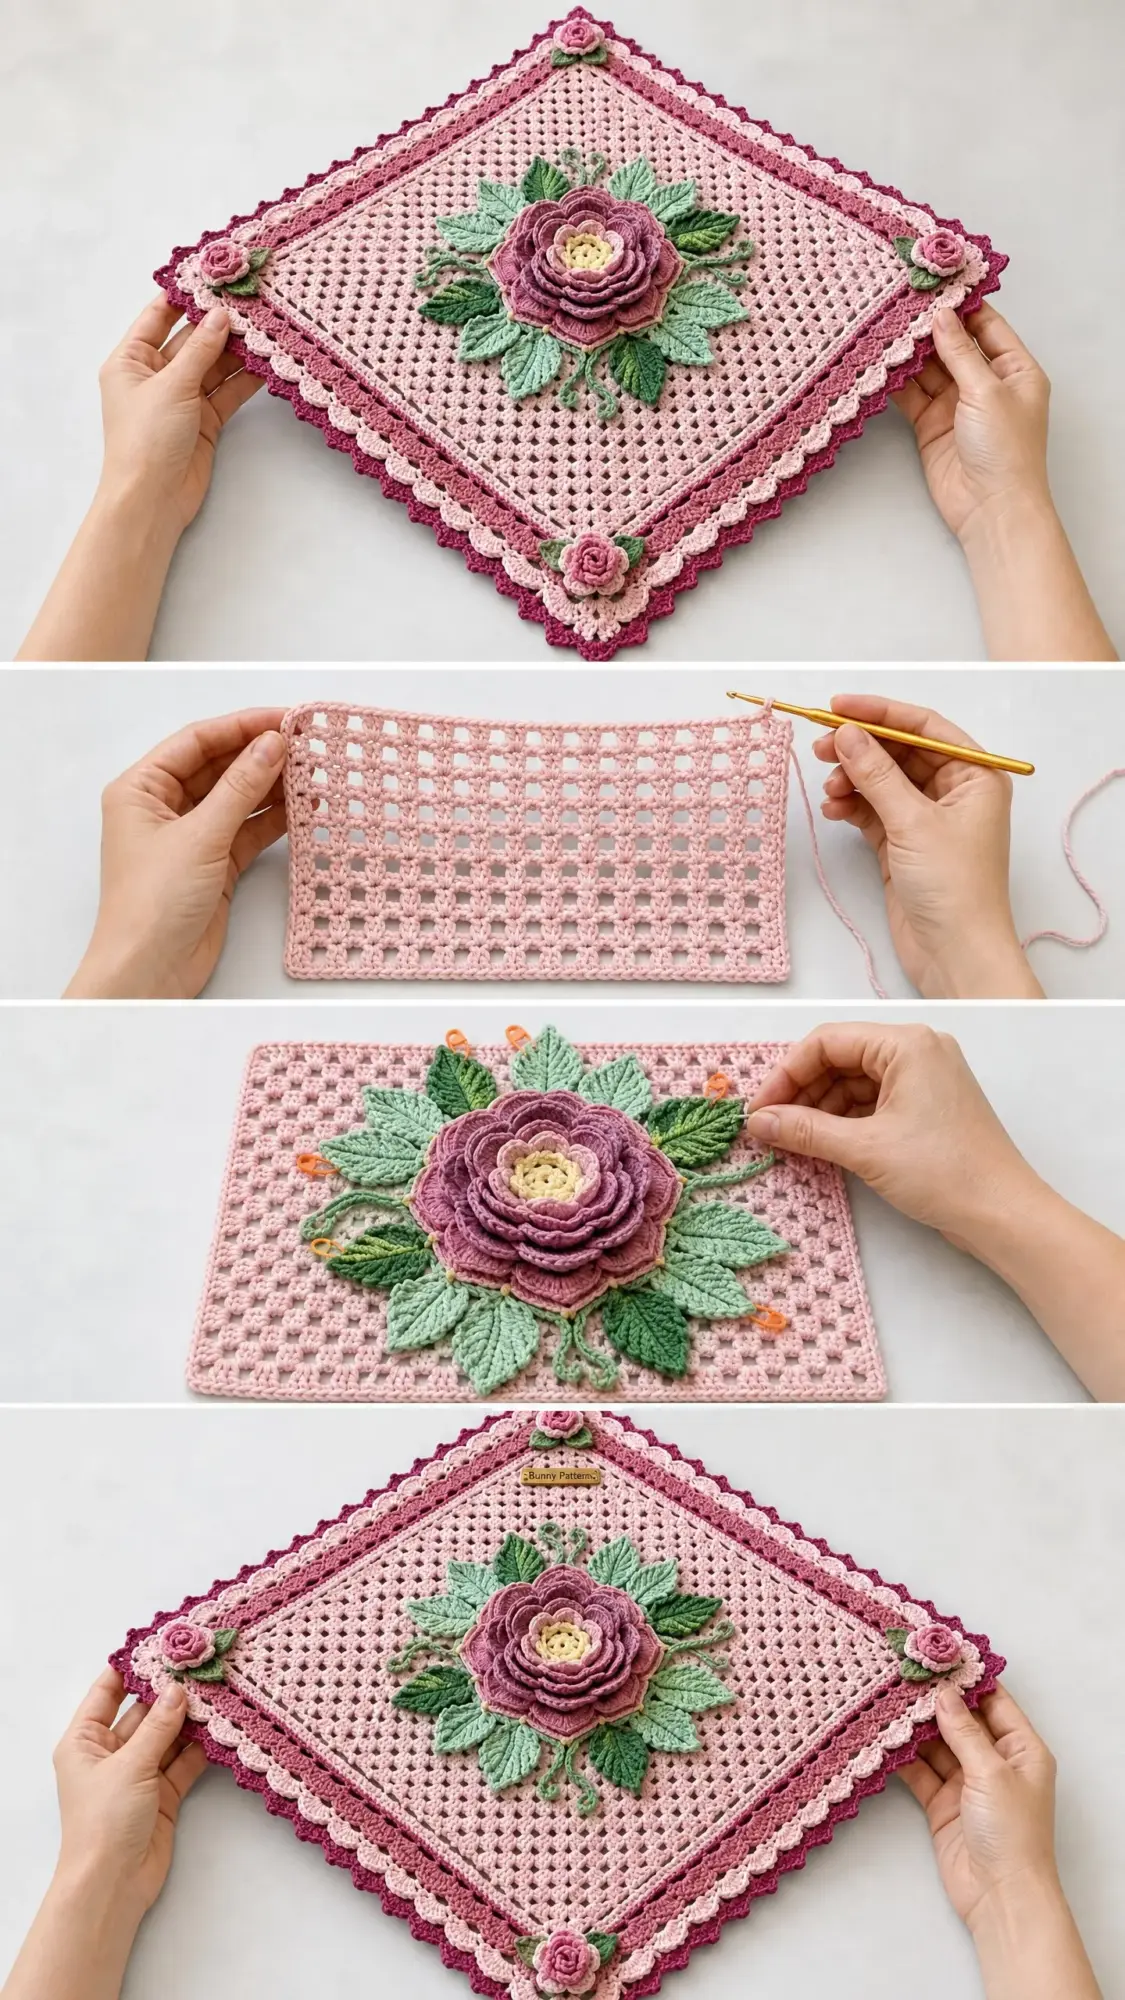
This table topper combines traditional granny square construction with modern three-dimensional appliqué work. The base is an open lacework mesh in soft blush pink, surrounded by borders in dusty rose and deep magenta. The star of the show is the large layered rose at the center, complete with radiating green leaves and four smaller corner roses.
Finished Measurements: Approximately 20 inches by 20 inches (51 cm by 51 cm) after blocking, measured point to point when displayed on the diagonal. The corner-to-corner measurement of the square itself is approximately 28 inches (71 cm).
Skill Level: Advanced Intermediate. If you’re comfortable with basic granny squares and willing to try sculptural crochet, you can absolutely do this. The roses require patience, but I’ll explain every layer.
Time Estimate: Approximately 18 to 24 hours total. The base and borders take about 8 to 10 hours. The large rose takes 3 to 4 hours. Each small rose is about 45 minutes. Leaves and assembly add another few hours.
Materials You’ll Need
Yarn (Worsted Weight):
Hook: US Size G-6 (4.0 mm)
Notions:
Yarn Suggestions: Lion Brand Vanna’s Choice works beautifully for this project. Try Fisherman for Color A, Pink for Color B, Magenta for Color C, Dusty Green for Color D, and Linen for Color E. Any smooth worsted weight yarn that achieves gauge will work. Avoid textured or variegated yarns since the open mesh and sculptural flowers need clear stitch definition.
Gauge
One granny square motif (Rounds 1 through 4) measures approximately 4 inches by 4 inches (10 cm by 10 cm).
In standard double crochet (dc) worked flat: 14 dc and 8 rows = 4 inches (10 cm).
Gauge matters here for achieving the stated finished dimensions. If your swatch is smaller, go up a hook size. If larger, go down.
Abbreviations and Special Stitches
Let me define everything you’ll encounter in this pattern:
Special Stitches Explained
Granny Cluster (GC): Work 3 dc into the same chain space or stitch. This group of 3 dc counts as one granny cluster throughout.
Corner Granny Shell: Work (GC, ch 2, GC) into the same corner chain-2 space. This creates the characteristic double-cluster corner.
Picot: Chain 3, then sl st into the first chain made. This creates a small decorative loop.
Shell Stitch: Work 5 dc into the same stitch or space.
Puff Stitch (for roses): (Yo, insert hook into stitch, yo, pull up loop to 1/2 inch height) 3 times into the same stitch. Yo, draw through all 7 loops on hook. Ch 1 to close.
Bobble (for rose center): (Yo, insert hook, pull up loop, yo draw through 2 loops) 5 times into the same stitch. Yo, draw through all 6 loops on hook.
Pattern Notes Before You Begin
1. The base is a large granny square worked outward from a central magic ring. All rounds are joined with a slip stitch.
2. Color changes happen at the JOIN of a round. Drop the current color before the joining slip stitch, pick up the new color, complete the join.
3. The table topper displays as a diamond (rotated 45 degrees). The four corners become the four visible points.
4. All three-dimensional elements (roses, leaves) are worked separately and sewn on AFTER blocking the base.
5. The ch-3 that begins a round counts as the first dc of the first granny cluster.
6. Right side faces up throughout all rounds. Do not turn.
Base Granny Square Instructions
Round 1 (Color A):
Make a MR. Ch 3 (counts as first dc), work 2 dc into MR, ch 2. (Work 3 dc into MR, ch 2) 3 times. Join with sl st to top of beg ch-3. Pull MR snug. (4 GC, 4 ch-2 corner sps)
Round 2 (Color A):
Sl st into the ch-2 corner sp. Ch 3, work 2 dc into same sp, ch 2, work 3 dc into same sp (first corner shell complete). Ch 1. Work (3 dc, ch 2, 3 dc) into each of the next 3 corner ch-2 sps, ch 1 between each corner shell. Join with sl st to top of beg ch-3. (4 corner shells, 0 side GC; 4 ch-1 side sps)
Round 3 (Color A):
Sl st into corner ch-2 sp. Ch 3, 2 dc into same sp, ch 2, 3 dc into same sp (corner shell). Ch 1. Work 3 dc into the ch-1 side sp (side GC). Ch 1. Work corner shell into next corner ch-2 sp. Repeat (ch 1, 3 dc into side sp, ch 1, corner shell) around. Join. (1 GC per side, 4 corner shells; total 8 GC)
Round 4 (Color A):
Sl st into corner ch-2 sp. Ch 3, 2 dc into same sp, ch 2, 3 dc into same sp. (Ch 1, 3 dc into next ch-1 sp) twice. Ch 1. Corner shell. Repeat around. Join. (2 GC per side, 4 corner shells; total 12 GC)
Round 5 (Color A):
Sl st into corner ch-2 sp. Corner shell. (Ch 1, 3 dc into next ch-1 sp) 3 times. Ch 1. Corner shell. Repeat around. Join. (3 GC per side, 4 corner shells; total 16 GC)
Round 6 (Color A):
Corner shell into corner sp. (Ch 1, GC into next sp) 4 times. Ch 1. Corner shell. Repeat around. Join. (4 GC per side, 4 corner shells; total 20 GC)
Round 7 (Color A):
Corner shell. (Ch 1, GC into next sp) 5 times. Ch 1. Corner shell. Repeat around. Join. (5 GC per side, 4 corner shells; total 24 GC)
Round 8 (Color A):
Corner shell. (Ch 1, GC into next sp) 6 times. Ch 1. Corner shell. Repeat around. Join. (6 GC per side, 4 corner shells; total 28 GC)
Round 9 (Color A):
Corner shell. (Ch 1, GC into next sp) 7 times. Ch 1. Corner shell. Repeat around. Join. (7 GC per side, 4 corner shells; total 32 GC)
Round 10 (Color A):
Corner shell. (Ch 1, GC into next sp) 8 times. Ch 1. Corner shell. Repeat around. Join. (8 GC per side, 4 corner shells; total 36 GC)
Round 11 (Color A):
Corner shell. (Ch 1, GC into next sp) 9 times. Ch 1. Corner shell. Repeat around. Join. (9 GC per side, 4 corner shells; total 40 GC)
Round 12 (Color A):
Corner shell. (Ch 1, GC into next sp) 10 times. Ch 1. Corner shell. Repeat around. Join. (10 GC per side, 4 corner shells; total 44 GC)
Checkpoint: After Round 12, your granny square base should measure approximately 12 inches by 12 inches (30.5 cm by 30.5 cm).
Border Section 1: Solid HDC Frame (Color B)
This section fills in the granny mesh to create a solid pink inner frame.
Round 13 (Color B):
Join Color B with a sl st into any corner ch-2 sp. Ch 2 (counts as first hdc), work 2 hdc into same corner sp (3 hdc total in corner). Work 2 hdc into each ch-1 side sp across, and 1 hdc into the top of each dc across. At each corner ch-2 sp, work 3 hdc. Continue around all 4 sides. Join with sl st to top of beg ch-2. (176 hdc)
Round 14 (Color B):
Ch 2, hdc in each hdc around, working 3 hdc into each corner center hdc. Join. (184 hdc)
Round 15 (Color B):
Ch 2, hdc in each hdc around, working 3 hdc into each corner center hdc. Join. (192 hdc)
Checkpoint: The solid hdc frame should measure approximately 1.5 inches wide. Total square now measures approximately 15 inches by 15 inches.
Border Section 2: Inner Picot Trim (Color A)
Round 16 (Color A):
Join Color A with sl st into first hdc after a corner. Sc in each hdc around, working 3 sc into each corner center st. Join. (200 sc)
Round 17 (Color A):
Ch 1, sc in first sc. (Ch 3, sk 2 sc, sc in next sc) across each side. At corners, work (sc, ch 3, sc) into the corner center sc. Join. (approximately 68 ch-3 sps)
Round 18 (Color A):
Sl st into first ch-3 sp. Ch 1, (sc, picot, sc) into each ch-3 sp around. Join. Fasten off Color A. (68 picot points)
Border Section 3: Outer Shell Edging (Color C)
Round 19 (Color C):
Join Color C with sl st into the sc between any two picot groups at a side midpoint. Ch 3 (counts as dc). Along each side, work shell (5 dc) into every other picot sp, with 1 sc between shells. At each corner picot sp, work a large corner shell: (3 dc, ch 2, 3 dc). Continue around, maintaining symmetry. Join with sl st to top of beg ch-3. Fasten off Color C.
Round 20 (Color C):
Join Color C with sl st into the ch-2 sp at any corner shell. Ch 1, (sc, ch 2, sc) into corner ch-2 sp. Sc into each dc across to next corner, working (sc, ch 2, sc) into each corner ch-2 sp. Join. Fasten off Color C.
Checkpoint: The table topper base is now complete. It should measure approximately 18 to 19 inches across.
Large Center Rose
The rose uses Color B for outer petals, Color C for deep interior petals, and Color E for the center.
Foundation Ring:
With Color C, make a MR. Ch 1, work 12 sc into MR. Join with sl st to first sc. (12 sc)
Round 1 Petal Layer Setup (Color C):
Ch 1, work 2 sc into each sc around through front loops only. Join. (24 sc in front loops; 12 back loops remain)
First Petal Layer (Color C):
(Ch 1, 1 sc, 3 dc, 1 sc into next 5 sts, sl st into following st) 4 times. (4 small tight petals) Fasten off Color C.
Second Petal Layer (Color B):
Join Color B into any back loop of the foundation ring. Ch 1, 2 sc into each back loop around. (24 sc)
Work petals: (Ch 1, 1 sc, 1 hdc, 3 dc, 1 hdc, 1 sc, sl st) into next 8 sts. Repeat 3 times. (3 larger petals)
Third Petal Layer (Color B):
Behind the second layer, work into the space behind the petal round to create a new ring of 36 sc.
Petal repeat: (Ch 1, sc, hdc, dc, tr, dc, hdc, sc, sl st) into next 9 sts. Repeat 4 times. (4 large outer petals)
Rose Center (Color E):
With Color E, make MR. Ch 1, work 6 sc. Work (bobble, ch 1) into each sc around. (6 bobbles) Pull MR tight. Fasten off, leaving a 12-inch tail. Gather and shape the center into a raised dome. Sew onto the innermost ring.
The finished rose should measure approximately 4 to 4.5 inches in diameter.
Small Corner Roses (Make 4)
With Color B, make MR. Ch 1, work 9 sc into MR. Join. (9 sc)
Round 1 (front loops only):
Ch 1, 2 sc into each sc around through front loops only. Join. (18 sc)
First Petal Layer (Color B):
(Ch 1, sc, 3 dc, sc, sl st) into next 6 sts. Repeat 3 times. (3 petals)
Second Petal Layer (Color C):
Join Color C into any back loop of foundation. 2 sc into each back loop. (18 sc)
(Ch 1, sc, hdc, 2 dc, hdc, sc, sl st) into next 6 sts. Repeat 3 times. (3 larger outer petals)
Fasten off. Each small rose measures approximately 1.5 to 2 inches in diameter.
Leaves for Center Rose (Make 6)
With Color D, ch 14.
Row 1: Starting in 2nd ch from hook: sl st 1, sc 1, hdc 1, dc 3, hdc 1, sc 1, sl st 1. Working back along the opposite side of the foundation chain: sc 1, hdc 1, dc 3, hdc 1, sc 1, sl st 1. (28 sts total)
Sl st back up to the leaf tip, then sl st down the center to create a vein ridge. Fasten off leaving a 6-inch tail. Each leaf measures approximately 2 to 2.5 inches long.
Small Leaves for Corner Roses (Make 8)
With Color D, ch 9.
Starting in 2nd ch from hook: sl st 1, sc 1, hdc 1, dc 1, hdc 1, sc 1, sl st 1. Working back on the opposite side: sc 1, hdc 1, dc 1, hdc 1, sc 1, sl st 1.
Fasten off. Each small leaf measures approximately 1.5 inches long.
Blocking the Base
Before attaching any appliqués, wet block the granny square base.
Submerge the base in cool water for 10 to 15 minutes. Remove without wringing. Roll in a clean dry towel to remove excess water. Lay flat on a blocking mat. Pin each corner point and side midpoint to achieve a perfectly square shape. Both diagonal measurements should be equal. Allow to dry completely, 24 to 48 hours.
Do NOT block the three-dimensional roses and leaves. They need to stay puffy and sculptural.
Assembly and Finishing
Step 1: Lay the blocked, dry base flat, right side up.
Step 2: Arrange the 6 leaves radiating outward from the center at approximately 120-degree intervals. Place the large center rose on top, centered. Pin everything.
Step 3: Using Color D yarn, whipstitch each leaf flat against the mesh, stitching through chain spaces. Secure with knots on the wrong side.
Step 4: Using Color C, stitch around the perimeter of the outermost petal ring, tacking the rose to the base in 6 to 8 points. The center should sit raised, not flattened.
Step 5: At each corner point, position 1 small rose approximately 1 to 1.5 inches from the edge. Place 2 small leaves behind each corner rose, angled outward. Pin.
Step 6: Sew corner leaves and roses using the same technique.
Step 7: Weave in all remaining ends. Confirm the piece lies flat.
Care Instructions
Hand wash in cool water with gentle soap. Do not wring. Roll in a towel, press, and lay flat to dry away from direct heat. If using acrylic yarn, machine wash on gentle cold in a mesh bag and lay flat to dry. Do not machine dry or iron directly over the roses.
You Did It!
Thank you so much for choosing this pattern for your next project. I hope the process brings you as much joy as the finished piece will bring to your table. This table topper makes a gorgeous gift for weddings, housewarmings, or anyone who appreciates handmade beauty.
If you make this pink rose garden table topper, I would absolutely love to see your finished creation. Tag me on Instagram or share a photo in my Facebook group. Nothing makes my day quite like seeing your work.
Save this pattern to your Pinterest boards so you can find it when you’re ready to start. And if you have any questions or want to share your progress, drop a comment below. Happy crocheting!
You Might Also Like
- Sage Green Boho Crochet Backpack Free Pattern
- Berry Purple Magenta Crochet Platform Wedge Sandals Pattern
- Coral Reef Charm Bracelet Free Crochet Pattern
- Ocean Blue Coastal Granny Square Backpack Crochet Pattern