
This project is SUPER QUICK to become your new favorite summer accessory! If you’ve been looking for a head-turning crochet piece that’s equal parts stylish and functional, this sage daisy visor cap delivers on every level.
Get the Ad-Free PDF Pattern
Scroll down for the full pattern, or get the ad-free printable PDF from the shop.
Get the Printable PDF →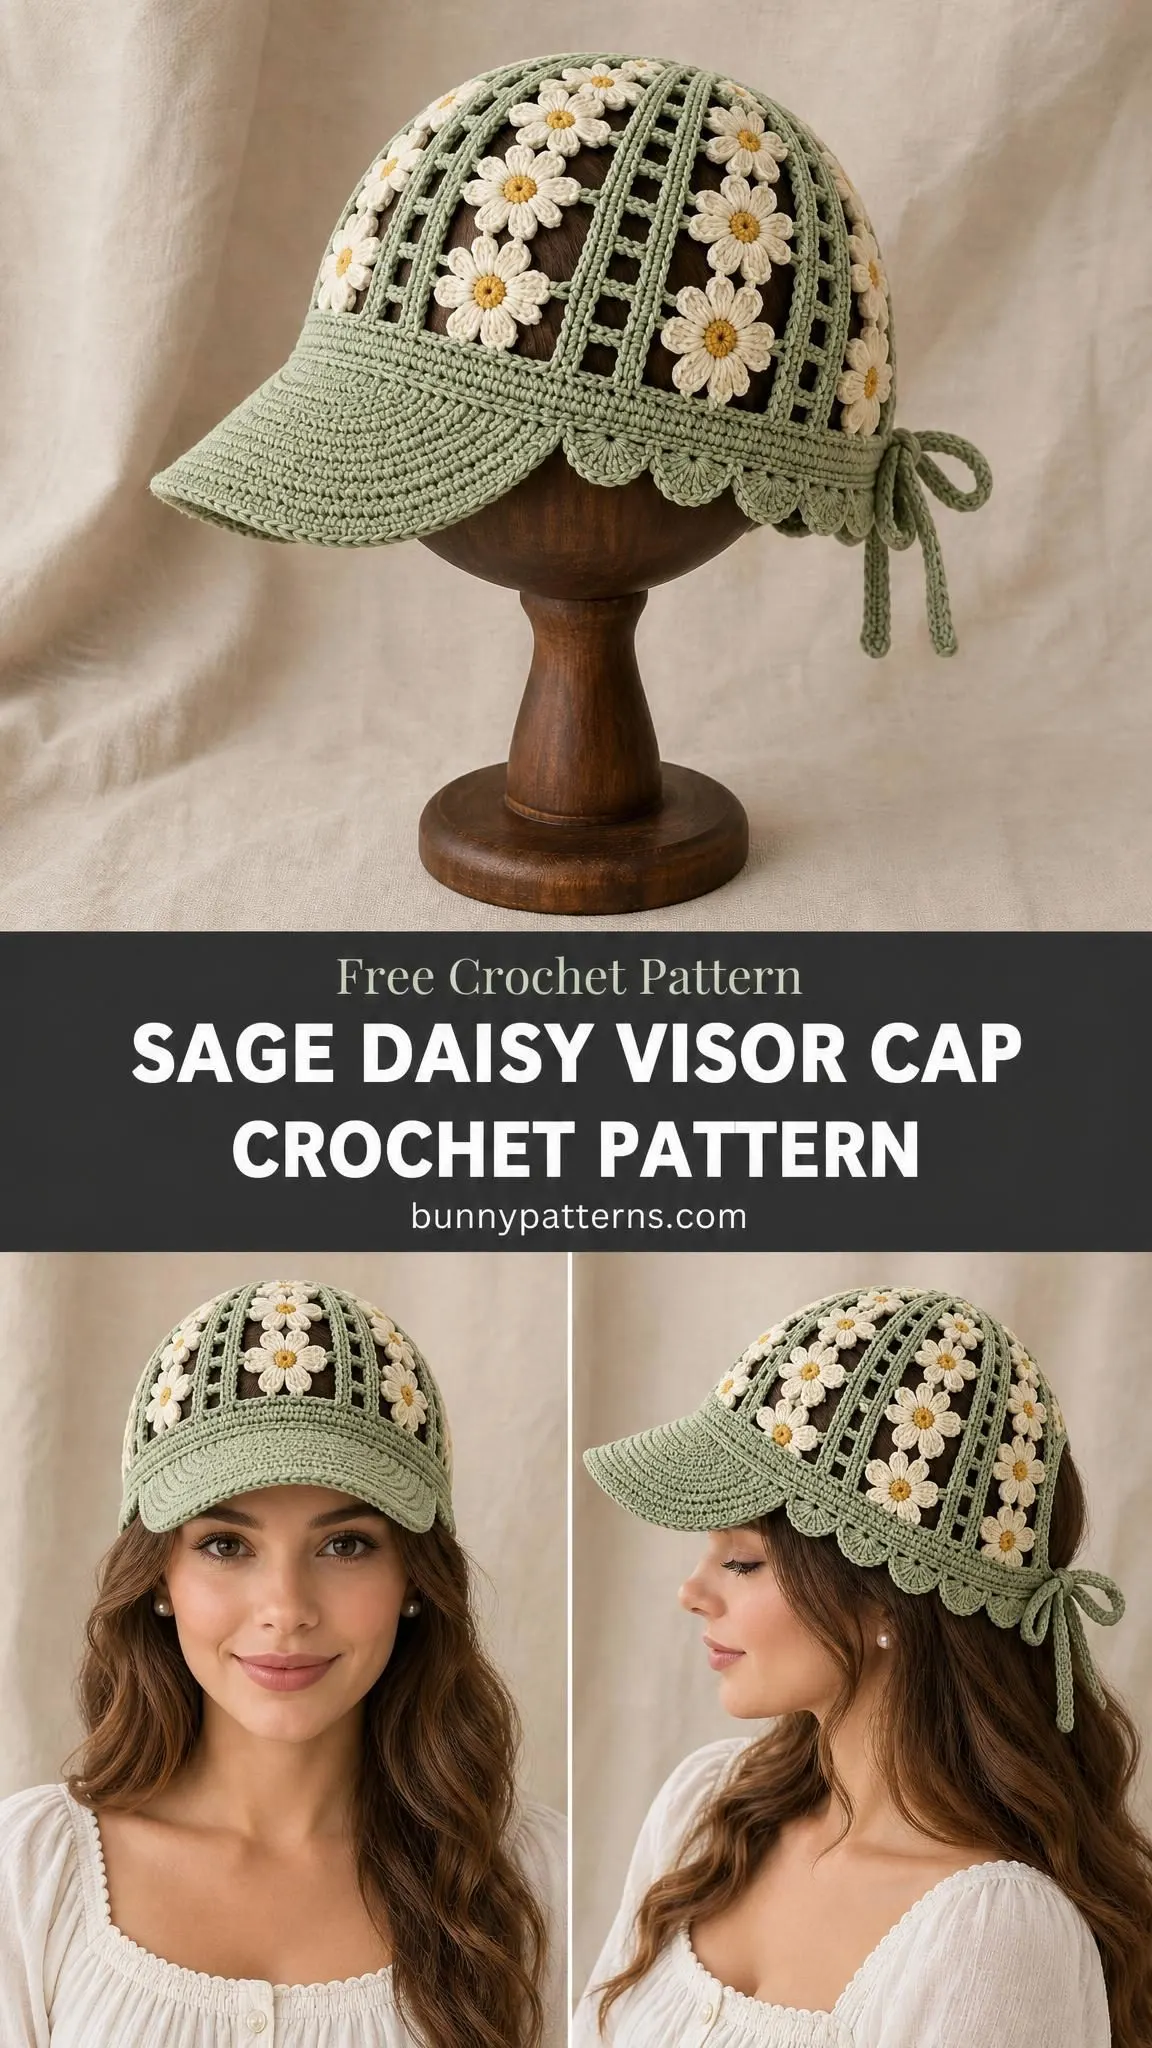
The open ladder mesh crown keeps you cool while the sturdy double-layer visor actually shades your face. And those sweet little ivory daisies with butter-yellow centers? They transform a simple cap into something genuinely special. This is the kind of project that looks impressive but comes together faster than you’d expect.
Whether you’re making it for yourself or as a gift for someone who appreciates handmade accessories, this ponytail-friendly design works beautifully for beach days, gardening, farmer’s markets, or just running errands in style.
Why You’ll Love This Visor Cap Pattern
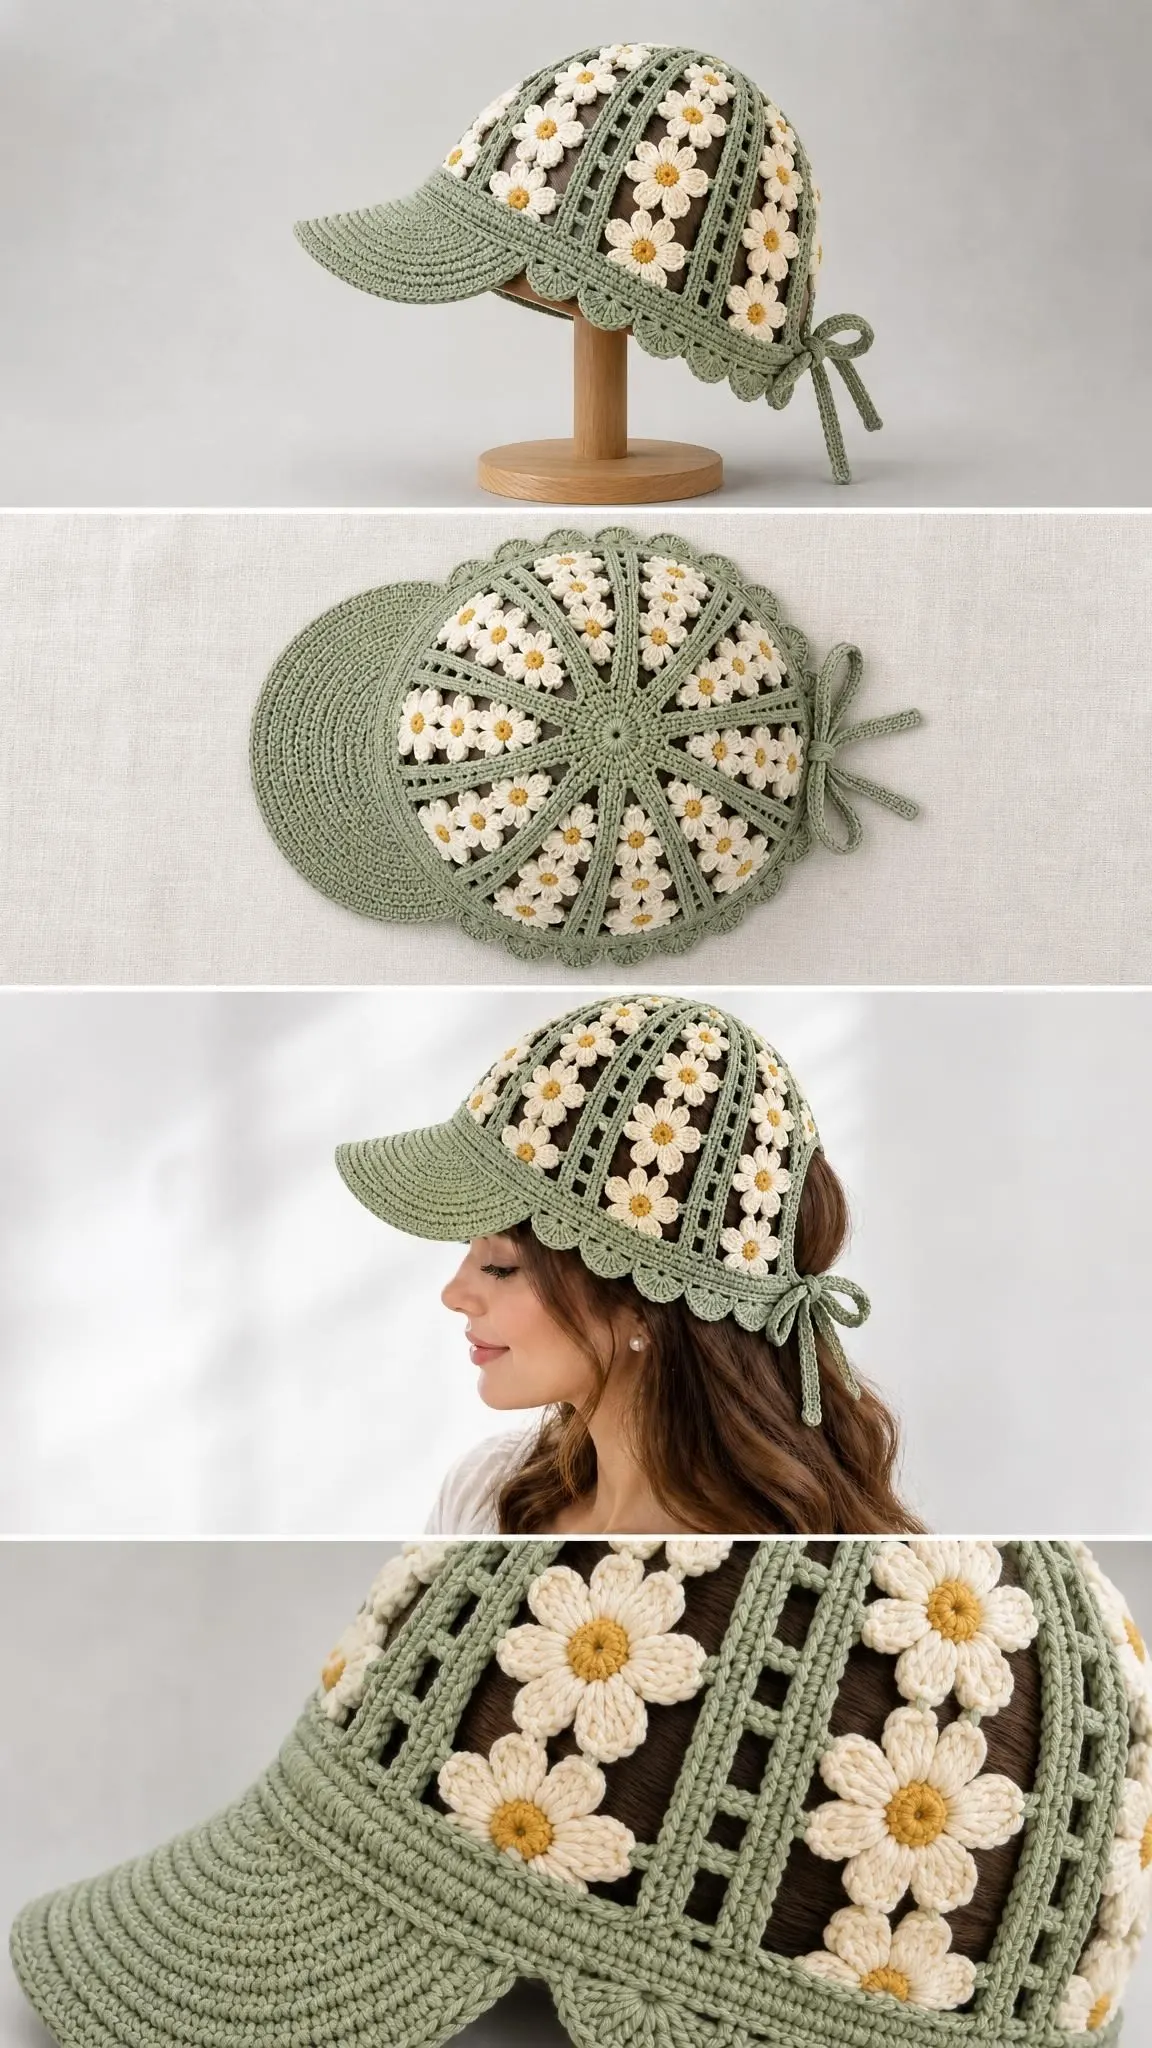
This fitted adult visor cap fits head sizes 54 to 57 cm comfortably. It sits about 18 cm deep with a generous 20 x 6 cm visor that provides real sun coverage. The rear opening accommodates ponytails, buns, or simply allows airflow on warm days.
The construction is clever but not complicated. You’ll work the crown from the top down in joined rounds, then switch to flat rows to create the rear opening. The visor is made separately as two matching layers, giving it structure and durability. Finally, you’ll add the scalloped edging, ties, and those charming five-petal daisies.
The airy ladder mesh pattern creates a beautiful grid effect that shows off the flowers perfectly. Each daisy sits in its own little window, making them pop against the sage green background.
Materials and Tools You’ll Need
Gather these supplies before you begin:
Yarn:
- Smooth fingering weight cotton, approximately 200 m per 50 g
- Main color (sage green): 100 g / 400 m
- Contrast colors: 15 g / 60 m each for ivory daisies and butter-yellow centers
Hooks:
- 2.5 mm hook for the crown
- 2.25 mm hook for the visor and trim
Notions:
- Tapestry needle
- 8 stitch markers
- Scissors
- Tape measure
- Optional: washable flexible visor insert, cut 3 mm smaller than the crocheted layers
The estimated yarn quantities include fabric for the appliqués and the double-layer visor. If you’re making a pearl version, you’ll also need 6 to 10 sew-on 8 mm imitation pearls and strong sewing thread.
Gauge
Getting gauge right matters here since the cap needs to fit properly.
Crown gauge: 22 stitch positions (11 small mesh cells) x 12 rows = 10 cm
Dense visor gauge: 22 single crochet (sc) x 24 rows = 10 cm
The 120-position crown circumference measures approximately 54.5 cm.
Make a swatch at least 15 x 15 cm. Wash and dry it the same way you’ll care for the finished piece, then measure the central 10 cm without stretching. Change your hook size if needed to match gauge. Cotton lace can lengthen while worn, so all dimensions listed are blocked targets.
Abbreviations and Special Stitches
This pattern uses US crochet terminology throughout.
- ch = chain
- st(s) = stitch(es)
- sp = space
- sl st = slip stitch (insert hook, yarn over, pull through both loops on hook)
- sc = single crochet (insert hook, yarn over, pull up a loop, yarn over, pull through both loops)
- hdc = half double crochet
- dc = double crochet (yarn over, insert hook, yarn over, pull up a loop, [yarn over, pull through 2 loops] twice)
- tr = treble crochet
- BLO = back loop only
- RS/WS = right side / wrong side
- rep = repeat
- inc = increase
- sc2tog = single crochet 2 stitches together (a decrease)
Small Mesh (Flat)
Chain 3 (counts as first dc), then work [ch 1, skip next ch-1 space, dc in next dc] to end. Work the dc into the post stitch, not the gap. A mesh cell is one ch-1 space bounded by dc posts. For flat work with C cells, you’ll have C+1 dc posts and C chains, giving you total positions of 2C+1.
Shell Trim
On a prepared sc edge with a multiple of 6 stitches: [skip 2 sc, 5 dc in next sc, skip 2 sc, sl st in next sc].
Picot Trim
Work [sc in next 3 sts, ch 3, sl st into third ch from hook].
Pattern Notes
- Turning ch 3 counts as a dc
- Ch 1 does NOT count as a sc
- Join rounds with sl st unless stated otherwise
- Flat rows turn after each row
- Joined dress rounds do not turn
- Brackets [ ] enclose a repeat
- Do not count joining sl sts
- Sew with RS together unless directed otherwise
- Work main fabric in sage green
- Use contrast colors for named trims and appliqués
This pattern provides one adult sample size only. Check the measurements before committing your yarn. Altering stitch counts requires recalculating motif placement and shaping.
Construction Overview
Here’s what you’ll be doing:
- Increase a circular lace top to 60 mesh cells (120 stitch positions)
- Work four closed mesh rounds
- Work five open rows, leaving a rear notch
- Add the front visor
- Finish edges and attach motifs and ties
Target dimensions:
- Head: 54-57 cm
- Crown depth: about 18 cm
- Rear opening: about 6 x 5 cm
- Visor: 20 x 6 cm
Step-by-Step Instructions
Crown Lace Disc
Round 1: Into an adjustable ring, ch 3 (first dc), 11 dc; join. 12 dc.
Round 2: Ch 3, ch 1; [dc in next dc, ch 1] 11 times; join. 12 dc + 12 ch-1 spaces; 12 cells.
Round 3: Sl st into first ch-1 space. Work [(dc, ch 1, dc, ch 1) in next space, (dc, ch 1) in each of next 1 spaces] 6 times; replace first dc with ch 3 and join. 18 dc + 18 ch-1 spaces; 18 cells.
Round 4: Sl st into first ch-1 space. Work [(dc, ch 1, dc, ch 1) in next space, (dc, ch 1) in each of next 2 spaces] 6 times; replace first dc with ch 3 and join. 24 dc + 24 ch-1 spaces; 24 cells.
Round 5: Sl st into first ch-1 space. Work [(dc, ch 1, dc, ch 1) in next space, (dc, ch 1) in each of next 3 spaces] 6 times; replace first dc with ch 3 and join. 30 dc + 30 ch-1 spaces; 30 cells.
Round 6: Sl st into first ch-1 space. Work [(dc, ch 1, dc, ch 1) in next space, (dc, ch 1) in each of next 4 spaces] 6 times; replace first dc with ch 3 and join. 36 dc + 36 ch-1 spaces; 36 cells.
Round 7: Sl st into first ch-1 space. Work [(dc, ch 1, dc, ch 1) in next space, (dc, ch 1) in each of next 5 spaces] 6 times; replace first dc with ch 3 and join. 42 dc + 42 ch-1 spaces; 42 cells.
Round 8: Sl st into first ch-1 space. Work [(dc, ch 1, dc, ch 1) in next space, (dc, ch 1) in each of next 6 spaces] 6 times; replace first dc with ch 3 and join. 48 dc + 48 ch-1 spaces; 48 cells.
Round 9: Sl st into first ch-1 space. Work [(dc, ch 1, dc, ch 1) in next space, (dc, ch 1) in each of next 7 spaces] 6 times; replace first dc with ch 3 and join. 54 dc + 54 ch-1 spaces; 54 cells.
Round 10: Sl st into first ch-1 space. Work [(dc, ch 1, dc, ch 1) in next space, (dc, ch 1) in each of next 8 spaces] 6 times; replace first dc with ch 3 and join. 60 dc + 60 ch-1 spaces; 60 cells.
Round 11: Ch 3; [ch 1, dc in next dc] 59 times; ch 1, join to top of ch 3. 60 dc + 60 ch-1 spaces.
Rounds 12-14: Ch 3; [ch 1, dc in next dc] 59 times; ch 1, join. 60 dc + 60 ch-1 spaces. Repeat this instruction for each round.
Rear Opening
Mark a rear arc of 7 mesh cells. Place the working start at the first boundary post of the remaining 53-cell front arc. Cut and rejoin yarn there if needed.
Row 15: Ch 3; [ch 1, dc in next dc] 53 times along the front arc. Leave rear 7 cells unworked; turn. 54 dc + 53 ch-1 spaces; 53 cells.
Rows 16-19: Work small mesh across; turn. 54 dc + 53 ch-1 spaces; 53 cells. Repeat this instruction for each row.
Checkpoint: Crown circumference before opening should measure about 54.5 cm. Rear notch should be about 6.4 cm wide x 4.2 cm deep. Block crown to approximately 18 cm depth, adjusting only the straight mesh row count if needed.
Visor (Make 2 Matching Layers)
Use your 2.25 mm hook. The starting edge gets attached to the cap later. For the wide version, block width to 21 cm. For petite versions, block to 19 cm without changing stitch counts.
Row 1: Ch 45; sc in second ch and each remaining ch; turn. 44 sc.
Row 2: Ch 1, sc2tog, sc in next 40 sts, sc2tog; turn. 42 sc.
Row 3: Ch 1, sc2tog, sc in next 38 sts, sc2tog; turn. 40 sc.
Row 4: Ch 1, sc2tog, sc in next 36 sts, sc2tog; turn. 38 sc.
Row 5: Ch 1, sc2tog, sc in next 34 sts, sc2tog; turn. 36 sc.
Row 6: Ch 1, sc2tog, sc in next 32 sts, sc2tog; turn. 34 sc.
Row 7: Ch 1, sc2tog, sc in next 30 sts, sc2tog; turn. 32 sc.
Row 8: Ch 1, sc2tog, sc in next 28 sts, sc2tog; turn. 30 sc.
Row 9: Ch 1, sc2tog, sc in next 26 sts, sc2tog; turn. 28 sc.
Row 10: Ch 1, sc2tog, sc in next 24 sts, sc2tog; turn. 26 sc.
Row 11: Ch 1, sc2tog, sc in next 22 sts, sc2tog; turn. 24 sc.
Row 12: Ch 1, sc2tog, sc in next 20 sts, sc2tog; turn. 22 sc.
Row 13: Ch 1, sc2tog, sc in next 18 sts, sc2tog; turn. 20 sc.
Row 14: Ch 1, sc2tog, sc in next 16 sts, sc2tog; turn. 18 sc.
Five-Petal Flowers (Make 24)
These sweet daisies are quick to make once you get the hang of them.
Round 1: Into an adjustable ring, ch 1, 10 sc; join to first sc. 10 sc.
Round 2: [Sl st in next sc; (ch 2, 3 dc, ch 2, sl st) in next sc] 5 times. Fasten off. 5 petals; 15 dc.
Block each motif flat. Small flowers should target about 3 cm across in cap yarn.
Assembly
You’ll need: Main color yarn, 2.25 mm hook, tapestry needle, both visor layers, optional flexible insert.
Assembly pass 1: Align visor layers with wrong sides together. Whipstitch their shaped outer edges, inserting the optional washable support before closing the last edge. 2 layers joined.
Assembly pass 2: Center the 44-stitch starting edge over the front 44 stitch positions of the cap rim. Sew through both visor layers and cap edge once per position. 44 attachment stitches.
Checkpoint: Visor should sit symmetrically opposite the rear opening and curve down slightly. No sharp insert corners should protrude.
Edgings and Details
Edging round 1: Sc around the rear opening and exposed lower rim, using 1 sc per stitch/chain position and 2 sc per dc row end. Mark and record your actual total E. E sc.
Edging round 2: Work 1 sc in each sc. For scalloped versions, add shell trim on the exposed lower sides only, leaving up to 5 remainder stitches as sc. For picot versions, use picot trim. For straight edges, use plain sc. E base stitches consumed.
Tie row 1 (make 2): Ch 66, sl st in second ch and each remaining ch; fasten off. Attach one tie to each lower rear corner. 65 sl sts per tie.
For daisy versions, sew the motifs around the crown with balanced spacing.
Checkpoint: Ties should close comfortably without pulling the opening shut. All decorations should be secure, and the visor should remain centered.
Finishing Your Visor Cap
Finishing pass 1: Weave each tail through at least 4 cm of dense fabric, reverse direction, and trim. 0 unsecured tails.
Finishing pass 2: Damp-block the crown over a 54-55 cm form and shape the visor by hand; air-dry fully. 1 finished cap.
Final checkpoint: Target head range 54-57 cm, crown about 18 cm deep, visor about 20 x 6 cm. Do not stretch lace while wet.
Care Instructions
Follow your yarn label for specific guidance. Unless it specifies otherwise, hand-wash cool with mild detergent, support the wet fabric, and dry flat away from direct heat. Remove any removable visor insert before washing. Do not wring, tumble dry, or iron acrylic components.
This is an adult item only. Appliqués are small parts that should be attached securely and inspected before wear. Open mesh does not provide sun protection or opaque coverage.
Tips for Success
Don’t skip your gauge swatch. Cotton yarn behaves differently than acrylic, and this fitted cap needs to match the target measurements. A 15 x 15 cm swatch washed and dried like your finished piece tells you everything you need to know.
Block your flowers individually. It makes a huge difference in how professional they look when attached. Flat, uniform daisies are much easier to position evenly around the crown.
Consider the optional visor insert. A flexible washable insert gives the brim real structure. Cut it 3 mm smaller than your crocheted layers so it doesn’t peek out at the edges.
Mark your rear arc carefully. Those 7 mesh cells determine your ponytail opening, so take your time placing markers before you start the flat rows.
Thank you so much for choosing this pattern! The sage daisy visor cap is such a satisfying project, and I hope you enjoy every stitch. If you make one, please share your photos on Instagram or Facebook. Seeing your finished caps in different colors would be absolutely wonderful.
Save this pattern to your Pinterest boards so you can find it whenever inspiration strikes, and drop a comment below if you make this visor cap. Your feedback and photos make this crafting community such a special place!
Want a Quick & Easy Printable Version?
Get a clean, beautifully formatted PDF of this pattern — easy to follow step by step, ready to print or save on any device. No scrolling, no distractions, just the pattern.
Get the Printable PDF →You Might Also Like
- Arctic Ice Mermaid Plush Doll Free Crochet Pattern
- Crochet Sunflower Baby Dress Free Pattern
- Emerald Diamond Lattice Mermaid Gown Free Crochet Pattern
- Cozy Gray Hexagon Sofa Throw Free Crochet Pattern