
Meet "Daisy," the cardigan that looks like a sunny afternoon wrapped around your shoulders. With her creamy mesh body, cheerful butter-yellow centered daisies, and relaxed open-front silhouette, she brings vintage charm and modern wearability together in one gorgeous piece.
Get the Ad-Free PDF Pattern
Scroll down for the full pattern, or get the ad-free printable PDF from the shop.
Get the Printable PDF →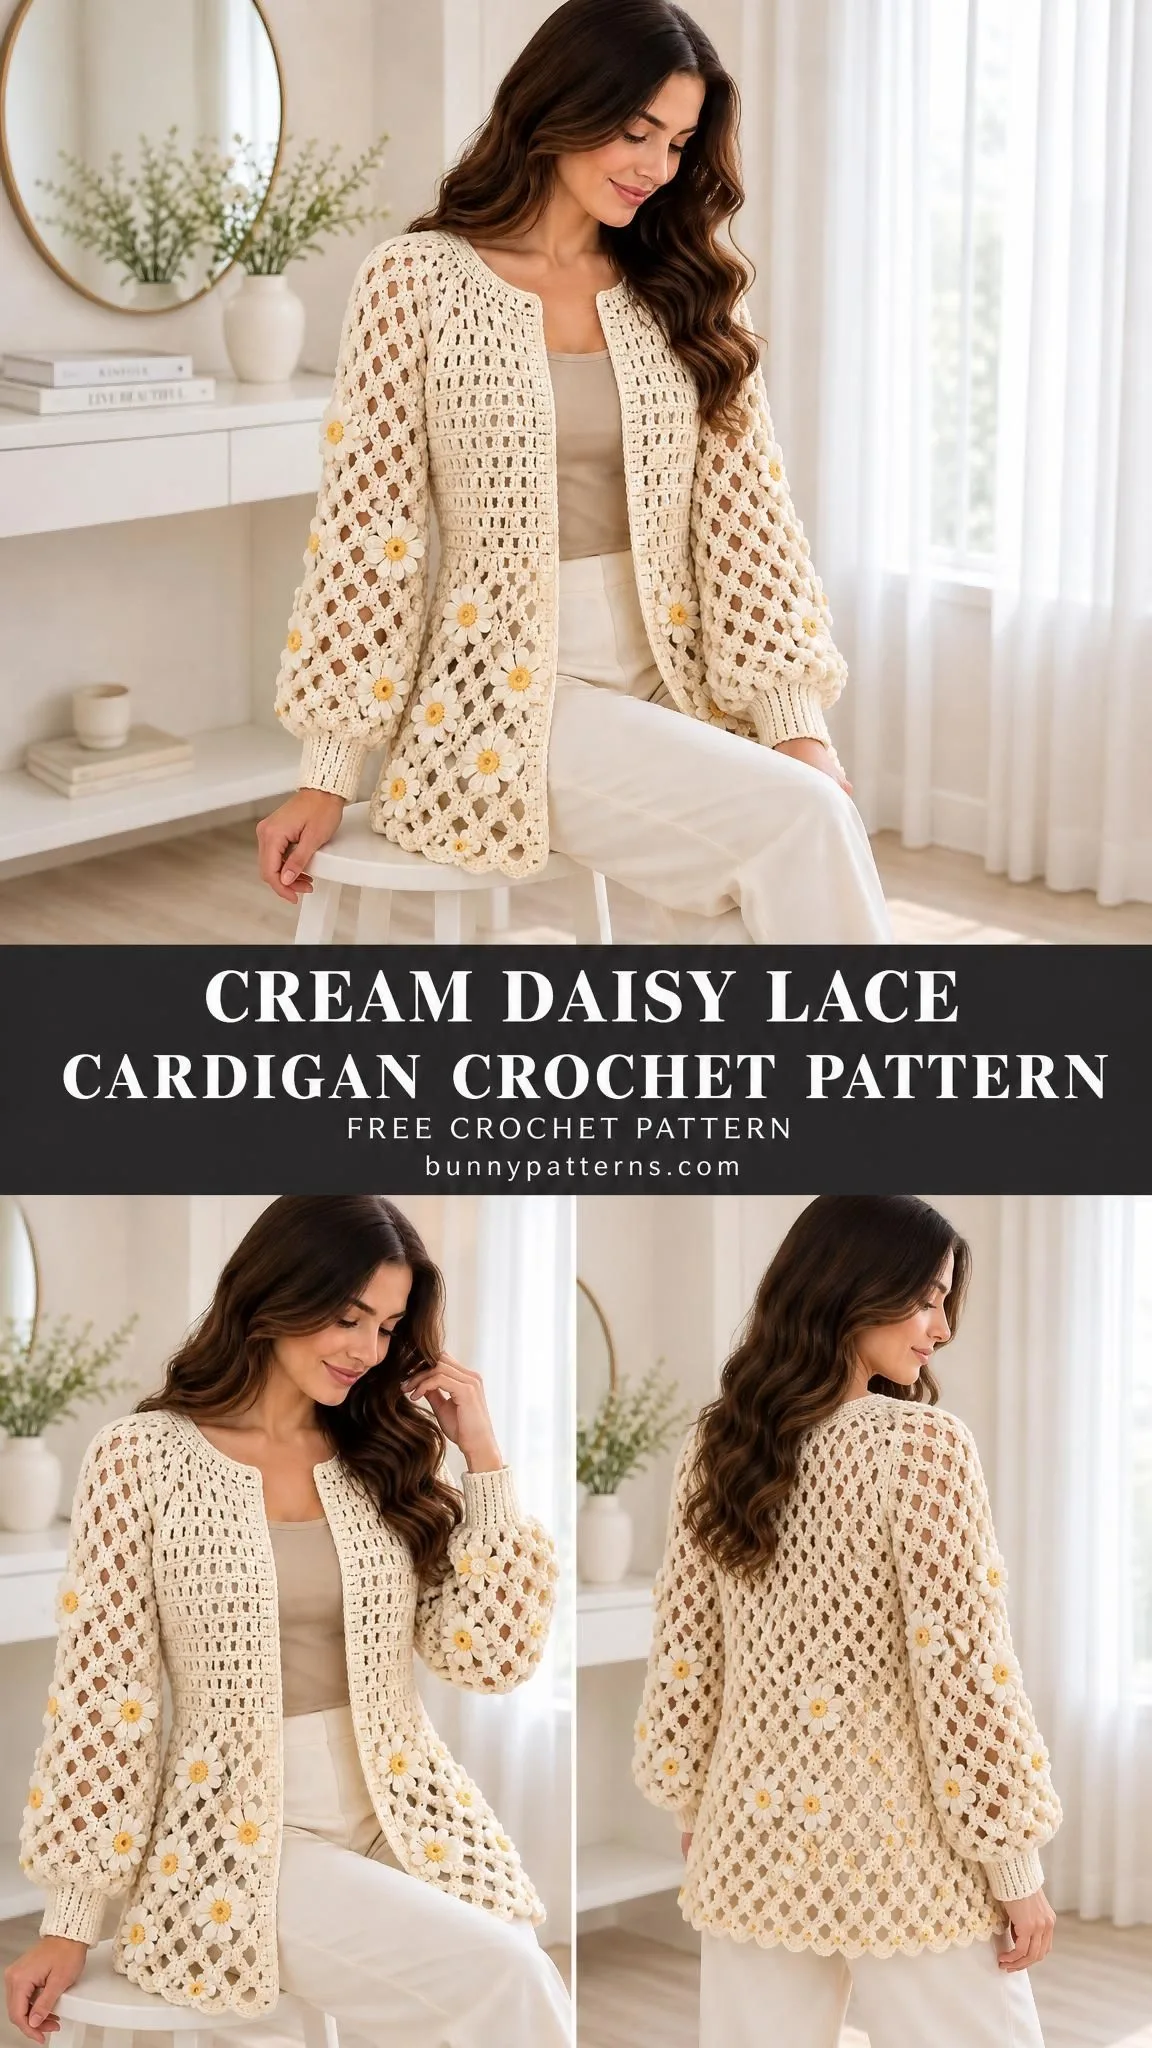
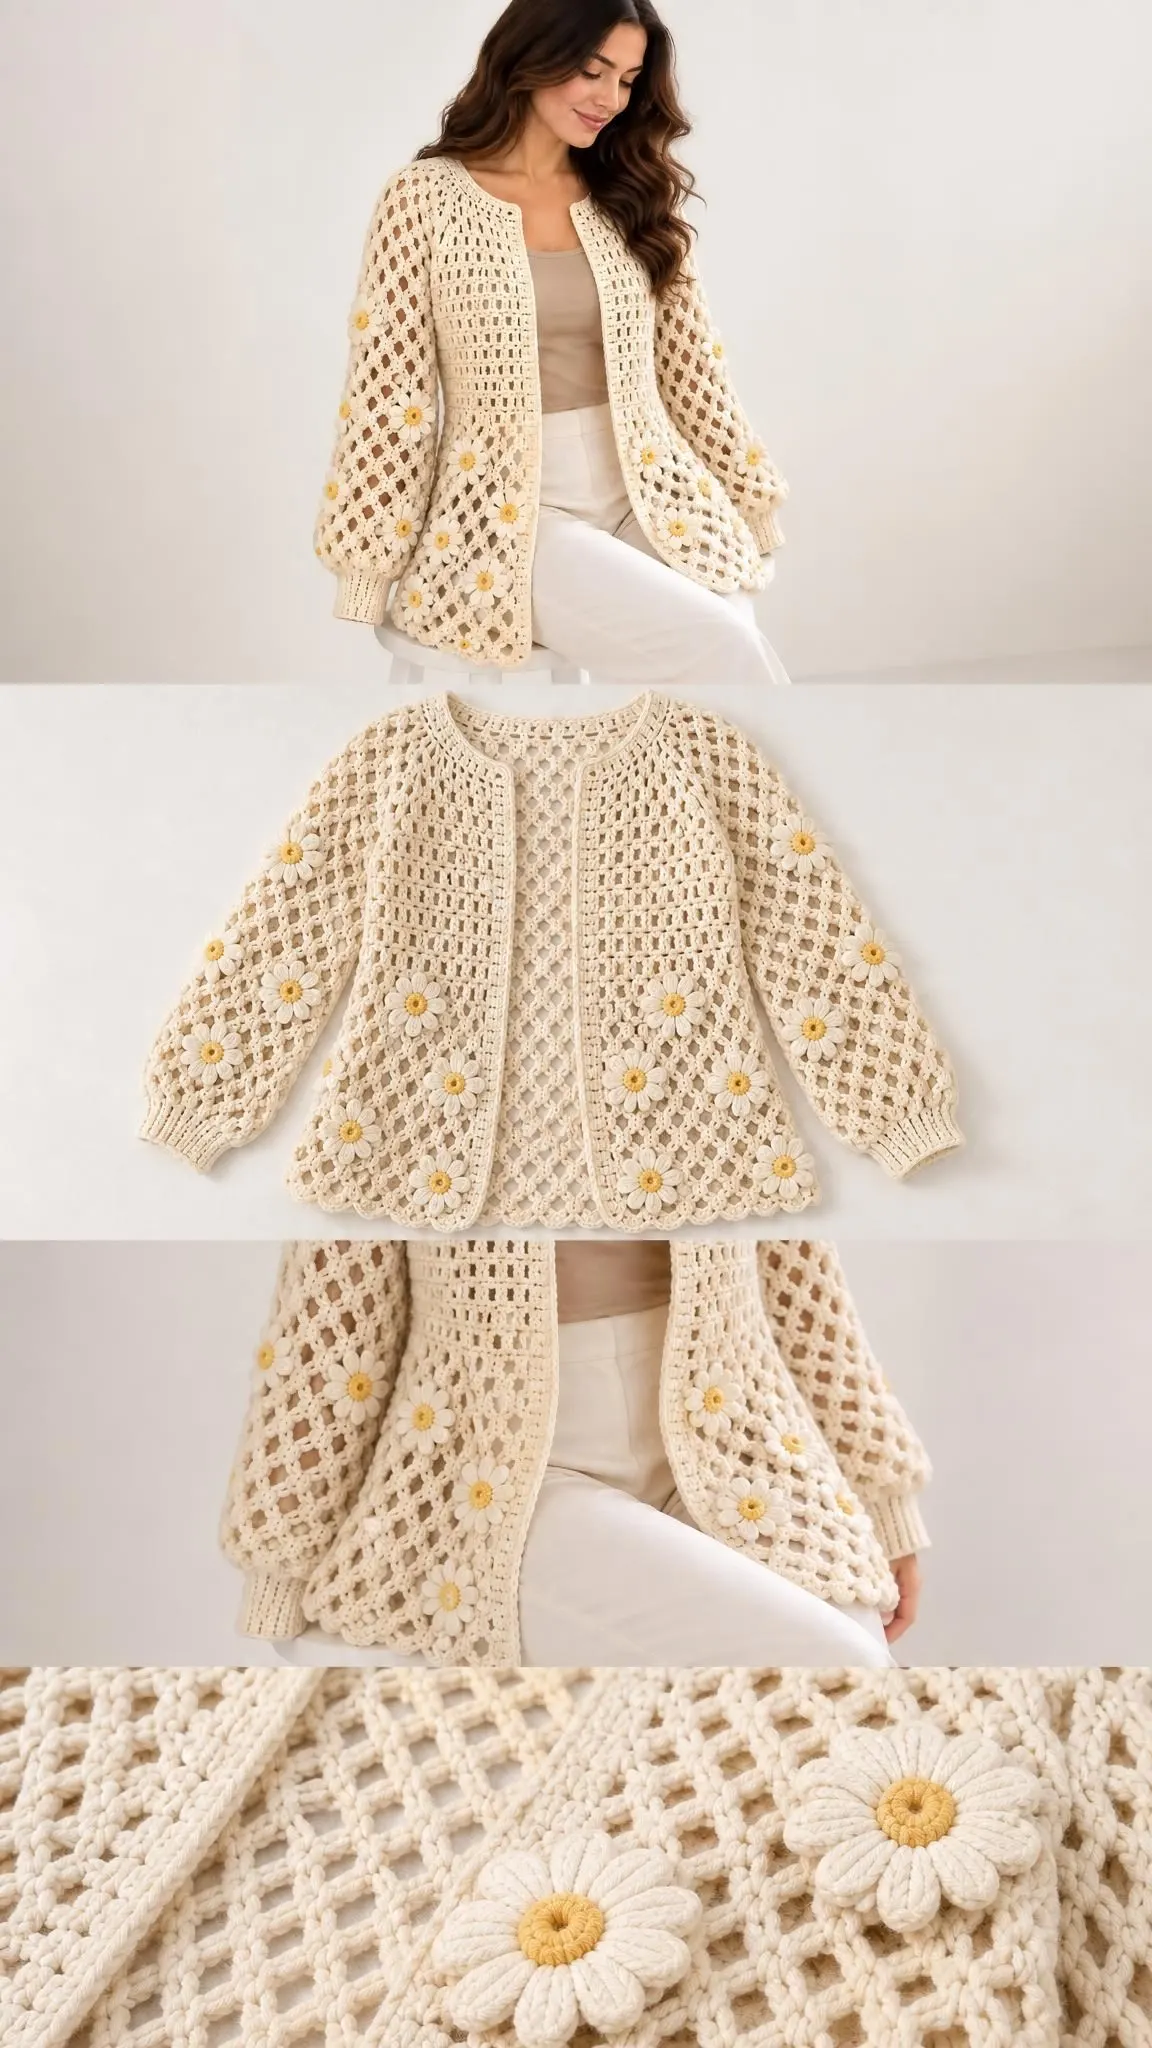
This design has real personality. The upper body features a structured small mesh that transitions into an airy large lattice pattern below the bust, creating visual interest without overwhelming complexity. Those sweet five-petal daisy appliques scattered across the lower body and sleeves give it a handmade, whimsical quality that stands out from ordinary cardigans.
Whether you picture yourself wearing Daisy over a summer dress or layered with a tank on cool spring evenings, this hip-length cardigan is designed to become a wardrobe staple you reach for again and again.
About This Cream Daisy Lace Cardigan Pattern
This open-front adult cardigan offers approximately 102 cm of body coverage, fitting an 88-94 cm bust with roughly 8-14 cm of positive ease. The relaxed fit makes it comfortable for layering without feeling bulky. Body length measures about 62 cm, and sleeves run approximately 40 cm including the ribbed cuffs.
The construction method is straightforward once you understand the flow. You’ll work three panels from the shoulder down (one back panel and two front panels), join them at the shoulders and sides, then attach flat-worked sleeves. The finishing touches include a continuous front edging and those charming daisy appliques that make this cardigan truly special.
Skill level: Intermediate. You should be comfortable with basic crochet stitches, increasing, working in rows, and seaming pieces together. The mesh and lattice patterns use simple stitches in a rhythmic repeat, so once you establish the pattern, it flows smoothly.
Materials You’ll Need
Gathering your supplies before starting keeps the project moving without frustrating interruptions. Here’s everything required for this cream daisy lace cardigan crochet pattern:
Yarn:
- Main color (cream): Smooth DK cotton blend, approximately 700 g / 1540 m
- Contrast color (butter yellow for daisy centers): Approximately 100 g / 220 m total
Look for yarn with about 220 m per 100 g. A cotton blend works beautifully here because it provides good stitch definition for the mesh patterns while offering comfortable drape for a wearable garment.
Hooks:
- 4 mm hook for main fabric
- 3.5 mm hook for cuffs and trim
Or use whatever sizes achieve gauge. This is important, so don’t skip the swatching step.
Notions:
- Tapestry needle
- 8 stitch markers
- Measuring tape
- Scissors
- Optional: 12 sew-on imitation pearls and strong thread for the pearl version
Gauge (Please Don’t Skip This)
I know checking gauge feels tedious when you’re eager to start. But for a garment that needs to fit actual human bodies, gauge determines whether you end up with a cardigan or a tent. Take the time here.
Small mesh gauge: 16 stitch positions (8 cells) x 10 rows = 10 cm
Large lattice gauge: 4 arches x 10 rows = 10 cm, lightly blocked
The back panel in small mesh should measure 40 cells wide, which equals approximately 51 cm. Each front panel measures 20 cells wide, approximately 26 cm.
How to swatch properly:
Make a swatch at least 15 x 15 cm. Wash and dry it exactly as you plan to treat the finished cardigan. Then measure the central 10 cm without stretching the fabric. If your measurements are off, change your hook size. Go up a hook size if your swatch is too small, down if it’s too large. Record both width and height measurements.
One important note: all dimensions in this pattern are blocked targets. Cotton lace tends to lengthen while worn, so keep that in mind during finishing.
Abbreviations and Special Stitches
This pattern uses US crochet terminology throughout. Here are all the abbreviations you’ll encounter:
- ch = chain
- st(s) = stitch(es)
- sp = space
- sl st = slip stitch (insert hook, yarn over, pull through both loops on hook)
- sc = single crochet (insert hook, yarn over, pull up loop, yarn over, pull through both loops)
- hdc = half double crochet
- dc = double crochet (yarn over, insert hook, yarn over, pull up loop, [yarn over, pull through 2 loops] twice)
- tr = treble crochet
- BLO = back loop only
- RS/WS = right side/wrong side
- rep = repeat
- inc = increase
- sc2tog = single crochet 2 stitches together (a decrease)
Special Stitch Definitions
Small Mesh (worked flat):
Ch 3 (this counts as your first dc), [ch 1, skip next ch-1 sp, dc in next dc] to end of row. Work the dc into the post stitch, not into the gap. A mesh cell equals one ch-1 space bounded by dc posts on either side. For flat work with C cells, you’ll have C+1 dc posts and C chains, giving you total positions of 2C+1.
Shell Trim:
On a prepared sc edge with a multiple of 6 stitches: [skip 2 sc, 5 dc in next sc, skip 2 sc, sl st in next sc]. Repeat across.
Picot Trim:
[Sc in next 3 sts, ch 3, sl st into third ch from hook]. Repeat across.
Bobble (BO):
[Yarn over, insert hook in indicated anchor, yarn over and draw up loop, yarn over and pull through 2 loops] 5 times, then yarn over and pull through all 6 loops on hook.
Pattern Notes Before You Begin
Read through these notes carefully. They’ll save you confusion later.
- Turning ch 3 counts as a dc
- Ch 1 does NOT count as a sc
- Join rounds with sl st unless stated otherwise
- Flat rows turn after each row
- Brackets [ ] enclose a repeat
- Do not count joining slip stitches in your stitch counts
- Sew with right sides together unless directed otherwise
- Work main fabric in cream (first listed color)
- Use contrast colors only where specifically named
Size note: This document provides one adult sample size only. Check the finished measurements against your body before committing yarn. Altering stitch counts requires recalculating motif placement and shaping. No multi-size grading is included.
Construction Overview
Understanding how the pieces fit together helps you visualize the project before you start.
The building blocks:
- Back panel: approximately 51 cm wide
- Two front panels: approximately 26 cm each
- Total bust coverage: approximately 102 cm
- Body length: approximately 62 cm
The process:
- Crochet back and two fronts from the top down
- Work small mesh for the upper body, then transition to decorative large lattice below
- Sew shoulders and sides
- Attach flat-worked sleeves
- Add ribbed cuffs by gathering the sleeve openings
- Work continuous front edging
- Attach daisy appliques
Back Panel Instructions
The back panel forms the foundation of your cardigan. You’ll start with small mesh at the shoulders, then transition to the larger lattice pattern below the bust.
Row 1: Ch 84. Dc in sixth ch from hook, [ch 1, skip 1 ch, dc in next ch] 39 times. Turn. (40 cells, 41 dc + 40 ch-1 spaces)
Rows 2-30: Work small mesh across. Turn. (40 cells)
This creates the structured upper back section. Now you’ll transition to the more open lattice pattern.
Large Lattice Foundation Instructions:
Ch 1, sc in first dc, [ch 5, skip next mesh cell and its following cell, sc in their ending dc post] across. Each arch spans 4 old stitch positions, ending on every second old dc post. For the back, this creates 20 arches.
Continuing Row (use this exact method to preserve arch count):
Ch 5 (counts as edge dc + ch 2), sc in first old arch, [ch 5, sc in next old arch] to last arch, ch 2, dc in last edge sc (or third chain of prior turning ch-5). Turn.
Count the two edge half-arches together as one arch. On the following row: ch 1, sc in first dc, [ch 5, sc in next full arch] across, then ch 5, sc in last edge dc. These two rows alternate as an offset row and a return row.
Row 31: Work large-lattice foundation. Turn. (20 arch equivalents)
Rows 32-62: Continue alternating offset lattice rows and return lattice rows with plain sc anchors. Turn after each row. (20 arch equivalents throughout)
Checkpoint: Back length should measure approximately 62 cm, width approximately 51 cm. Important: do not block lower lace wider than the upper grid section.
Left Front Panel Instructions
Row 1: Ch 28. Dc in sixth ch from hook, [ch 1, skip 1 ch, dc in next ch] 11 times. Turn. (12 cells, 13 dc + 12 ch-1 spaces)
Mark the neck edge. Keep the opposite armhole edge straight. For the left front, the neck edge is at the start of Row 2.
How to increase at row start: Ch 3, then work (ch 1, dc) in the first dc.
How to increase at row end: Work (ch 1, dc) again in the last dc.
Rows 2-9: Work small mesh, increasing one cell at the marked neck edge only each row. Turn.
- Row 2: 13 cells
- Row 3: 14 cells
- Row 4: 15 cells
- Row 5: 16 cells
- Row 6: 17 cells
- Row 7: 18 cells
- Row 8: 19 cells
- Row 9: 20 cells
Rows 10-30: Work small mesh across without increases. Turn. (20 cells)
Row 31: Work large-lattice foundation. Turn. (10 arch equivalents)
Rows 32-62: Continue alternating offset lattice rows and return lattice rows with plain sc anchors. Turn after each row. (10 arch equivalents throughout)
Checkpoint: Left front length approximately 62 cm, width approximately 26 cm.
Right Front Panel Instructions
Row 1: Ch 28. Dc in sixth ch from hook, [ch 1, skip 1 ch, dc in next ch] 11 times. Turn. (12 cells, 13 dc + 12 ch-1 spaces)
Mark the neck edge. For the right front, the neck edge is at the end of Row 2.
Rows 2-9: Work small mesh, increasing one cell at the marked neck edge only each row. Turn.
- Row 2: 13 cells
- Row 3: 14 cells
- Row 4: 15 cells
- Row 5: 16 cells
- Row 6: 17 cells
- Row 7: 18 cells
- Row 8: 19 cells
- Row 9: 20 cells
Rows 10-30: Work small mesh across without increases. Turn. (20 cells)
Row 31: Work large-lattice foundation. Turn. (10 arch equivalents)
Rows 32-62: Continue alternating offset lattice rows and return lattice rows with plain sc anchors. Turn after each row. (10 arch equivalents throughout)
Checkpoint: Right front length approximately 62 cm, width approximately 26 cm.
Sleeves (Make 2)
The sleeves are worked flat from the upper arm down, then seamed and attached to the armholes.
Row 1: Ch 68. Dc in sixth ch from hook, [ch 1, skip 1 ch, dc in next ch] 31 times. Turn. (32 cells)
Row 2: Work large-lattice foundation. Turn. (16 arches)
Rows 3-35: Continue alternating offset lattice rows and return lattice rows. Turn after each row. (16 arch equivalents throughout)
Ribbed Cuffs (Make 2)
Switch to your 3.5 mm hook for the cuffs.
Row 1: Ch 11. Sc in second ch and each remaining ch. Turn. (10 sc)
Rows 2-40: Ch 1, sc BLO in each st. Turn. (10 sc)
The cuff should measure approximately 5 cm deep x 20 cm around before joining into a ring. Adjust the row count only if needed to pass comfortably over the hand. Record your actual count so you can match the second cuff exactly.
Five-Petal Daisy Flowers (Make 12)
These cheerful appliques are the signature detail of this cardigan.
Round 1: Into an adjustable ring, ch 1, work 10 sc. Join to first sc. (10 sc)
Round 2: [Sl st in next sc, (ch 2, 3 dc, ch 2, sl st) in next sc] 5 times. Fasten off. (5 petals, 15 dc total)
Block each motif flat. Small flowers should measure approximately 5 cm across in cardigan-weight yarn.
For the contrast centers, work Round 1 in butter yellow, then switch to cream for Round 2.
Assembly Instructions
Gather your main color yarn, tapestry needle, 4 mm hook, both sleeves, and optional cuffs.
Seam Pass 1 (Shoulders):
At each side, join the outer 12 front mesh cells to the outer 12 back mesh cells along the foundation edge. Leave the center 16 back cells unseamed for the neck opening. The front neck shaping remains open. (2 shoulder seams, 12 cells each)
Seam Pass 2 (Sides):
Mark 20 cm down from the shoulder on both back and corresponding front panels. Sew body sides from hem to markers. (2 armholes, approximately 40 cm circumference each)
Seam Pass 3 (Sleeves):
Sew each sleeve lengthwise to form a tube. Place the sleeve seam at the underarm, match the sleeve-top midpoint to the shoulder seam, and sew the top edge evenly into the armhole. (2 sleeves attached)
Seam Pass 4 (Cuffs):
If using cuffs, join the cuff’s first and last rows into a ring. Quarter-mark both the cuff and sleeve opening, then whipstitch while gathering the sleeve evenly to fit. Do not stretch the cuff beyond comfortable hand circumference. (2 cuffs attached)
Assembly Checkpoint: Shoulders should sit evenly. Sleeves should move comfortably. Front edges remain open. Upper back width approximately 51 cm, each front approximately 26 cm.
Edgings and Details
Switch to your 3.5 mm hook and main color (or contrast if desired for trim).
Border Round 1:
Join at one lower front corner. Sc evenly around the entire open-front/neck/hem outline: work 2 sc per dc row end, 1 sc per foundation position, 4 sc per complete lower-lattice arch (2 per edge half-arch), and 3 sc at each outward corner. Record your total stitch count and mark the middle corner stitches.
Border Round 2:
Sc in each st, placing 3 sc in each marked corner st. Move markers to the middle corner stitches.
Border Round 3 (optional for broader band):
Repeat Round 2.
Adding Shell or Picot Trim (optional):
For shell-edged versions, add shell trim along the lower hem and sleeve openings using complete 6-st repeats. Finish any remainder in sc. For picot versions, add picot trim along the hem. Keep the front/neck edge plain to avoid curling.
Attaching Daisy Appliques:
Sew 12 flower appliques with matching yarn. Place half on the fronts and half across the back and sleeves, distributing them evenly and avoiding the underarm areas. Secure each center and each outer petal point.
Edging Checkpoint: Front bands should lie flat. Hem should not flare unintentionally. Cuffs should pass over hands and recover their shape. No visible loose decoration threads.
Finishing Your Cardigan
Finishing Pass 1 (Weave in Ends):
Weave every yarn end through at least 5 cm of fabric, reverse direction, and trim. (0 loose tails)
Finishing Pass 2 (Blocking):
Wet-block flat, aligning side seams and matching sleeve lengths. Pin the lace section to match the upper-panel width rather than stretching it wider.
Final Checkpoint: Body length approximately 62 cm, sleeves approximately 40 cm including cuffs, total body coverage approximately 102 cm. Recheck measurements after drying and again after a short wear, as cotton lace can relax over time.
Care Instructions
Follow your yarn label for specific guidance. Unless it specifies otherwise:
- Hand-wash cool with mild detergent
- Support the wet fabric when lifting
- Dry flat away from direct heat
- Do not wring, tumble dry, or iron acrylic components
Safety notes: This is an adult item only. The daisy appliques are small parts and potential snagging hazards. Attach them securely and inspect before each wear. Keep away from babies and young children. The open mesh does not provide sun protection or opaque coverage.
Tips for Success with This Crochet Cardigan Pattern
Tip 1: Swatch both fabrics. The small mesh and large lattice behave differently. Swatching both ensures your finished cardigan has the right proportions.
Tip 2: Count religiously. Mesh patterns make it easy to lose or gain stitches without noticing. Count at the end of every row for the first several rows of each section.
Tip 3: Use stitch markers liberally. Mark your neck edge increases, armhole positions, and corner stitches. Future you will be grateful.
Tip 4: Block conservatively. Resist the urge to stretch that beautiful lace section. Pin it to match the upper mesh width, or the cardigan will have an odd bell shape.
Tip 5: Make all daisies at once. Working them assembly-line style (all Round 1s, then all Round 2s) is faster and ensures consistent sizing.
This cream daisy lace cardigan is the kind of project that rewards your time with a truly special handmade garment. The combination of structured mesh shoulders, flowing lattice body, and sweet daisy details creates a piece that looks far more complex than it actually is to crochet.
Thank you so much for choosing this pattern! I hope you love every stitch of your Daisy cardigan. If you make one, I’d absolutely love to see it. Tag your photos on Instagram or share them in our Facebook community. Seeing your finished projects is genuinely the best part.
Save this pattern to your Pinterest boards so you can find it when you’re ready to cast on, and leave a comment below if you make your own Daisy cardigan. I’d love to hear which colorway you choose!
Want a Quick & Easy Printable Version?
Get a clean, beautifully formatted PDF of this pattern — easy to follow step by step, ready to print or save on any device. No scrolling, no distractions, just the pattern.
Get the Printable PDF →You Might Also Like
- Dusty Rose Ribbed Ankle Socks Free Crochet Pattern
- Sage Green Woodland Baby Romper Free Crochet Pattern
- Dusty Rose Garden Bobble Sweater Free Crochet Pattern
- Sage Green Botanical One Shoulder Top Free Crochet Pattern