
I have been dreaming about designing a bag that feels vintage but still works for modern life. Something with structure. Something with personality. Something that makes people stop and ask where you got it.
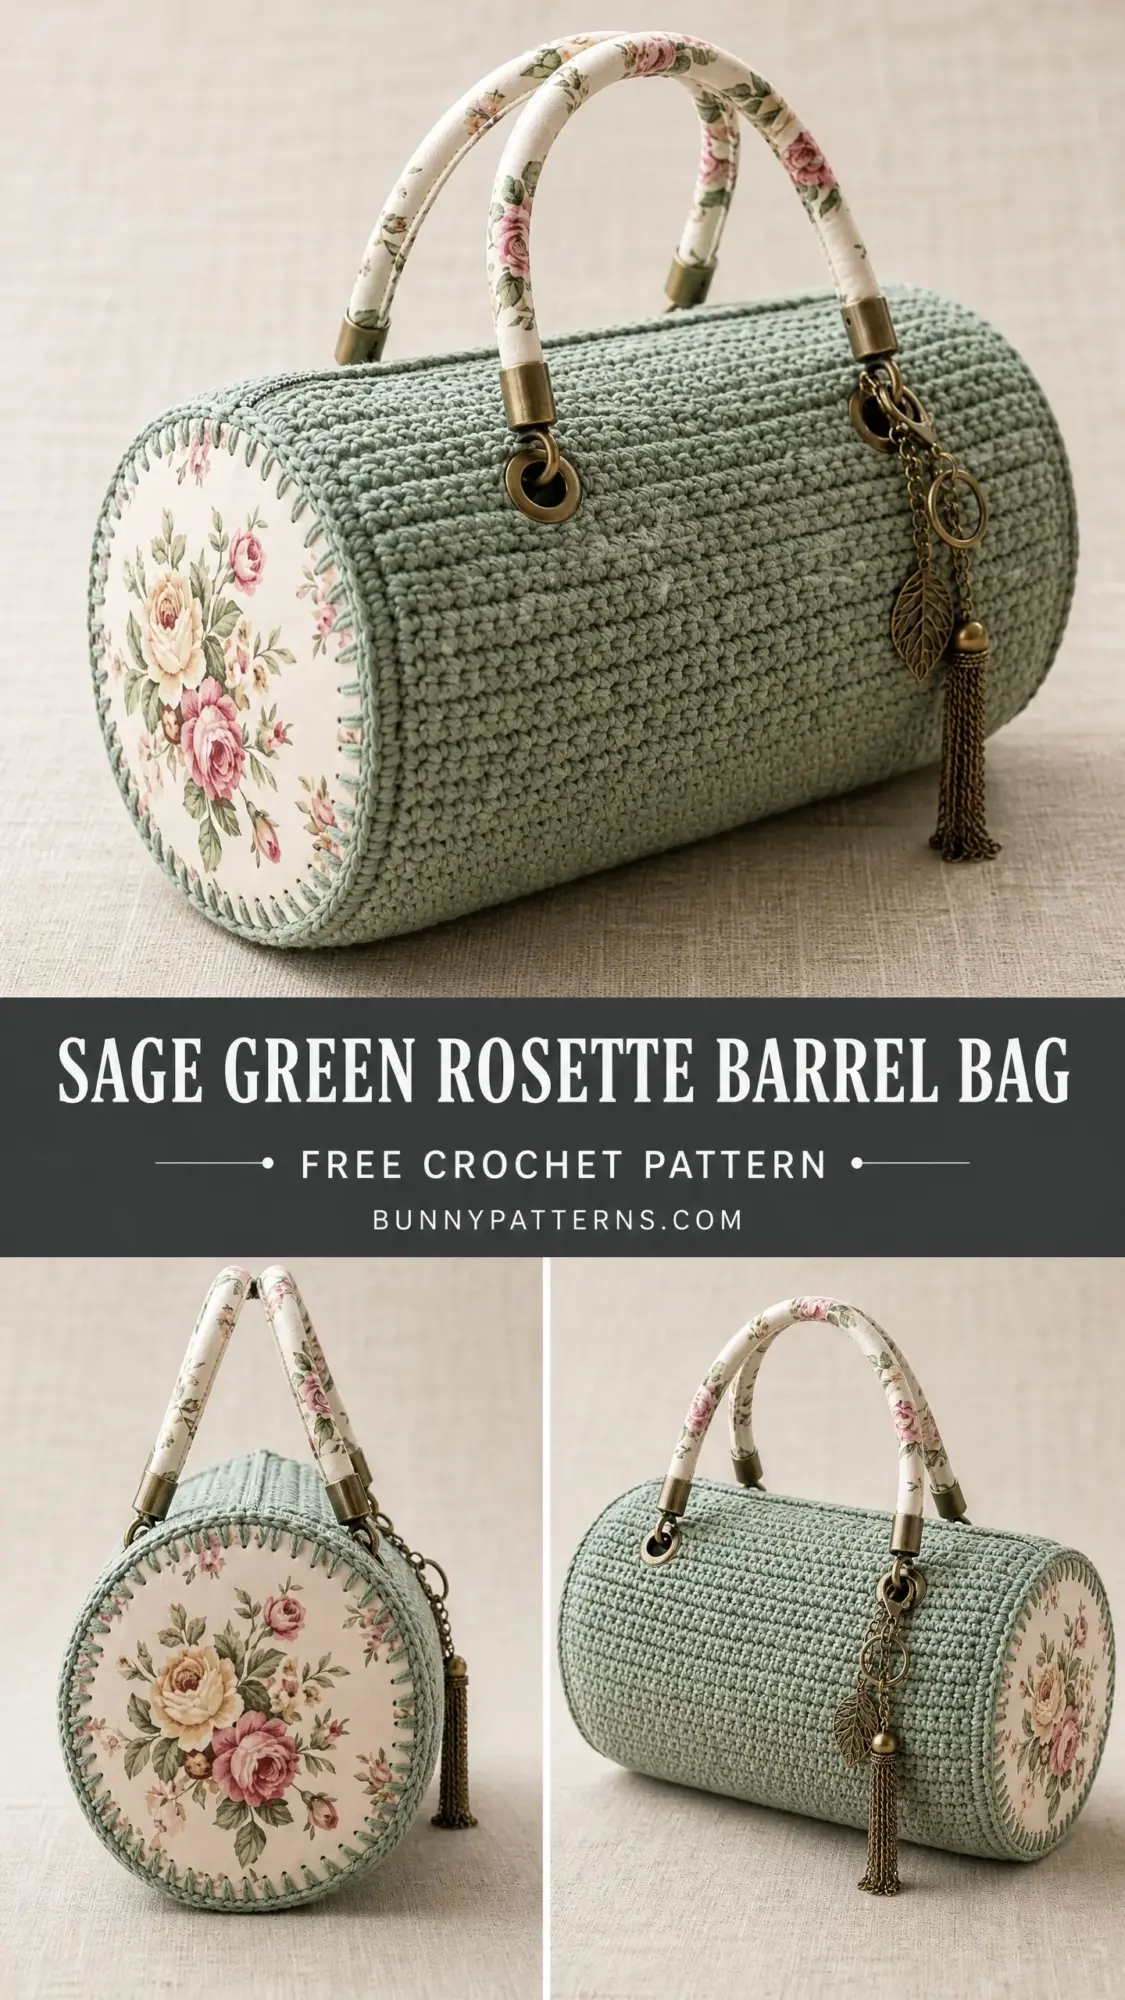
This barrel bag checks every single box. I wanted a project that combines crochet with fabric elements, uses a stitch pattern that creates real structure without stiffeners in the body, and looks like it belongs in a boutique window. The slip stitch rib technique gives the sage green exterior a woven, almost knitted appearance that holds its shape beautifully.
I am SO pleased with how this turned out. The floral end panels add that romantic cottage feel, the brass hardware elevates everything, and the whole construction is more approachable than it looks. If you have been wanting to try a mixed media project or just want a bag that is truly one of a kind, this is your next make.
About This Crochet Barrel Bag Pattern
This cylindrical barrel bag features a sage green crocheted body worked in a dense slip stitch rib texture. The fabric has a firm, woven appearance that holds its shape without feeling stiff or uncomfortable. Two circular end panels covered in vintage style floral cotton fabric give the bag its signature charm. These panels attach to the crocheted cylinder with a whipstitch edging worked in the main yarn.
The bag closes with a zipper running along the top length. Two tubular handles covered in matching floral fabric terminate in antique brass barrel ends that feed through brass grommets. A decorative brass charm cluster featuring a leaf charm and tassel hangs from one grommet for that finishing touch.
Skill Level: Intermediate. You need to be comfortable working slip stitch rib in the back loop, seaming a flat rectangle into a cylinder, sewing in a zipper, and doing basic fabric construction for the end panels and handles. No complex shaping is required, but the mixed media finishing requires patience and basic sewing skills.
Time Estimate: 10 to 14 hours total, including crochet, assembly, and finishing.
Finished Measurements
Materials Needed for Your Barrel Bag
Yarn
Main Color (MC): approximately 350 yards or 320 meters of worsted weight (Category 4) cotton or cotton blend yarn in sage green
Yarn Suggestions
1. Lion Brand 24/7 Cotton in Sage: 100 percent mercerized cotton, 186 yards per 100 gram skein, worsted weight. Firm, smooth, holds stitch definition beautifully. You will need 2 skeins.
2. Paintbox Yarns Simply DK Cotton (held double): 100 percent cotton, 137 yards per 50 gram skein. Holding two strands together gives a worsted weight fabric with excellent stiffness and a subtle sheen. You will need 4 skeins at 50 grams each.
3. We Are Knitters The Petite Wool in Sage: a soft wool cotton blend at worsted weight, 153 yards per 100 gram skein. This adds slight elasticity for a firmer seam join. You will need 3 skeins.
Substitution note: Choose a smooth, plied yarn (not fuzzy or textured) so the slip stitch rib texture reads clearly. Cotton or cotton blend yarns are strongly preferred because they block flat and hold a rigid shape without internal stiffening. Avoid superwash wool alone, which can stretch and lose the barrel shape with use.
Fabric
Hardware and Notions
Hook
US size G-6 or 4.0 mm crochet hook (adjust to match gauge)
Additional Tools
Gauge
22 stitches and 24 rows = 4 inches or 10 cm in slip stitch rib pattern (slip stitch worked through back loop only, worked flat with a turning chain of 1)
Gauge is critical for this project. The finished cylinder circumference is determined by the row count of the flat rectangle, and the cylinder length is determined by the stitch count. Swatch before beginning and block your swatch under light misting before measuring.
Abbreviations (US Terms)
Special Stitch: Slip Stitch Rib (Worked Flat)
This stitch creates a dense, horizontally ribbed texture that resembles woven fabric from the right side. It is the key to this bag’s structured appearance.
Row 1 (foundation): Insert hook into the second chain from hook, yarn over, pull up a loop and pull it through the loop on the hook (slip stitch made). Work one slip stitch in each remaining chain across. Your stitch count equals number of chains minus 1.
Row 2 and all following rows: Chain 1. Turn. Working through the back loop only of each stitch, insert hook, yarn over, pull up a loop and pull it through the loop on the hook (slip stitch through blo made). Repeat across entire row.
Important Technique Notes
The chain 1 at the start of each row does NOT count as a stitch. Insert into the very first stitch of the row immediately.
Keep tension loose and consistent. Slip stitch worked tightly will distort the fabric and make seaming difficult. If you are a tight crocheter, go up a hook size.
The right side is the side facing you on odd numbered rows when beginning with a right side foundation row.
When you turn at the end of each row, the last stitch worked becomes the last stitch of the next row. Always count your stitches at the end of every row until the pattern is automatic.
Pattern Notes Before You Begin
1. The bag body is worked as a flat rectangle in slip stitch rib. The two short edges of the rectangle become the length of the barrel (12 inches). The two long edges become the circumference (18 inches). After finishing the rectangle, you seam the two long edges together to form the cylinder.
2. The end panels are not crocheted. They are fabric circles cut from the floral cotton, backed with optional cardboard stiffeners, and hand sewn to the ends of the crocheted cylinder using whipstitch in MC yarn.
3. The handles are fabric tubes sewn from the floral cotton, stuffed firmly, and finished with brass barrel end caps. They attach through grommets installed at the top center of the cylinder.
4. The zipper runs along the top seam of the cylinder. When you seam the rectangle into a cylinder, leave the seam open for the central 12 inches and only tack the seam at both ends to anchor the zipper tape.
5. All yarn ends should be woven in along the wrong side before assembly.
6. The stitch count for the body rectangle: 66 stitches wide by 108 rows tall. This produces approximately 12 inches in width (barrel length) and approximately 18 inches in height (barrel circumference).
Step by Step Crochet Pattern Instructions
Section 1: Bag Body (Flat Rectangle)
Foundation chain: Chain 67. (This creates 66 working stitches after the first row.)
Row 1 (RS): Insert hook into second chain from hook, yo, pull loop through loop on hook (sl st made). Work 1 sl st into each remaining ch across. Turn. (66 sl sts)
Row 2: Ch 1 (does not count as a stitch, now and throughout). Working in blo, sl st in each st across. Turn. (66 sl sts)
Rows 3 through 108: Repeat Row 2. Turn at end of each row. (66 sl sts at end of every row)
After Row 108, do not fasten off. Proceed to Section 2.
Checkpoint After Section 1
Your rectangle should measure approximately 12 inches wide and 18 inches tall (measured along the row height direction). The right side should show clear horizontal ridges running across the width. If your piece is shorter than 18 inches in height, work additional rows in increments of 4 rows until you reach the target measurement. If it is taller, rip back in increments of 4 rows.
Section 2: Edging Round
Before seaming, work a single round of edging around the rectangle perimeter to stabilize the edges and create clean attachment points for the end panels.
With RS facing and working with the live loop still on hook after Row 108:
Short right hand edge: Work 1 sc evenly into the edge of each row end, approximately 1 sc per row. (108 sc)
Bottom long edge: Work 1 sc into each foundation chain stitch along the bottom edge. (66 sc)
Short left hand edge: Work 1 sc evenly into the edge of each row end, going upward. (108 sc)
Top long edge (zipper edge): Do not work sc along this edge. Instead, fasten off yarn neatly and weave in the end.
The sc edging is worked only on three sides. The fourth side (the top, which becomes the zipper opening seam) is left without edging.
Section 3: Seaming Into a Cylinder
Fold the rectangle with right sides together so the two long edges (the 18 inch edges) are aligned.
Using MC and a tapestry needle, work a mattress stitch or whipstitch seam along this long edge, leaving the center 12 inches open (the full center opening) and tacking only the first 0.25 inch at each end of the seam to anchor the zipper tape ends.
Turn the cylinder right side out. The cylinder is now open at both circular ends and has a 12 inch zipper opening along the top seam line.
Section 4: Grommet Installation
Install the grommets before attaching the end panels, as it is easier to work on the open cylinder.
On the top seam line of the cylinder, measure and mark 4 grommet positions:
This gives you 4 grommets total, 2 per handle attachment point. Install grommets following manufacturer instructions. The grommets should sit approximately 0.5 inch from the seam.
Section 5: Zipper Installation
Lay the zipper face down against the wrong side of the zipper opening seam, centered so the zipper pull is accessible from the outside. The zipper tape should extend approximately 0.25 inch beyond the seam allowance on each side.
Using sewing thread and a sewing needle, hand stitch or machine stitch the zipper tape to the inside of the bag along both edges of the zipper opening. Stitch close to the crochet fabric edge but not through the front face of the work.
Tack the zipper tape ends to the seam tack points. Test the zipper before proceeding.
Section 6: Fabric End Panels (Make 2)
Cutting: Cut 2 circles of floral fabric, each 7.25 inches diameter. This is the 5.75 inch finished diameter plus 0.75 inch seam allowance all around.
If using stiffeners, cut 2 circles of cardboard or plastic, each exactly 5.75 inches diameter.
Assembly of each end panel:
1. Fold the fabric seam allowance (0.75 inch) toward the back of the fabric circle and press with an iron, clipping small notches around the curved edge every 0.5 inch so the fabric lies flat.
2. If using a stiffener, slip the cardboard or plastic circle inside the folded seam allowance. The printed fabric face should be on the outside.
3. Using sewing thread, baste the folded seam allowance in place around the back of the panel.
Attaching each end panel:
Hold one fabric panel against one open end of the crocheted cylinder, aligning the folded edge with the sc edging.
Using MC yarn and a tapestry needle, work whipstitch all around the perimeter, catching the sc edging of the cylinder and the folded fabric edge together. Space stitches approximately every 2 sc stitches. After completing the whipstitch, knot yarn securely on the inside and weave in end.
Repeat for the second end panel.
Checkpoint After Section 6
The bag body should now be a complete barrel shape with both ends closed, a zipper along the top seam, and 4 grommets in place. The barrel should hold its cylindrical shape without collapsing.
Section 7: Handles (Make 2)
Cutting fabric: Cut 2 rectangles of floral fabric, each 14 inches long by 3.5 inches wide.
Sewing handle tubes: Fold each rectangle in half lengthwise with right sides together. Sew a seam 0.5 inch from the long raw edge, leaving both short ends open. Turn the tube right side out.
Stuffing: Pack fiberfill or tightly rolled batting into the tube so it is firm and holds a round shape. The finished tube should be approximately 0.5 inch in diameter when stuffed.
Finishing tube ends: Trim excess fabric at each short end so approximately 0.5 inch of fabric remains beyond the stuffing. Fold this fabric end in and slip the brass barrel end cap over the end. Secure with a small stitch of sewing thread through the end cap flange. Repeat for all 4 tube ends.
Attaching handles: Feed one end of a handle through one grommet from the outside to the inside of the bag. The barrel end cap will prevent the handle end from pulling back through. Repeat with the other end of the same handle through the corresponding grommet. This forms one arched handle.
Repeat with the second handle through the remaining two grommets.
Section 8: Charm Embellishment
Open the lobster clasp and attach it to the right hand grommet (front side) of the bag, so the charm hangs outside on the right side.
Attach the leaf charm and tassel charm to the lobster clasp or to a jump ring connected to it. Close all jump rings securely with flat nose pliers.
Size Customization Tips
To make a smaller bag (10 inches long, 14 inch circumference):
To make a larger bag (14 inches long, 22 inch circumference):
General formula: Desired barrel length in inches times stitch gauge (stitches per inch) equals foundation chain number (add 1 for turning chain). Desired circumference in inches times row gauge (rows per inch) equals total row count.
Finishing and Blocking Your Barrel Bag
Weave in all yarn ends on the wrong side of the crocheted cylinder before assembling. Ends should be woven in a minimum of 1 inch in both directions to prevent unraveling.
Blocking the cylinder: Lightly mist the finished crocheted cylinder (before attaching end panels) with water and gently shape it around a rolled towel or cylindrical form of the correct diameter. Allow to dry completely, which may take 12 to 24 hours. Cotton yarns respond well to wet blocking and will stiffen slightly as they dry.
Do not block with heat or steam if your yarn contains synthetic content.
Care Instructions
Hand wash only in cool water with a gentle detergent. Do not wring. Press gently between two towels to remove excess water and reshape. Air dry flat away from direct sunlight. Do not machine wash, machine dry, or dry clean.
If you used plastic stiffener circles instead of cardboard, the bag may tolerate slightly more moisture. Cardboard stiffeners should be removed before any wet cleaning.
Store the bag stuffed loosely with tissue paper to maintain the barrel shape when not in use.
Final Thoughts on This Barrel Bag Crochet Pattern
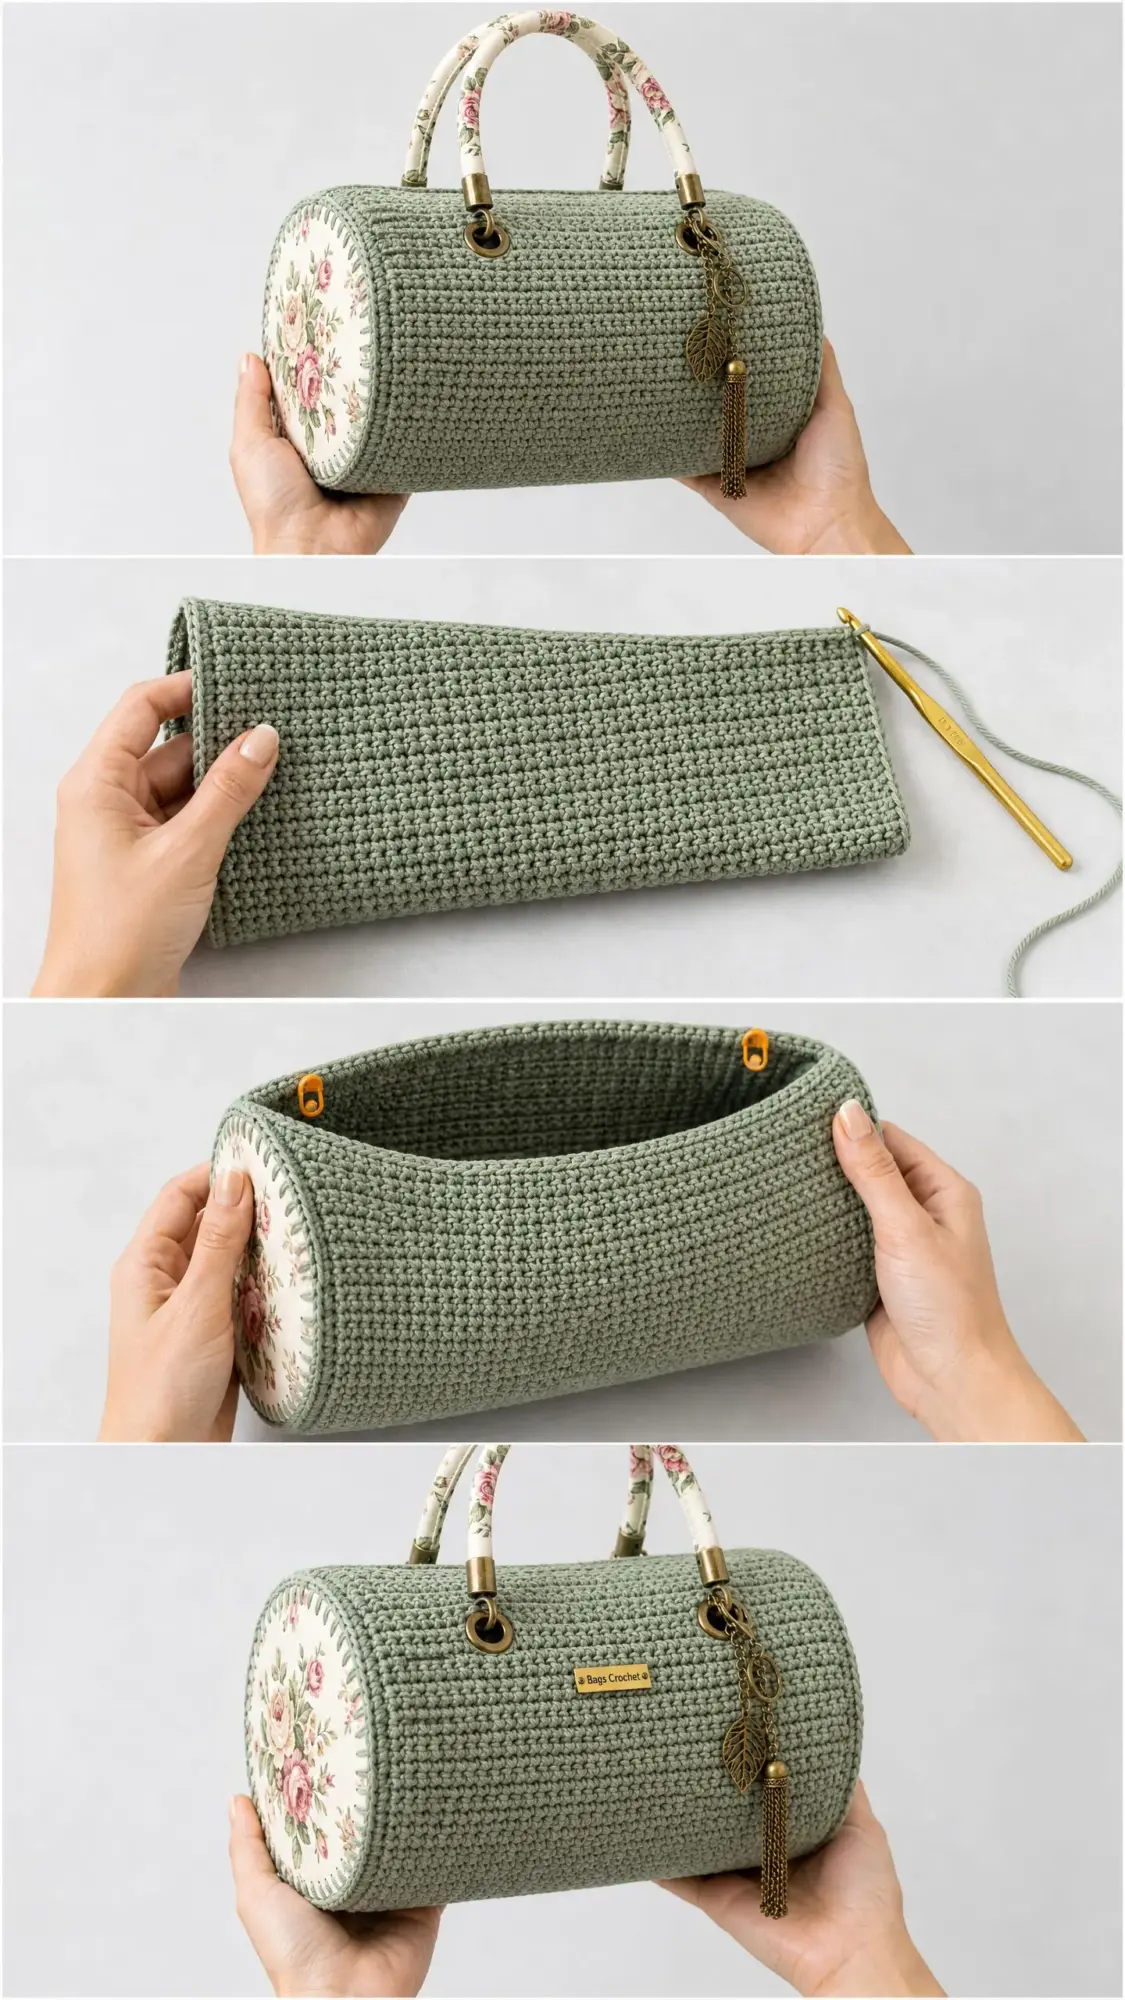
This Sage Green Rosette Barrel Bag is truly a showstopper project. The combination of structured slip stitch crochet, romantic floral fabric, and quality brass hardware creates something that looks far more complicated than it actually is. Once you understand the basic slip stitch rib technique and take your time with the assembly steps, everything comes together beautifully.
Whether you make this for yourself or as a special gift, it is the kind of handmade piece that gets compliments everywhere you go. The cottage core aesthetic works perfectly for spring and summer, but honestly, I would carry this bag year round.
Thank you so much for choosing this pattern for your next project. I truly hope you enjoy every stitch. If you make this barrel bag, I would absolutely love to see it! Tag me on Instagram or share a photo in my Facebook group. There is nothing better than seeing your beautiful finished projects.
Do not forget to save this pattern to your Pinterest boards so you can find it easily when you are ready to start. And if you have any questions or want to share how yours turned out, drop a comment below. Happy crocheting!
You Might Also Like
- Pastel Rainbow Shell Stitch Bodysuit Free Pattern
- Lavender Jellyfish Baby Blanket Free Crochet Pattern
- Ocean Breeze Granny Square Tote Free Crochet Pattern
- Ocean Breeze Ombre Braided Purse Free Crochet Pattern