
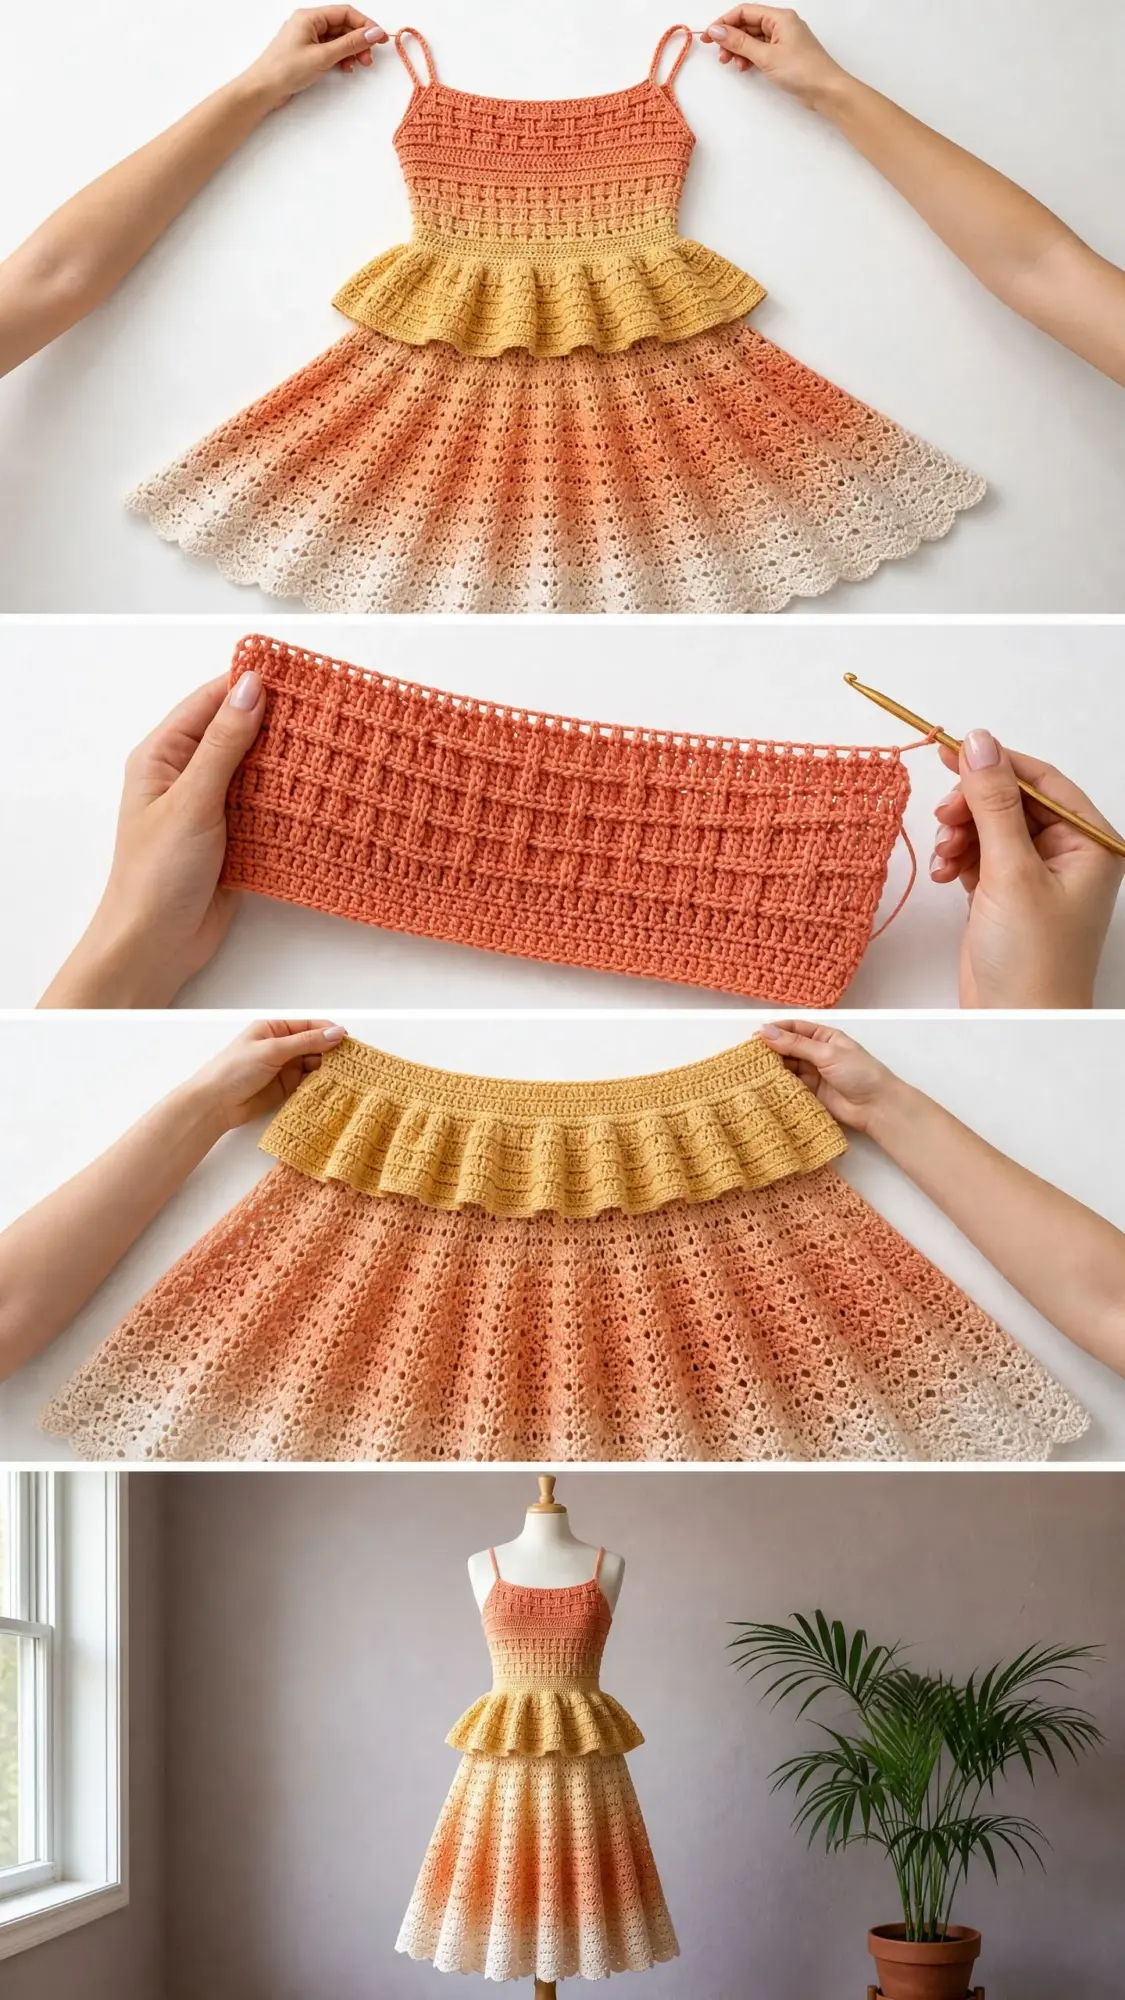
This is a midi-length crochet dress with a fitted basketweave bodice, a gathered peplum ruffle at the waist, and a flowing lace skirt that fades from coral to ivory. The construction moves from top to bottom in three distinct sections. You will use front and back post double crochets for the textured bodice and a shell-and-fan lace stitch for the skirt.
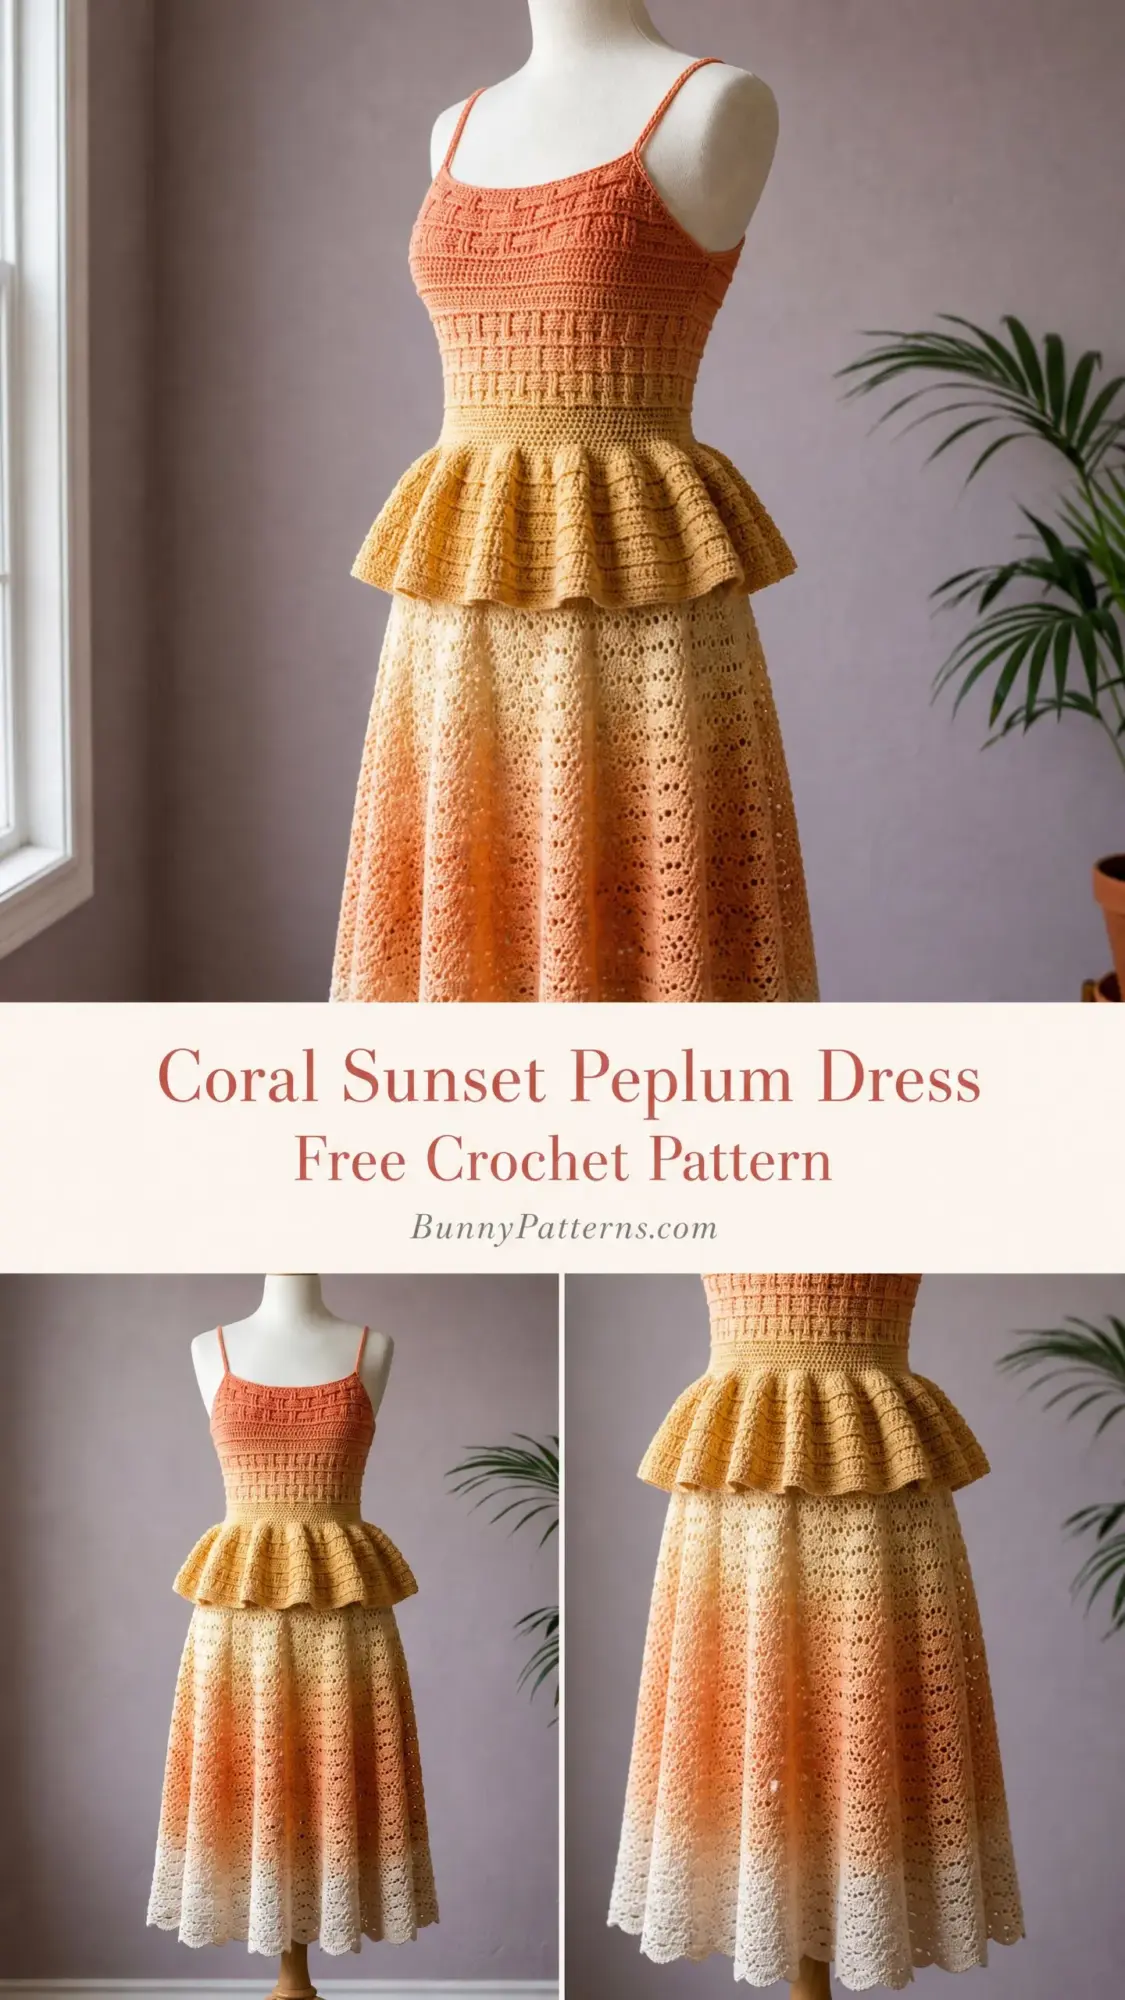
The color gradient creates that beautiful sunset effect you see in the finished piece. Deep coral at the top transitions through peach and golden yellow at the waist, then warm orange and light peach cascade down the skirt before ending in ivory white at the scalloped hem.
If you have worked garments before and feel comfortable with post stitches and lace patterns, you are ready for this project. It takes approximately 40 to 60 hours to complete, so think of it as a satisfying long-term project rather than a quick weekend make.
About This Coral Sunset Peplum Dress Crochet Pattern
I love how this dress combines three completely different techniques into one cohesive garment. The basketweave bodice provides structure and a flattering fit. The peplum adds a playful feminine touch right at the waist. And that lace skirt? It flows and moves beautifully while naturally flaring into an A-line silhouette.
The spaghetti straps keep things simple and adjustable. You work them last, so you can try on the dress and position them exactly where they feel most comfortable on your shoulders.
Skill level: Intermediate to Advanced. You should have completed at least two garment projects before starting this dress. Comfort with post stitches, color changes, and lace stitch patterns is essential.
Finished measurements for size Small/Medium:
Materials You Will Need
Yarn: Light worsted weight or DK weight (CYCA 3) cotton or cotton-blend yarn. You will need approximately 2,800 to 3,200 yards (2,560 to 2,926 meters) total across all colors.
Here is the color breakdown:
Tip: If you prefer working with gradient yarn for the skirt, a single gradient skein of 800 to 1,000 yards in a coral-to-ivory colorway can replace Colors D, E, and F.
Recommended yarn options:
Avoid fuzzy or textured yarns. They will obscure the basketweave texture and the lace pattern. Stick with smooth cotton or bamboo-cotton blends. The bamboo adds lovely drape to the skirt section.
Hooks:
Notions:
Gauge
Getting gauge right matters a lot for this fitted bodice. Please swatch before starting.
Bodice gauge (E-4 hook, basketweave stitch): 18 stitches x 20 rows = 4 inches x 4 inches (10 cm x 10 cm)
Skirt gauge (F-5 hook, lace fan pattern): One full 12-stitch lace repeat = 2.5 inches (6.4 cm) wide. 8 rows of lace pattern = 3 inches (7.6 cm) tall.
If your gauge is off, adjust your hook size. Too many stitches per inch means you should go up a hook size. Too few means you should go down.
Abbreviations
Let me walk you through all the abbreviations used in this pattern. I will define each one clearly so there is no confusion.
Special Stitches for This Crochet Pattern
These are the techniques that give this dress its distinctive look. Take your time learning them before diving in.
FPdc (Front Post Double Crochet)
This stitch creates raised vertical ridges on the front of your fabric. Here is how to work it:
Yarn over. Insert your hook from front to back to front around the post of the indicated stitch from the previous row. You are going around the vertical bar of the stitch, not through the top loops. Yarn over and pull up a loop. Yarn over and draw through 2 loops. Yarn over and draw through the remaining 2 loops.
BPdc (Back Post Double Crochet)
This stitch sits behind the fabric and creates recessed vertical grooves. It works the same way as FPdc, but you insert your hook from back to front to back around the post instead.
Basketweave Stitch Pattern
This pattern works over a multiple of 8 stitches. Here is the sequence:
Rows 1 and 2: Work 4 FPdc over next 4 sts, work 4 BPdc over next 4 sts. Repeat across.
Rows 3 and 4: Work 4 BPdc over next 4 sts, work 4 FPdc over next 4 sts. Repeat across.
These 4 rows form one complete basketweave square. The alternating raised and recessed blocks create that woven texture you see in the bodice.
Shell Lace Stitch Pattern
This pattern works over a multiple of 12 stitches plus 1.
Row 1 (RS): Ch 3 (counts as dc), 2 dc in first st, sk 2 sts, sc in next st, sk 2 sts, 5 dc in next st (shell made), sk 2 sts, sc in next st, sk 2 sts, 5 dc in last st (half shell at edge). Repeat from bracket.
Row 2 (WS): Ch 1, turn, sc in first dc, ch 2, sk 2 dc, dc in sc, ch 2, sk 2 dc, sc in center dc of shell. Repeat across, ending sc in top of tch.
Row 3 (RS): Ch 3, turn, 2 dc in first sc, sc in next dc, 5 dc in next sc, sc in next dc. Repeat, end 3 dc in last sc.
Peplum Gather Increase
Work 2 dc in every stitch across the peplum foundation row to double the stitch count. This creates the gathered ruffle effect.
Scallop Edging Stitch
Sl st to first st, ch 1, sc in same st, skip 2 sts, 5 dc in next st, skip 2 sts, sc in next st. Repeat around, join with sl st to first sc.
Pattern Notes Before You Begin
The dress is worked in joined rounds for the bodice to eliminate a visible seam. Because the basketweave pattern requires turning each round to keep the post stitches oriented correctly, you will turn your work at the start of each round. Mark the right side with a stitch marker before you begin so you always know which side you are looking at.
Color changes: To create a smooth gradient, change colors in the last yarn over of the last stitch before your join. On the following round, work fully in the new color. For an even smoother transition, alternate one round of the outgoing color with one round of the incoming color for two transition rounds before switching completely.
The peplum is worked back and forth in rows rather than in the round. This allows for slight shaping at the front.
The skirt is worked in rounds from the waist down. The lace pattern naturally provides A-line flare through the fan increases in each shell repeat.
The straps are worked last as simple chain cords, then attached and adjusted to fit.
Throughout the pattern, "round" applies to the bodice and skirt sections. "Row" applies to the peplum and strap sections.
All stitch counts appear at the end of each row or round in parentheses.
Step by Step Instructions
Bodice Section
The bodice is worked in joined, turned rounds beginning with a foundation chain sized to fit the bust.
Foundation Chain:
With Color A (Deep Coral) and E-4 (3.5 mm) hook, ch 154. Being careful not to twist the chain, join with a sl st to the first ch to form a ring.
Note: 154 chains yield 153 working stitches. At 18 stitches per 4 inches, this produces a circumference of approximately 34 inches (86 cm). Adjust your foundation chain in multiples of 8 for different sizes.
Round 1 (RS): Ch 2 (does not count as st here or throughout bodice), turn to WS, hdc in each ch around, join with sl st to first hdc.
Important: On this round, work the last 2 hdc together as an invisible decrease to bring your total to 152 stitches. 152 is divisible by 8 (152 divided by 8 equals 19 repeats). Place marker on RS. (152 hdc)
Round 2 (RS): Ch 2, turn to WS, work Row 1 of basketweave pattern across: (4 FPdc over next 4 sts, 4 BPdc over next 4 sts) 19 times, join with sl st to first FPdc. (152 sts)
Round 3: Ch 2, turn to RS, (4 FPdc over next 4 sts, 4 BPdc over next 4 sts) 19 times, join. (152 sts)
Round 4: Ch 2, turn, (4 BPdc over next 4 sts, 4 FPdc over next 4 sts) 19 times, join. (152 sts)
Round 5: Ch 2, turn, (4 BPdc over next 4 sts, 4 FPdc over next 4 sts) 19 times, join. (152 sts)
Rounds 2 through 5 form the first full basketweave square. Repeat Rounds 2 through 5 for the full basketweave pattern.
Rounds 6 through 9: Continue the basketweave pattern as established. (152 sts each round)
Begin color transition from Color A to Color B (Peach) on Round 10. Change color in last yo of last st of Round 9 before joining.
Rounds 10 through 13 (Color B): Continue basketweave pattern. (152 sts each round)
Waist Shaping
Now we begin tapering from bust to waist. Over the next 11 rounds, you will decrease from 152 stitches to 128 stitches. Your target waist stitch count of 128 (16 repeats of 8) yields approximately 28.4 inches (72 cm) circumference at gauge.
How to work post stitch decreases:
FPdc2tog: Yo, insert hook around post of next st, yo, pull up loop, yo, draw through 2 loops. Yo, insert hook around post of following st, yo, pull up loop, yo, draw through 2 loops. Yo, draw through all 3 loops on hook.
BPdc2tog works the same way from the back.
Round 14 (Color B, begin waist shaping): Ch 2, turn, work basketweave pattern to position 1 (after approximately 48 sts), FPdc2tog over next 2 sts, continue pattern to position 2 (after approximately 48 more sts), FPdc2tog, continue to position 3, FPdc2tog, finish round, join. Work final 2 sts as sc2tog at join for clean stitch alignment. (148 sts)
Round 15: Ch 2, turn, basketweave across, join. (148 sts)
Round 16 (shaping): Ch 2, turn, work 3 evenly spaced FPdc2tog, continue pattern, join. Adjust to 144 sts with 1 sc2tog at end. (144 sts)
Round 17: Ch 2, turn, basketweave across. (144 sts)
Round 18 (shaping): Work 4 evenly spaced FPdc2tog, join. (140 sts)
Round 19: Basketweave across. (140 sts)
Round 20 (shaping): Work 4 evenly spaced FPdc2tog, join. (136 sts)
Round 21: Basketweave across. (136 sts)
Round 22 (shaping, Color C Golden Yellow begins): Change to Color C in last yo of Round 21. Work 4 evenly spaced FPdc2tog, join. (132 sts)
Round 23: Basketweave across. (132 sts)
Round 24 (shaping): Work 4 evenly spaced FPdc2tog, join. (128 sts)
Round 25: Basketweave across (Color C). (128 sts)
Checkpoint 1: After Round 25, the bodice should measure approximately 10 inches (25 cm) from the top edge and approximately 28 to 29 inches (71 to 74 cm) in circumference at the narrowest point. Stitch count is 128.
Peplum Section
The peplum is worked back and forth in rows beginning from the current working round of the bodice. Continue with Color C (Golden Yellow).
Peplum foundation row: Do not turn. Work across the live stitches of Round 25 as follows. Work 2 dc in each stitch around to double the stitch count and create the gathered ruffle. Do not join. Turn to work rows. (256 dc)
Peplum Row 1 (WS): Ch 3 (counts as dc), turn, dc in each st across. (256 dc)
Peplum Row 2 (RS): Ch 3, turn, dc in next 2 sts, 2 dc in next st; (dc in next 3 sts, 2 dc in next st) across to last 3 sts, dc in last 3 sts. (320 dc)
Peplum Row 3 (WS): Ch 3, turn, dc in each st across. (320 dc)
Peplum Row 4 (RS): Ch 3, turn, (dc in 4 sts, 2 dc in next st) 64 times. (384 dc)
Peplum Row 5 (WS): Ch 3, turn, dc in each st across. (384 dc)
Peplum Row 6 (RS): Ch 3, turn, dc in each st across. (384 dc)
Fasten off Color C. Join Color D (Warm Orange) at beginning of peplum for skirt pickup.
Checkpoint 2: The peplum should measure approximately 4 inches (10 cm) in depth from the bodice waist join to the peplum lower edge.
Skirt Section
The skirt is worked in rounds from the peplum join downward using US Size F-5 (3.75 mm) hook. The skirt begins at the waistline join point (the 128-stitch waistline), not from the peplum edge. Pick up stitches by inserting your hook into the base of the peplum foundation row, into the original 128 waist stitches.
Skirt Setup Round: Join Color D (Warm Orange) to any stitch at the waist join with sl st. Ch 3 (counts as dc). Work dc in each waist stitch around: 128 dc total. Join with sl st to top of ch-3 beg. (128 dc)
The lace pattern requires a multiple of 12 stitches plus 1. The closest multiple of 12 to 128 is 132, plus 1 equals 133. You will adjust on Round 1.
Skirt Round 1 (lace setup, inc round): Ch 3, (dc in 25 sts, 2 dc in next st) 5 times, dc in rem 2 sts, join. (133 dc)
This supports 11 full lace repeats of 12 stitches plus 1 edge stitch.
Skirt Round 2 (begin lace pattern, RS): Ch 1, sc in first st, (sk 2 sts, 5 dc in next st, sk 2 sts, sc in next st) 11 times, adjusting final repeat to end at join, sl st to first sc. (11 shells)
Skirt Round 3 (transition row): Ch 5 (counts as dc + ch 2), turn, sk first 3 dc of shell, sc in center dc of shell, ch 2, dc in next sc, (ch 2, sk 2 dc, sc in center dc of shell, ch 2, dc in next sc) 10 times, ch 2, join with sl st to 3rd ch of beg ch-5. (11 dc + 11 sc + 22 ch-2 sps)
Skirt Round 4 (RS): Ch 1, turn, sc in first dc, 5 dc in next sc, sc in next dc; (5 dc in next sc, sc in next dc) 10 times, end 2 dc in same dc as beg sc (to complete half shell), join. (133 sts equivalent)
Skirt Rounds 2 through 4 form one complete lace repeat set. Continue repeating these 3 rounds for the full skirt depth.
Color Sequence for Skirt
Rounds 2 to 10: Color D (Warm Orange), 3 full lace repeats.
Rounds 11 to 19: Transition Color D to Color E (Light Peach) over rounds 11 to 13 (alternate colors each round), then Color E fully for rounds 14 to 19.
Rounds 20 to 28: Color E to Color F (Ivory White) transition over rounds 20 to 22, then Color F for rounds 23 to 28.
Skirt Increase Rounds
Every 9 rounds, on a Round 4 equivalent (the shell round), work 7 dc in each center shell position instead of 5 dc. This adds 2 extra stitches per repeat and increases the circumference gradually for the A-line silhouette.
After completing 9 lace rounds (Rounds 2 through 10, Color D):
Skirt Increase Round A: Work shell round with 7 dc in each shell center. Total active stitches increase to approximately 154 equivalents.
After completing 9 more lace rounds:
Skirt Increase Round B: Work shell round with 9 dc in each shell center. Total active stitches increase to approximately 176 equivalents.
Checkpoint 3: After completing 18 lace rounds, the skirt should measure approximately 13 to 14 inches (33 to 36 cm) from the waist pickup. Hold the piece up to check that the lace fans are opening evenly and the fabric falls smoothly without bunching.
Continue lace rounds in Color E and then Color F until the skirt measures 26 to 28 inches (66 to 71 cm) from waist to desired hem length. End on a Round 4 equivalent (shell round) so the scallop edging attaches neatly.
Checkpoint 4: The total dress length from top of bodice to hem should be 40 to 42 inches (102 to 107 cm) before blocking.
Scallop Hem Edging
With Color F (Ivory White) and F-5 (3.75 mm) hook, join yarn to any sc between shells on the final skirt round.
Edging Round: Ch 1, sc in same st, sk 2 sts, 5 dc in next st (center of shell or open sp), sk 2 sts, sc in next st. Repeat around entire hem, join with sl st to first sc. Fasten off. (Approximately 22 to 24 scallop repeats)
Straps
The straps are thin spaghetti straps worked as simple chain cords.
With Color A (Deep Coral) and E-4 (3.5 mm) hook, ch 80 (approximately 14 inches, adjustable to fit).
Strap Row 1: Sl st in 2nd ch from hook and in each ch across. Fasten off, leaving a 12-inch (30 cm) tail for sewing. (79 sl sts)
Make 2 straps.
Position straps approximately 3 inches (7.6 cm) apart at front and back bodice top edge, centered over the bust. Try on the dress or fit to dress form before securing. Thread tapestry needle with long tail and sew straps securely to bodice top edge using whipstitch, reinforcing with 3 passes.
Finishing Your Coral Sunset Peplum Dress
Weave in all ends securely, particularly at color change points in the bodice and skirt. Use a tapestry needle to bury yarn tails through at least 6 stitches in multiple directions. Cotton yarn can slip loose over time, so take extra care here.
Optional waistband stabilization: Thread thin elastic cord through the waist join row (the pickup round where bodice meets skirt) using a tapestry needle. Draw the cord through each stitch or through alternate stitches. Overlap cord ends by 1 inch (2.5 cm), sew together securely, and tuck the join behind a stitch.
Blocking
Wet blocking is strongly recommended for this dress and really makes the lace skirt shine.
Fill a clean basin with cool water. Submerge the dress fully and allow to soak for 20 minutes. Gently press out water without wringing. Roll in a clean dry towel and press to remove excess moisture.
Lay flat on a blocking board or clean carpet. Pin the bodice to its finished measurements. Stretch the lace skirt gently outward to open the fan motifs and pin the scalloped hem to its widest measurement. Allow to dry completely. This may take 24 to 48 hours depending on humidity.
Once dry, the lace skirt will retain its open, flowing shape.
Size Customization Tips
To adjust the bust size, change the foundation chain in multiples of 8 stitches. Each additional 8-stitch repeat adds approximately 1.75 inches (4.5 cm) to the bust circumference.
For a larger size, begin with a larger foundation chain. For example, a size Large with a 38-inch (97 cm) bust uses a foundation chain of 174, adjusted to 176 (22 repeats of 8) for basketweave divisibility.
Adjust waist shaping decreases to achieve a proportionate waist-to-bust ratio. As a general guide, decrease to 80 to 85 percent of your bust stitch count at the waist.
To lengthen the bodice, work additional rounds of basketweave pattern before beginning waist shaping. Each 2 rounds of basketweave adds approximately 0.4 inches (1 cm) of length.
To lengthen the skirt, continue adding lace repeat sets (3 rounds each) until the desired length is reached. Each 3-round lace set adds approximately 1 inch (2.5 cm) of skirt length.
The peplum depth can be increased by working additional rows of dc before beginning the skirt pickup.
Care Instructions
Hand wash in cool water with a gentle soap or wool wash. Do not wring. Press gently in a towel to remove water. Lay flat to dry away from direct sunlight, which can fade the coral and orange hues.
Do not tumble dry or iron directly. If using a yarn labeled machine washable, a delicate cycle in a mesh laundry bag is acceptable.
Store folded flat or on a wide padded hanger to preserve the skirt’s shape.
Final Thoughts on This Crochet Tutorial
This dress is genuinely a showstopper. The combination of the structured basketweave bodice, the playful peplum, and that gorgeous flowing lace skirt creates something special. Yes, it takes time. Yes, it requires focus. But when you slip it on and see how beautifully those colors cascade from coral to ivory, every hour of work feels worth it.
Take your time with the post stitches in the bodice section. They can feel awkward at first, but once you get into the rhythm, they become almost meditative. The skirt section moves faster because the lace pattern is more open and the stitches cover more ground.
Thank you so much for choosing this pattern. I hope you love making it as much as I loved designing it. If you finish your dress, I would absolutely love to see it! Tag me on Instagram or share a photo in my Facebook group. Seeing your finished projects genuinely makes my day.
If you enjoyed working on this coral sunset peplum dress crochet pattern, save it to your Pinterest boards so you can find it easily later. And please leave a comment below if you make it. I love hearing how projects turn out and seeing the color combinations you choose!
You Might Also Like
- Coral Reef Fish Crochet Beach Tote Free Pattern
- Pastel Daisy Crochet Hoodie Free Crochet Pattern
- Blush Pink Cherry Blossom Granny Bag Free Pattern
- Blush Pink Romantic Granny Backpack Free Crochet Pattern