
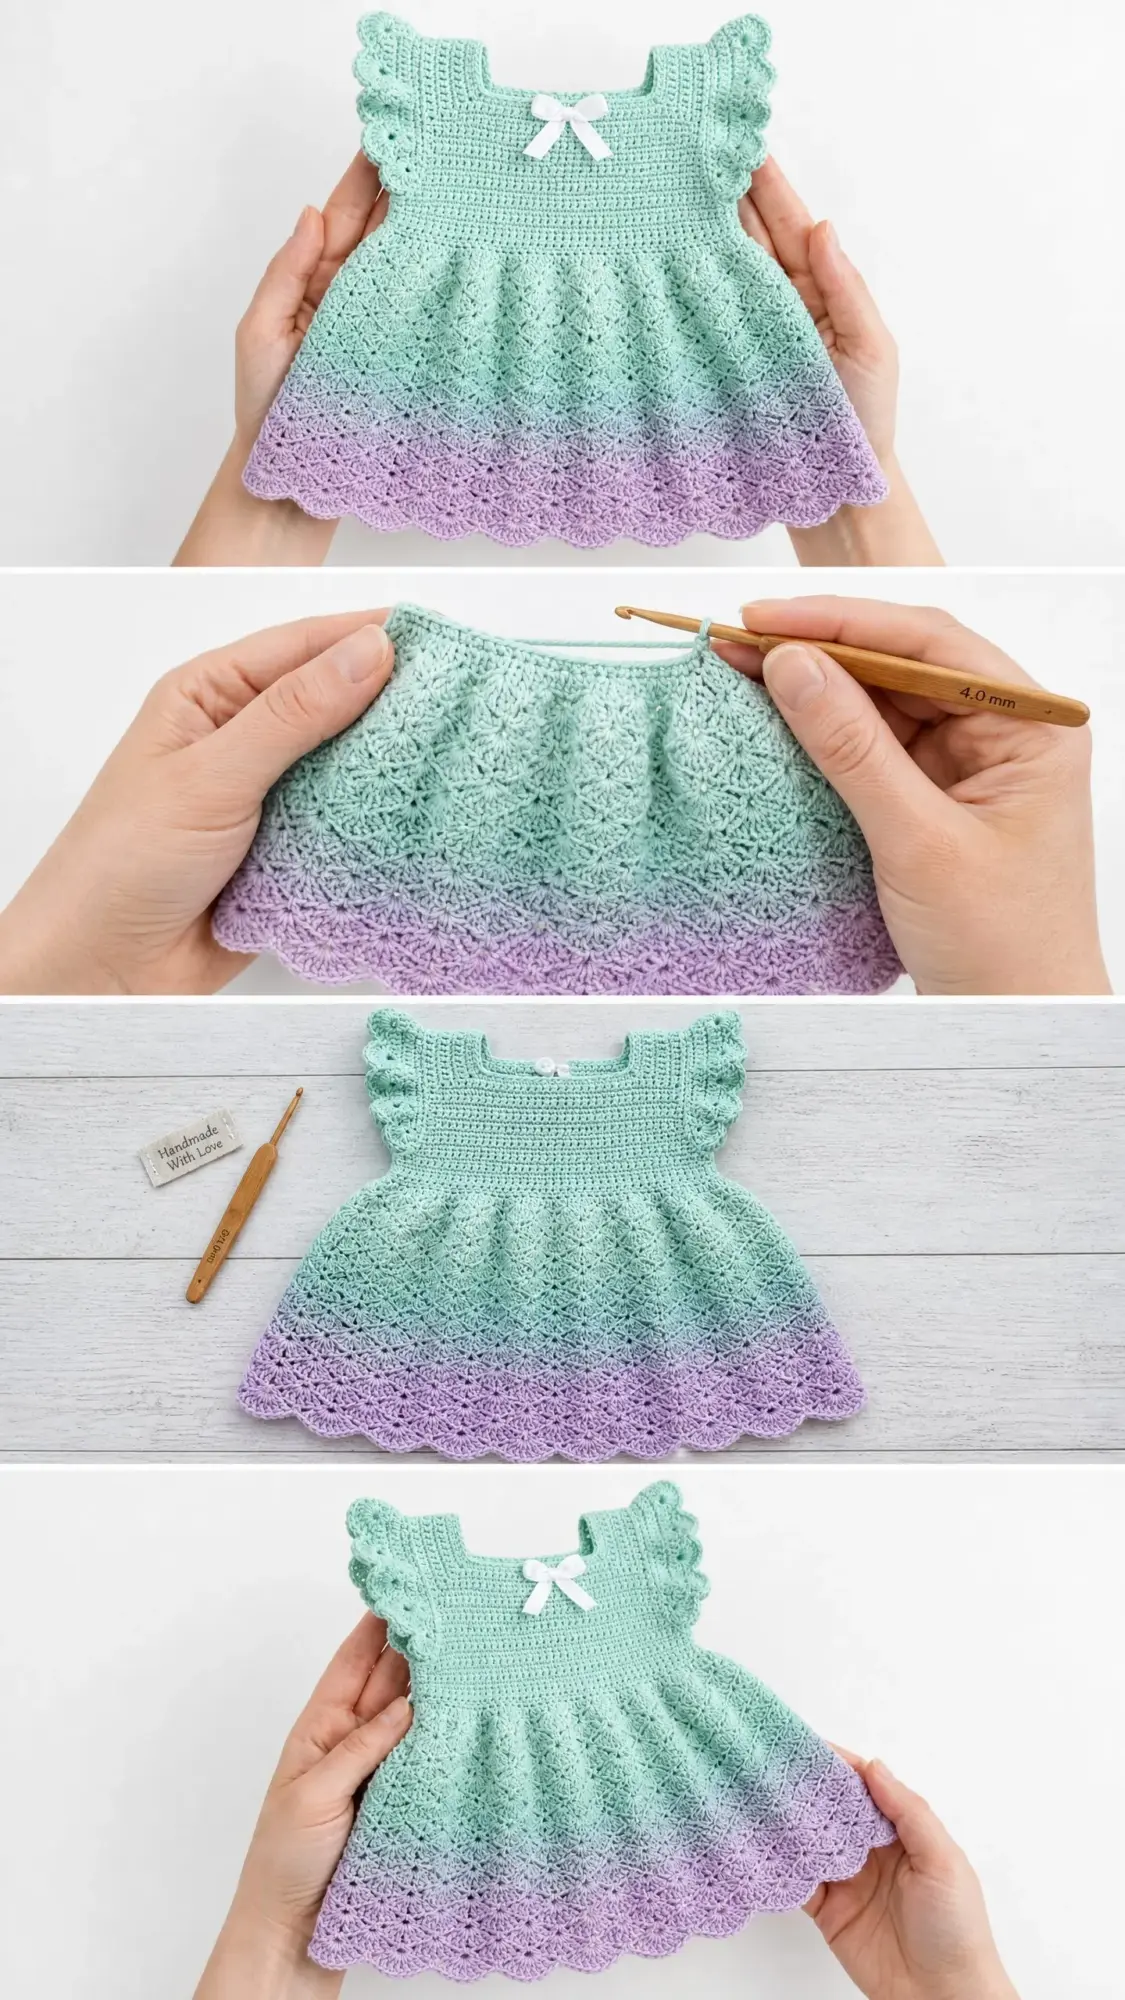
I set out to design a baby dress that would feel special without being fussy. Something with beautiful texture, a flattering silhouette, and colors that felt fresh and modern. The square neckline, the flutter sleeves, the gradient from cool mint to soft lavender, the shell stitch hem with those perfect scallops. Every detail was intentional.

This dress works from the top down in one piece, which means you can try it on as you go and adjust the length easily. The bodice uses simple single crochet for structure, while the skirt transitions through a diamond lattice stitch into flowing shell fans at the hem. Two distinct textures in one garment.
I am SO pleased with how it turned out. It looks complicated, but I promise you can handle this if you have worked with shells before and feel comfortable joining pieces.
About This Crochet Pattern
This crochet baby dress pattern creates a sweet A-line silhouette sized for 12 to 18 months. The finished measurements give you a chest circumference of approximately 20 inches and a total length from shoulder to hem of about 15 inches. The structured bodice sits at 6 inches, while the flowing skirt adds another 9 inches of swishy movement.
The color story here is simple but striking. You will start with mint green at the top, work through the bodice and most of the skirt, then transition to lavender for that dreamy shell stitch hem. The gradient happens naturally because you are changing colors at a specific round. No fancy yarn required.
Construction method: The dress builds in this order. First you work three bodice panels flat. Then you join them at the underarms. Then you work the skirt in rounds going downward. Finally you pick up stitches around the armholes and add those adorable flutter sleeves. A button loop closure at the back neck finishes everything off.
Materials You Will Need
Yarn: DK weight yarn, CYCA #3, in cotton or cotton-acrylic blend
Hook: US size G-6 / 4.0 mm crochet hook, or size needed to meet gauge
Notions:
Yarn suggestions: Lion Brand 24/7 Cotton in Mint and Lilac works beautifully. Paintbox Yarns Simply DK in Spearmint Green and Dusty Violet is another excellent choice. For a more luxurious finish, try Scheepjes Catona held double in Chrystalline and Lavender.
Choose a smooth yarn with good stitch definition. Fuzzy or textured yarns will obscure the pretty shell and lattice details. Cotton or cotton-blend yarns block beautifully and feel perfect against baby skin.
Gauge
18 single crochet (sc) and 20 rows equals 4 inches, worked flat with a US G-6 hook, blocked.
For the shell stitch section, one complete 6-stitch shell fan repeat measures approximately 1.33 inches wide and 0.75 inches tall.
To make a gauge swatch: Chain 24. Work in single crochet for 24 rows. Fasten off and block. Measure the center 18 stitches and 20 rows. If your swatch is too small, go up a hook size. If it is too large, go down a hook size. Gauge matters here because this is a garment that needs to fit.
Abbreviations
Single crochet (sc): Insert hook into stitch, yarn over, pull up a loop, yarn over, pull through both loops. This is your basic short stitch.
Double crochet (dc): Yarn over, insert hook into stitch, yarn over, pull up a loop, yarn over, pull through two loops, yarn over, pull through remaining two loops. This taller stitch creates the shells.
Chain (ch): Yarn over, pull through loop on hook. Creates foundation and spacing.
Slip stitch (sl st): Insert hook, yarn over, pull through stitch and loop on hook in one motion. Used for joining rounds.
Chain space (ch-sp): The gap created by chains in the previous row or round. You work into this space, not into the chain itself.
Skip (sk): Pass over the indicated stitch without working into it.
Sc2tog (single crochet two together): Insert hook into first stitch, pull up a loop, insert hook into next stitch, pull up a loop, yarn over, pull through all three loops. This decreases one stitch.
Special Stitches Explained
Shell Fan Stitch: Work 5 double crochet into the same stitch or chain space. This creates a fan shape. In this pattern, shells are separated by a chain-1 space and anchored to the middle stitch of the previous shell.
Diamond Lattice Stitch: This texture alternates between two row types. Row A works a V-stitch (dc, ch 1, dc) into one spot, then skips a stitch, then works a single crochet, then skips another stitch. Row B reverses the positions, placing single crochets into the V-stitch chain spaces and V-stitches into the single crochets. The alternation creates the diamond pattern you see in the skirt.
Flutter Sleeve Scallop: A decorative edge created by working slip stitch, chain 2, 4 double crochet, chain 2, slip stitch all into the same stitch. This forms a little fan that repeats around the armhole.
Pattern Notes Before You Begin
The bodice is worked flat in rows. You will make three separate pieces, then join them with chain bridges at the underarms.
All turning chains in the bodice: chain 1 does NOT count as a stitch. In the skirt shell section: chain 3 DOES count as the first double crochet. I will remind you at each section.
The back opening runs from the neck down approximately 2.5 inches. This allows the dress to slip over baby’s head when the button is unfastened.
Place a stitch marker at the beginning of each skirt round. This helps you track where rounds start, especially in the lattice section where the visual pattern can distract you.
Step by Step Pattern Instructions
Back Bodice Right Panel
Using Color A, chain 23.
Row 1 (WS): Sc into the 2nd chain from hook and into each chain across. Turn. (22 sc)
Row 2 (RS): Ch 1, sc into each stitch across. Turn. (22 sc)
Rows 3 through 12: Repeat Row 2. Turn after each row. (22 sc)
After Row 12, the panel measures approximately 2.5 inches tall. Place a stitch marker at the armhole edge, which is the right edge when looking at the right side. Set aside but do not fasten off.
Back Bodice Left Panel
Using Color A, chain 23.
Row 1 (WS): Sc into the 2nd chain from hook and into each chain across. Turn. (22 sc)
Rows 2 through 12: Ch 1, sc across. Turn. (22 sc)
Place a stitch marker at the armhole edge, which is the left edge when the right side is facing. Set aside but do not fasten off.
Front Bodice
Using Color A, chain 41.
Row 1 (WS): Sc into the 2nd chain from hook and into each chain across. Turn. (40 sc)
Rows 2 through 12: Ch 1, sc across. Turn. (40 sc)
Place stitch markers at both ends to mark the armhole edges. Set aside.
Yoke Joining Row
This row unites all three bodice panels with chain underarm bridges.
With right side facing, hold the Back Right Panel with the yarn still attached at the top of the last row.
Joining Row (RS): Ch 1, sc across 22 stitches of Back Right Panel. Chain 4 for the underarm bridge. Sc across 40 stitches of Front Bodice. Chain 4 for the second underarm bridge. Sc across 22 stitches of Back Left Panel using the yarn attached to that panel, or join a new strand of Color A with a standing sc. Turn.
Stitch count: 22 + 4 ch-bridge + 40 + 4 ch-bridge + 22 = 88 stitches and 8 chain stitches.
Skirt Setup Round
Turn the joined piece so the wrong side faces you. The skirt is now worked in joined rounds from this point down.
Round 1 Setup: With right side facing, join Color A with slip stitch to the first stitch at the center front bottom of the joining row. Ch 1. Sc across all stitches, working 1 sc into each of the 4 underarm bridge chains on each side as well. Join with slip stitch to first sc. (88 sc)
At the waist joining round you should have 88 sc total forming a complete circle. The waist should measure approximately 19 to 20 inches when the back edges are pinned together.
Skirt Diamond Lattice Section in Color A
Lattice Round 1: Ch 4, which counts as dc plus ch 1. Skip next stitch. Work (dc, ch 1, dc) into next stitch. Skip next stitch. Sc into next stitch. Skip next stitch. Repeat from (dc, ch 1, dc) into next stitch, skip next stitch, sc into next stitch around. End with slip stitch to 3rd chain of beginning ch-4. (22 V-sts, 22 sc)
Lattice Round 2: Ch 1. Sc into the first ch-1 space of first V-stitch. Ch 1. Dc into next sc. Ch 1. Sc into next ch-1 space. Ch 1. Dc into next sc. Repeat around. Join with slip stitch to first sc. (44 sc, 44 dc)
Lattice Round 3: Ch 4, which counts as dc plus ch 1. Dc into same space as beginning to form the first V-stitch. Skip the next dc. Sc into the next sc. Skip next dc. Work (dc, ch 1, dc) into next sc. Repeat around. Join with slip stitch to 3rd chain of beginning ch-4. (22 V-sts, 22 sc)
Lattice Round 4: Repeat Lattice Round 2. (44 sc, 44 dc)
Lattice Round 5: Repeat Lattice Round 3. (22 V-sts, 22 sc)
Lattice Round 6: Repeat Lattice Round 2. (44 sc, 44 dc)
Skirt Expansion Round
Expansion Round 7: Ch 1. Sc into the first ch-1 space. Work 2 sc into the next dc for an increase. Sc into the next sc. Work 2 sc into the next dc for an increase. Repeat around. Join with slip stitch to first sc. (110 sc)
Stitch Count Adjustment
Adjustment Round 8: Ch 1. Sc2tog over next 2 stitches. Sc across 53 stitches. Sc2tog. Sc across remaining 53 stitches. Join with slip stitch to first sc. (108 sc)
Now you have 108 stitches, which divides evenly by 4 for the lattice repeat.
Continuing the Diamond Lattice
Lattice Round 9: Ch 4, which counts as dc plus ch 1. Skip next stitch. Work (dc, ch 1, dc) into next stitch. Skip next stitch. Sc into next stitch. Repeat around. Join with slip stitch to 3rd chain of beginning ch-4. (27 V-sts, 27 sc)
Lattice Round 10: Ch 1. Sc into first ch-1 space. Ch 1. Dc into next sc. Ch 1. Sc into next ch-1 space. Ch 1. Dc into next sc. Repeat around. Join with slip stitch to first sc. (54 sc, 54 dc)
Lattice Round 11: Repeat Lattice Round 9 structure. (27 V-sts, 27 sc)
Lattice Round 12: Repeat Lattice Round 10. (54 sc, 54 dc)
Lattice Round 13: Repeat Lattice Round 9 structure. (27 V-sts, 27 sc)
Lattice Round 14: Repeat Lattice Round 10. (54 sc, 54 dc)
After Round 14, the skirt from waist should measure approximately 6 inches.
Hem Expansion Round
Expansion Round 15: Ch 1. Sc across each working position of Round 14, placing 2 sc into every 18th sc for 6 increases total. Join with slip stitch to first sc. (114 sc)
To distribute evenly, work 17 sc, then 2 sc into next stitch. Repeat 5 more times, then sc to end of round.
Color Change
At the end of Round 15, join Color B. Before making the final slip stitch join, draw up Color B through the loop on the hook to complete the slip stitch. Fasten off Color A. Continue all remaining rounds in Color B.
Skirt Shell Hem Section in Color B
Shell Round 1: Ch 3, which counts as first dc. Work 4 dc into same stitch as join to complete the beginning shell. Skip 2 stitches. Sc into next stitch. Skip 2 stitches. Work 5 dc into next stitch for a shell. Repeat around. End with slip stitch to top of beginning ch-3. (19 shells, 19 sc)
Shell Round 2: Ch 1. Sc into same stitch as join, which is the center of the beginning shell. Ch 2. Work 5 dc into next sc. Ch 2. Sc into center dc of next shell. Repeat around. Join with slip stitch to first sc. (19 shells, 19 sc)
Shell Round 3: Ch 3, which counts as dc. Work 4 dc into same sc for beginning shell. Ch 1. Sc into center dc of next shell. Ch 1. Work 5 dc into next sc. Repeat around. Join with slip stitch to top of beginning ch-3. (19 shells, 19 sc)
Shell Round 4: Ch 1. Sc into same stitch. Ch 2. Work 5 dc into next sc. Ch 2. Sc into center dc of next shell. Repeat around. Join with slip stitch to first sc. (19 shells, 19 sc)
Shell Round 5: Ch 3. Work 4 dc into same sc. Ch 1. Sc into center dc of shell. Ch 1. Work 5 dc into next sc. Repeat around. Join with slip stitch to top of ch-3. (19 shells, 19 sc)
Scallop Border Round
Scallop Round: Ch 1. Sc into same stitch. Work 5 dc into next sc. Sc into center dc of next shell. Repeat around. Join with slip stitch to first sc. Fasten off. (19 shells, 19 sc)
The completed skirt from waist to hem should measure approximately 9 inches.
Flutter Sleeves
Each armhole opening spans the 12 bodice rows plus the 4-chain underarm bridge, giving approximately 30 stitch positions per armhole.
Flutter Sleeve Setup Round: With right side facing and Color A, join yarn with slip stitch at the center underarm bridge of one armhole. Ch 1. Work 30 sc evenly around the armhole opening. Distribute approximately 12 sc up the back armhole edge, 4 sc along the top shoulder curve, 12 sc down the front armhole edge, and 2 sc across the underarm chain bridge. Join with slip stitch to first sc. (30 sc)
Flutter Scallop Round: Work (slip stitch into next stitch, ch 2, 4 dc into same stitch, ch 2, slip stitch into same stitch) into every 3rd sc around. Work 10 scallops total. Join with slip stitch. Fasten off. (10 scallops)
Repeat for the second armhole.
Neckline and Back Opening Edging
With right side facing and Color A, join yarn at the top right corner of the back right panel.
Neckline Edging Round: Ch 1. Sc evenly along the right back opening edge, approximately 12 sc. Continue across the back neck, approximately 22 sc. Continue along the top of the front neckline, approximately 40 sc. Continue across the second back neck section, approximately 22 sc. Work down the left back opening edge, approximately 12 sc. Do not join. Work is now flat along the opening. (approximately 108 sc)
Edging Row 2: Sc into each sc along the entire edging, working 3 sc into each corner stitch at the four neckline corners to keep the work flat. Turn. (approximately 112 sc)
At the top of the right back opening, work the button loop:
Button Loop: Ch 6. Skip 3 sc. Slip stitch into next sc. Fasten off.
Sew the button to the corresponding position on the left back panel.
Finishing Your Baby Dress
Weave in all yarn ends securely using your yarn needle. Work the tails through the backs of stitches in multiple directions to prevent unraveling.
Blocking: Soak the finished dress in cool water with a small amount of gentle wash for 15 minutes. Roll in a clean towel to remove excess water. Do not wring. Lay flat on a blocking mat. Pin the hem scallops outward to open them fully. Pin the neckline corners to right angles. Pin the flutter sleeves flat. Allow to dry completely before removing pins.
Size Customization Tips
To size up to 2T to 3T: Begin bodice panels with chain 27 for backs and chain 49 for front. Work 14 rows instead of 12. Adjust stitch counts accordingly.
To size down to 6 to 9 months: Begin bodice panels with chain 19 for backs and chain 35 for front. Work 10 rows.
To lengthen: Add one more pair of lattice rounds before the expansion round.
To shorten: Remove one pair of lattice rounds.
Always ensure your final stitch count before the shell hem is divisible by 6.
Care Instructions
Machine wash gentle cycle in cool water using a mesh laundry bag. Lay flat to dry. Do not tumble dry. If pressing is needed, use a damp cloth between the iron and the fabric on the reverse side.
Store folded flat. Avoid hanging, which can stretch the skirt over time.
Thank you so much for choosing this pattern! I really hope you love making this dress as much as I loved designing it. If you make one, I would absolutely love to see it. Tag me on Instagram or share a photo in my Facebook group.
Save this crochet tutorial to your Pinterest boards so you can find it when you are ready to start. And please drop a comment below if you make this dress. I love hearing how your projects turn out and seeing the color combinations you choose!
You Might Also Like
- Pastel Rainbow Unicorn Granny Square Blanket Free Pattern
- Dusty Rose Garden Bobble Sweater Free Crochet Pattern
- Ocean Blue Chameleon Amigurumi Free Crochet Pattern
- Blush Pink Shell Stitch Halter Dress Free Crochet Pattern