
You know that gorgeous skein of DK weight yarn you’ve been saving for something special? This is the project. Dig it out of your stash because this little dress is worth every yard of that precious fiber you’ve been hoarding.
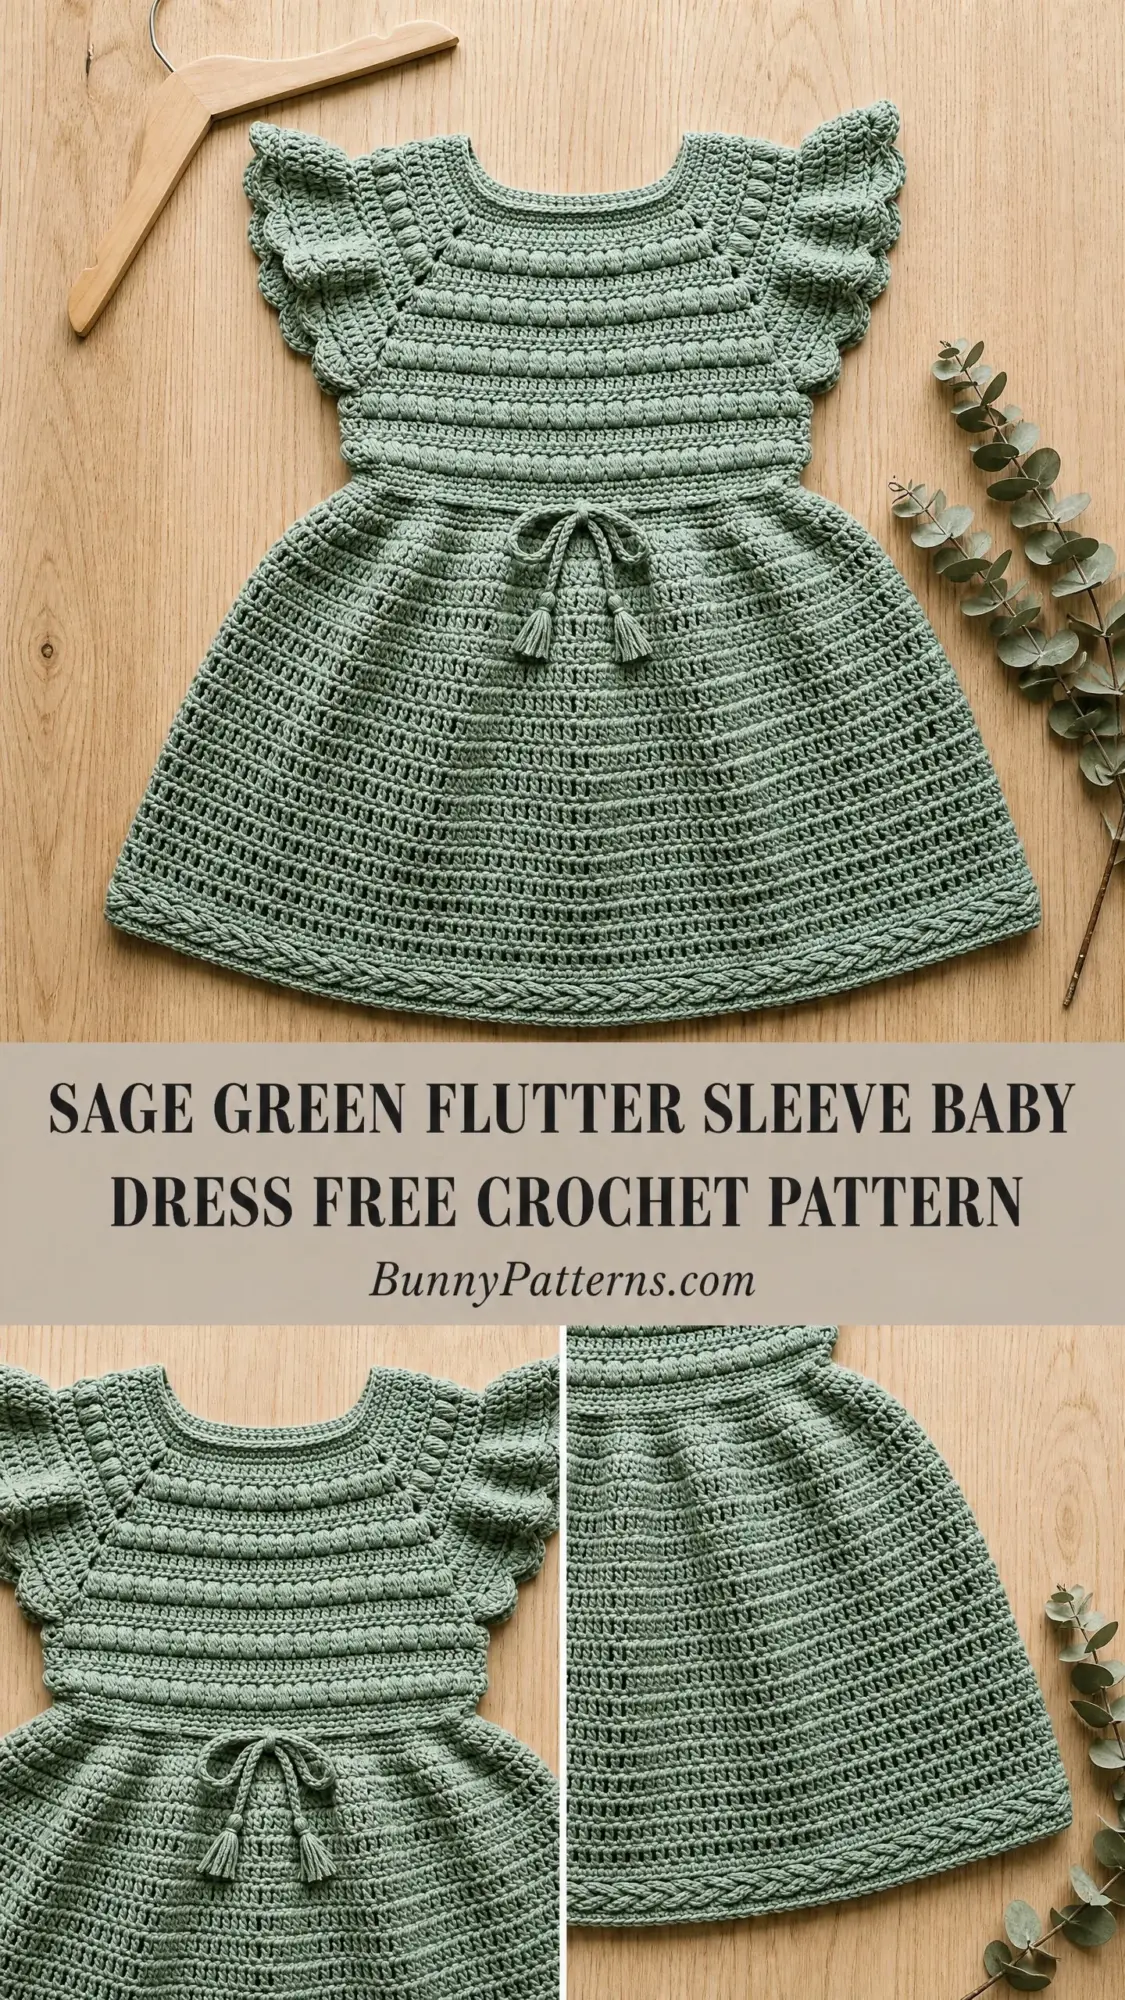
This sage green flutter sleeve baby dress combines a textured bobble bodice, dreamy ruffled sleeves, and a beautifully flared skirt with a braided cable border at the hem. The construction moves from top to bottom, starting flat for the yoke and bodice, then joining in the round for the skirt. It’s an intermediate level project, so I’ll be honest with you. If you’ve never worked bobble stitches or surface slip stitches before, this will stretch your skills. But that’s exactly what makes it so satisfying to complete.
The finished dress fits babies 12 to 18 months and features a drawstring waist with adorable tassel accents. Every detail comes together to create something that looks far more complicated than it actually is. Let me walk you through the entire process step by step.
Why This Baby Dress Pattern Works So Well
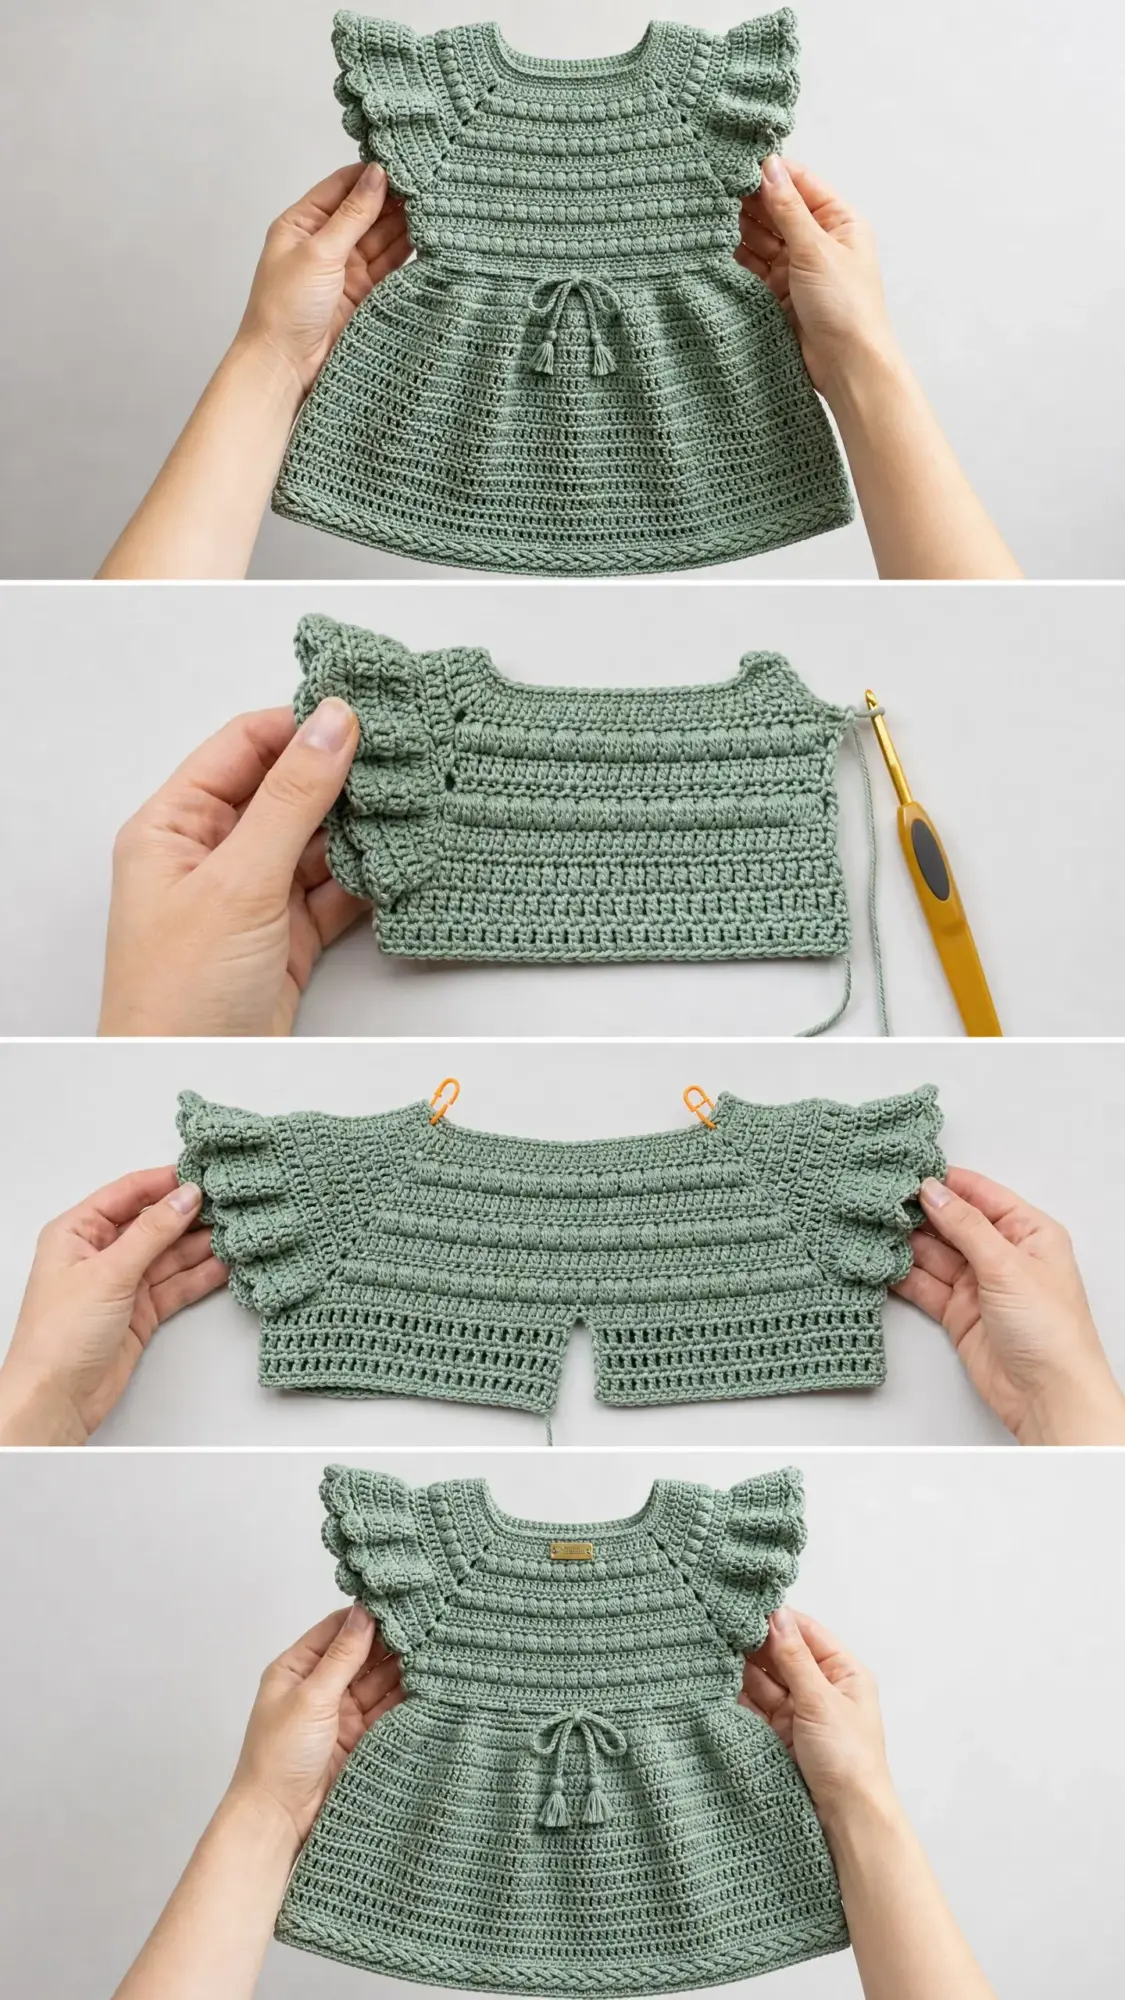
The genius of this design lies in the construction method. You work the front and back bodice panels separately as flat pieces, seam them at the shoulders and sides, then join everything into a tube for the skirt. This approach gives you complete control over fit and makes it easy to try the dress on as you go.
The flutter sleeves get picked up and worked outward from the armhole edges after the body is assembled. They’re worked flat rather than in the round, which creates that gorgeous butterfly wing effect you see in the finished piece. The ruffles build quickly through strategic increases that double the stitch count twice before finishing with a scalloped edge.
The braided cable hem border looks incredibly impressive, but it’s actually surface slip stitches worked in diagonal passes after the skirt is complete. Two passes crossing each other create the illusion of a woven braid. It’s one of those techniques that seems intimidating until you try it and realize it’s just slip stitches worked on top of the fabric.
Materials You’ll Need
Yarn: DK weight (CYCA 3, Light), approximately 380 to 420 yards total in sage green
Hook: US Size G-6 / 4.00 mm for bodice, yoke, and skirt. US Size F-5 / 3.75 mm for flutter sleeves and hem border
Notions:
Yarn Suggestions That Work Beautifully
Paintbox Yarns Simply DK in the Spearmint colorway matches this sage green perfectly. It’s 100% premium acrylic, machine washable, and you’ll need 3 skeins at 137 yards per skein.
Drops Safran offers slightly more drape with its 50% cotton, 50% acrylic blend. The skirt will have beautiful movement with this option. You’ll need approximately 3 skeins at 175 yards per skein.
Lion Brand 24/7 Cotton gives excellent stitch definition thanks to its mercerized finish. The bobble texture on the bodice really pops with this yarn. You’ll need 2 to 3 skeins at 186 yards per skein.
Avoid fluffy or bouclé yarns for this project. Stitch definition matters for the bobble rows and braided border.
Finished Measurements
This pattern fits size 12 to 18 months with these finished dimensions:
Gauge
With G-6 / 4.00 mm hook: 18 stitches x 20 rows = 4 inches / 10 cm in single crochet, blocked
Please check your gauge before starting. One stitch difference over 4 inches will alter the chest circumference by over 1 inch and the skirt circumference by over 2 inches. Make a swatch, wash it, block it, then measure. Adjust hook size up or down until your swatch matches.
Abbreviations and Stitch Definitions
ch = chain: yarn over, pull through loop on hook
sc = single crochet: insert hook, yarn over, pull up loop, yarn over, pull through both loops
hdc = half double crochet: yarn over, insert hook, pull up loop, yarn over, pull through all 3 loops
dc = double crochet: yarn over, insert hook, pull up loop, yarn over, pull through 2 loops, yarn over, pull through remaining 2 loops
sl st = slip stitch: insert hook, yarn over, pull through stitch and loop on hook
sk = skip
st(s) = stitch(es)
RS = right side
WS = wrong side
pm = place marker
bo = bobble stitch (see special stitch instructions below)
ss = surface slip stitch
Special Stitches
Bobble Stitch (bo)
This creates a raised bump that pops out from the fabric. Here’s how to work it:
1. Yarn over and insert hook into the indicated stitch
2. Pull up a loop, yarn over, pull through 2 loops (one incomplete double crochet on hook)
3. Yarn over and insert hook into the same stitch again, pull up a loop, yarn over, pull through 2 loops
4. Yarn over and insert hook into the same stitch again, pull up a loop, yarn over, pull through 2 loops
5. Yarn over and pull through all 4 loops on hook
6. Chain 1 to close and secure the bobble (this closing chain does NOT count as a stitch)
Important tip: The bobble rows are worked on WS rows so the bobbles face outward on the RS. If your bobbles pop toward you as you work, just push them through to the other side after completing the row.
Surface Slip Stitch (for the braided border)
After the skirt is complete, you’ll create the braided look by working slip stitches on top of the fabric:
1. With RS facing, insert hook from front to back in the indicated stitch
2. Draw up a loop from the WS through to the RS
3. Move 2 stitches to the left and 1 round up diagonally, insert hook from front to back
4. Draw loop through the fabric AND through the loop on hook
You’ll work this in two passes, one going left and one going right, to create the braid illusion.
Pattern Instructions
Section 1: Front Yoke and Bodice (worked flat)
Foundation: Chain 45.
Row 1 (RS): Sc in 2nd ch from hook and in each ch across. Turn. (44 sc)
Row 2 (WS): Ch 1, sc in each st across. Turn. (44 sc)
Row 3 (RS) Increase row: Ch 1, 2 sc in first st, sc in next 10 sts, 2 sc in next st, sc in next 18 sts, 2 sc in next st, sc in next 10 sts, 2 sc in last st. Turn. (48 sc)
Row 4 (WS): Ch 1, sc in each st across. Turn. (48 sc)
Row 5 (RS) Increase row: Ch 1, 2 sc in first st, sc in next 11 sts, 2 sc in next st, sc in next 20 sts, 2 sc in next st, sc in next 11 sts, 2 sc in last st. Turn. (52 sc)
Row 6 (WS): Ch 1, sc in each st across. Turn. (52 sc)
Row 7 (RS) Increase row: Ch 1, 2 sc in first st, sc in next 12 sts, 2 sc in next st, sc in next 22 sts, 2 sc in next st, sc in next 12 sts, 2 sc in last st. Turn. (56 sc)
Row 8 (WS) First Bobble Row: Ch 1, sc in first 3 sts, (bo in next st, sc in next 3 sts) across, ending sc in last st. Turn. (56 sts; 13 bobbles)
Row 9 (RS): Ch 1, sc in each st across. Turn. (56 sc)
Row 10 (WS) Increase row: Ch 1, 2 sc in first st, sc in next 13 sts, 2 sc in next st, sc in next 24 sts, 2 sc in next st, sc in next 13 sts, 2 sc in last st. Turn. (60 sc)
Row 11 (RS): Ch 1, sc in each st across. Turn. (60 sc)
Row 12 (WS) Second Bobble Row: Ch 1, sc in first st, (bo in next st, sc in next 3 sts) across, ending bo in last bobble position, sc in last st. Turn. (60 sts; 15 bobbles)
Row 13 (RS): Ch 1, sc in each st across. Turn. (60 sc)
Row 14 (WS) Increase row: Ch 1, 2 sc in first st, sc in next 14 sts, 2 sc in next st, sc in next 26 sts, 2 sc in next st, sc in next 14 sts, 2 sc in last st. Turn. (64 sc)
Row 15 (RS): Ch 1, sc in each st across. Turn. (64 sc)
Row 16 (WS) Third Bobble Row: Ch 1, sc in first 3 sts, (bo in next st, sc in next 3 sts) across, ending sc in last st. Turn. (64 sts; 16 bobbles)
Row 17 (RS): Ch 1, sc in each st across. Turn. (64 sc)
Row 18 (WS): Ch 1, sc in each st across. Turn. (64 sc)
Place a locking stitch marker in the last working loop and set aside.
Section 2: Back Yoke and Bodice (worked flat)
The back is identical to the front except it has no bobble rows. All WS rows are plain sc rows.
Foundation: Chain 45.
Row 1 (RS): Sc in 2nd ch from hook and in each ch across. Turn. (44 sc)
Rows 2 through 18: Work all rows as plain sc on both RS and WS rows, working the same increase rows at Rows 3, 5, 7, 10, and 14. All other rows: Ch 1, sc in each st across. Turn.
After Row 18, you will have 64 sc. Fasten off leaving a 12 inch tail for seaming.
Section 3: Joining at Shoulders and Adding Bodice Extension Rows
Place the front and back bodice panels with RS facing each other. Using a yarn needle and yarn tail, seam the shoulder edges together. The shoulder seam spans the first 10 stitches on each side edge (left and right shoulders). The center 44 stitches remain open as the neckline.
After seaming, join yarn to the bottom edge of the front bodice panel at the right side edge, RS facing.
Bodice Extension Row 1 (RS): Working across the bottom 64 sts of the front bodice, sc across. Turn. (64 sc)
Bodice Extension Row 2 (WS) Eyelet Row: Ch 1, sc in first 2 sts, (ch 1, sk 1 st, sc in next 2 sts) x 20, sc in last 2 sts. Turn. (44 sc + 20 ch-1 eyelets = 64 working positions)
Bodice Extension Row 3 (RS): Ch 1, sc in each sc and in each ch-1 sp across. Turn. (64 sc)
Repeat on the back bodice panel bottom edge identically.
Section 4: Side Seams and Joining for the Skirt
With RS facing each other, seam the side edges of the front and back bodice together, leaving an armhole opening of approximately 2 inches at the top of each side seam. Mark the armhole boundaries with stitch markers.
After side seaming, join yarn to the bottom edge at the side seam with a sl st, placing marker for beginning of round.
Join Round: Ch 1, sc in each st around, sl st to first sc to join. Pm for beginning of round. (128 sc)
Section 5: Skirt (worked in joined rounds from waist down)
Round 1: Ch 1, sc in each st around, sl st to join. (128 sc)
Round 2 Increase Round: Ch 1, (sc in next 7 sts, 2 sc in next st) x 16, sl st to join. (144 sc)
Rounds 3 and 4: Ch 1, sc in each st around, sl st to join. (144 sc)
Round 5 Increase Round: Ch 1, (sc in next 8 sts, 2 sc in next st) x 16, sl st to join. (160 sc)
Rounds 6 and 7: Ch 1, sc in each st around, sl st to join. (160 sc)
Round 8 Increase Round: Ch 1, (sc in next 9 sts, 2 sc in next st) x 16, sl st to join. (176 sc)
Rounds 9 and 10: Ch 1, sc in each st around, sl st to join. (176 sc)
Round 11 Increase Round: Ch 1, (sc in next 10 sts, 2 sc in next st) x 16, sl st to join. (192 sc)
Rounds 12 and 13: Ch 1, sc in each st around, sl st to join. (192 sc)
Round 14 Increase Round: Ch 1, (sc in next 11 sts, 2 sc in next st) x 16, sl st to join. (208 sc)
Rounds 15 and 16: Ch 1, sc in each st around, sl st to join. (208 sc)
Round 17 Increase Round: Ch 1, (sc in next 12 sts, 2 sc in next st) x 16, sl st to join. (224 sc)
Rounds 18, 19, and 20: Ch 1, sc in each st around, sl st to join. (224 sc)
Round 21 Final Increase Round: Ch 1, (sc in next 13 sts, 2 sc in next st) x 16, sl st to join. (240 sc)
Rounds 22 and 23: Ch 1, sc in each st around, sl st to join. (240 sc)
Do not fasten off.
Section 6: Flutter Sleeves
Switch to the smaller hook (F-5 / 3.75 mm).
With RS facing, join yarn to the top of the armhole opening at the shoulder seam.
Pick-Up Row: Sc evenly around the entire armhole opening, picking up 1 st per row end. You should have approximately 20 sc around the armhole. Pm. (20 sc)
Sleeve Row 1 (Increase): Ch 1, 2 sc in each st around. (40 sc)
Turn to work flat (not in the round) for the remaining ruffle rows.
Sleeve Row 2: Ch 2 (does not count as st), 2 hdc in each st across. Turn. (80 hdc)
Sleeve Row 3 Scallop Edging: Ch 1, (sl st in next st, ch 3, 3 dc in same st as sl st, sl st in next st) across. Fasten off. (40 scallops)
Repeat for the second armhole.
Section 7: Neckline Edging
With the smaller hook (F-5 / 3.75 mm), join yarn to the center back neckline with RS facing.
Neckline Round 1: Ch 1, sc evenly around the neckline opening (approximately 96 sc around). Sl st to join. (96 sc)
Neckline Round 2 Scallop Edging: (Sl st in next st, ch 3, 3 dc in same st, sl st in next st) around. Fasten off. (48 scallops)
Section 8: Drawstring Cord and Tassels
With the main hook (G-6 / 4.00 mm), chain 100. Sl st in 2nd ch from hook and in each ch across. Fasten off. (99 sl sts)
This creates a cord approximately 22 inches long.
Thread the cord through the eyelet row at the waist, beginning and ending at the center front.
For each tassel: Cut 12 strands of yarn each 5 inches long. Fold in half. Using a separate 6 inch strand, tie tightly around the folded midpoint. Attach to the cord end by threading the tie strand through and knotting firmly. Trim to approximately 1.5 inches below the tie point.
Make and attach two tassels, one for each end of the cord.
Section 9: Braided Cable Hem Border
Work 2 additional rounds at the hem with a looser tension (consider going up to H-8 / 5.00 mm hook for these prep rows).
Prep Round A: Ch 1, sc in each st in back loop only around. Sl st to join. (240 sc)
Prep Round B: Ch 1, sc in both loops in each st around. Sl st to join. (240 sc)
Fasten off.
Surface Braid Pass 1 (Left Diagonal): With RS facing, join yarn with a sl st at the base of Round A. Work surface slip stitches diagonally: insert hook 2 sts to the left and 1 round up, draw yarn through fabric and through loop on hook. Continue around. Fasten off.
Surface Braid Pass 2 (Right Diagonal): Join yarn 2 sts to the right of the starting point of Pass 1. Work surface slip stitches diagonally in the opposite direction. Fasten off.
Finishing and Blocking
Weave in all yarn ends securely, weaving each tail in at least 2 directions for approximately 1 inch each pass.
For wet blocking, hand wash gently in cool water with mild soap. Squeeze out excess water without wringing. Roll in a clean towel to absorb moisture. Lay flat on a blocking board, pin the skirt to finished measurements (approximately 53 inches circumference at the hem), and pin the flutter sleeves to fan outward. Allow to dry completely.
Time to Make This Dress Your Own
This sage green flutter sleeve baby dress takes approximately 12 to 18 hours for an experienced crocheter. A first attempt may take up to 24 hours. Don’t rush it. The bobble texture, ruffled sleeves, and braided border all deserve your attention and patience.
The result is a dress that looks like it came from a boutique. Every baby shower guest will want to know where you found it. You made it. With your own hands and your favorite yarn from that stash you’ve been building.
Thank you so much for choosing this pattern for your next project. I would absolutely love to see your finished dress, so please tag me on Instagram or share in our Facebook group when you complete yours. Seeing your color choices and personal touches truly makes my day.
If this pattern caught your eye, go ahead and save it to your Pinterest boards so you can find it easily when you’re ready to start. And if you make this sweet little dress, drop a comment below. I’d love to hear how it turned out and which yarn you chose!
You Might Also Like
- Coral Sunset Granny Square Tote Free Crochet Pattern
- Blush Pink Cherry Blossom Granny Bag Free Pattern
- Autumn Burnt Orange Maple Leaf Earrings Free Crochet Pattern
- Blush Pink Tiered Baby Dress Free Crochet Pattern