
THIS is the dress pattern you have been waiting for. I am talking about a show-stopping, heirloom-quality, absolutely gorgeous fitted lace sundress that will make everyone ask where you bought it. Yes, it takes time. Yes, it requires skills you have probably been building for years. But if you are ready to level up and create something truly spectacular, this dusty rose romantic crochet lace dress is calling your name.
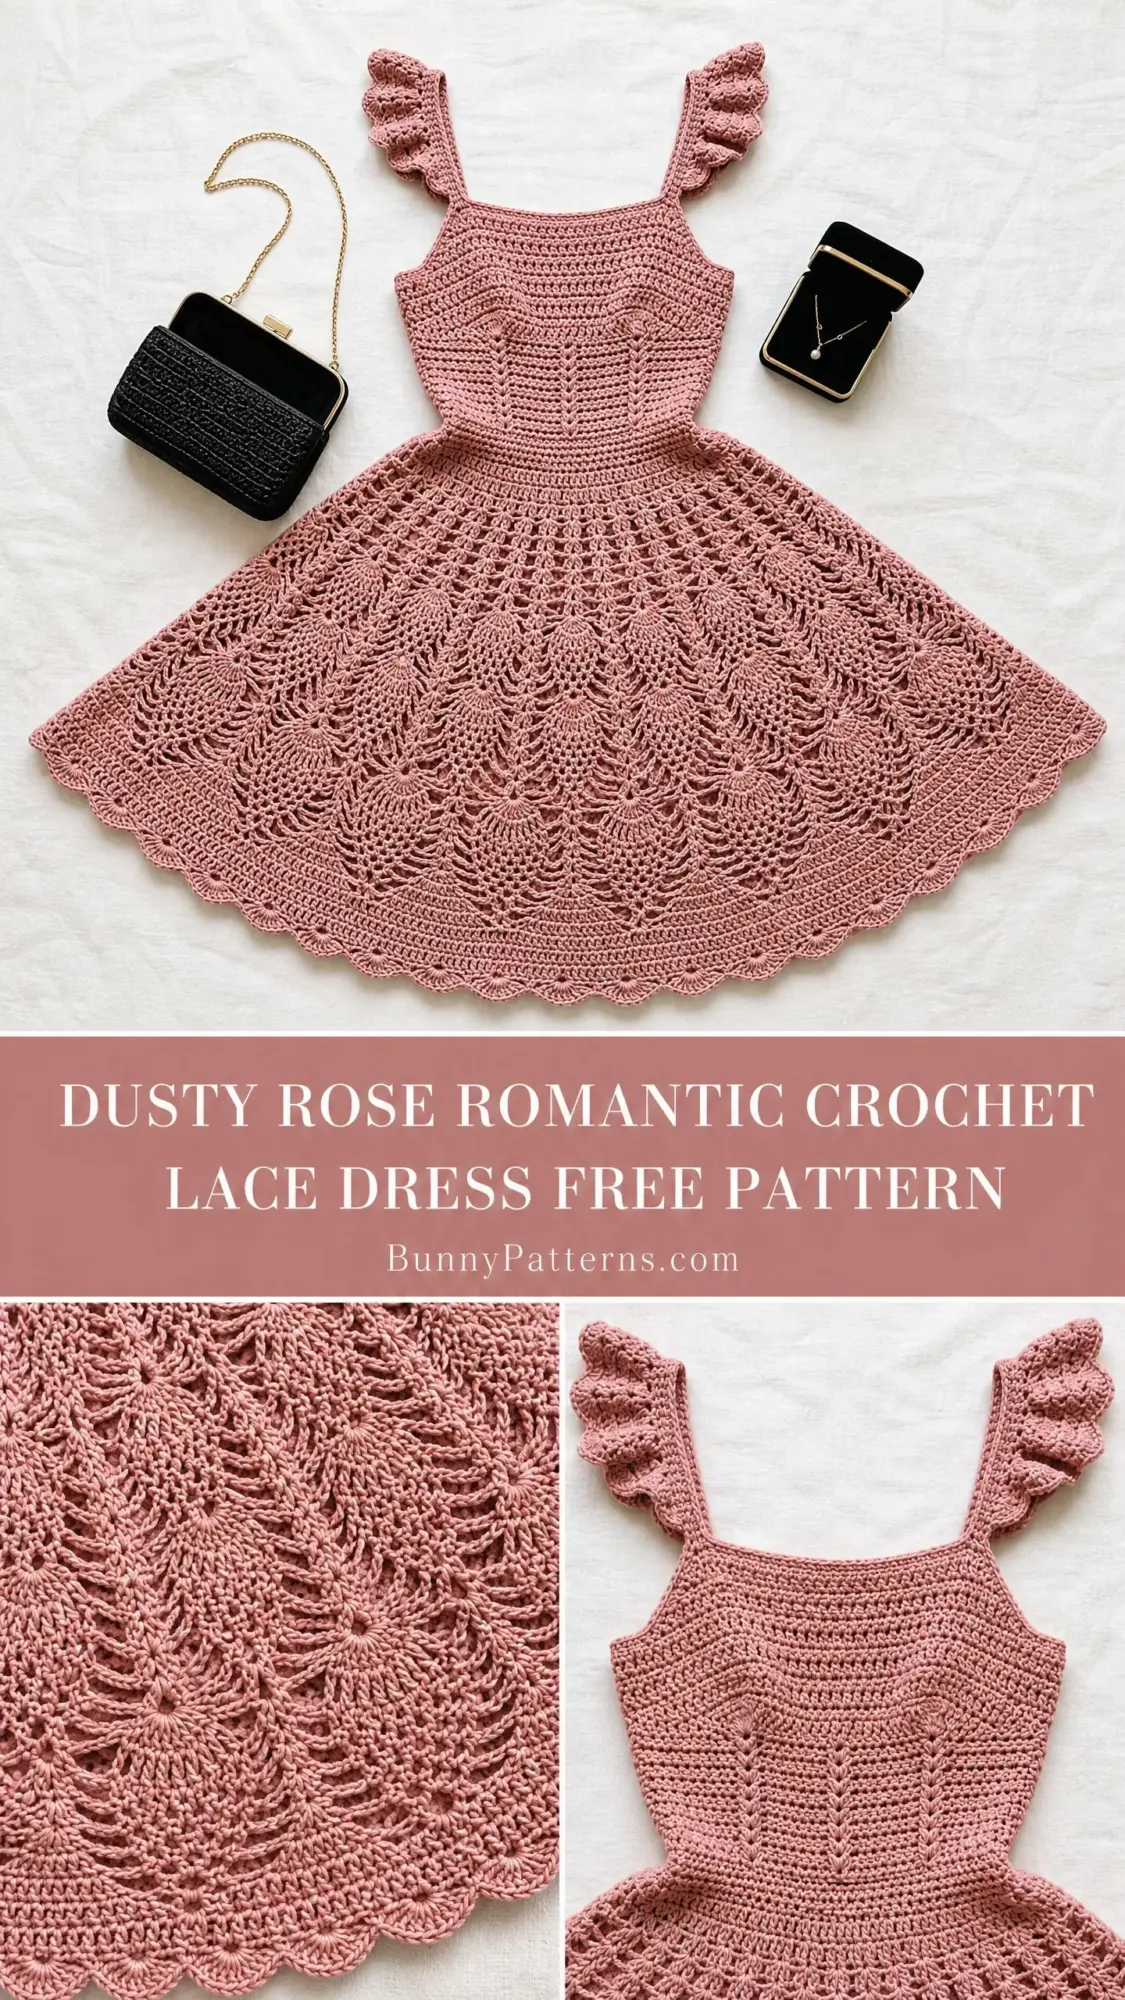
The pineapple lace skirt alone is worth the effort. Those delicate, fan-shaped motifs cascade beautifully from a structured bodice, and the flutter sleeves add the perfect romantic finishing touch. This is the kind of project you work on over several weeks, savoring every round.
Fair warning: this is an advanced pattern. But if you have conquered lace before, you are absolutely ready. Let me walk you through every single detail.
Why This Crochet Lace Dress Pattern Stands Out
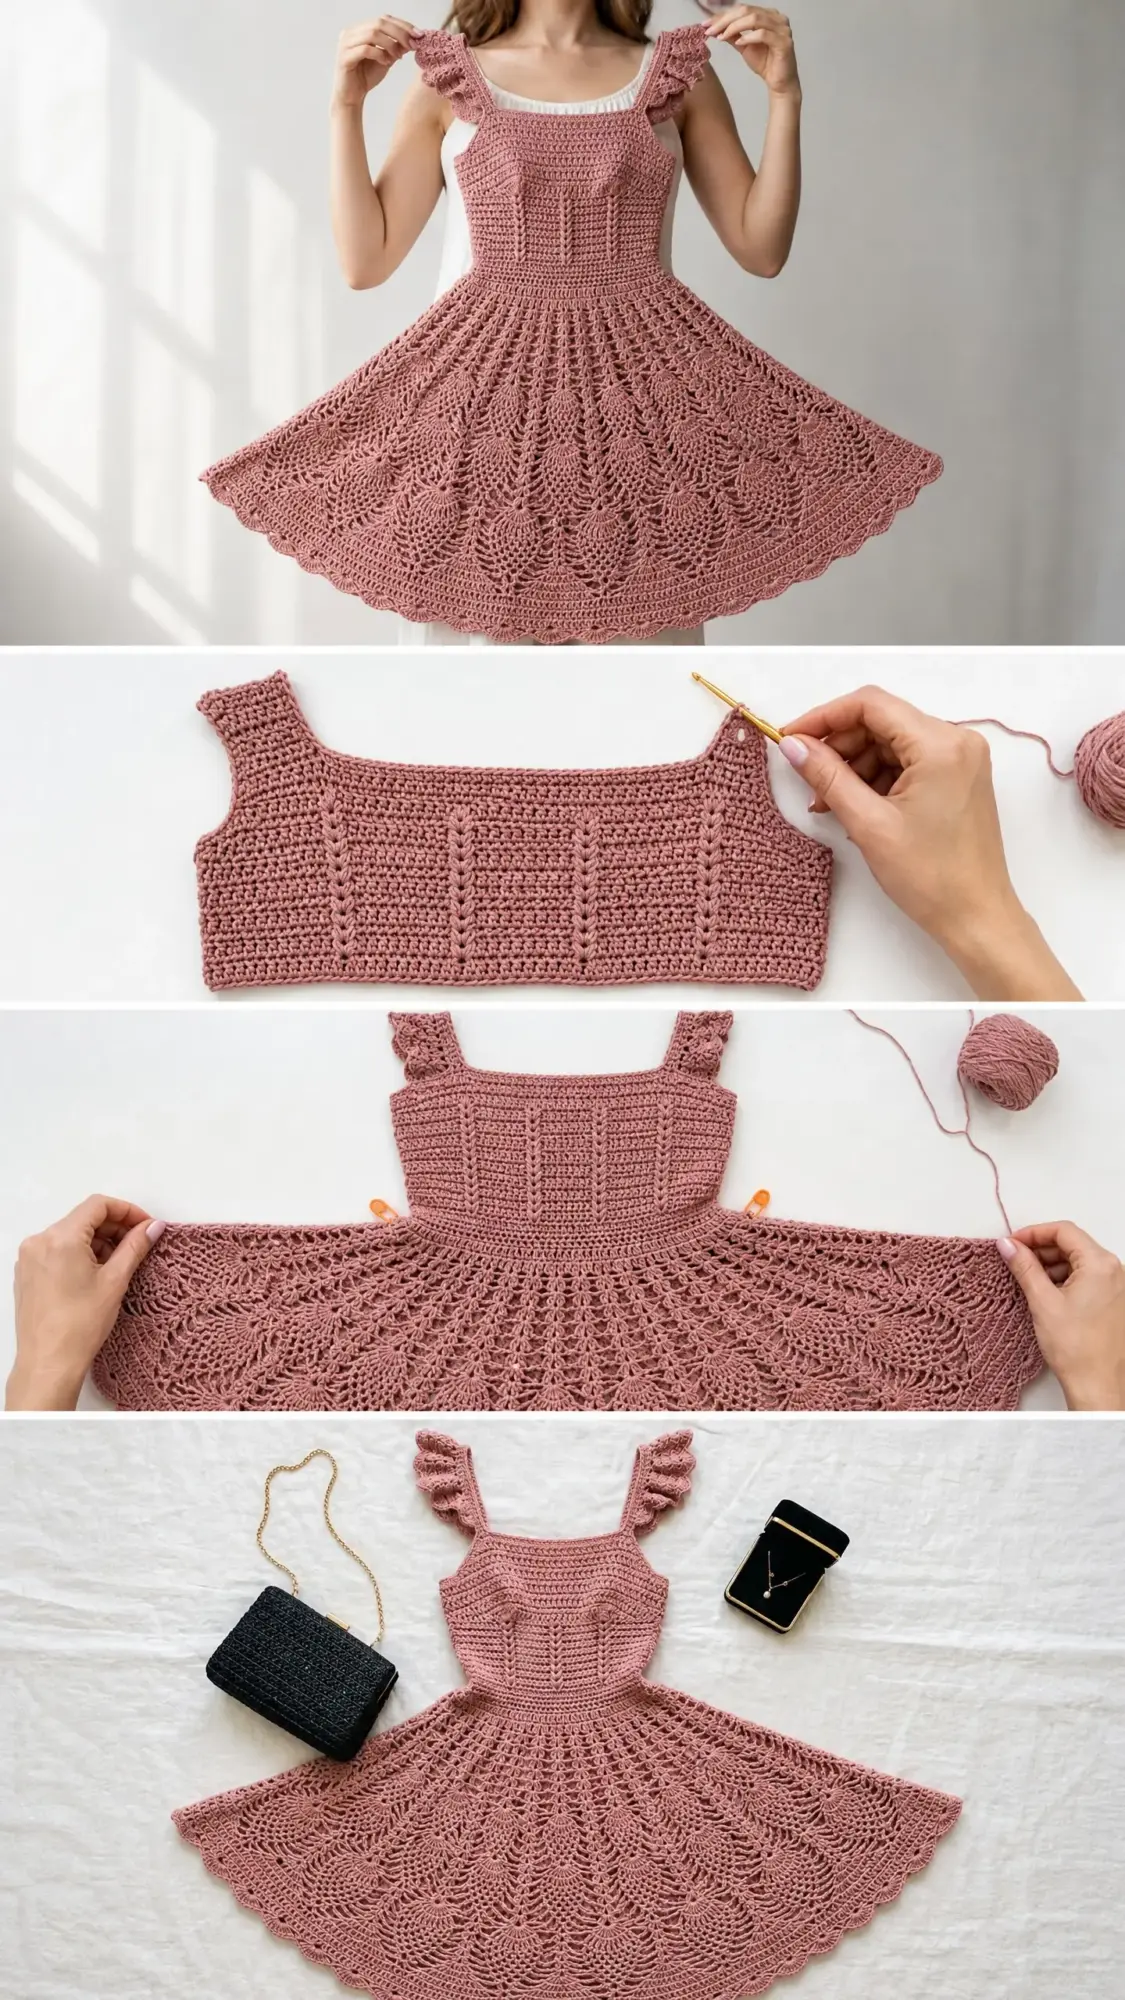
The construction of this dress is genuinely clever. You work the bodice in two flat panels with shaping built right in through increases and decreases. No complicated short rows to stress about. The skirt gets picked up at the waist and worked in continuous rounds, which means no seaming that massive circle of lace.
The pineapple lace pattern is traditional but executed beautifully here. Those distinctive leaf-shaped motifs form naturally as you decrease stitches round by round, tapering each "pineapple" to a delicate point before starting the next tier.
And those flutter sleeves? They are worked separately and attached at the end. Simple ruffles that add movement and femininity without overcomplicating the construction.
Skill Level and Time Commitment
Let me be honest with you. This pattern is labeled advanced for good reason. You need confident experience with:
If you are an intermediate crocheter eyeing this dress, I recommend practicing the pineapple lace on a small swatch first. Make a doily or a test square. Get comfortable with the rhythm before committing to a full garment.
Time estimate: 40 to 60 hours for an experienced crocheter working size small. Add another 8 to 12 hours for blocking and finishing. This is a labor of love, not a weekend project.
Finished Measurements
The pattern includes three sizes. All measurements are taken after blocking.
Size Small:
Size Medium:
Size Large:
The bodice measures 12 inches (30.5 cm) from shoulder to waist across all sizes. The skirt measures 21 inches (53 cm) from waist to hem.
Materials You Will Need
Yarn: Size 2 fine/sport weight cotton or cotton-blend yarn in dusty rose or antique pink.
Yardage requirements:
Recommended yarns:
1. Paintbox Yarns Simply DK (100% cotton, 137 yards per 50g ball). Use 11 balls for S, 12 for M, 13 for L. This yarn has a smooth, tight ply that shows lace definition beautifully.
2. Drops Safran (50% cotton, 50% acrylic, 175 yards per 50g ball). Use 8 balls for S, 9 for M, 10 for L. The slight acrylic content gives extra drape to the skirt.
3. Lion Brand 24/7 Cotton (100% mercerized cotton, 186 yards per 100g ball). Use 8 balls for S, 9 for M, 10 for L. The mercerized finish provides excellent stitch definition and a subtle sheen.
Important substitution note: Choose a smooth, plied yarn with minimal halo or fuzz. The pineapple lace needs to remain crisp and readable. Avoid bouclé, chenille, or loosely spun singles. Mercerized cotton is ideal. If substituting a different fiber, swatch carefully because acrylic and cotton block and drape very differently.
Hooks:
Notions:
Gauge Information
Getting gauge right is critical for this fitted garment. A deviation of even one stitch per inch will noticeably affect your finished measurements.
Bodice gauge (E-4 hook, single crochet in rows):
22 stitches x 26 rows = 4 inches x 4 inches (10 cm x 10 cm)
Skirt gauge (F-5 hook, pineapple lace pattern):
One pineapple repeat (16 stitches) = 2.9 inches (7.4 cm) wide after blocking
One pineapple vertical repeat (12 rows) = 3 inches (7.6 cm) tall
Block your swatch before measuring. This step is non-negotiable for lace.
Abbreviations and Stitch Definitions
beg = beginning
BLO = back loop only (insert hook under the back loop of the stitch only, leaving the front loop unworked)
ch = chain
ch-sp = chain space (the gap created by chain stitches in a previous row)
dc = double crochet (yarn over, insert hook, pull up loop, yarn over and pull through 2 loops twice)
dc2tog = double crochet 2 together (a decrease that joins two stitches into one using double crochet)
FLO = front loop only
hdc = half double crochet
lp(s) = loop(s)
MC = main color (dusty rose)
pm = place marker
rem = remaining
rep = repeat
rnd = round
RS = right side
sc = single crochet (insert hook, pull up loop, yarn over and pull through both loops)
sc2tog = single crochet 2 together (a decrease that joins two stitches into one)
sk = skip
sl st = slip stitch
sp = space
st(s) = stitch(es)
t-ch = turning chain
tr = treble crochet
WS = wrong side
yo = yarn over
Special Stitches Explained
Pineapple Shell
This forms the foundation of each pineapple motif in the skirt.
Step 1: Work 7 dc all into the same chain space or stitch. This creates the shell.
Step 2: On the following round, sc into each of the 7 dc, placing ch 1 between each sc. You now have 7 sc with ch-1 spaces between them.
Step 3: On each following round, work sc across the pineapple but skip one sc at each end. This reduces the pineapple by 2 stitches per round.
Step 4: Continue until only 1 sc remains at the pineapple tip.
Fan Stitch
Used at the skirt transition and hem edging.
Step 1: Skip 2 stitches.
Step 2: Work 5 dc into the next stitch.
Step 3: Skip 2 stitches.
Step 4: Sl st or sc into the next stitch.
Ruffle Increase Round
Work 2 dc into every stitch around. This doubles the stitch count and creates the gathered ruffle effect for the flutter sleeves.
Picot
Step 1: Ch 3.
Step 2: Sl st into the first ch of the ch-3.
Scallop Edging
Step 1: Sc into the first stitch.
Step 2: Ch 2.
Step 3: Work 4 dc into the next stitch.
Step 4: Ch 2.
Step 5: Sc into the stitch after the 4 dc.
Step 6: Repeat, positioning each scallop peak over a pineapple tip or fan point.
Pattern Notes Before You Begin
Construction overview: The dress is built in three separate elements: front bodice panel, back bodice panel, and skirt. The flutter sleeves are worked separately and sewn on after assembly.
The bodice panels are worked flat from top down, shaped with increases for bust fullness and decreases for waist definition, then joined at side seams. The skirt is picked up at the waist and worked in continuous rounds downward.
Hook usage:
Stitch counts: Numbers in parentheses show size S counts. First brackets show M, second brackets show L. Example: (88 sc) [94 sc] [100 sc]
Joining rounds: Do not join rounds in the skirt unless specified. Use a stitch marker at the round beginning and work in a continuous spiral.
Turning chains:
Right side identification: The RS is the side facing you on Row 1. Mark it with a stitch marker immediately.
Part 1: Front Bodice Panel Instructions
The front panel is worked from top (neckline) down to waist.
Foundation chain: Ch 89 [ch 95] [ch 101].
Row 1 (RS): Sc in 2nd ch from hook and in each ch across. Turn. (88 sc) [94 sc] [100 sc]
Rows 2 through 8: Ch 1, sc in each st across. Turn. (88 sc) [94 sc] [100 sc]
After Row 8, the piece measures approximately 1.25 inches from foundation edge. This is your neckline band.
Bust Dart Shaping
Row 9: Ch 1, sc in first 20 [21] [22] sts, 2 sc in next st, sc in next 46 [50] [54] sts, 2 sc in next st, sc in rem 20 [21] [22] sts. Turn. (90 sc) [96 sc] [102 sc]
Row 10: Ch 1, sc in each st across. Turn. (90 sc) [96 sc] [102 sc]
Row 11: Ch 1, sc in first 21 [22] [23] sts, 2 sc in next st, sc in next 46 [50] [54] sts, 2 sc in next st, sc in rem 21 [22] [23] sts. Turn. (92 sc) [98 sc] [104 sc]
Row 12: Ch 1, sc in each st across. Turn. (92 sc) [98 sc] [104 sc]
Row 13: Ch 1, sc in first 22 [23] [24] sts, 2 sc in next st, sc in next 46 [50] [54] sts, 2 sc in next st, sc in rem 22 [23] [24] sts. Turn. (94 sc) [100 sc] [106 sc]
Row 14: Ch 1, sc in each st across. Turn. (94 sc) [100 sc] [106 sc]
Row 15: Ch 1, sc in first 23 [24] [25] sts, 2 sc in next st, sc in next 46 [50] [54] sts, 2 sc in next st, sc in rem 23 [24] [25] sts. Turn. (96 sc) [102 sc] [108 sc]
Rows 16 through 24: Ch 1, sc in each st across. Turn. Work 9 rows even. (96 sc) [102 sc] [108 sc]
After Row 24, the bodice measures approximately 3.75 inches. This is your mid-bust section.
Waist Shaping (Decreases)
Row 25: Ch 1, sc in first 22 [24] [25] sts, sc2tog, sc in next 48 [50] [54] sts, sc2tog, sc in rem 22 [24] [25] sts. Turn. (94 sc) [100 sc] [106 sc]
Row 26: Ch 1, sc in each st across. Turn. (94 sc) [100 sc] [106 sc]
Row 27: Ch 1, sc in first 21 [23] [24] sts, sc2tog, sc in next 48 [50] [54] sts, sc2tog, sc in rem 21 [23] [24] sts. Turn. (92 sc) [98 sc] [104 sc]
Row 28: Ch 1, sc in each st across. Turn. (92 sc) [98 sc] [104 sc]
Row 29: Ch 1, sc in first 20 [22] [23] sts, sc2tog, sc in next 48 [50] [54] sts, sc2tog, sc in rem 20 [22] [23] sts. Turn. (90 sc) [96 sc] [102 sc]
Row 30: Ch 1, sc in each st across. Turn. (90 sc) [96 sc] [102 sc]
Row 31: Ch 1, sc in first 19 [21] [22] sts, sc2tog, sc in next 48 [50] [54] sts, sc2tog, sc in rem 19 [21] [22] sts. Turn. (88 sc) [94 sc] [100 sc]
Row 32: Ch 1, sc in each st across. Turn. (88 sc) [94 sc] [100 sc]
Row 33: Ch 1, sc in first 18 [20] [21] sts, sc2tog, sc in next 48 [50] [54] sts, sc2tog, sc in rem 18 [20] [21] sts. Turn. (86 sc) [92 sc] [98 sc]
Rows 34 through 36: Ch 1, sc in each st across. Turn. Work 3 rows even. (86 sc) [92 sc] [98 sc]
Row 37: Ch 1, sc in first 17 [19] [20] sts, sc2tog, sc in next 48 [50] [54] sts, sc2tog, sc in rem 17 [19] [20] sts. Turn. (84 sc) [90 sc] [96 sc]
Rows 38 through 40: Ch 1, sc in each st across. Turn. (84 sc) [90 sc] [96 sc]
Row 41: Ch 1, sc in first 16 [18] [19] sts, sc2tog, sc in next 48 [50] [54] sts, sc2tog, sc in rem 16 [18] [19] sts. Turn. (82 sc) [88 sc] [94 sc]
Rows 42 through 44: Ch 1, sc in each st across. Turn. (82 sc) [88 sc] [94 sc]
After Row 44, the front bodice measures approximately 7 inches tall. The piece tapers from 88 [94] [100] sts at top to 82 [88] [94] sts.
Continue Waist Shaping
Row 45: Ch 1, sc in first 15 [17] [18] sts, sc2tog, sc in next 48 [50] [54] sts, sc2tog, sc in rem 15 [17] [18] sts. Turn. (80 sc) [86 sc] [92 sc]
Rows 46 through 48: Ch 1, sc in each st across. Turn. (80 sc) [86 sc] [92 sc]
Row 49: Ch 1, sc in first 14 [16] [17] sts, sc2tog, sc in next 48 [50] [54] sts, sc2tog, sc in rem 14 [16] [17] sts. Turn. (78 sc) [84 sc] [90 sc]
Rows 50 through 52: Ch 1, sc in each st across. Turn. (78 sc) [84 sc] [90 sc]
Row 53: Ch 1, sc in first 13 [15] [16] sts, sc2tog, sc in next 48 [50] [54] sts, sc2tog, sc in rem 13 [15] [16] sts. Turn. (76 sc) [82 sc] [88 sc]
Rows 54 through 56: Ch 1, sc in each st across. Turn. (76 sc) [82 sc] [88 sc]
After Row 56, the front panel measures approximately 9.5 inches. This is your narrowest waist point.
Final Waist Rows
Row 57: Ch 1, sc in first 12 [14] [15] sts, sc2tog, sc in next 48 [50] [54] sts, sc2tog, sc in rem 12 [14] [15] sts. Turn. (74 sc) [80 sc] [86 sc]
Rows 58 through 62: Ch 1, sc in each st across. Turn. Work 5 rows even. (74 sc) [80 sc] [86 sc]
Row 63 (waist edging row): Ch 1, sc in each st across. Do not turn. Fasten off, leaving a 20 inch (50 cm) tail for seaming. (74 sc) [80 sc] [86 sc]
Checkpoint: The front bodice should measure 12 inches (30.5 cm) tall.
Note on center front texture: The center 46 [50] [54] stitches are worked in BLO for Rows 3 through 63 to create the subtle ribbed texture visible in the finished dress. Side panels (approximately 14 sts each side) are worked through both loops for a firmer edge.
Part 2: Back Bodice Panel Instructions
The back bodice is worked identically to the front with one modification: it has a center back split at the top for the neckline opening.
Back Left Shoulder Strap
Foundation chain: Ch 14.
Row 1 (RS): Sc in 2nd ch from hook and in each ch across. Turn. (13 sc)
Rows 2 through 8: Ch 1, sc in each st across. Turn. (13 sc)
Back Right Shoulder Strap
Work a separate foundation chain: Ch 14.
Row 1 (RS): Sc in 2nd ch from hook and in each ch across. Do not fasten off. (13 sc)
Rows 2 through 8: Ch 1, sc in each st across. Turn. (13 sc)
Joining the Straps
Row 9 (joining row, RS): With right shoulder strap on hook and RS facing, ch 1, sc across 13 sts of right strap, ch 62 [68] [74], sc across 13 sts of left strap. Turn.
Row 10: Ch 1, sc in first 13 sts, sc in each of the 62 [68] [74] ch sts, sc in last 13 sts. Turn. (88 sc) [94 sc] [100 sc]
From Row 10 onward, follow the front panel instructions exactly, matching all shaping rows and stitch counts.
Final row: (74 sc) [80 sc] [86 sc]
Fasten off, leaving a 20 inch tail for seaming.
Part 3: Assembling the Bodice
With RS held together, use mattress stitch or whip stitch to seam the side edges. Join from waist edge upward approximately 10 inches on each side, leaving the upper 2 inches open as armhole openings.
Attach the back shoulder straps to the front panel neckline corners using slip stitch or sewing.
Optional back closure: Sew one small button to the inside edge of the right back strap. Work a ch-4 button loop at the corresponding point on the left strap.
Part 4: Skirt Instructions
Switch to F-5 (3.75 mm) hook for all skirt rounds.
Setup Round
Join yarn at left side seam with RS facing. Work sc evenly around the waist opening.
Target stitch counts:
Increase evenly as needed to reach target count. Sl st to join.
Expansion Rounds
Rnd 1 (S): 2 sc in next st, sc in next 9 sts; rep from 16 times. (176 sc)
Rnd 1 (M): 2 sc in next st, sc in next 10 sts; rep from 16 times. (192 sc)
Rnd 1 (L): 2 sc in next st, sc in next 11 sts; rep from 16 times. (208 sc)
Rnd 2: Sc in next 10 sts, 2 sc in next st; rep from 16 times. (192 sc) [208 sc] [224 sc]
Rnd 3: Sc in next 11 sts, 2 sc in next st; rep from 16 times. (208 sc) [224 sc] [240 sc]
Pineapple Lace Section
Rnd 4 (shell setup): Sc in next st, ch 2, sk 2 sts, 7 dc in next st, ch 2, sk 2 sts; rep from around. Join with sl st.
Rnd 5: Sc in first ch-2 sp, ch 3, (sc in next dc, ch 1) 6 times, sc in last dc, ch 3, sc in next ch-2 sp, ch 3; rep from around. Join.
Rnd 6: Sc in ch-3 sp, ch 3, (sc in next sc, ch 1) 5 times, sk last ch-1 sp, sc in next ch-1 sp, ch 3, sc in ch-3 sp, ch 3; rep from around. Join.
Rnd 7: Sc in ch-3 sp, ch 3, (sc in next sc, ch 1) 4 times, sc in next sc, ch 3, sc in ch-3 sp, ch 3; rep from around. Join.
Rnd 8: Sc in ch-3 sp, ch 3, (sc in next sc, ch 1) 3 times, sc in next sc, ch 3, sc in ch-3 sp, ch 3; rep from around. Join.
Rnd 9: Sc in ch-3 sp, ch 3, (sc in next sc, ch 1) 2 times, sc in next sc, ch 3, sc in ch-3 sp, ch 3; rep from around. Join.
Rnd 10: Sc in ch-3 sp, ch 3, sc in next sc, ch 1, sc in next sc, ch 3, sc in ch-3 sp, ch 3; rep from around. Join.
Rnd 11 (pineapple tip): Sc in ch-3 sp, ch 3, sc in next sc, ch 3, sc in ch-3 sp, ch 3; rep from around. Join.
Rnd 12 (fan between pineapples): Sc in ch-3 sp, ch 2, 5 dc in pineapple tip sc, ch 2, sc in ch-3 sp, ch 3; rep from around.
Continue repeating the pineapple lace pattern, beginning each new tier with shells worked into the fan dc stitches. Work until skirt measures 21 inches from waist.
Finish with scallop edging around the hem, positioning each scallop peak over a pineapple tip.
Blocking Your Finished Dress
Blocking is essential for lace. Soak the completed dress in lukewarm water with a small amount of wool wash for 20 minutes. Gently squeeze out water without wringing. Roll in a towel to remove excess moisture.
Pin the dress to blocking mats, stretching the lace skirt to open up the pineapple motifs. Use rust-proof T-pins generously along the scalloped hem. Allow to dry completely before unpinning.
Styling Your Romantic Crochet Lace Dress
The finished dress pairs beautifully with a simple black clutch and delicate gold jewelry, as shown in the styling photo. The dusty rose color is incredibly versatile for weddings, garden parties, date nights, or any special occasion where you want to feel absolutely stunning.
Because this is a lace garment, consider wearing a slip underneath in a matching or coordinating color. A simple nude or blush slip works perfectly.
I hope this crochet lace dress pattern inspires you to create something truly beautiful. This is the kind of project that becomes a treasured piece in your wardrobe for years to come.
If you make this dress, I would absolutely love to see it! Tag me on Instagram or share your photos in my Facebook group. Seeing your finished projects is genuinely my favorite part of sharing patterns.
Save this pattern to your Pinterest boards so you can find it when you are ready to start. And please drop a comment below if you have questions or when you finish your dress. I cannot wait to see what you create!
You Might Also Like
- Ivory Pineapple Lace Girl Dress Free Crochet Pattern
- Dusty Rose Openwork Draped Poncho Free Crochet Pattern
- Sage Green Textured Clutch Bag Free Crochet Pattern
- Sage Green Summer Tote with Cream Tassels Free Crochet Pattern